Popular

- Manage License (Add on)
- Bulk Revoke
- Generating Access Code
- Direct Distribution (Add On)
- Creating Single User or Multiple Users (Bulk Upload)
- Admin Center and Profile and Settings
- Revoking Content
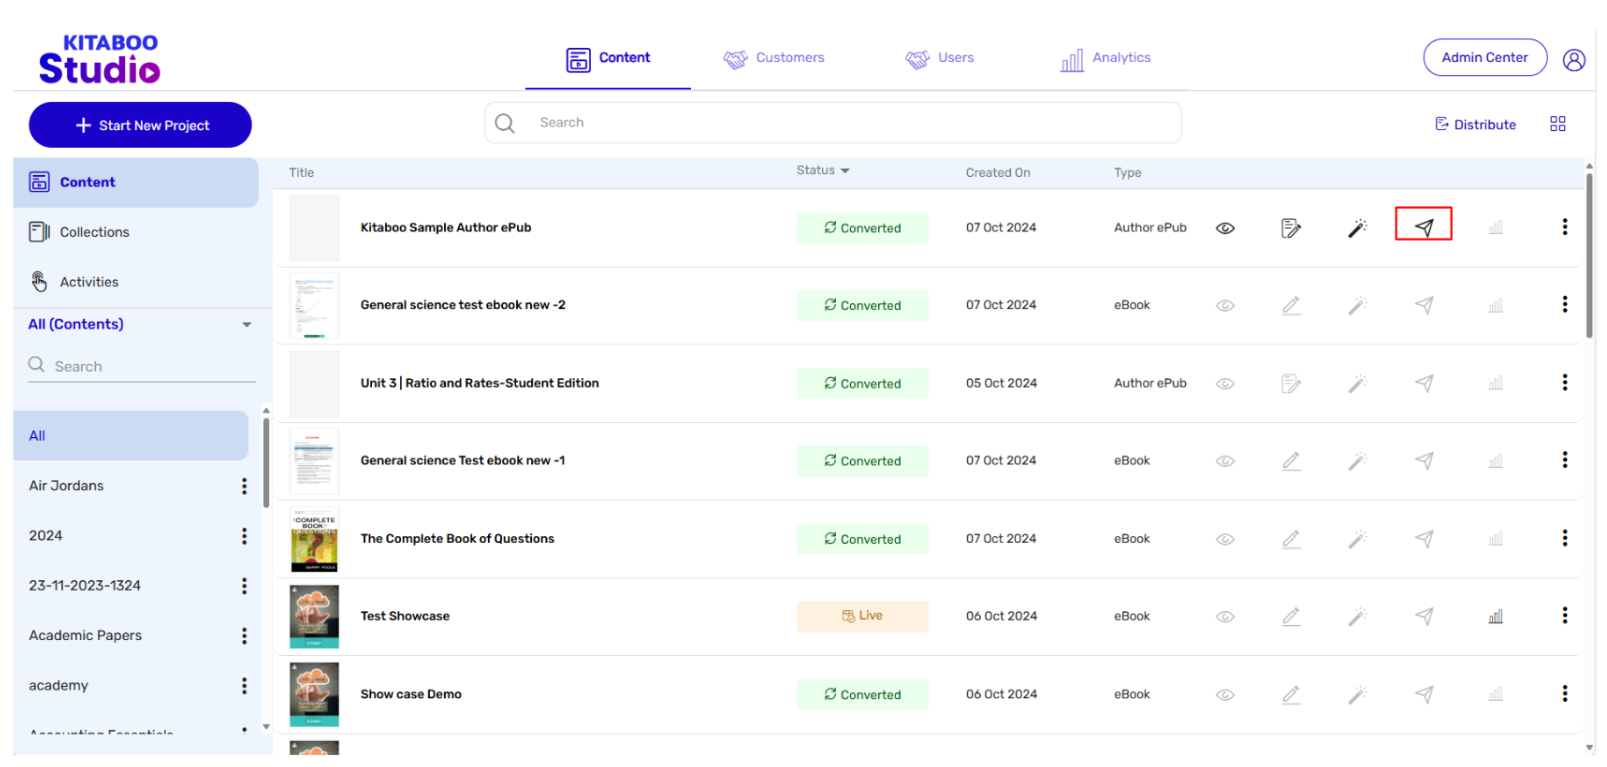
- Distributing Content
- Signing in to Kitaboo
- Promote User/Transfer
- Create Class/Update Class
- Selective Oneroster Sync with API/ZIP/SFTP
- Account Management

1. Creating a Fix eBook
- Sign in with your Enterprise Admin credentials.
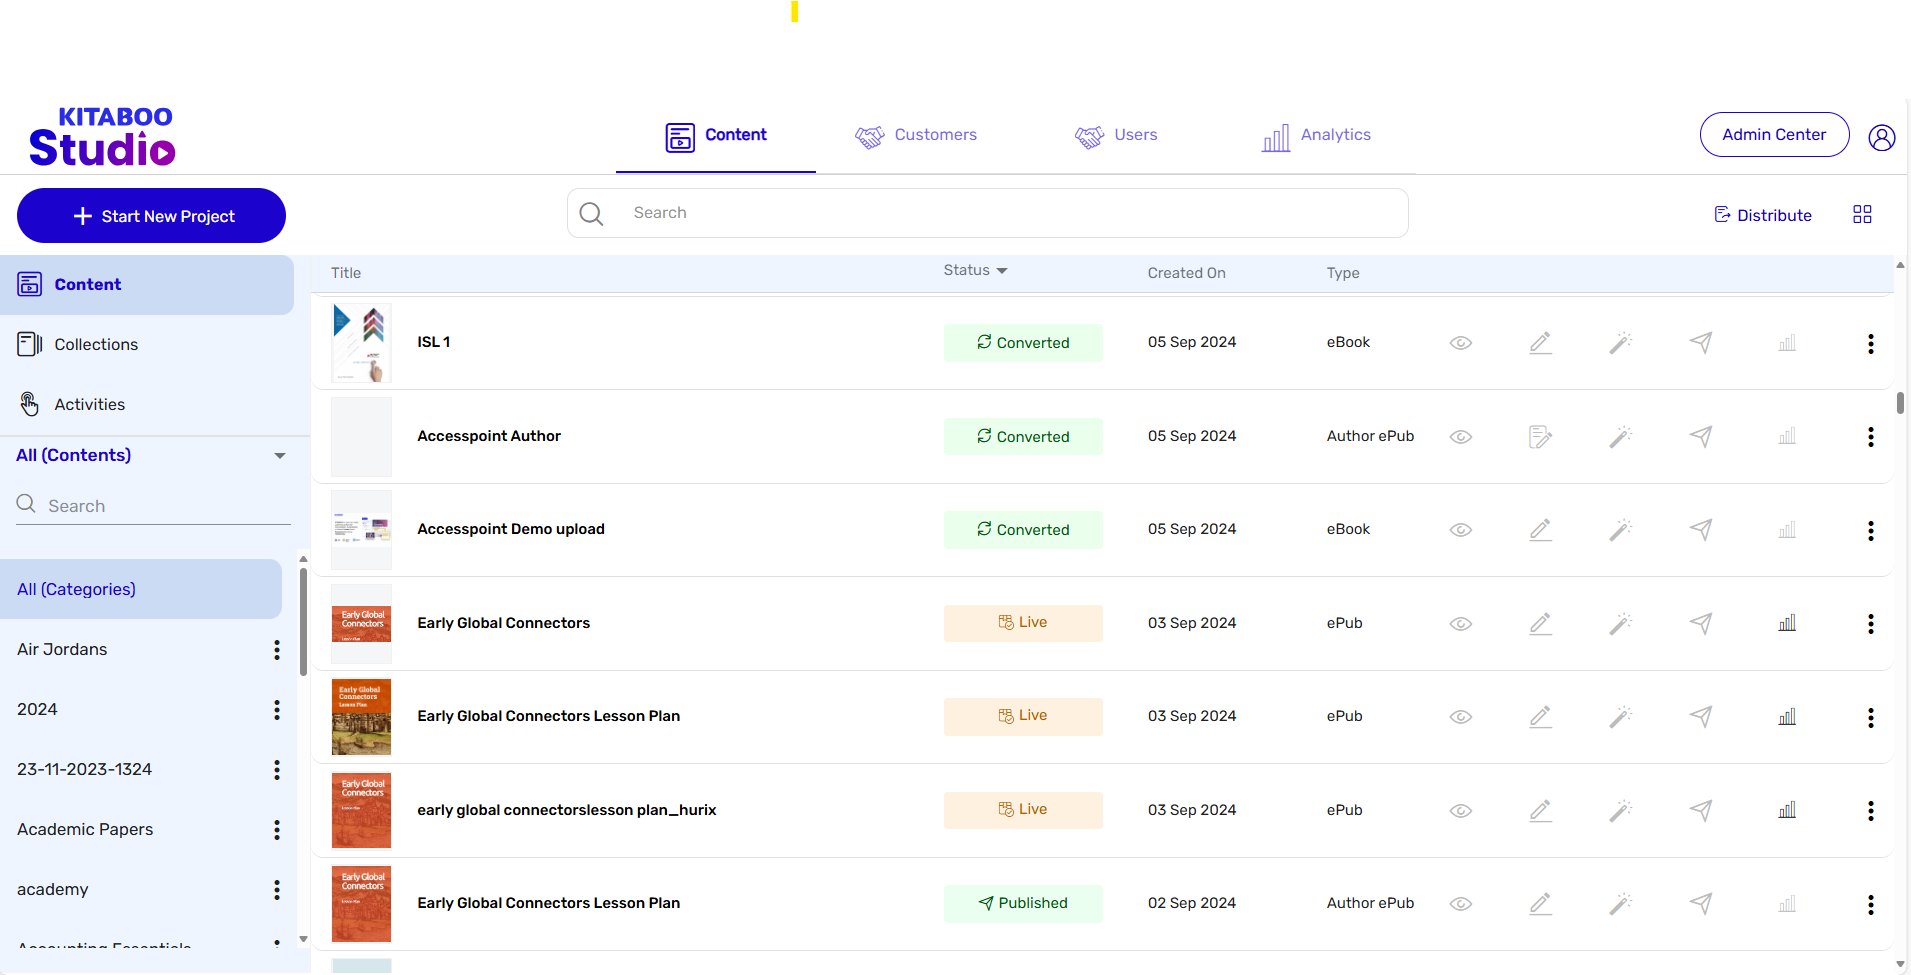
- Switch to the Content tab. > Click on the Start New Project button.
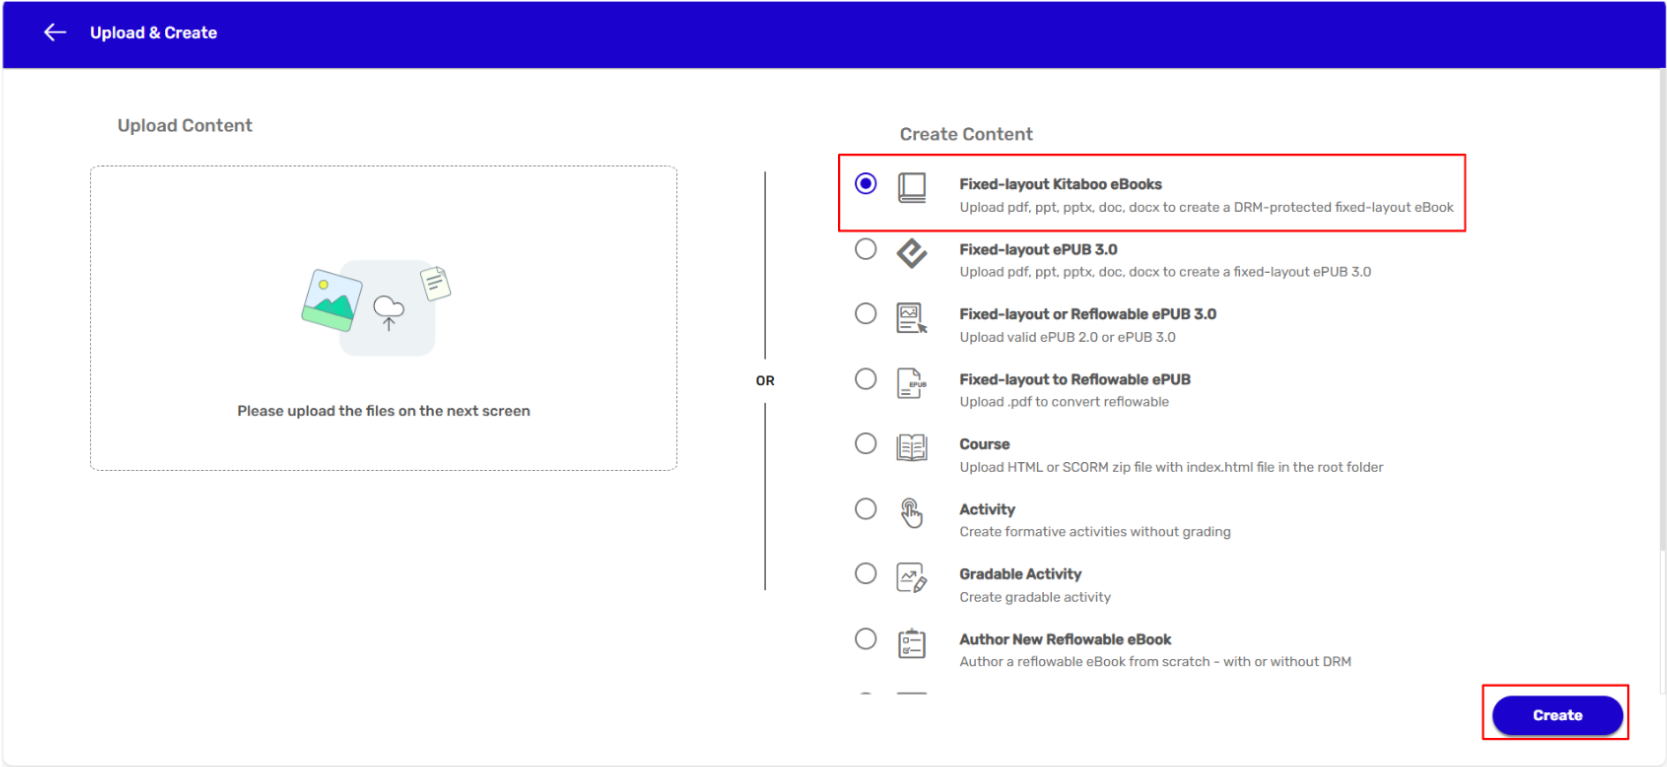
- On the Upload & Create page, select the Fixed eBook option from the Create Content list. > Click on the Create button.
- Enter details in the Title, Author, Description, and Category , and Keywords fields in the Upload Details section also upload a file in the specified format which is mentioned.
NOTE:
1. Several categories have already been added to the Category list. You can either select one of them or add a new category to the list, if required.
2. If you want to add a new category, enter a relevant name for the category, and click on the +icon.
3. Keywords and Tags should be relevant to the content of the eBook you’re going to create.
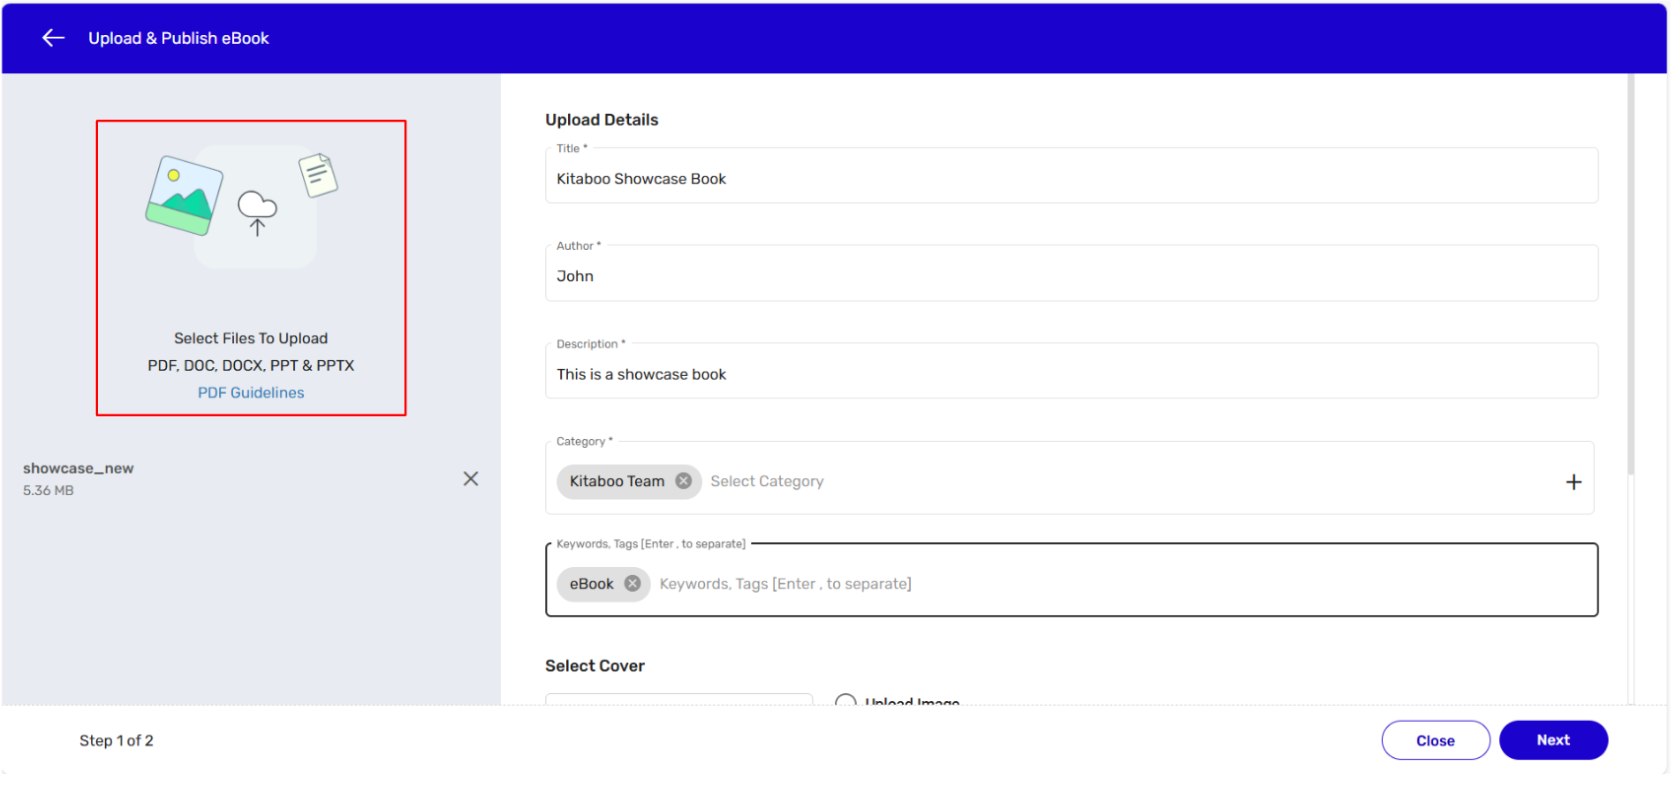
- Scroll down and select a cover image, if any, for the to-be-created eBook. > Check the Advance Metadata checkbox.
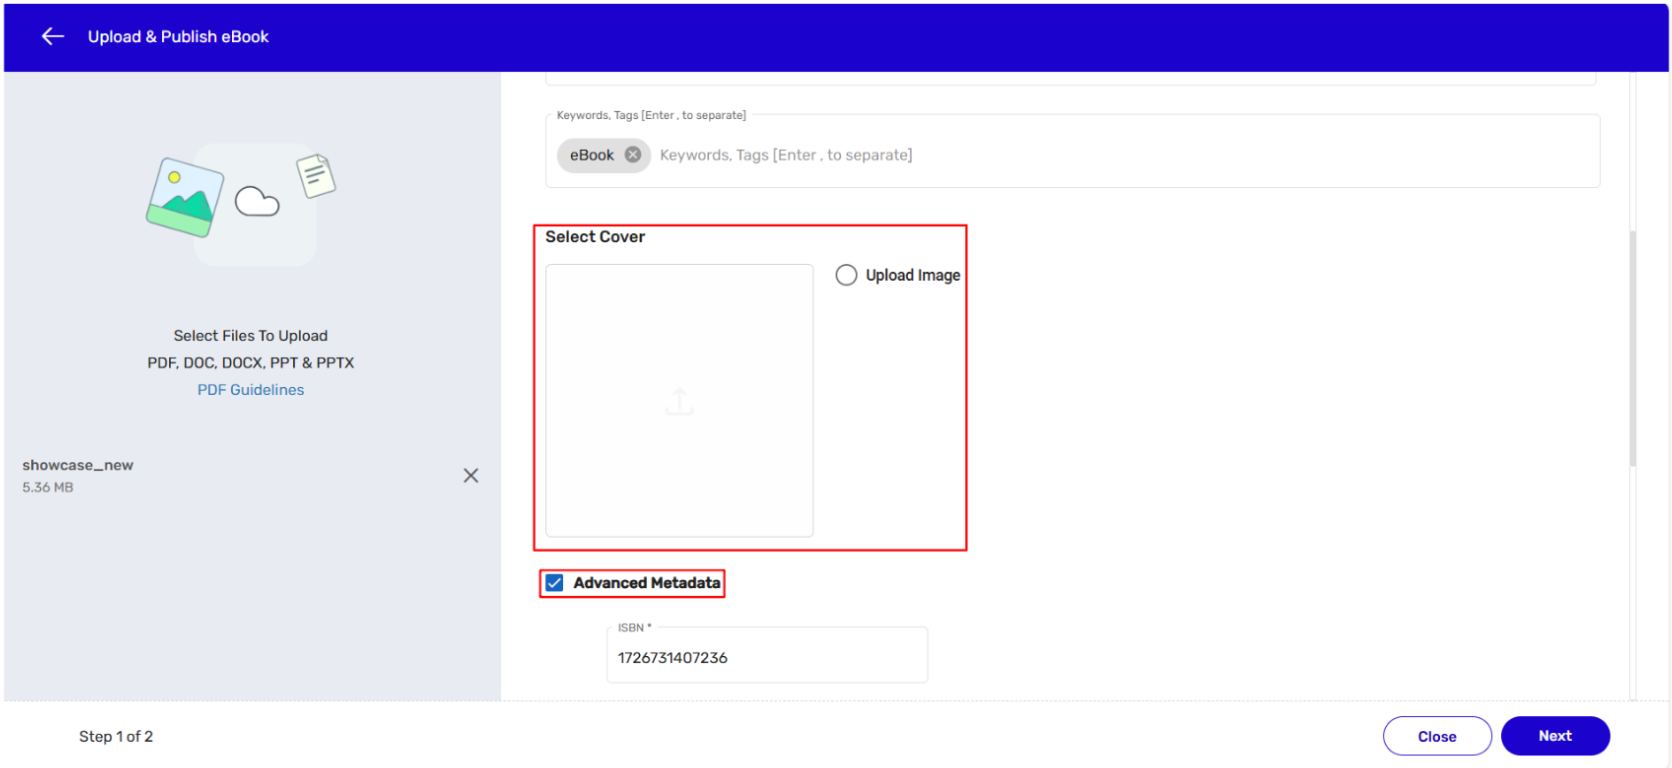
- Provide details in the ISBN field and select the desired options for Font Permission, Lock Book Orientation, and Book Type that appear after selecting the Advance Metadata checkbox. > Click on the Next button.
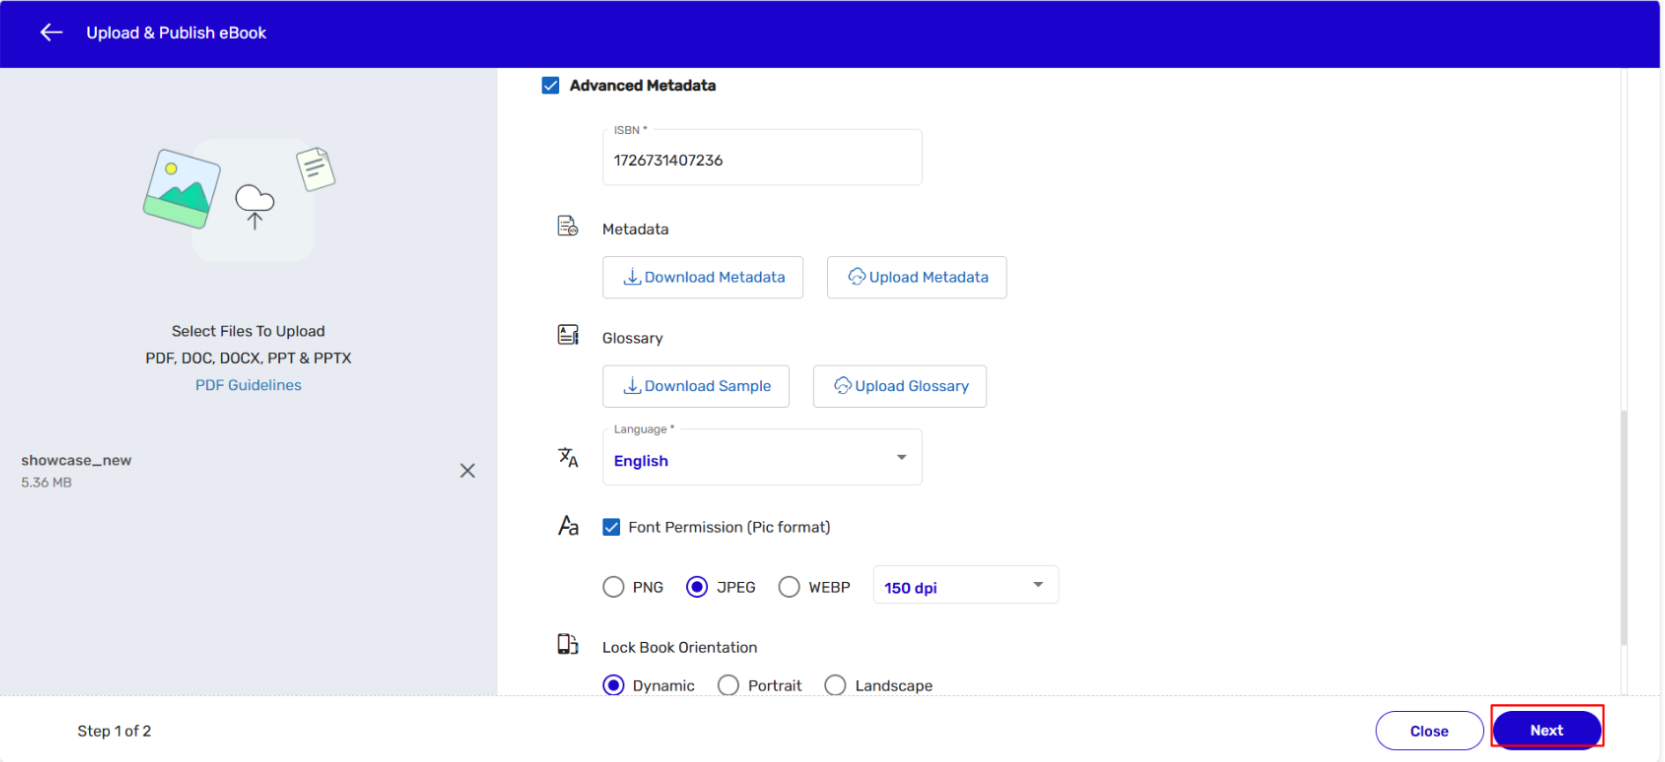
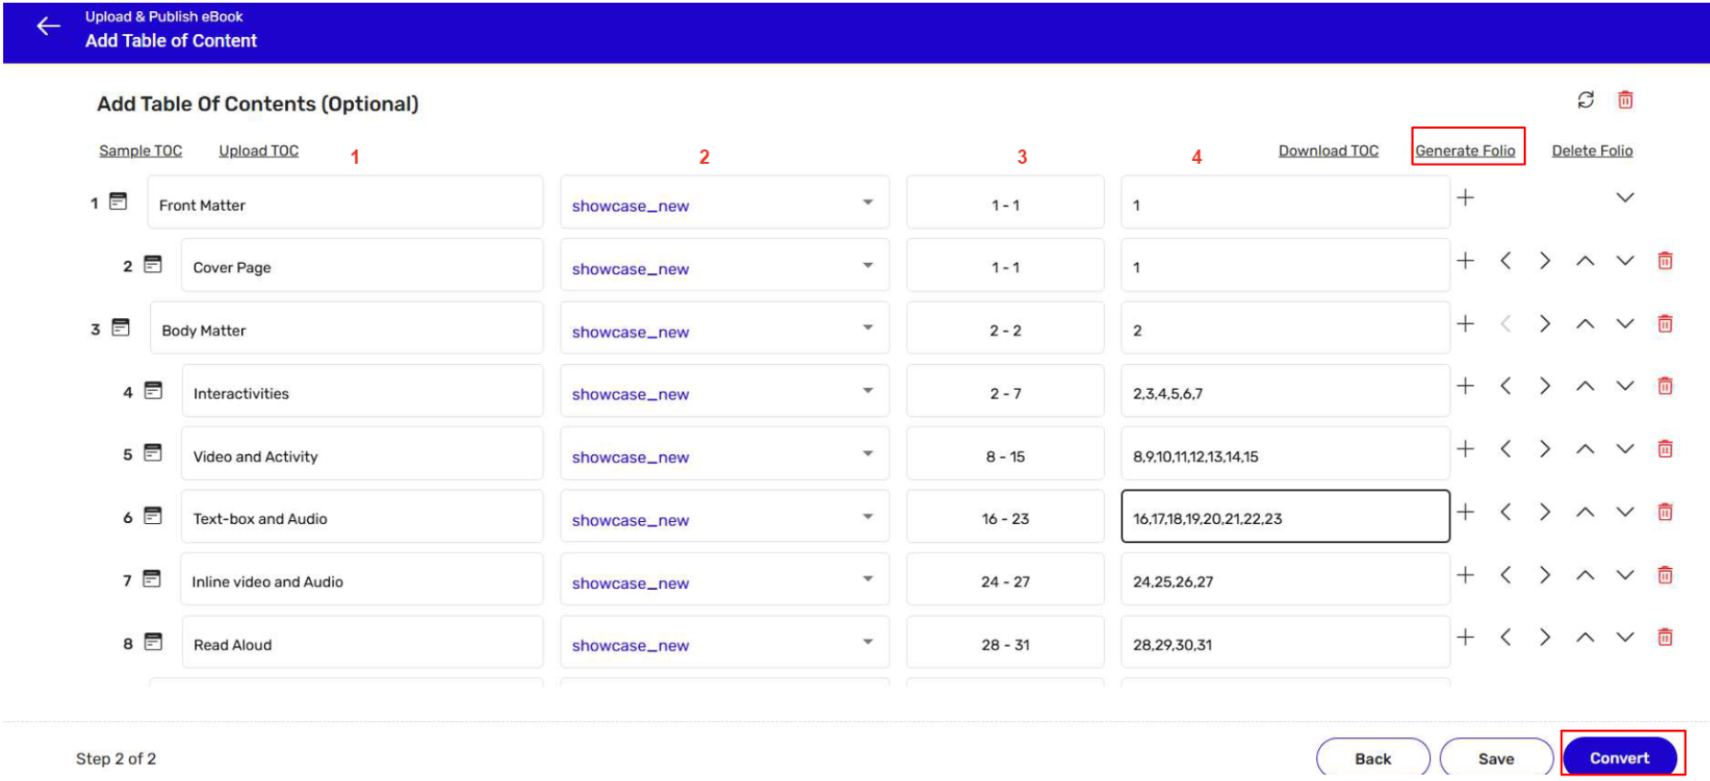
- On the Add Table of Contents page, you can add a Table of Contents (TOC), define a title for your eBook, define page range for various chapters, topics, sections, etc., and also generate folios for them. > Click on Convert.
NOTE:
1. You can enter a title for your eBook in this field.
2. The system will automatically display your file name(s) in this field.
3. The system will automatically display page range(s) for chapters, topics, sections, etc. in this field.
4. The system will automatically display folios in this field. You can manually modify them and generate a final table of folios by clicking the Generate Folio button. Once an eBook has been successfully created, you can issue licenses and distribute the eBook.
2. Creating a Fixed-layout ePUB 3.0
- Sign in with your Enterprise Admin credentials.

- Switch to the Content tab. > Click on the Start New Project button.
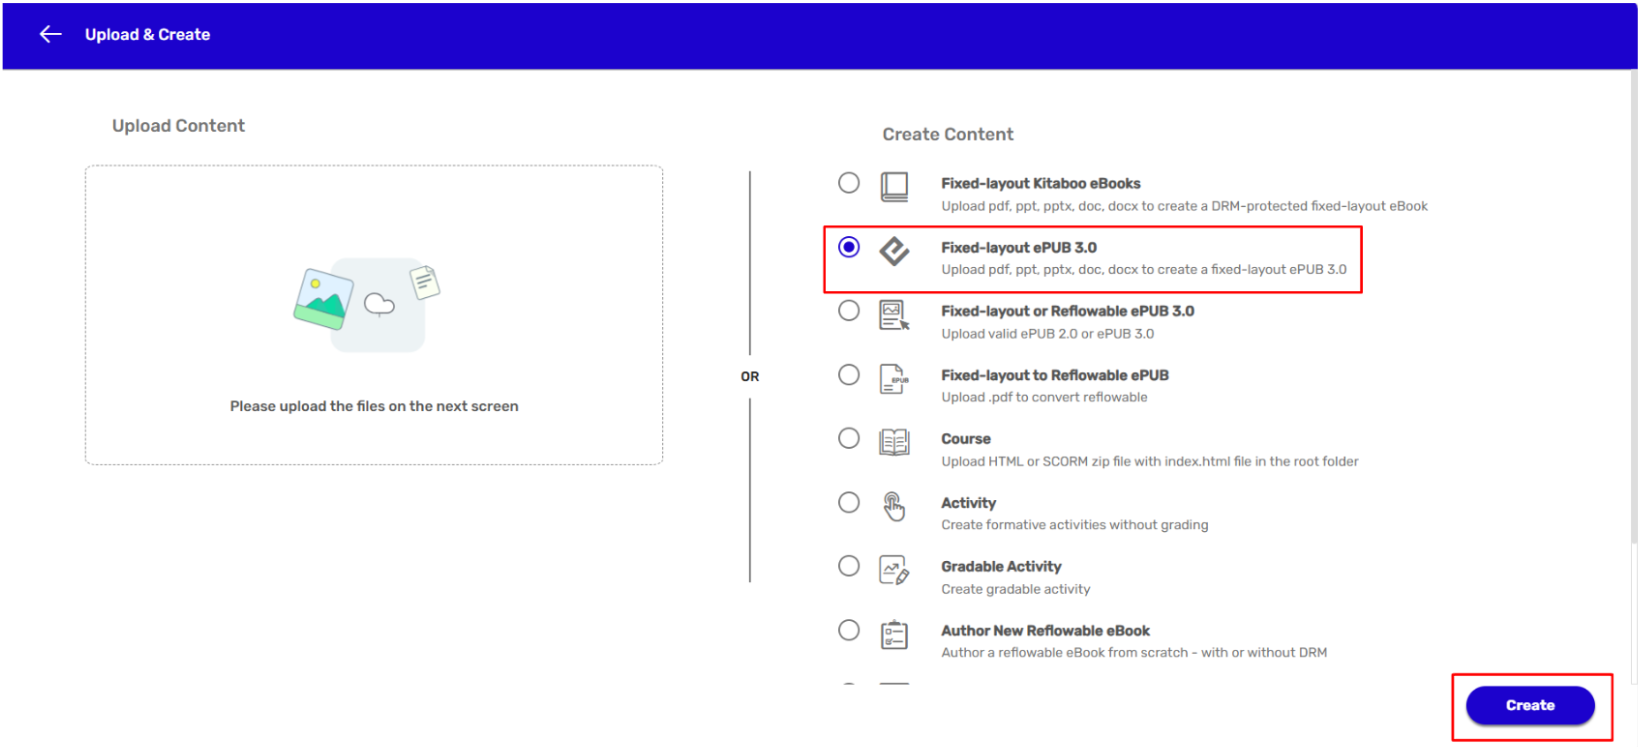
- On the Upload & Create page, select the Fixed ePub option from the Create Content list. > Click on the Create button.
- On the Upload & Publish ePub page, enter a title for your ePub and upload a cover image, if any.
NOTE: At this stage, you can also upload your ePub file in PDF, DOC, or PPT formats.
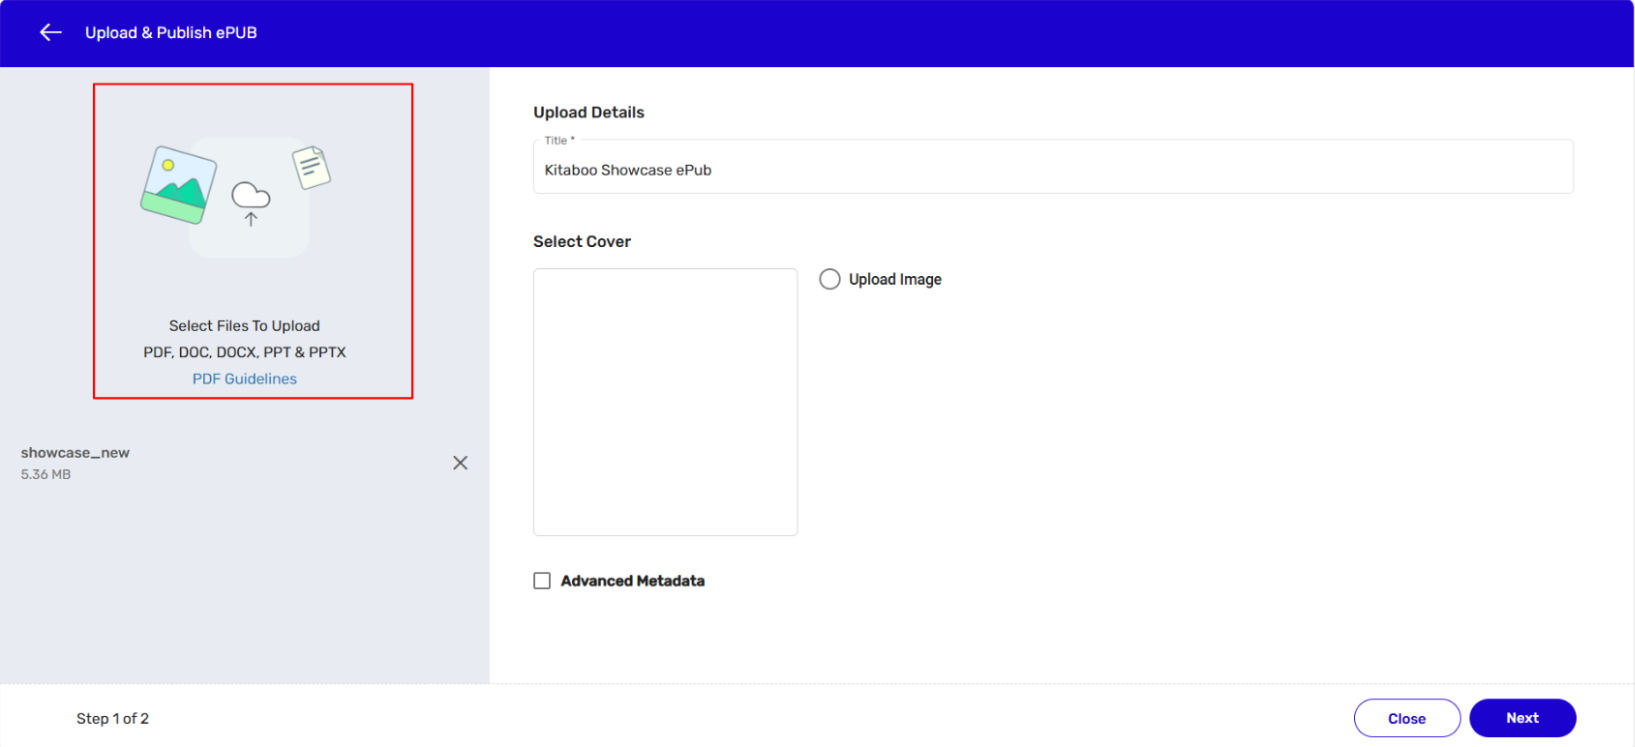
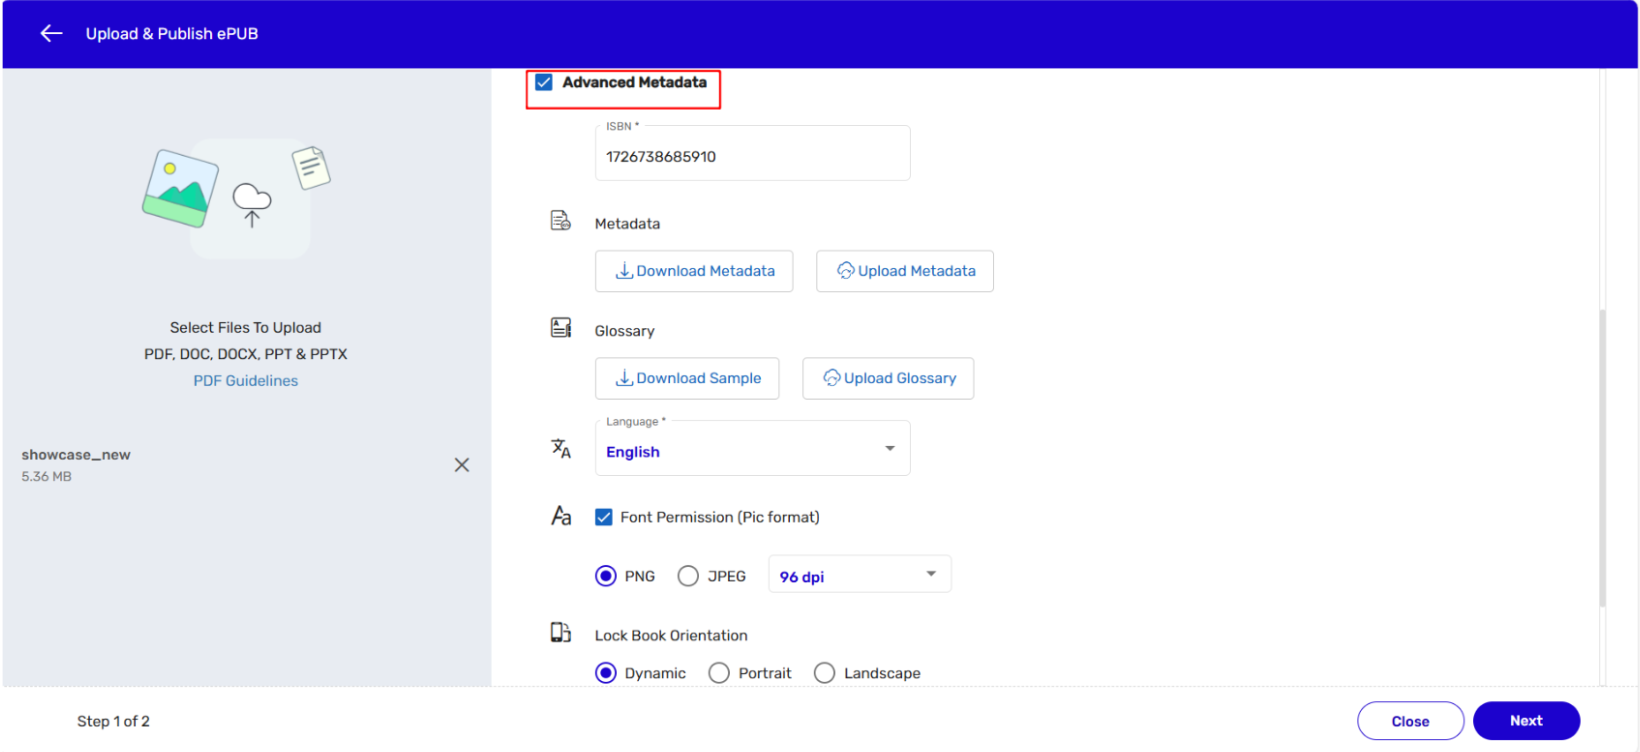
- Scroll down and check the Advance Metadata box. > Select the desired options in the various fields that appear. > Click on the Next button.
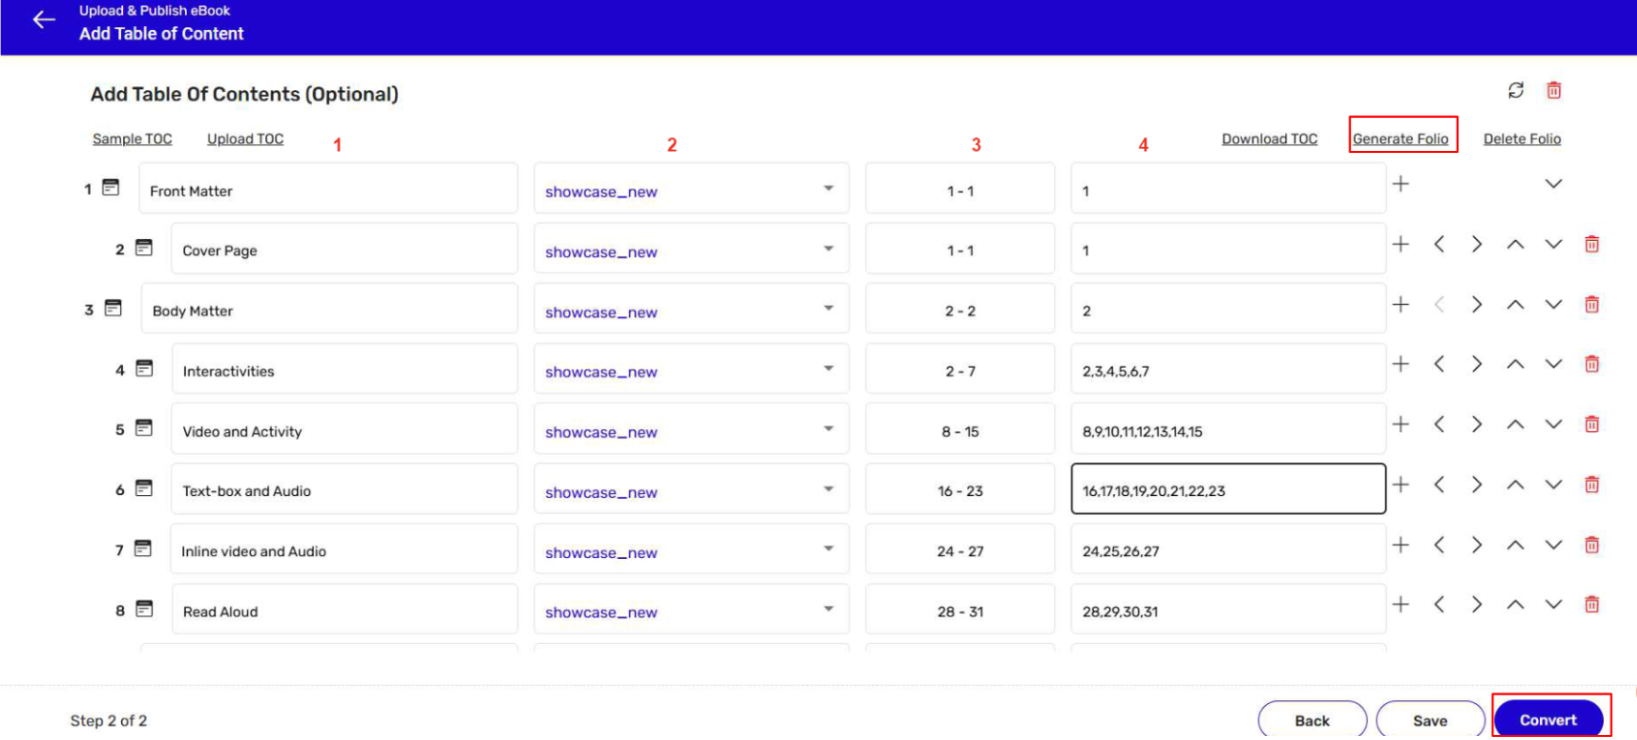
- On the Add Table of Contents page, you can add a Table of Contents (TOC), define a title for your eBook, define page range for various chapters, topics, sections, etc., and also generate folios for
them. > Click on Convert.
NOTE:
1. You can enter a title for your ePub in this field.
2. The system will automatically display your file name(s) in this field.
3. The system will automatically display page range(s) for chapters, topics, sections, etc. in this field.
4. The system will automatically display folios in this field. You can manually modify them and generate a final table of folios by clicking the Generate Folio button. Once an ePub has been successfully created, you can issue licenses and distribute the ePub
3. Creating Fixed-layout or Reflowable ePUB 3.0
- Sign in with your Enterprise Admin credentials.
- Switch to the Content tab. > Click on the Start New Project button.
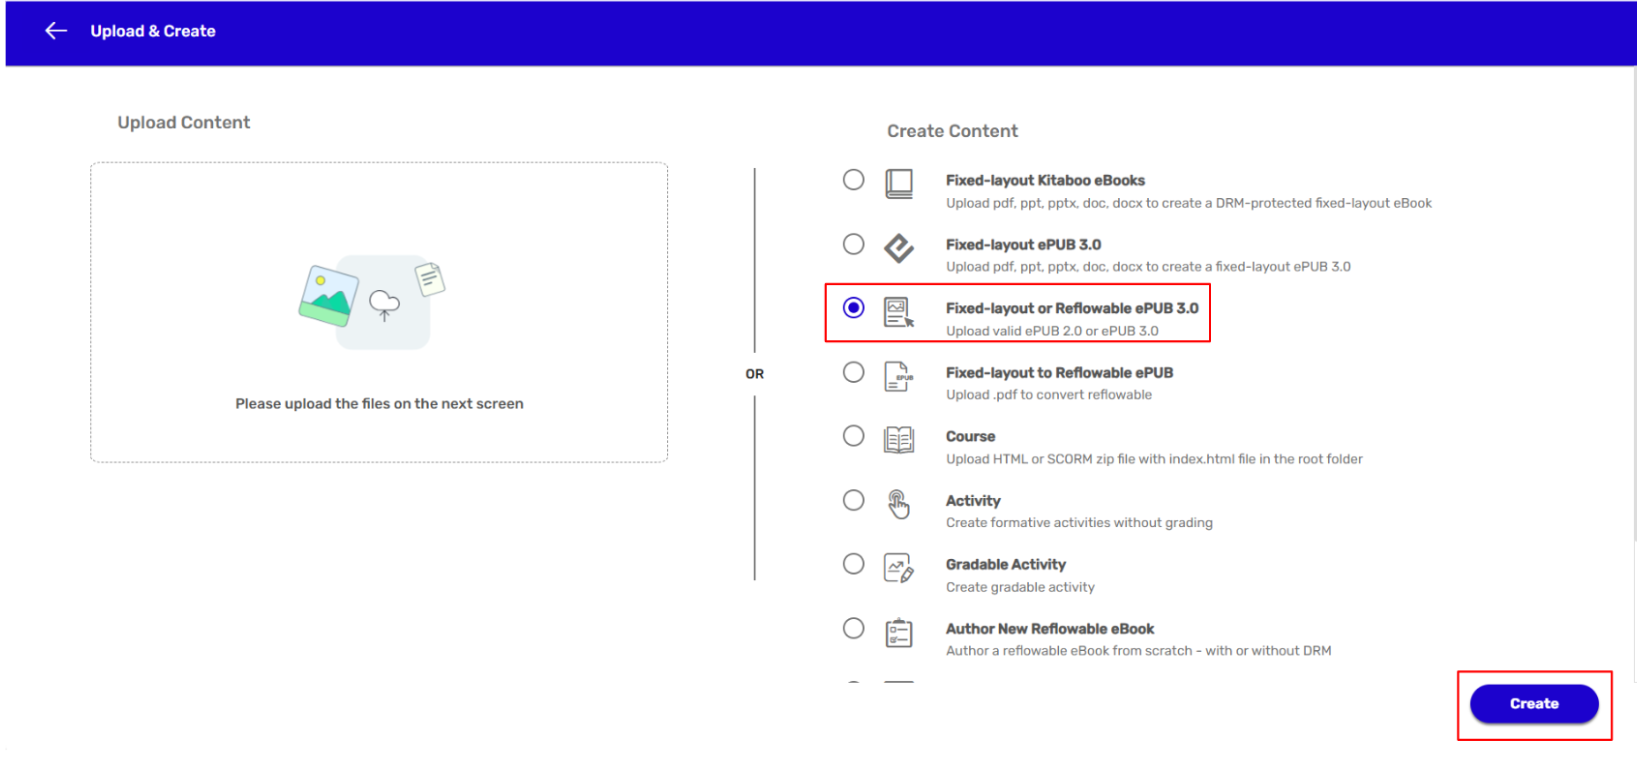
- On the Upload & Create page, select the Creating Fixed-layout or Reflowable ePUB 3.0 option from the Create Content list. > Click on the Create button.
- On the Upload & Publish Reflow ePUB page, enter the upload details like Title, Author, Description, ISBN Code, and Category.
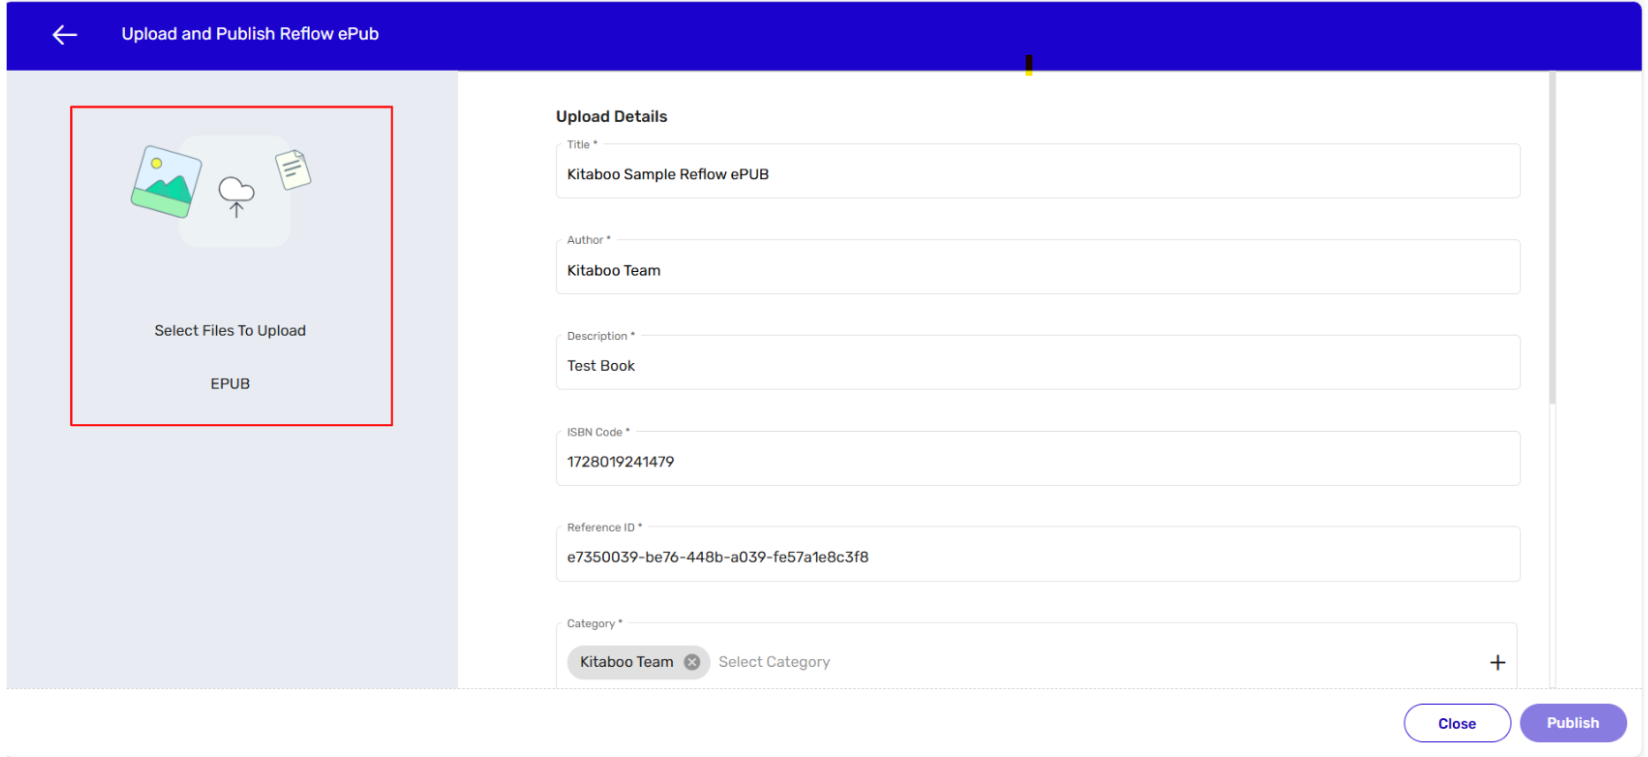
NOTE:
● You can either continue with the system generated ISBN Code or modify it.
● Several categories have already been added to the Category list. You can either select one of them or add a new category to the list if required.
● If you want to add a new category, enter a relevant name for the category, and click on the + icon.
- Scroll down and enter a few keywords/tags relevant to your content. > Select a cover image, if any,
for the to-be-uploaded ePUB.
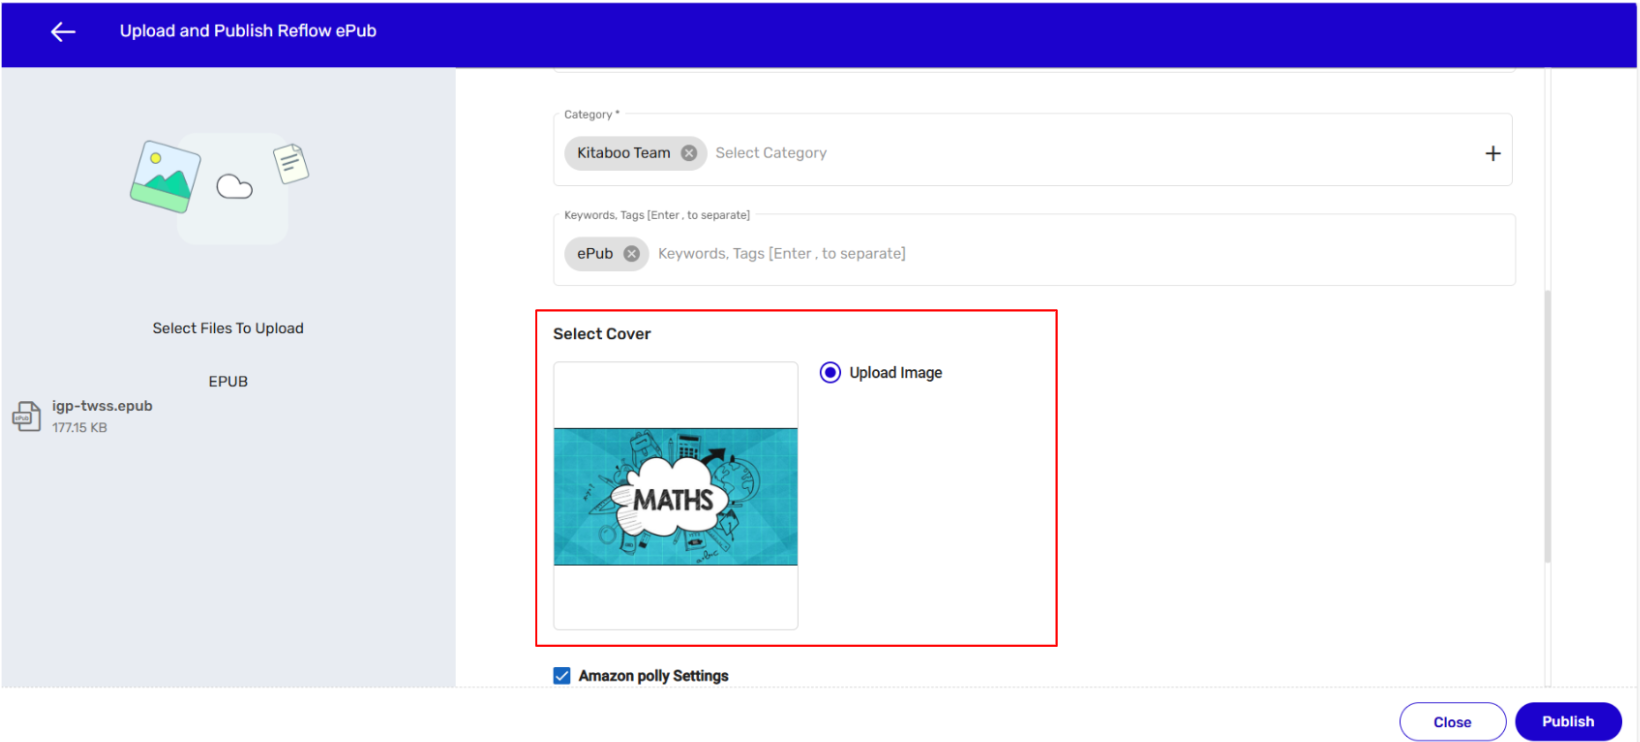
NOTE:
● Keywords and Tags should be relevant to the content of the ePub you’re going to upload.
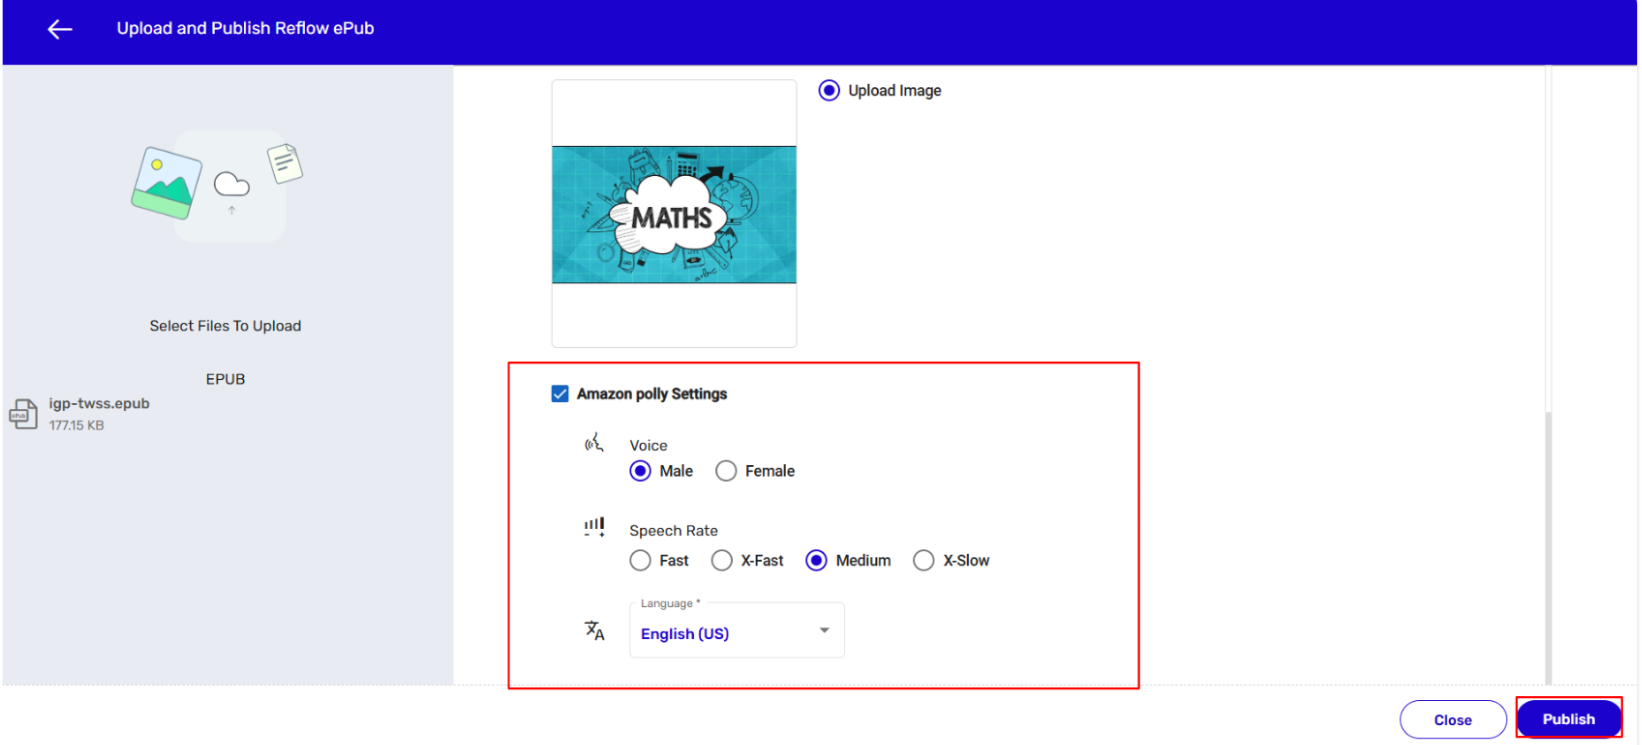
- Scroll down further and check the Amazon Polly Settings checkbox. > Select the desired options in the various fields that appear. > Upload the ePub file you want to use through the Kitaboo system. > Click on the Publish button. Once an ePub has been successfully published, you can issue licenses and distribute the ePub.
4. Creating a Course
- Sign in with your Enterprise Admin credentials.
- Switch to the Content tab. > Click on the Start New Project button.
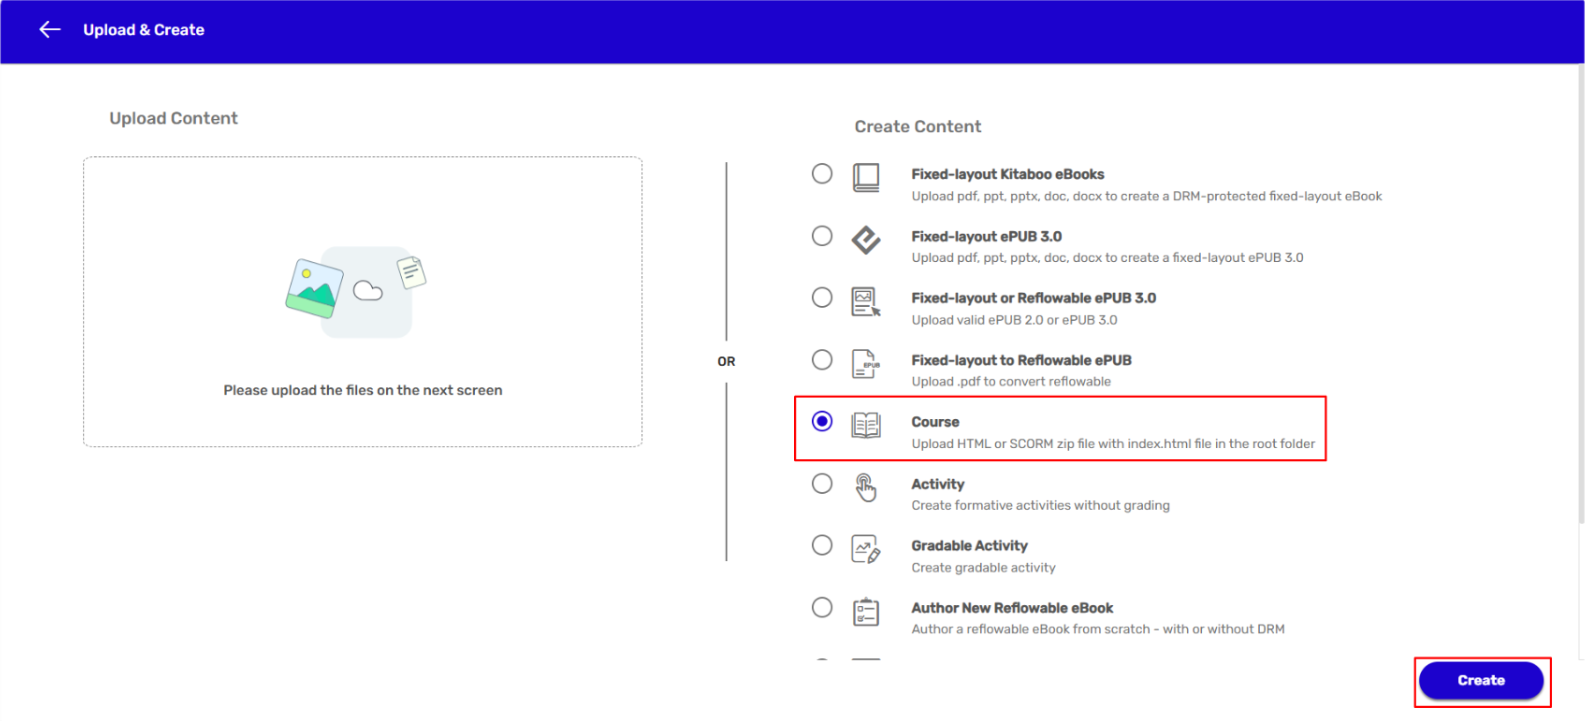
- On the Upload & Create page, select the Course Option option from the Create Content list. > Click on the Create button.
- Enter details in the Title, Author, Description, ISBN Code, and Category fields in the Upload Details section.
Note:
● Users can create two types of courses by using the Kitaboo system. They are – the HTML course and the SCORM course.
● The system will automatically generate an ISBN Code for the to-be-created course.
You can either retain the same code or modify it.
● Several categories have already been added to the Category list. You can either
select one of them or add a new category to the list, if required.
● If you want to add a new category, enter a relevant name for the category, and click
on the + icon.
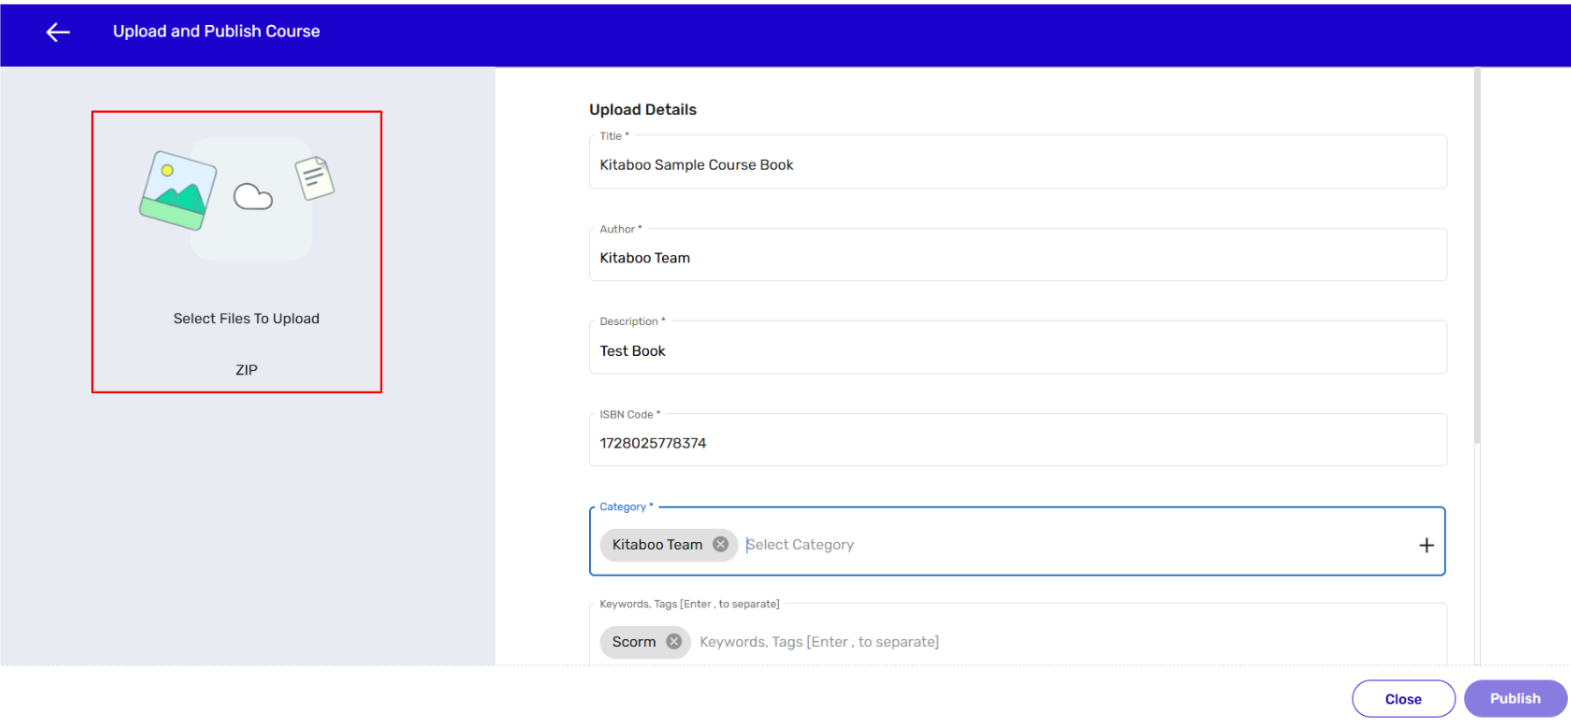
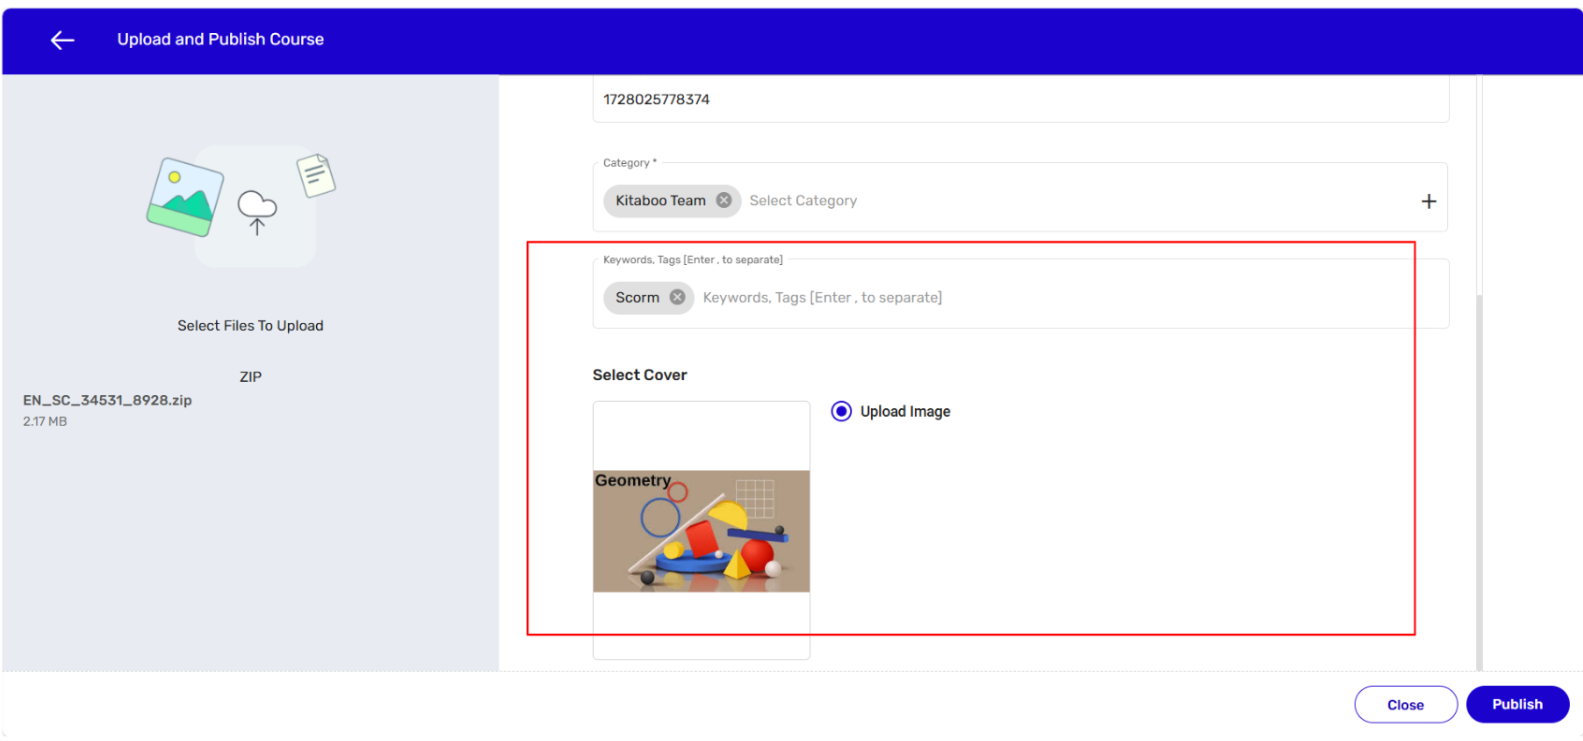
- Scroll down and enter Keywords and comma-separated Tags. > Next, select a cover image for your course. > Upload a relevant file for the to-be-created course. > Click on the Publish button. NOTE:
● Keywords and Tags should be relevant to the content of the course you’re going to create.
● The file you want to upload for the course creation should be in the ZIP format only. You can also drag and drop or paste a relevant file.
● The system may take 30 seconds to 2 minutes time in archiving a course. Hence, sometimes the just-created book may immediately not be displayed on the Titles list. Once a course has been successfully created, you can issue licenses and distribute the course.
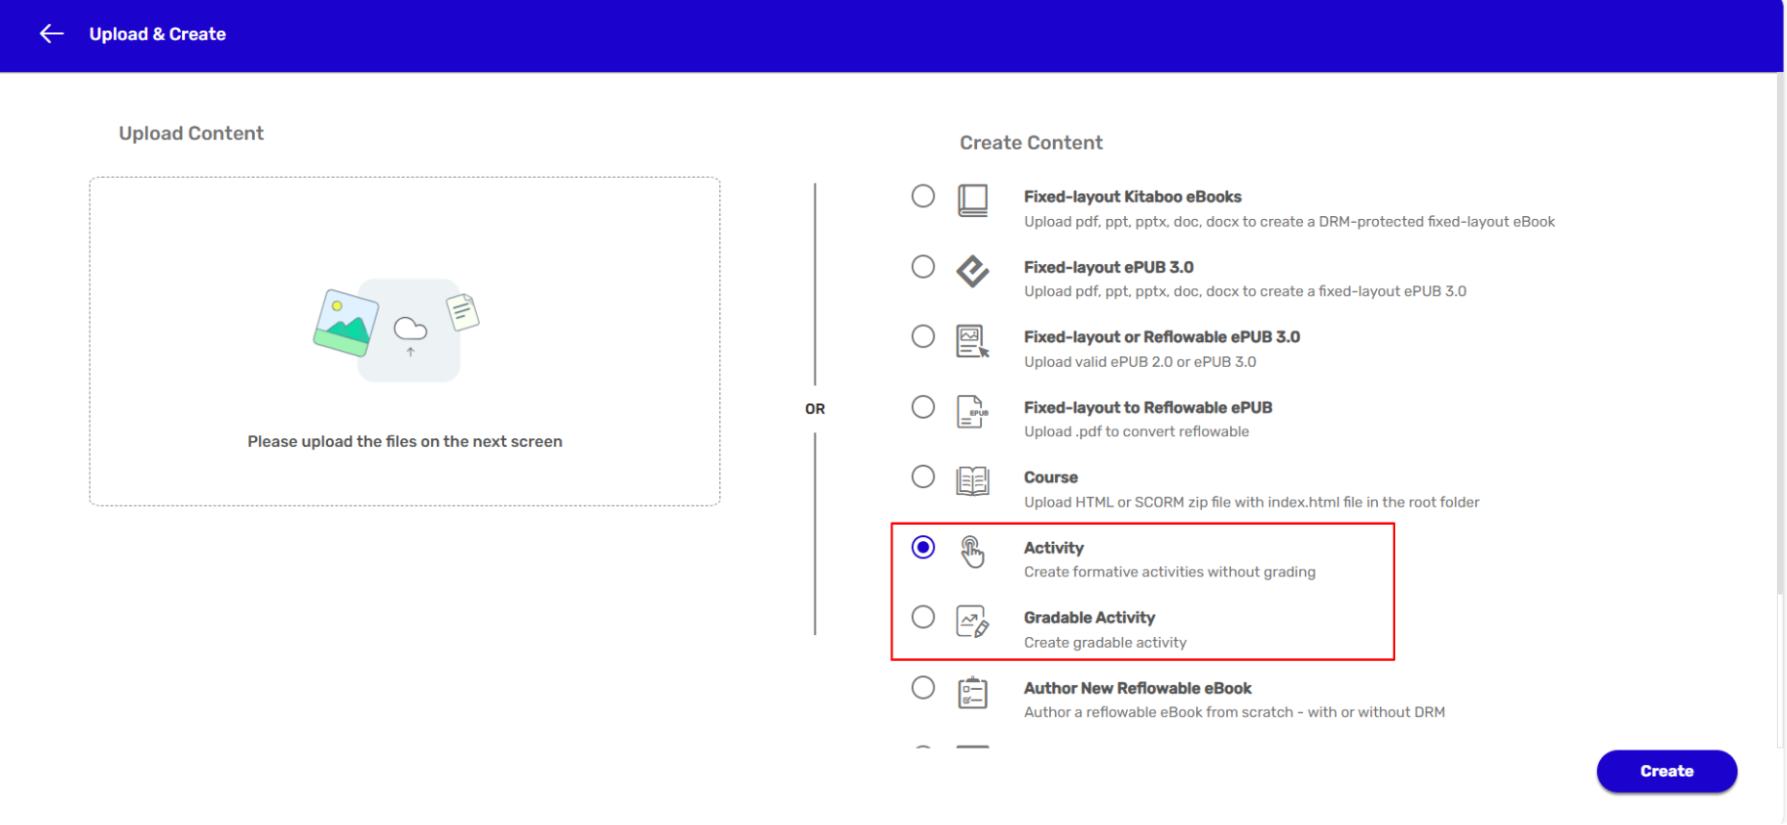
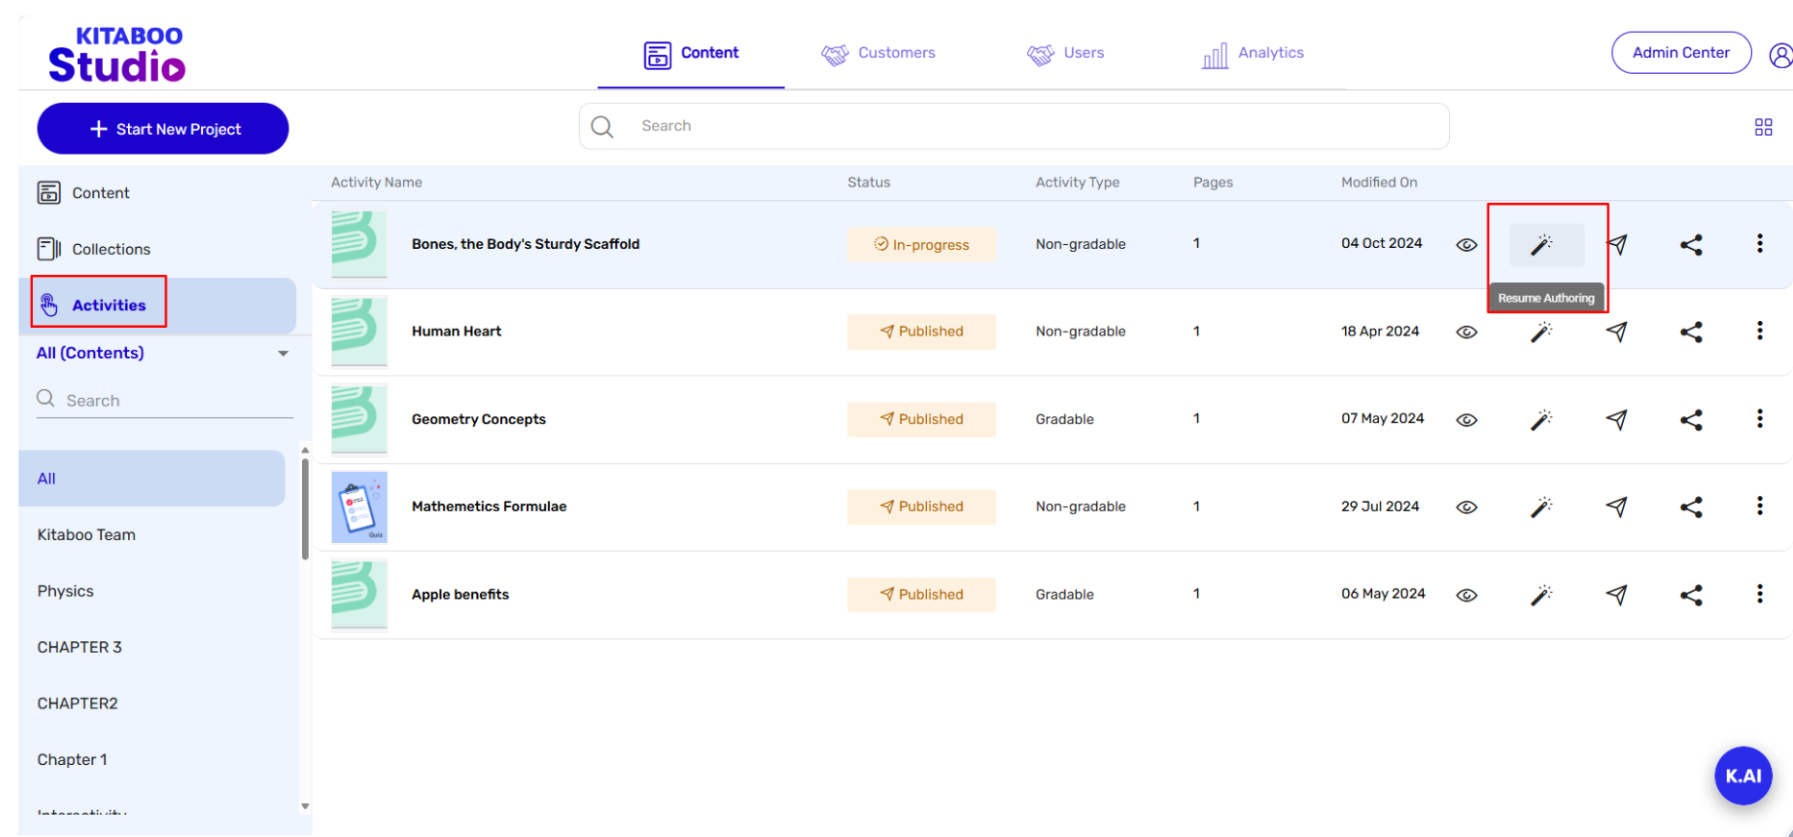
5. Activity or Gradable Activity Creation
- Sign in with your Enterprise Admin credentials.

- Switch to the Content tab. > Click on the Start New Project button.
- On the Upload & Create page, select the Activity Option option from the Create Content list. > Click on the Create button.
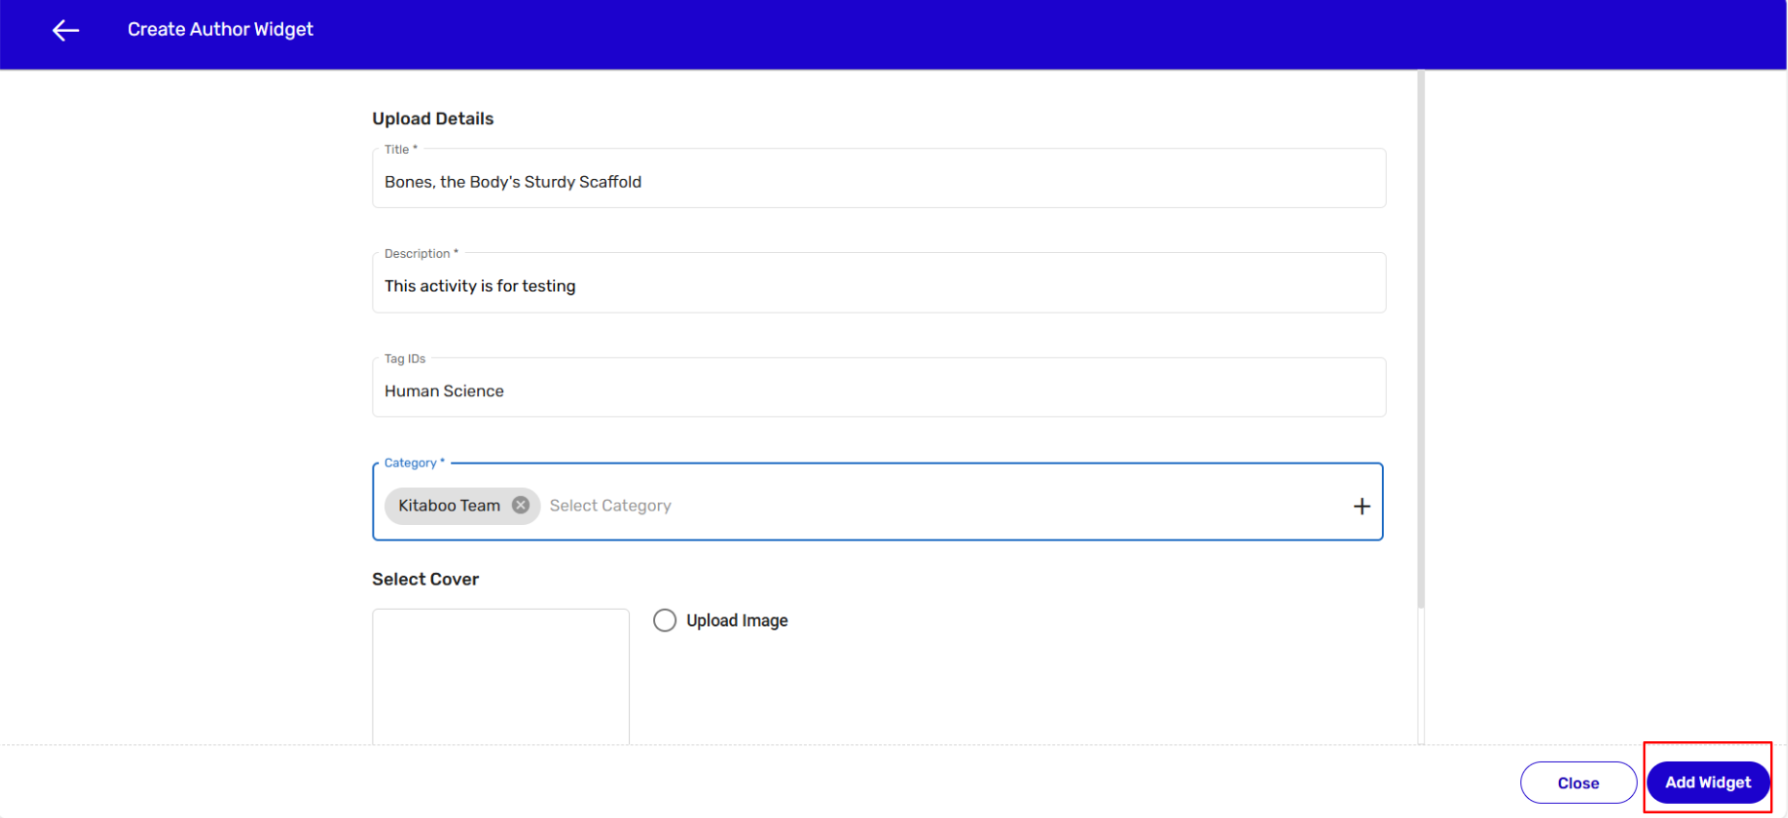
- Enter details in the Title, Description, Tag IDs, and Category fields in the create Author Widget section along with Cover Image and then click on Add Widget.
- Once you click on Add Widget Button, you will redirected to Activities tab and you have to click on Resume Authoring.
- A new page will thus appear. You can add a TOC and define various components like layouts, elements, widgets, etc.
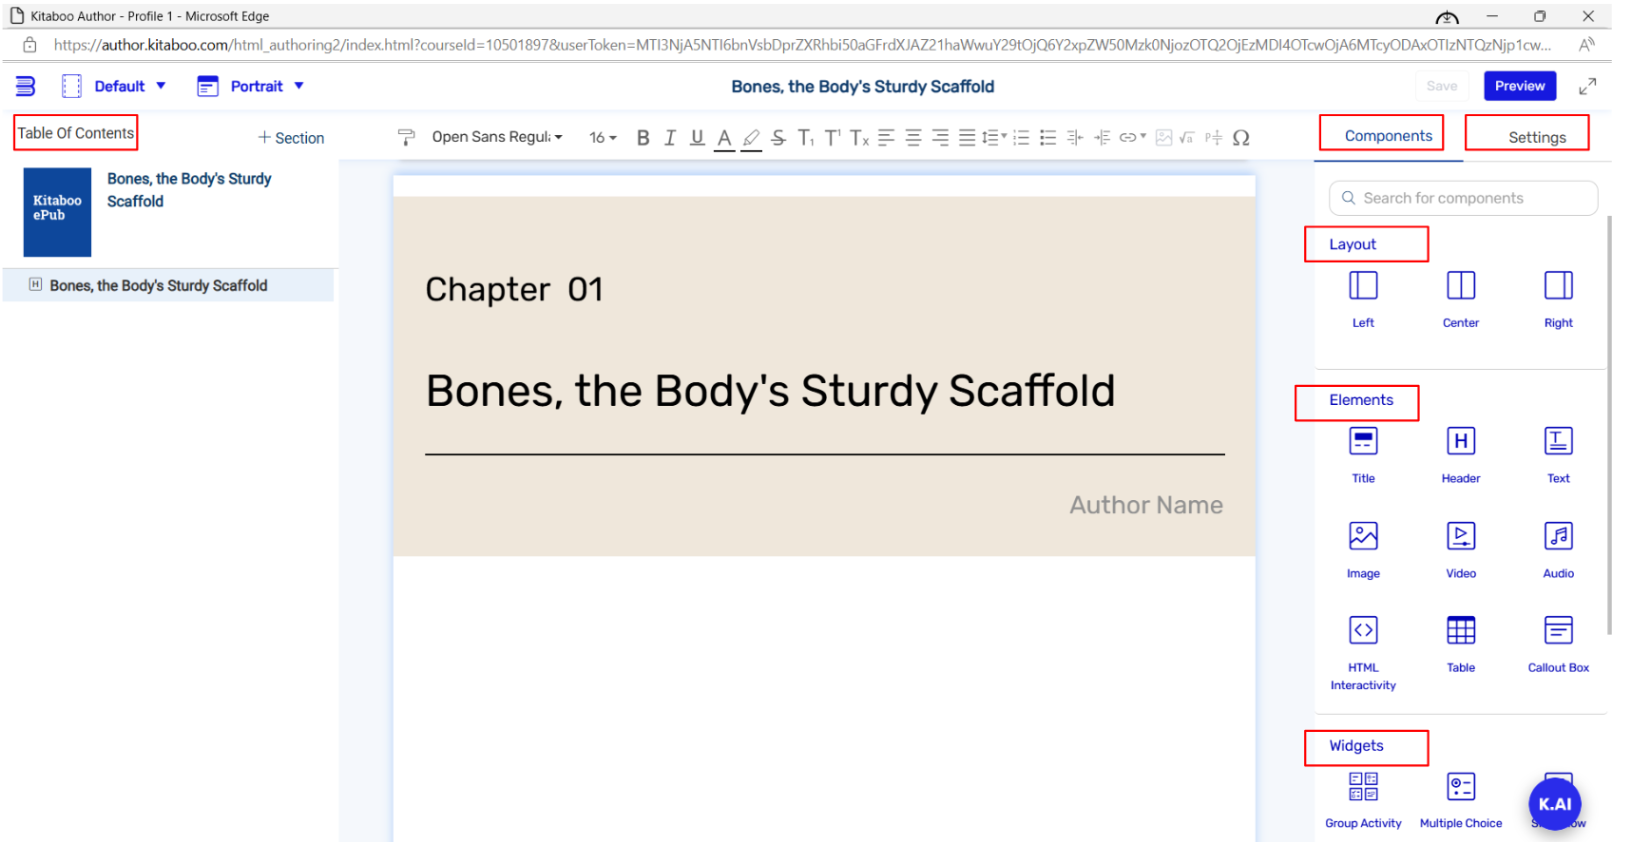
- From the Settings tab, you can select a template from the list of templates for the title of your Activity. > Click on the Save button.
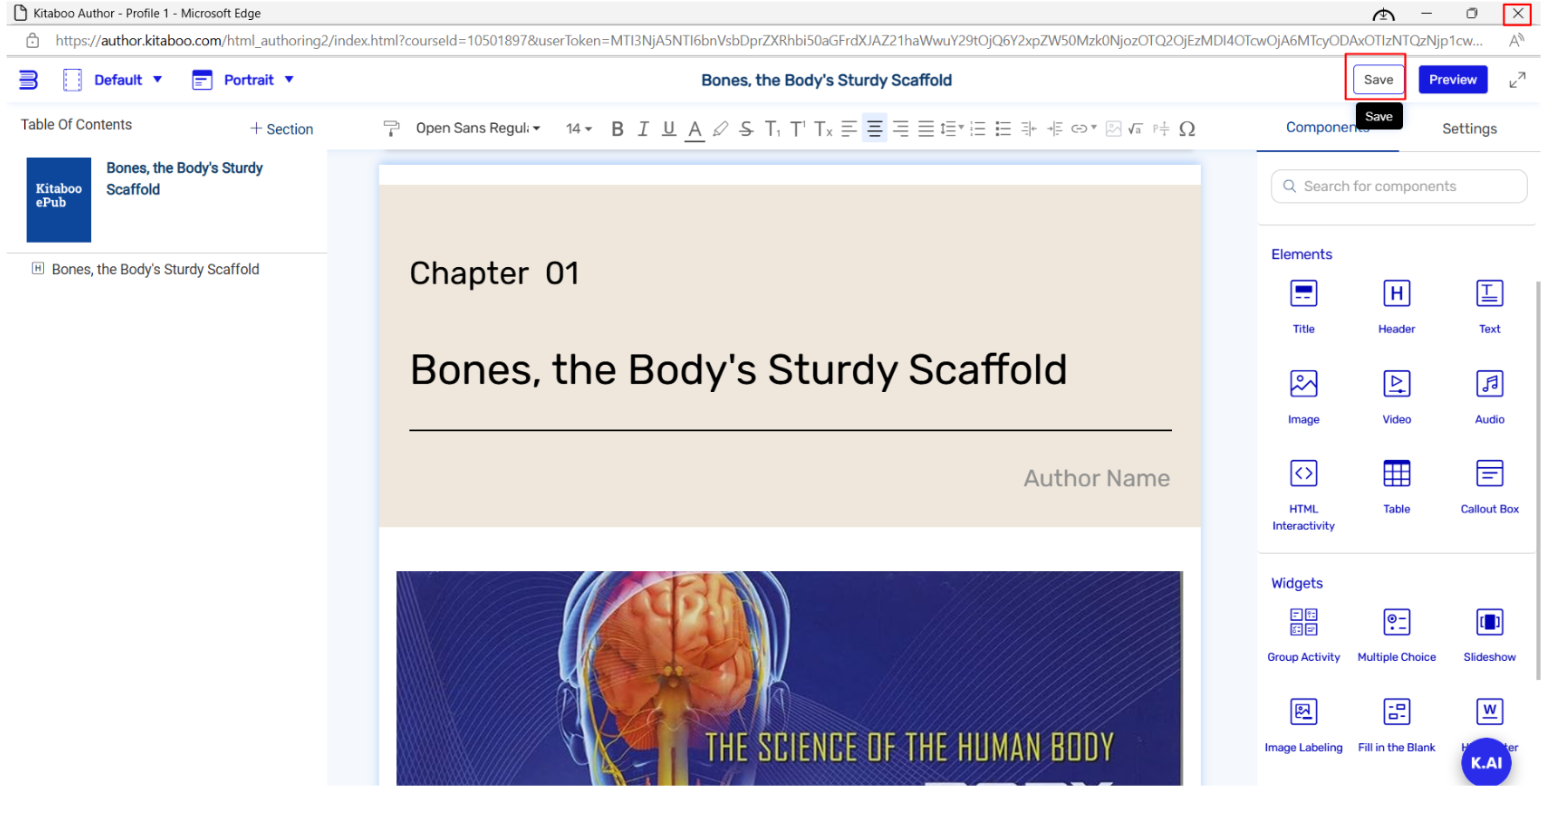
- Once you close the page, you can also relaunch it later by clicking the Resume button. The Publish button let you publish the activity.

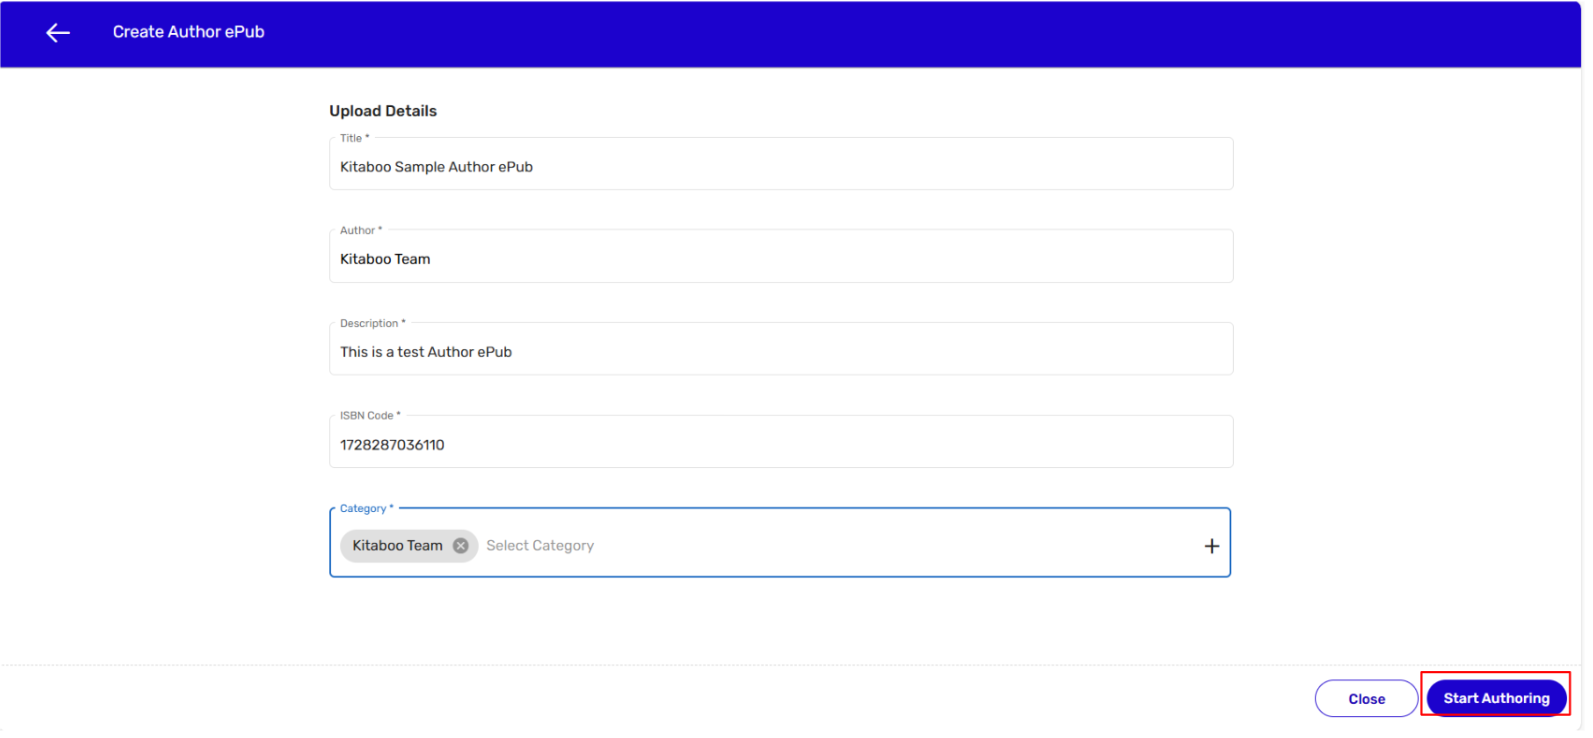
6. Authoring an ePub
- Sign in with your Enterprise Admin credentials.

- Switch to the Content tab. > Click on the Start New Project button.

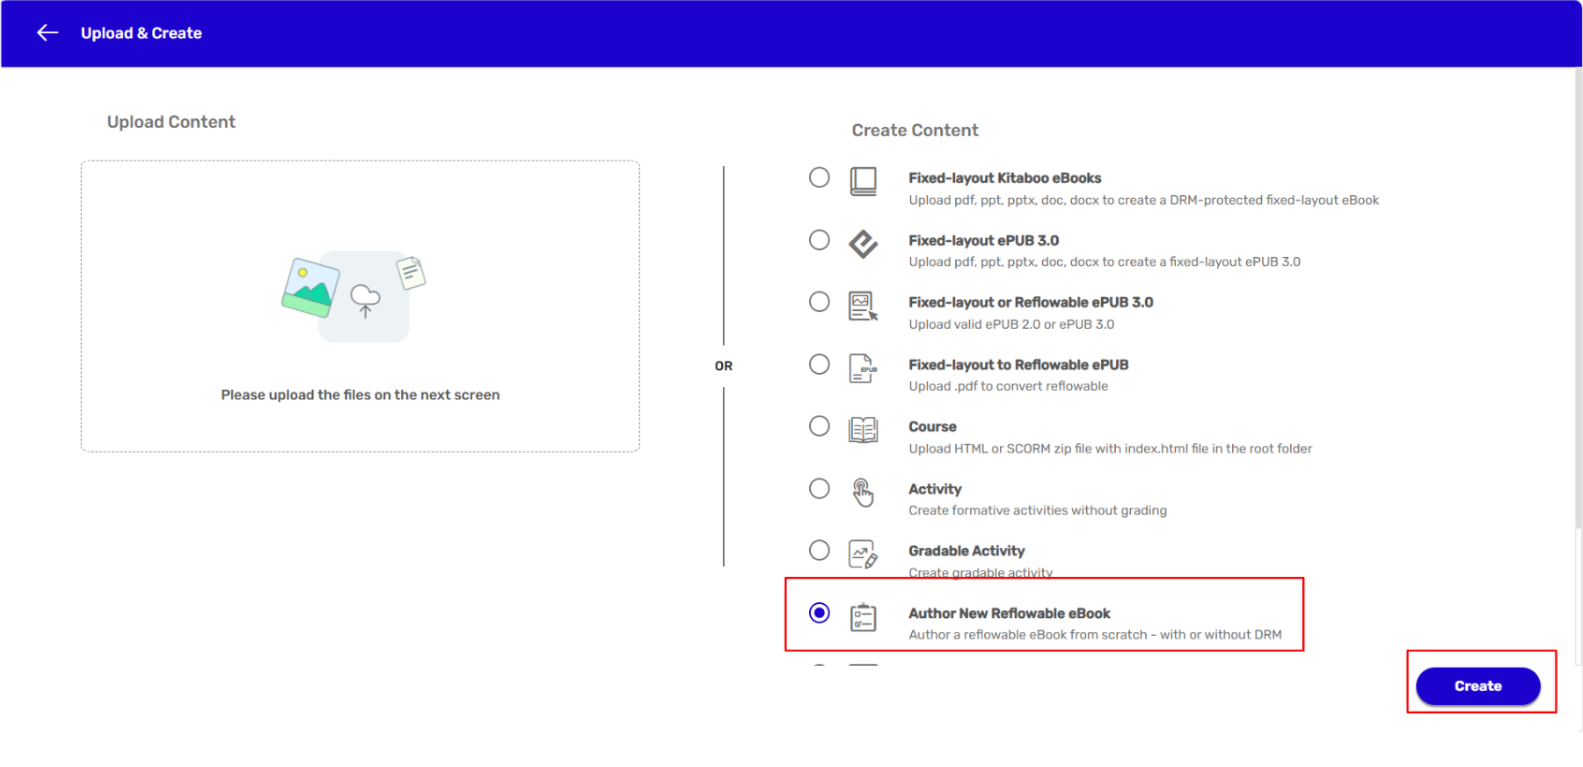
- On the Upload & Create page, select the Author New Reflowable eBook option from the Create Content list. > Click on the Create button.
- Enter details in the Title, Author, Description, ISBN Code, and Category fields in the Upload Details section.
NOTE:
● The system will automatically generate an ISBN Code for the to-be-created course. You can either retain the same code or modify it.
● Several categories have already been added to the Category list. You can either select one of them or add a new category to the list if required.
● If you want to add a new category, enter a relevant name for the category, and click on the + icon.
- A new page will thus appear. You can add a TOC and define components like layouts, elements, widgets etc. of your to-be-authored ePub on this page.
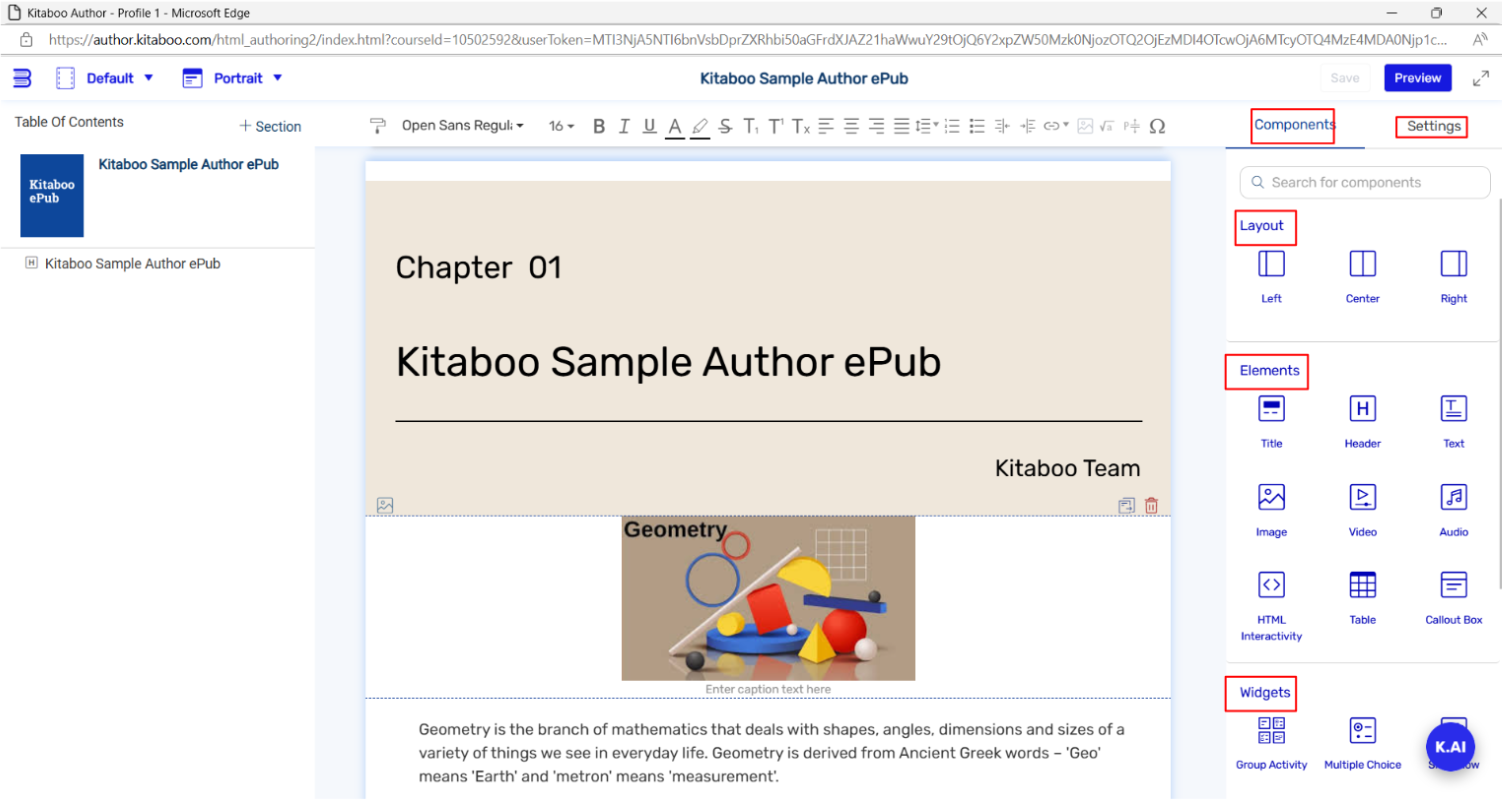
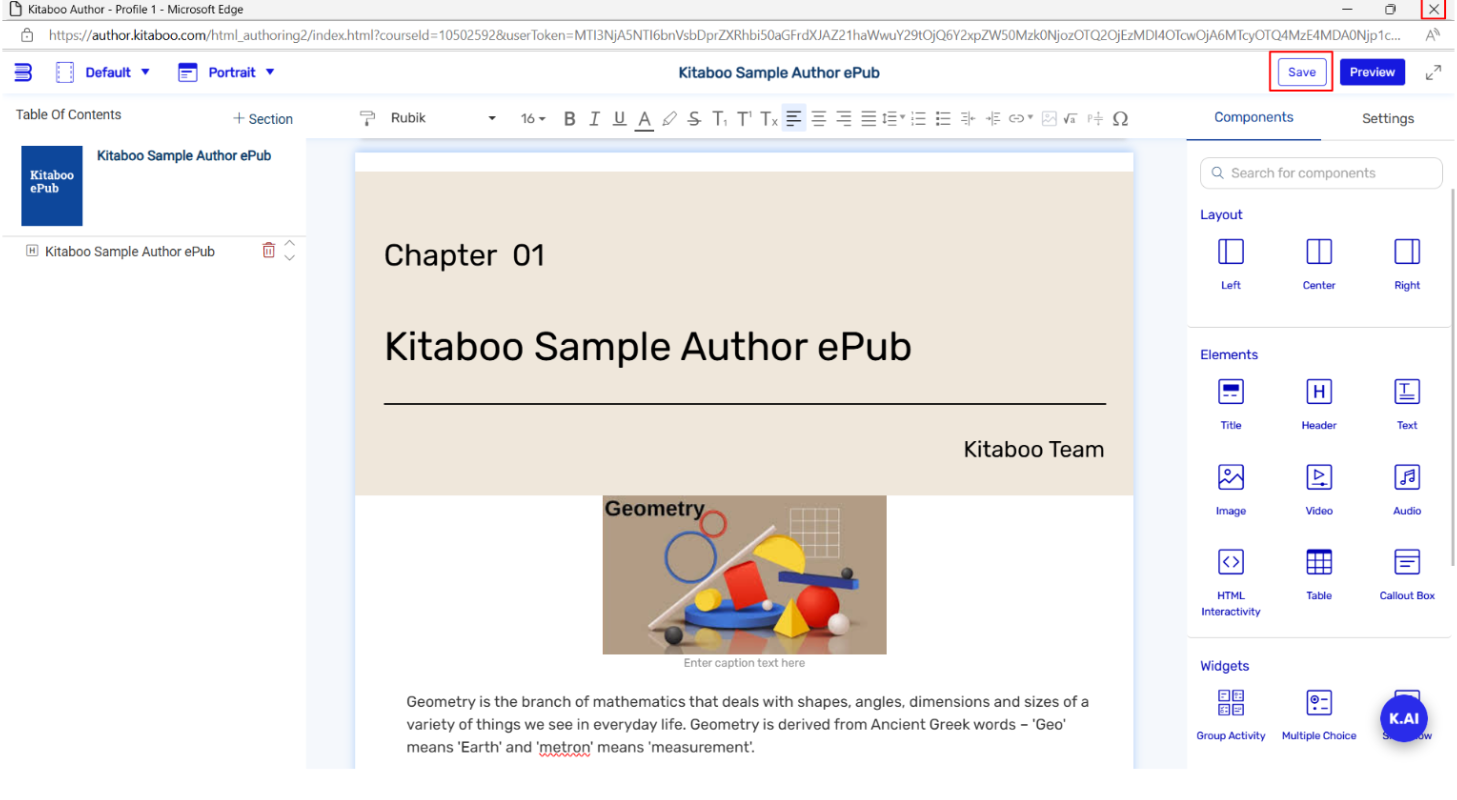
- From the Settings tab, you can select a template from the list of templates for the title of your ePub. > Click on the Save button.
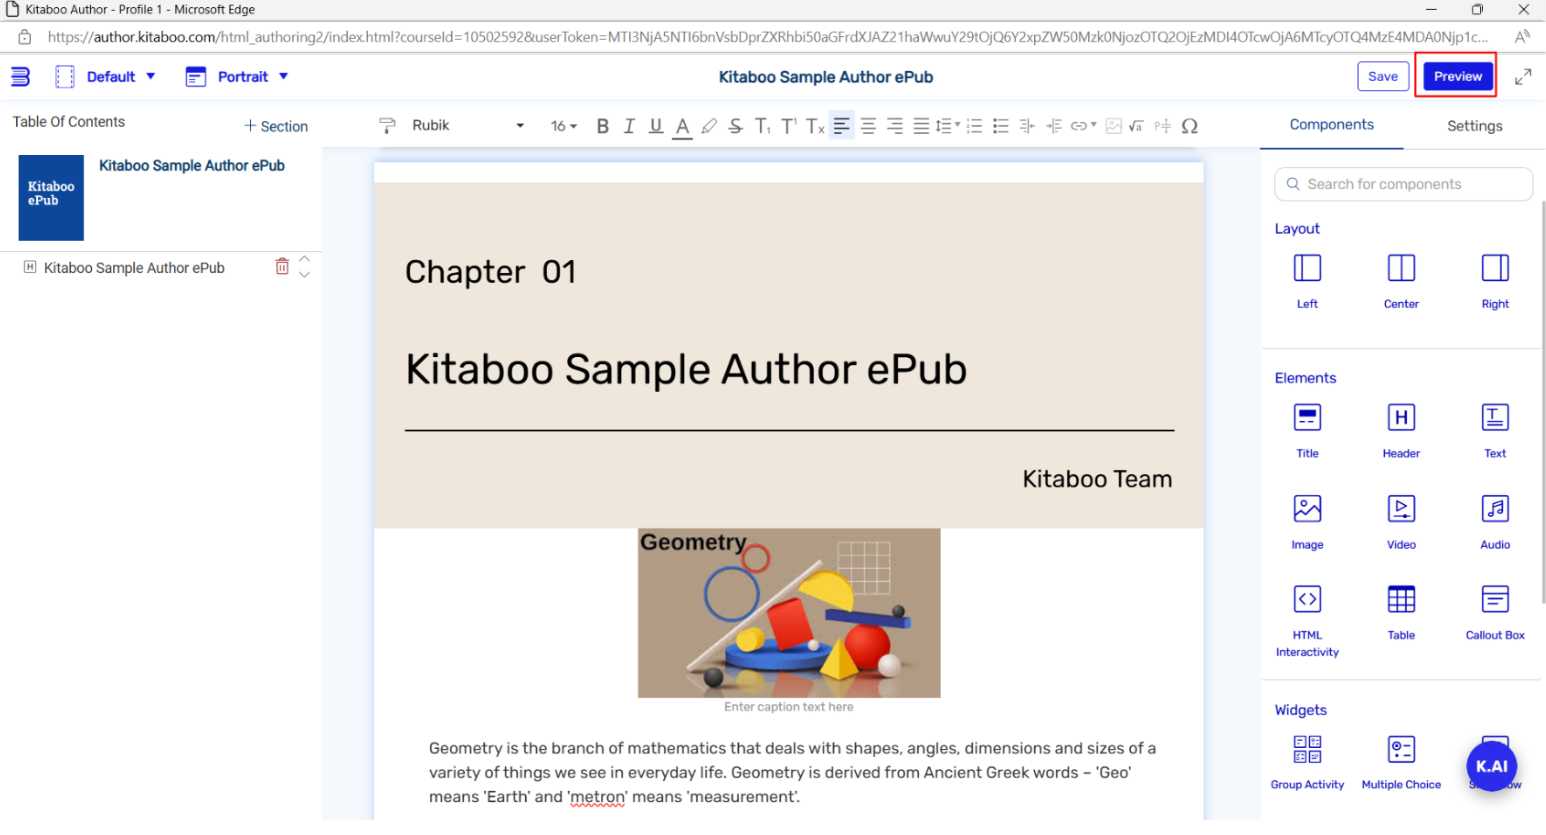
- By clicking on the Preview button, you can also preview the page on a Desktop, Tablet, or Mobile. You can also preview it on the Kitaboo Reader.
- Once you close the page, you can also relaunch it later by clicking the Resume button. The Publish and Archive buttons let you publish or archive the ePub.
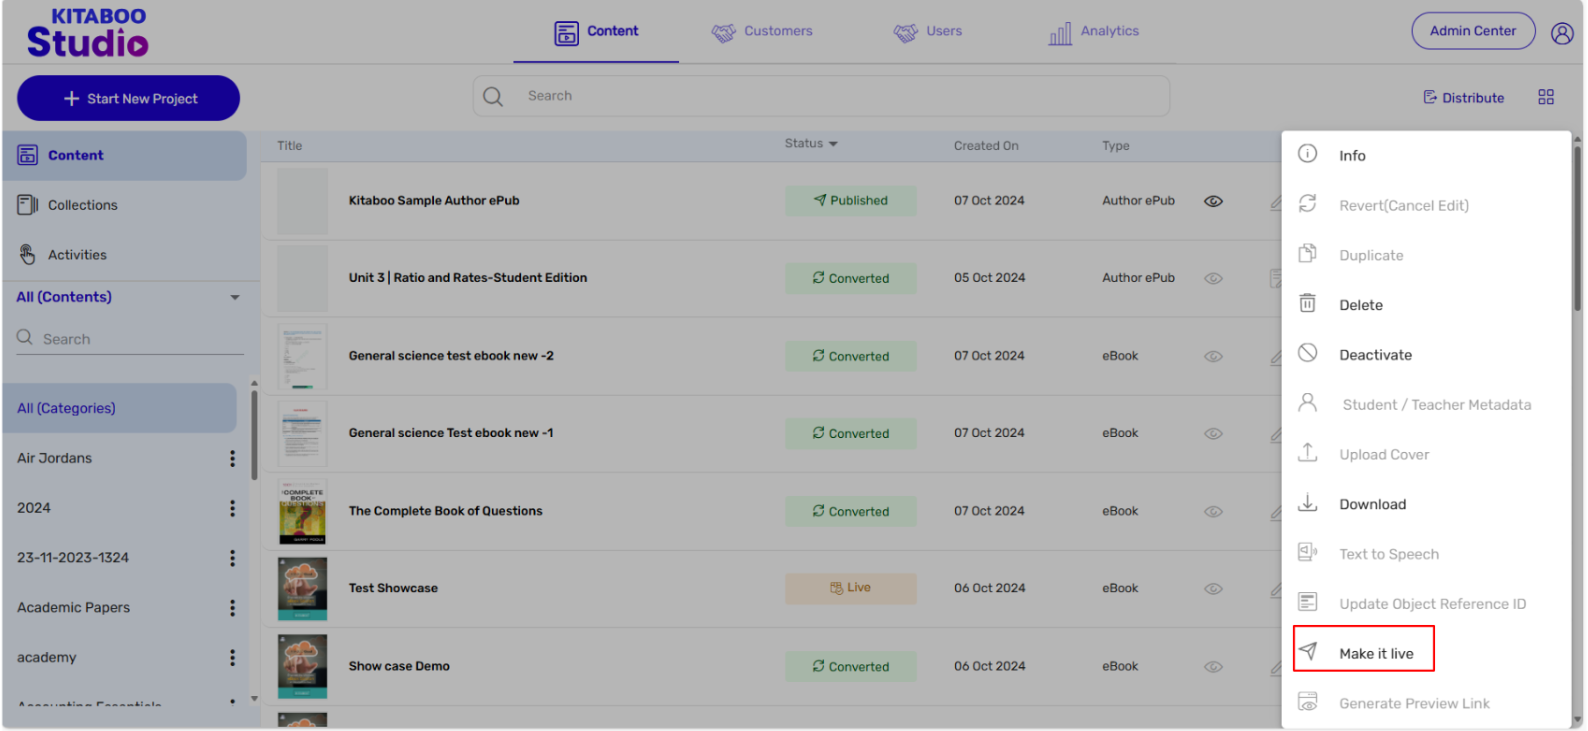
- Once The Author ePub is Published, you can archive it by clicking on More Option and select Make it live.
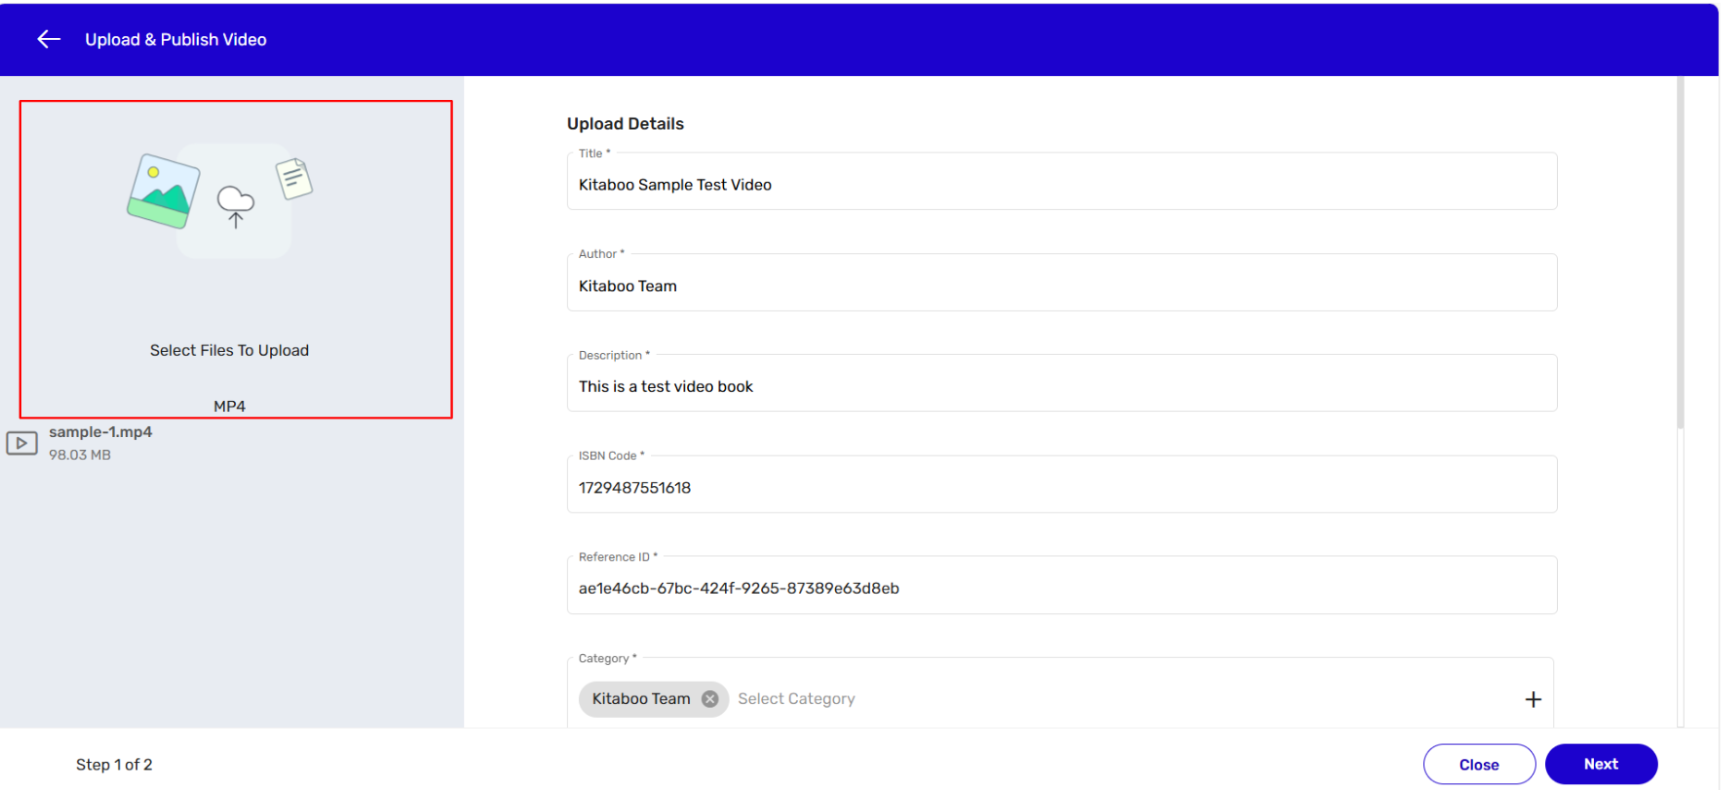
7. Creating a Video Book
- Sign in with your Enterprise Admin credentials.

- Switch to the Content tab. > Click on the Start New Project button.
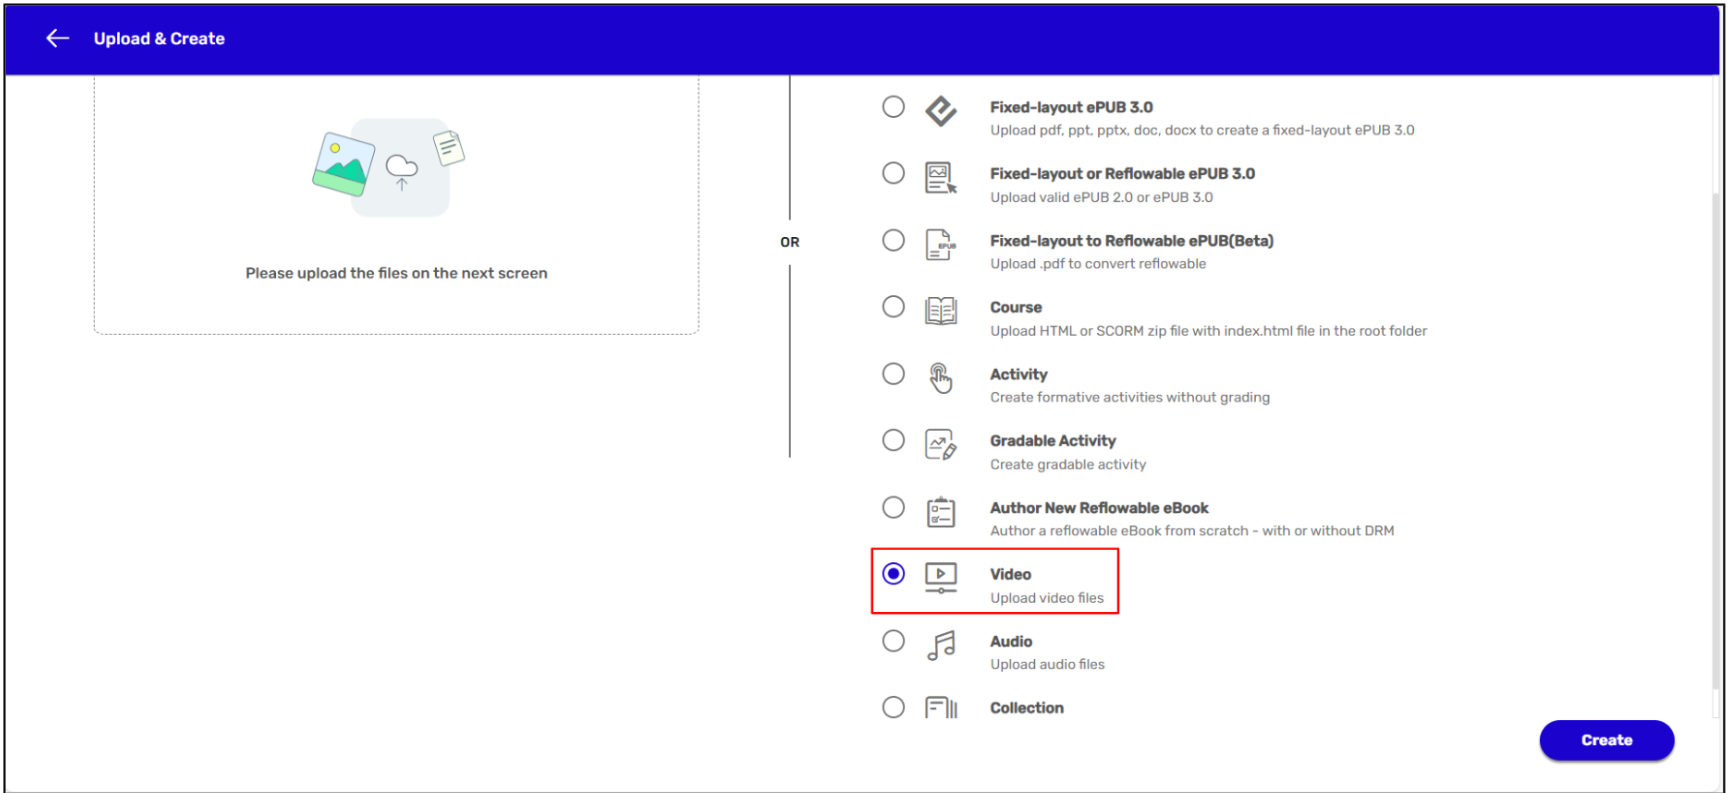
- On the Upload & Create page, select the Video option from the Create Content list. > Click on the Create button.
- 4. Enter details in the Title, Author, Description, ISBN Code, and Category fields in the Upload Details section.
NOTE:
● The system will automatically generate an ISBN Code for the to-be-created video book. You can either retain the same code or modify it.
● Several categories have already been added to the Category list. You can either select one of them or add a new category to the list, if required.
● If you want to add a new category, enter a relevant name for the category, and click on the + icon.
- Scroll down and enter Keywords and comma-separated Tags. > Next, select a cover image for your video book.
NOTE: Keywords and Tags should be relevant to the content of the video book you’re going to create.
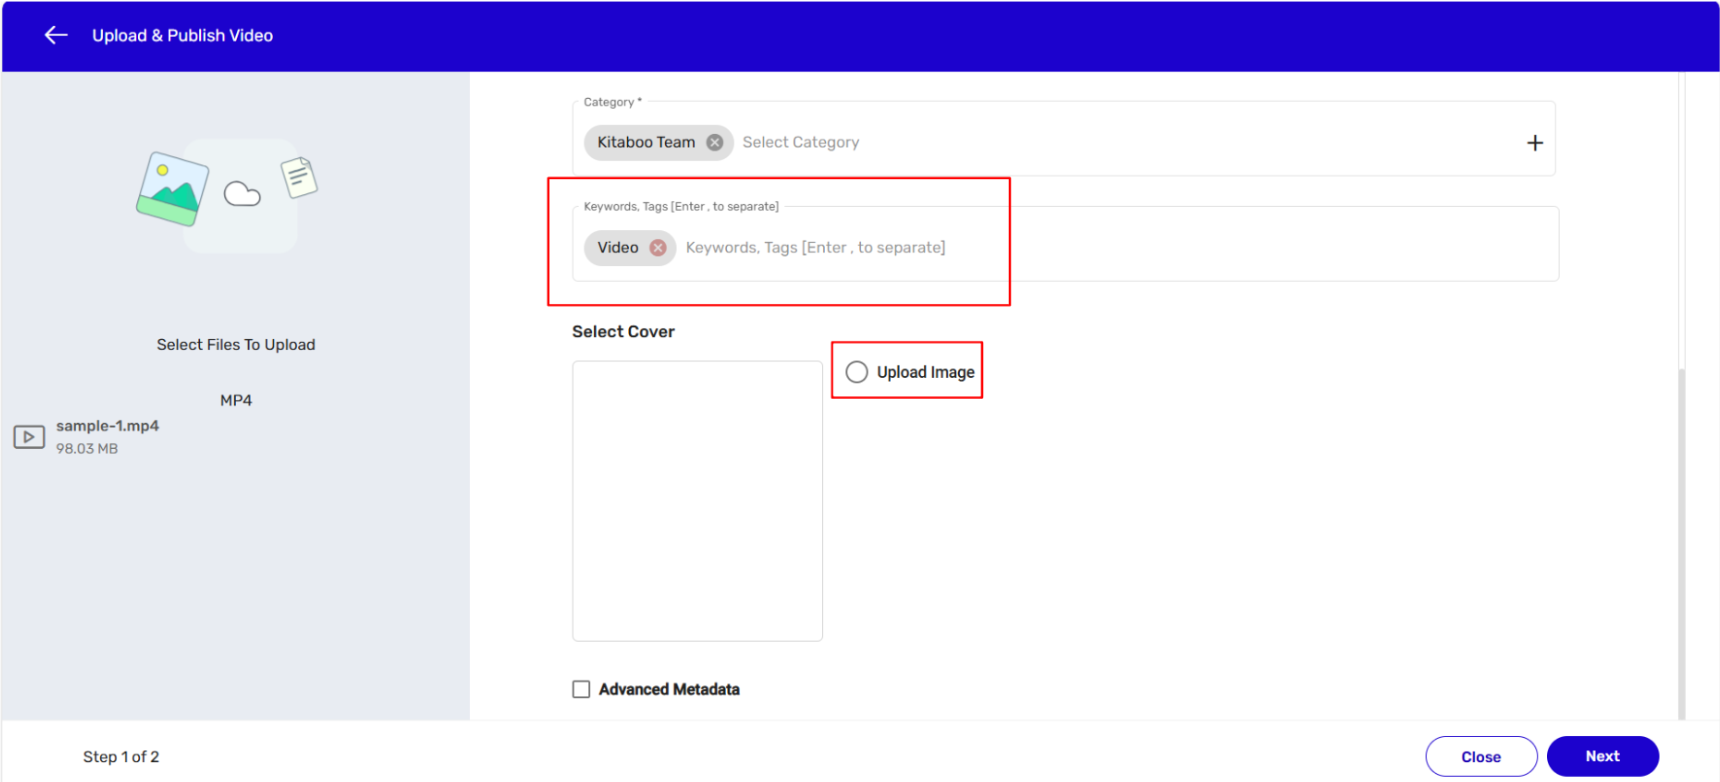
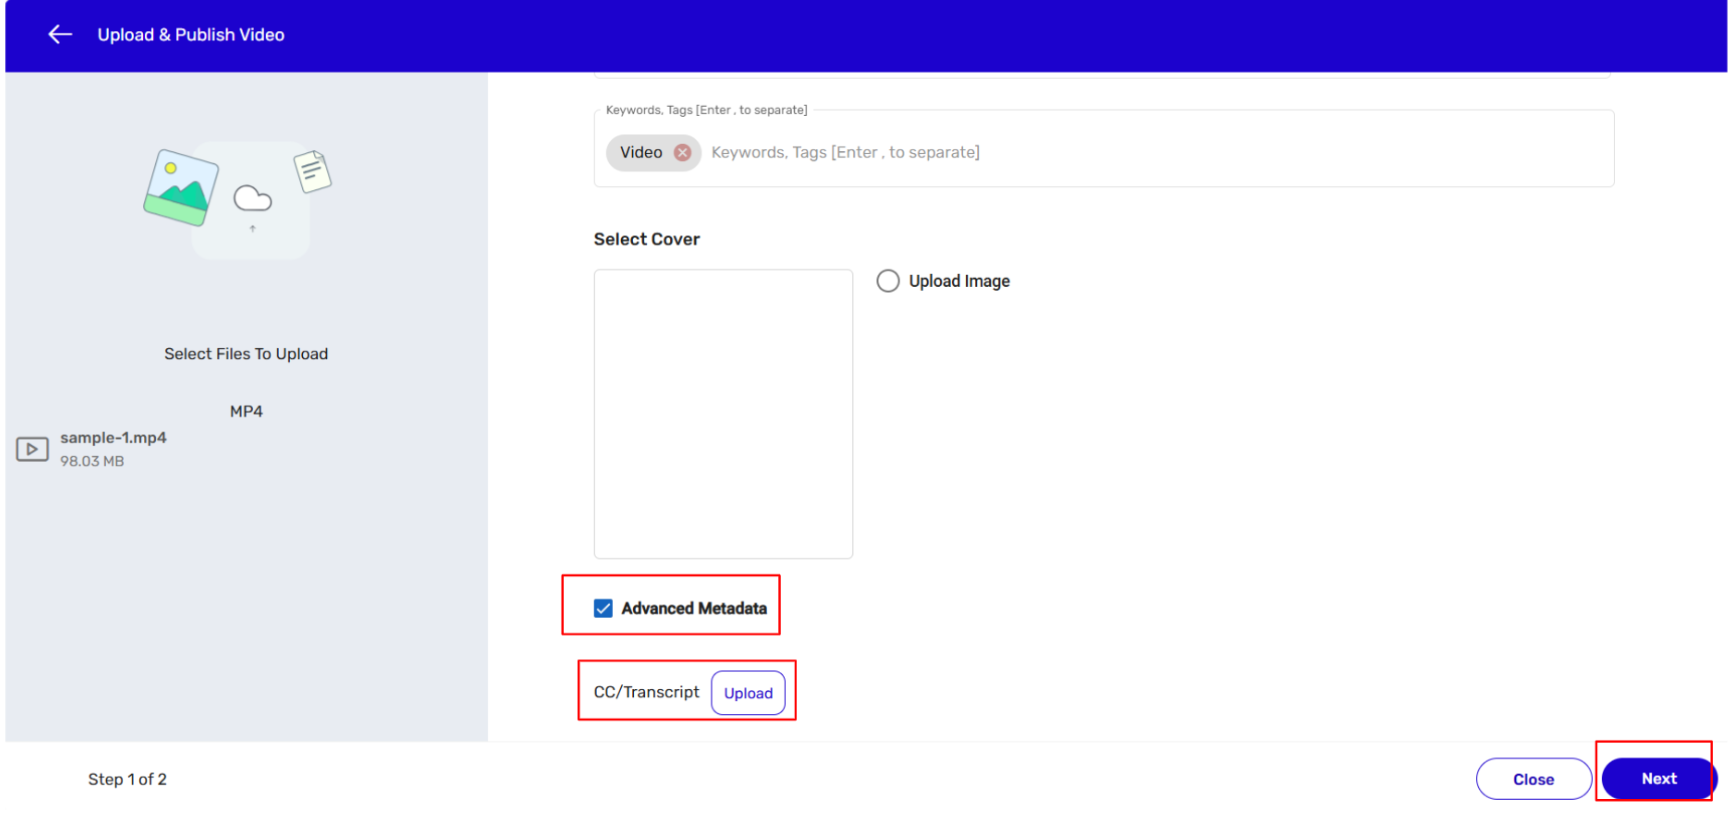
- Scroll down further and check the Advance Metadata checkbox. > Select the CC/Transcript
(Beta)button and upload the Close
Caption (CC) or the transcript file of the video you want to create. > Upload a relevant file for the to-be-created video book. > Click on the Next button.
NOTE:
● The file you want to upload for the video book creation should be in the mp4 format
only. You can also drag and drop or paste a relevant file.
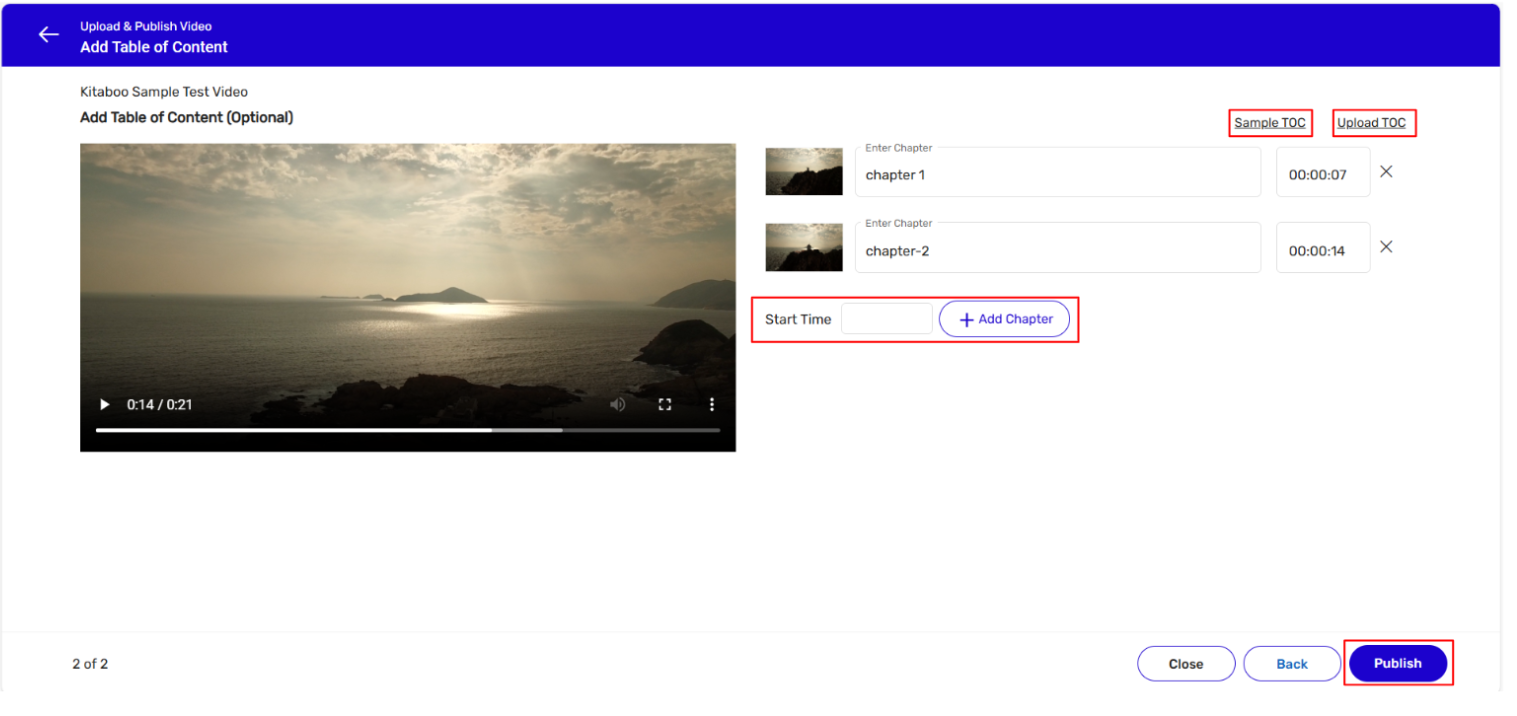
- Add a TOC (Table of Content) for the video book. However, this is optional. > Click on the Publish button. You can add TOC manually or you can use the upload TOC icon to add TOC in bulk. Adding to the point you can also download the sample TOC file.
NOTE:
● If you want to add chapter names to the TOC, you can find the start time of each chapter and its name by dragging the slider of the video book on the left panel.
● Based on the names on the video book, keep on adding the chapter names. Once a video book has been successfully created, you can issue licenses and distribute the book.
Specification:
• The Video files to be ingested should be in MP4 format.
• Supported Encoding: H264
• Maximum Video Size – 1.5 GB
• Maximum Video Length – 12hrs
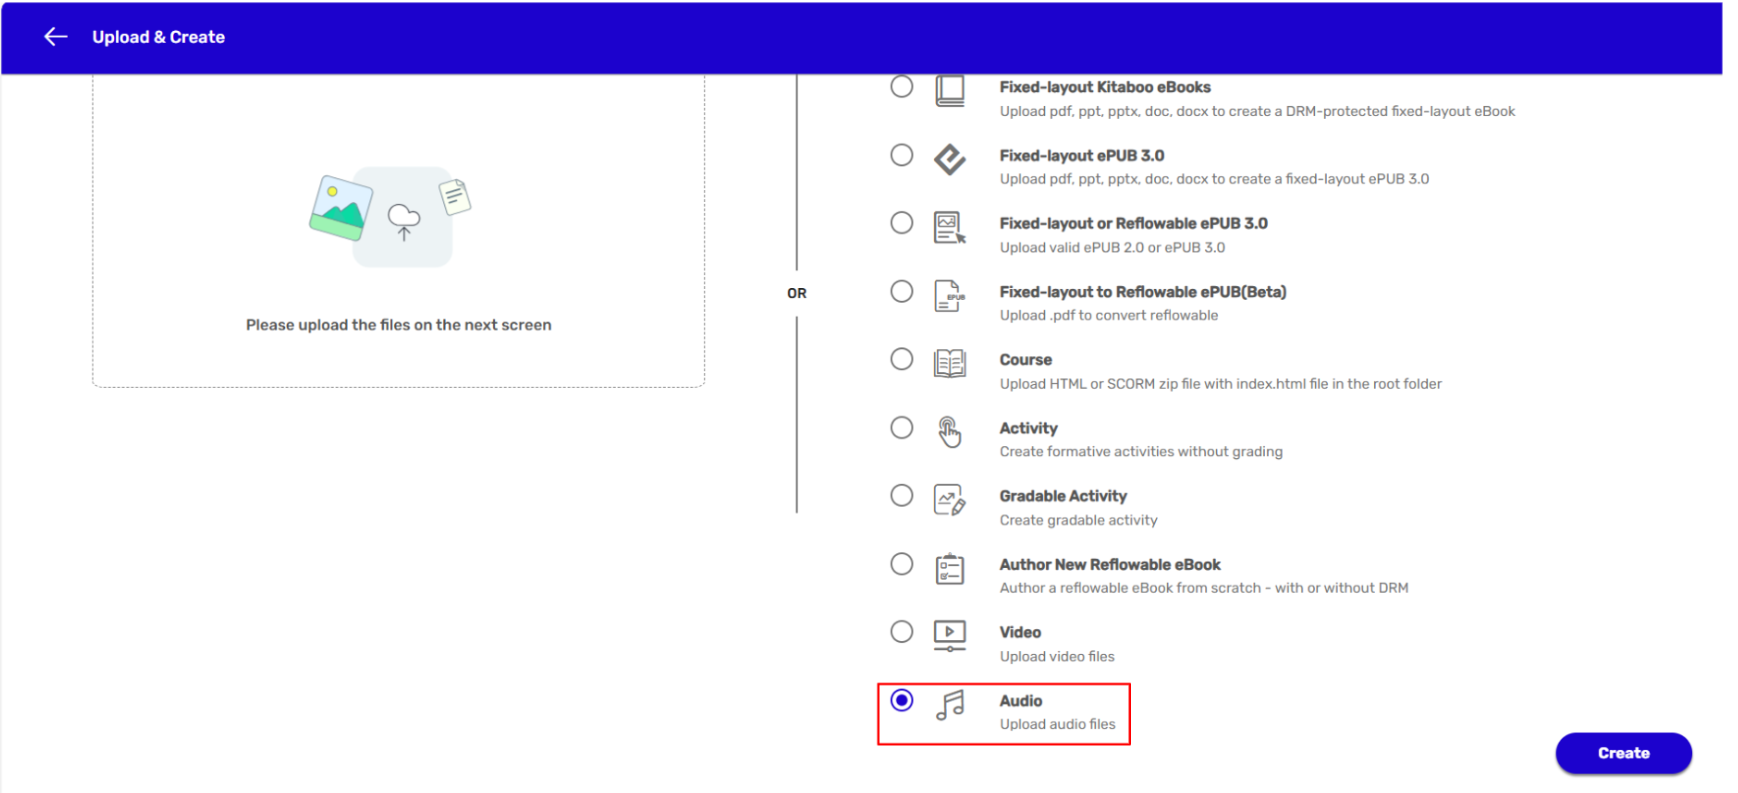
8. Creating an Audio Book
- Sign in with your Enterprise Admin credentials.

- Switch to the Content tab. > Click on the Start New Project button.

- On the Upload & Create page, select the Audio option from the Create Content list. > Click on the Create button.
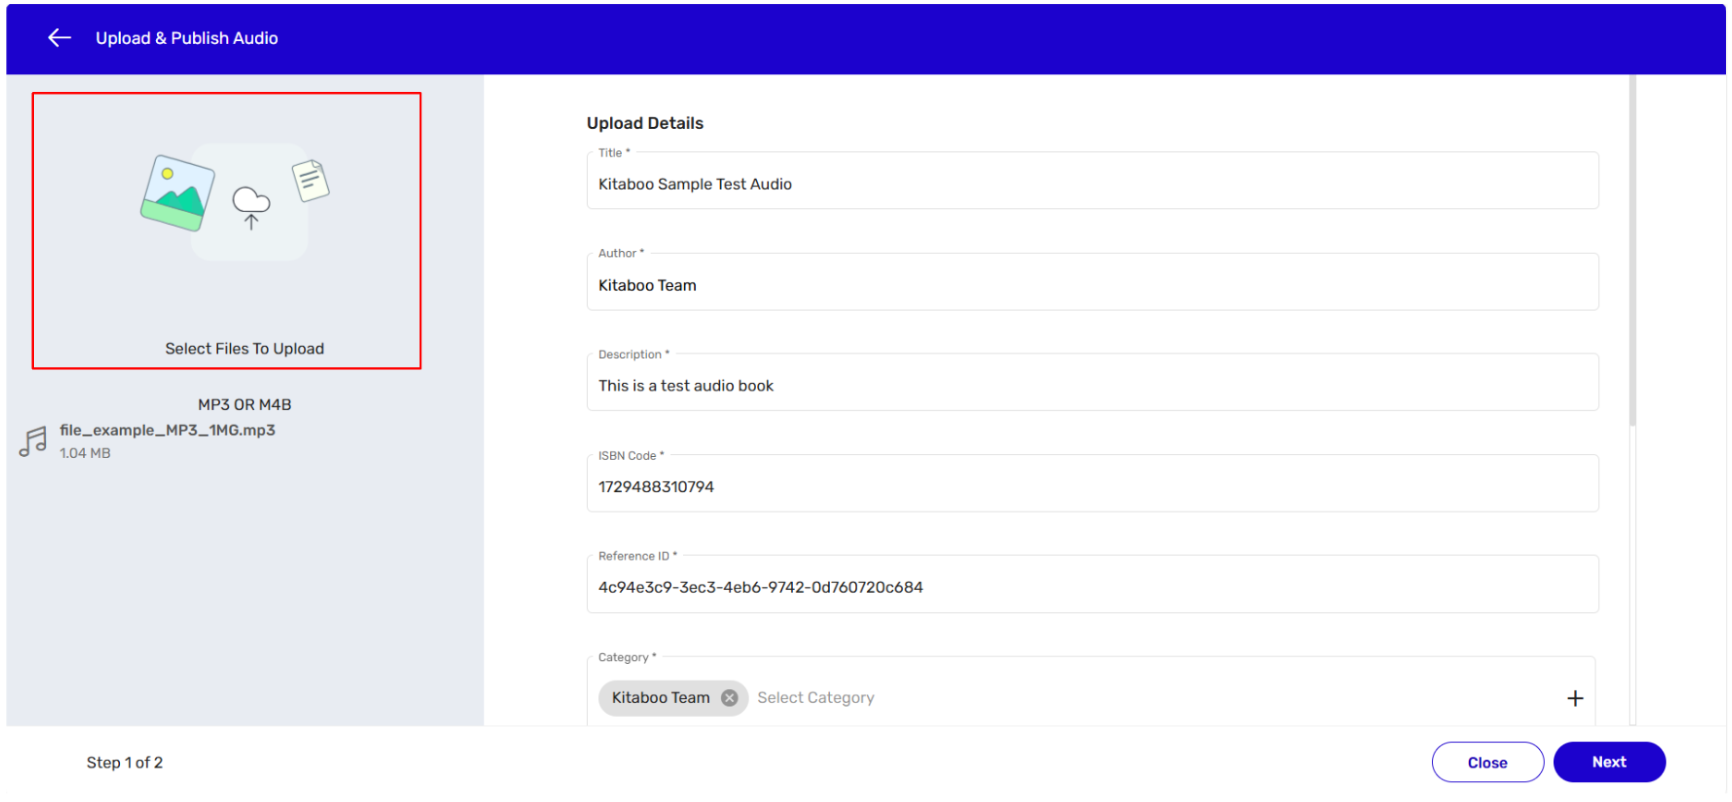
- Enter details in the Title, Author, Description, ISBN Code, and Category fields in the Upload Details section.
NOTE:
● The system will automatically generate an ISBN Code. You can either retain the same code or modify it.
● Several categories have already been added to the Category list. You can either select one of them or add a new category to the list if required.
● If you want to add a new category, enter a relevant name for the category, and click on the + icon.
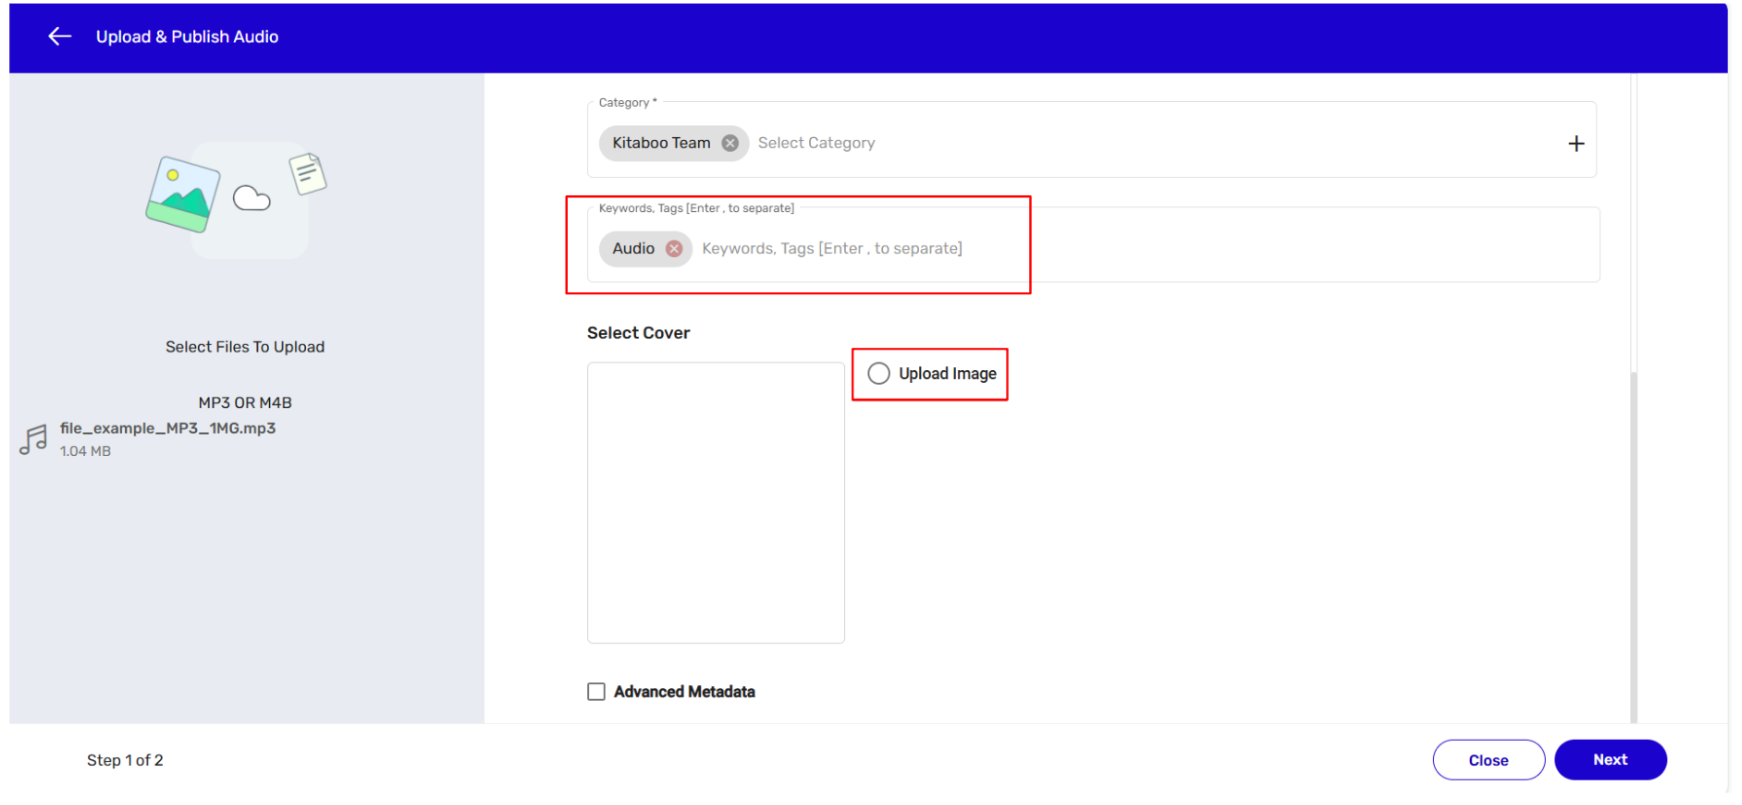
- Scroll down and enter Keywords and comma-separated Tags. > Next, select a cover image for the audiobook.
NOTE: Keywords and Tags should be relevant to the content of the audiobook you’re going to create.
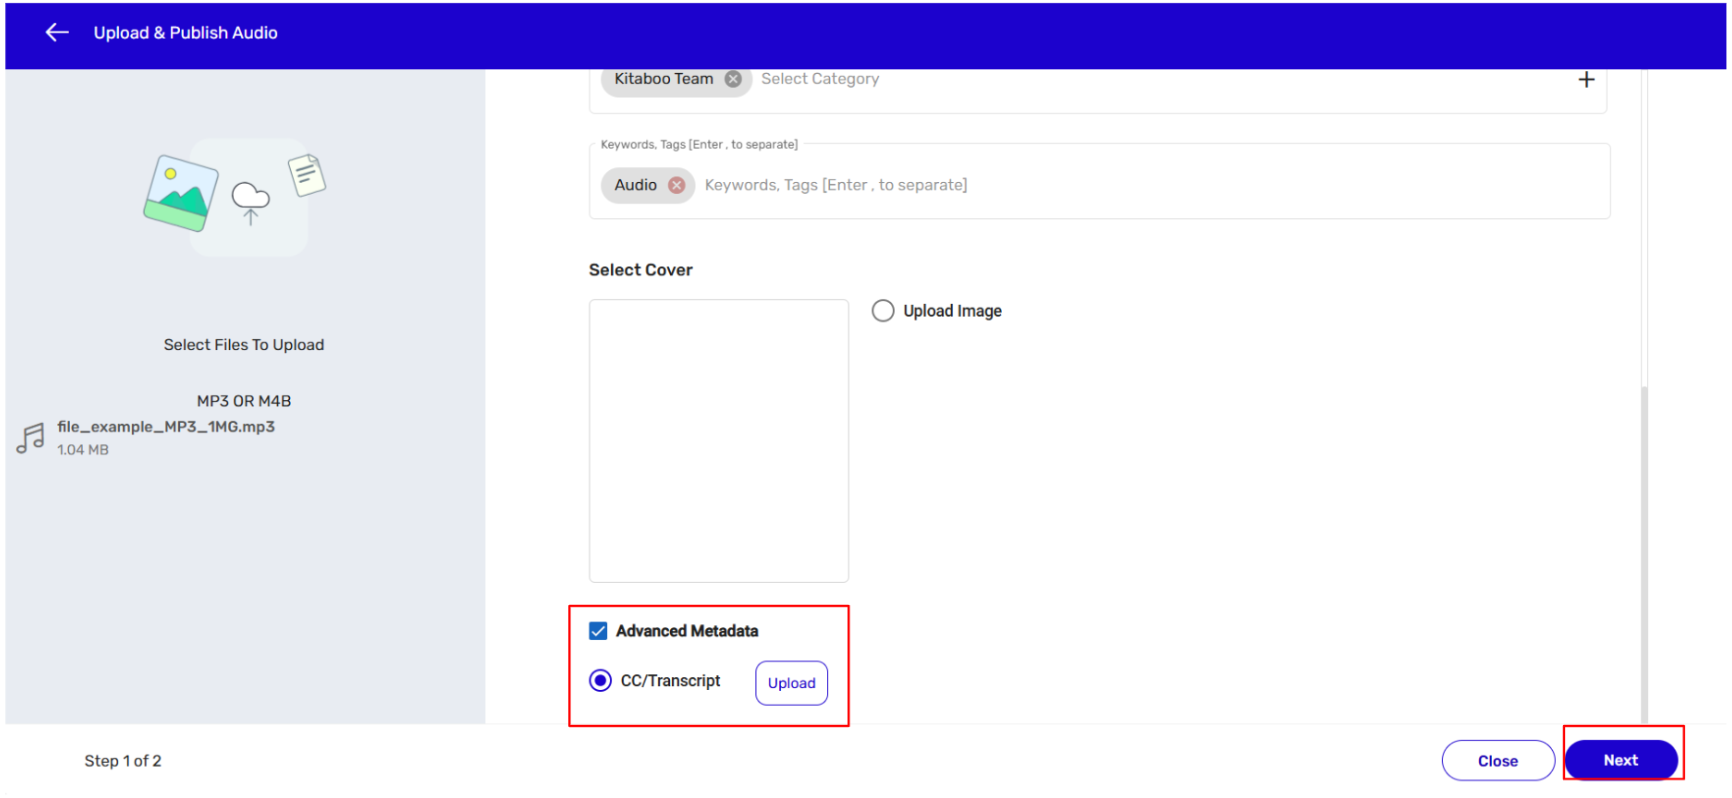
- Scroll down further and check the Advance Metadata checkbox. > Select the CC/Transcript (Beta)
button and upload the Close Caption (CC) or the transcript file of the audiobook you want to create. > Upload a relevant file for the to-be-created audiobook. > Click on the Next button. The file you want to upload for the audio book creation should be in the mp3, M4B format only. You can also drag and drop or paste a relevant file.
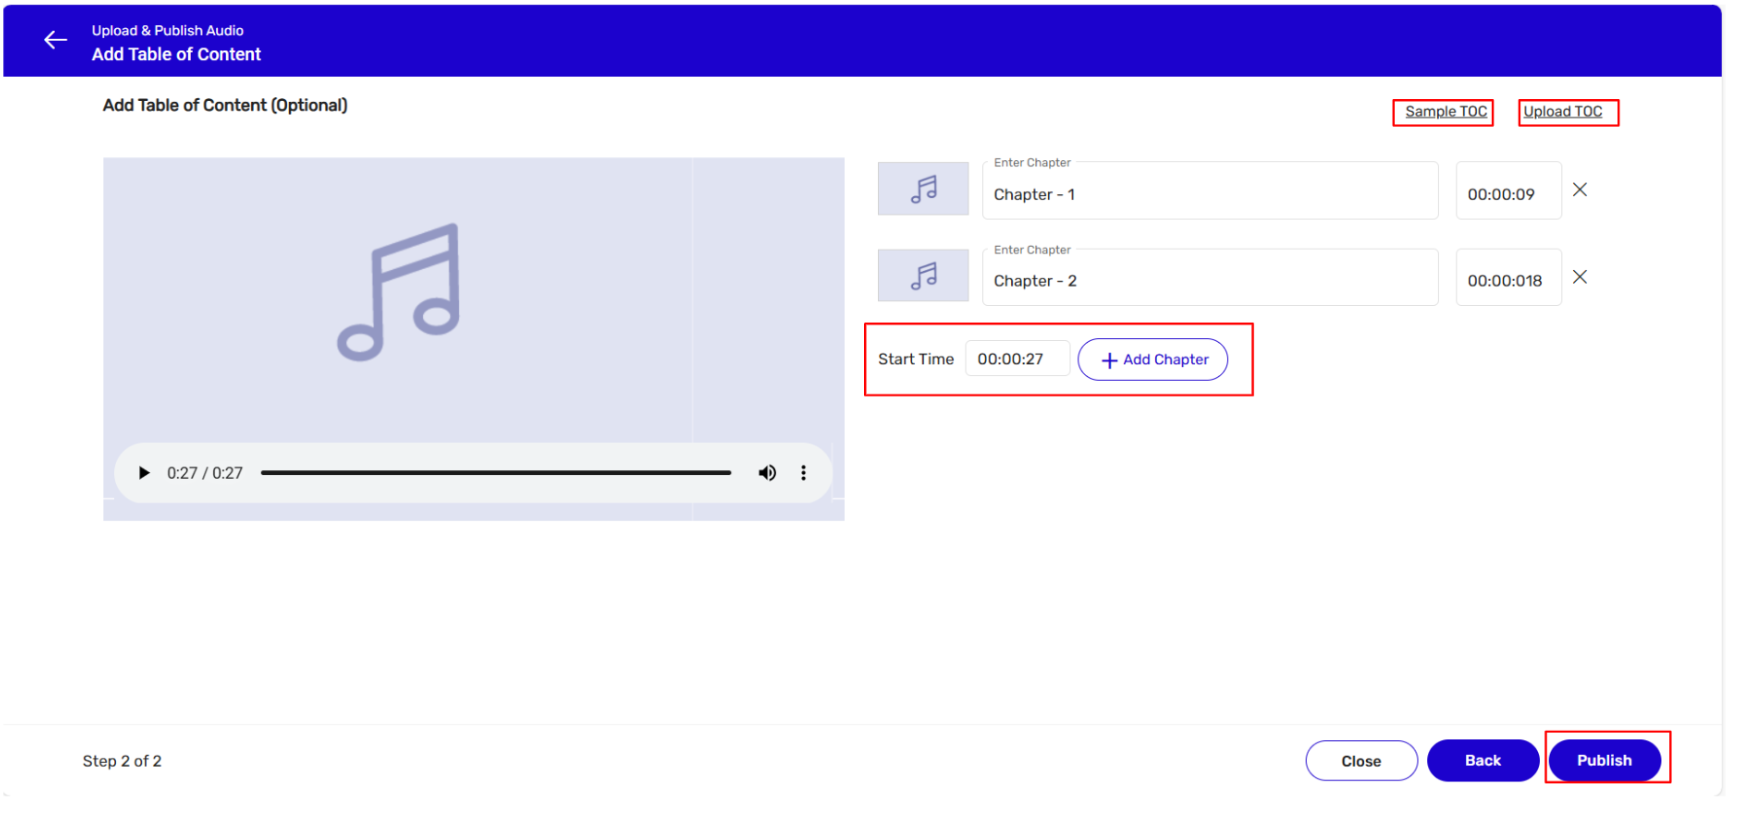
- You can add TOC manually or you can use the upload TOC icon to add TOC in bulk. Adding to the point you can also download the sample TOC file.
NOTE:
● If you want to add chapter names to the TOC, you can find the start time of each chapter and its name by dragging the slider of the audio book on the left panel.
● Based on the content of the audio book, keep on adding the chapter names.
● If the file is in M4B format, the TOC will generate automatically by clicking on Auto Generate TOC. Once an audio book has been successfully created, you can issue licenses and distribute the book.
Specification:
• The Audio files to be ingested should be in MP3, M4B format only.
• Recommended Bit Rate is 64 – 256 kbps
• Maximum Audio size – 1.5 GB
• Maximum Audio Length – 6hrs