Popular
- Manage License (Add on)
- Bulk Revoke
- Generating Access Code
- Direct Distribution (Add On)
- Creating Single User or Multiple Users (Bulk Upload)
- Admin Center and Profile and Settings
- Revoking Content
- Distributing Content
- Signing in to Kitaboo
- Promote User/Transfer
- Create Class/Update Class
- Selective Oneroster Sync with API/ZIP/SFTP
- Analytics Dashboard and Reports Overview
- How Kitaboo Reader – Text-to-Speech (TTS) Works
- Activated User – Definition & Billing Policy
- What is Sequential Learning and How to Enable It? (Add On)
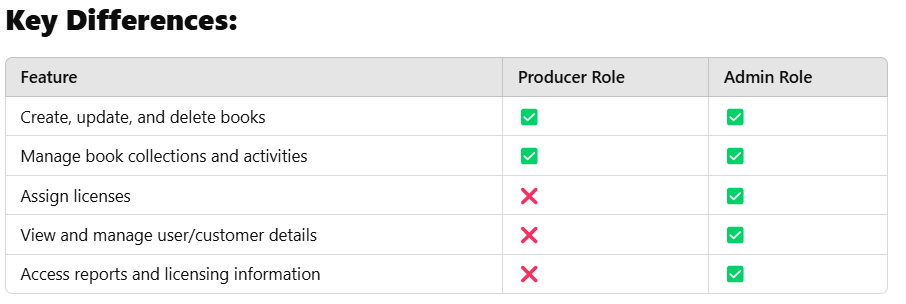
- Understanding User Roles: Producer vs. Admin
- How to Add External LTI Link (Add-On)
- Auto Book Deletion Process
- Adding group with SAML
- Syncing Data with Clever
- Selective Oneroster Sync with API/ZIP/SFTP
- Syncing Data with PowerSchool
- Syncing Data with OneRoster
- Adding a Group
- Searching a Customer
- Issuing Licenses
- Editing a Customer
- Deactivating a Customer
- Adding a Google Classroom Customer
- Adding a OneRoster Customer
- Adding One roster 1.2
- Adding a LTI 1.3 Customer with OneRoster
- Adding a LTI 1.3 Customer
- Adding an LTI 1.1 Customer with OneRoster
- Adding LTI 1.1 Customers
- Sorting Customer and Group
- Creating a Collection
- Enable K-AI at the content level
- Content Lifecycle Stages in Kitaboo for eBooks
- Creating a Fixed-layout Kitaboo eBooks
- Creating Fixed-layout ePub 3.0
- Upload 3rd Party ePub 2.0/3.0
- Creating a Course or Uploading Scorm
- Activity or Gradable Activity Creation
- Authoring an ePub
- Creating a Video Book
- Creating an Audio Book
- Updating the Cover Image
- Editing a Fixed eBook
- Deleting and Deactivating Content
- Users Tab
- How to Edit and Delete a Category
- Clever Integration
- Classlink Integration
- Canvas LTI Integration
- Admin Center
- Analytics Tab
- Adding a Customer
- Creating Admin Accounts
“The portal enables you to manage licenses efficiently, allowing you to add or remove licenses from the pending licenses list as needed.”
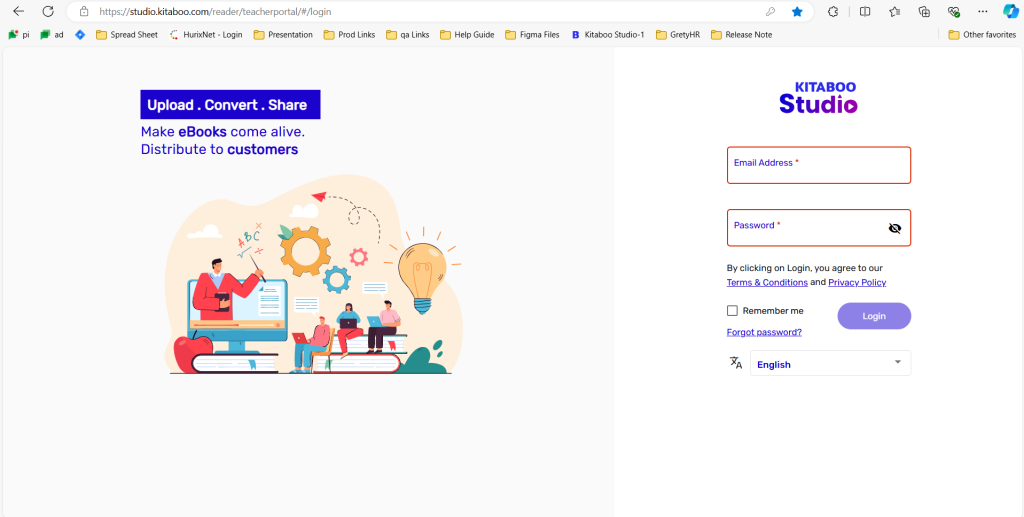
- Sign in with your Customer Admin credentials.
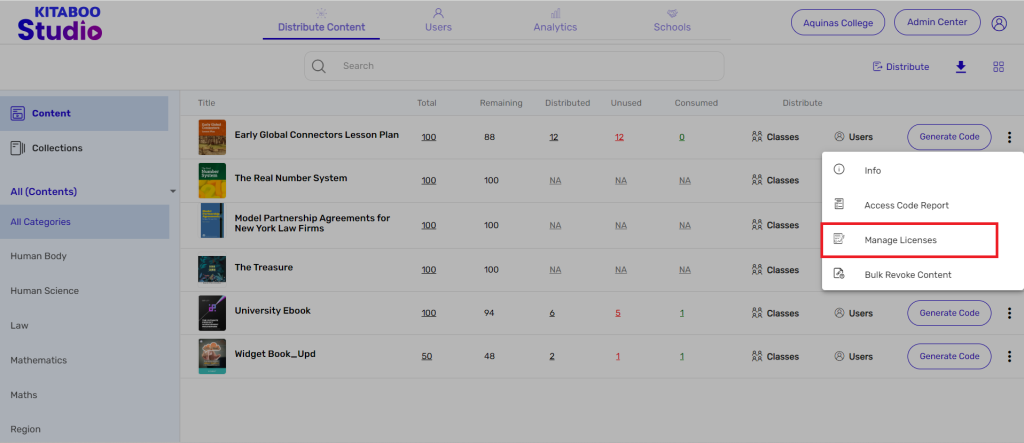
- In the “Distribute Content” tab, click on the “More Options” menu next to the title for which you want to manage licenses, and select “Manage Licenses.”
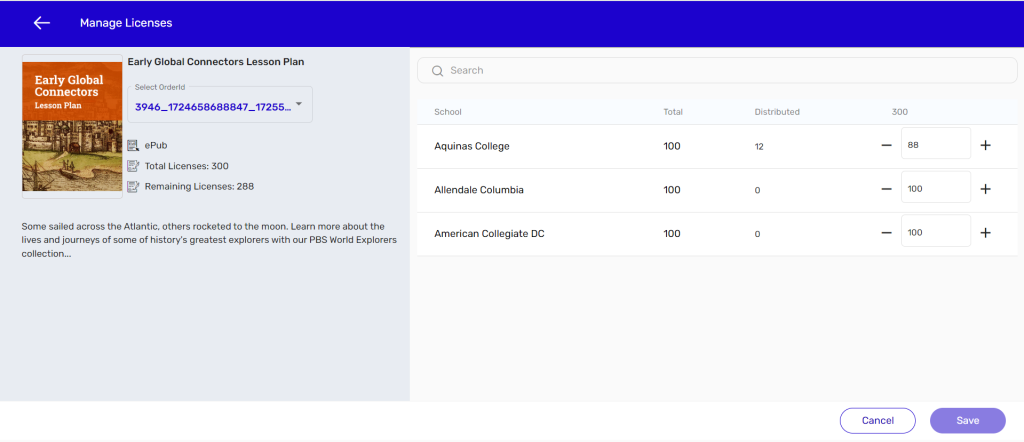
- Here, you will see the list of school names along with the total licenses issued and the number of licenses distributed. Additionally, the remaining license count is displayed, allowing you to easily manage the licenses as needed > Click on Save.
The portal empowers you to revoke the access of content for all users or all classes or all students or all teachers in one-go. Once done, the user or the class will no longer be able to access the content on the Reader.
- Sign in with your Customer Admin credentials.
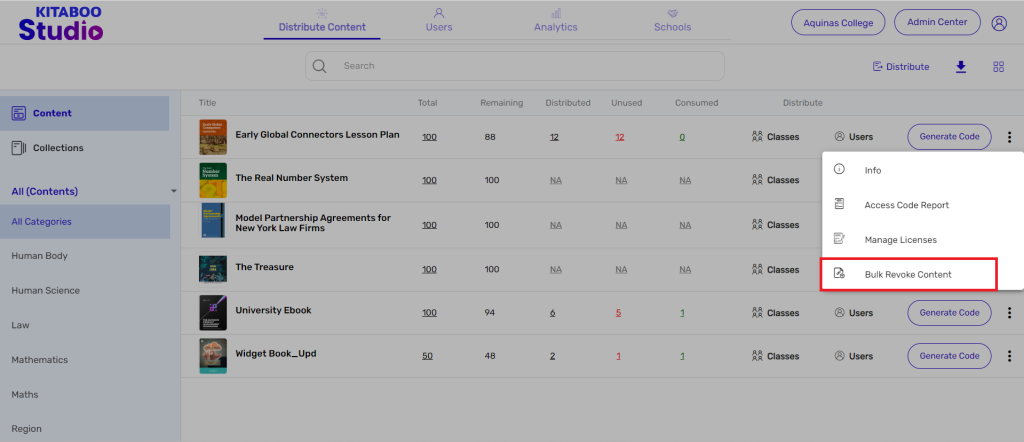
- On the Distribute Content tab, click on more options against the title you want to revoke and select Bulk Revoke.
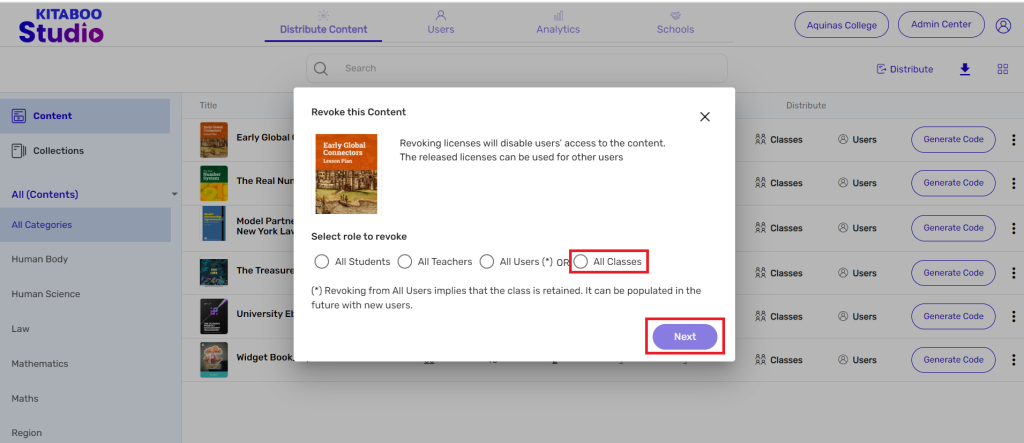
- Select the role for whom you want to revoke content e.g. all users or all classes or all students or all teachers > Click on Next.
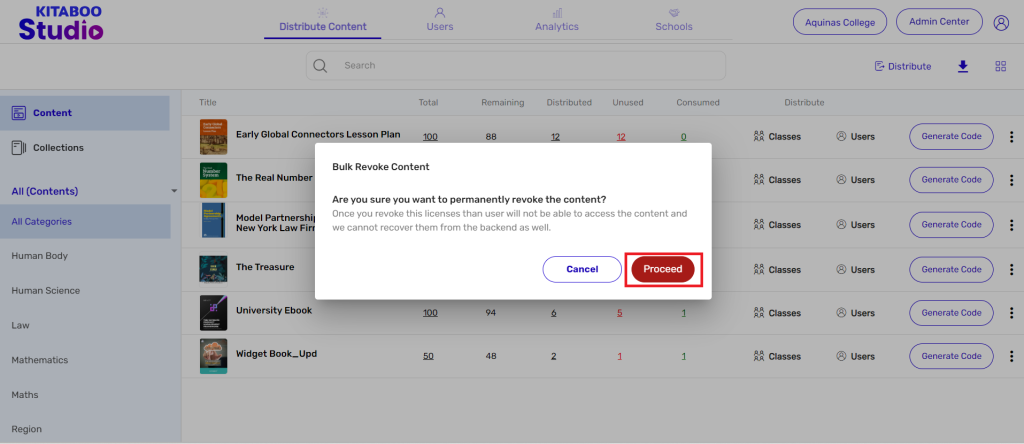
- Click on Proceed to confirm.
At times users may not be interested in being routed through the school and class network for accessing Kitaboo’s digital content. They prefer to have direct access to the content. Kitaboo has a solution for such users as well. Kitaboo allows such users to log in the portal by using a system-generated access code.
Let’s see how it happens.
- Sign in with your Customer Admin credentials.

Go to the Distribute Content tab > Select the content a user wants to access. > Click on Generate Code.
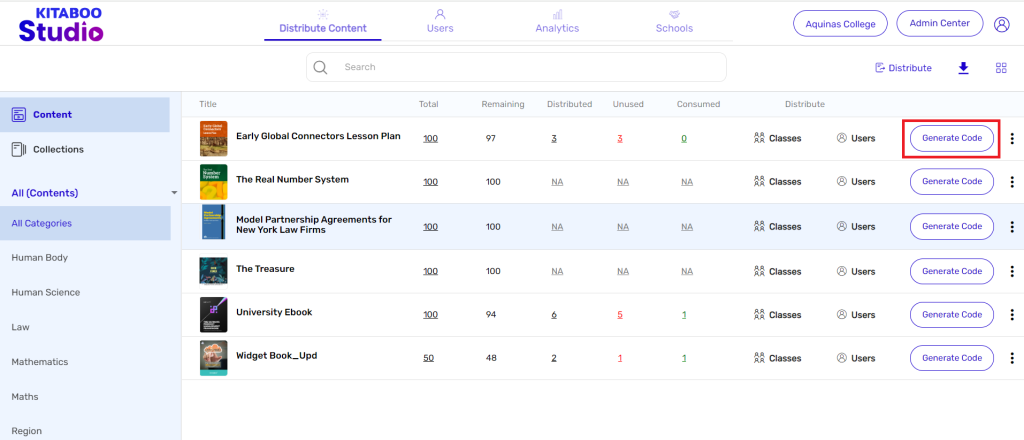
- Click on Access Code.
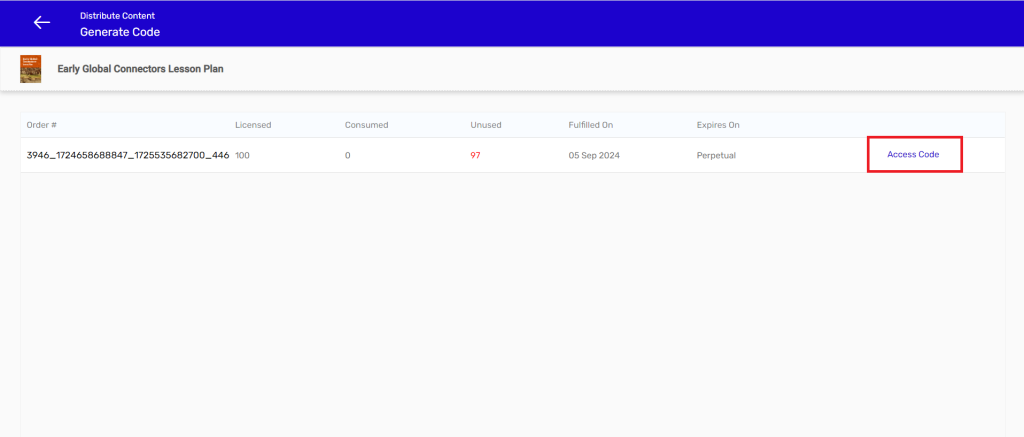
- Select the Access Code type boxes. > Enter the number of codes to be generated. > Click on Generate.
NOTE:
● Unique Access Codes can be utilized by individual users only once.
● Common Access Code provides a single access code that can be utilized by individual users multiple times as per the license limit.
● Class Access Codes are redeemed by a student-type user and an instructor-type user. When these access codes are redeemed, the users automatically become part of a single group or a class.
● Once you select the Class Access Code checkbox the Class Name field and the Data-sharing options will appear. You should provide the required information before clicking on Generate.
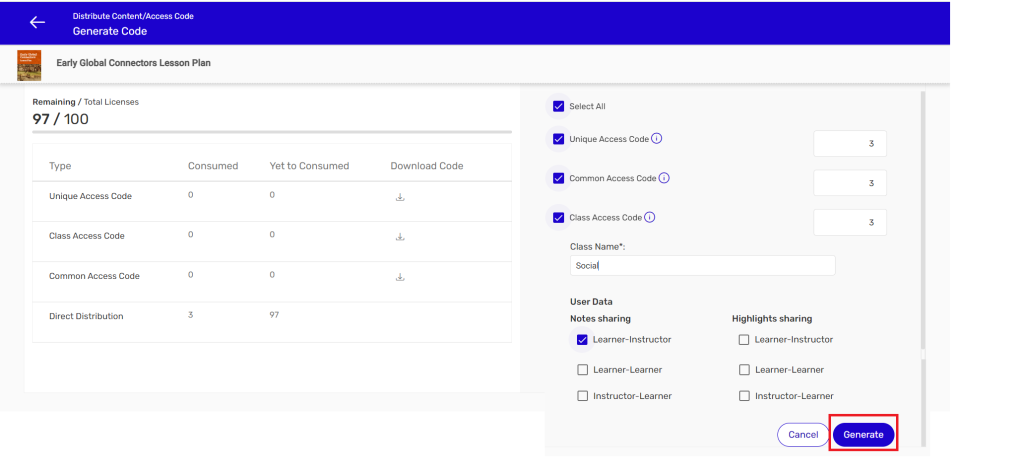
- Download each type of Access Code sheet.
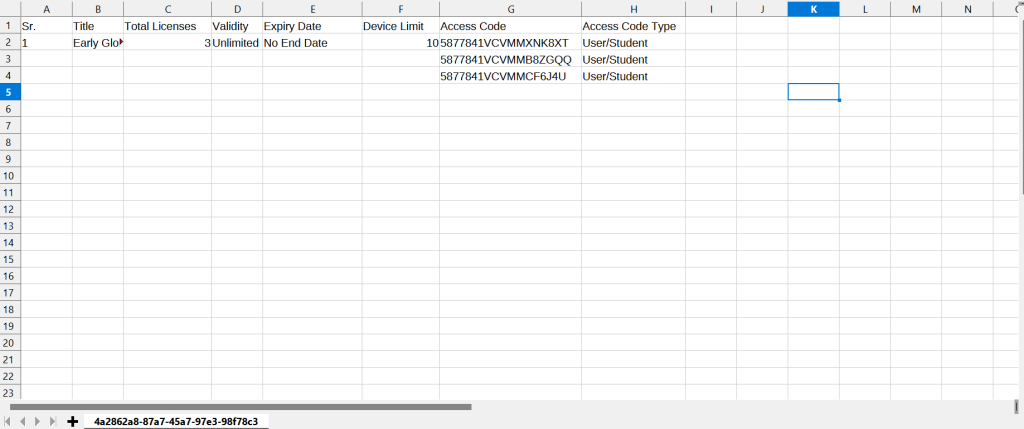
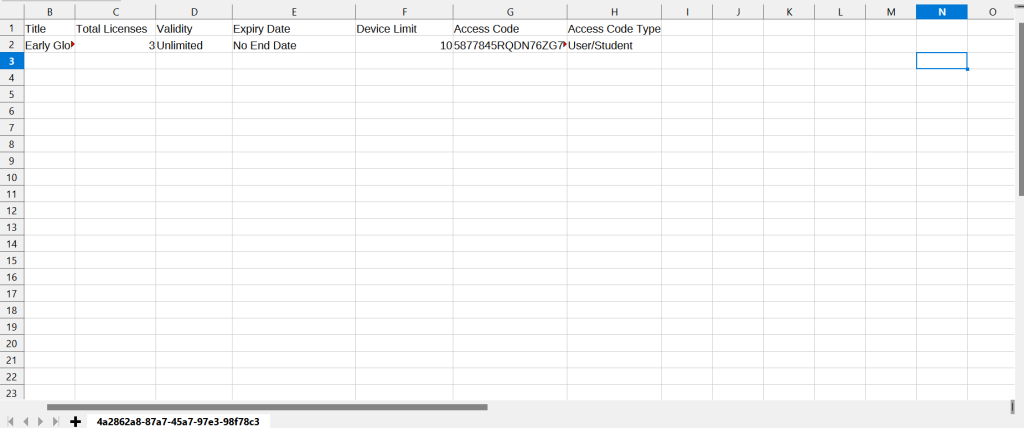
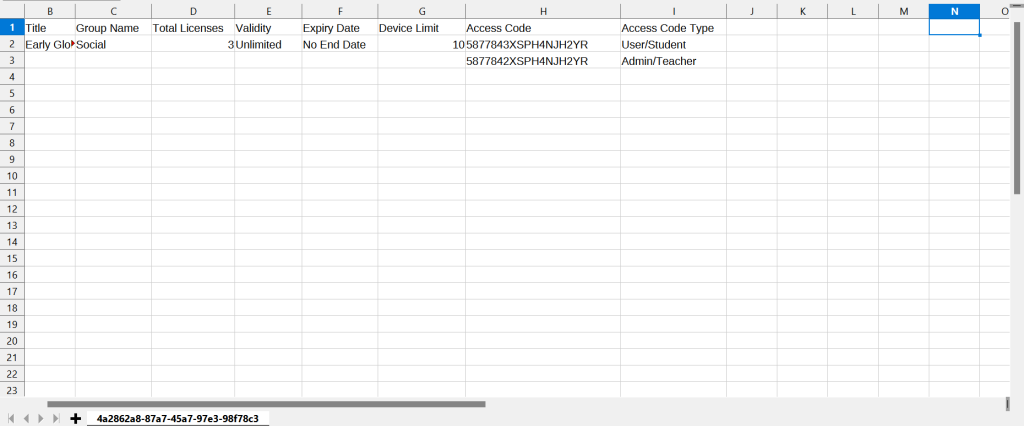
NOTE: Access codes get generated in Excel sheets. The number of sheets depends upon the number of access code types you select for generating codes.
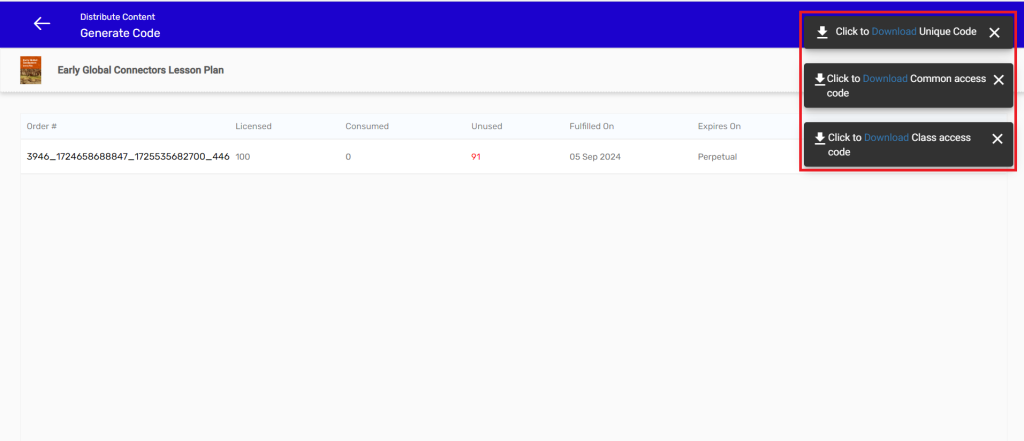
1. Access Code sheet: Unique Access Code
2. Access Code sheet: Common Access Code
3. Access Code sheet: Class Access Code
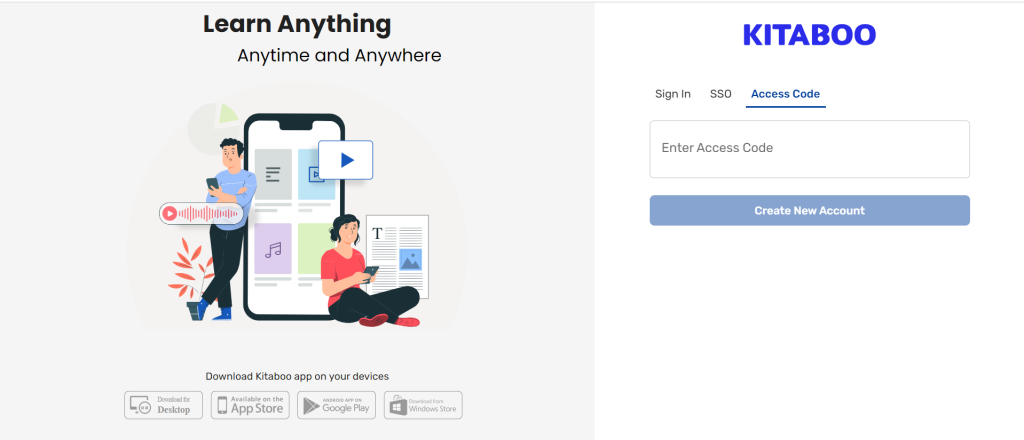
- Sign in to the Kitaboo Reader portal for redeeming the access codes > Go to the Access Code tab > Copy the required access codes from the excel sheet > Enter the Access Code and click on Send.
The Kitaboo system allows you to directly distribute content using the user’s email address. The system will automatically create the user and distribute the selected content to the provided email, while also sending a notification email confirming the successful content distribution.
- Sign in with your Customer Admin credentials.

- On the Dashboard, Click on Distribute.
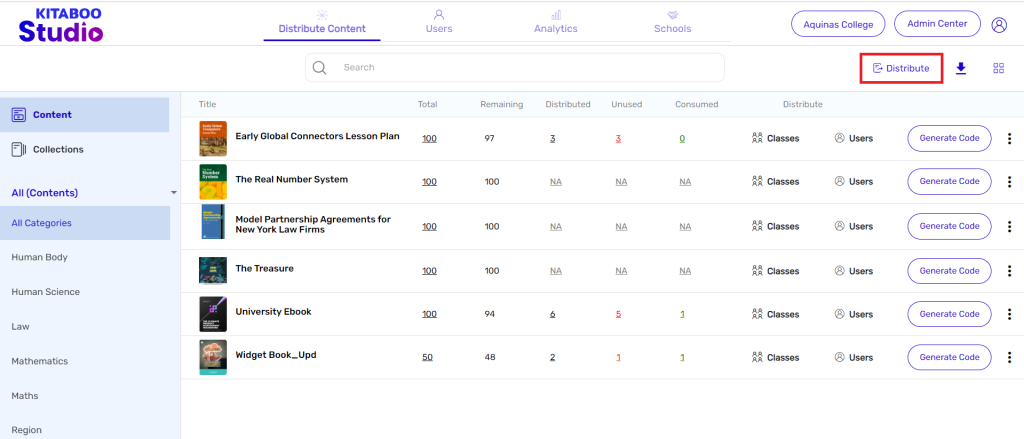
- Please select the content/collection you wish to distribute. Now, click on “Share via email” once you have selected the desired content.
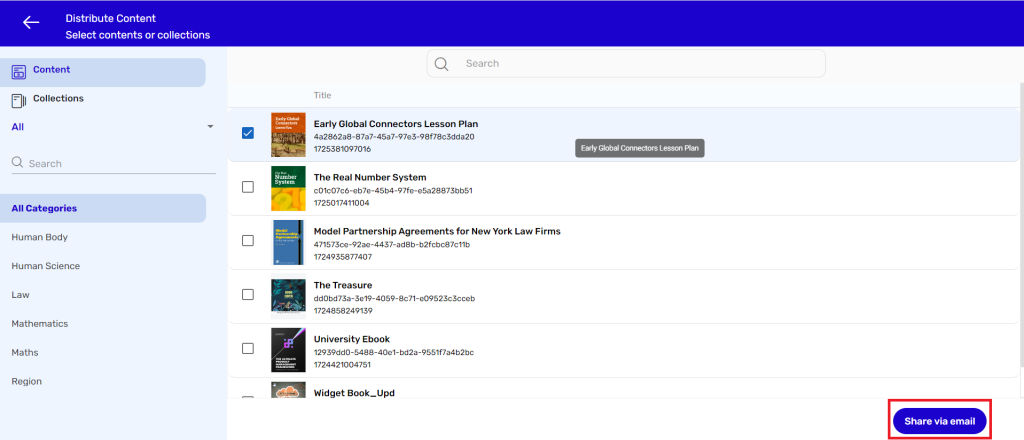
- Select the order number from which you want to share the selected content with the user.
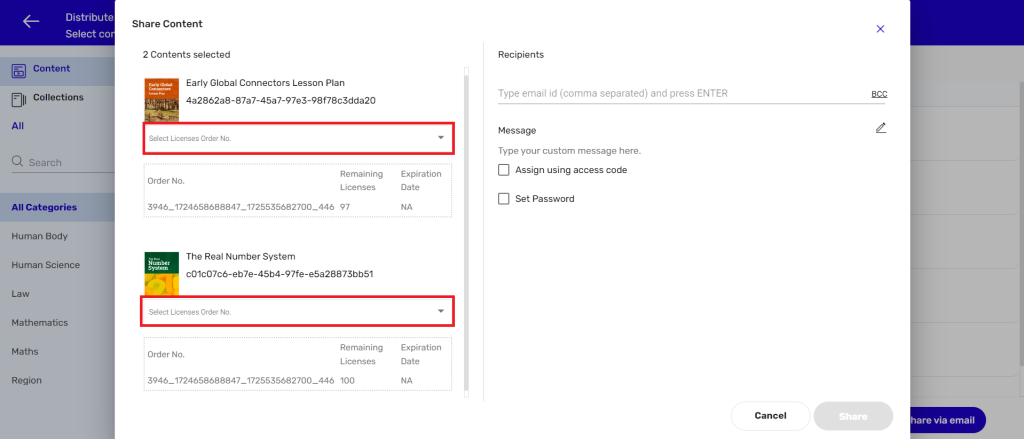
- Enter the “email address” of the users to whom you wish to distribute content. You also have the option to “Add BCC and a custom message to the email notification.
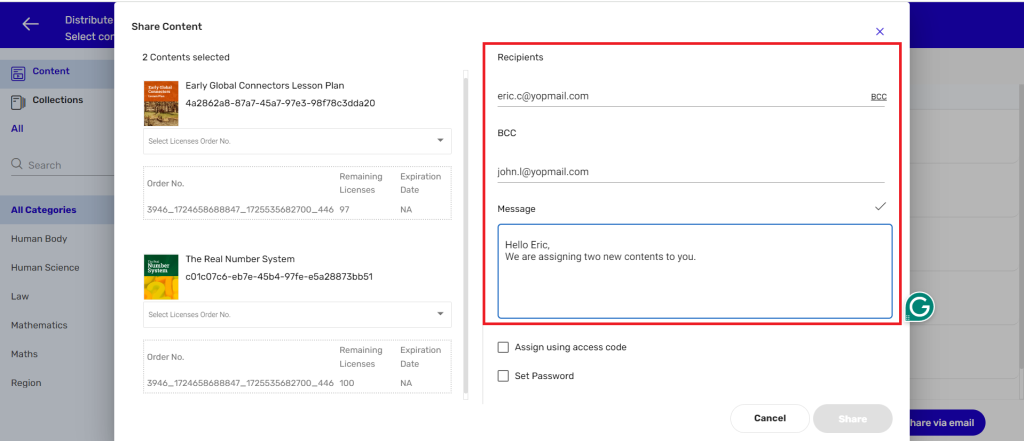
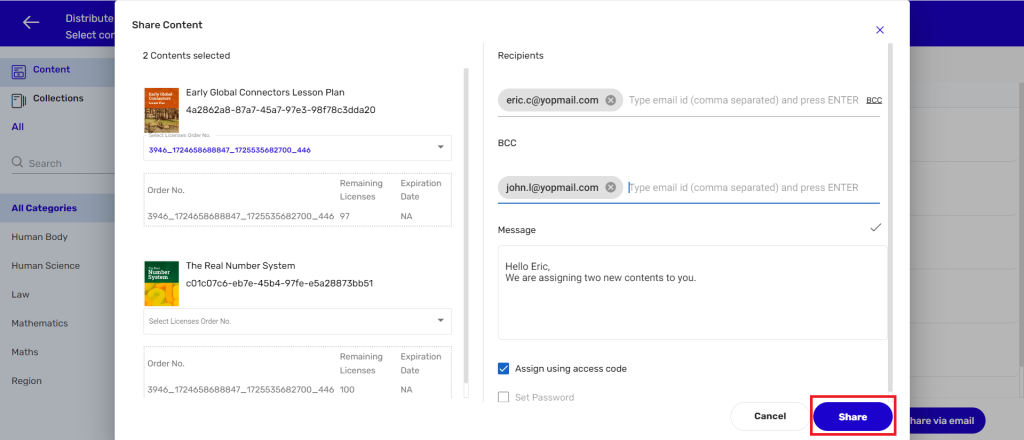
- After successfully adding the user’s emails, you can now “Set password”, and “share an access code” for the content.
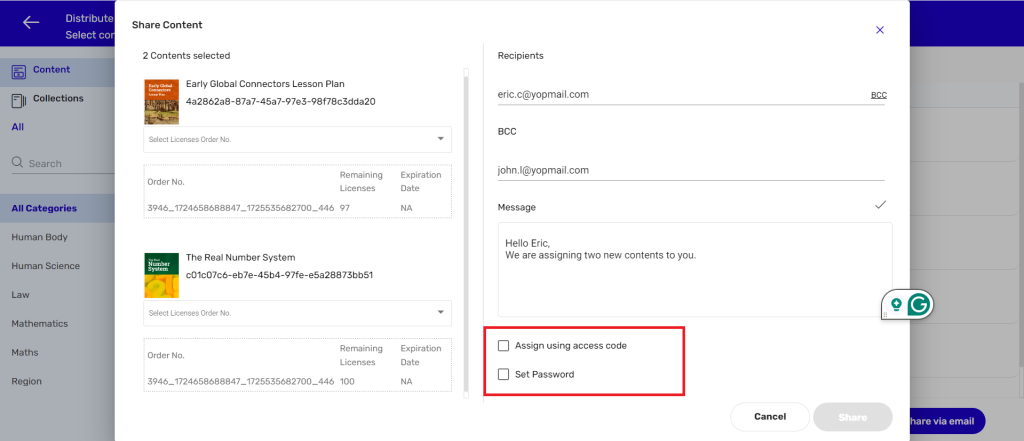
- After filling in all the required fields, you can now click on “Share”.
Note:
1.Users will receive an email notification once the content has been successfully distributed.
2. This feature will only work for the customer/partner from which you have logged in . If we attempt to add a user from a different partner, an error message will be displayed: “User exists in another partner
3. This feature by default will not be available. It is an add-on feature, kindly connect with the respective CSM to know the process for enabling the feature.
1. Adding Single User –
As an enterprise you have already added your group by using your Enterprise Admin credentials. Now, it is high time that your group on their part distributes content to the end users – teachers, students, or to your corporate employees. So first your group needs to add users to the database.
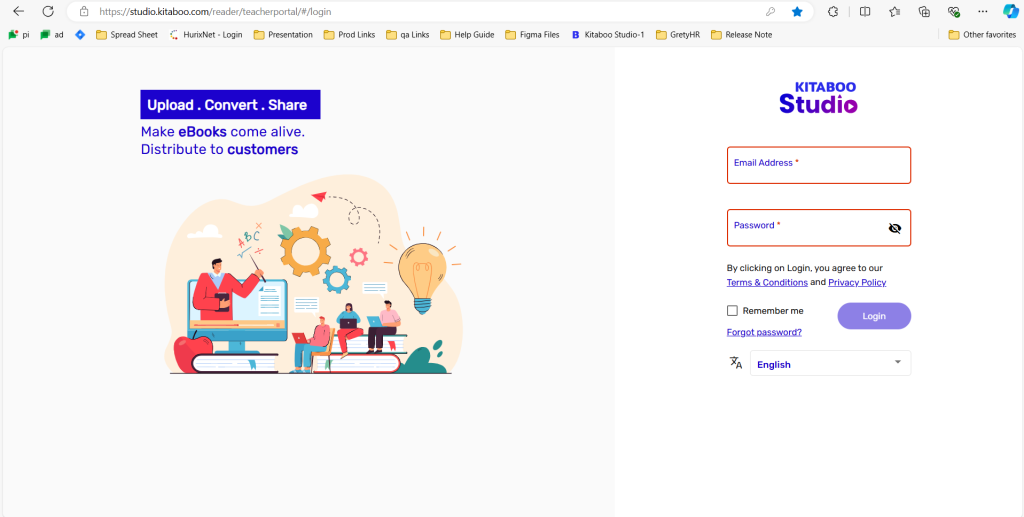
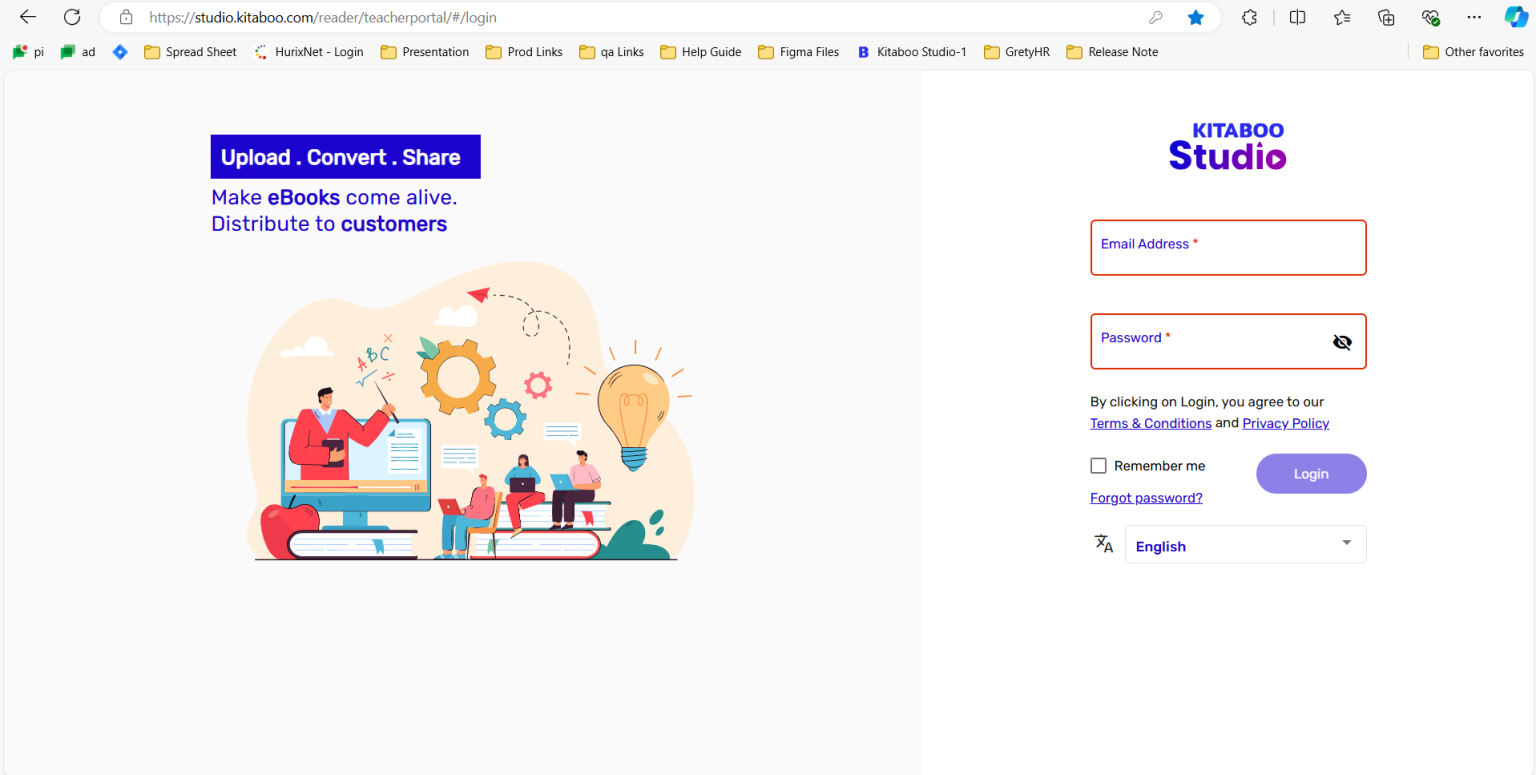
1. Navigate to the Kitaboo Studio
Reader login page. > Enter your Group Admin credentials.
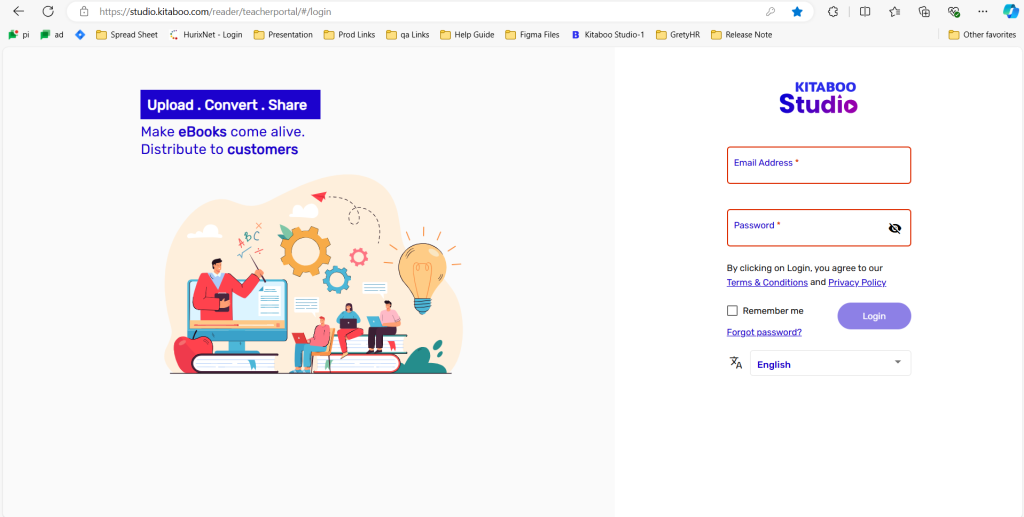
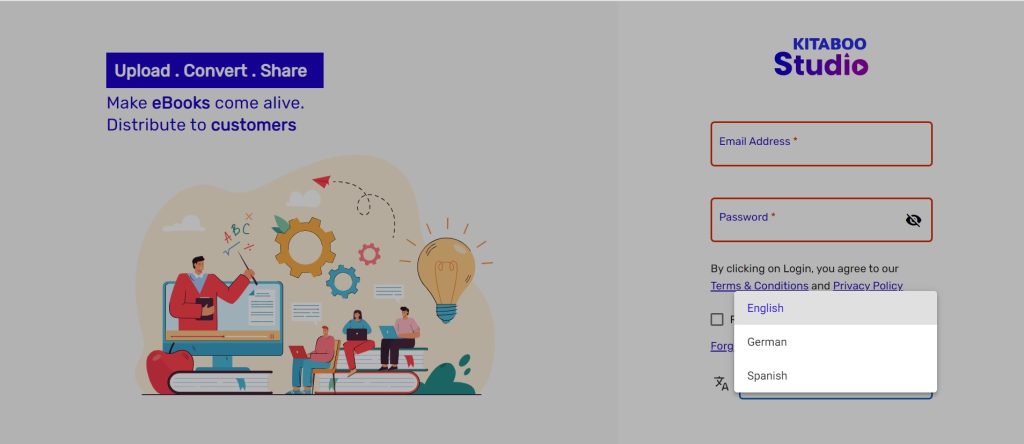
2. Select your preferred language. > Click on Login.
NOTE: English is the default login language.
3. Switch to the Users tab. > Click on Add User.
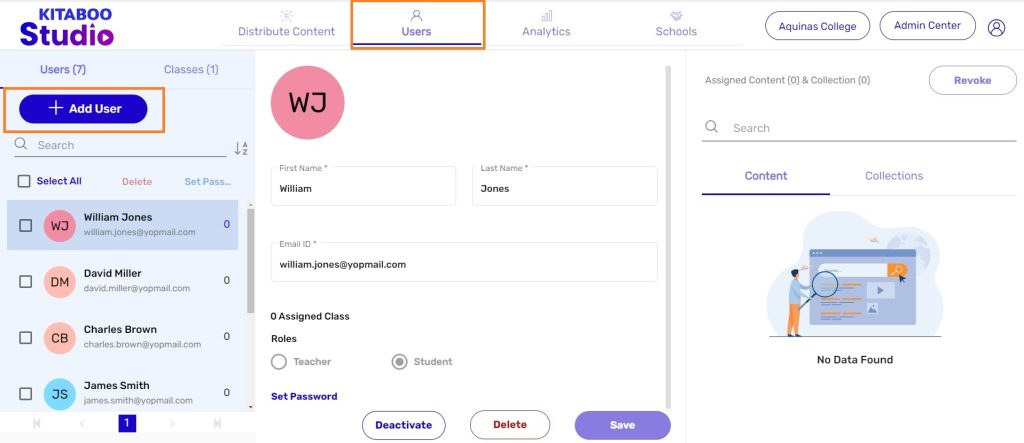
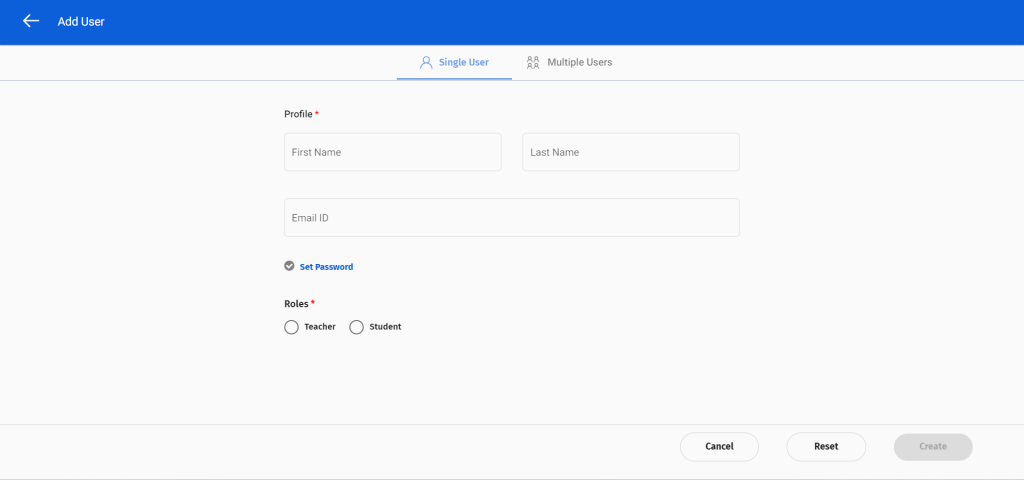
4. Enter the User’s profile details > Define Role (Teacher or Student) >
Click on Create. > Click on the Set Password link.
NOTE: Multiple users can also be created in one go by using a sample sheet.
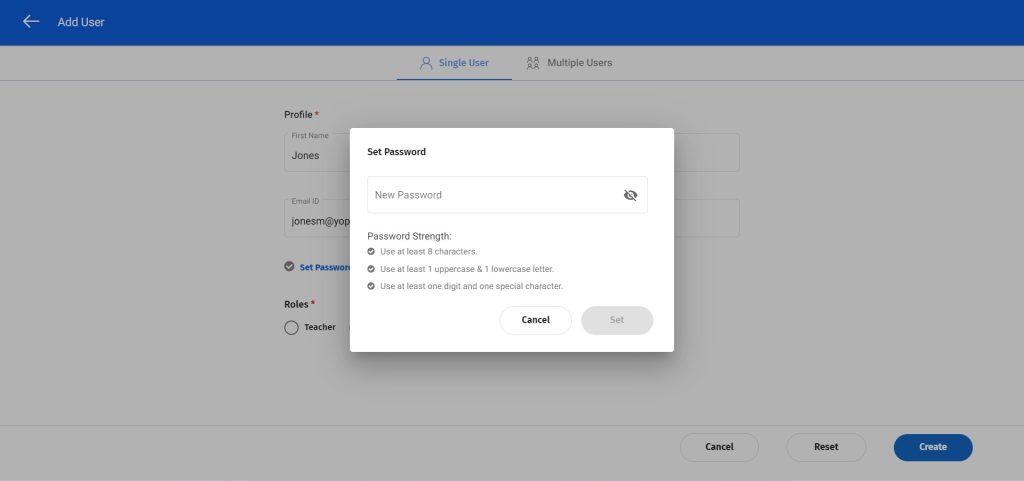
5. On the Set Password pop-up, enter a new password as per the
prescribed format for a password. > click on the Set button. > Click on Save.
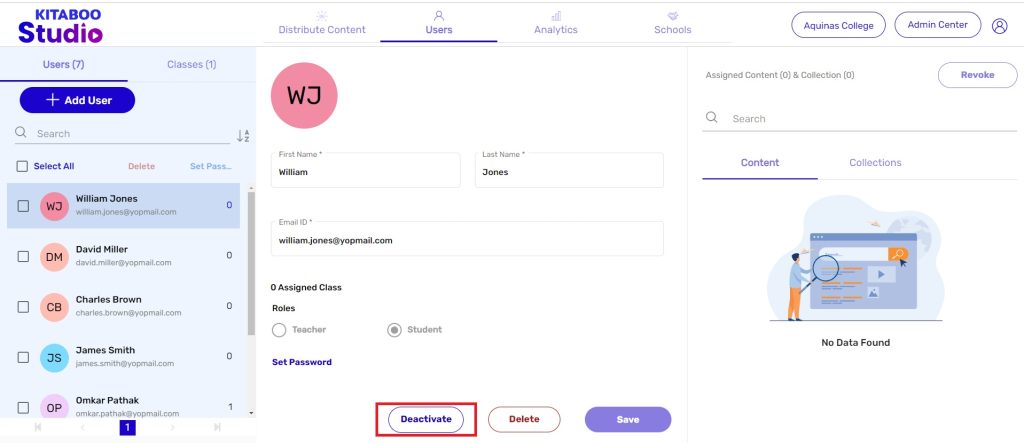
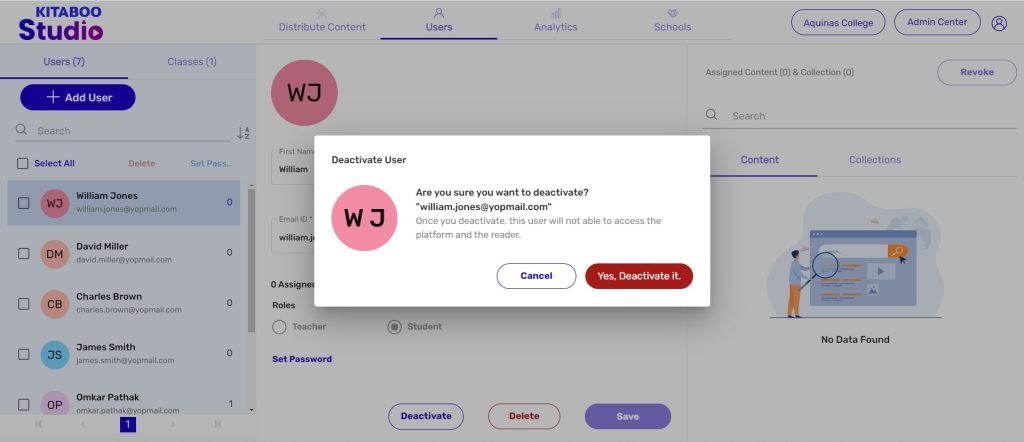
6. You can also deactivate a user. For deactivating a user:
Select the user, on the left pane, you want to deactivate. > Click on the Deactivate button.
7. Click on Yes, Deactivate it on the pop-up.
Once confirmed for deactivation, the deactivated user will NOT be able to access the reader.
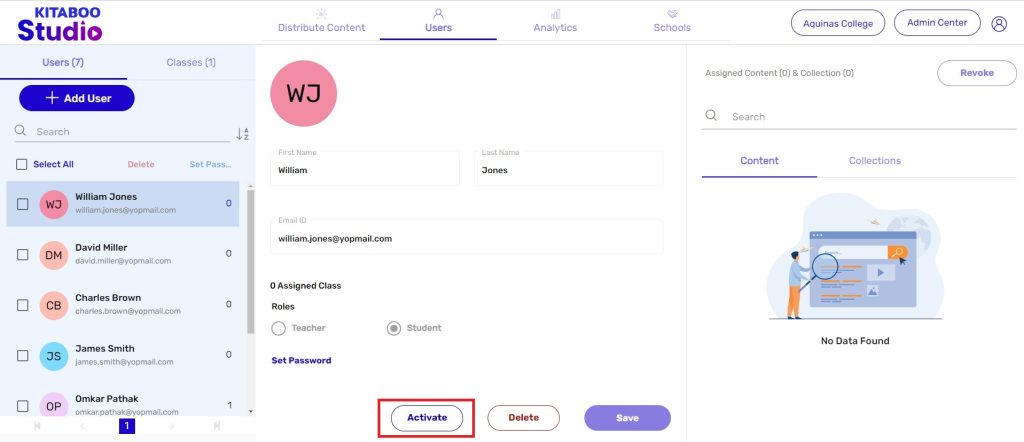
8. You can also reactivate a deactivated user. For this:
Select the user you want to reactivate. > Click on Activate.
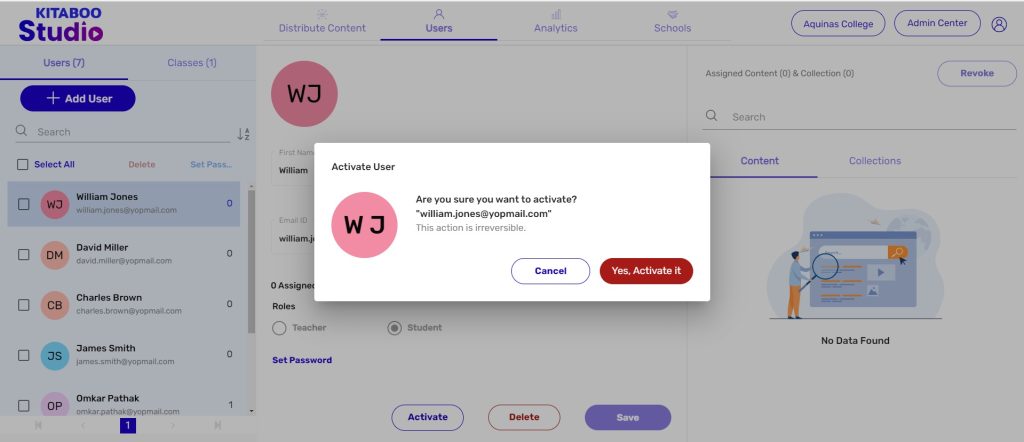
9. Click on Yes, Activate it to confirm.
2. Creating Bulk Users via Bulk Upload sheet
Kitaboo Studio also enables you to create bulk users for a class. Let’s see how to do it.
- Sign in with your Customer/Partner Admin credentials.
- Switch to the User tab. > Click on the + Add User button.
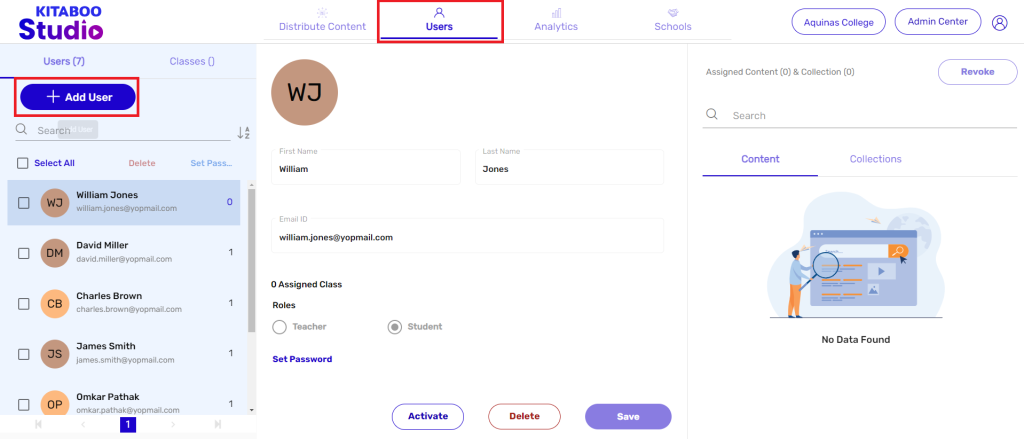
- On the Multiple Users tab, click on the Download Sample link. > Save the Excel sheet on your local machine. You need to enter the users’ details as per the format in the sheet.
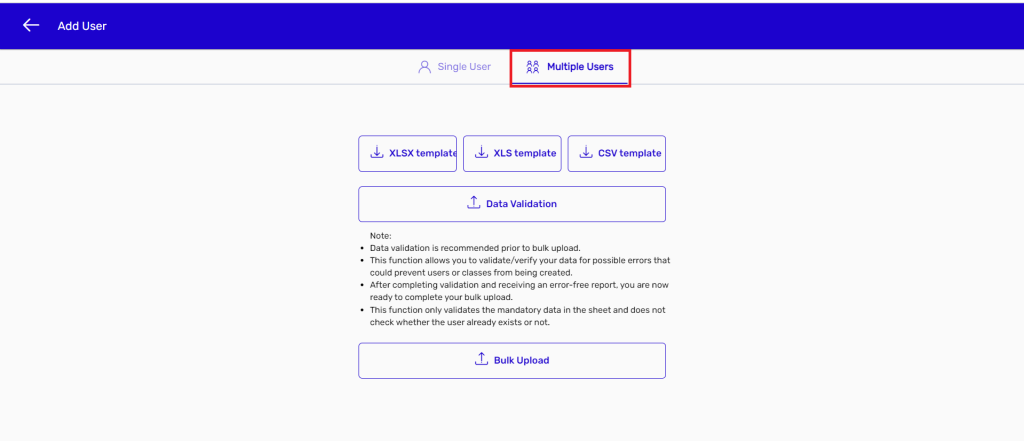
There are two tabs on the sample Excel sheet (download the sample file) – Bulk Upload and Instructions. You need to enter the details of the users on the Bulk Upload page. It is advisable to read through the instructions on the Instructions page before adding the users’ details. A recap of the
I) Special characters should not be used in contact numbers, city names, ZIP codes, and country names.
II) Username is a mandatory field. If you leave it blank, the system will create a username based on the given email ID. For example, for the email ID john.ked@gmail.com, the system will be creating a username as john.ked@gmail.com.
IV) You must ensure that all the mandatory fields are filled in before uploading the Bulk Upload Excel sheet.
V) You should refer to the Bulk Upload sheet for example, clarification, or reference.
VI) You should not edit the column header and order on the Bulk Upload sheet.
- Enter the new users’ details in the respective columns as per the format only. > Save the changes you have made.
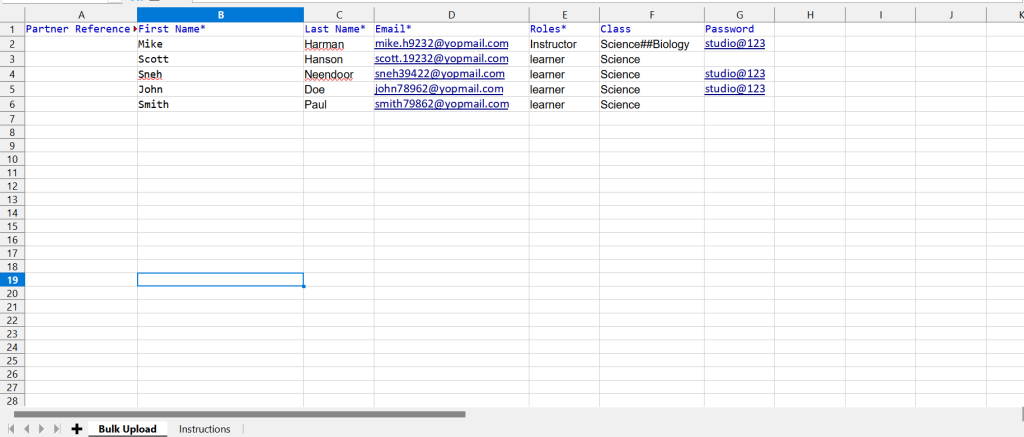
- Click on Data Validation on the Multiple Users page. > Upload the updated Sample sheet.
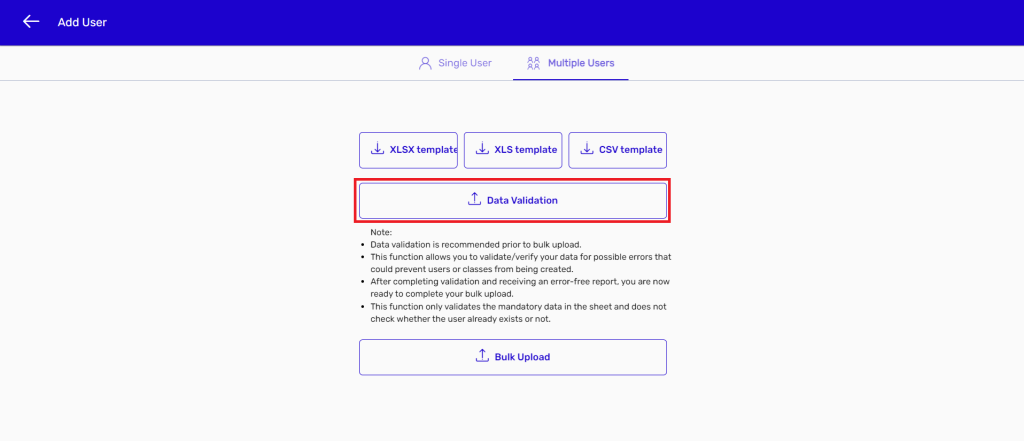
Note: Data validation is recommended before bulk upload. This function allows you to validate/verify your data for possible errors that could prevent users or classes from being created. After completing validation and receiving an error-free report, you are now ready to complete your bulk upload.
- Click on Upload Sheet on the Multiple Users page. > Upload the updated Bulk Upload sheet.
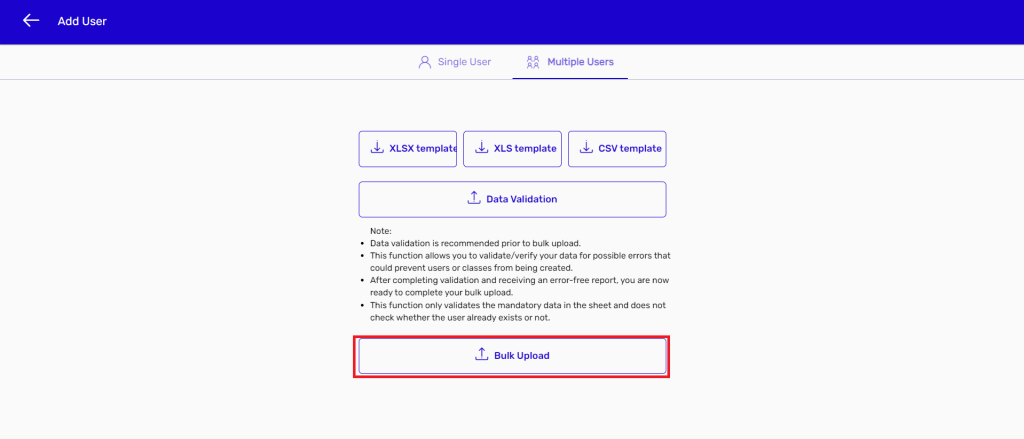
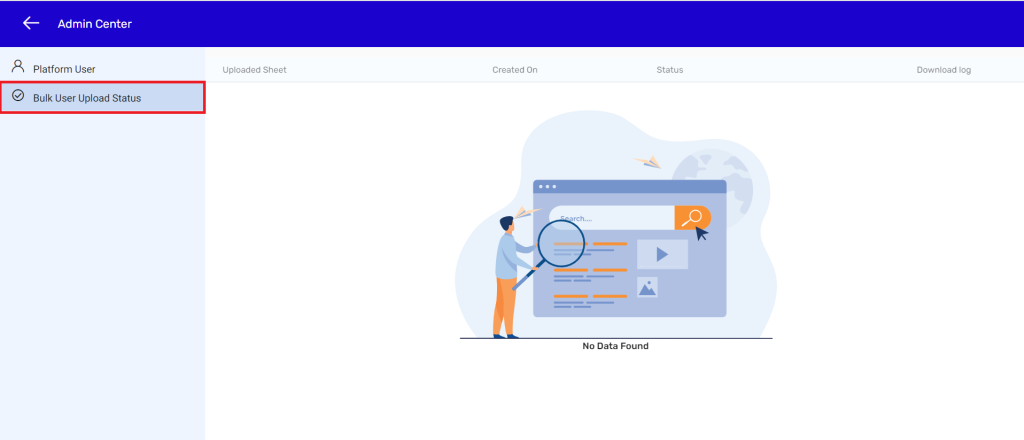
- You will be getting a confirmation message for a successful file upload. You can also download the updated sheet by clicking on Admin Center > Bulk User Upload Status,
Admin Center
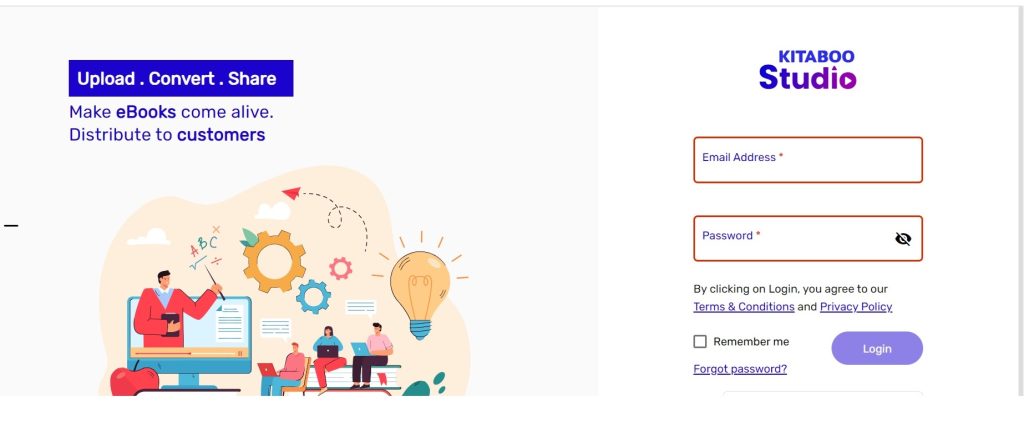
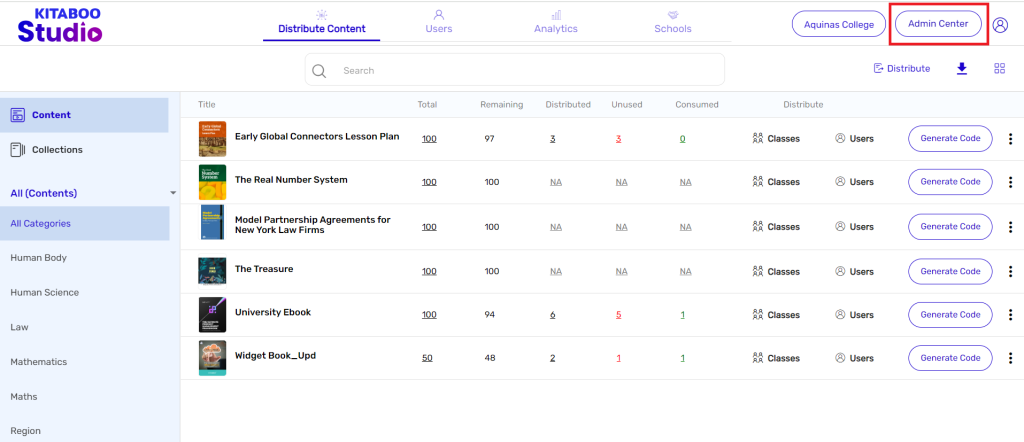
1. Sign in with your Group Admin credentials.
2. The Admin Center button is placed on the top right corner of the screen.
3. The Admin Center page enables the main Group Admin to either edit the profile of an existing group admin user or add a new group admin user (sub-admin).
NOTE: Items like name, email ID, and password editable, except role.
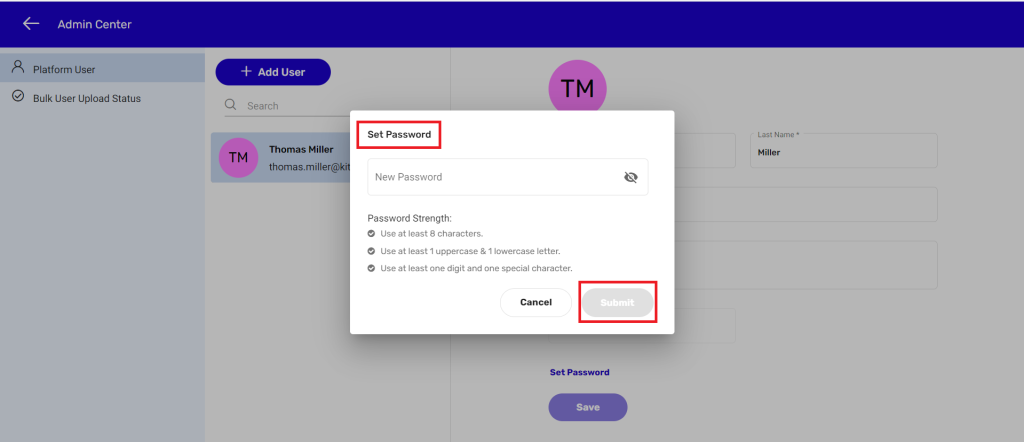
Important: The main group admin can change the password of his/her own account as well as of the other users attached to the group admin account.
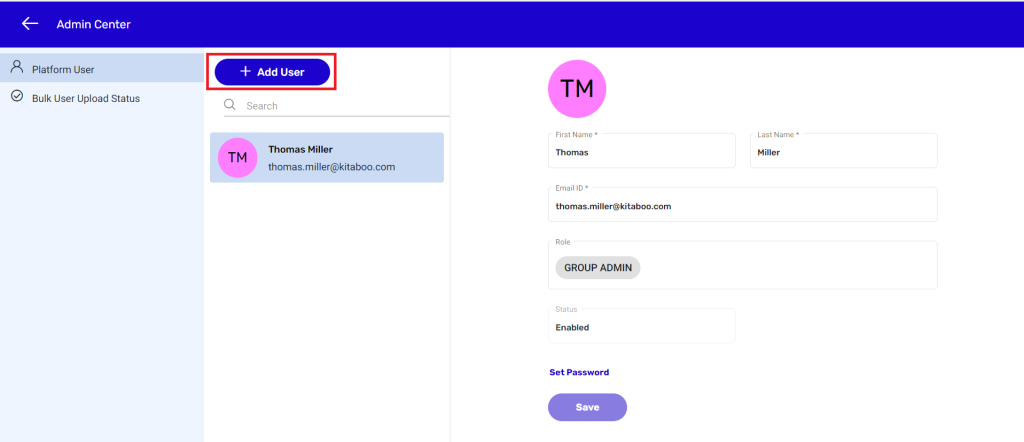
4. To change the password of an existing user:
Click on the Set Password link. > On the Set Password pop-up, enter a new password as per the prescribed format for a password. > click on Save.
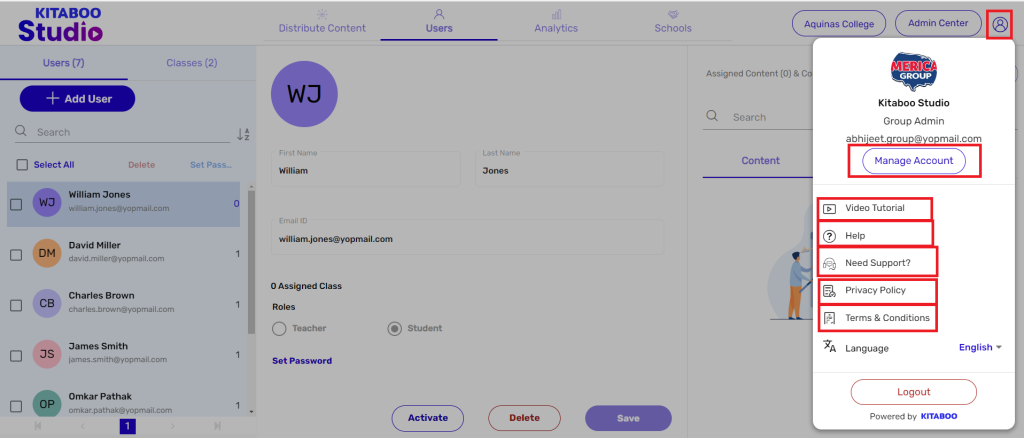
Profile and Settings
1. Sign in with your Group Admin credentials.

2. The Profile and Settings button is placed on the top right corner of the screen.
3. Some of the options available on the Profile and Settings section are:
● Manage Account
● Video Tutorial
● Platform Help Guide
● Privacy Policy
● Terms and Conditions
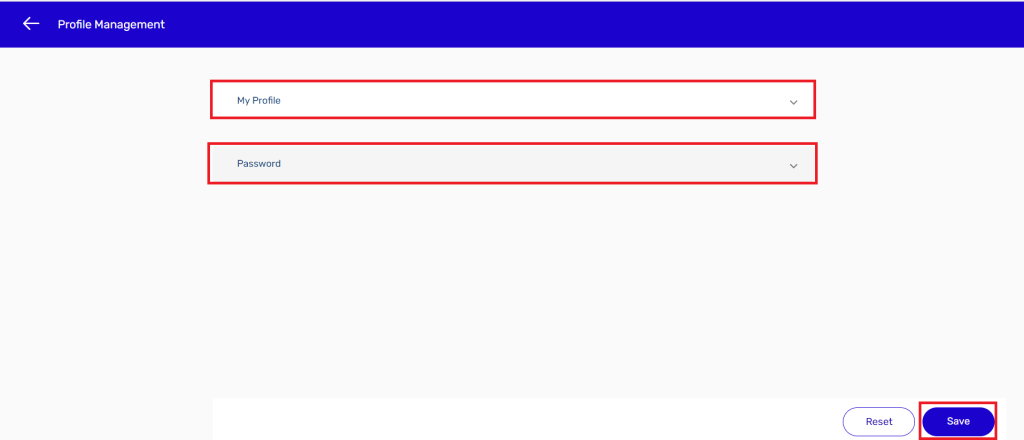
4. The Manage Account link enables a group admin to edit the profile and password of his/her own account.
NOTE: A group admin cannot edit the password of others’ accounts from the Profile and Settings section. It can only be done through the Admin Center Section.
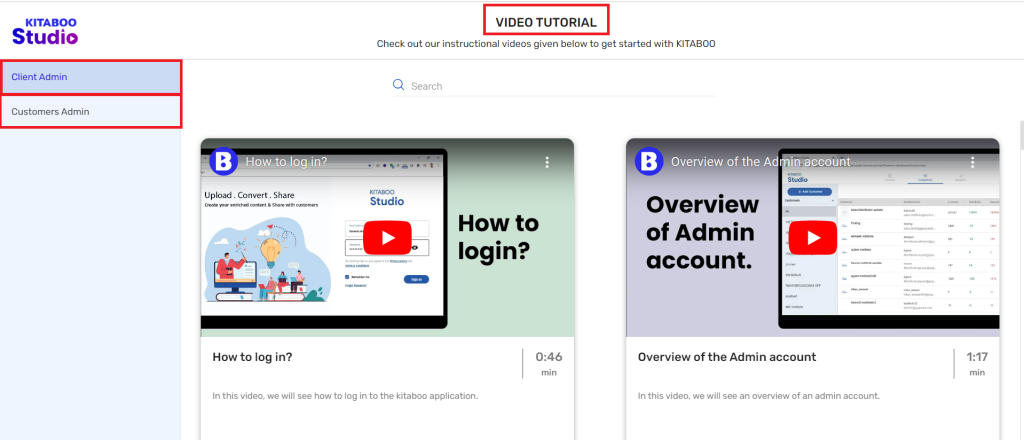
5. The Video Tutorial link lets an group admin access some of the instructional
videos on the Kitaboo platform.
There are two options present under Video Tutorial.
-Client Admin
-Customers Admin
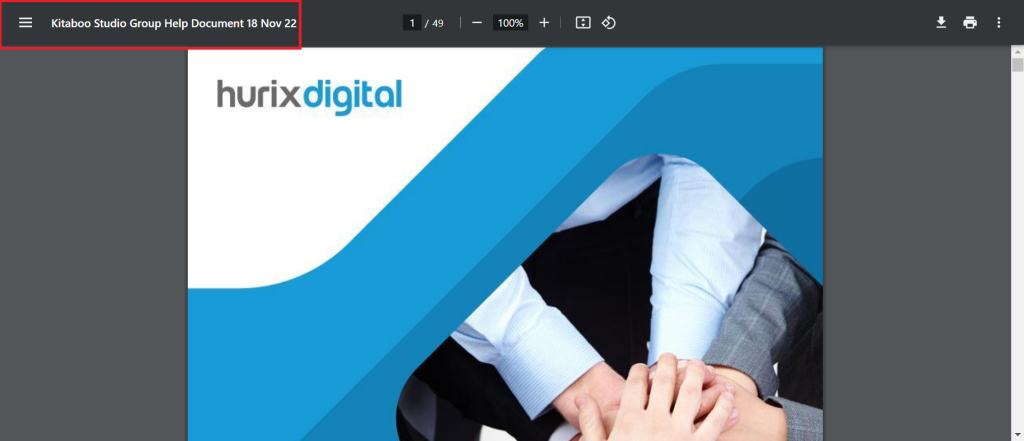
6. The Platform Help Guide link takes you to the Kitaboo Help document.
7. You can get to know the Kitaboo Studio privacy policies and terms and conditions by using the relevant links. You can also log out from the Kitaboo platform by using the Log out button.
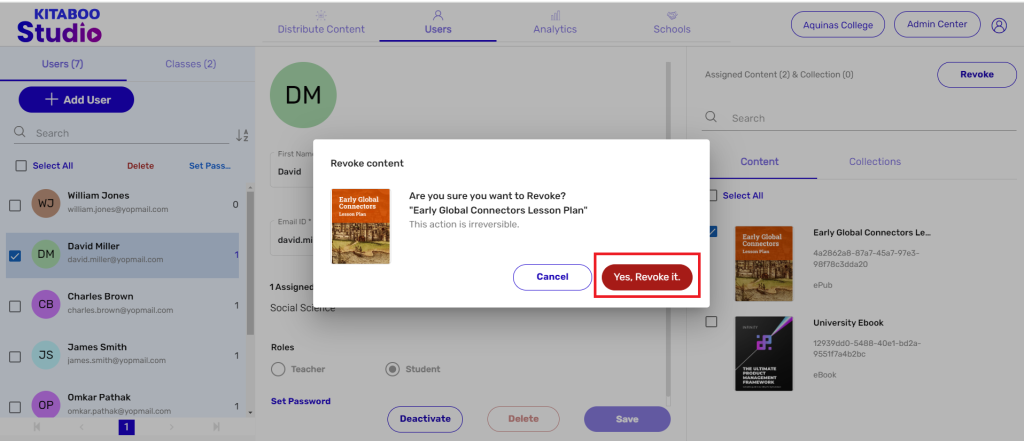
The portal empowers you to revoke the access of content for a user or a class. Once done, the user or the class will no longer be able to access the content on the Reader.
Revoking Content from a User
1. Sign in with your Group Admin credentials.

2. Go to the Users tab.
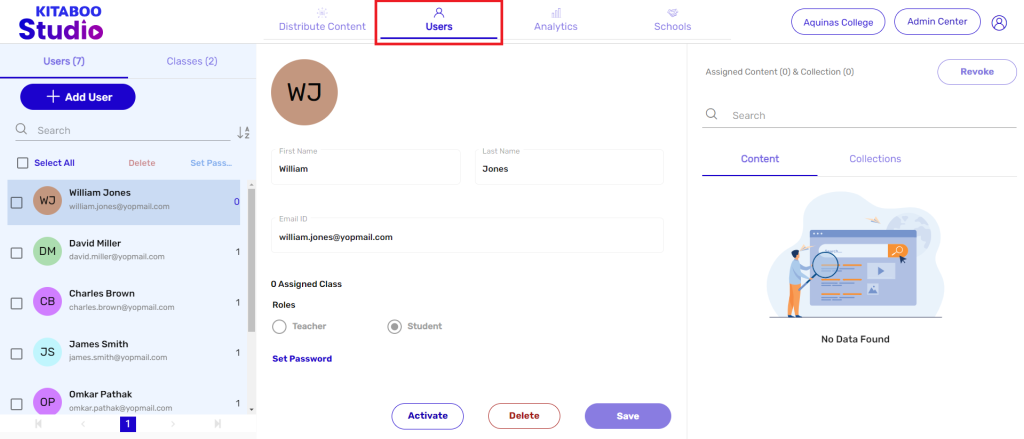
3. Select the User from list for whom you want to revoke content. > Select title(s) listed under Contents. > Click on Revoke.
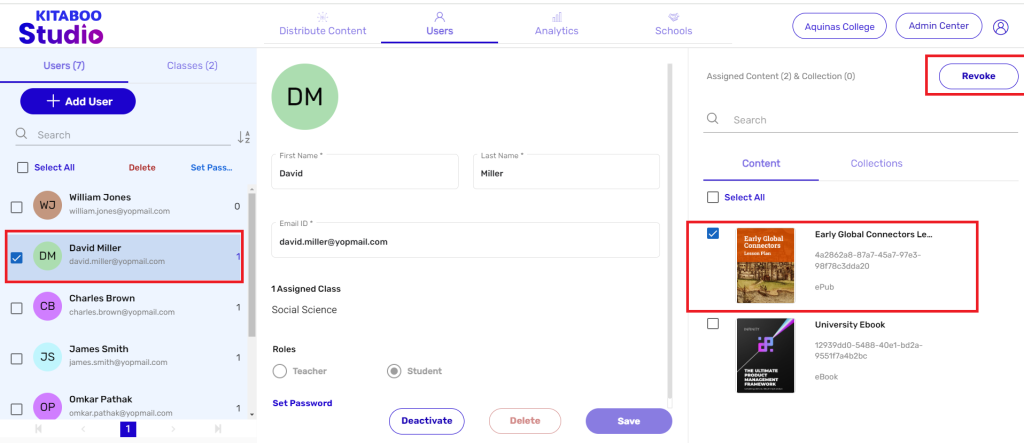
4. Click on Yes, Revoke it to confirm.
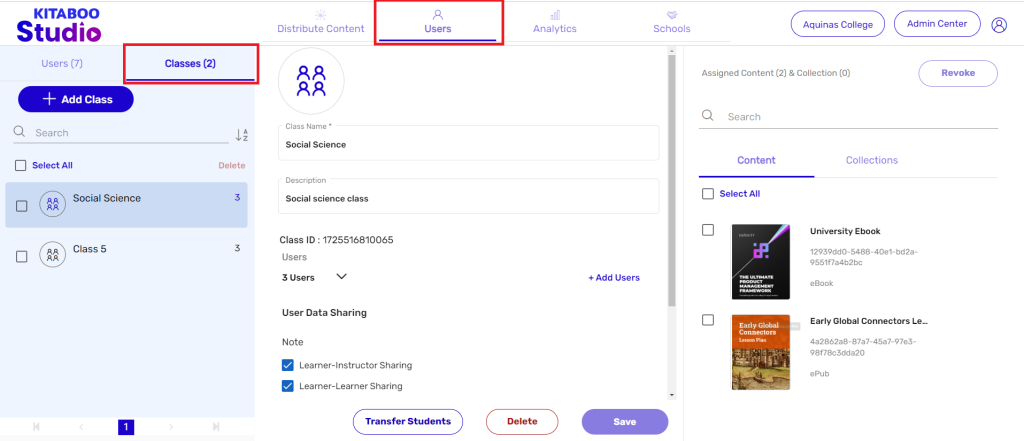
Revoking Content from a Class
1. Sign in with your Group Admin credentials.

2. Go to the Users tab. > Click on Class.
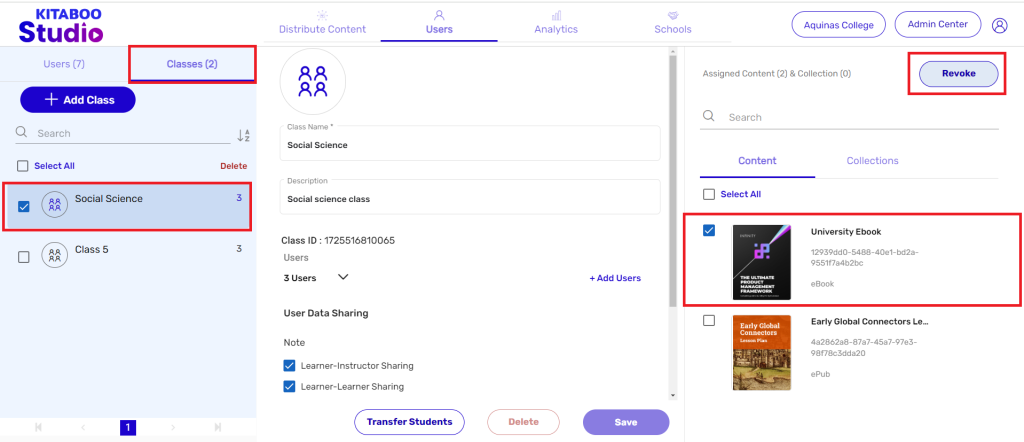
3. Select the Class from list for which you want to revoke content. > Select title(s) listed under Contents. > Click on Revoke.
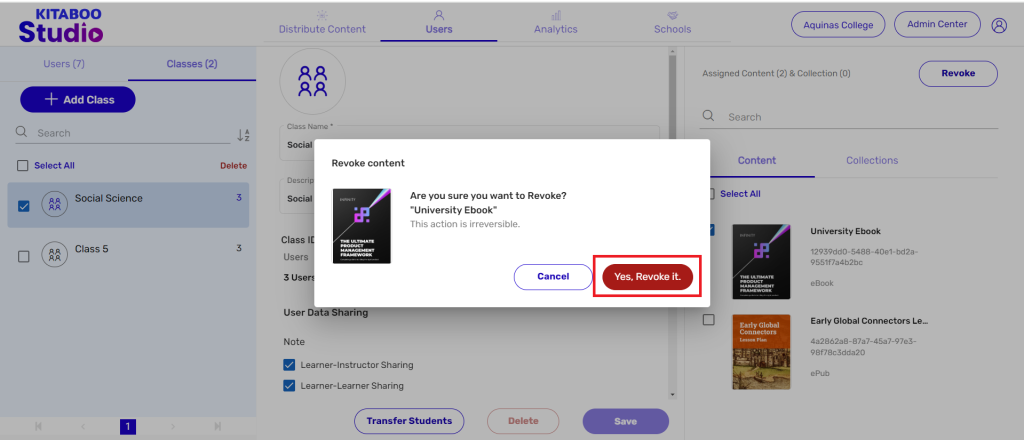
4. Click on Yes, Revoke it for your confirmation.
After you have created a class and added users to the class, you can now distribute content to a class or directly to the users.
Distributing Content to a Class
1. Sign in with your Group Admin credentials.
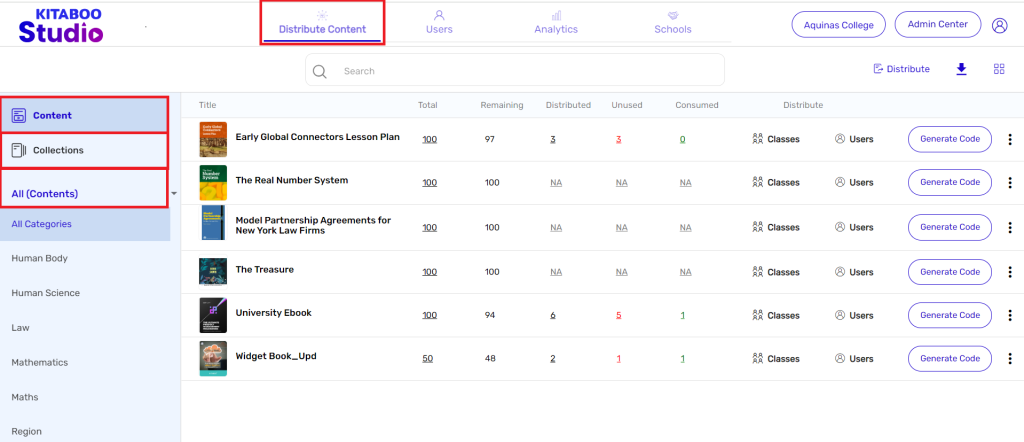
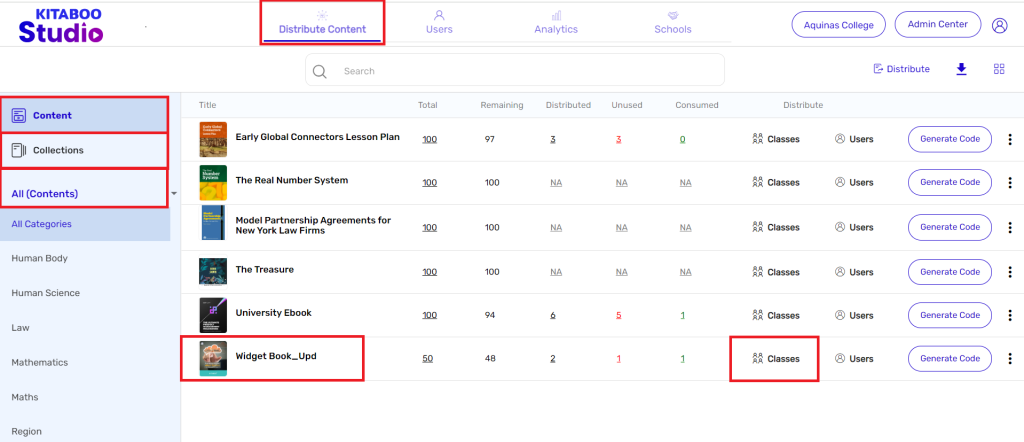
2. On the Distribute Content tab, you have three options – Contents, Collections, and All (Content) – to use for distributing a content.
NOTE: The Contents option will be the default selection.
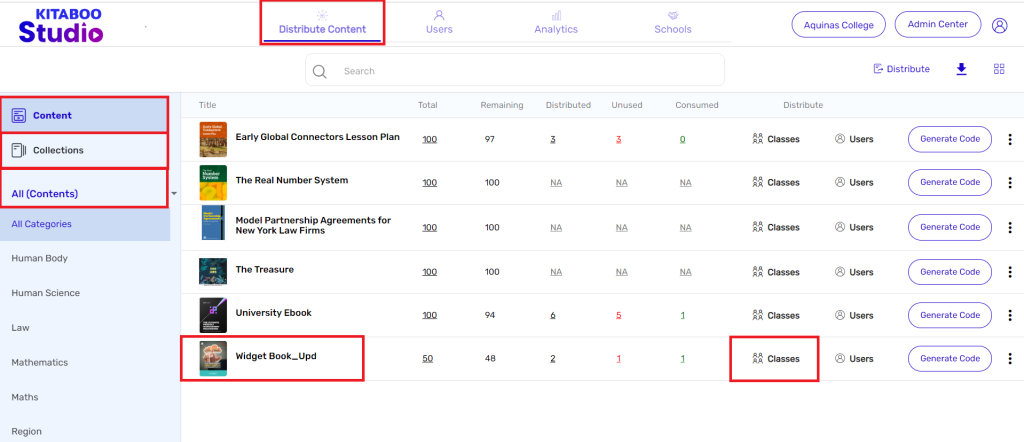
3. Click on any of the two options. > Click on the Class against the title you want to distribute.
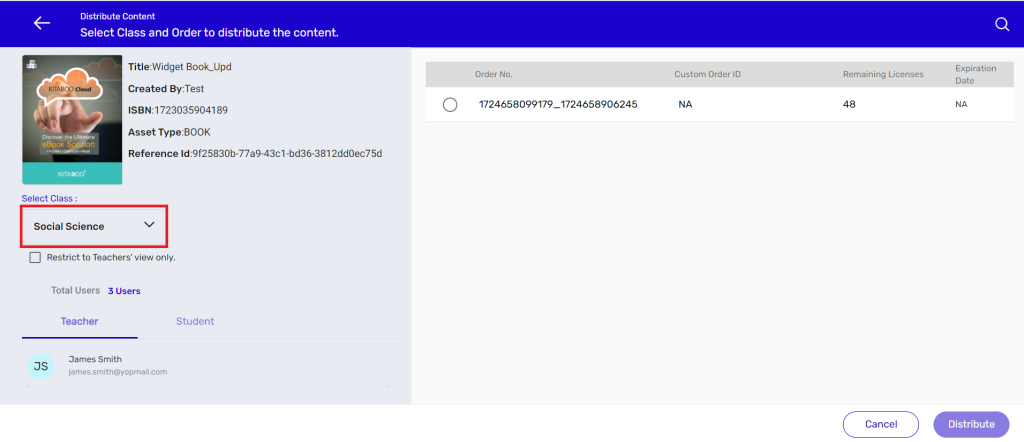
4. Select Class from the list. > Check the Restriction box if you want the content to be accessible to teacher’s only. > Select the Order No. > Click on Distribute.
Distributing Content to All Classes At Once
The Kitaboo system also allows you to distribute content to all classes in one go. Let’s see how to do the bulk distribution of content.
1. Sign in with your Group Admin credentials.
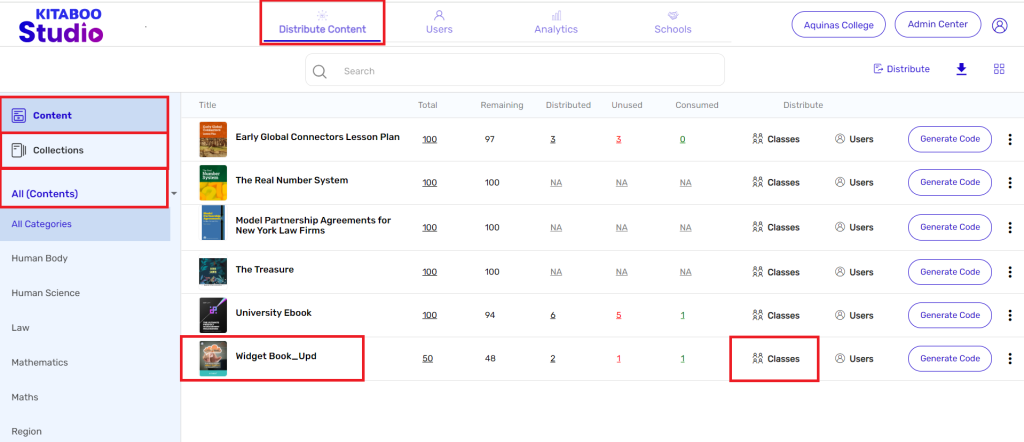
2. On the Distribute Content tab, click on Class against the title you want to distribute.
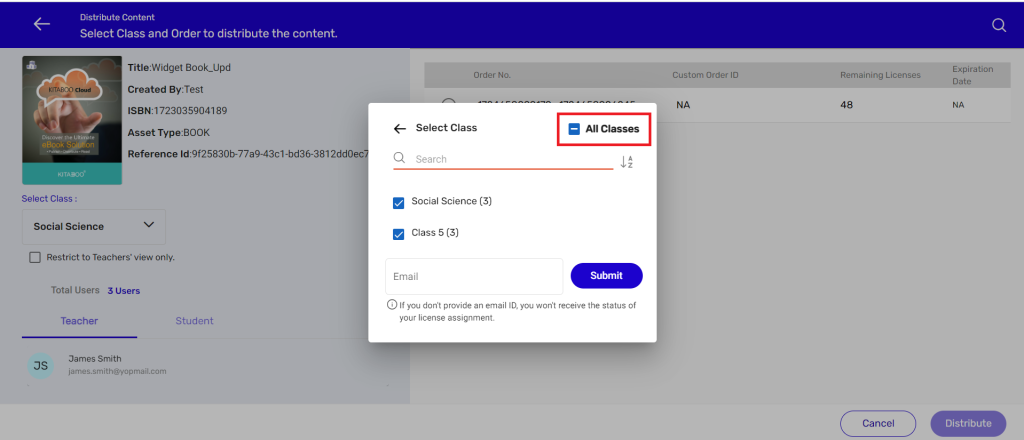
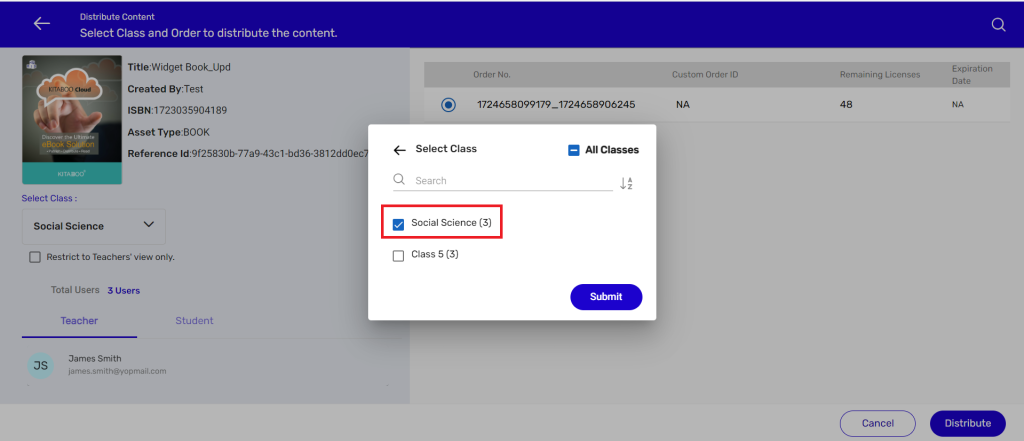
3. Click on the Select Class drop-down menu arrow. A pop-up will appear which will allow you to select either a particular class or the entire list of classes by checking the All Classes box.
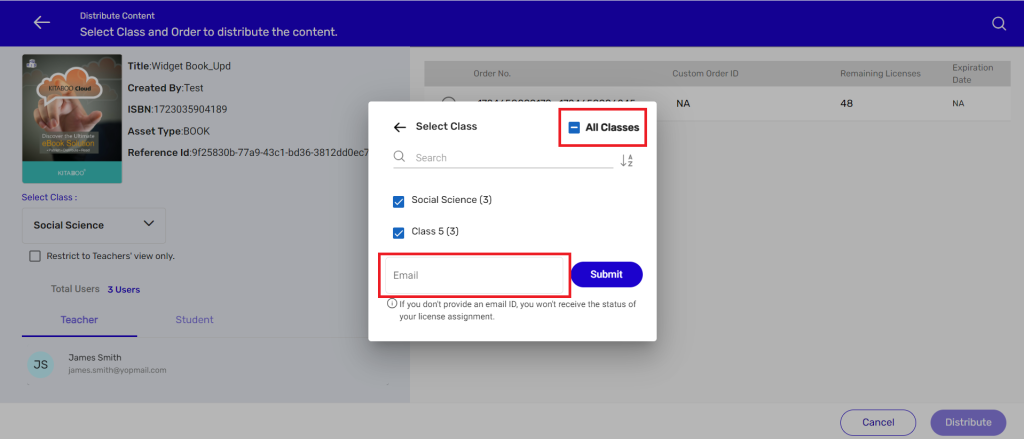
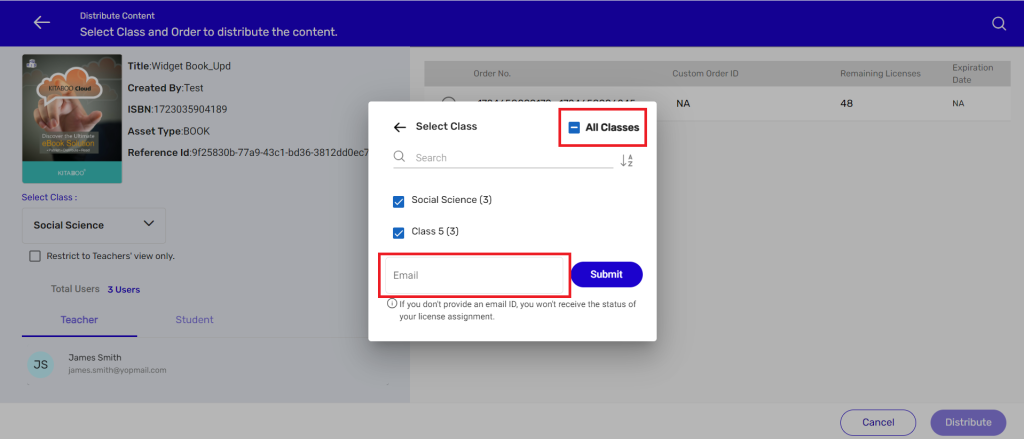
4. As you want to distribute content to the entire list of classes, select the All Classes box. > Provide an email ID in the field that appears once you select the All Classes box. > Click on the Submit button.
NOTE:
● Once you click on the Submit button, the server will start the process of assigning
content one-by-one. After the process is completed, the system will send an email to the email ID you have provided with.
● The system will assign content to both set of classes – those you had created
manually as well as to those that were created by using the group access code.
5. Select the Order. > Click on the Distribute button.
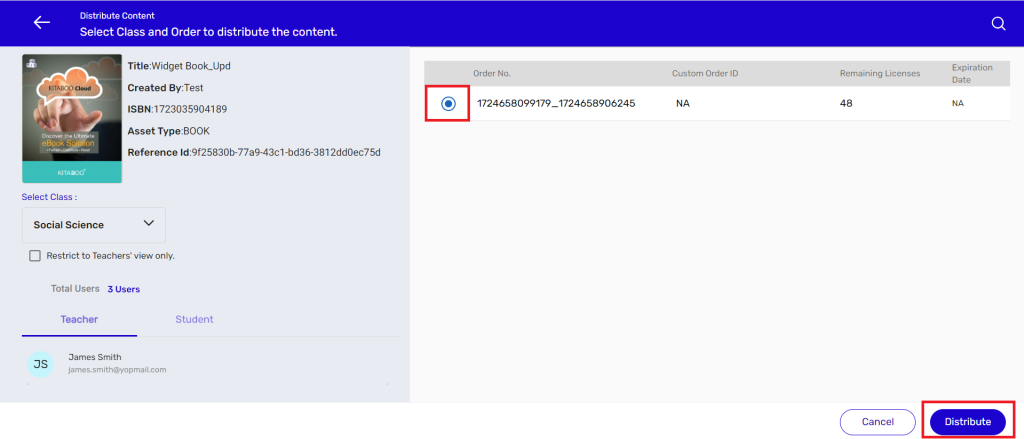
Important: You must have a sufficient number of licenses for completing the bulk distribution process.
Distribute Content to Multiple Class
The Kitaboo system also allows you to distribute content to multiple classes in one go. Let’s see how to do the bulk distribution of content.
1. Sign in with your Group Admin credentials.

2. On the Distribute Content tab, click on Class against the title you want to
distribute.
3. Click on the Select Class drop-down menu arrow. A pop-up will appear which will allow you to select either a particular class or Check-Box to select multiple classes.
4. As you want to distribute content to the Selected list of classes. Provide an
email ID in the field that appears once you select the Multiple Classes box. >
Click on the Submit button.
NOTE:
● Once you click on the Submit button, the server will start the process of assigning
content one-by-one. After the process is completed, the system will send an email to the email ID you have provided with.
● The system will assign content to both set of classes – those you had created
manually as well as to those that were created by using the group access code.
5. Select the Order. > Click on the Distribute button.
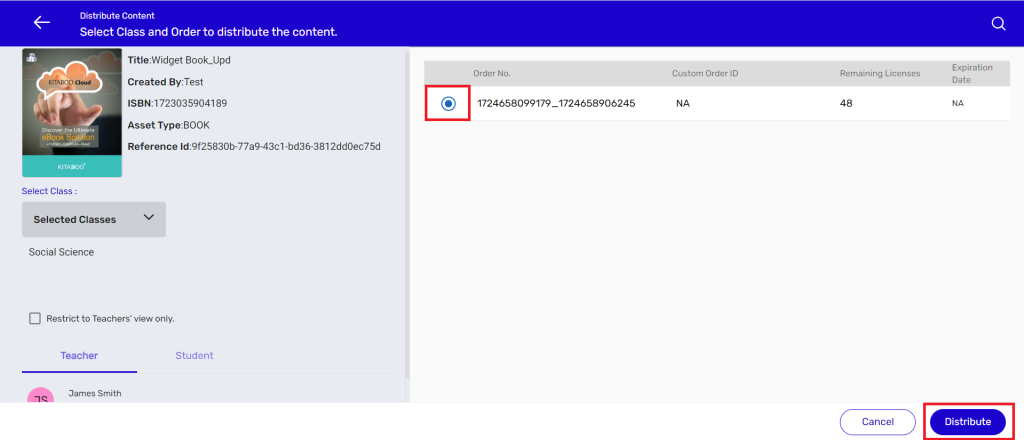
Important: You must have a sufficient number of licenses for completing the bulk distribution process.
Distributing Content to a User
Instead of distributing content to the entire class, you can distribute it to an individual user or to multiple users.
1. Sign in with your Group Admin credentials.

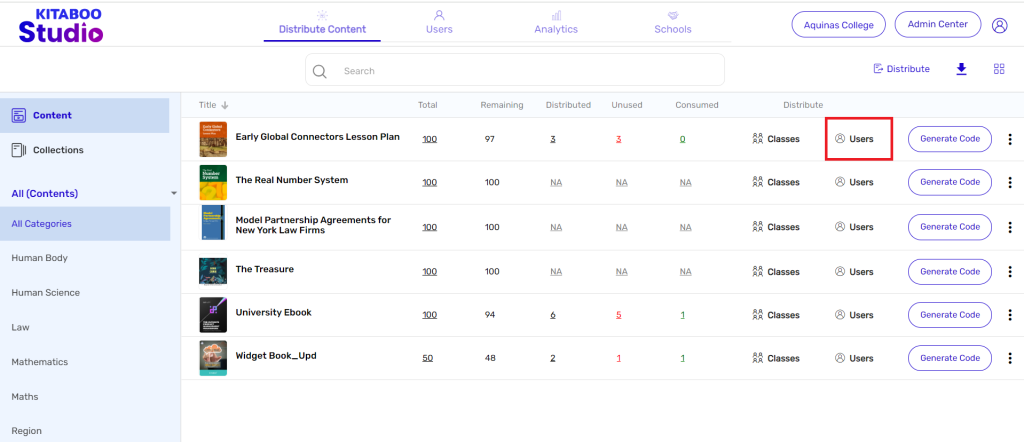
2. Go to the Distribute Content tab. > Click on Users aligned to the title you want to distribute.
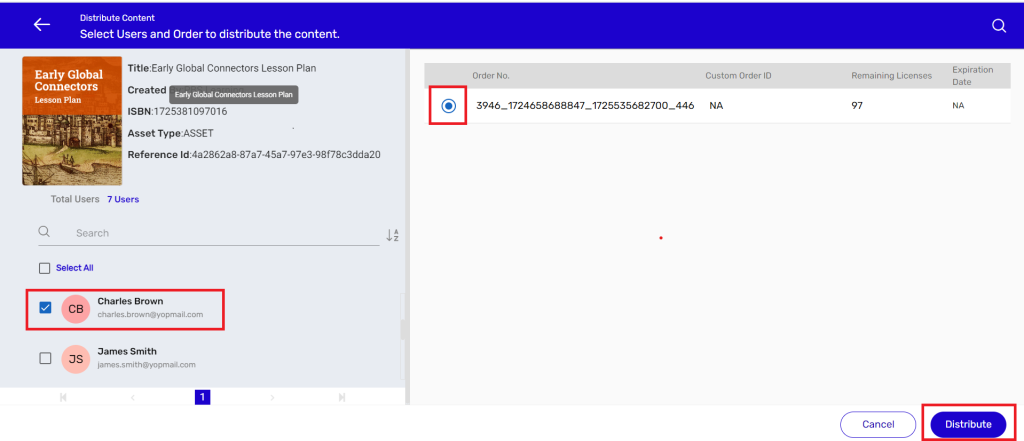
3. Select User(s) from the list. > Select the Order No. > Click on Distribute.
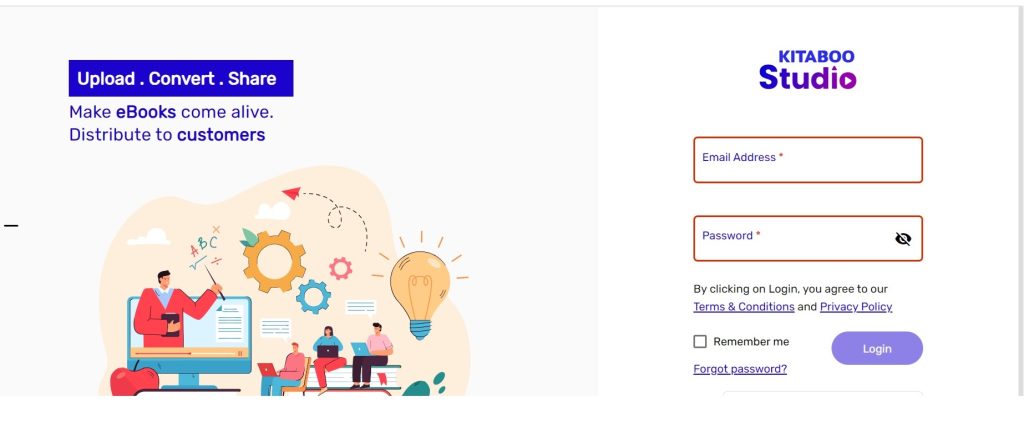
Signing in to Kitaboo
Kitaboo’s Studio Portal empowers you to create, publish and securely distribute your digital content in multiple formats to your customers. It also empowers you to manage and track your customers. The portal supports content in three popular languages namely English, German, and Spanish and is a leading platform for education and online training.So if you represent a group of educational institutions or a corporate house, what are you waiting for!
Be a part of our customer-driven environment and enjoy our delightful productswith a simple, honest pricing.
Login as District Administrator
Go to the Institute Administrator Portal:
Enter your Email Address
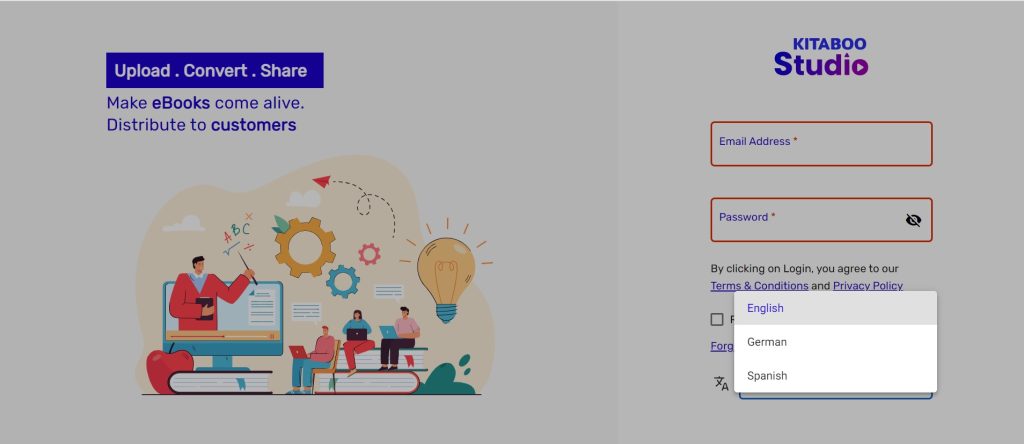
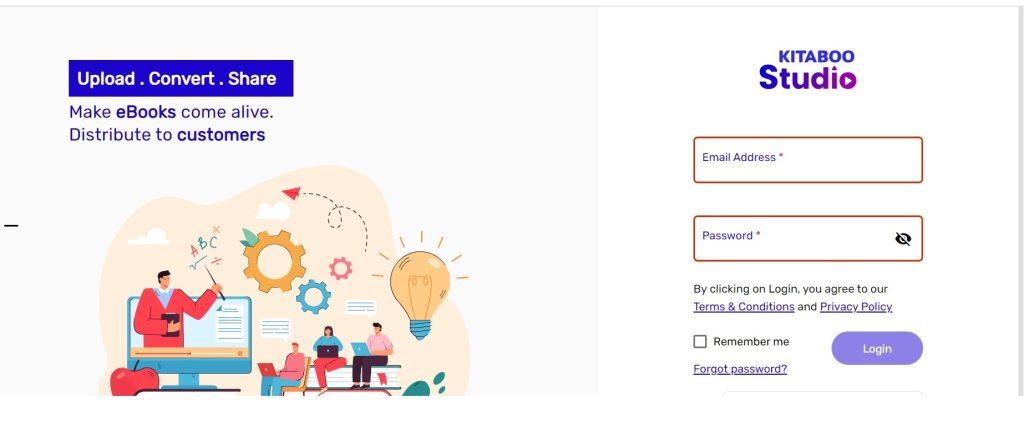
1.1: Navigate to the Kitaboo Studio Reader login page and enter your Group Admin login credentials.

1.2: Select your preferred language > Click on Login.
NOTE: English is the default login language
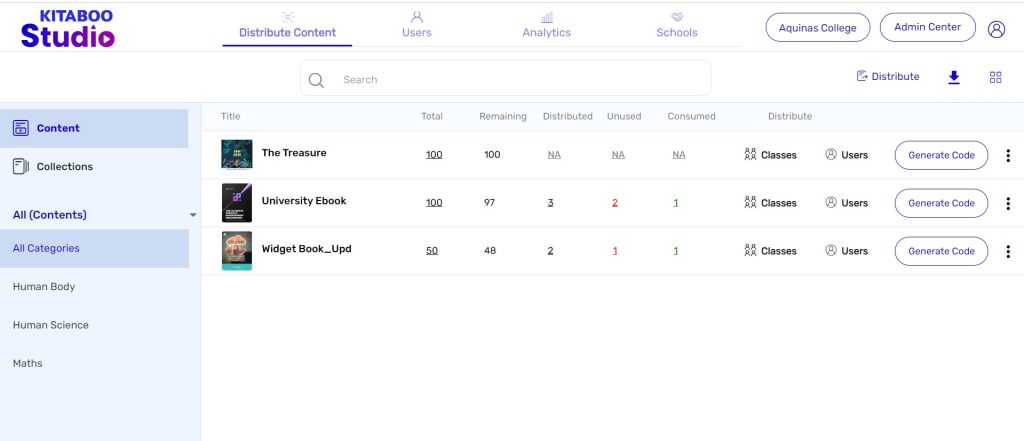
1.3: This is a dashboard where you can distribute content, perform user creation, class creation, analytics (for classes, users, content, and collection), and customers/schools/partners/institutes related to that group .
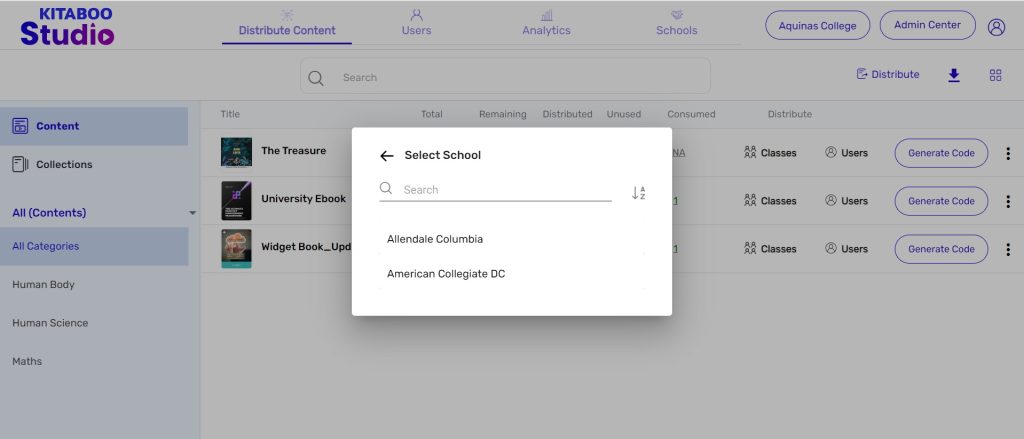
1.4: This is a dropdown where you can see the all associated school/partners
/institutes/customers related to that group.
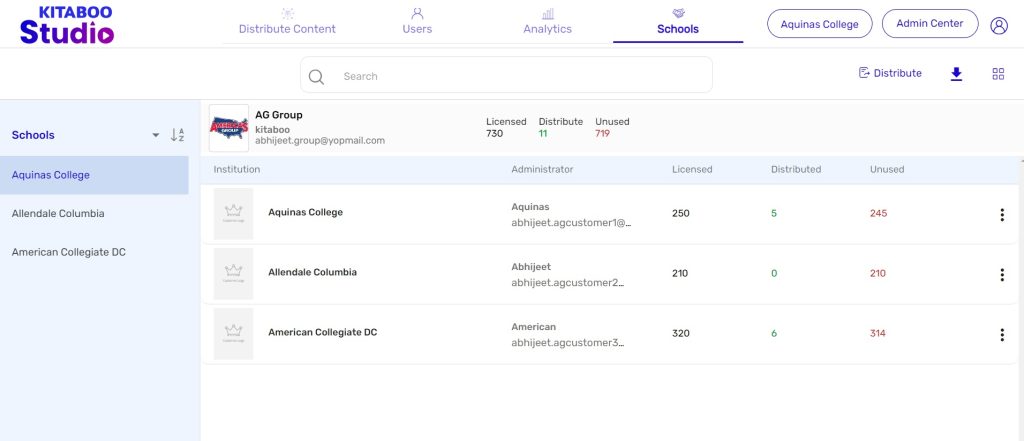
1.5: This is a school dashboard page where we can see the list of schools/partners
/institutes/customers.
Know the Buttons and Links on the Kitaboo UI
The Distribute Content Tab
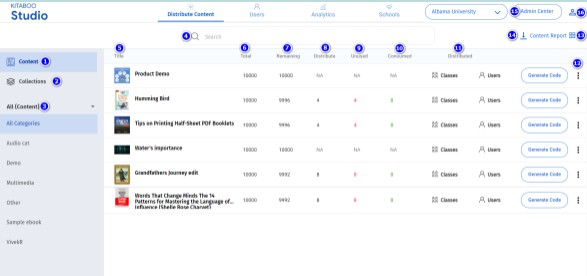
1. Content – Lists all the available content on the Kitaboo system.
2. Collections – Lists all the available collections (a few pieces of content grouped
together) on the Kitaboo system.
3. All (Content)– Lists all the available content based on their types or categories,
like eBook, ePub, SCORM, audio book, video book etc.
4. Search – Lets you do a quick search of content by its name.
5. Titles – Displays names of the titles on the Kitaboo system.
6. Total – Defines the total number of licenses issued.
7. Remaining – Defines how many of the issued licenses are still available for
distribution.
8. Distribute – Defines the number of licenses that have already been distributed.
9. Unused – Defines the number of licenses still to be used or consumed by users.
10. Consumed – Defines the number of licenses already used or consumed by
users.
11. Distribute – Lets you select whether you want to distribute content to a class or
a user.
12. More Options Icon – Lets you discover more information about a view the
access code report for a content.
13. Toggle View – Enables you to select the way you want to view the list of content
– whether in the form of a simple list or as a grid with thumbnails for the listed
content.
14. Content Report – Enables you to download a report on the usage of content
comprising information like total number of licenses, number of remaining,
distributed, unused, and consumed licenses.
15. Admin Center – Lets the main group admin view or edit the profile including the
password or add a sub-group admin user.
16. Profile and Settings – Lets you manage your profile, view a few video tutorials,
access the Kitaboo platform help guide, and know about the platform privacy
policies and terms and conditions.
The Users Tab: Users
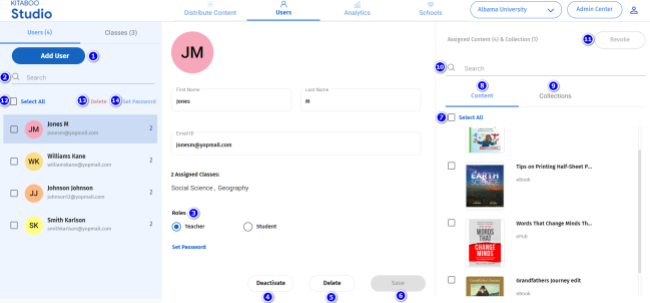
1. Add User – Enables you to add a new user or multiple users to the Kitaboo system.
2. Search – Enables you to do a quick search of an existing user.
3. Roles – Lets you define the role of the to-be-added user – whether a teacher or a
student.
4. Deactivate – Enables you to deactivate or suspend an existing user. A deactivated user exists on the Kitaboo system, but will not be able to access content until he/she remains deactivated. He/she can be restored.
5. Delete – Enables you to delete or remove a user from the Kitaboo system. A deleted user cannot be restored.
6. Save – Lets you save the edits.
7. Select All – Lets you select all the listed pieces of content/collections if you want to revoke all of them from a user.
8. Content – Displays a list of content assigned to a user.
9. Collections – Displays a list of collections assigned to a user.
10. Search – Enables you to do a quick search of a content or a collection.
11. Revoke – Enables you to revoke the selected pieces content or collections from access by a user.
The Users Tab: Class
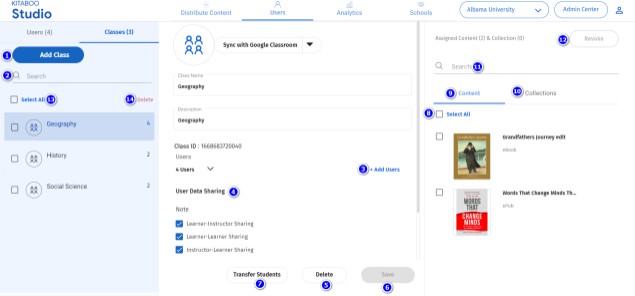
1. Add Class – Enables you to add a new class to the Kitaboo system.
2. Search – Enables you to do a quick search of an existing class.
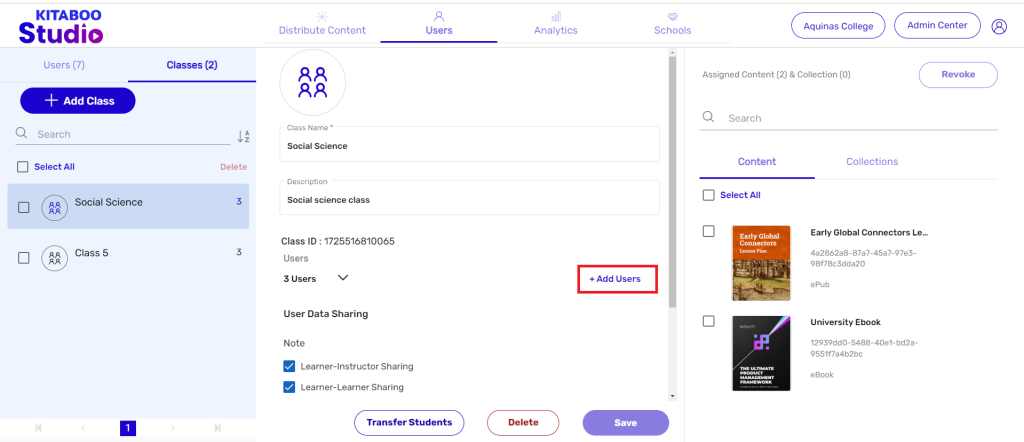
3. Add Users – Lets you add new users to an existing class .
4. User Data Sharing – Lets you define the data like notes and highlights sharing options by selecting the relevant checkboxes.
5. Delete – Enables you to delete or remove an existing class from the Kitaboo system. A deleted class cannot be restored.
6. Save – Lets you save the edits.
7. Transfer Student – Enables you to transfer the students from one class to another
class.
8. Select All – Lets you select all the listed pieces of content/collections if you want to revoke all of them from a class.
9. Content – Displays a list of content assigned to a class.
10. Collections – Displays a list of collections assigned to a class.
11. Search – Enables you to do a quick search of a content or a collection.
12. Revoke – Enables you to revoke the selected pieces content or collections from access by a class.
13. Select all – Lets you select all the listed classes if you want to select all of them/few of them from the class list.
14. Delete Selected Class- Lets you delete all the listed classes if you want to delete all of them/few of them from the class list.
The Kitaboo portal also provides you to promote users from one to another class. You just need to follow a few steps for promoting the users.
1. Sign in with your Group Admin credentials.

2. On the Users tab, click on Class.
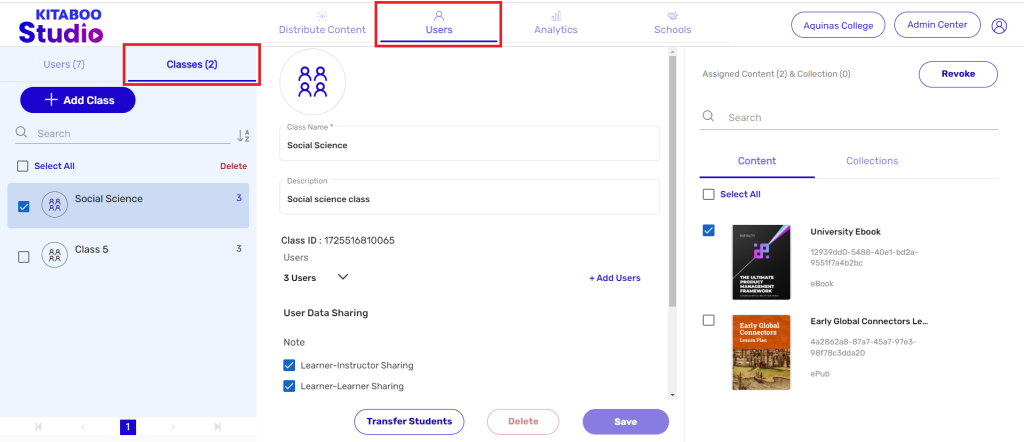
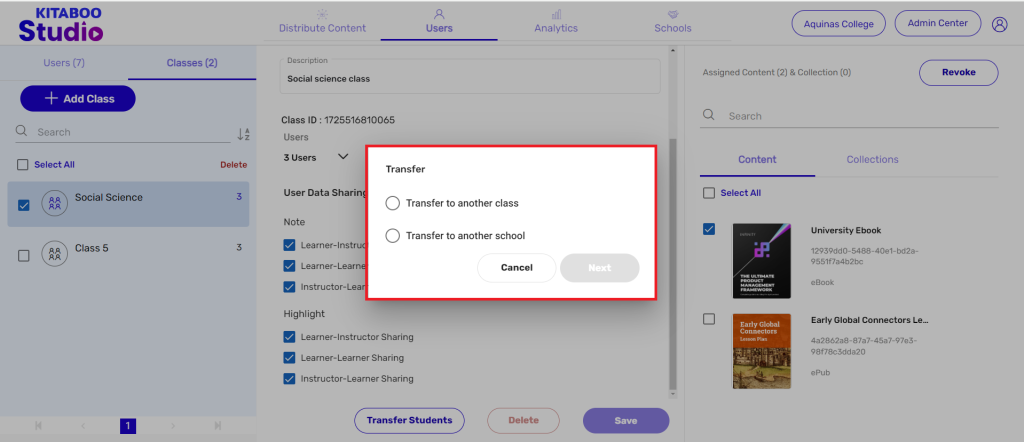
3. Select the Class you want to Promote > then click on Transfer Student Button >
After you click It will show the list of existing classes.
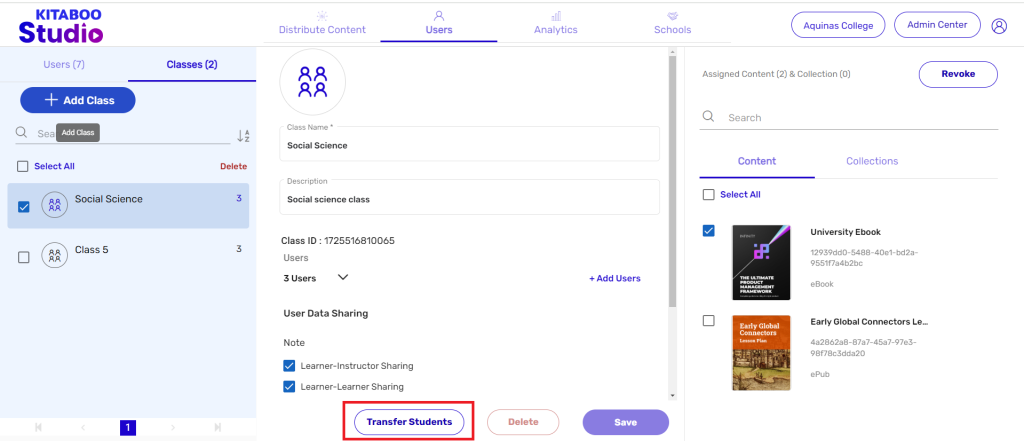
Transfer to another class
4. Select the Transfer to another class from the list and then click on Next.
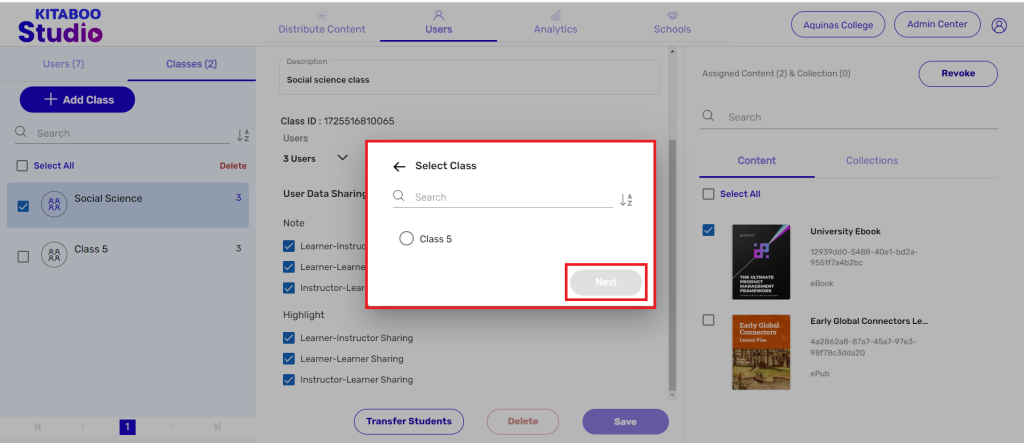
5. Now Select the Class from the list and then click on Next.
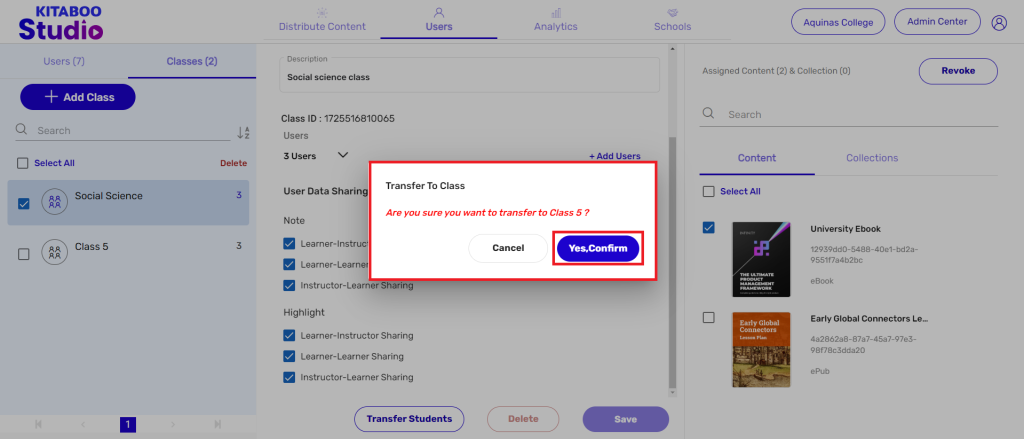
6. You will see a Disclaimer popup up before you promote the users to another
Class. Kindly confirm to Promote.
Note: “Promoted Successfully” message will appear.
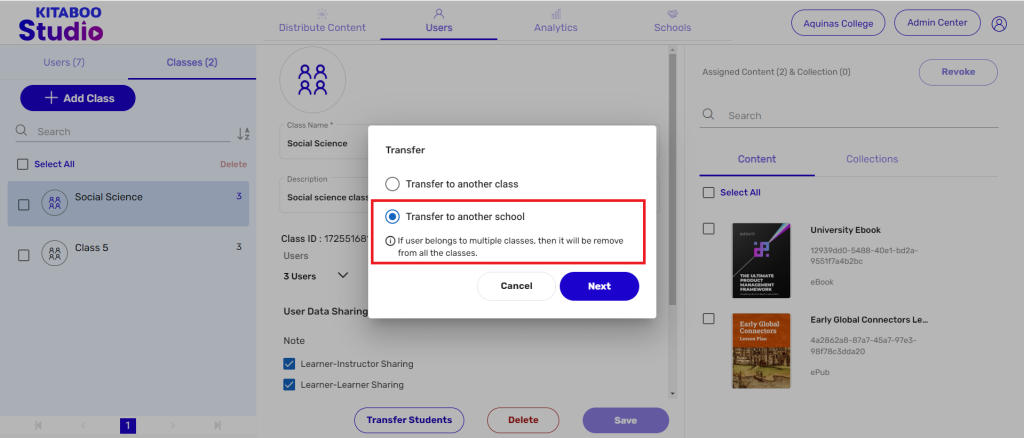
Transfer to another school
7. Select the Transfer to another School from the list and then click on Next.
8. Select the School name from the list and then click on Next.
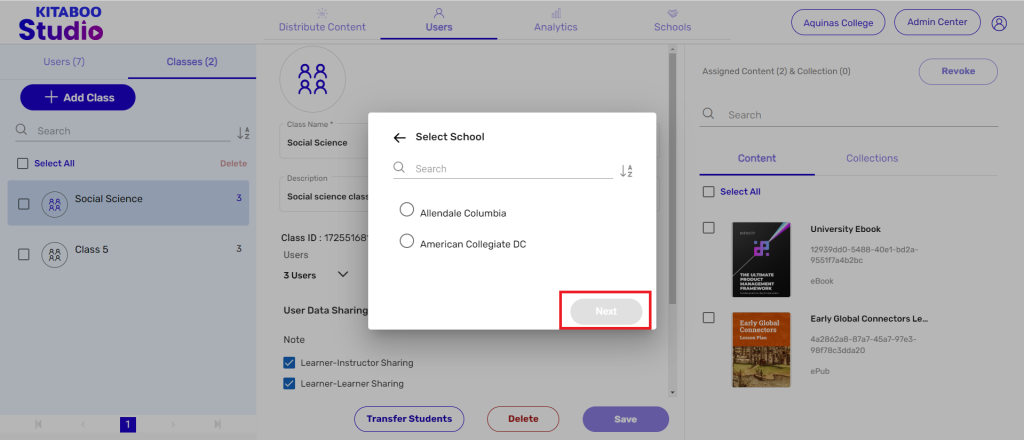
9. Now Select the Class from the list and then click on Next.
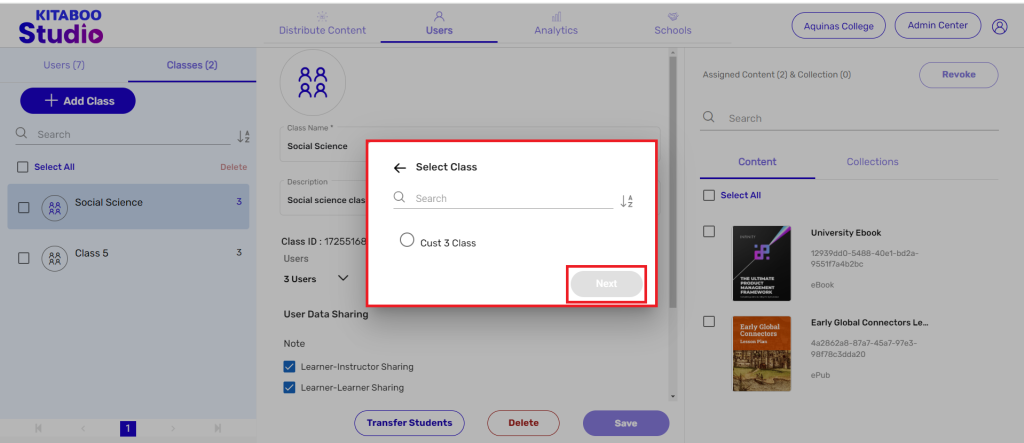
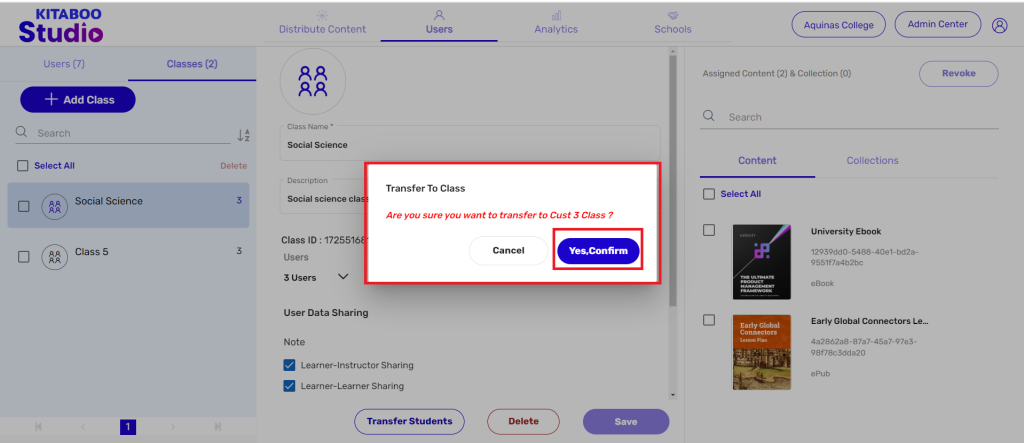
10. You will see a Disclaimer popup up before you promote the users to another
Class. Kindly confirm to Promote.
Note: “Promoted Successfully” message will appear.
NOTE:
● Teachers will not be promoted, only students will be promoted to selected class.
● License will be auto revoked from e.g Class A and content which is already assigned to
e.g Class B will be auto distributed to newly promoted students.
● If Class A does not have any content and you promote Class B users, in this case, it will be promoted.
● If Class A does not have sufficient licenses for promoting users from Class B, In this case not a single user will be promoted.
Creating a Class
Kitaboo Studio empowers you to create a class for your users. You can create a class by following a few simple steps.
1. Sign in with your Group Admin credentials.

2. Switch to the Users tab, click on Class on the Users tab .
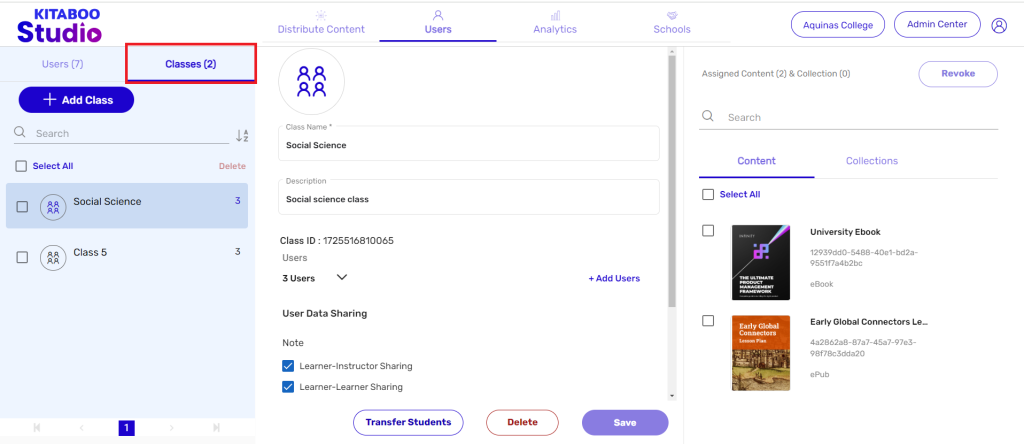
3. Click on the Add Class button.
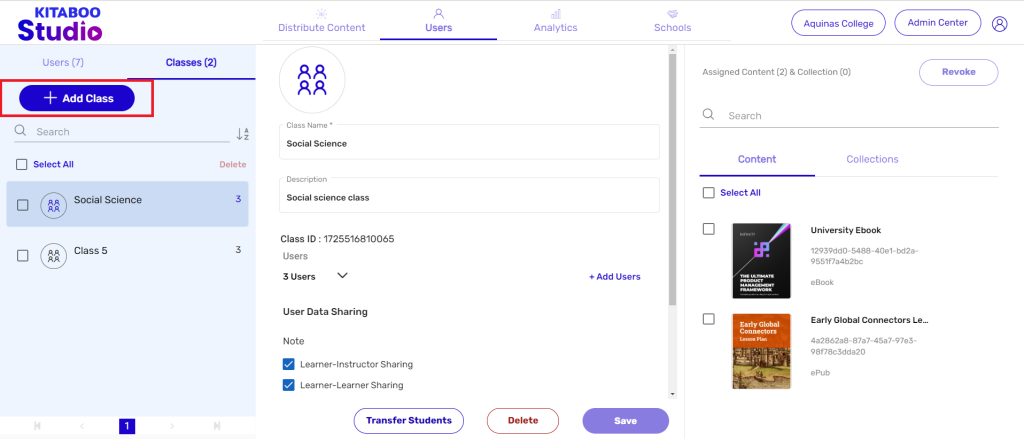
4. Enter details in the Class Name and the Description fields. > Expand the User Data Sharing drop-down menu and check the set of data sharing pairs in terms of notes-sharing and viewing of highlights. > Select Teacher(s) from the list of teachers.
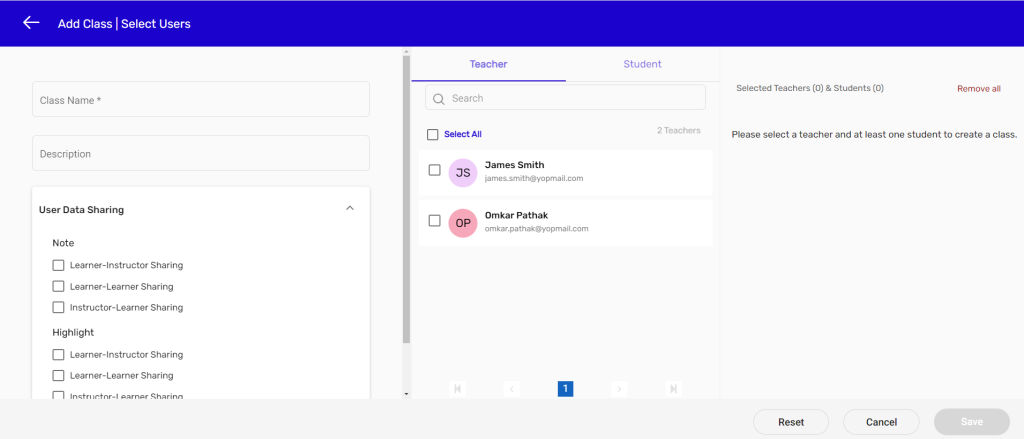
5. Switch to the Student tab. > Select Student(s) from the list of students. > Click on the Add button.
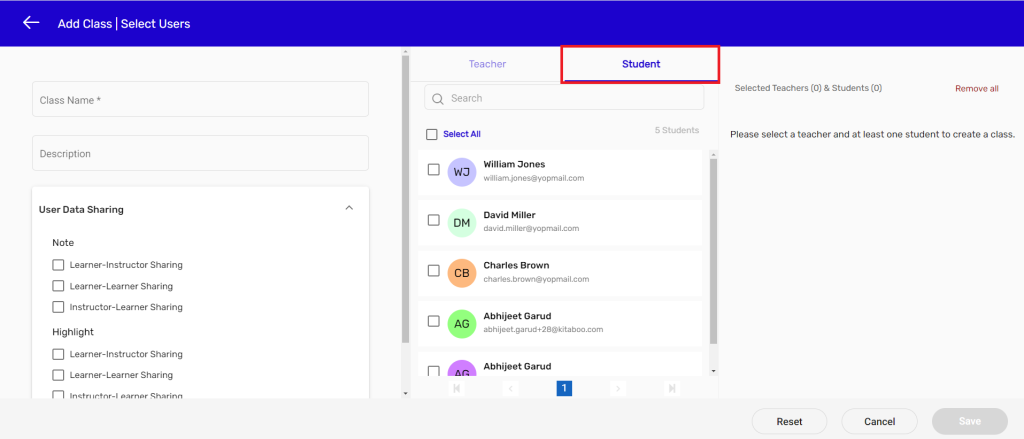
NOTE:
● The Teacher tab will be the default selection.
● Minimum one teacher and one student should be selected to create a class.
Editing a Class
You have already created a class. You may, however, need to modify some of the information related to the class. The Kitaboo portal allows you to edit the required information.
1. Sign in with your Group Admin credentials.
2. Switch to the Users tab. > Click on Class on the Users tab.
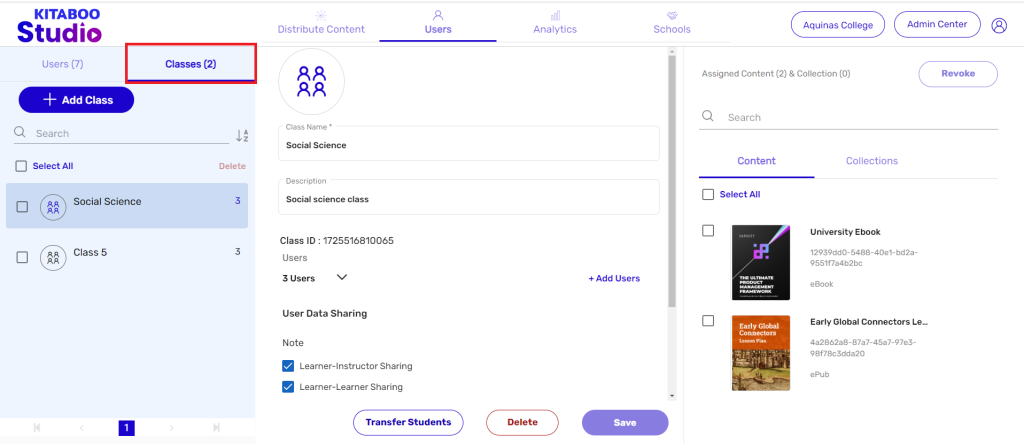
3. Select the class you want to edit. > Modify information in the desired field(s). > Click on Save.
NOTE: Information in the highlighted field has been edited in this example.
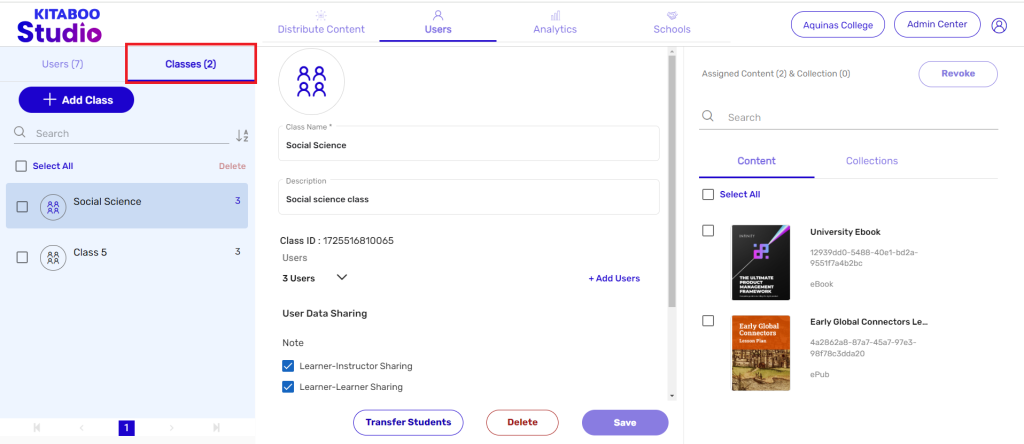
Adding a New User to an Existing Class
The Kitaboo portal also enables you to add a new user or more than one user to an existing class. You just need to follow a few steps for adding a new user.
1. Sign in with your Group Admin credentials.
2. On the Users tab, click on Class.
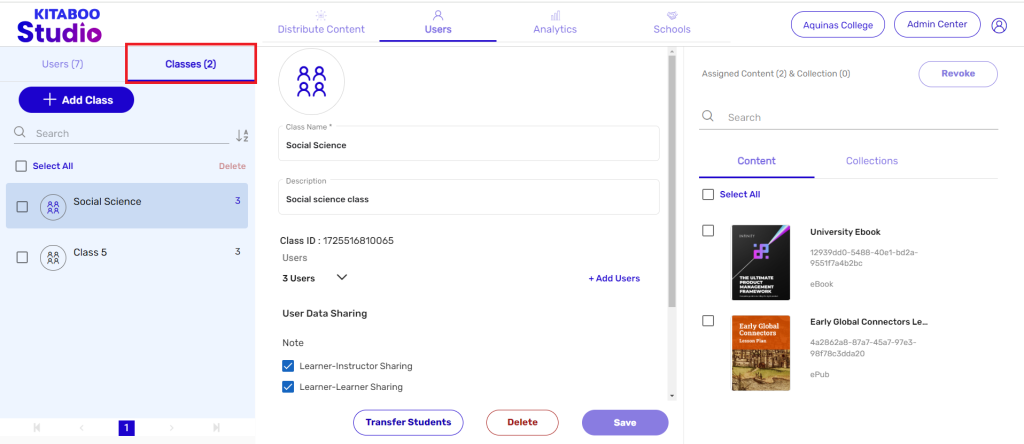
3. Select the class you want to add user(s) to. > Click on the Add Users hyperlink.
This will open the Assign Contents pop-up.
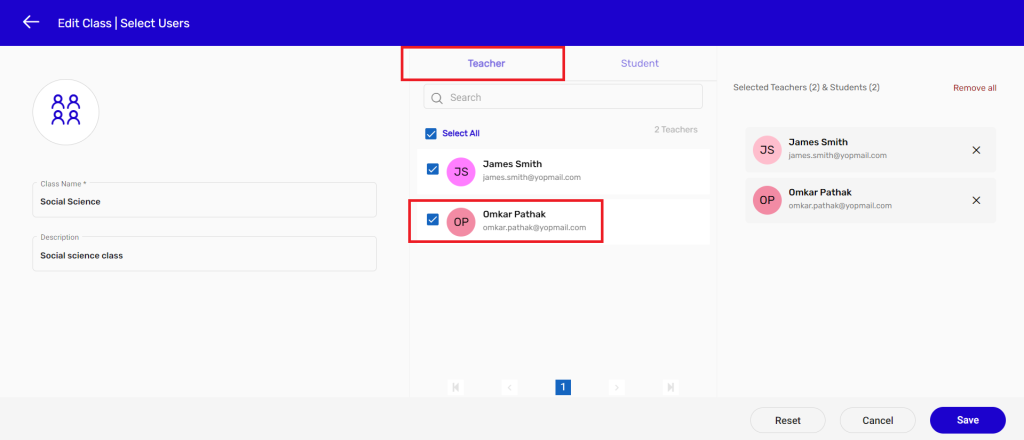
4. Select the user’s Role (Teacher or Student) you want to add. > Select the
user’s name(s) Box from the list.
NOTE: The highlighted user (Teacher) has been added in this example.
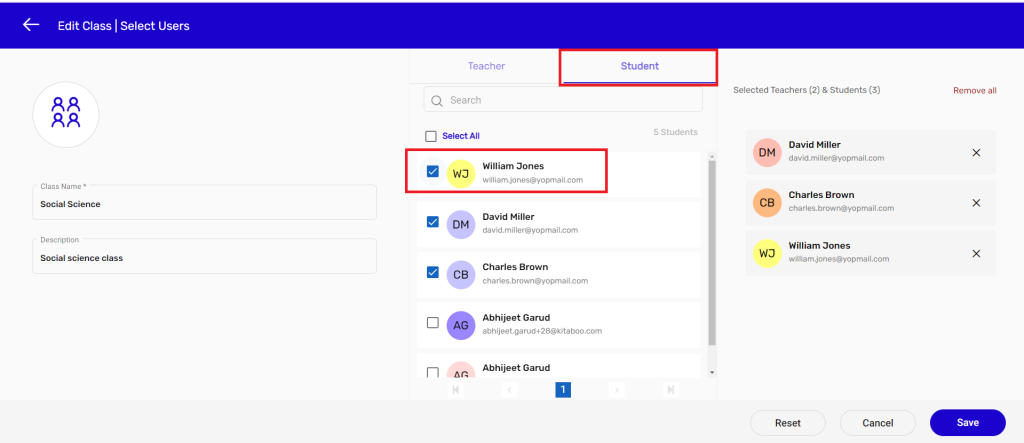
5. Switch the user’s Role if required. > Select the user’s name(s) Checkbox
from the list. > Click on Add.
NOTE: The highlighted users (students) have been added in this example.
6. In this example, there are three titles listed on the Assign Contents pop-up.
You can manually select an order number from the drop-down menu against each title. > Click on the Assign button.
However if the number of titles is too many, you can select the checkbox on the pop-up, and click on the Assign button.
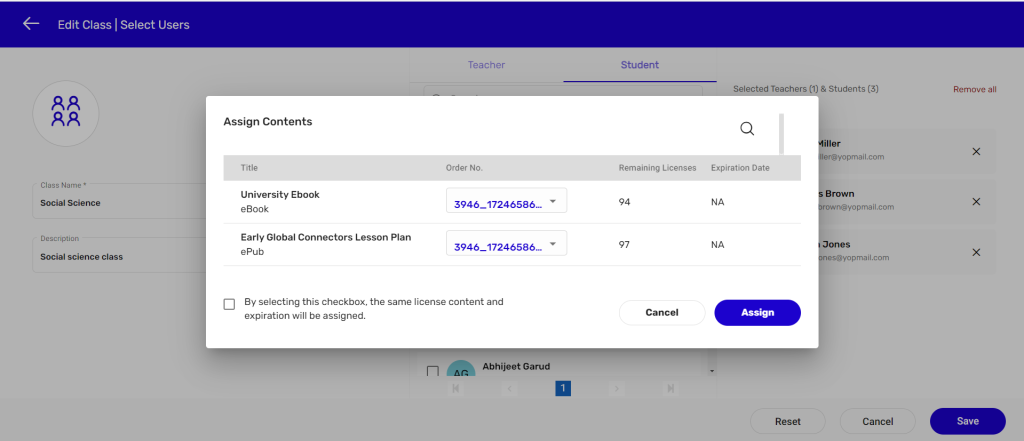
NOTE: The system will automatically select a title with remaining licenses valid for a maximum expiry period.
Important:
● No new user can be added to an existing class if there is no content assigned to the class.
● No new user can be added to an existing class if the number of remaining licenses for the content assigned to the class is zero.
Removing a User from an Existing Class
The Kitaboo system also allows you to remove a user from an existing class. Let’s see how to do it.
1. Sign in with your GroupAdmin credentials.
2. On the Users tab, click on Class.
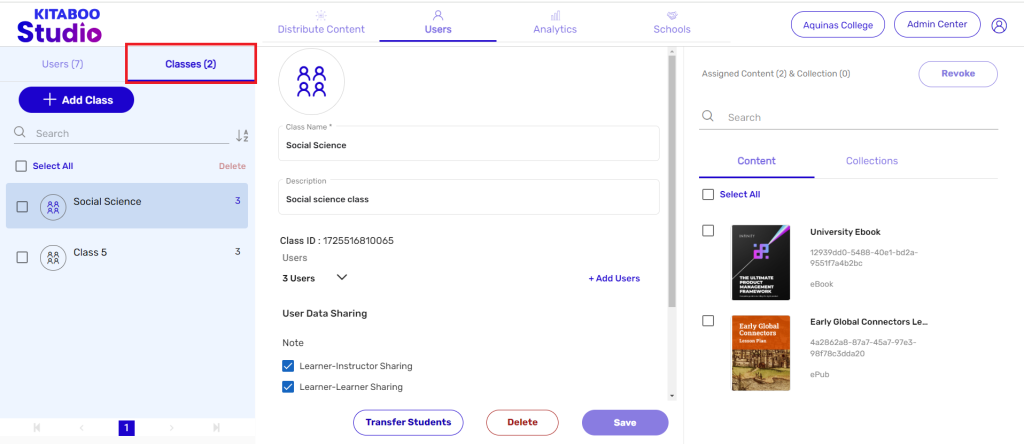
3. Select the Class you want a user to remove from. > Click on Users.
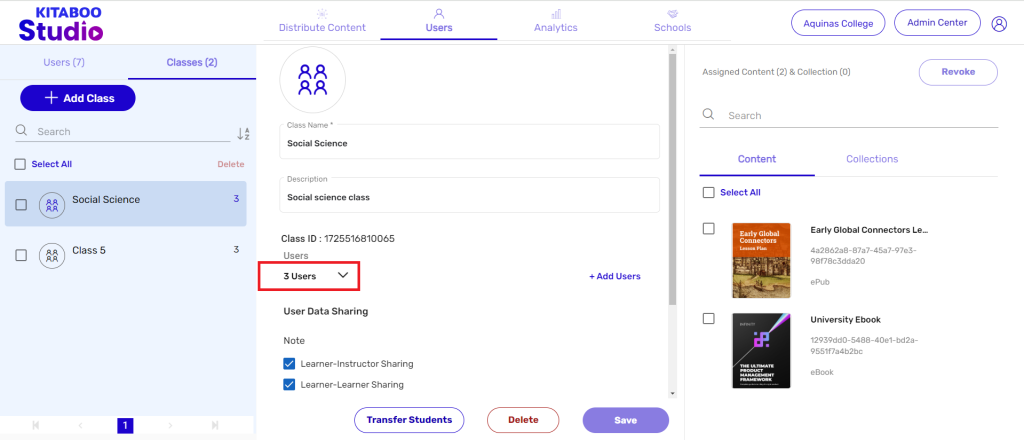
4. Click on the user type, Teacher, you want to remove. > Roll the cursor over the user you want to remove. > Click on the Cross symbol that appears.
NOTE: The user type Teacher will appear enabled by default.
5. Finally, click on Save.
6. If you want to remove a student: Click on Student. > Roll the cursor over
the student you want to remove. > Click on the Cross mark. > Click on Save.
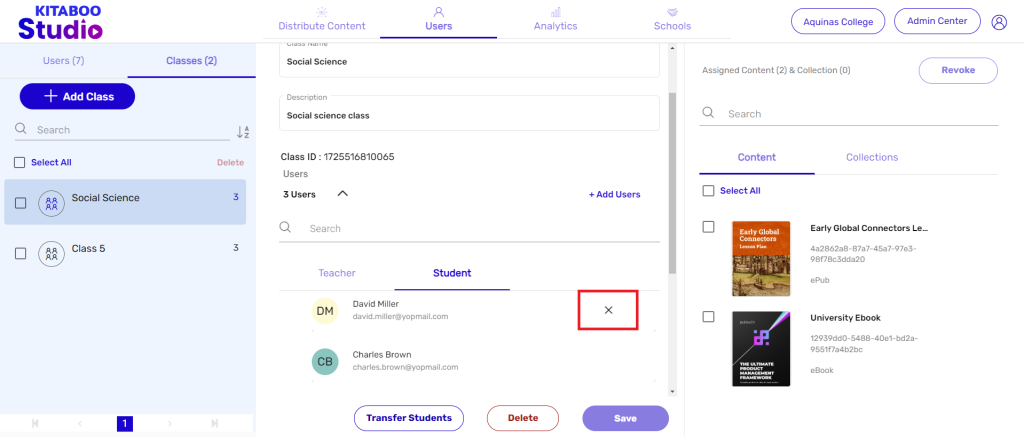
7. Finally, click on Save.
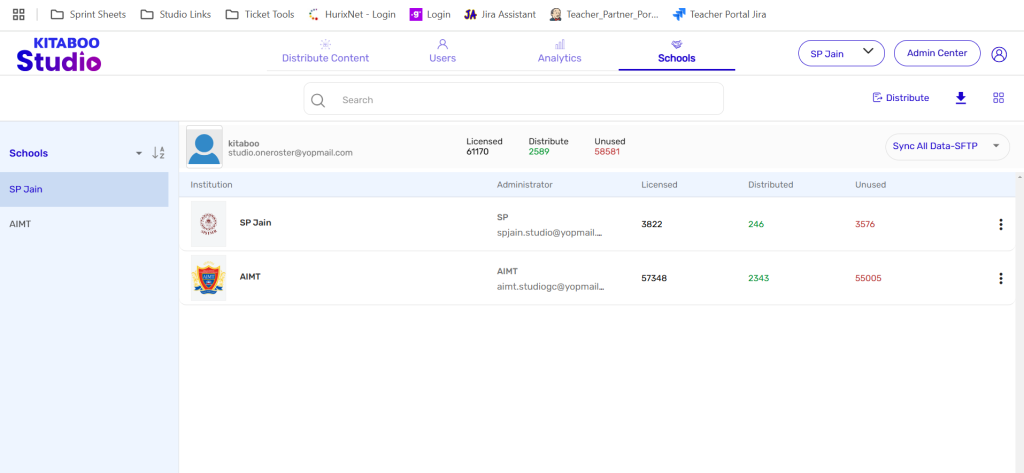
1. Once you create an Oneroster Group with all configurations like API/ZIP/SFTP. Login with the credentials and click on the School tab.
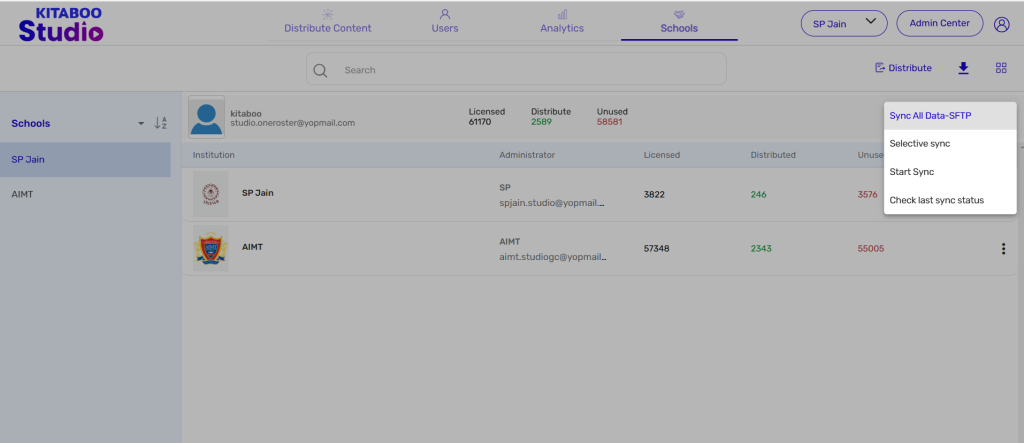
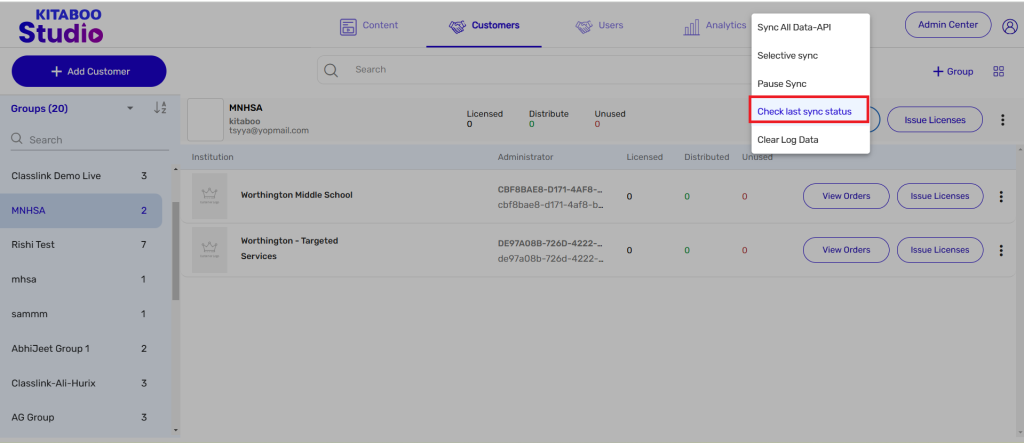
2. Once you click on the group you will find a dropdown menu with the name “Sync All Data-API/ZIP/SFTP”, “Selective sync”, “Check last sync status”.
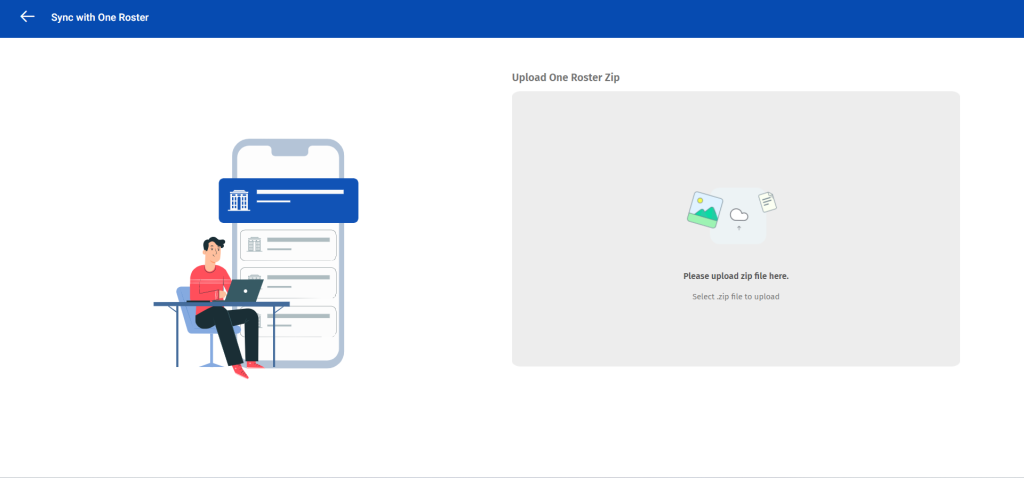
3. Now click on “Selective sync” depending on the account configuration you will get the option to upload Zip or you will get the data from SFTP/API on the screen.
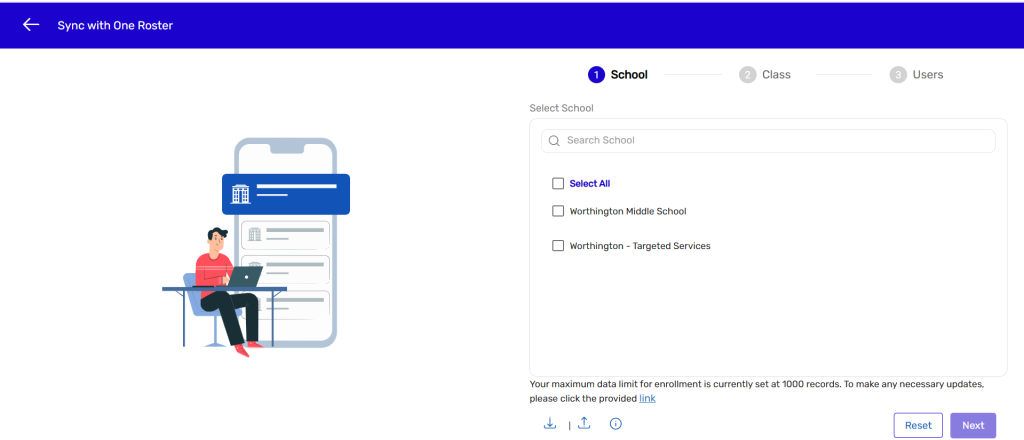
4. After successful data fetch it will show you the list of Schools. You can now either
Select All or Select the desired Schools from the list.
5. If there are a large number of Schools, you have the option to download the complete list of schools in a spreadsheet.
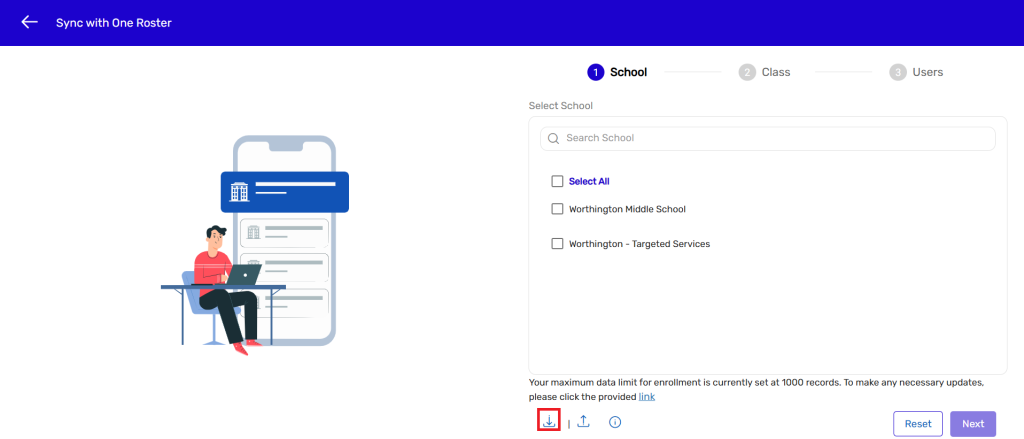
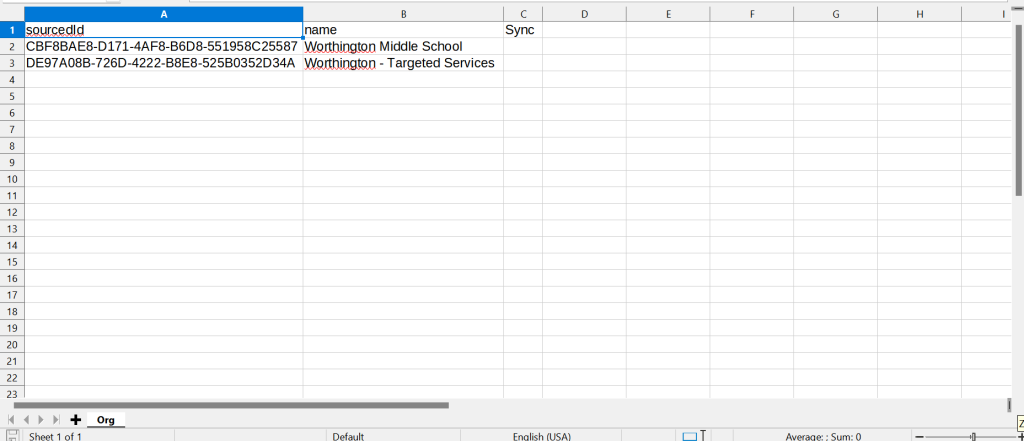
6. Open the downloaded spreadsheet with the name Org and fill “Yes” in the column
named sync. If you keep it “Blank” or fill it in “No” those schools will not get selected for rostering.
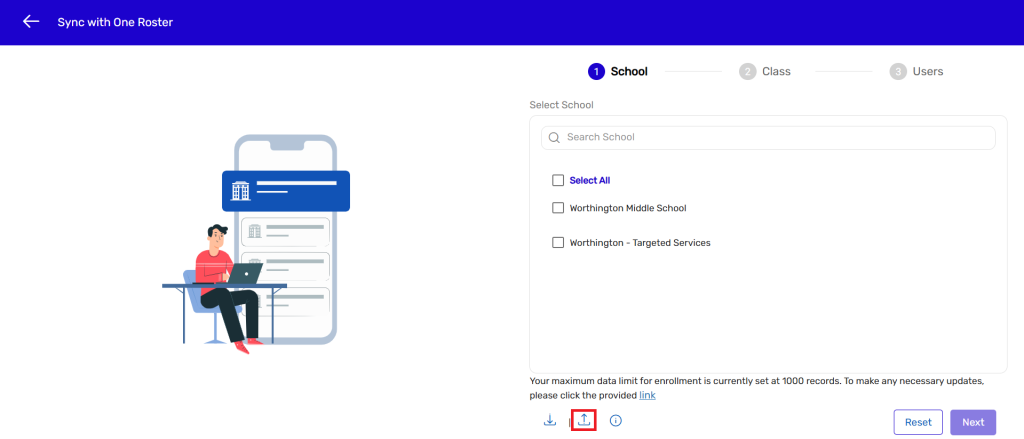
7. After you finalize the sheet and save the changes, then upload it via the upload icon.
8. After successful data fetch it will show you the list of Classes. You can now either
Select All or Select the desired Classes from the list.
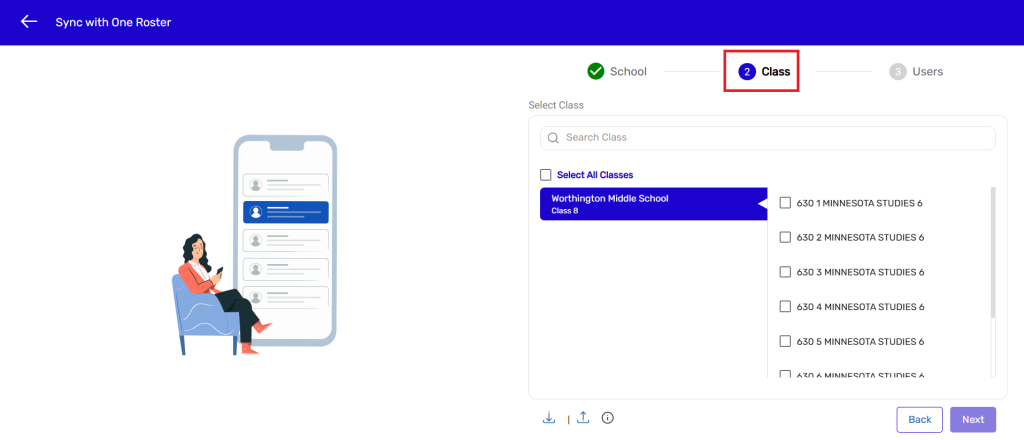
9. If there are a large number of Classes, you have the option to download the complete list of classes in a spreadsheet.
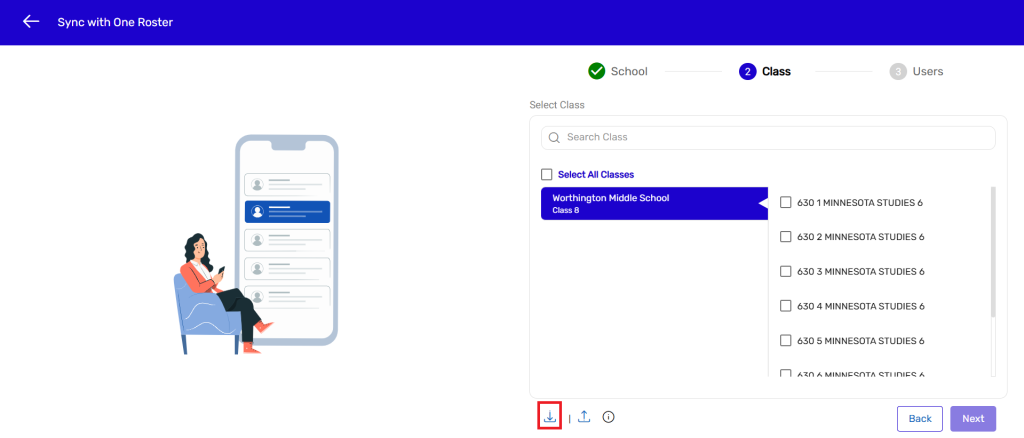
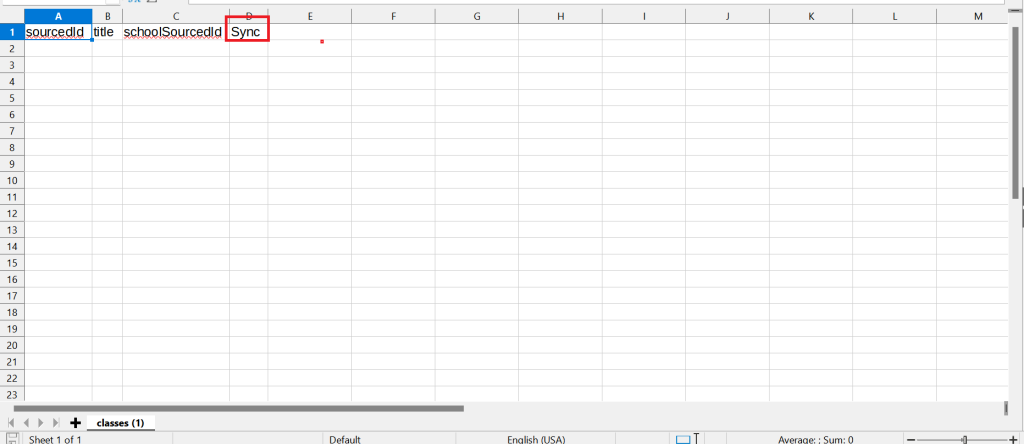
10. Open the downloaded spreadsheet with the name Classes and fill “Yes” in the
column named sync. If you keep it “Blank” or fill it in “No” those classes will not get
selected for rostering.
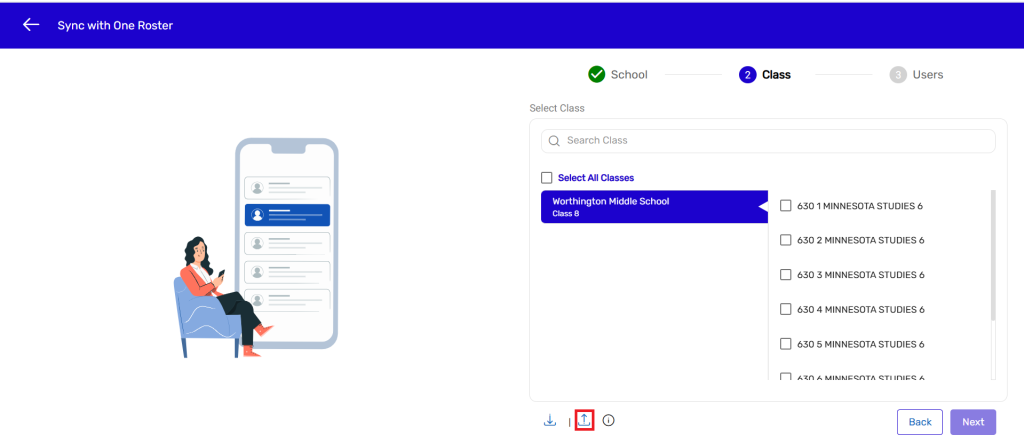
11. After you finalize the sheet and save the changes, then upload it via the upload icon.
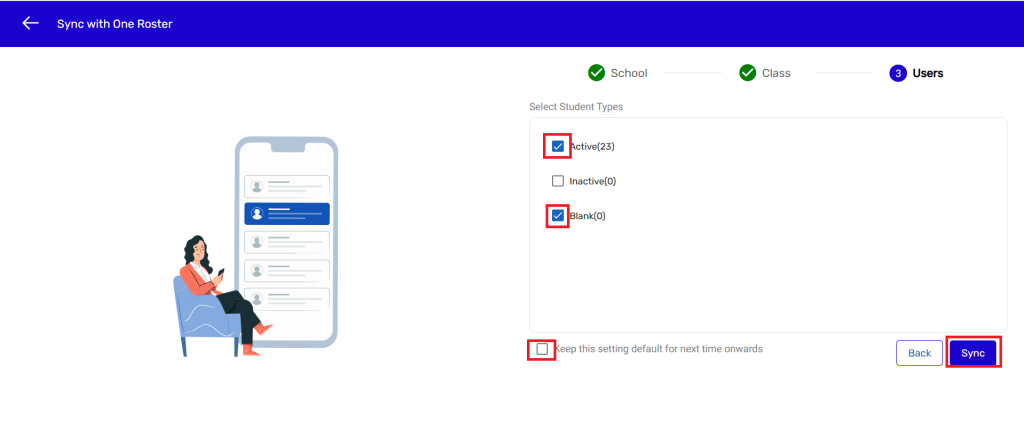
12. After successful data fetch it will show you the list of Users with statuses like Active, Inactive, Deleted, and Blank.
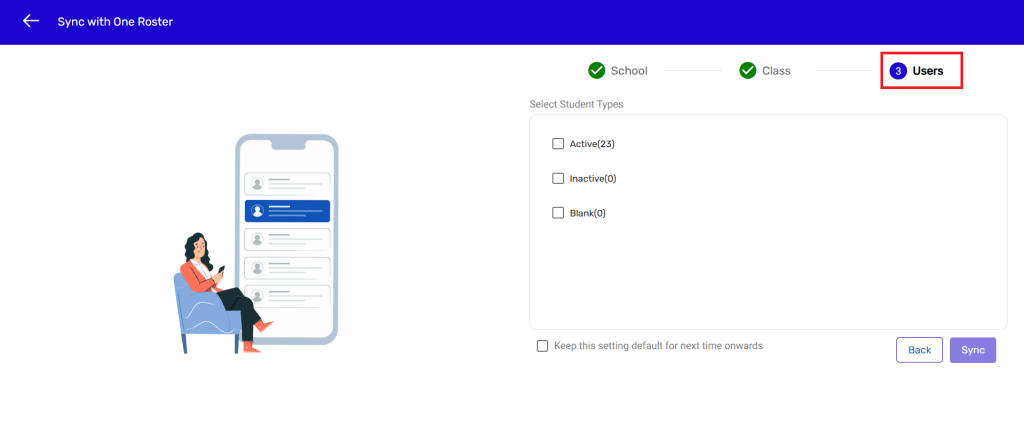
13. You need to select the user’s type depending on the status in order to sync the data on the platform. Click on the sync button. (Note: Success message will appear)
14. After a successful sync, you can view the status of the ongoing or completed roster sync in the one roster drop-down menu.
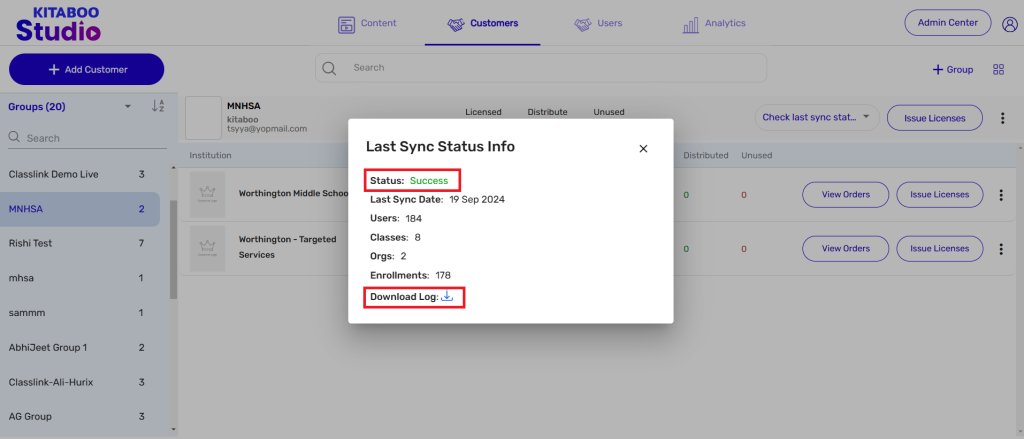
15. You can also find the status of the one roster sync, with the below parameters like Status, Last sync date, Users, Classes, Orgs, Enrollments, and Download log.
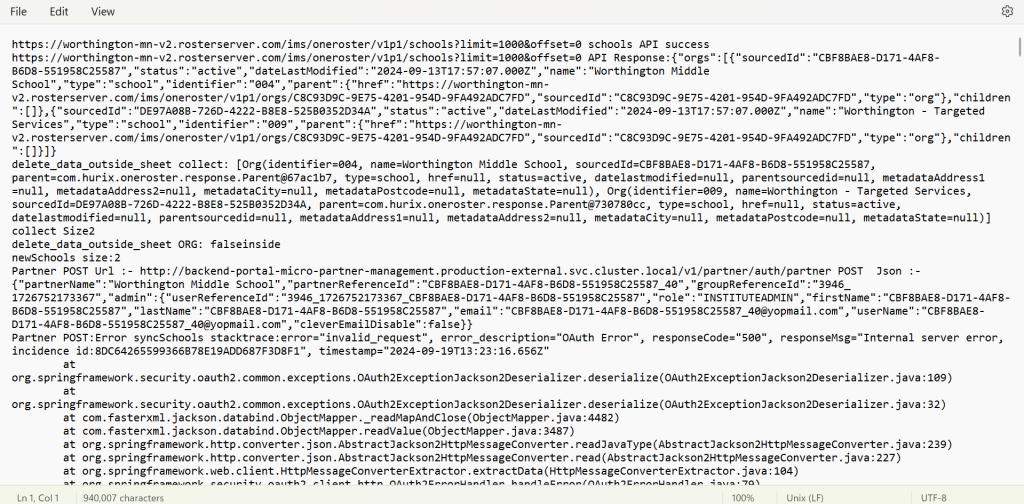
16. In the Download Log, you get all the sync reports in detail.
One-roster Sync Fail Email Notification
In this feature client admin and group admin will get an auto trigger email notification for failed roster sync.
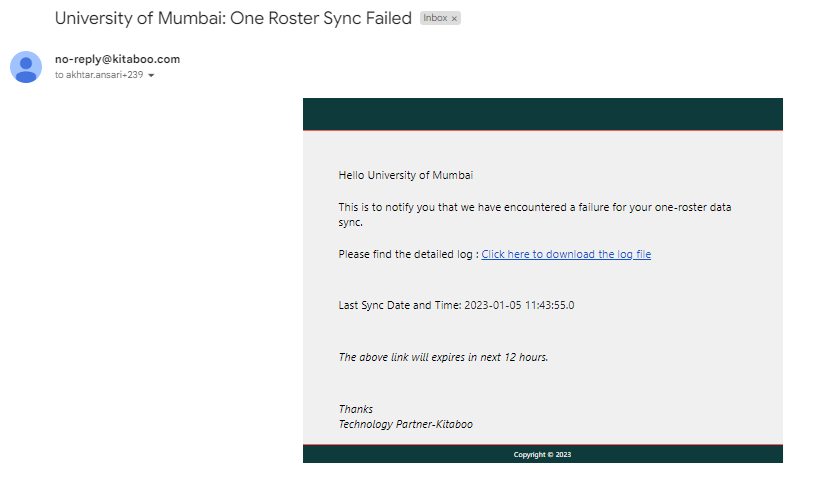
Notify insufficient License
In this feature client admin and group admin will get an auto triggered email notification for not having insufficient license for newly added/synced users.
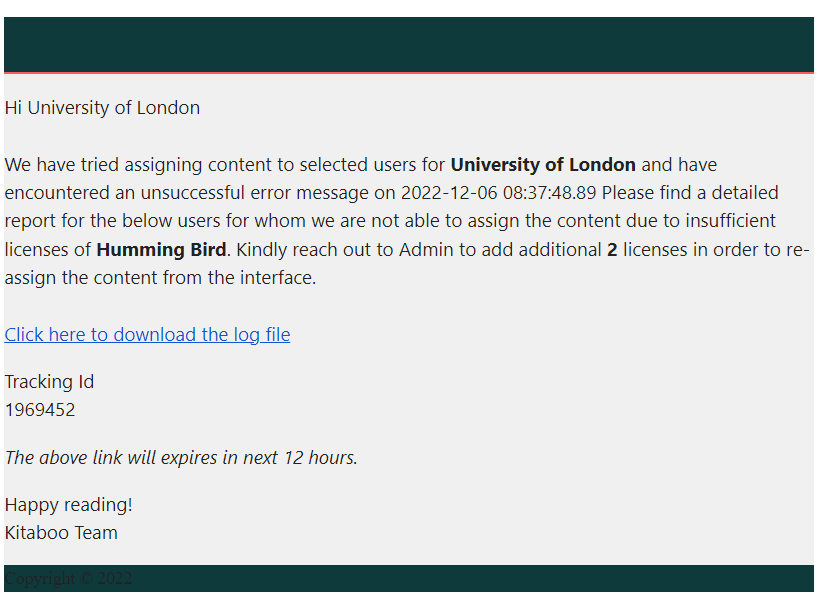
Definition
An Activated User, for the purposes of calculating the applicable monthly license fee, is defined as an End User who:
Has an active license for at least one eBook from the Customer, and
Has launched or downloaded one of the licensed eBooks.
The user continues to be classified as an Activated User until:
(a) All licenses assigned to the user have expired and/or been revoked, and no active licenses remain, or
(b) The user is manually deactivated or deleted by the Customer.
Billing Cycle
Billing for an Activated User is applicable for a fixed duration as per the contractually agreed period.
For example, if the agreed period is 15 months, billing will begin from the month in which the user first accesses any licensed eBook and will continue for the following 14 months—unless:
The user no longer has any active licenses, or
The user is deactivated or deleted by the Customer.
If a user is deleted and later re-created, the billing cycle will restart from the month of reactivation, and a new contract-defined period (e.g., 15 months) will begin.
Additionally, the billing period will reset after every new content assignment to the user, with a new contract-defined period (e.g., 15 months) commencing from that date.
Frequently Asked Questions (FAQ)
1. If a user is inactive for a certain period, can the system automatically deactivate them?
Kitaboo: No. Deactivation is not automatic. The Customer must manually deactivate users using the admin dashboard or reports. Once deactivated, the user will not be counted as an Activated User from the subsequent month.
2. Will a deactivated user still have access to their purchased eBooks?
Kitaboo: No. A deactivated user cannot access their account or previously purchased content. To regain access, the user must contact the Customer’s admin to request reactivation.
3. Can a user reactivate their own account and regain access to content?
Kitaboo: No. End-users cannot self-reactivate. They must reach out to the Customer’s admin for reactivation. Once reactivated, the user will regain access to their previously purchased content and can purchase new content.
4. What happens if a user is deleted after, say, 4 months of usage?
Kitaboo: If the user is deleted after 4 months, they will no longer be treated as an Activated User from the next month. However, if the same user is later re-created, a new contract-defined billing period (e.g., 15 months) will begin from the month of re-creation.
Sequential Learning
Sequential Learning allows you to define and configure a structured learning path where users must complete content in a specified order before unlocking the next item.
How to Enable Sequential Learning
The steps for creating a Sequential Learning collection are the same as standard collection creation https://help.kitaboo.com/docs/creating-a-collection/ , with one additional setting.
Step 1: Enable Sequential Learning
While creating a collection, select the “Enable Sequential Learning” checkbox.
Select this option if you want users to progress through the collection in a defined sequence, ensuring a structured and progressive learning experience.
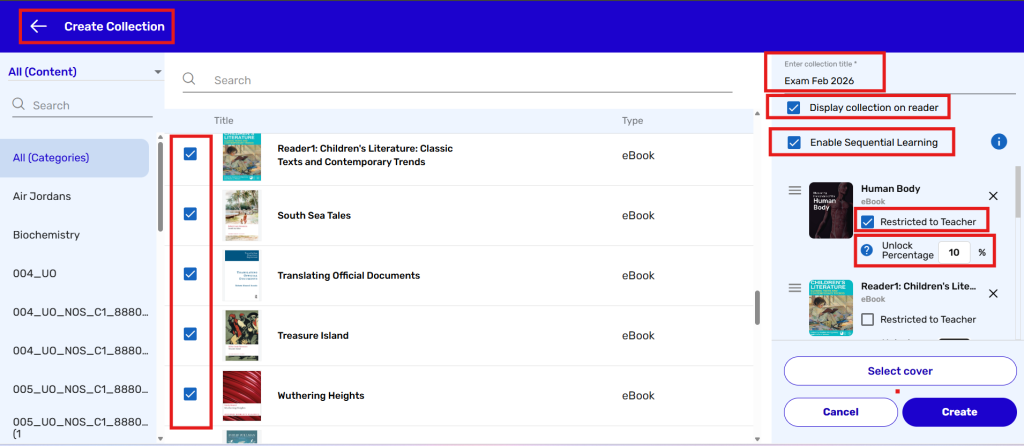
Step 2: Set Unlock Percentage
After enabling Sequential Learning:
Enter the required value in the “Unlock Percentage” field.
The next content item in the collection will be unlocked only after the user completes the previous content based on the defined percentage.
This rule applies sequentially to all content items in the collection.
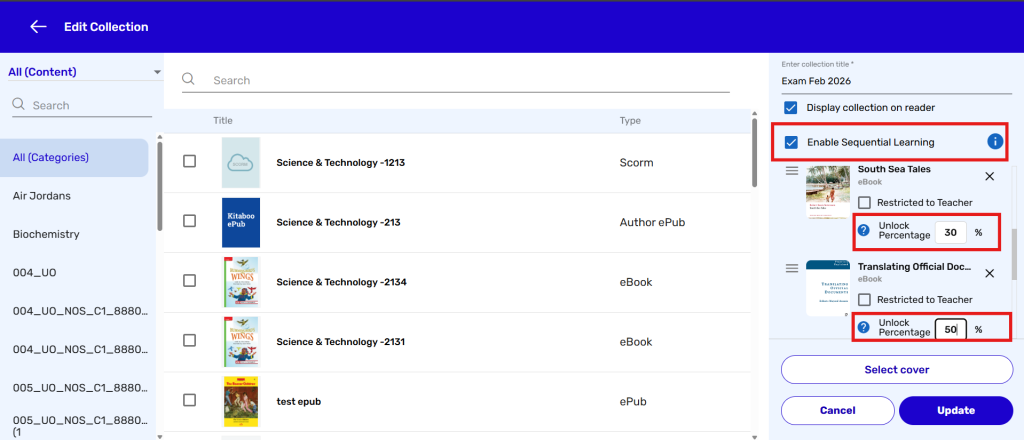
Editing a Sequential Learning Collection
If Sequential Learning is already enabled for a collection and you want to edit it:
Click on the More Options icon against the collection you want to edit.
Select the Edit option.
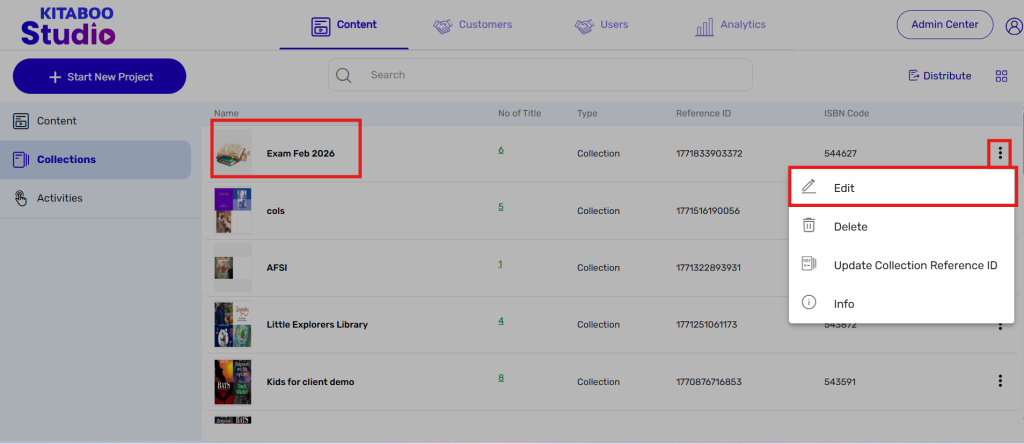
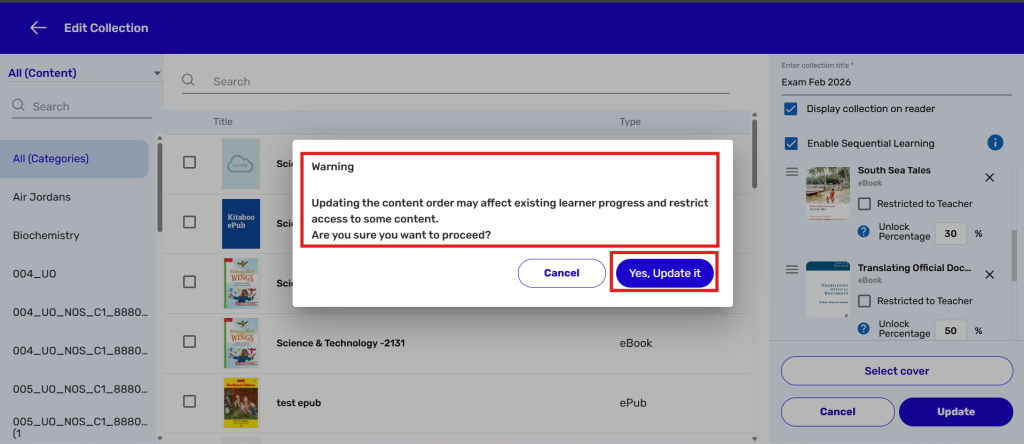
If you change the sequence (order) of the content within the collection:
If the last item in the sequence is moved up (its position is changed), the Unlock Percentage for that item will automatically reset to 0%.
You must re-enter the required percentage as per your learning path configuration.Note:
Updating the content order may affect existing learner progress and restrict access to some content.
Kitaboo Roles & Permissions Overview
| Role | Primary Purpose | Key Permissions & Capabilities |
|---|---|---|
| Students | Consume learning content and complete assigned activities | • Access licensed content (books, courses, audiobooks) • Read in web, mobile, and offline modes • Use reader tools (notes, highlights, bookmarks, TTS, audio) • Attempt quizzes, activities, and AI-generated learning aids (if enabled) • Track personal progress and activity |
| Teachers / Instructors | Facilitate instruction and monitor learner progress | • Assign content to classes or groups • View student reading progress and engagement • Access assessment results and analytics • Use instructional tools and annotations • Manage class-level settings |
| School Administrators | Manage users, licenses, and content at the school level | • Create and manage users and classes • Assign and reclaim licenses • View school-level usage and analytics • Configure onboarding, rostering, and access methods • Monitor content adoption within the school |
| District Administrators | Oversee multiple schools and district-wide operations | • Manage schools within the district • Assign and monitor licenses across schools • View district-level reports and analytics • Configure district onboarding (LTI, OneRoster, Google Classroom) • Monitor compliance and usage trends |
| Publishers | Manage digital content and commercial distribution | • Upload, publish, and manage titles • Control licensing models and access rules • View title-level and user-level analytics • Manage collections and metadata • Track content engagement and performance |
| Content Editors / Producers | Create, enrich, and maintain digital content | • Edit and update content • Add multimedia, assessments, and interactivity • Manage versions and revisions • Configure accessibility settings • Prepare content for publishing workflows |
| System Administrators | Platform configuration, security, and governance | • Full platform access and configuration • Manage roles and permissions • Configure SSO, authentication, and integrations • Monitor system health and logs • Enforce security and compliance policies |
1. Producer Role
The Producer role is intended for users responsible for book creation and content management.
Permissions & Capabilities:
- Create, update, and delete books
- Manage book collections and activities
Limitations:
- Can only access the “Content” tab
- Cannot assign licenses
- Cannot view or manage user or customer details
2. Admin Role
The Admin role has full access and permissions across the platform, including:
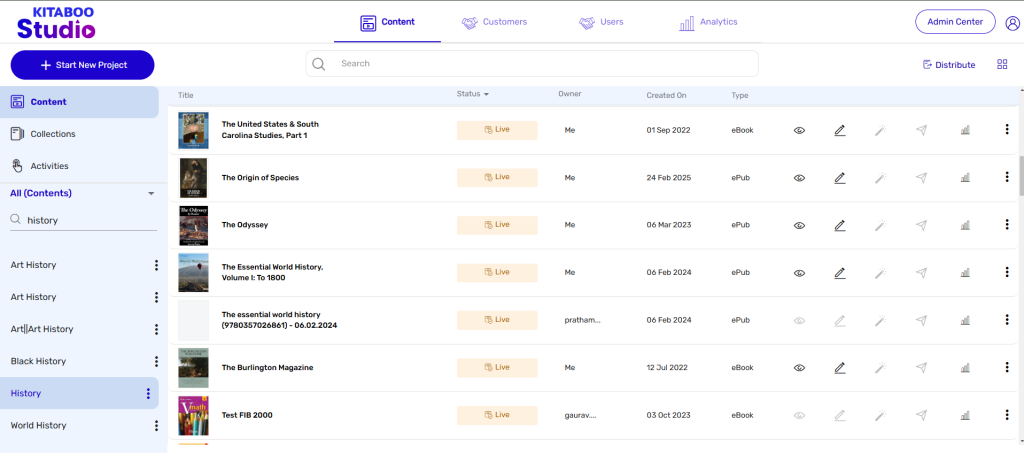
Permissions & Capabilities:
- Managing books and content
- Viewing and managing user details
- Assigning and distributing licenses
- Accessing reports and licensing information
Overview of LTI Tool Consumer & LTI Tool Provider
🔹 What is LTI?
LTI (Learning Tools Interoperability) is a standard that allows two different platforms (for example, two different eReaders or LMS systems) to communicate with each other securely.
- One platform provides the content/tool (Provider).
- The other platform consumes or launches that content/tool (Consumer).
🔹 LTI Tool Provider
- The Provider is the platform that hosts and serves the content.
- When your reader/content is being launched on another platform, your system acts as the Tool Provider.
- Example:
- Kitaboo has an eBook.
- A university uses Moodle LMS.
- Students log into Moodle and click on the book.
- Moodle (Consumer) requests the book from Kitaboo.
- Kitaboo (Provider) delivers the book seamlessly inside Moodle without students logging in again.
👉 In short: Provider = we are sharing our content to be launched from someone else’s system.
🔹 LTI Tool Consumer
- The Consumer is the platform that requests and displays the content from another provider.
- When you launch another platform’s content on your reader platform, your system acts as the Tool Consumer.
- Example:
- Another publisher (say, Pearson) has content hosted on their system.
- You integrate their content into the Kitaboo Reader.
- When a student opens Pearson’s course from Kitaboo, Kitaboo (Consumer) requests and launches it from Pearson’s system (Provider).
👉 In short: Consumer = we are embedding other platforms’ content into our system.🔹 Simple Analogy (Restaurant Example 🍽️)
- Provider = Restaurant kitchen (they cook and serve the food/content).
- Consumer = Customer’s table (they receive and enjoy the food/content).
- If Kitaboo serves its content inside another LMS → Kitaboo is the kitchen (Provider).
- If Kitaboo displays another publisher’s content → Kitaboo is the table (Consumer).
👉 So depending on the scenario, Kitaboo can be both:
- Provider when giving access to our content on other platforms.
Consumer when embedding other platforms’ content into our reader.
Sample External Tool Creation Process
The sample external tool creation process is outlined below, including the required data and the steps to add and verify it after creation in both the Content tab and the Admin Center.
In the UI, mandatory parameters are marked with an asterisk (*). The following details outline the mandatory and non-mandatory fields for configuring an external tool:
Mandatory Fields
External Tool Content Metadata
- Title* – Name of the external tool.
- Custom Parameter* – Custom parameter to be passed while launching the tool.
- Category* – Tool category selection.
- Language* – Default language for the tool.
Create LTI Tool
- Tool Name* – Unique name of the LTI tool.
- Client ID* – Client identifier provided for the LTI tool.
- Deployment ID* – Deployment identifier for the LTI integration.
- Public Keyset URL* – URL for fetching the public keyset.
- Initiate Login URL* – URL used to initiate the LTI login.
- Redirection URL – Redirection URL.
- Method* – Select method for login initiation.
- Issuer ID* – https://microservices.kitaboo.com (The Issuer ID field is https://microservices.kitaboo.com, and this will remain the same for all external tools on Production)
Non-Mandatory Fields
- Description (Content Metadata) – Optional description of the tool.
- Add Additional Parameter (LTI Tool creation) – Allows adding extra key-value parameters.
- Cover Image (Content Metadata) – Optional cover image for the external tool.
- Open in New Tab (checkbox) – Option to open the tool in a new tab. If not selected, the content will open inside an iFrame.
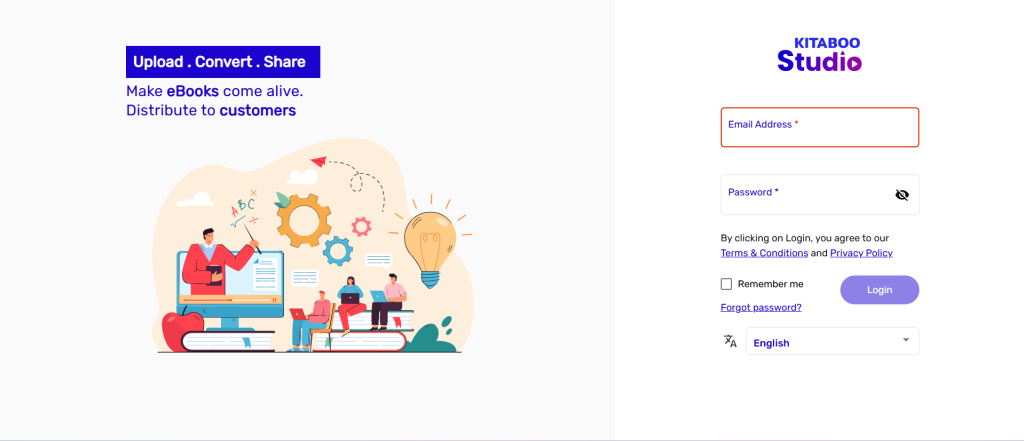
Sign in with your Enterprise Admin credentials.
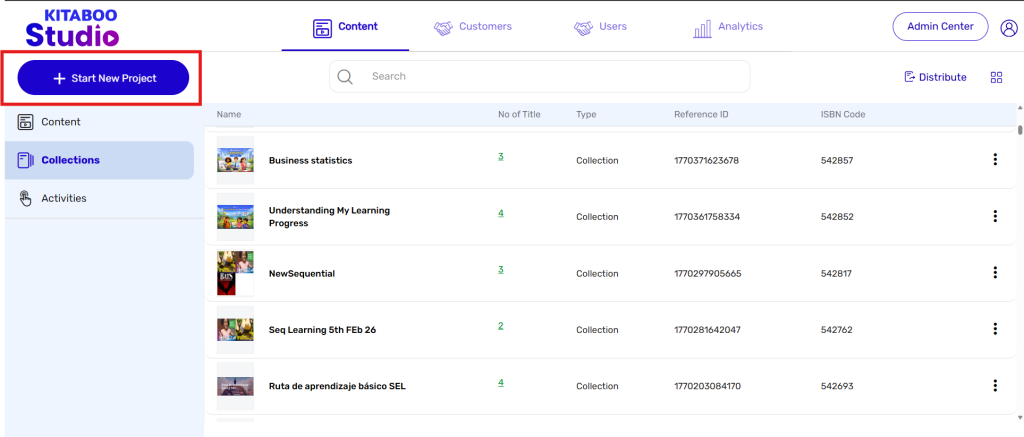
- Switch to the Content tab. > Click on the Start New Project button.
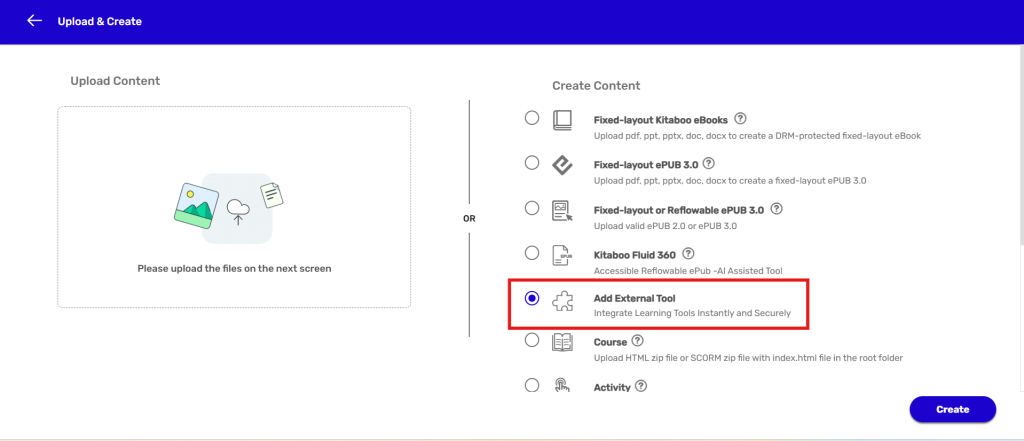
On the Upload & Create page, select the Add External Tool option from the Create Content list. > Click on the Create button
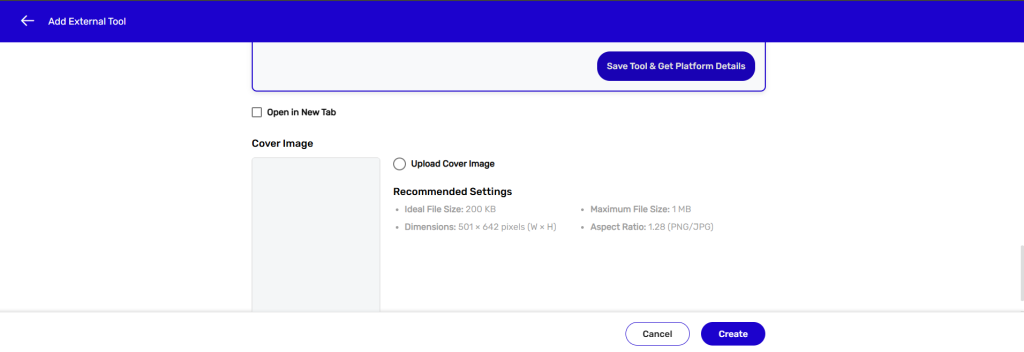
On clicking the Add External Tool option, the tool details screen will be displayed where you need to enter the required information (as explained previously).
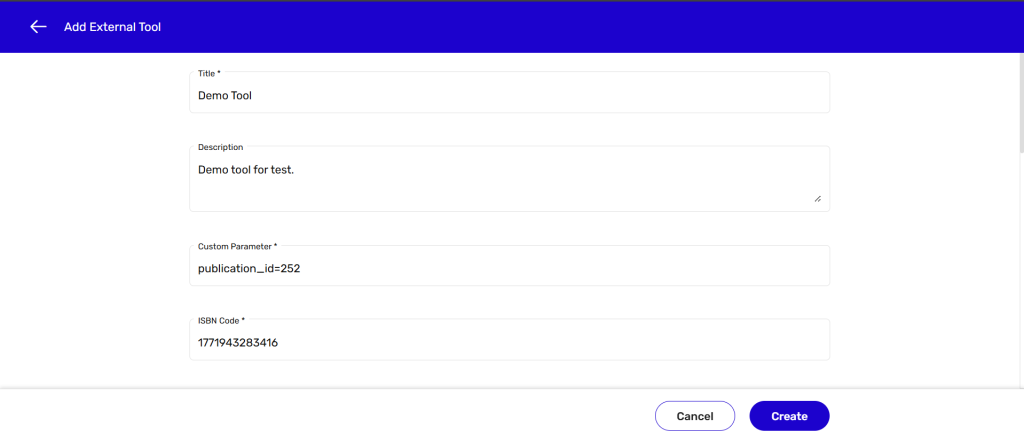
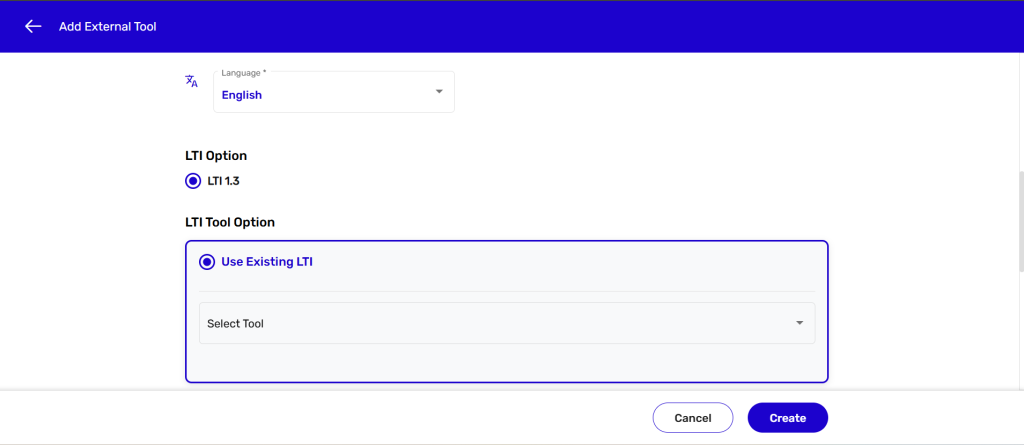
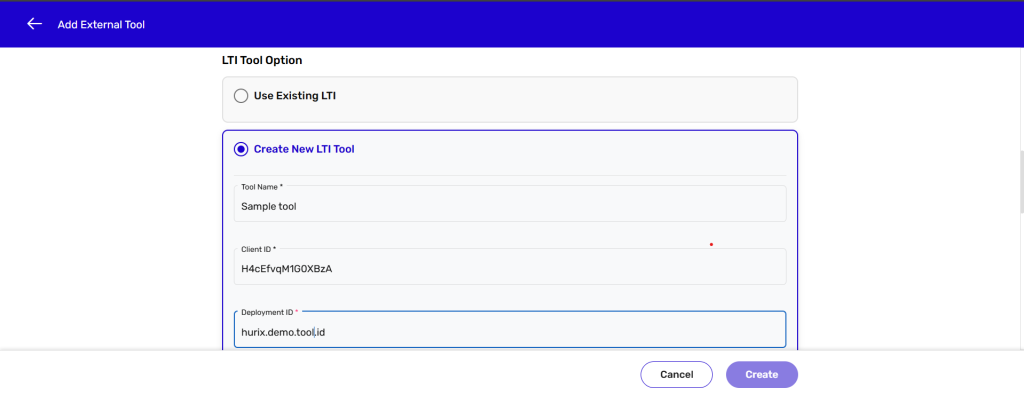
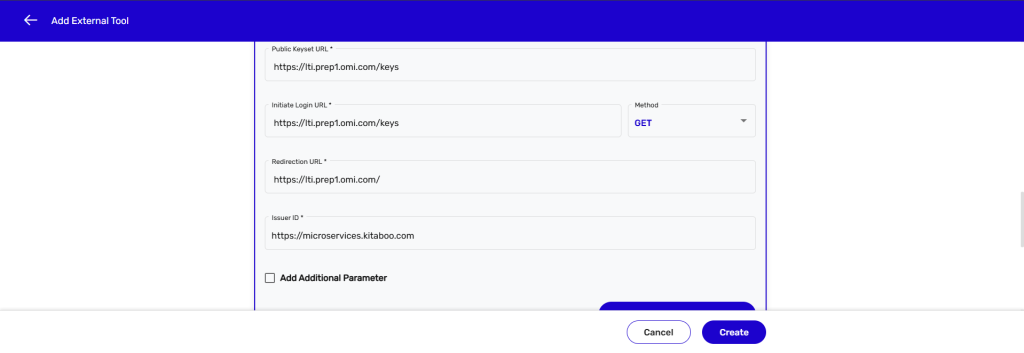
After entering all the required details, click on the Create button.
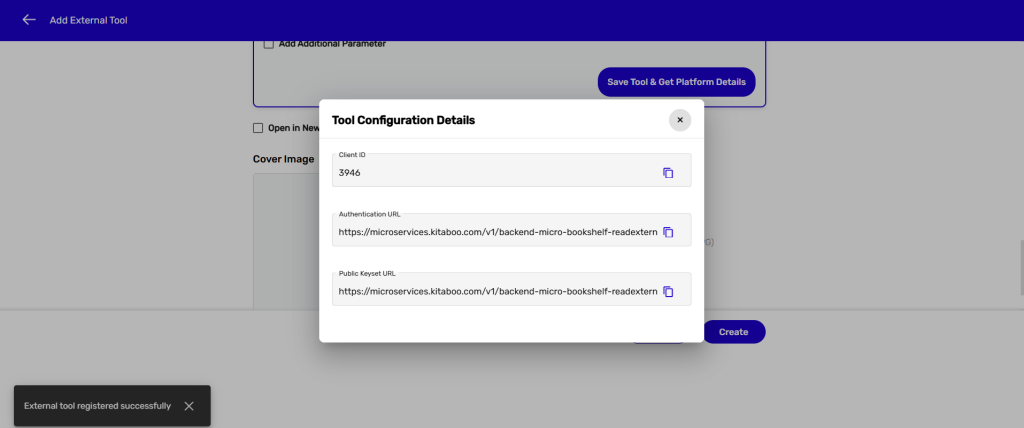
A success message will be displayed:
“External Tool registered successfully” along with the Tool Configuration details such as:
Client ID
Authentication URL
Public Keyset URL
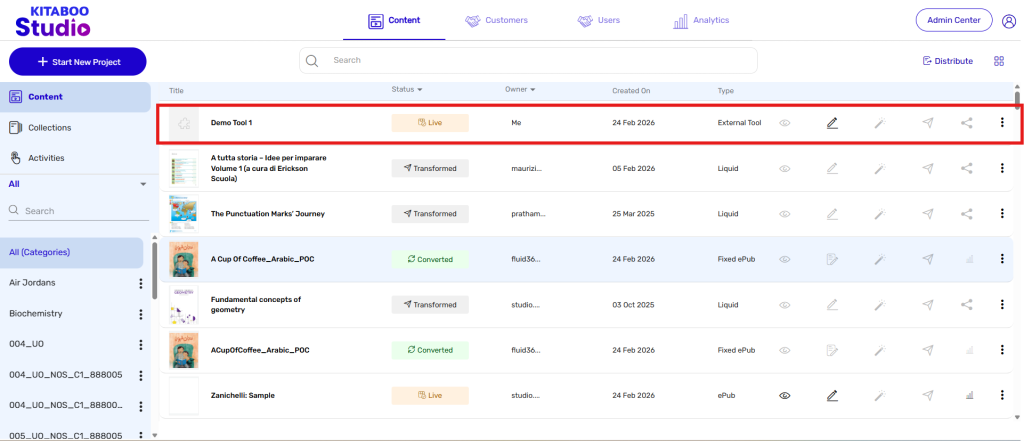
Once created, the external tool will be visible under the Content tab.
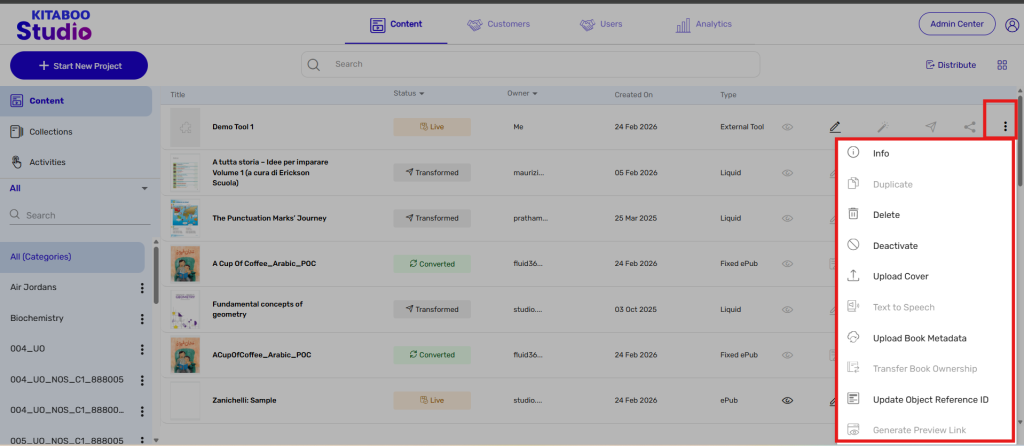
Click on the three dots (More Options) against the tool name to access the following options:
View Info
Delete Tool
Deactivate Tool
Upload Cover Image
Upload Book Metadata
Update Object Reference ID
External Tool in Admin Center
The created external tools can also be viewed in the Admin Center under the External Tool section.
Here, you can:
View configuration details
Edit the tool
Delete the tool
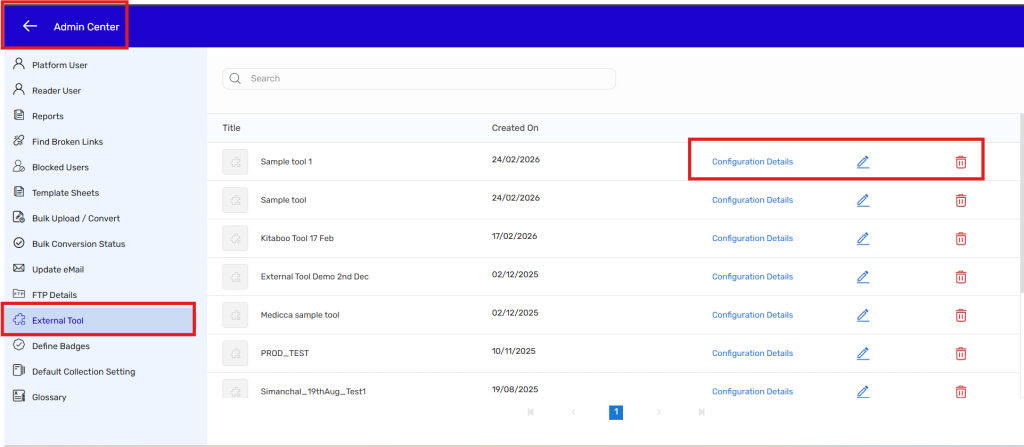
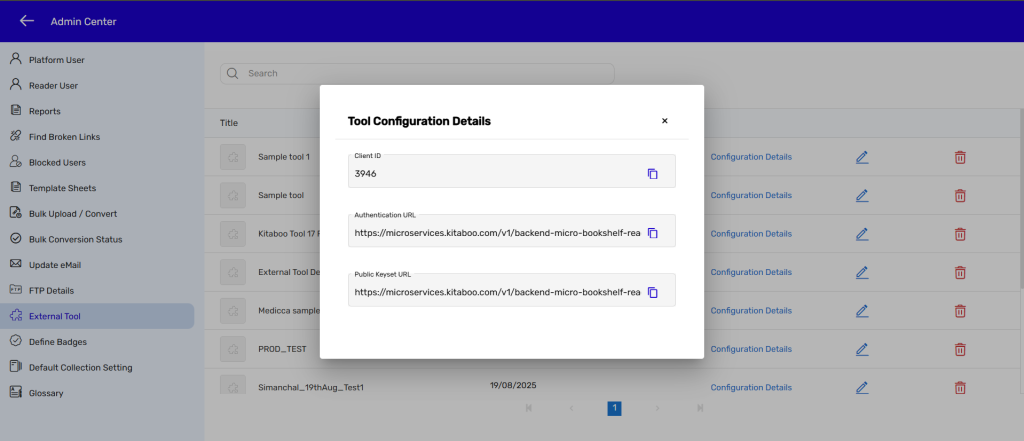
On clicking Configuration Details, the complete tool configuration information will be displayed.
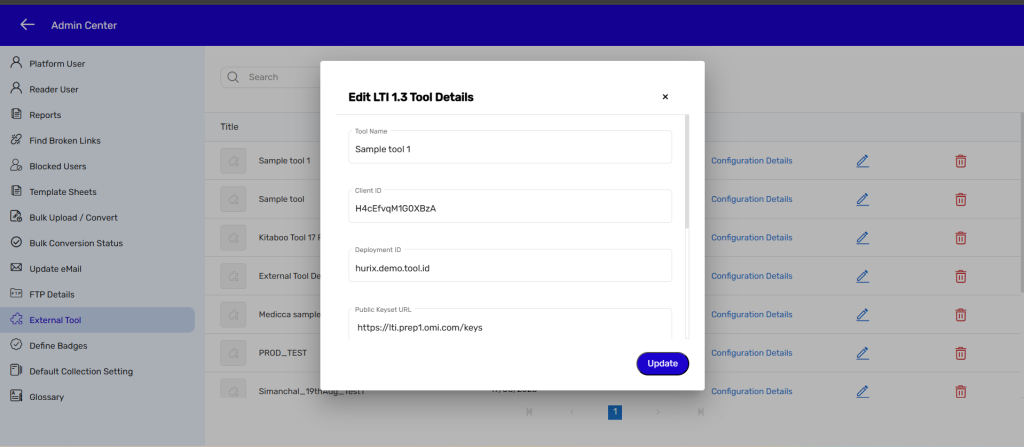
On clicking Edit Tool, the tool details screen will open where the available fields can be updated as required.
The auto-deletion process for books in the “In Progress” state:
- All books in the “In Progress” state that have not been modified for one month should be automatically deleted from the “In Progress” section.
- The archived, updated eBook will be reverted to its previous version in the archive section.
- Users will receive a notification pop-up only in the “In Progress” section upon logging into the system.

- Users will receive a notification pop-up in the following cases:
Case 1: On the 15th of every month – If the user has not logged in for 15 days, they will receive a notification warning upon their next login after 15 days.
Case 2: On the 22nd of every month – If the user has not logged in for 22 days before the end of the month, they will receive a notification warning upon their next login after 22 days but before 27 days.
Case 3: On the 27th of every month – If the user has not logged in for 27 days before the end of the month, they will receive a notification warning upon their next login after 27 days but before 28 days.
Case 4: On the 28th of every month – If the user has not logged in for 28 days, the books will be automatically deleted, and an email notification will be triggered.
Additional Notes:
- Notifications will be triggered according to the scheduler (on the 15th, 22nd, 27th, and 28th of every month).
- The user must either archive or modify the eBook to prevent auto-deletion. If no modifications are made, the book will be automatically deleted from the Kitaboo portal.
- If the user edits any book, the auto-deletion date will be adjusted to one month from the last edited date of that particular book.
Steps to Configure SAML Integration on the
Studio Platform:
- Login as Administrator:
Access the Studio platform using your administrator credentials.
- Create a Customer Group:
Navigate to the Customer tab.
Click on the +Group option.
Fill in the metadata, ensuring that the Client Group ID is unique and does not start with the word “SAML” (must be alphanumeric).

- Set Up SSO Source:
- The Kitaboo Support team will share the Service Provider (SP) .xml file consisting of the Reply URL and the Identifier, i.e. the entity ID.
- Select SSO Source as “SAML”.
Enter the SAML data obtained from the partner school/district, including:
IDP URL
BASE URL
Issuer ID
Certificate URL
Encrypted Response – Enable/Disable/None
Signed Request – Enable/Disable/None
Canonicalization Algorithm
Signature Algorithm

- Now select on the Rostering Type dropdown and select OneRoster or
- OneRoster 1.2 and accordingly fill up the details for the Rostering type.

- Add the Group:
Once all the required data is correctly filled, click the Add button.
- Sync Data:
Return to the Customer tab.
Filter the data by Group and select the recently created district from the list.
Click on Sync all data-API. To track the synchronization status, check the Status option.
- Generate Licenses:
After the data is properly synced, you can generate licenses for specific schools by clicking on the Issue License.
- Distribute Content:
District/School administrators can now log in and distribute content to users.

District Guide:
- Login as District Administrator:
Access the Studio platform using your district administrator credentials.
- Select School Account:
Select the school from the top right corner.
- Assign Content:
Navigate to the Distribute Content tab.
Click on User or Class to distribute the respective content.
Select the users and Order ID.
Click on the Distribute button.


- Revoke Content:
Navigate to the Users tab.
Select the user or class from which you want to revoke the content.

District/School FAQ:
Q1: Can district/school admins add new users or classes directly in Studio?
No, as it’s a SAML sync, user creation and updates need to be done via API/SFTP/ZIP. You must request the main admin to resync the data in Kitaboo so that the district admin can see the latest roster changes.
Q2: Can district/school admins set/reset passwords for users in Studio?
No, As SSO is done using SAML
Q3: Can district admins delete users/classes using Studio?
Yes, but whenever an auto sync occurs, the users and classes will be recreated.
Q4: Can district/school admins assign content to users beyond the license limit?
No, they can only distribute content within the limits allocated by the main admin. If additional licenses are needed, they should reach out to the main admin to increase the license count.
Q5: Can district admins control the license count school-wise?
Yes, district admins can manage license counts from the “Distribute Content” tab by selecting the title from the order and managing it under the “More” section.


API Endpoints Used
- OneRoster 1.1
/ims/oneroster/v1p1/orgs
/ims/oneroster/v1p1/schools/{schoolSourceid}/classes
/ims/oneroster/v1p1/schools/{schoolSourceid}/students
/ims/oneroster/v1p1/schools/{schoolSourceid}/teachers
/ims/oneroster/v1p1/schools/{schoolSourceid}/enrollments
OneRoster 1.2
/ims/oneroster/rostering/v1p2/schools
/ims/oneroster/rostering/v1p2/schools/{schoolSourceid}/classes
/ims/oneroster/rostering/v1p2/schools/{schoolSourceid}/students
/ims/oneroster/rostering/v1p2/schools/{schoolSourceid}/teachers
/ims/oneroster/rostering/v1p2/schools/{schoolSourceid}/enrollments

Signing in with SAML:
Learn how to sign in to Kitaboo Player with SAML (Sample flow.)
Note: How you sign in depends on how your administrator has set up access
1. Go to KitabooPlayer ➜ URL: https://player.kitaboo.com/
2. Click “Sign in with SAML”

3. After successful login users can access the content .

Let’s see how to create and add a group, and sync it with Clever.
- Sign in with your Enterprise Admin credentials.
- Click on + Group for adding a group.
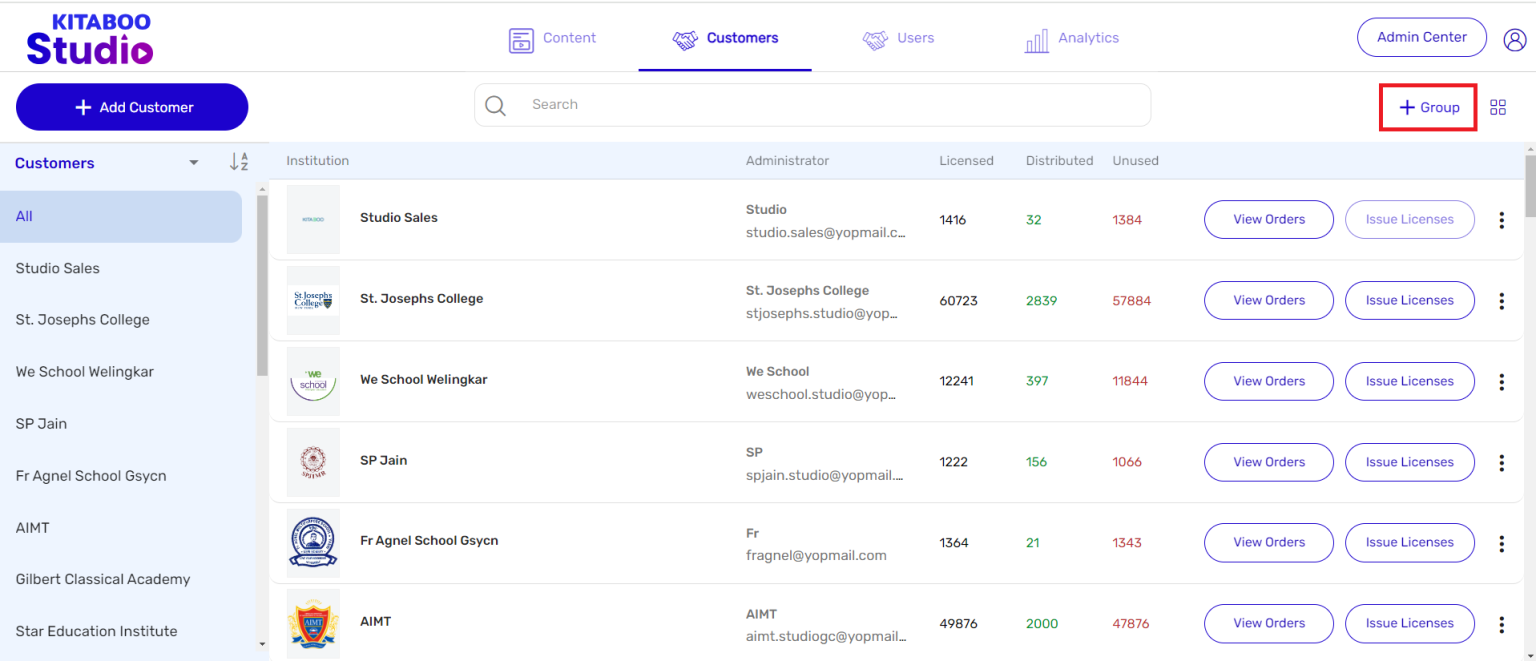
- Enter the group details like Group Name, Description, Email ID, and Client Group ID. > Select Clever from the SSO Source/Onboarding Type also Clever dropdown menu.
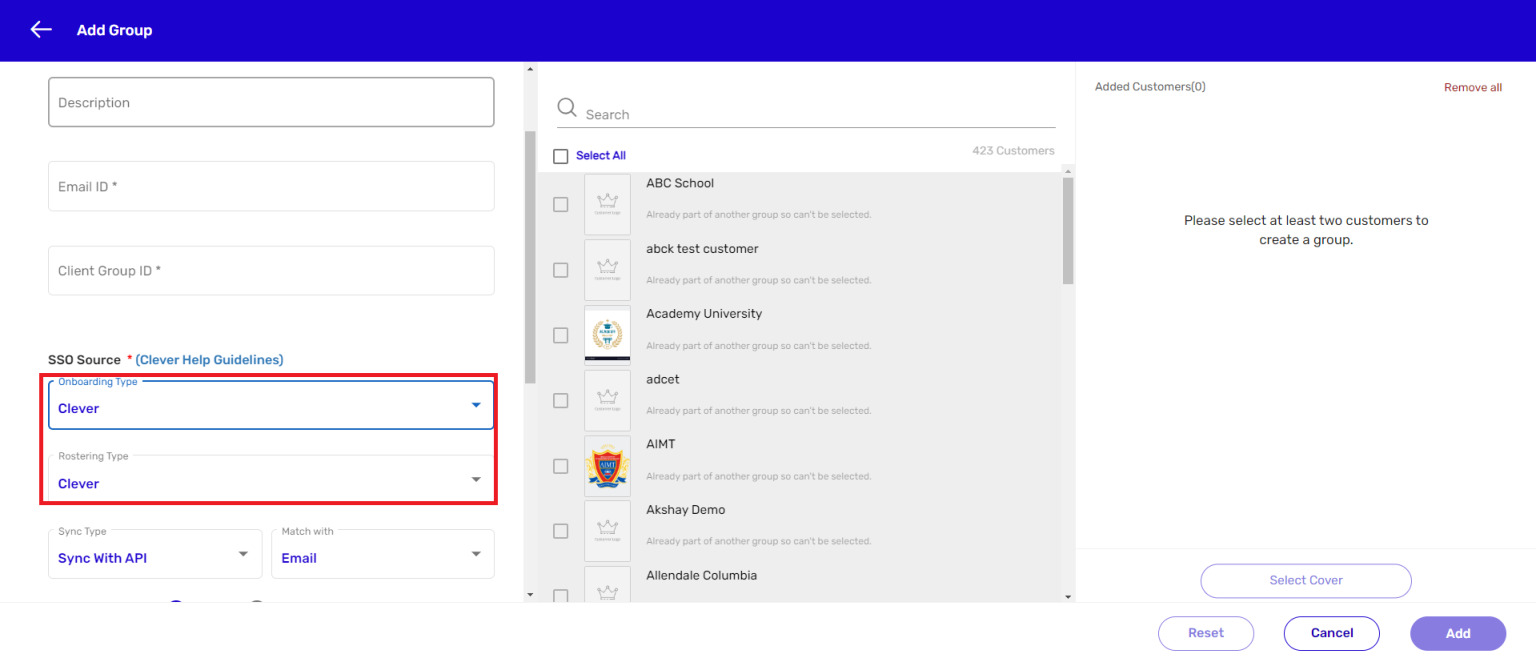
NOTE: The moment you select PowerSchool as the Onboarding type, a new field by the name Sync Type with Sync With API as a default sync type will appear. The other fields that you will find there are – Sync Frequency, Match with (either Email or Source ID), District ID, Auth Token, URL, Client ID, Secret Key.
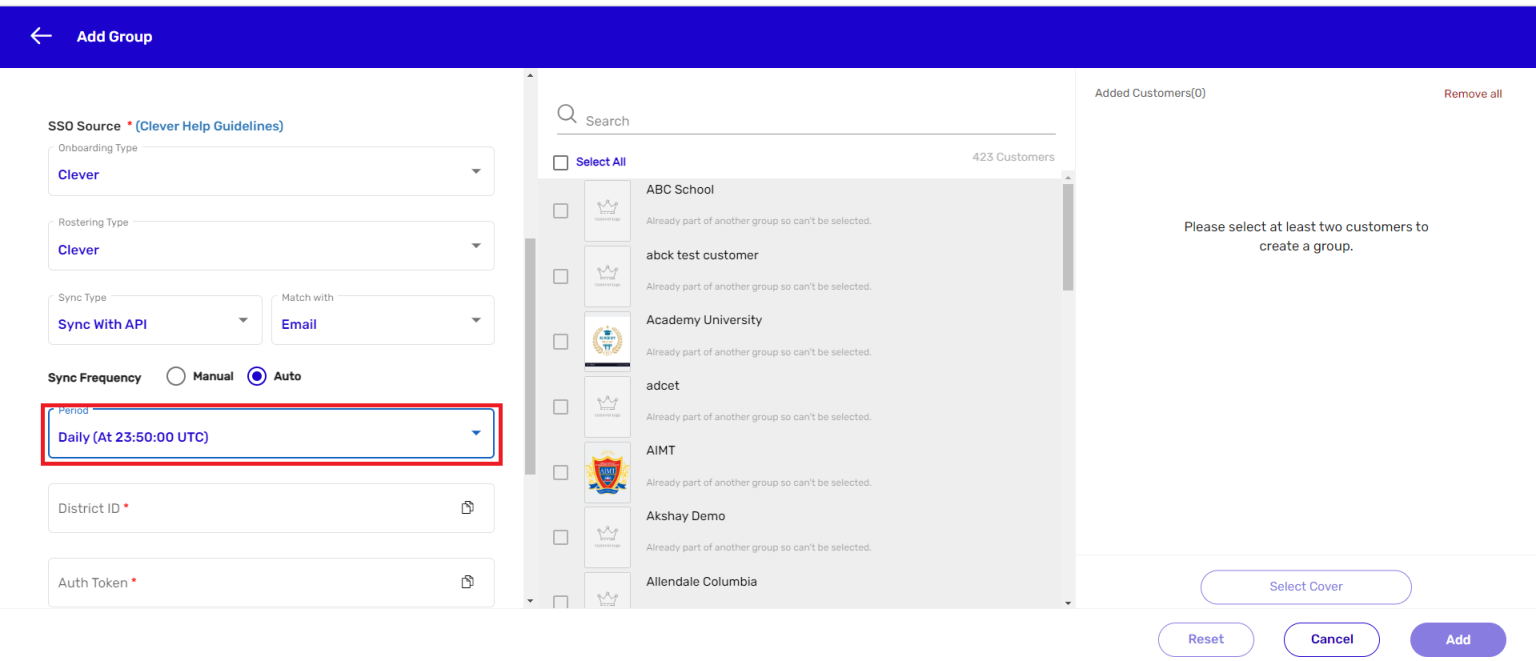
NOTE: There are two Sync Frequency options – Manual and Auto. Here Manual means you will have to manually sync the data. And, Auto means the system will automatically sync the data. If you select the Auto data syncing option, you will have to define how frequently you want the system to sync the data. Currently, there is only one option which is Daily.
We have selected Auto as the Sync Frequency option, and Daily as the Period for sync frequency in this example.
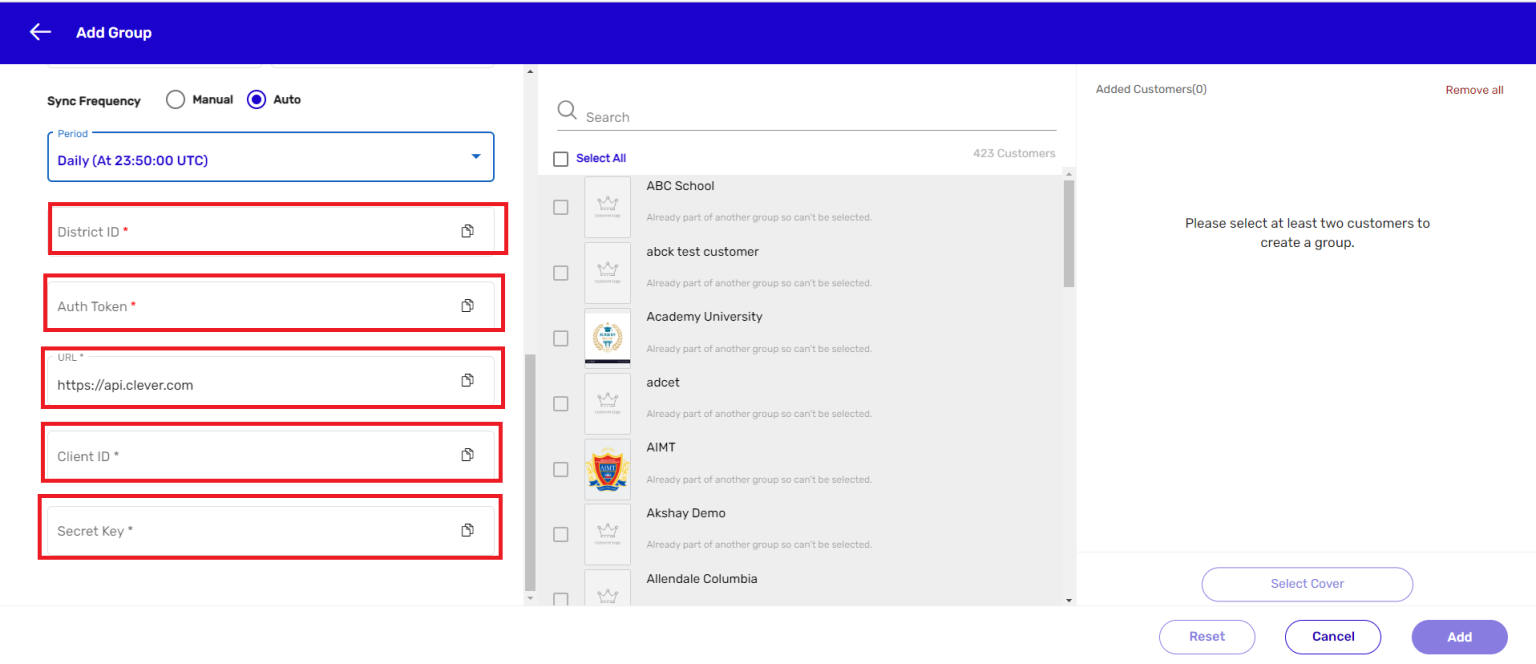
Enter details in the Access Token URL, Customer Key, Secret Key, and URL fields.
Select Customers from the list. > Click on Select Cover for providing a cover image to your group. > Click on Add.
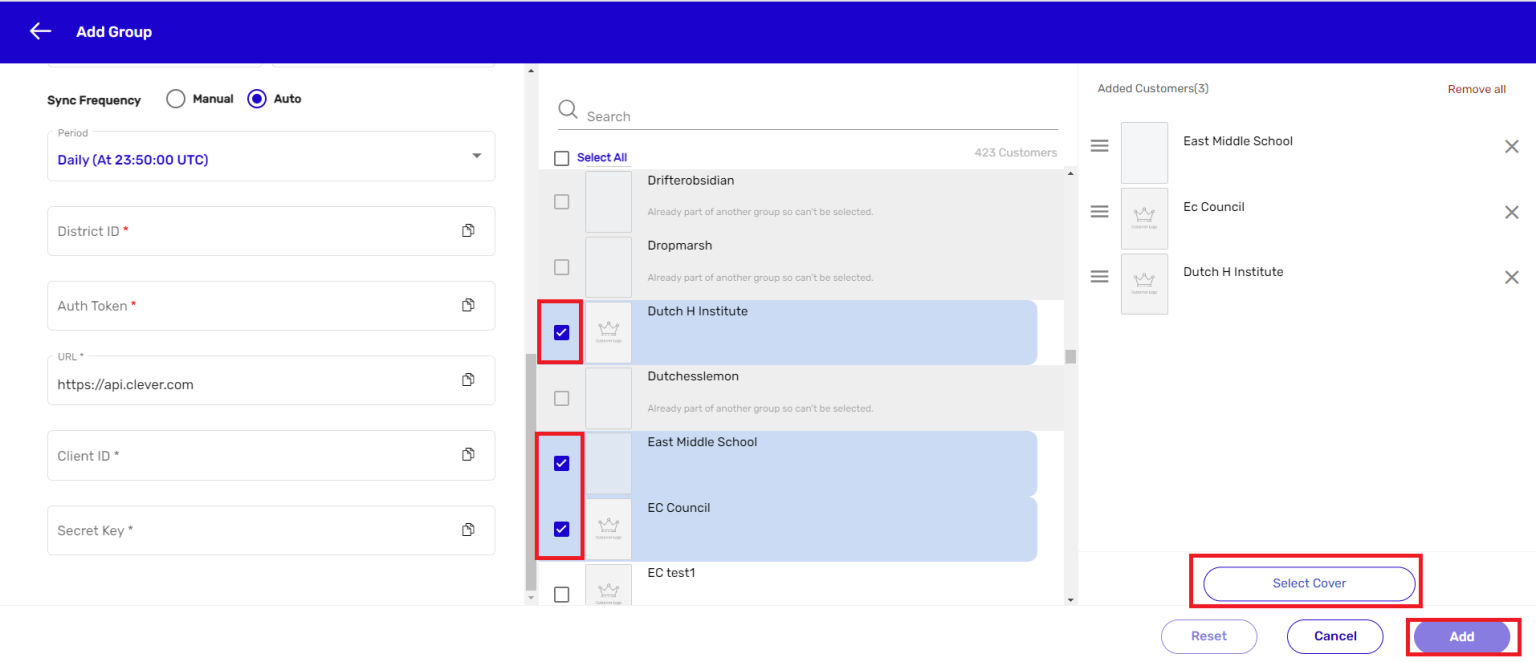
NOTE: Some of the customers on the list are greyed out. This is because they are already part of another group. Hence they cannot be selected.
Sync Data:
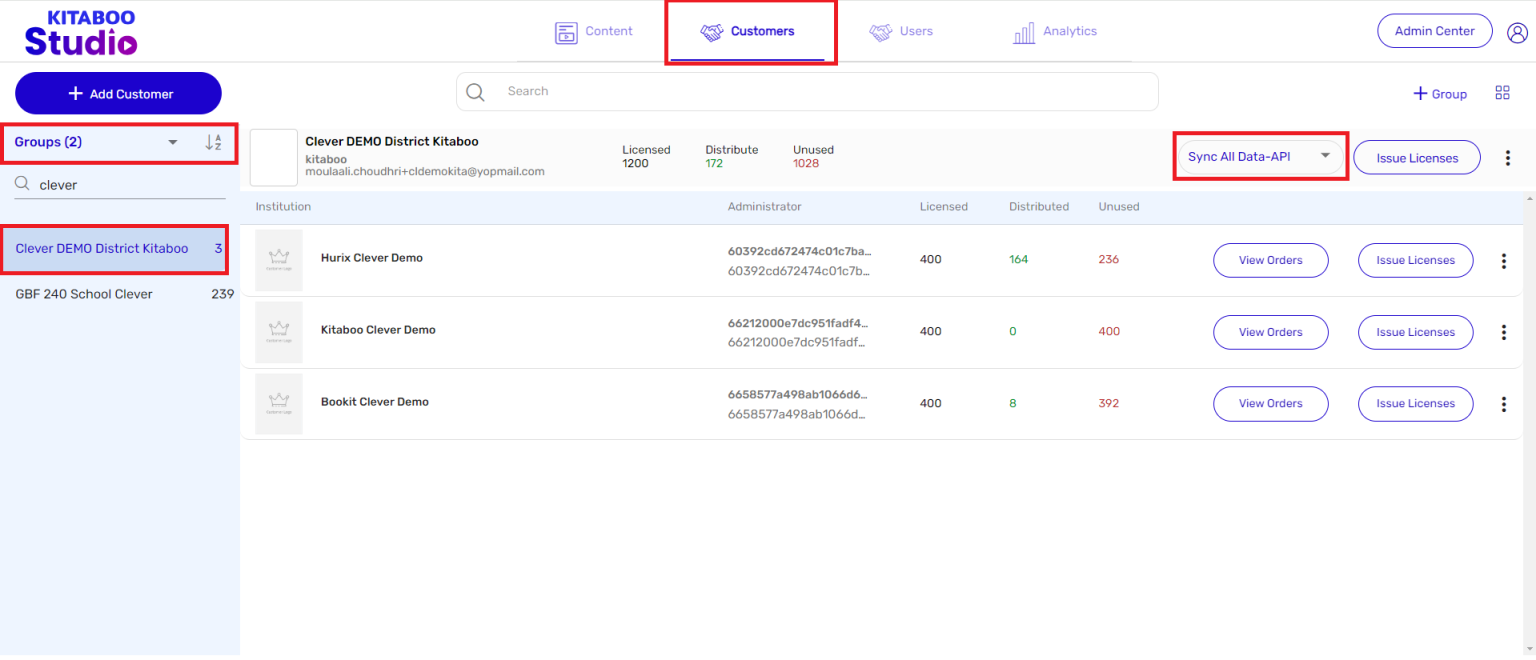
1. Return to the Customer tab.
2. Filter the data by Group and select the recently created district from the list.
3. Click on Sync all data-API. To track the synchronization status, check the Status option.
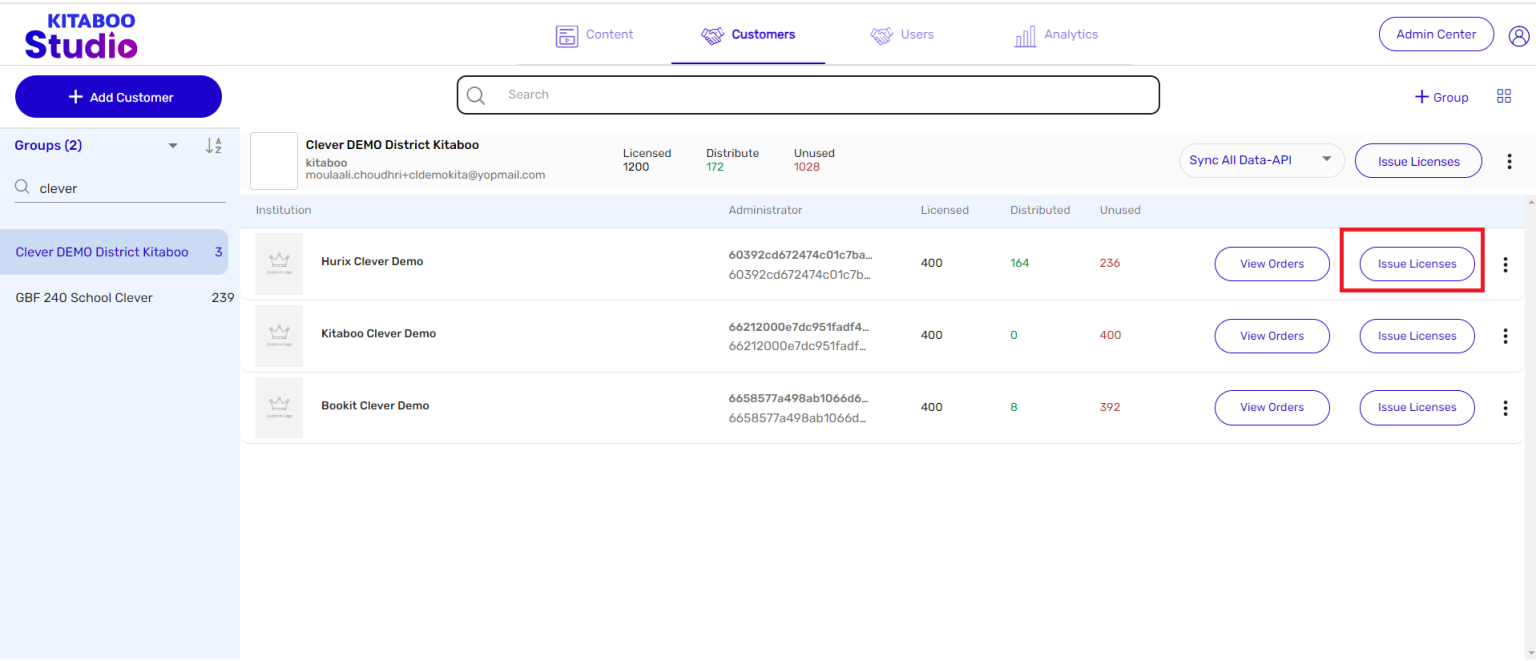
- Generate Licenses: After the data is properly synced, you can generate licenses for specific schools.
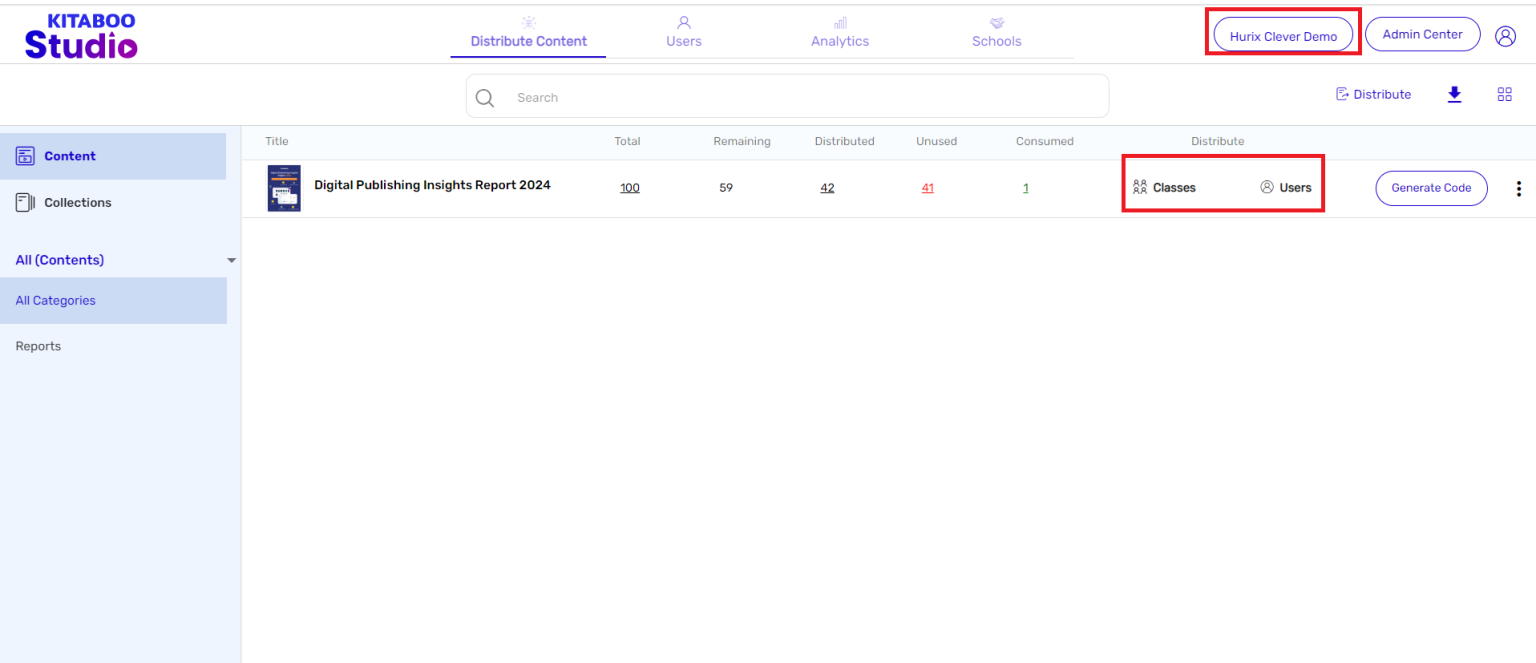
Distribute Content:
District/School administrators can now log in and distribute content to users.
- Configure Redirection URL on Clever Site: On the Clever site, configure the
redirection URL as follows: URL, i.e.
(https://microservices.kitaboo.com/v1/clever management/clever/KITABOO_CLIENT_I D/CLEVER_CLIENT_ID/CLEVER_CLIENT_SECRET/clever/redirect)
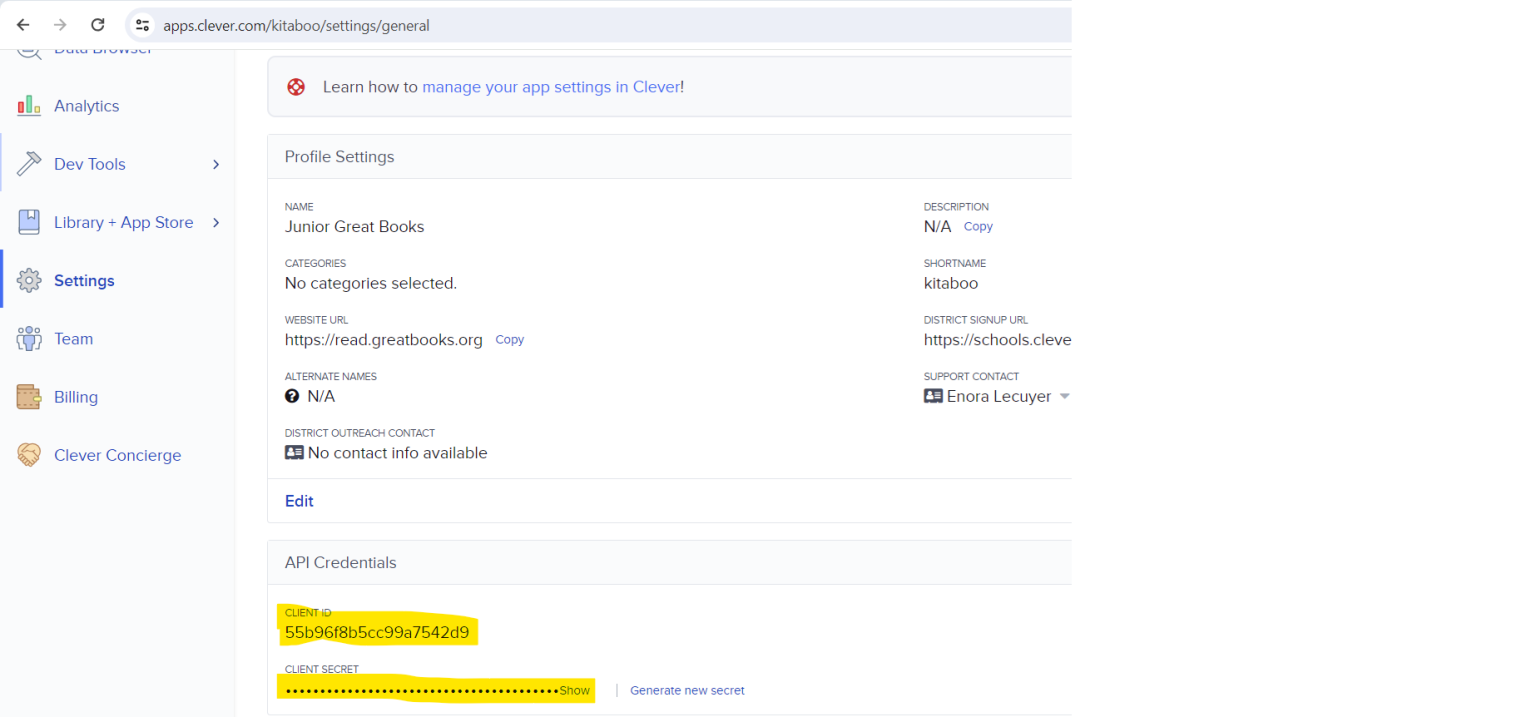
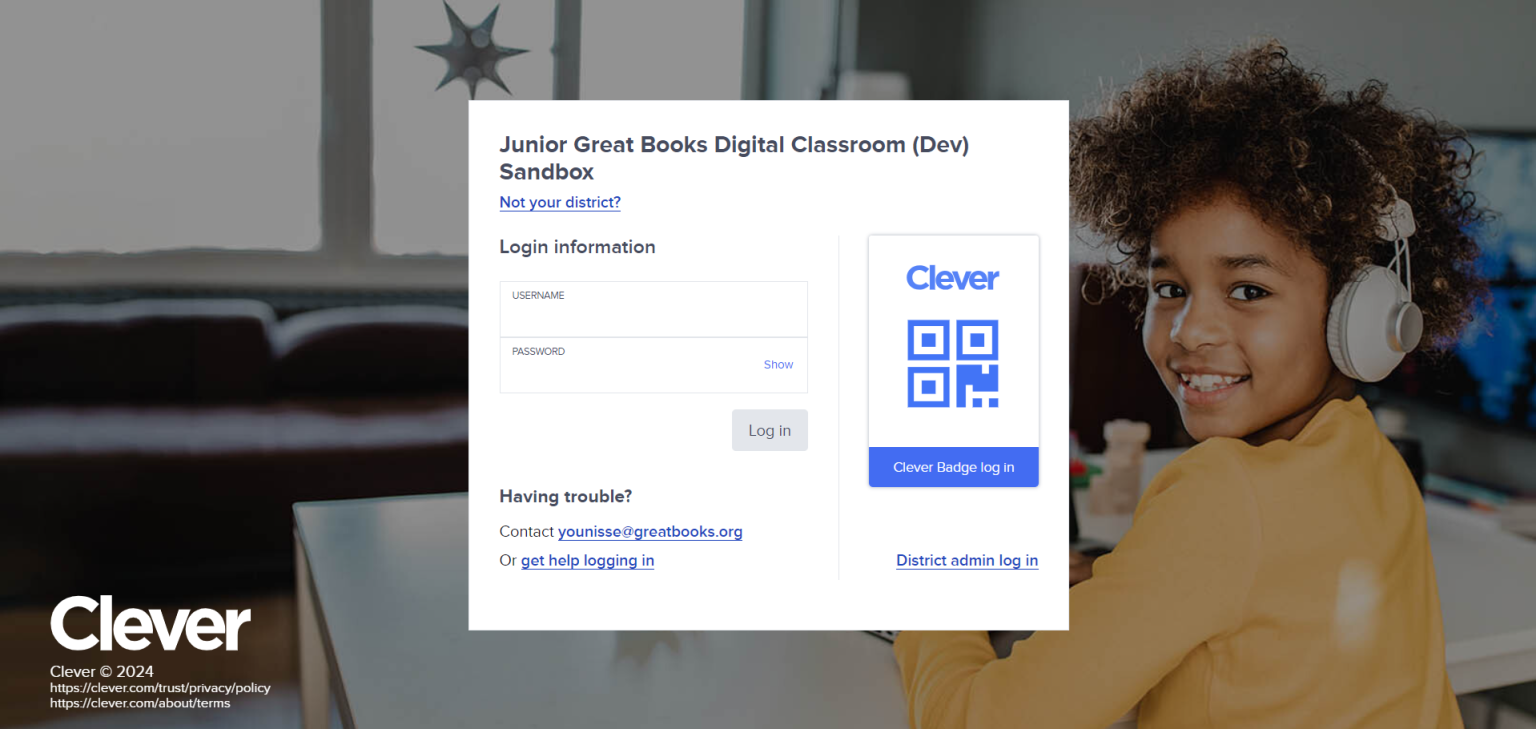
Access Content: Copy the Instant Login URL and provide it to students and teachers to access all assigned content.
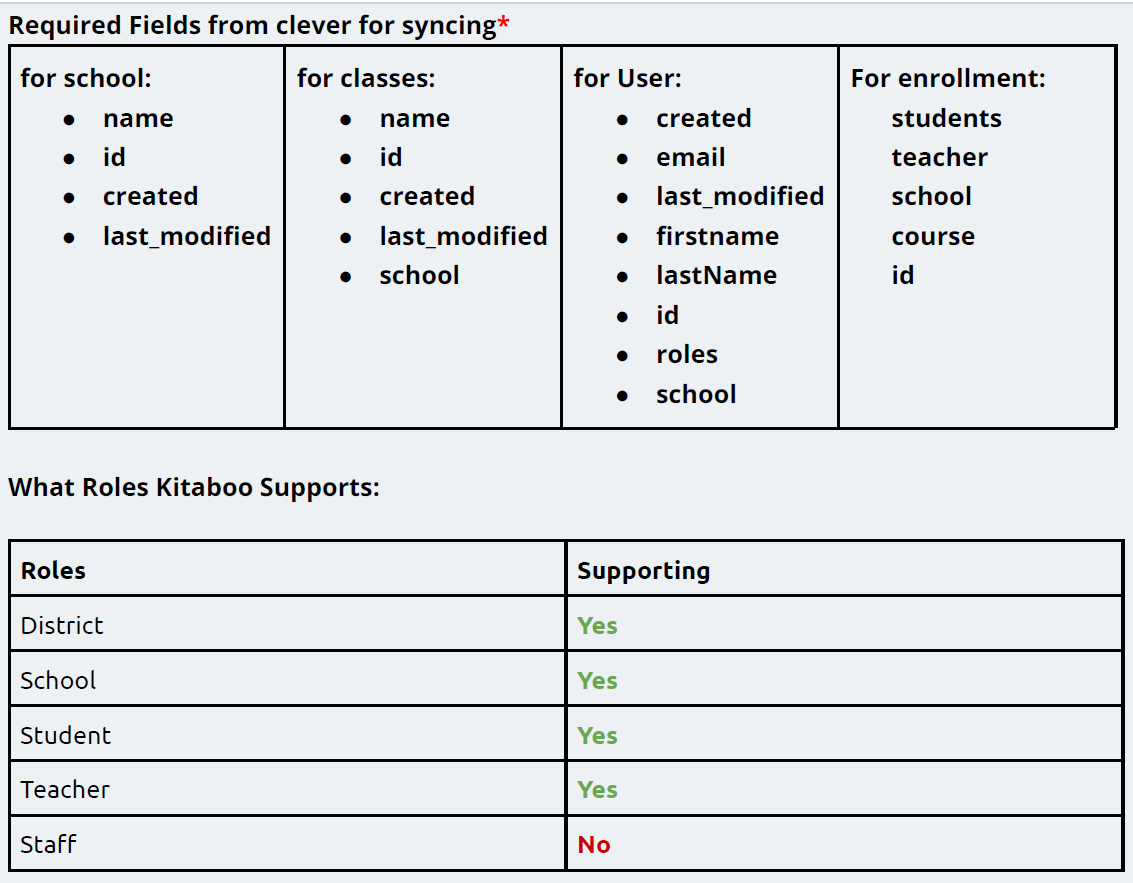
API Endpoints Used:
● /v3.0/schools
● /schools/{schools_ID}/sections
● /schools/{schools_ID}/users?role=teacher
● /schools/{schools_ID}/users?role=student
1. Once you create an Oneroster Group with all configuration like API/ZIP/SFTP. Search for your group name under the group tab.
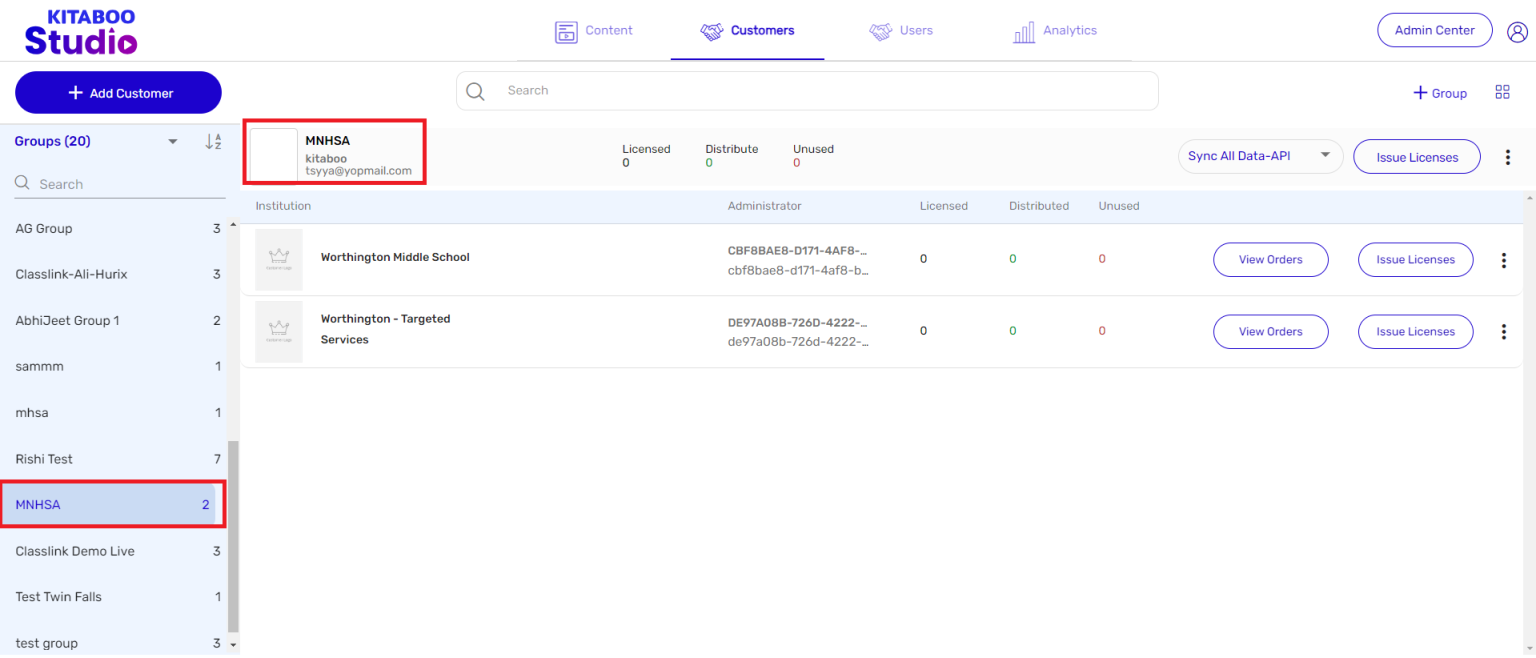
2. Once you click on the group you will find a dropdown menu with the name “Sync All Data-API/ZIP/SFTP”, “Selective sync”, “Check last sync status”.
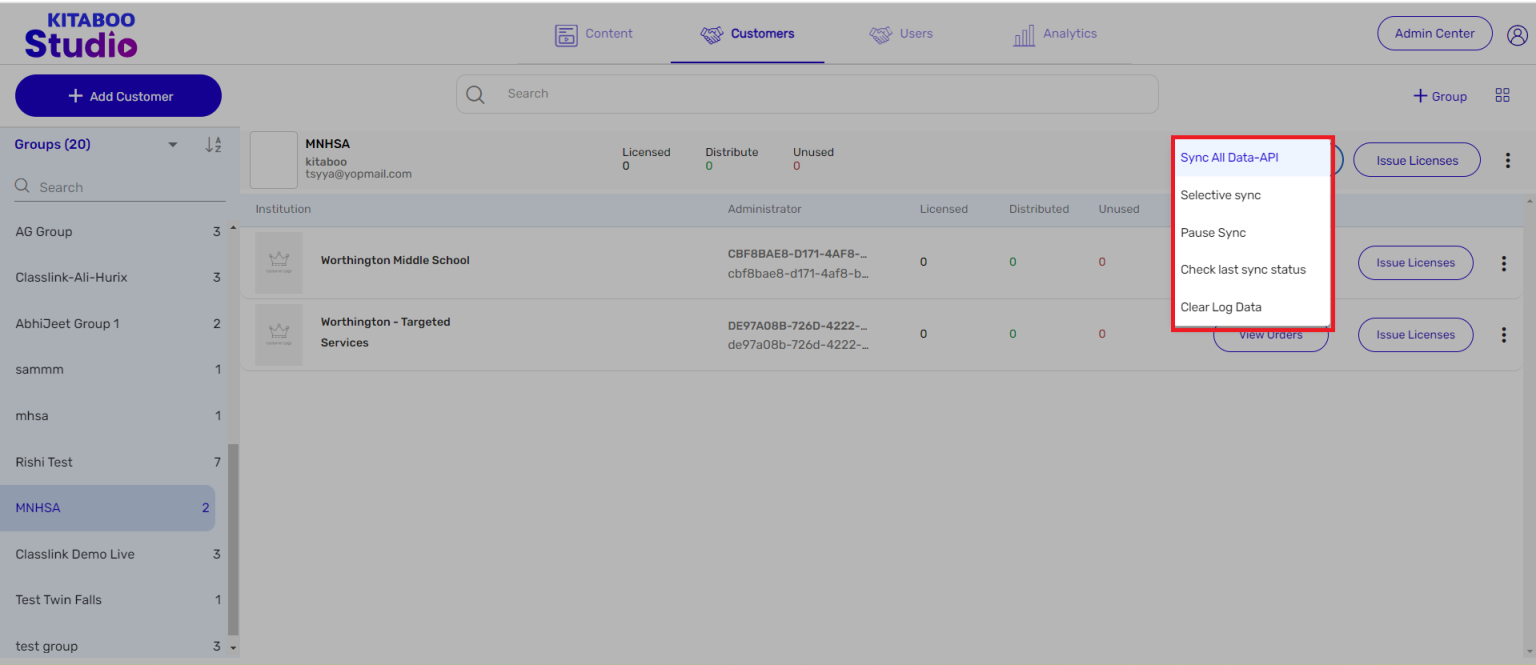
3. Now click on “Selective sync” depending on the account configuration you will get the option to upload Zip or you will get the data from SFTP/API on the screen.
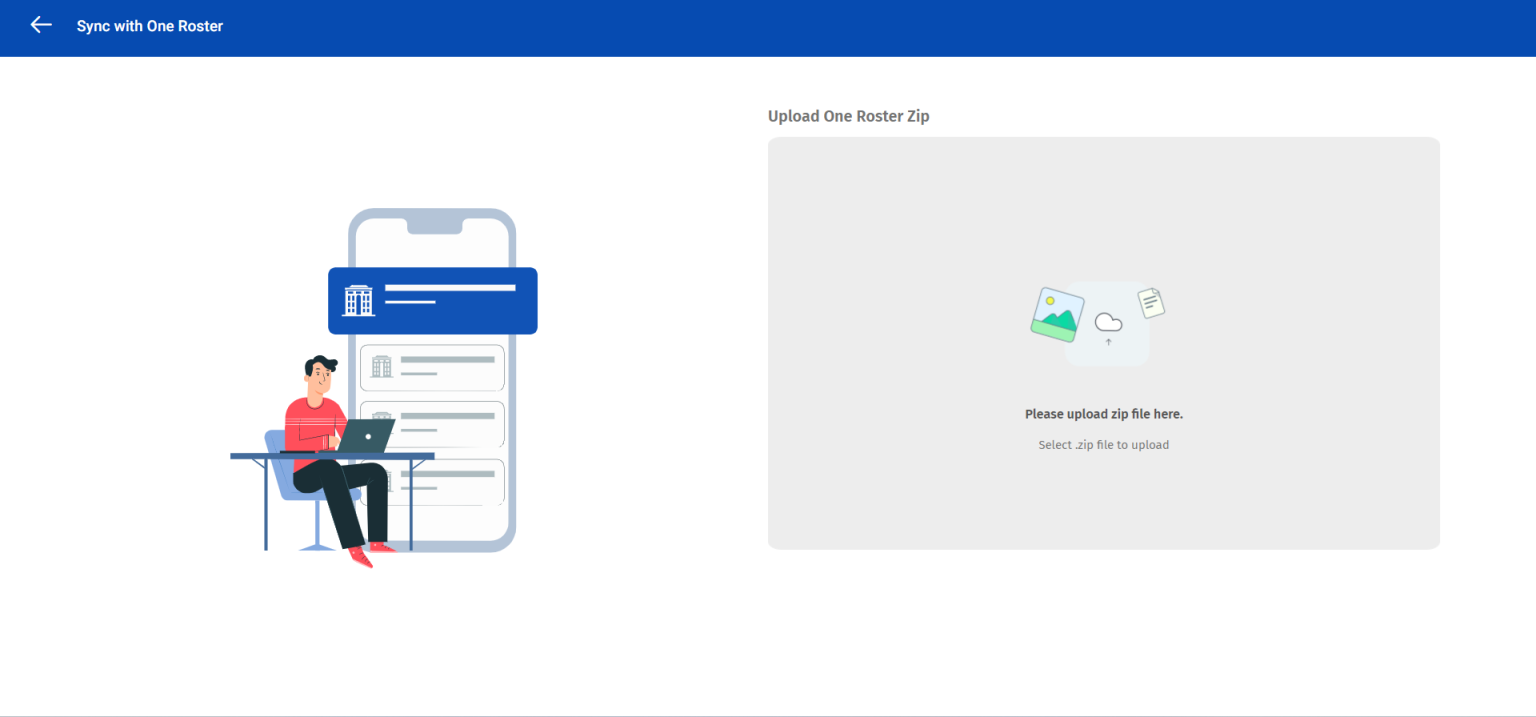
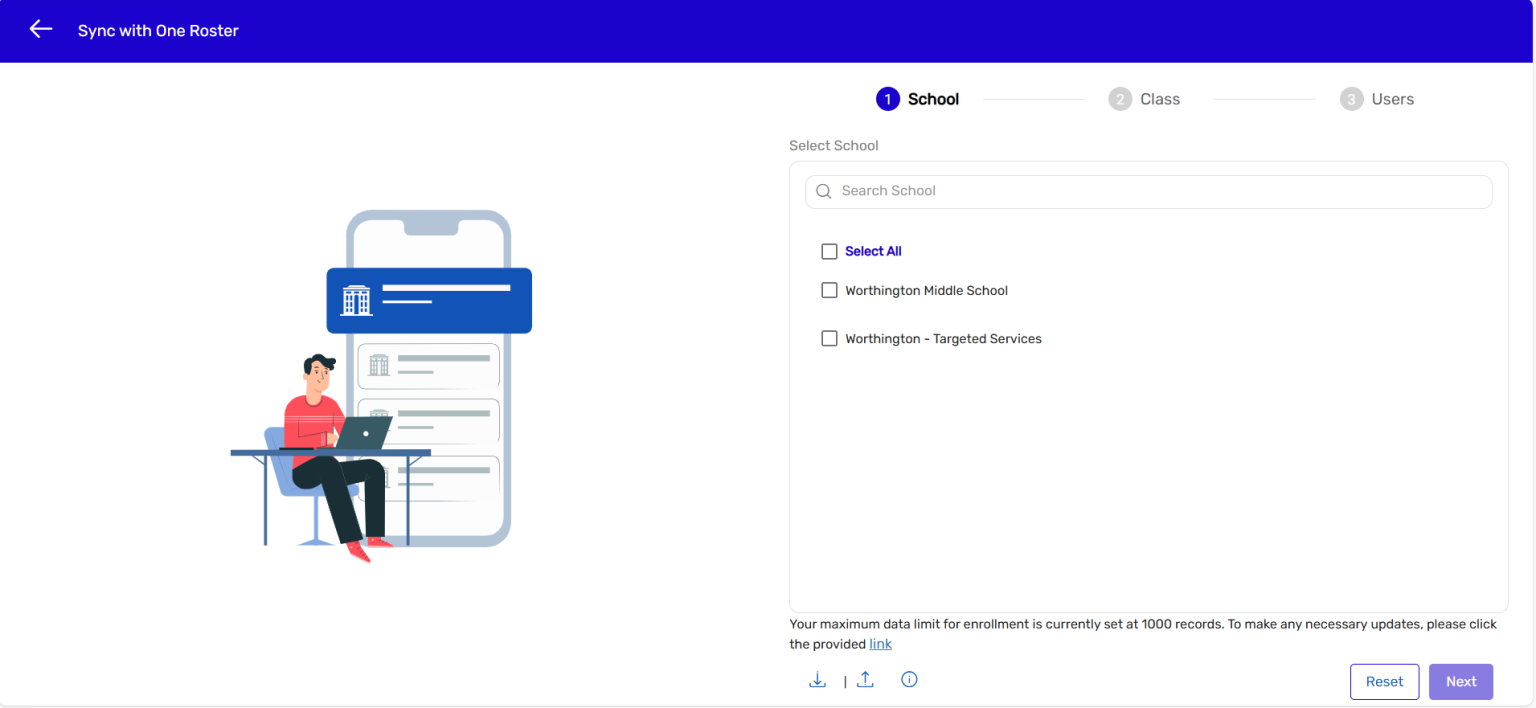
4. After successful data fetch it will show you the list of Schools. You can now either Select All or Select the desired Schools from the list.
5. If there are a large number of Schools, you have an option to download the complete list of schools in a spreadsheet.
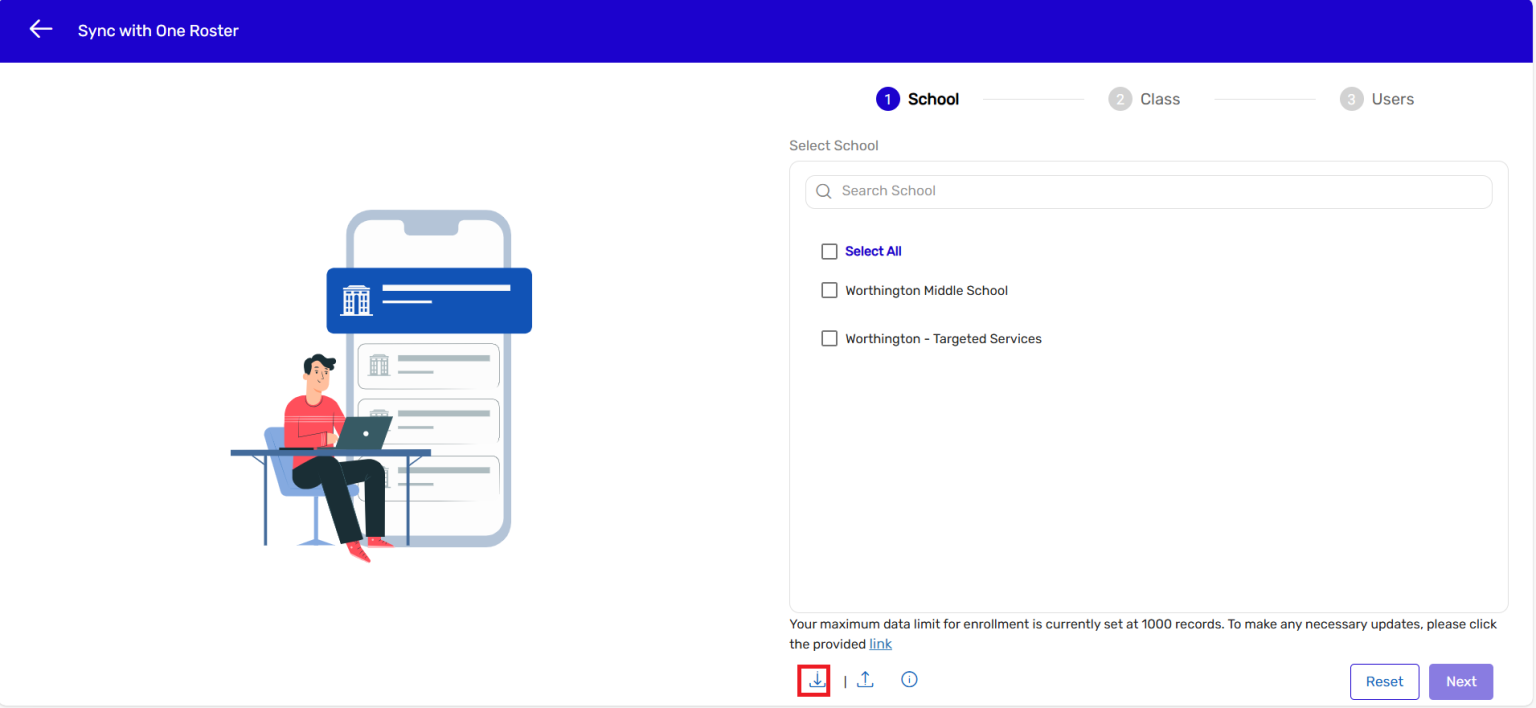
6. Open the downloaded spreadsheet with the name Org and fill “Yes” in the column
named sync. If you keep it “Blank” or fill it “No” those schools will not get selected for rostering.
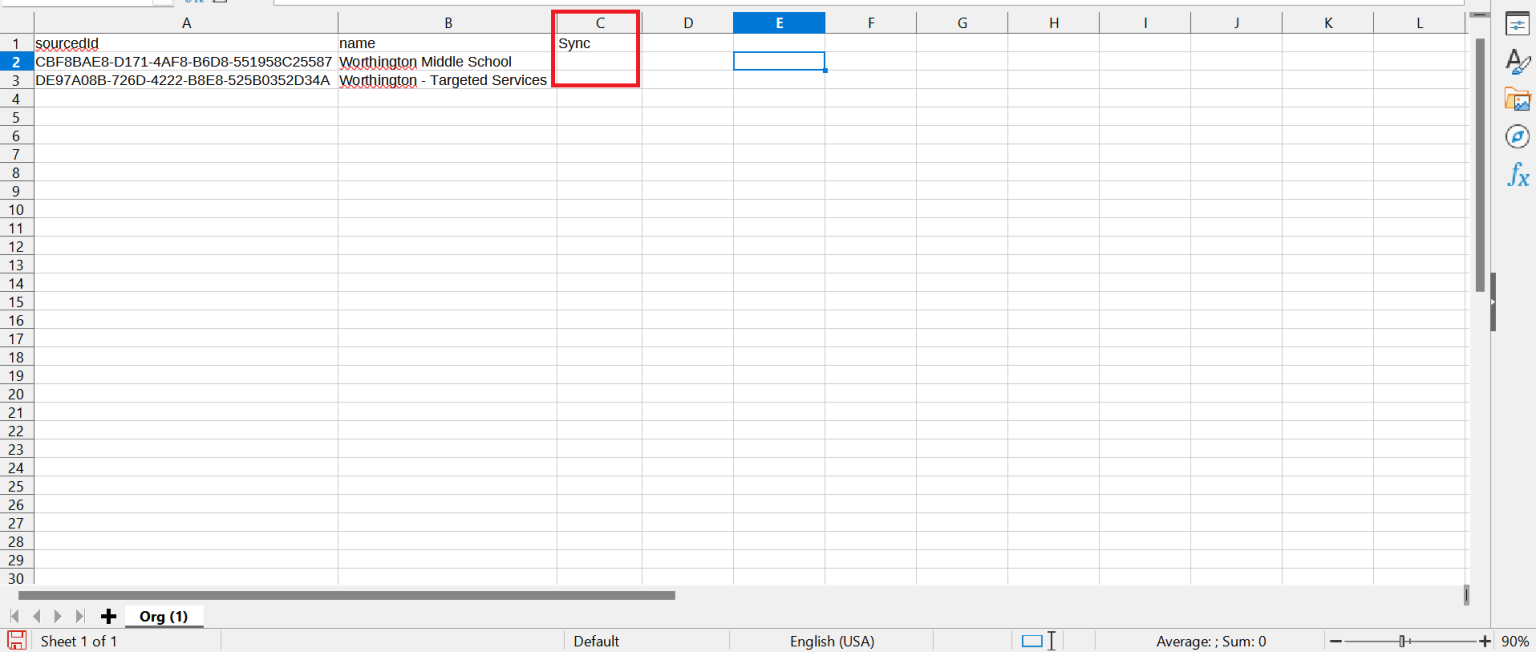
7. After you finalize the sheet and save the changes, then upload it via the upload icon.
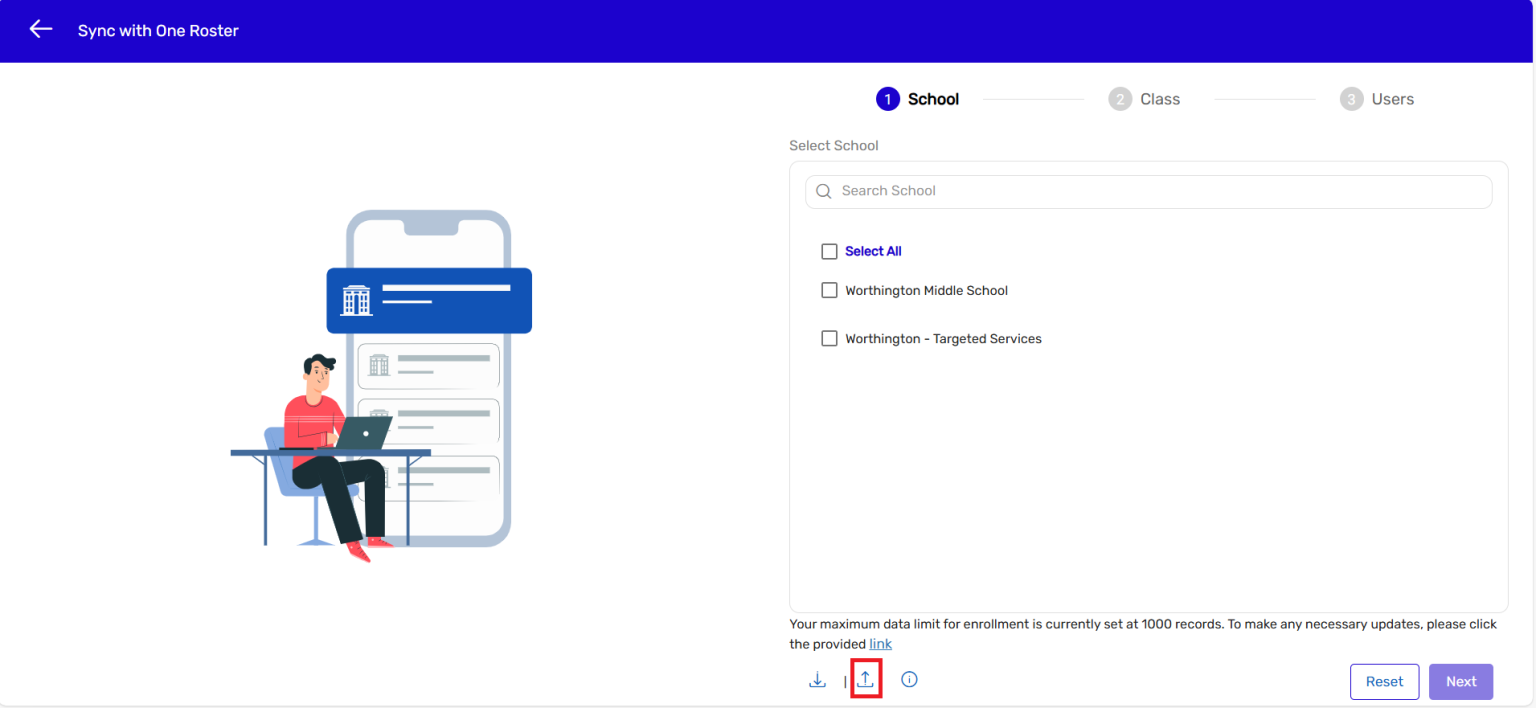
8. After successful data fetch it will show you the list of Classes. You can now either
Select All or Select the desired Classes from the list.
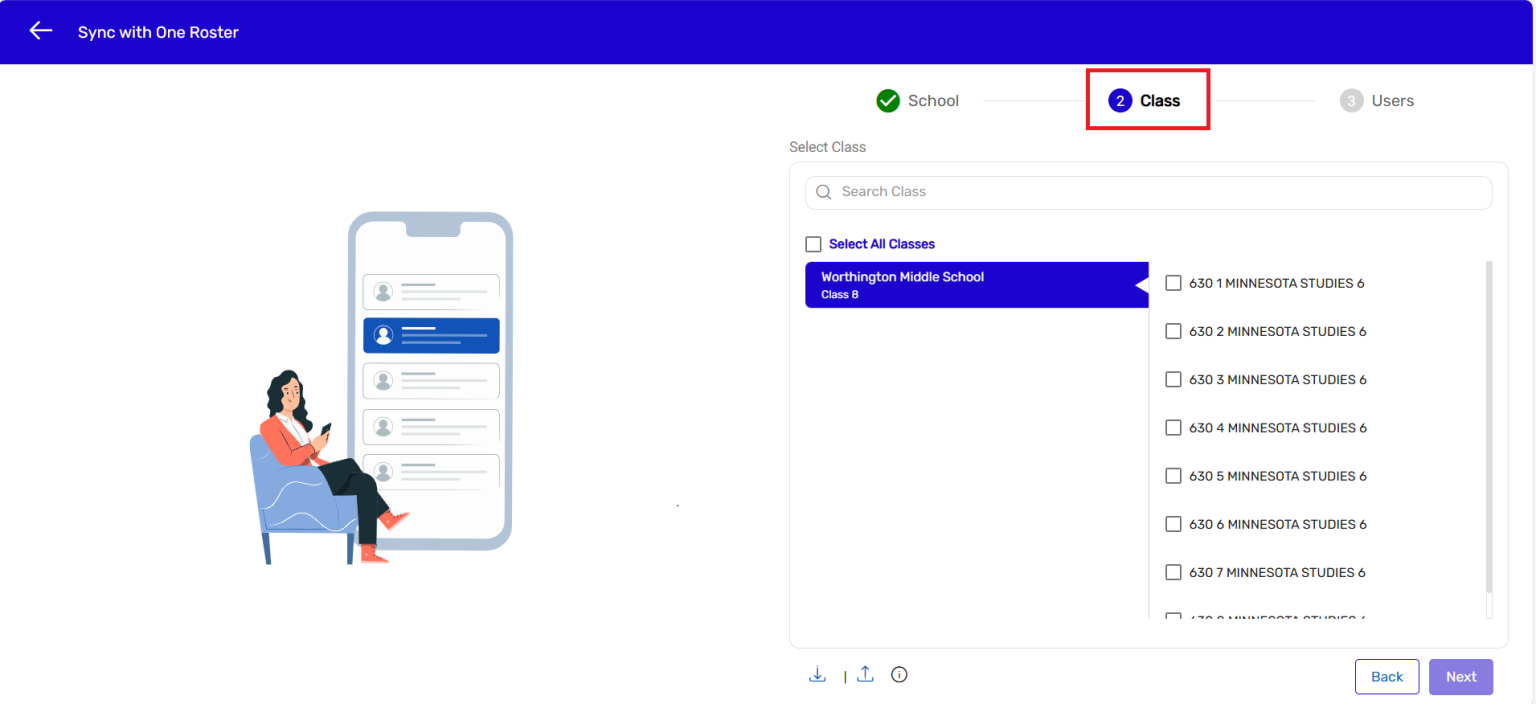
9. If there are a large number of Classes, you have an option to download the complete list of classes in a spreadsheet.
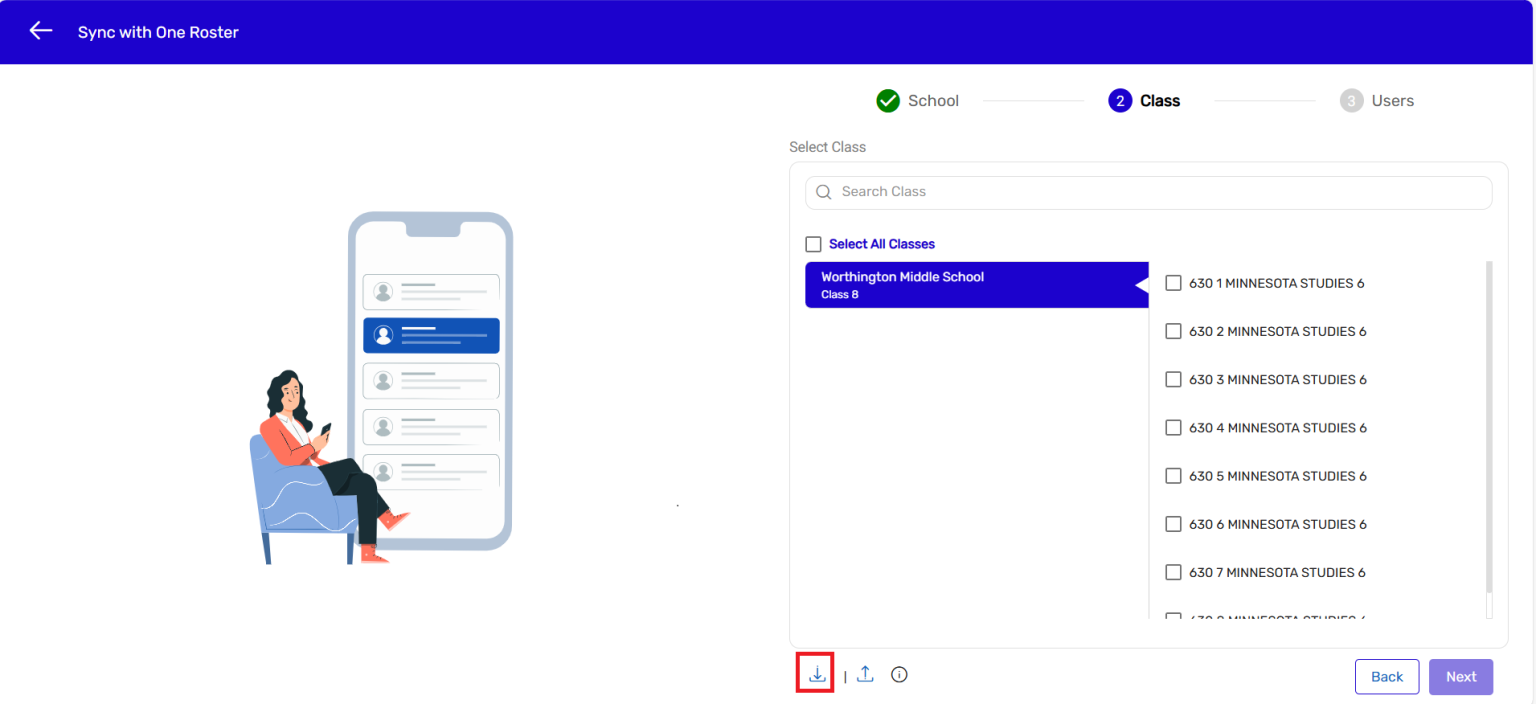
10. Open the downloaded spreadsheet with the name Classes and fill “Yes” in the
column named sync. If you keep it “Blank” or fill it “No” those classes will not get
selected for rostering.
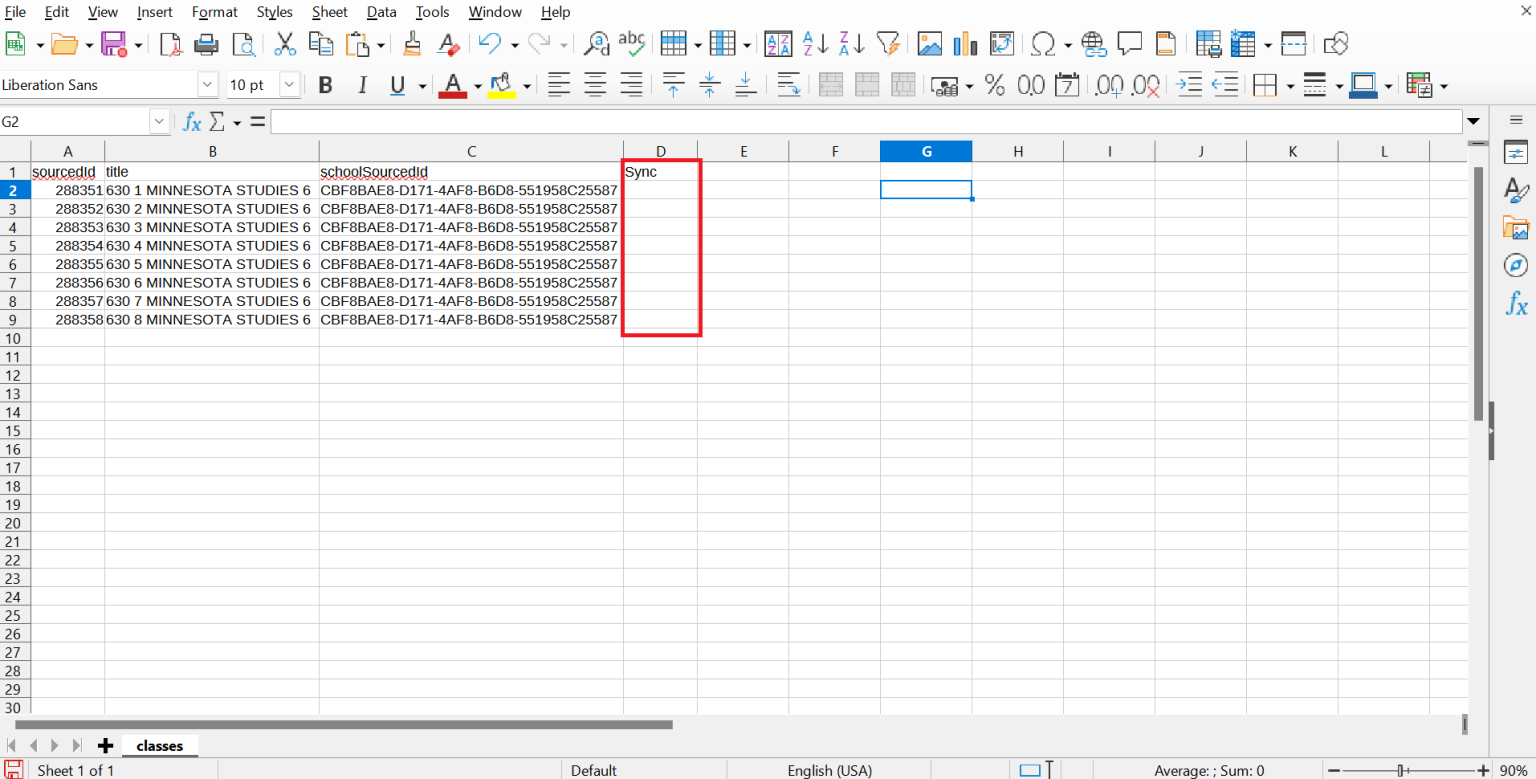
11. After you finalize the sheet and save the changes, then upload it via the upload icon.
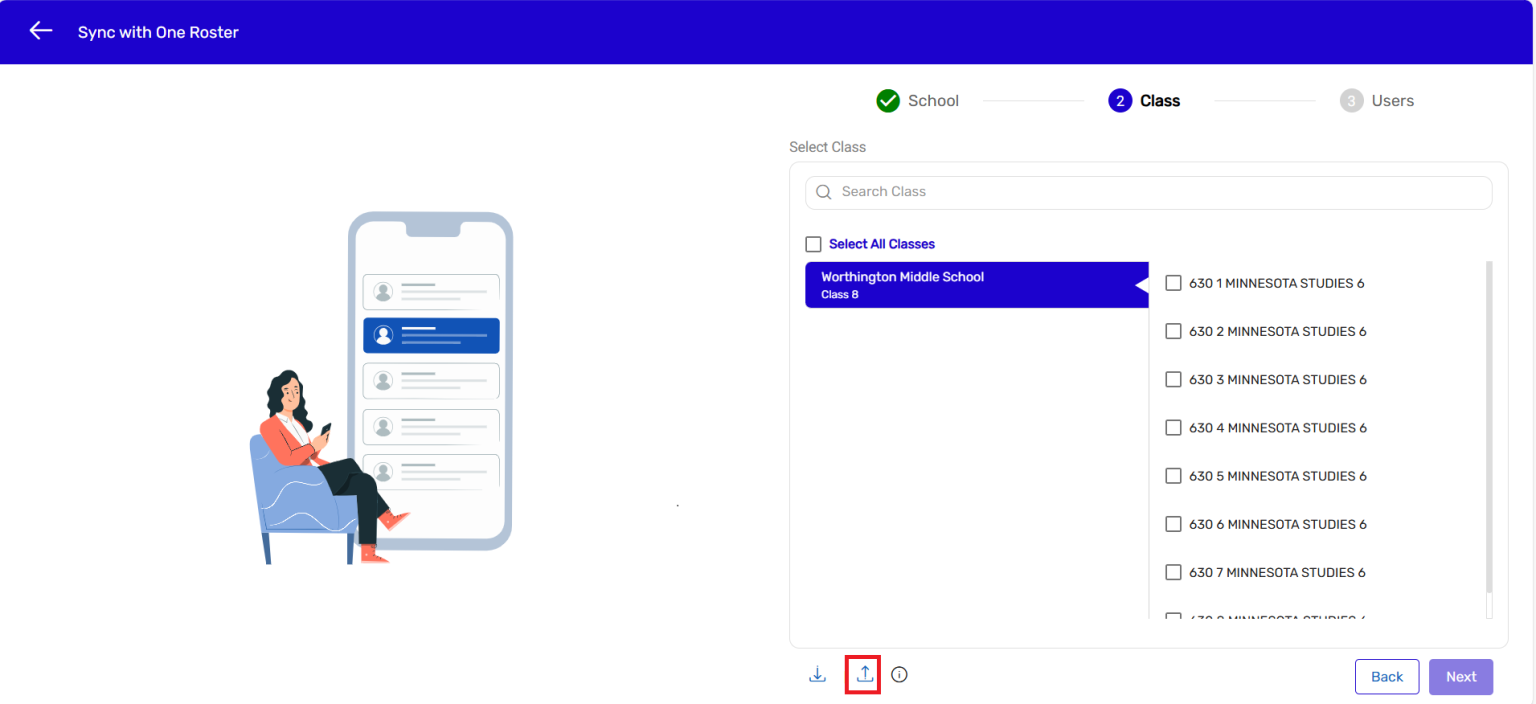
12. After successful data fetch it will show you the list of Users with status like Active, Inactive, Deleted and Blank.
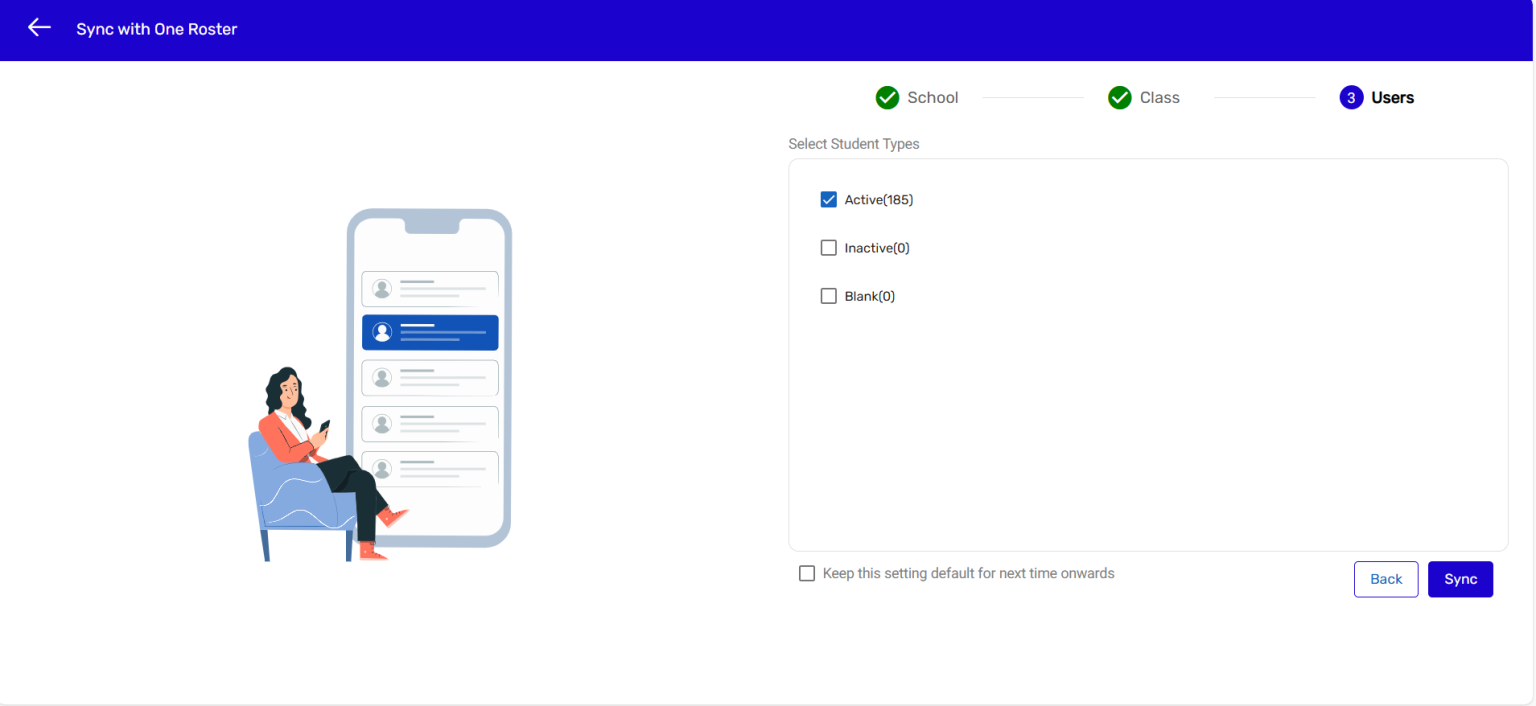
13. You need to select the user’s type depending on the status in order to sync the data on the platform. Click on the sync button.(Note: Success message will appear)
14. After a successful sync, you can view the status of the on-going or completed roster sync in the oneroster drop down menu.
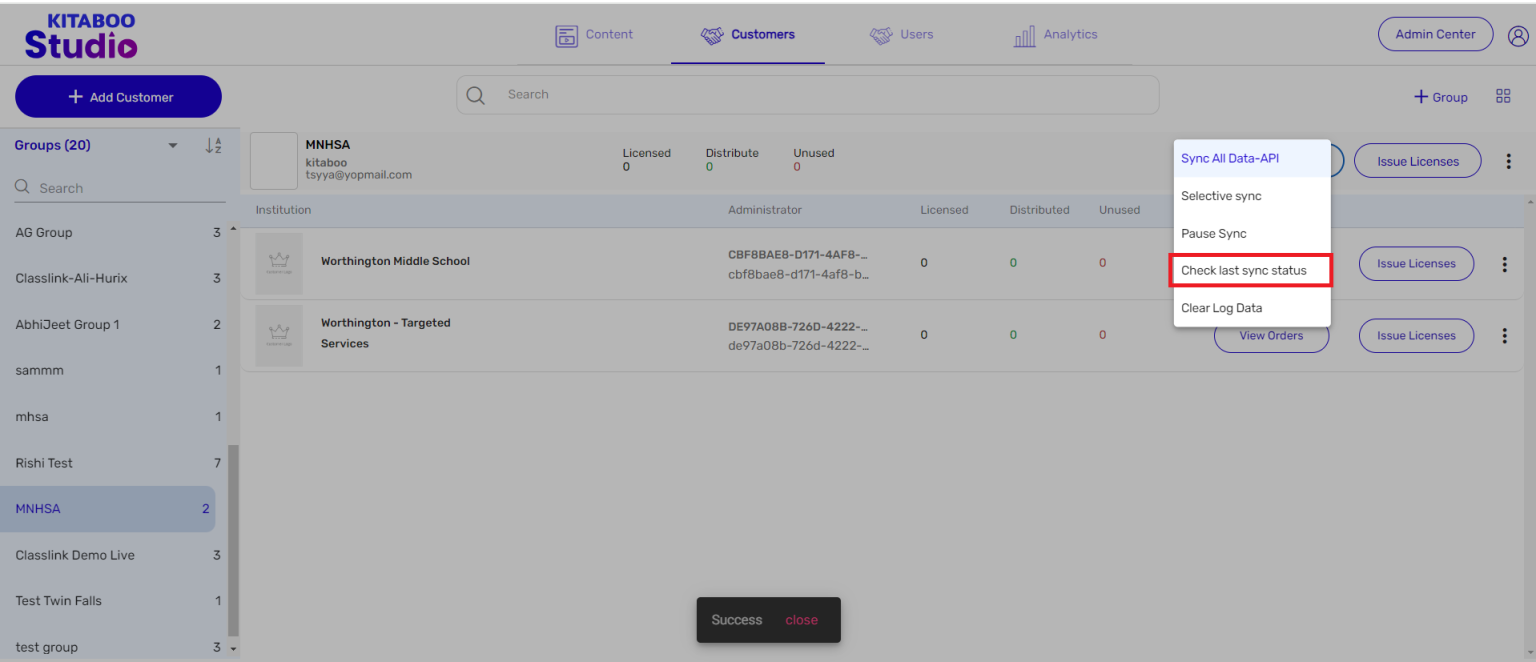
15. You can also find the status of the oneroster sync, with below parameters like Status, Last sync date, Users, Classes, Orgs, Enrollments and Download log.
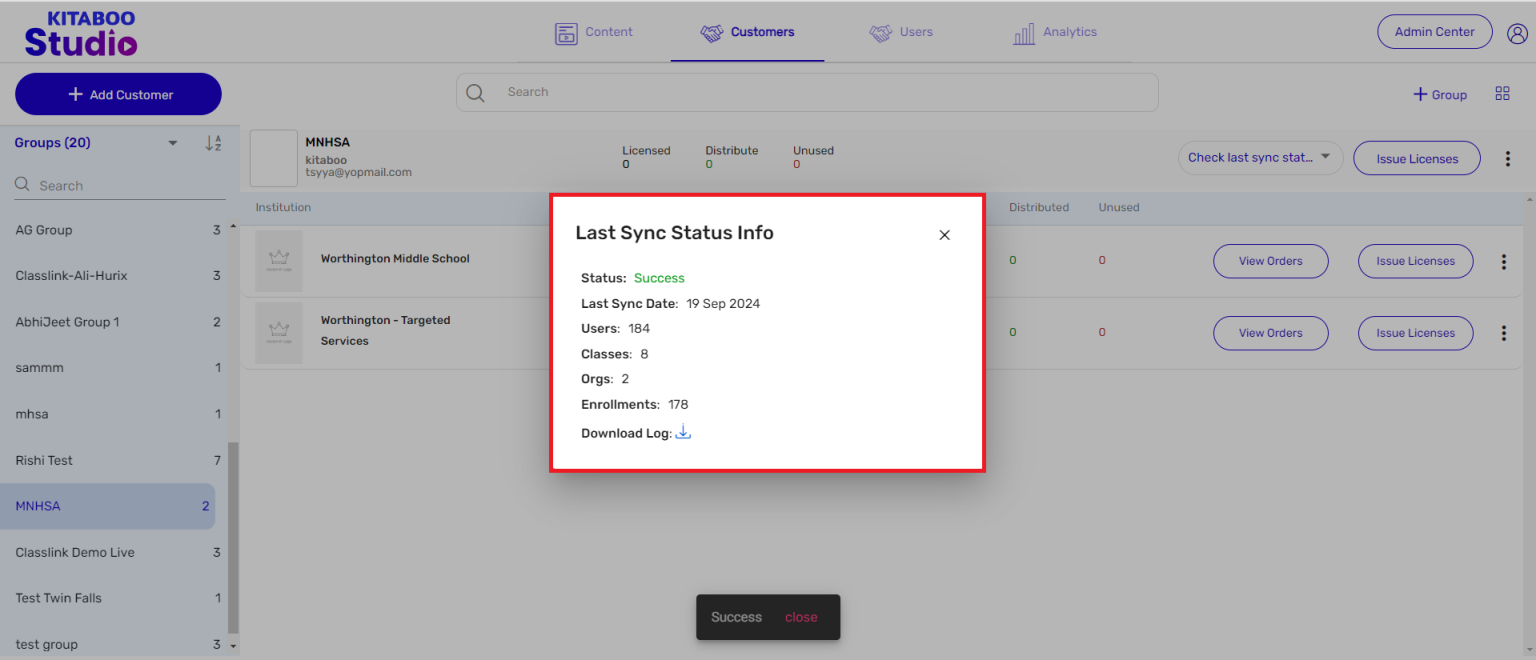
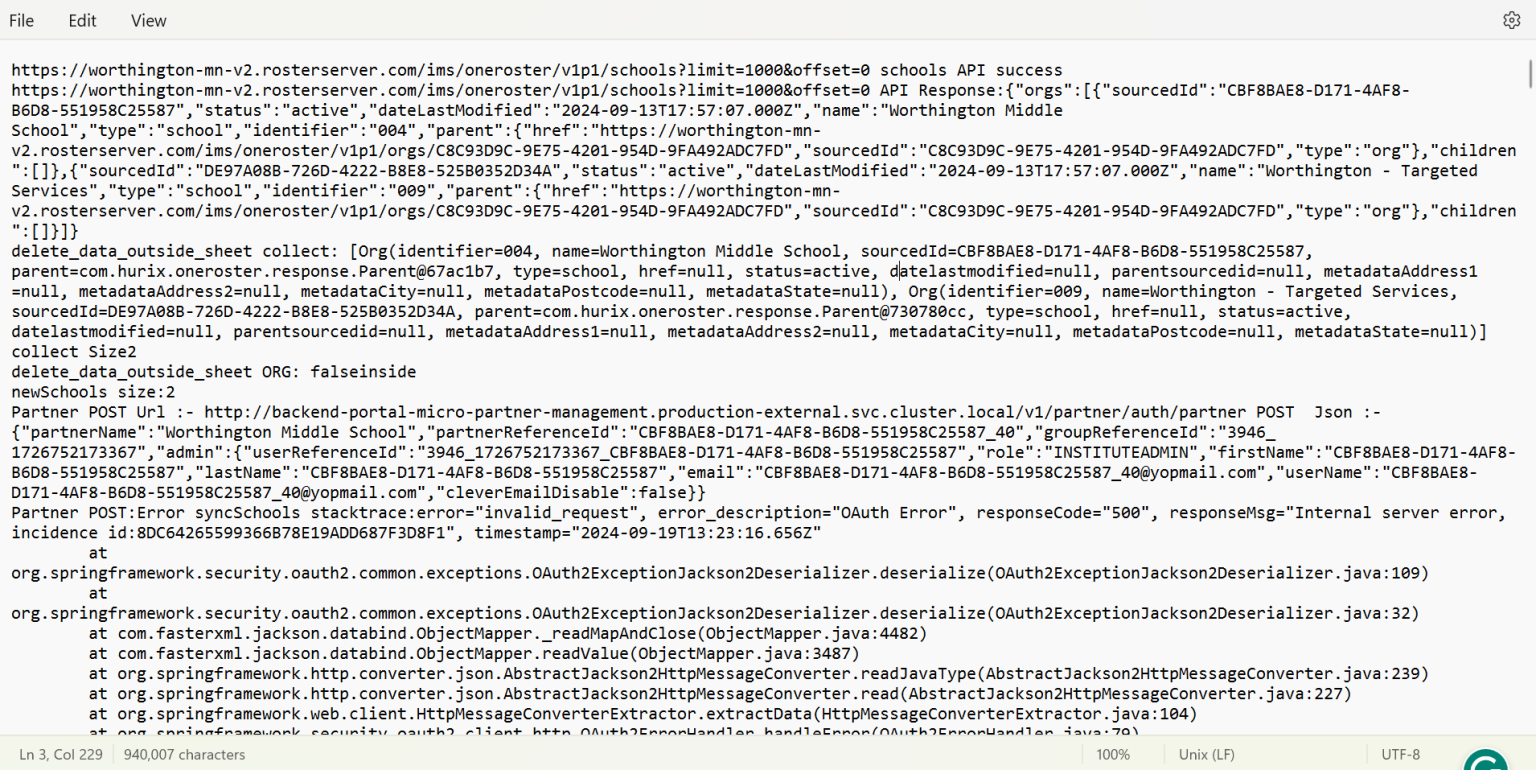
16. In the Download Log, you get all the sync reports in detail.
Let’s see how to create and add a group, and sync it with PowerSchool.
1. Sign in with your Enterprise Admin credentials.

2. Click on + Group for adding a group.
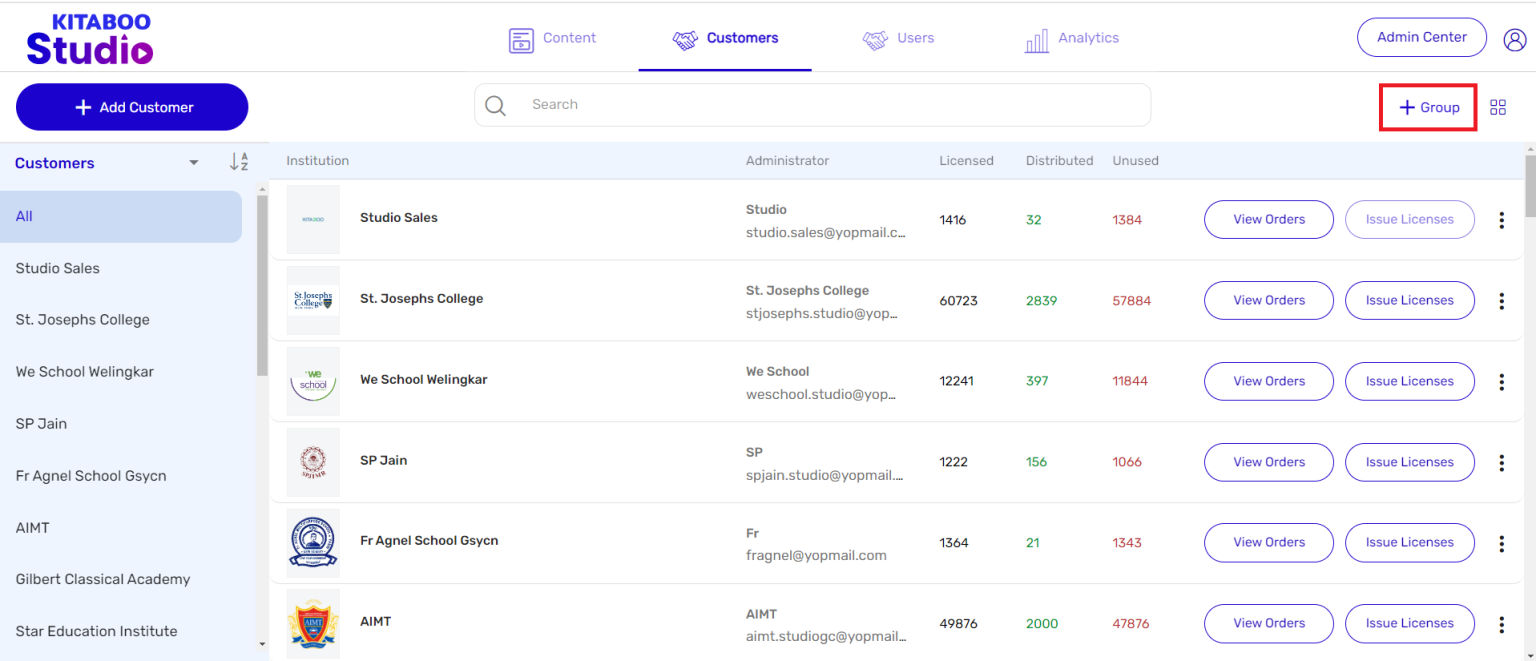
3. Enter the group details like Group Name, Description, Email ID, and Client Group ID. > Select PowerSchool from the SSO Source/Onboarding Type dropdown menu.
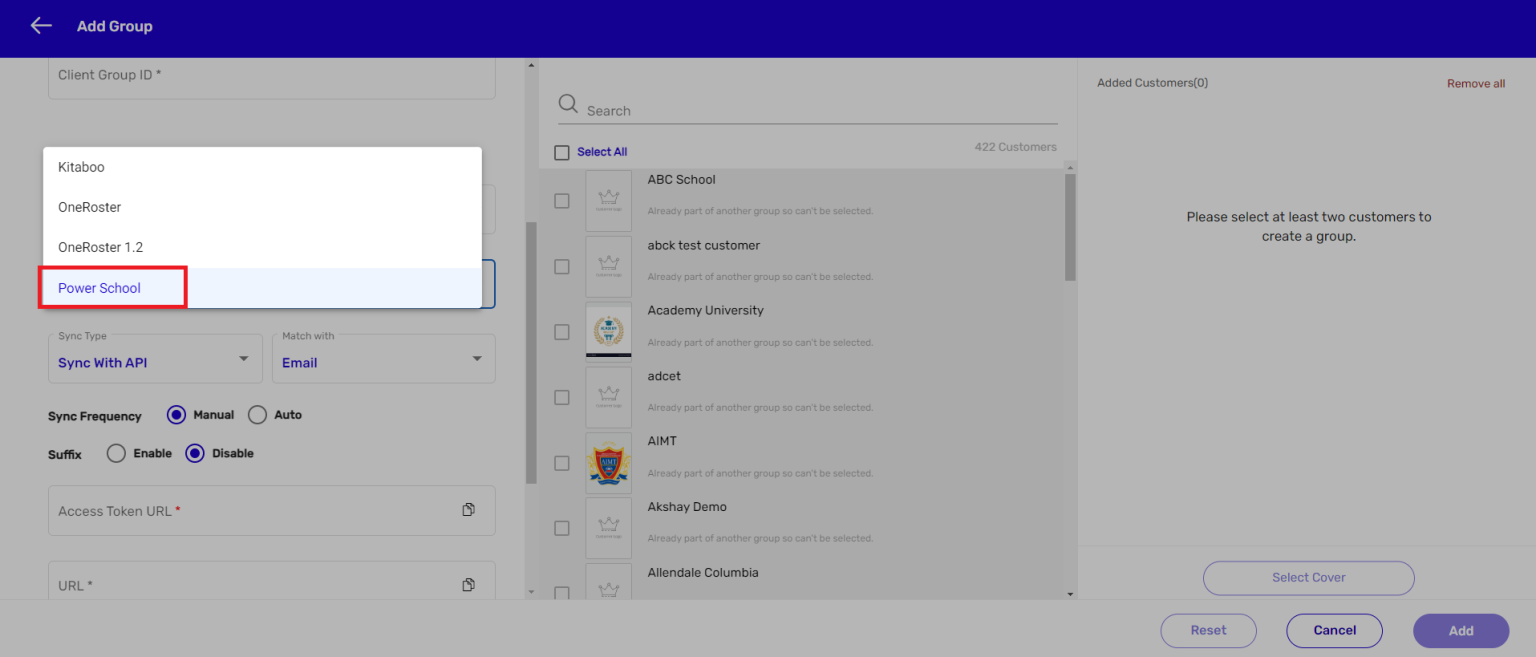
NOTE:
The moment you select PowerSchool as the Onboarding type, a new field by the
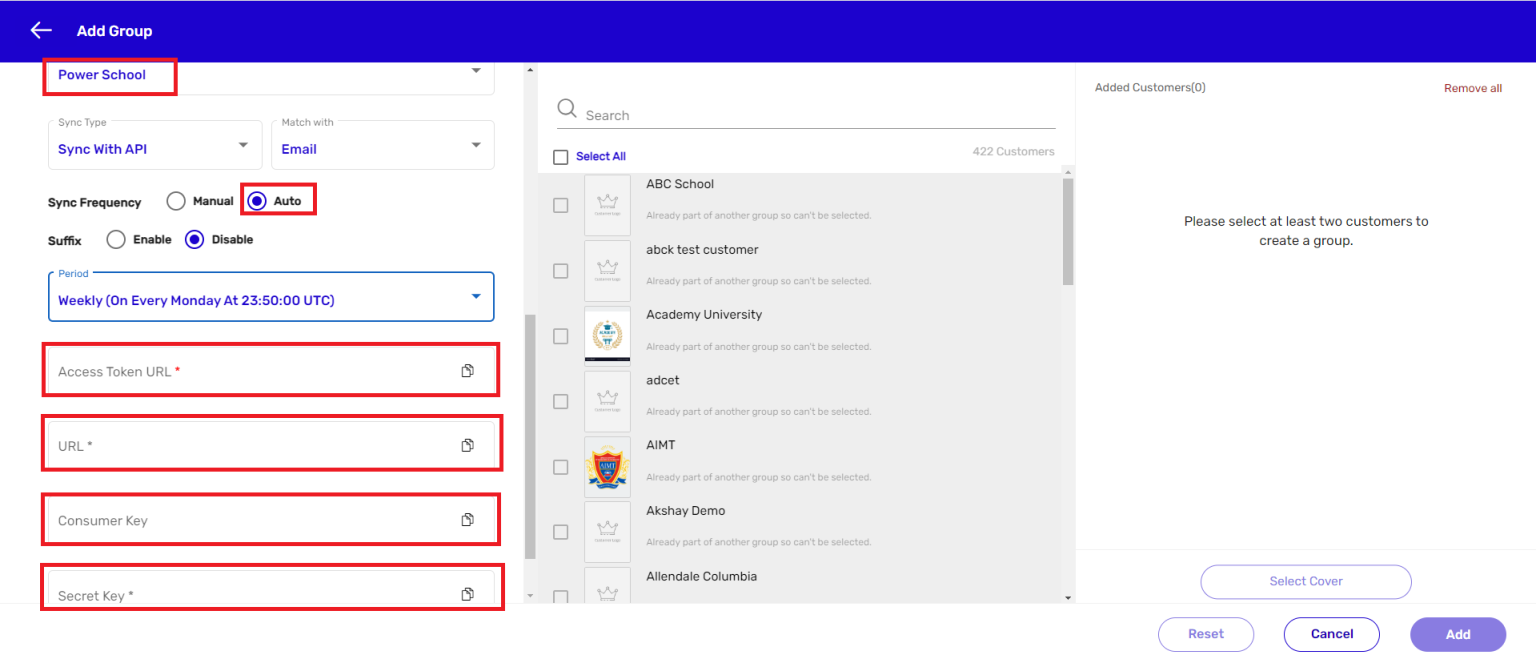
name Sync Type with Sync With API as a default sync type will appear. The other fields that you will find there are – Sync Frequency, Suffix, Access Token URL, URL, Consumer Key, Secret Key.
NOTE:
There are two Sync Frequency options – Manual and Auto. Here Manual means
you will have to manually sync the data. And, Auto means the system will automatically sync the data. If you select the Auto data syncing option, you will have to define how frequently you want the system to sync the data. Currently, there are six options available.
4. We have selected Auto as the Sync Frequency option, and Weekly as the Period for sync frequency in this example.
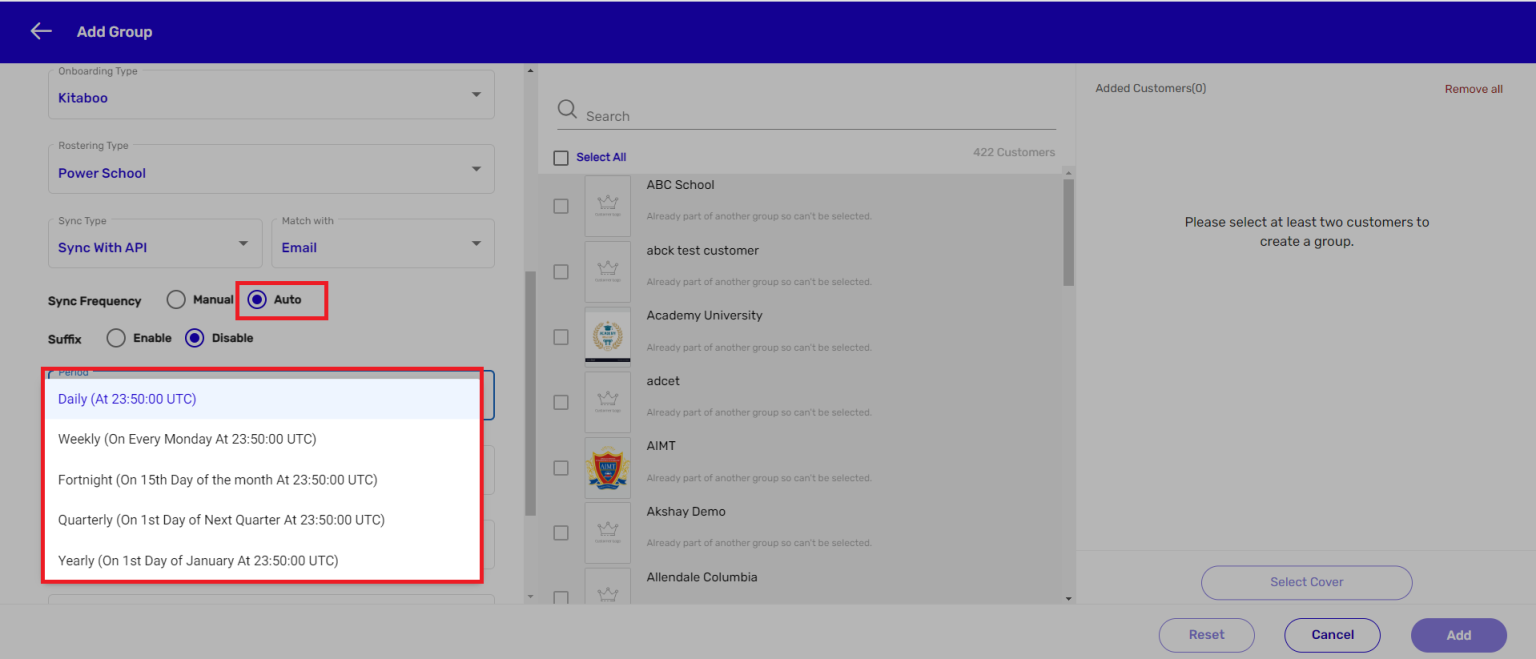
5. Enter details in the Access Token URL, Customer Key, Secret Key, and URL fields.
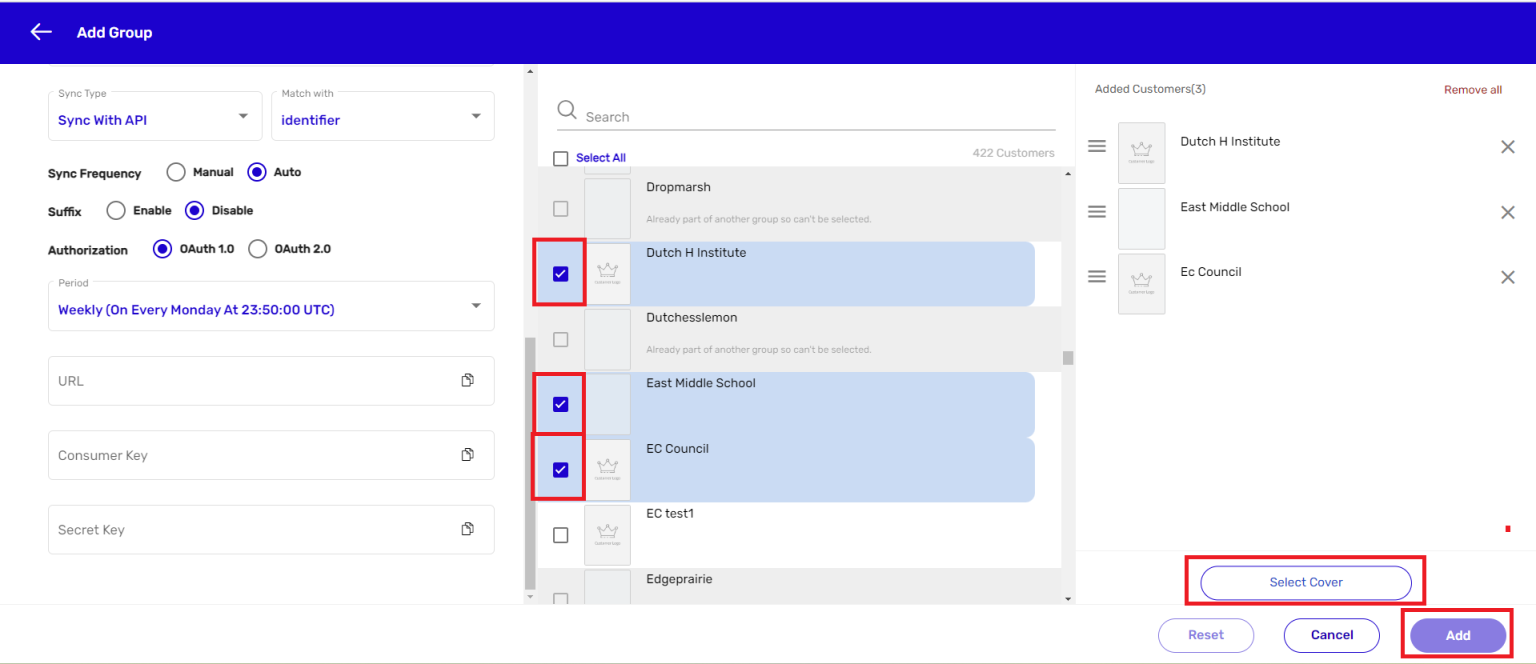
6. Select Customers from the list. > Click on Select Cover for providing a cover image to your group. > Click on Add.
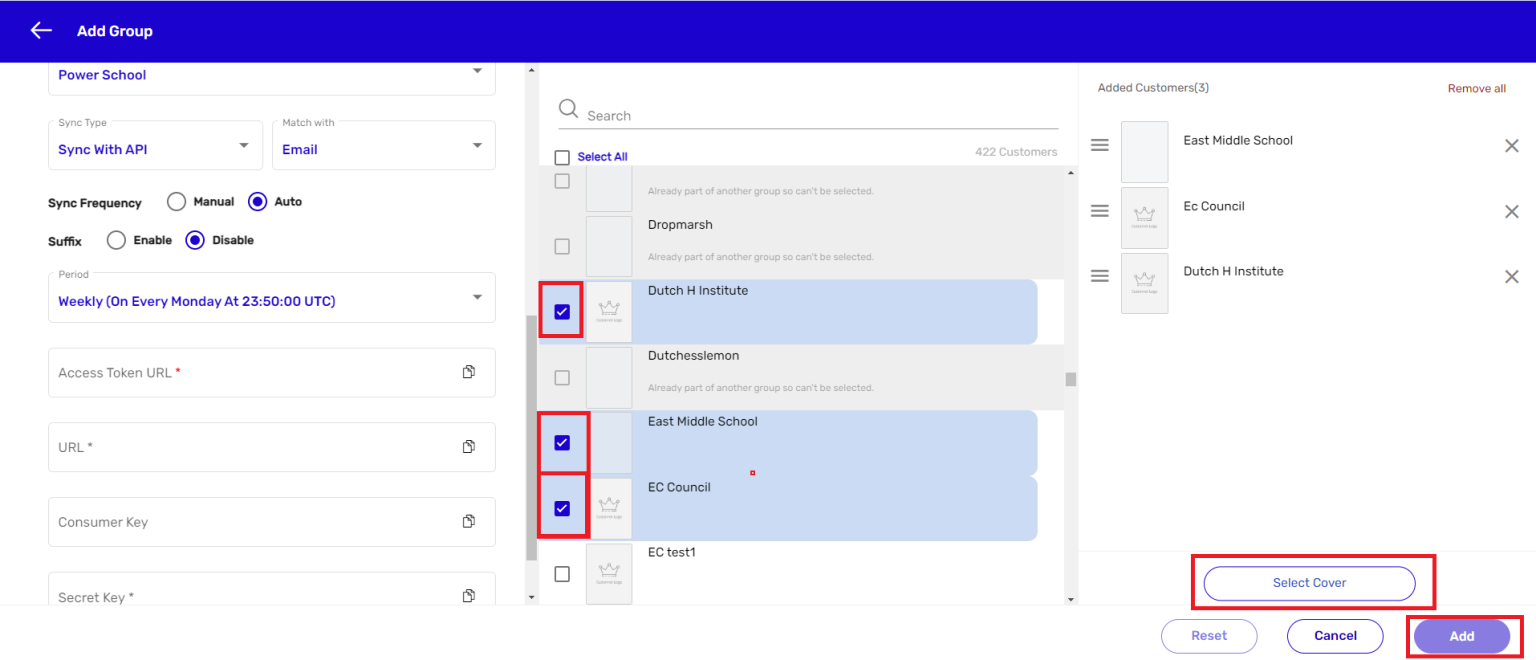
NOTE: Some of the customers on the list are greyed out. This is because they
are already part of another group. Hence they cannot be selected.
Finally, you will get a confirmation message: Sync up request is accepted.
Let’s see how to create and add a group, and sync it with OneRoster.
1. Sign in with your Enterprise Admin credentials.

2. Click on + Group for adding a group.
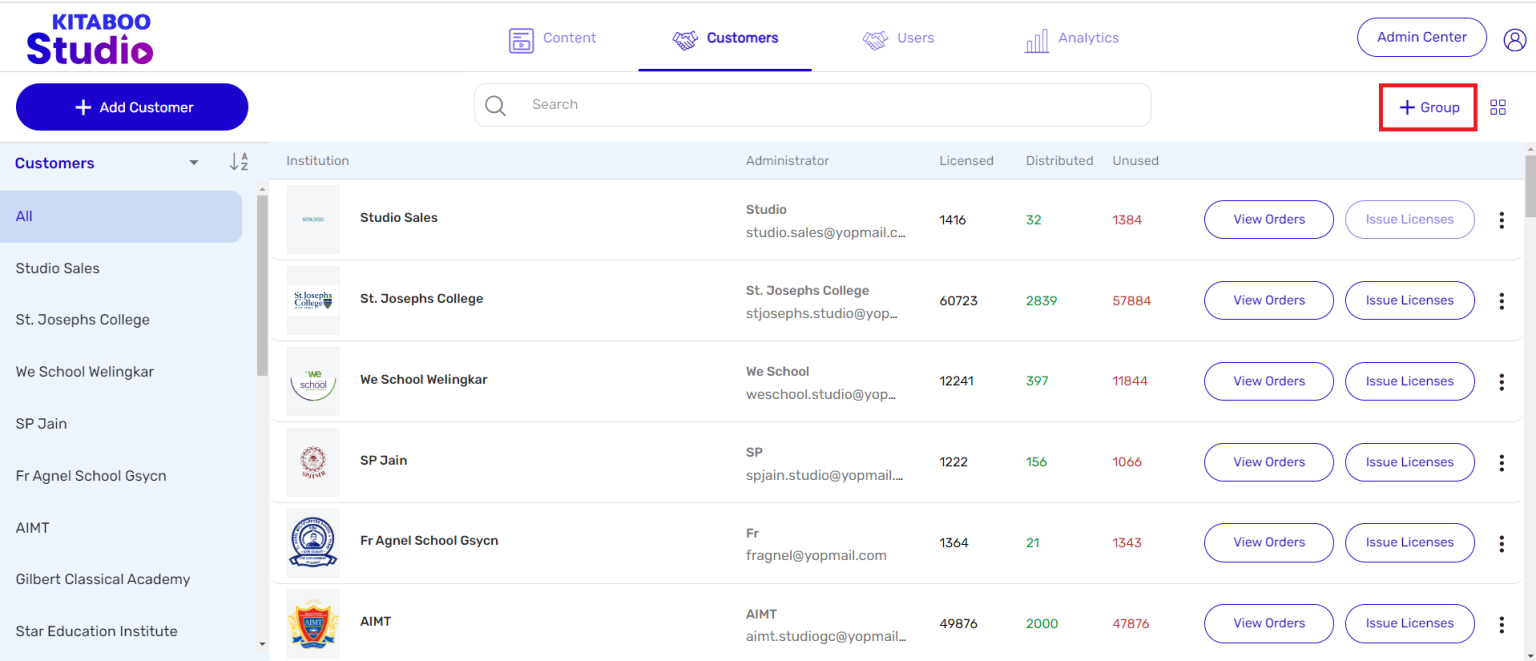
3. Enter the group details like Group Name, Description, Email ID, and Client Group ID. > Select OneRoster1.1 or OneRoster 1.2 from the SSO Source/Onboarding Type
dropdown menu.
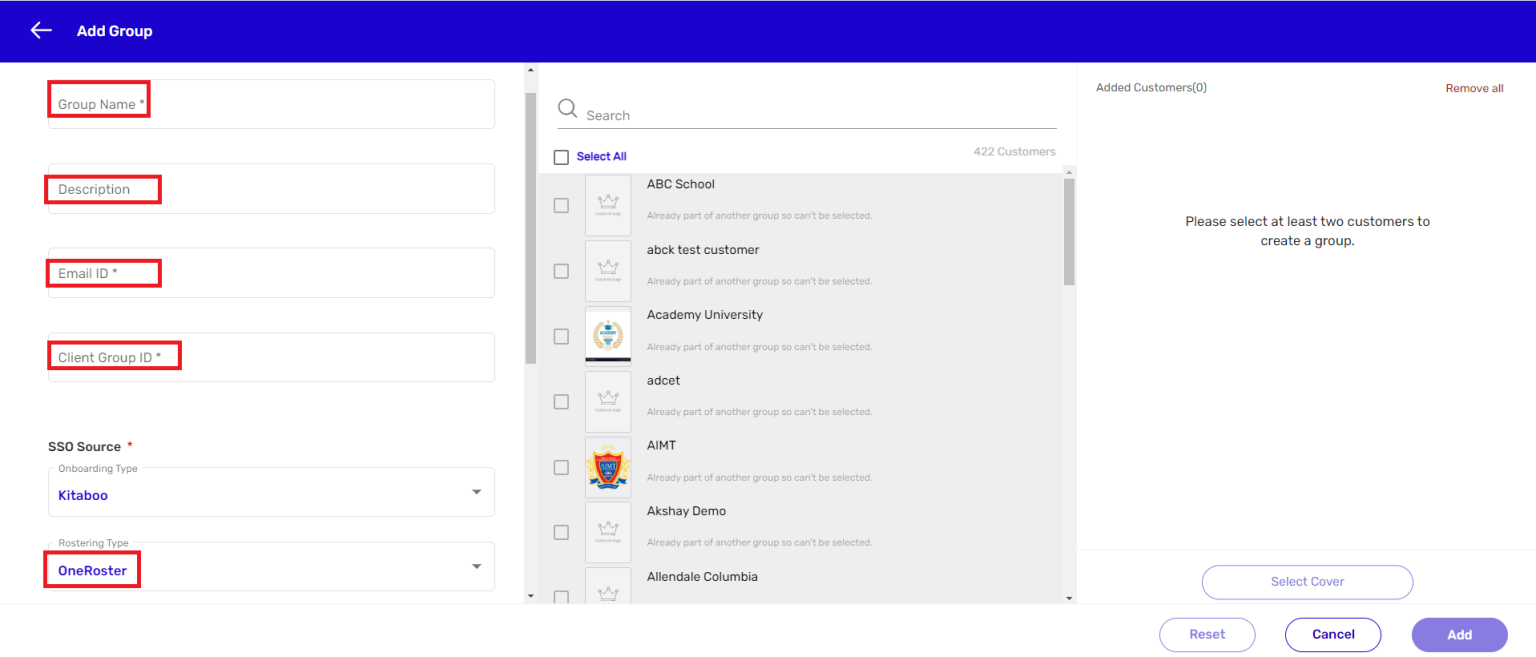
NOTE: The moment you select OneRoster as the Onboarding type, a new field by the name Sync Type with Sync With API as a default sync type will appear. The other fields that you will find there are – Sync Frequency, Client Partner ID, Consumer Key, Secret Key, URL, and Path. If you are selecting the OneRoster 1.1 then you can see the Authorization Option there you can select OAuth1.0 or OAuth 2.0.
4. The other Sync Type options are: SFTP and Zip Upload. We have continued with the default option, i.e., Sync With API in this example.
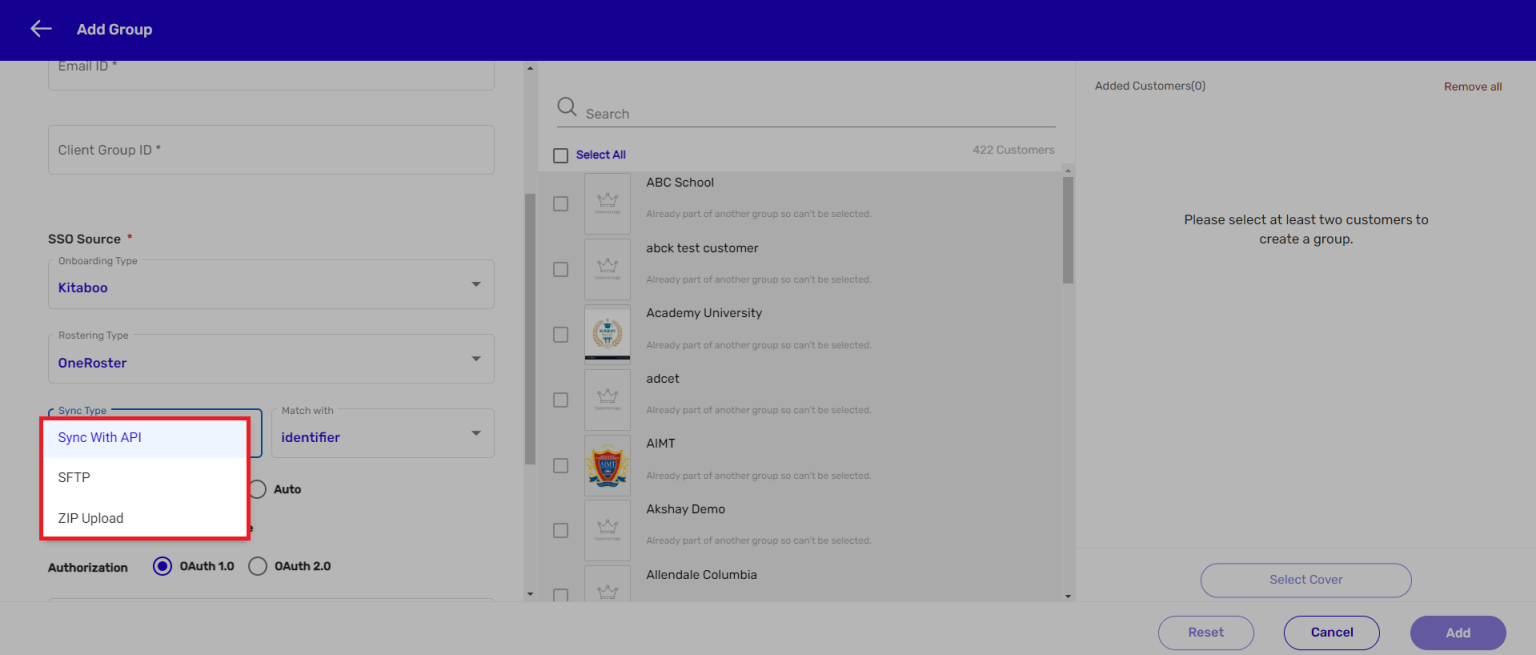
If you select the Sync With API option, OneRoster will do an API call and pull the
required data from the service. It will then create a partner, class, and a user. You can sync the OneRoster data by using the Sync with OneRoster hyperlink. You can also delete the OneRoster data on the server. The data will also get deleted from your system once you use the Update option.
● If you select the SFTP option as the sync type, the OneRoster file would not be uploaded automatically. You will have to provide the SFTP where you have placed your CSV file.
The server will then pick the OneRoster file from the SFTP you provide and create a
partner, class and a user.You can then assign the content to the desired class and user.
● If you select the Zip Upload option as the sync type, the user will be able to upload the OneRoster zip file to the server. The LMS will then create a class, and user aligned to the Partner ID you use. You can then assign the content to the desired class and user.
NOTE:
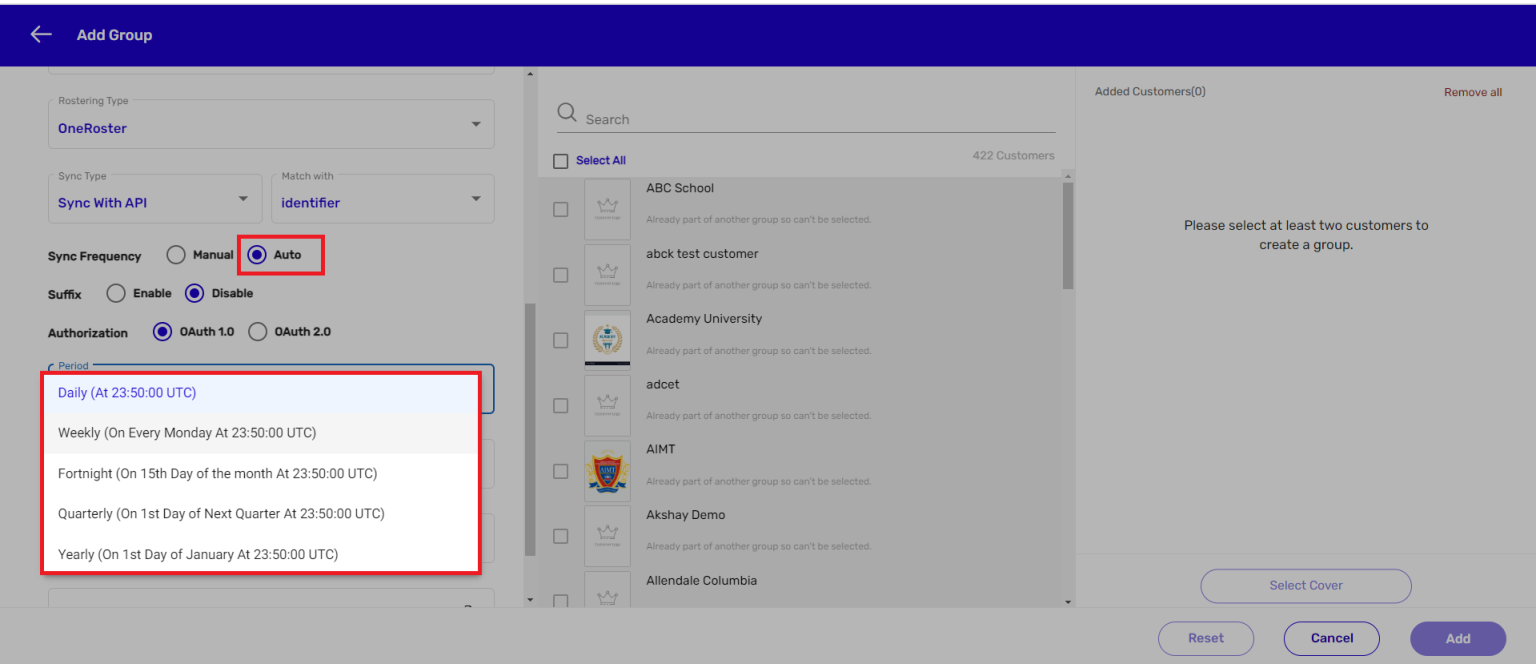
There are two Sync Frequency options – Manual and Auto. Here Manual means you will have to manually sync the data. And, Auto means the system will automatically sync the data.
If you select the Auto data syncing option, you will have to define how frequently you want the system to sync the data. Currently, there are six options available.
5. We have selected Auto as the Sync Frequency option, and Weekly as the
Period for sync frequency in this example.
6. Enter details in the Customer Key, Secret Key, and URL fields.
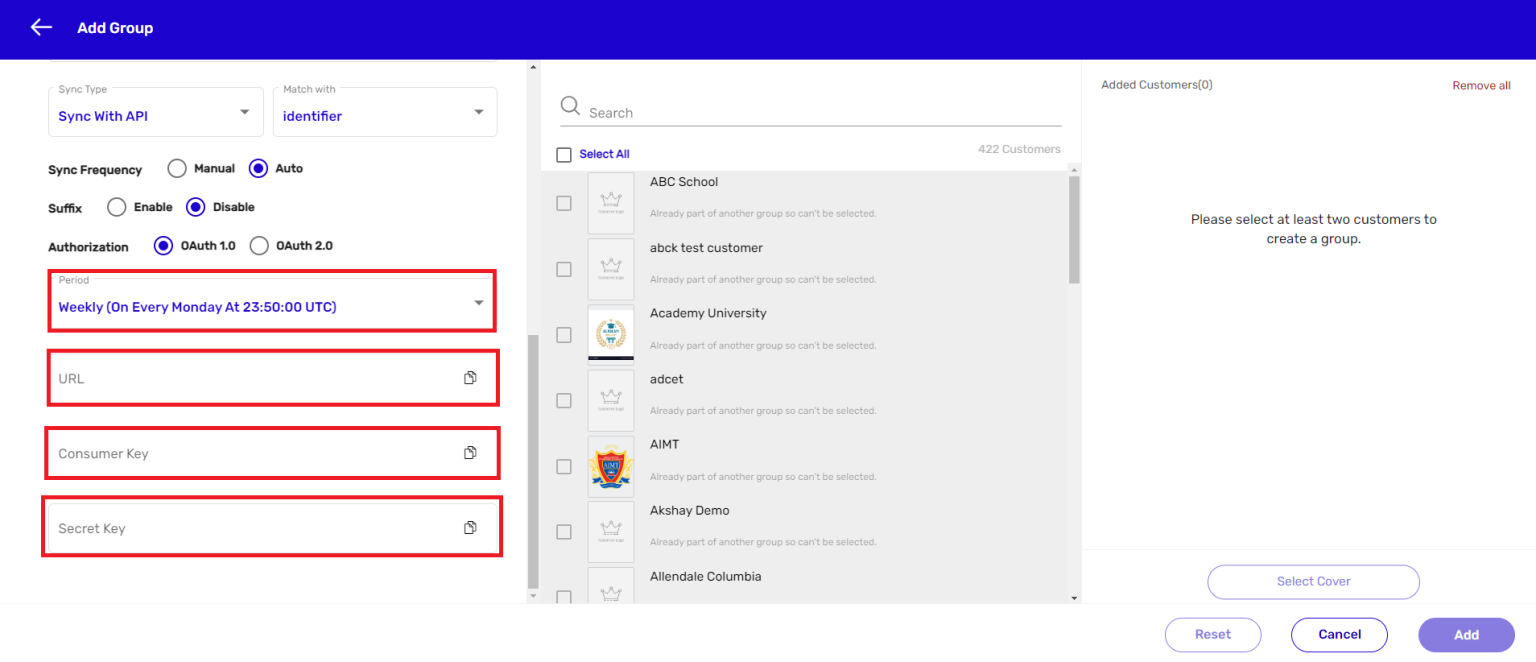
7. Select Customers from the list. > Click on Select Cover for providing a cover
image to your group. > Click on Add.
NOTE:
Some of the customers on the list are greyed out. This is because they
are already part of another group. Hence they cannot be selected.
Finally, you will get a confirmation message: Sync up request is accepted.
At times you may need to club your customers having something in common into a group. It will save you from performing a similar set of activities for individual customers, and also save your time and energy. Remember that there should at least be two customers to create a group. You may treat the group one customer, and enter the required details like group name, email ID, onboarding type, etc.
1. Sign in with your Enterprise Admin credentials.

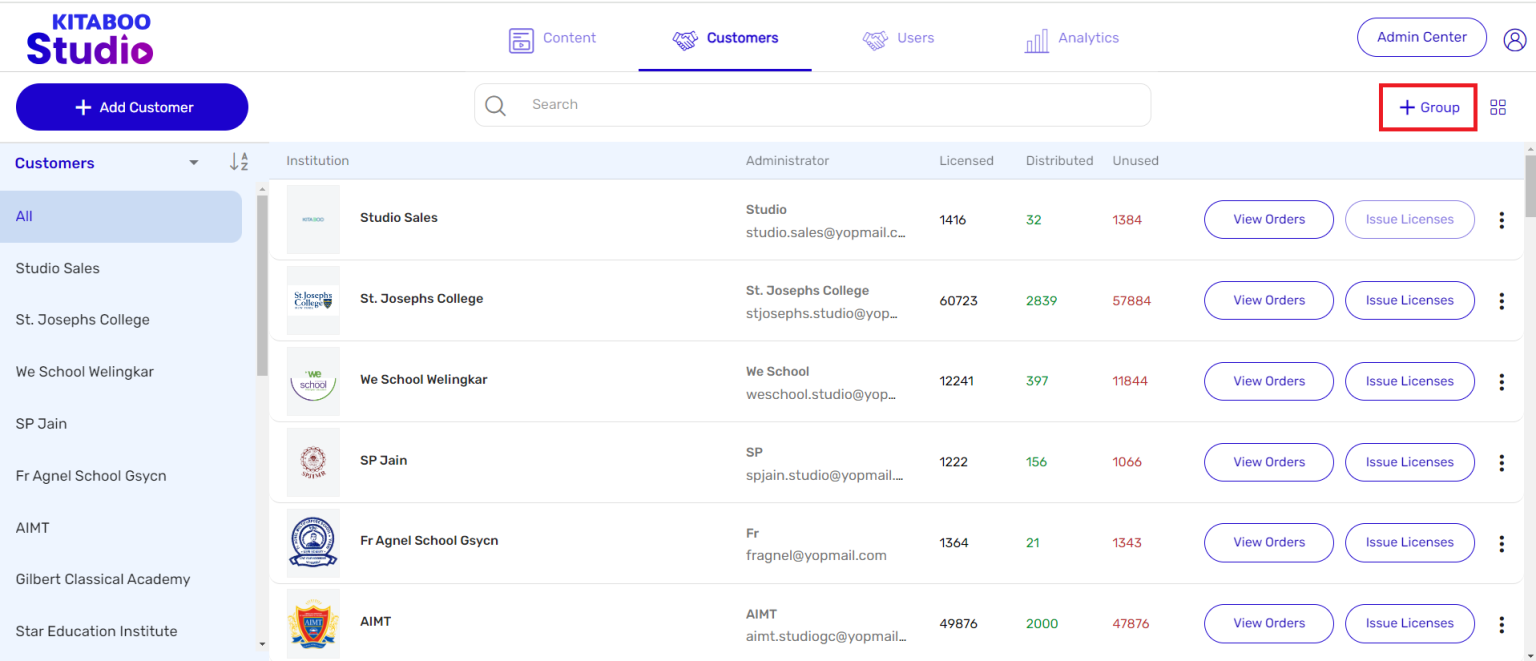
2. Click on + Group for adding a group
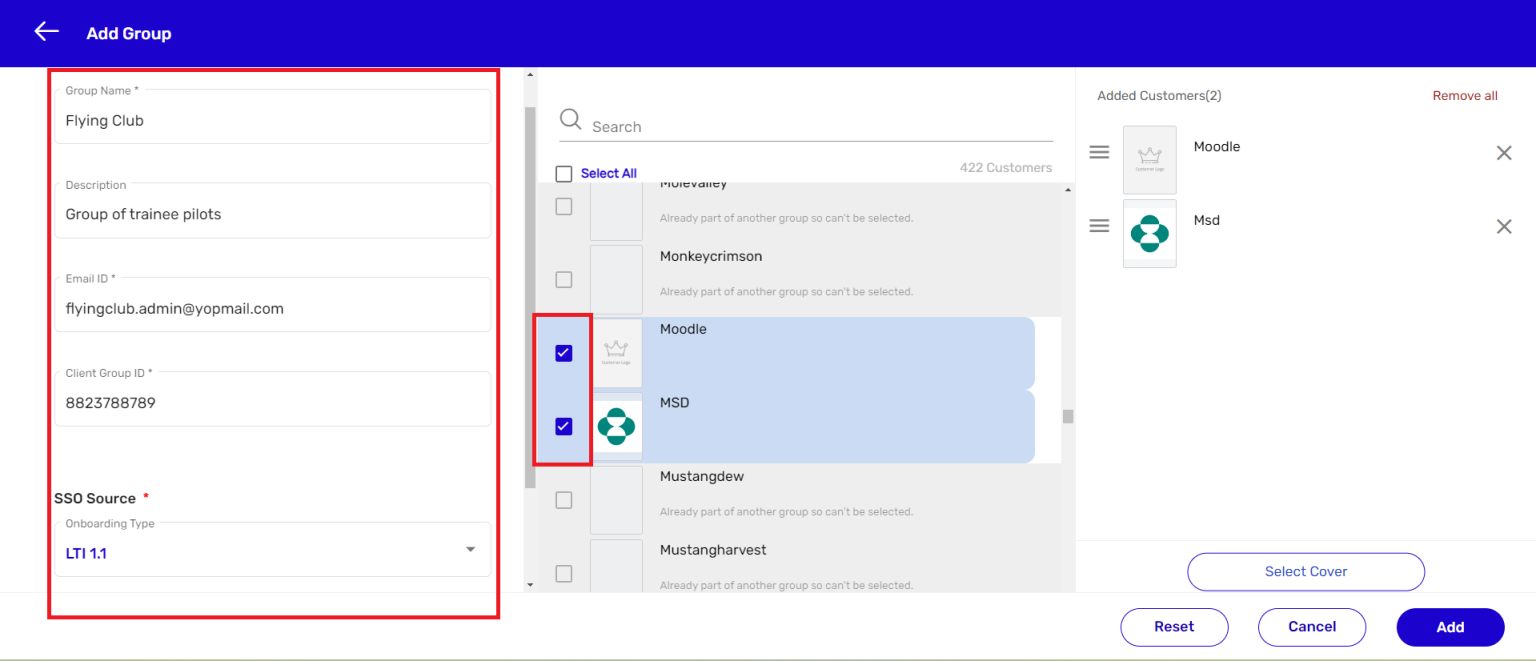
3. Enter the group details like Group Name, Description, Email ID, Group ID, and Onboarding Type. > Select Customers from the list.
NOTE: Some of the customers on the list are grayed out. This is because they are already part of another group. Hence they cannot be selected.
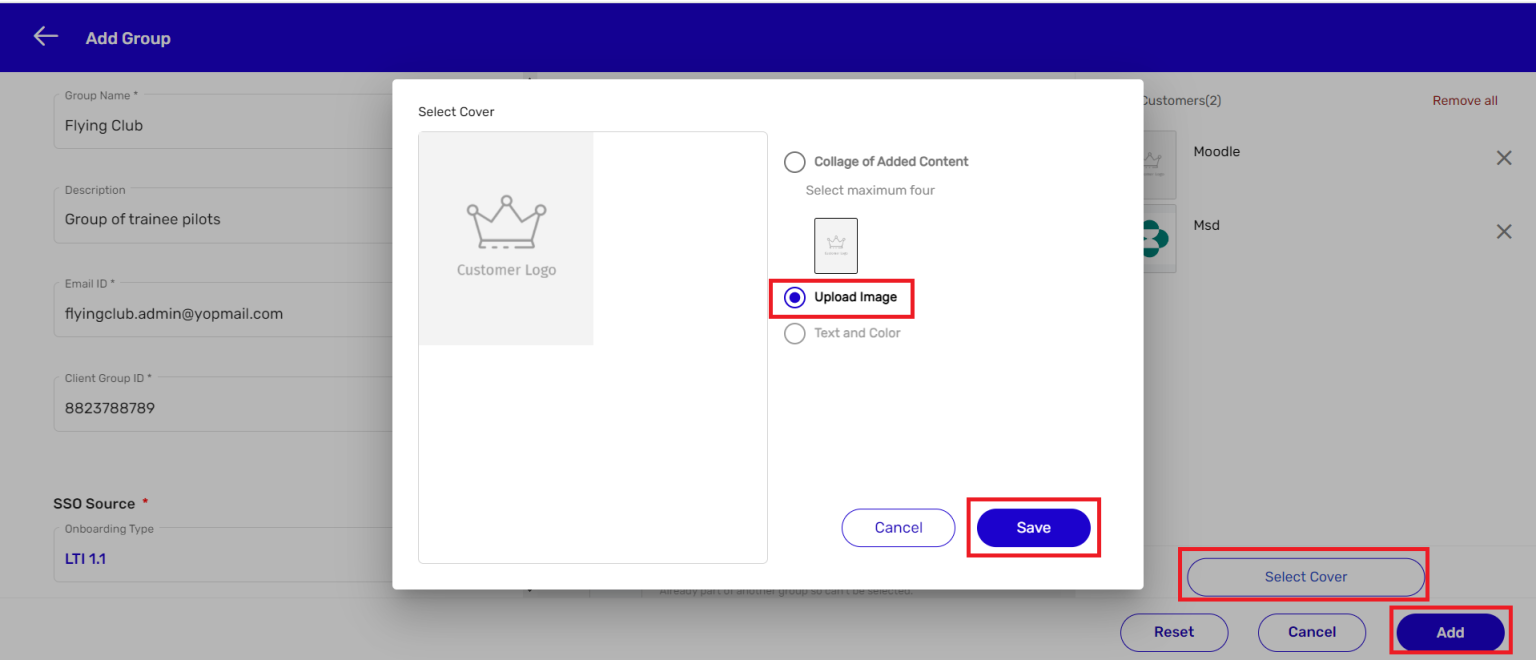
4. Click on Select Cover to upload a cover image, if any or go by the default
selection. > Click on Save. > Click on Add.
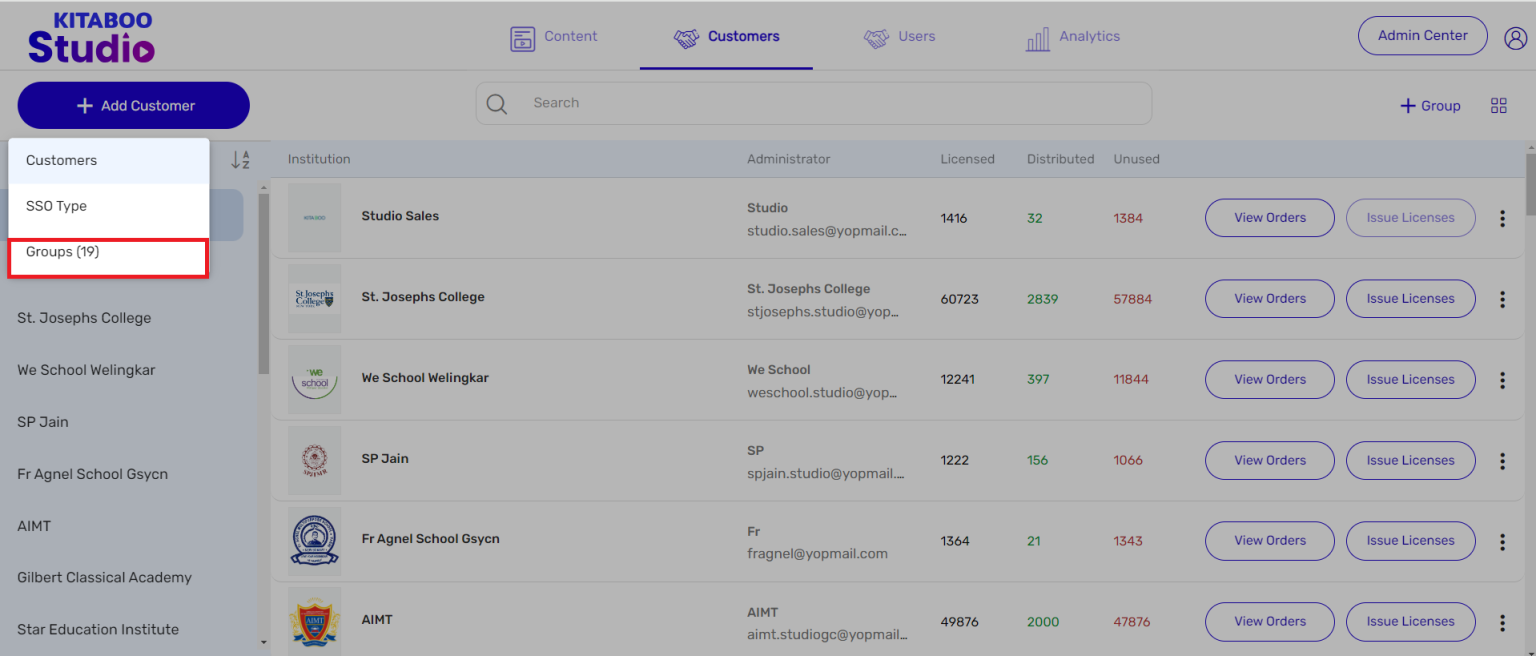
5. If you want to view the group you’ve recently added: Click on the Customers filter. > Select Groups.
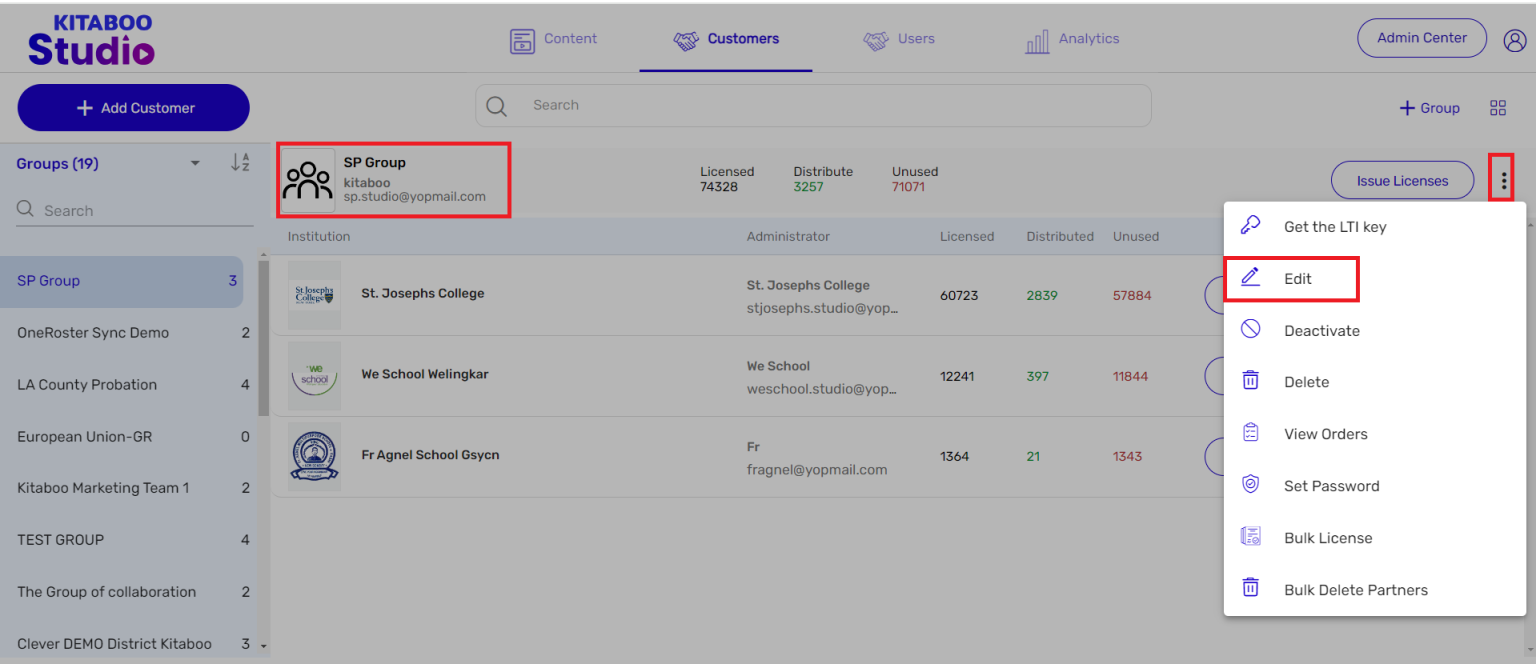
6. If you want to edit any of the group information:
Click on Edit. > Do the desired edits. > Click on Update.
NOTE: A group’s email ID cannot be edited once it has been added to the Kitaboo system.
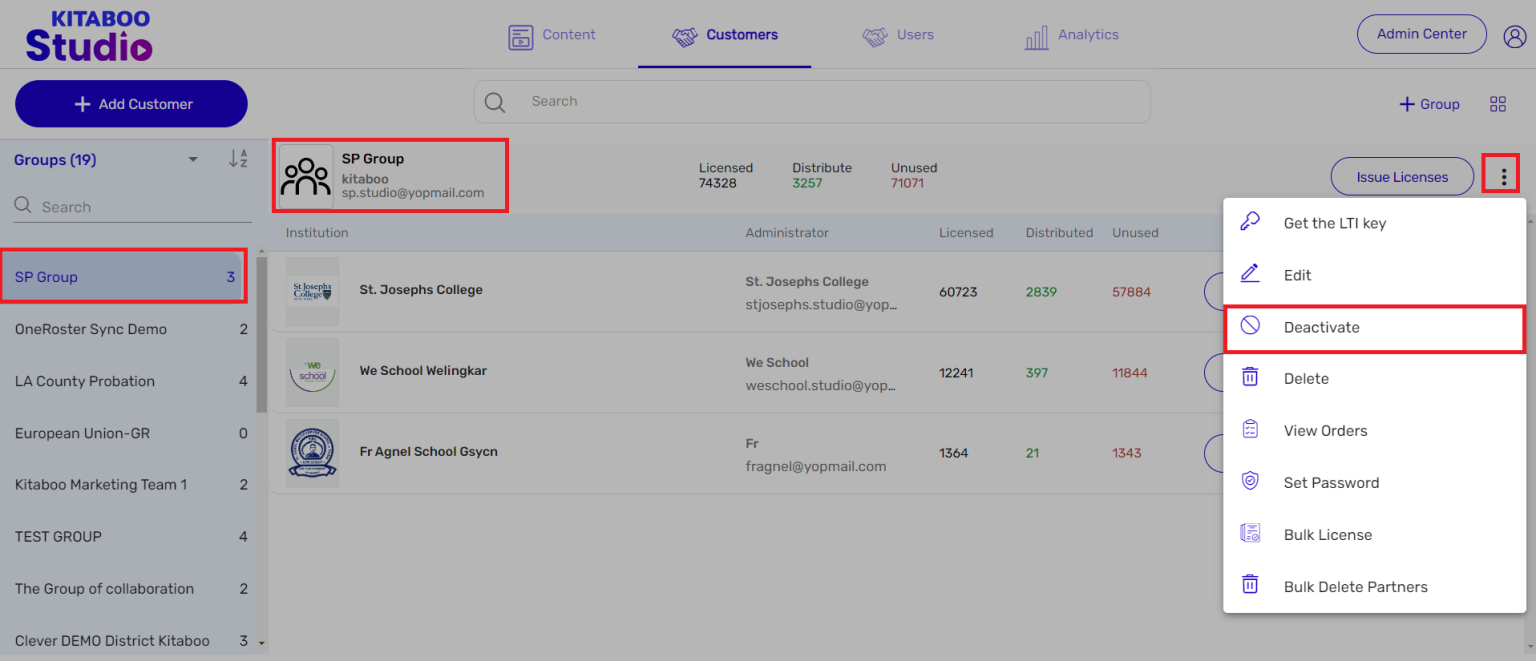
7. If you want to deactivate a group as a whole:
Click on Deactivate. > Confirm your action on the pop up. > Click on Update.
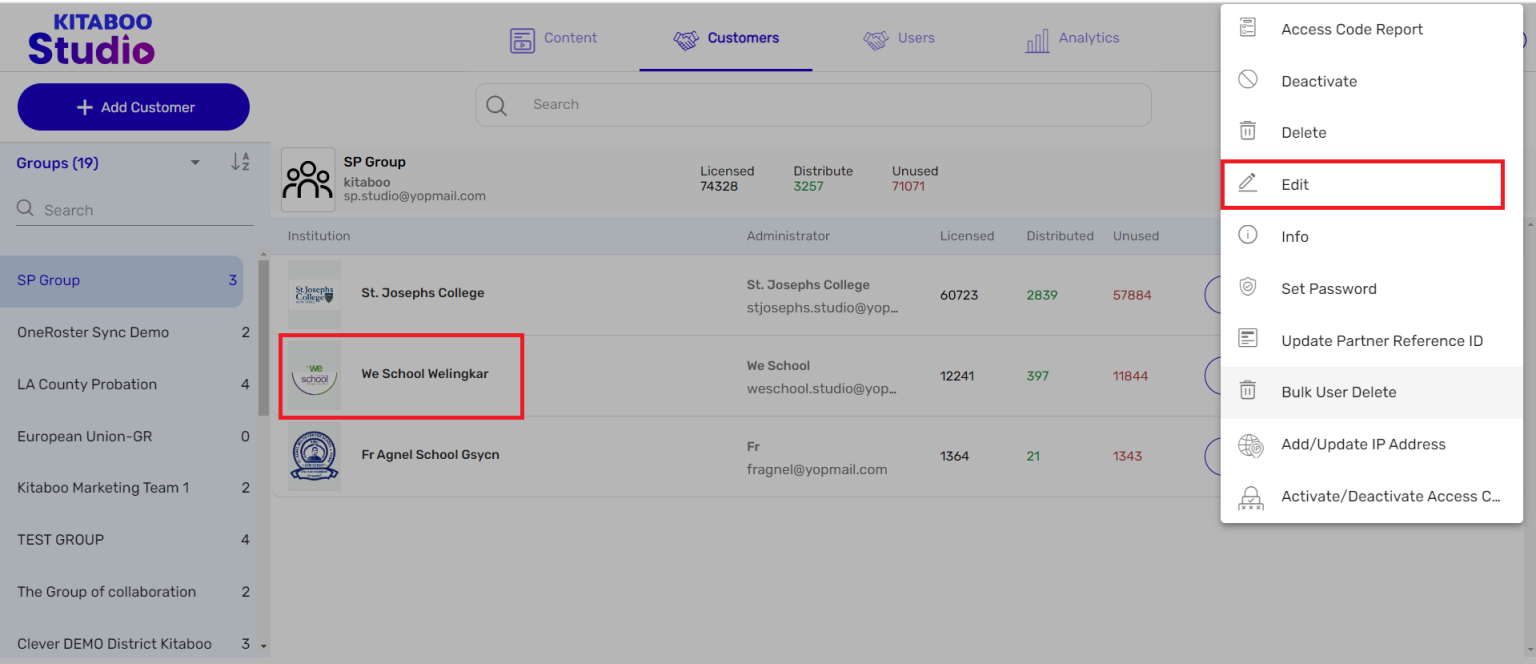
8. If you want to edit information related to a particular customer of a group:
Select the Group. > Click on the More icon against the customer you want to edit. > Select Edit. > Do the desired edits. > Click on Update.
9. If you want to deactivate a particular customer of a group:
Select the Group. > Click on the More icon against the customer you want to
edit. > Select Deactivate. > Confirm your action in the pop up message. > Click on Update.
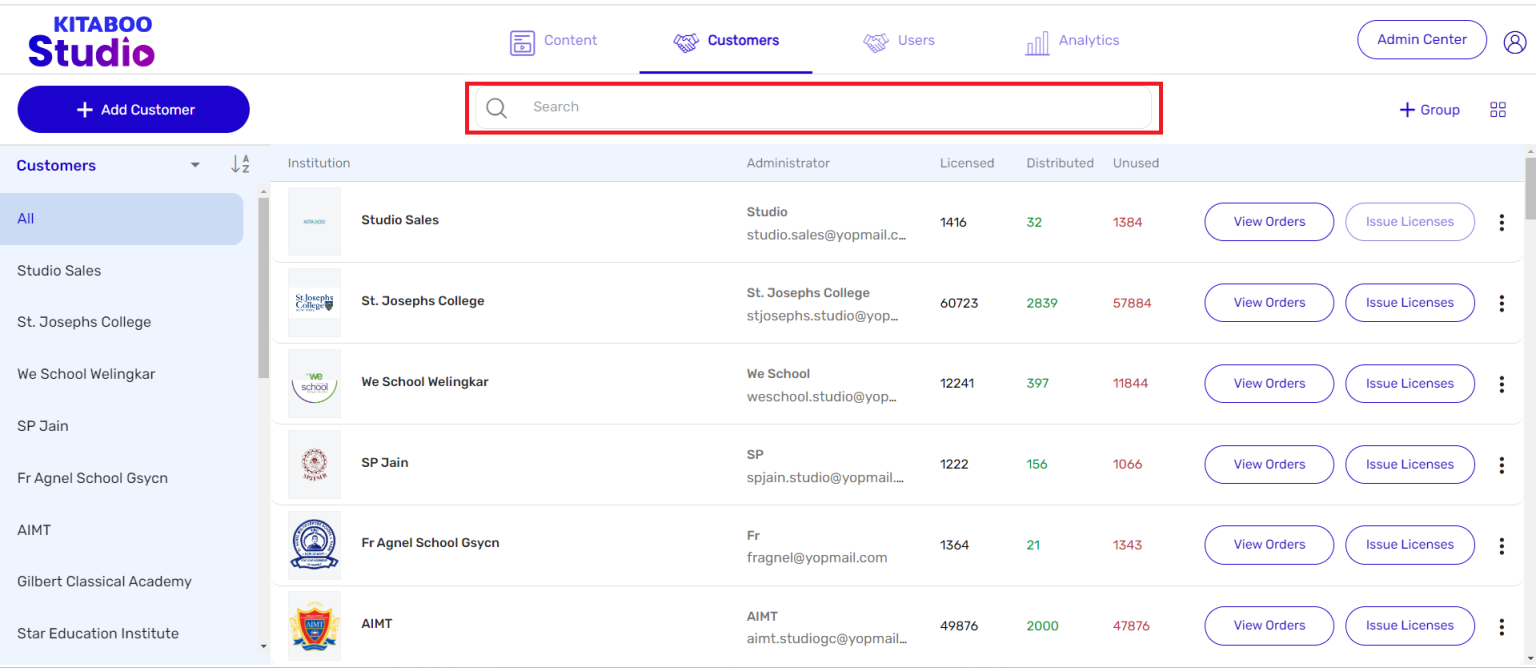
Kitaboo portal also lets you search your customers having something in common, like institute name, institution email ID etc.
1. Sign in with your Enterprise Admin credentials.

2. Enter the name of the item you want to search in the Search field. > Press the
Enter key.
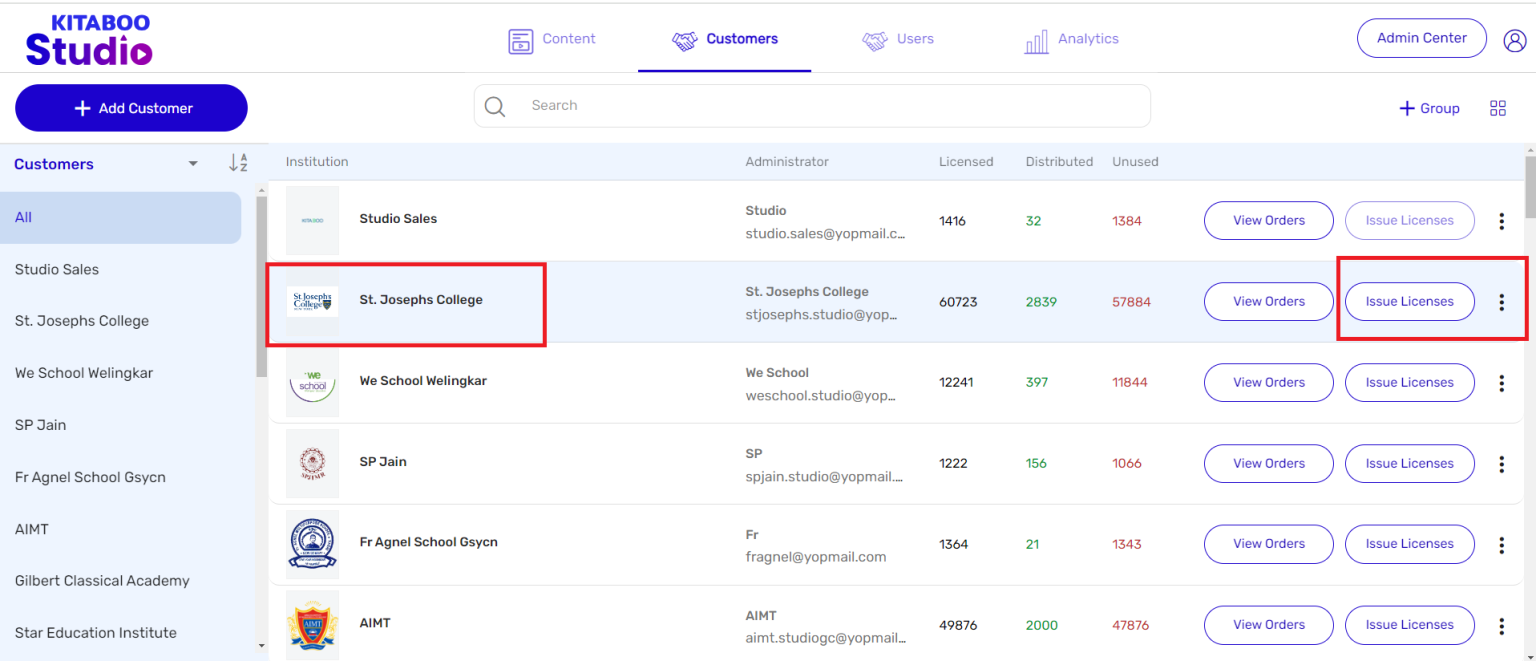
To grant access to the digital content to your customers, you need to grant them the access rights. Kitaboo Studio empowers you to issue licenses (access rights) to your customers. You can also define the period till a license will remain valid as well as set the number of devices the content can be downloaded to. The portal also empowers you to track the usage of licenses you have issued to a customer.
1. Sign in with your Enterprise Admin credentials.

2. Click on the Issue Licenses button against the institution (customer) you want to issue licenses to.
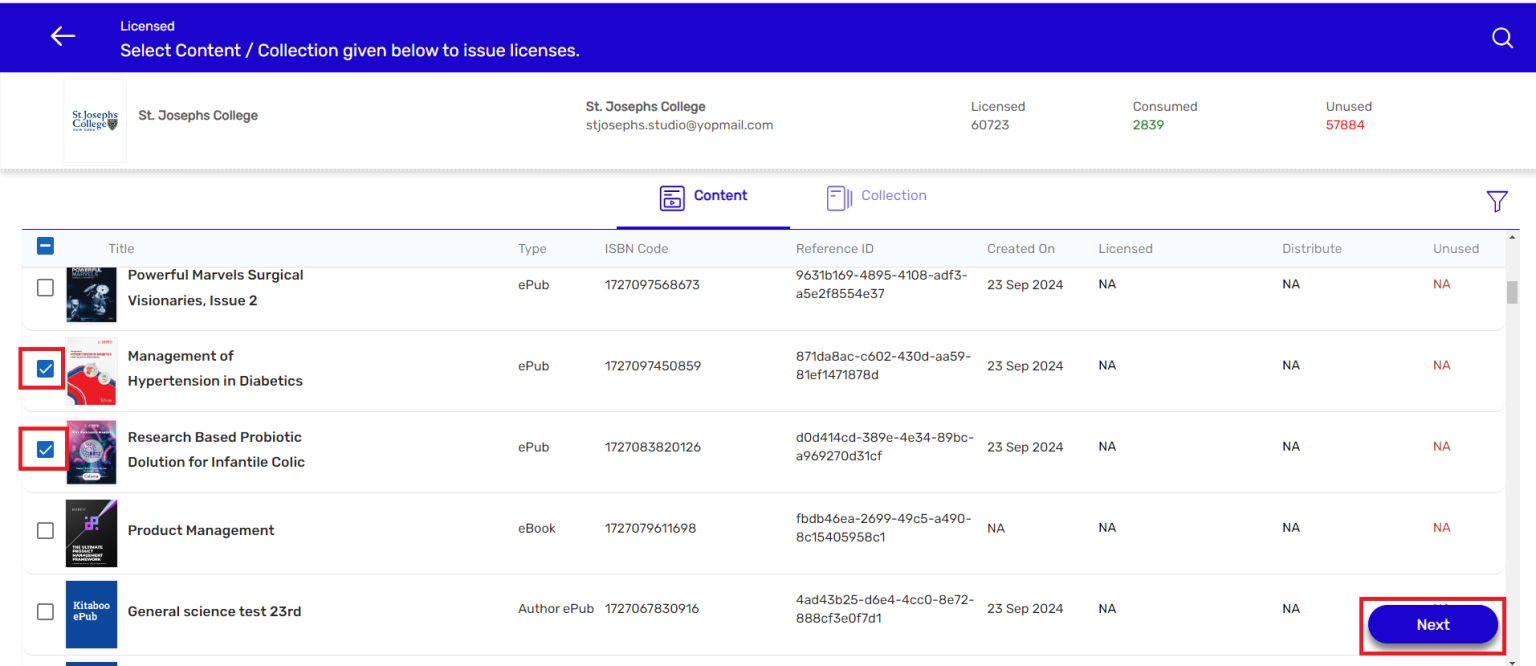
3. Select the titles from the list by checking the boxes. > Click on Next.
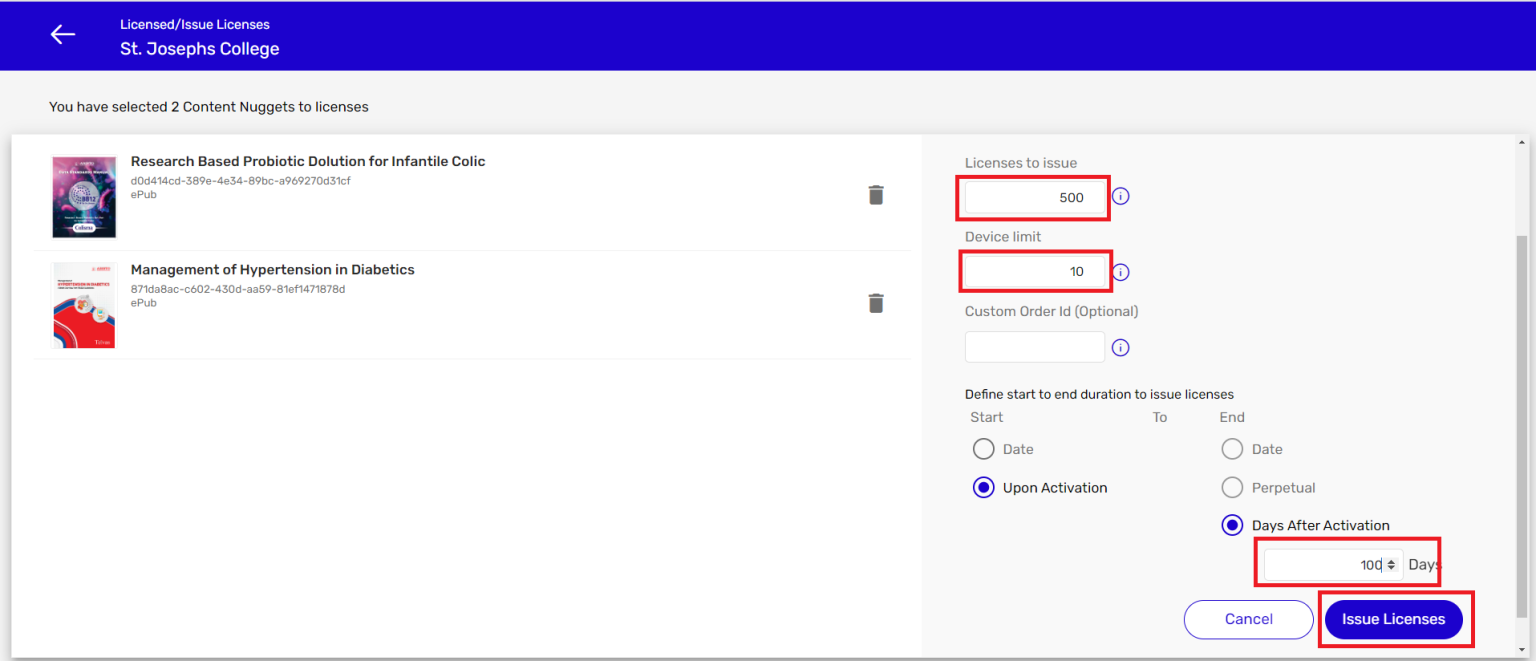
4. Define License count > Device limit > Set the Validity period > Click on Issue
Licenses.
NOTE: In this example, the license will be valid for 100 days after activation.
5. Alternatively, you can also define the Start date and the End date for the licenses to be issued.
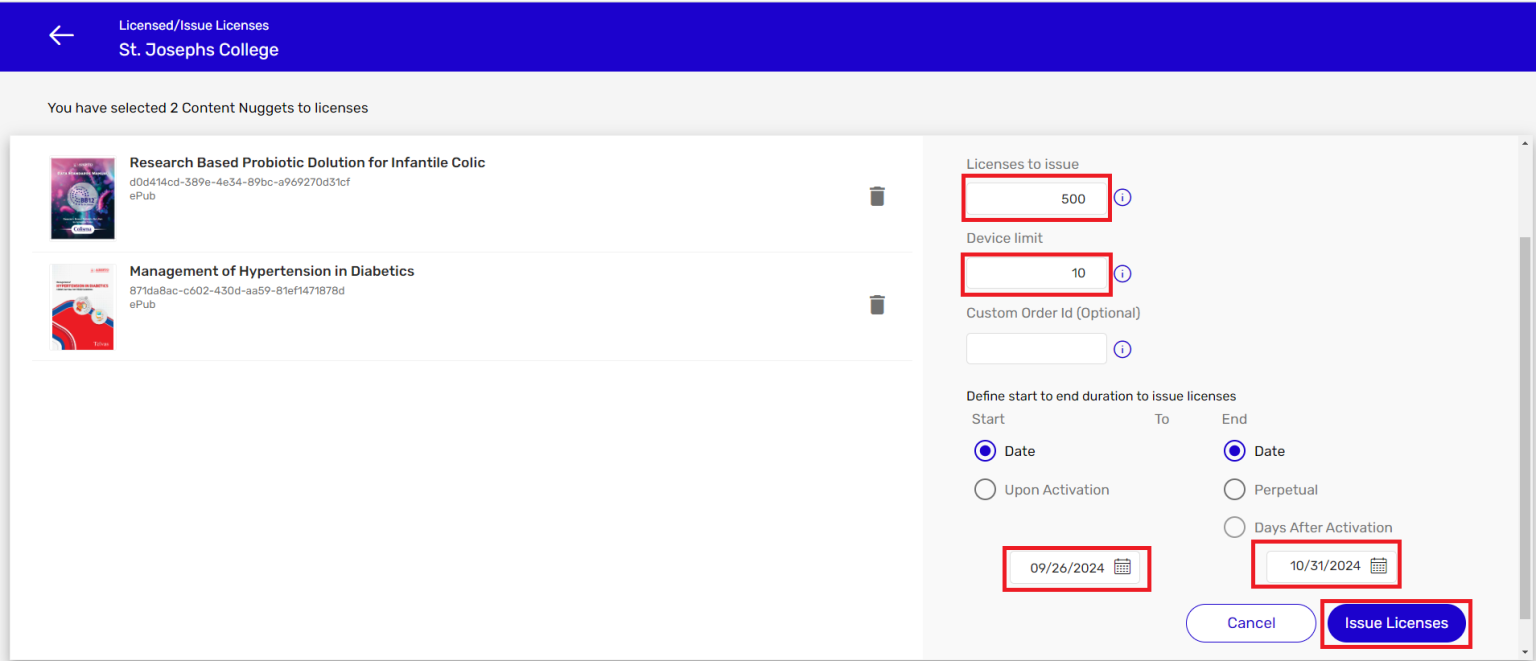
Remember that:
● If you want a license for a title to expire on a specific date, you should define the Start and End dates.
● If you want the title to expire after a certain number of days, select Upon Activation and also define the number of days you want to give access to the title.
● If you want to give unlimited access to a title(s), select Perpetual. In this case, there would be no end date.
The Kitaboo Studio portal also allows you to update the details of your customer like the address details, customer logo, onboarding type, administrator’s details etc. You can do so in three simple steps.
1. Sign in with your Enterprise Admin credentials.

2. Click on the More Options (three vertical dots) icon against the customer you want to edit.
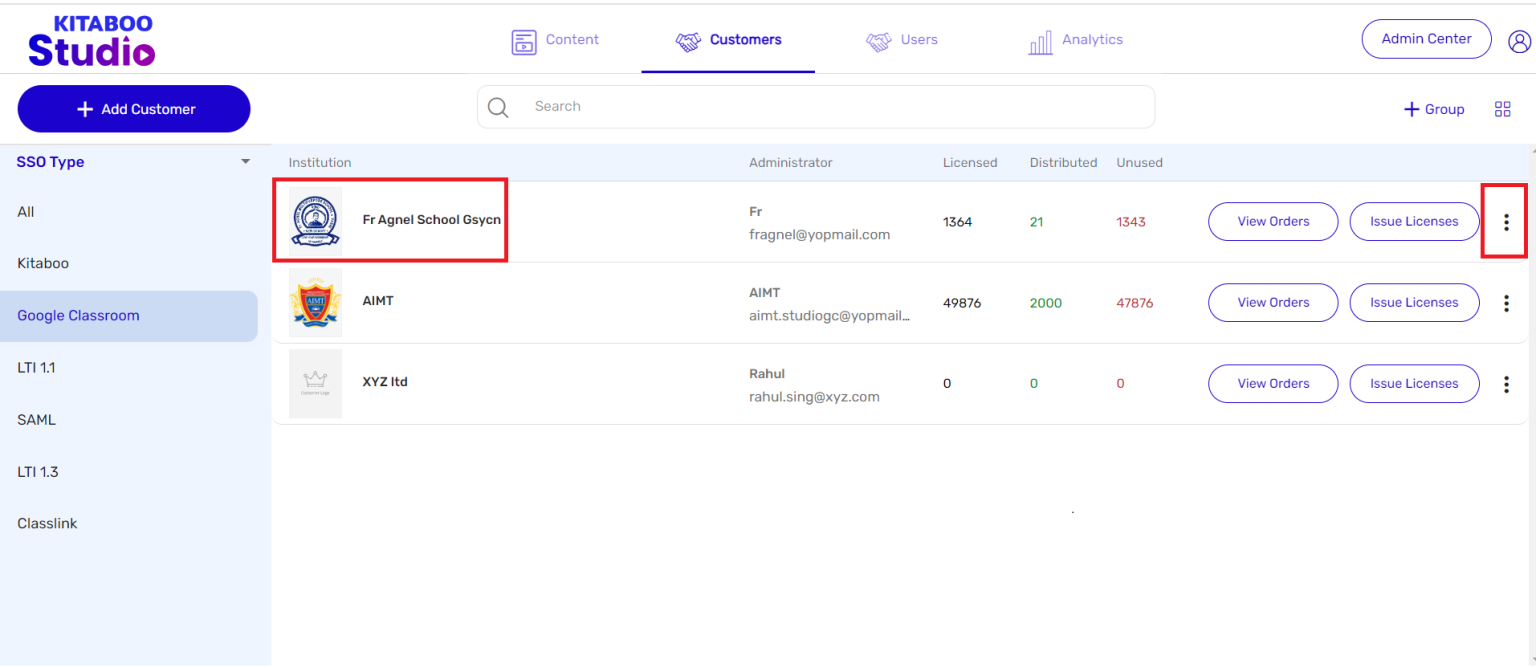
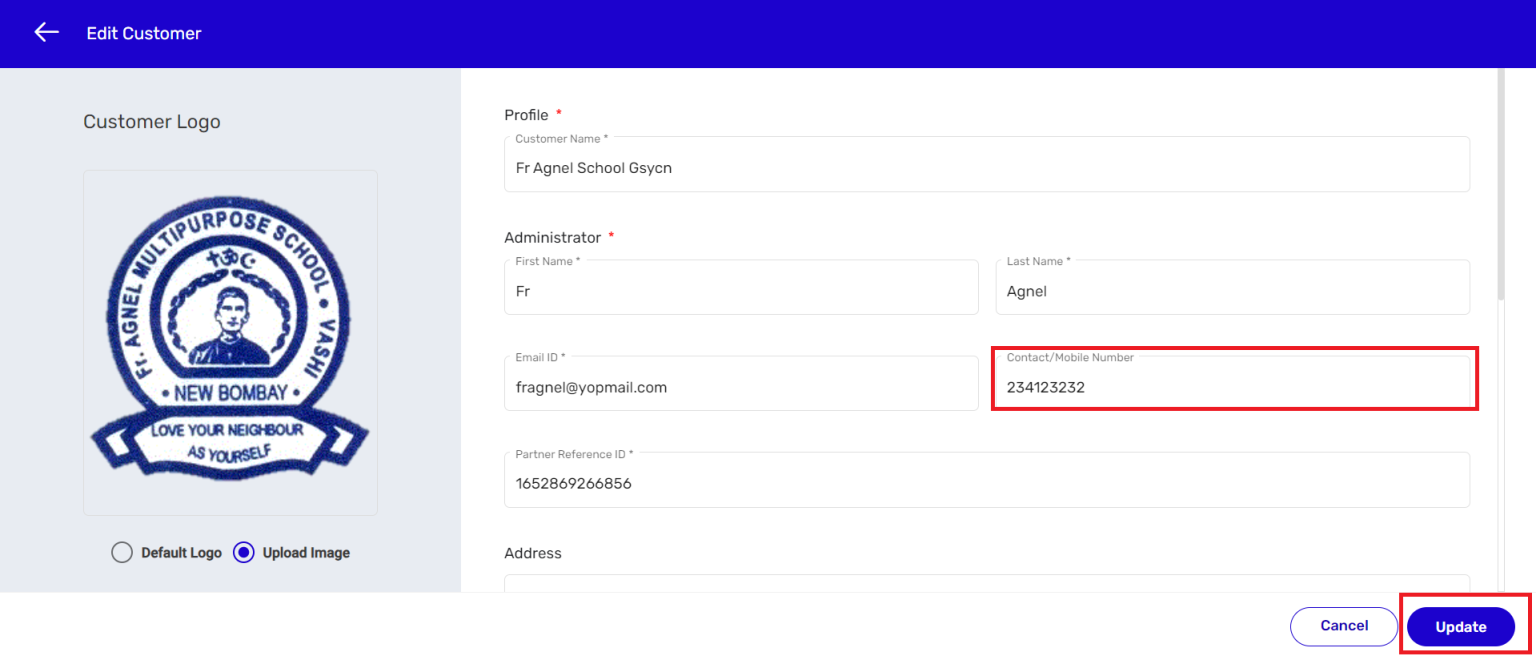
3. Click on the Edit option.
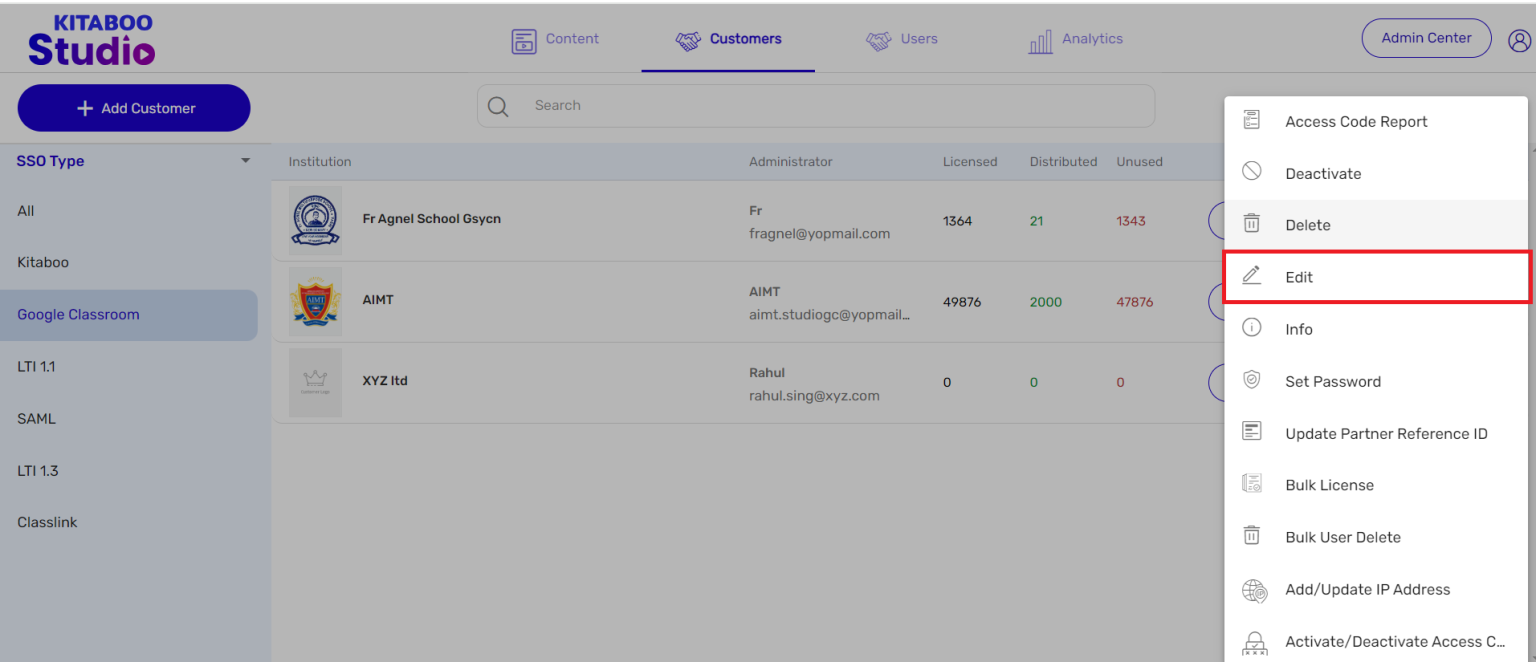
4. Do the desired edit(s). Click on Update.
NOTE: In this example, the contact number has been updated.
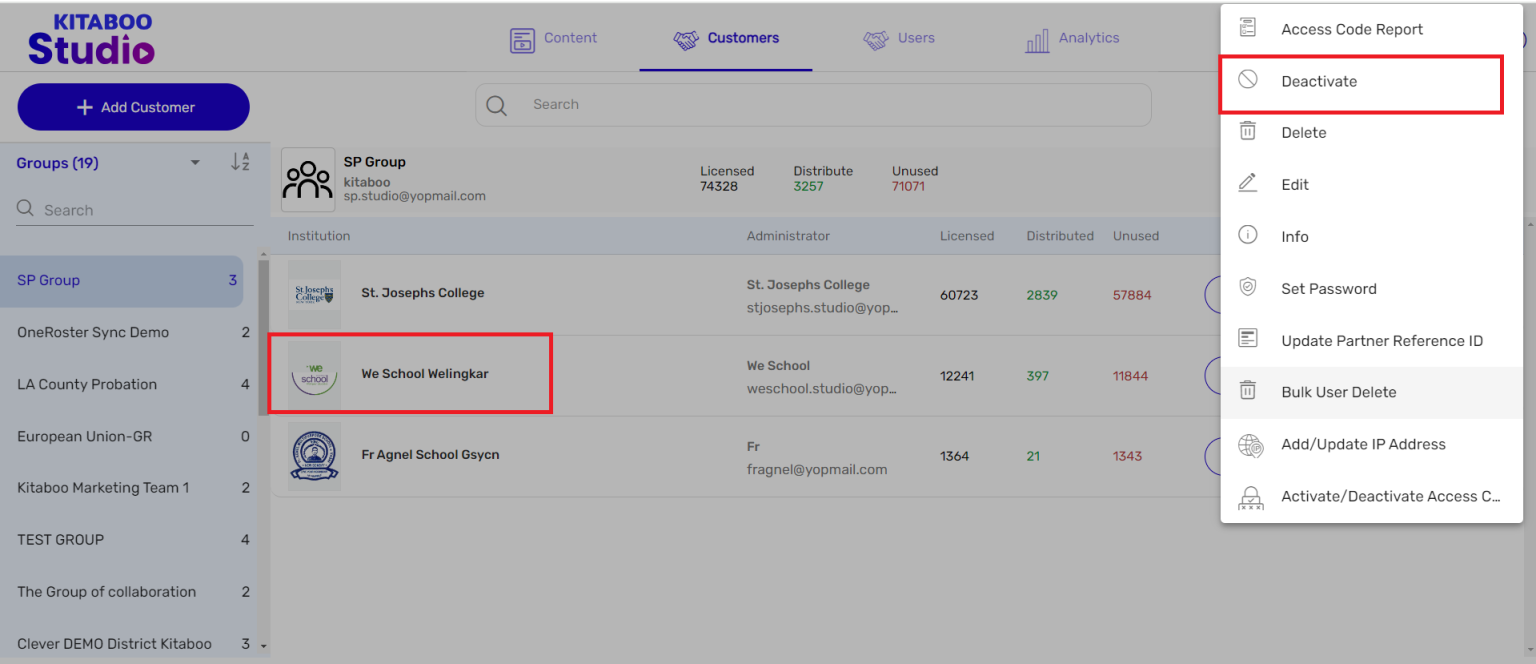
Sometimes you may need to deactivate a customer on account of several reasons, like violation of the privacy policy, breach of confidentiality agreement, or violation of the business terms & conditions. Kitaboo Studio allows you to deactivate such customer(s).
1. Sign in with your Enterprise Admin credentials.

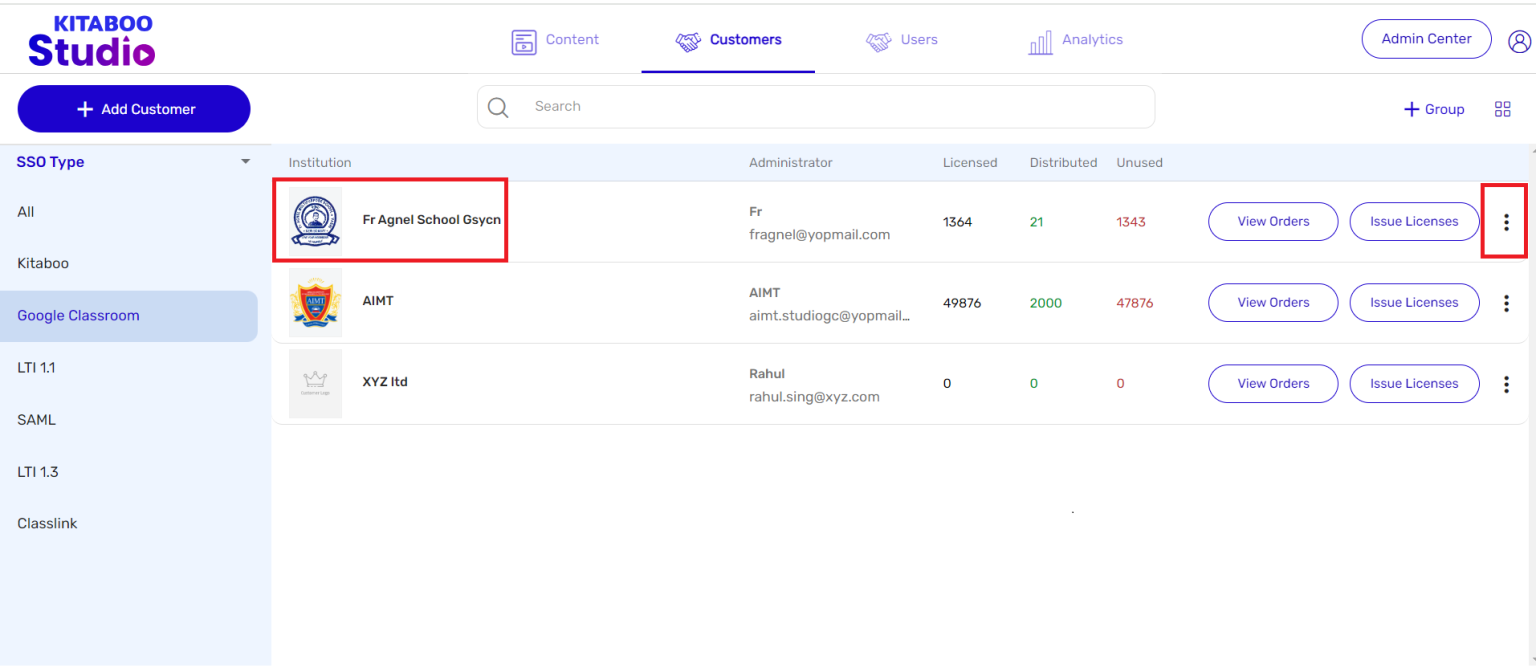
2. Click on the More Options (three vertical dots) icon against the customer you want to deactivate.
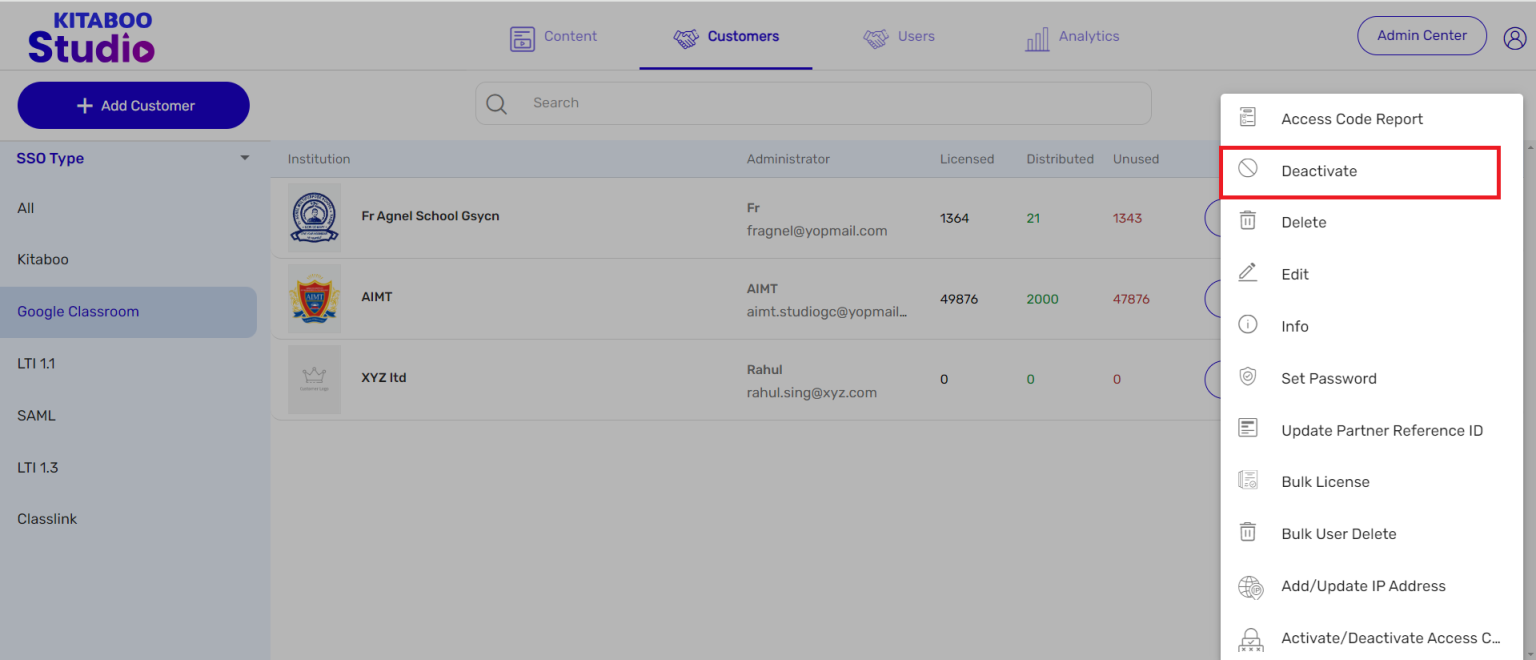
3. Click on the Deactivate option.
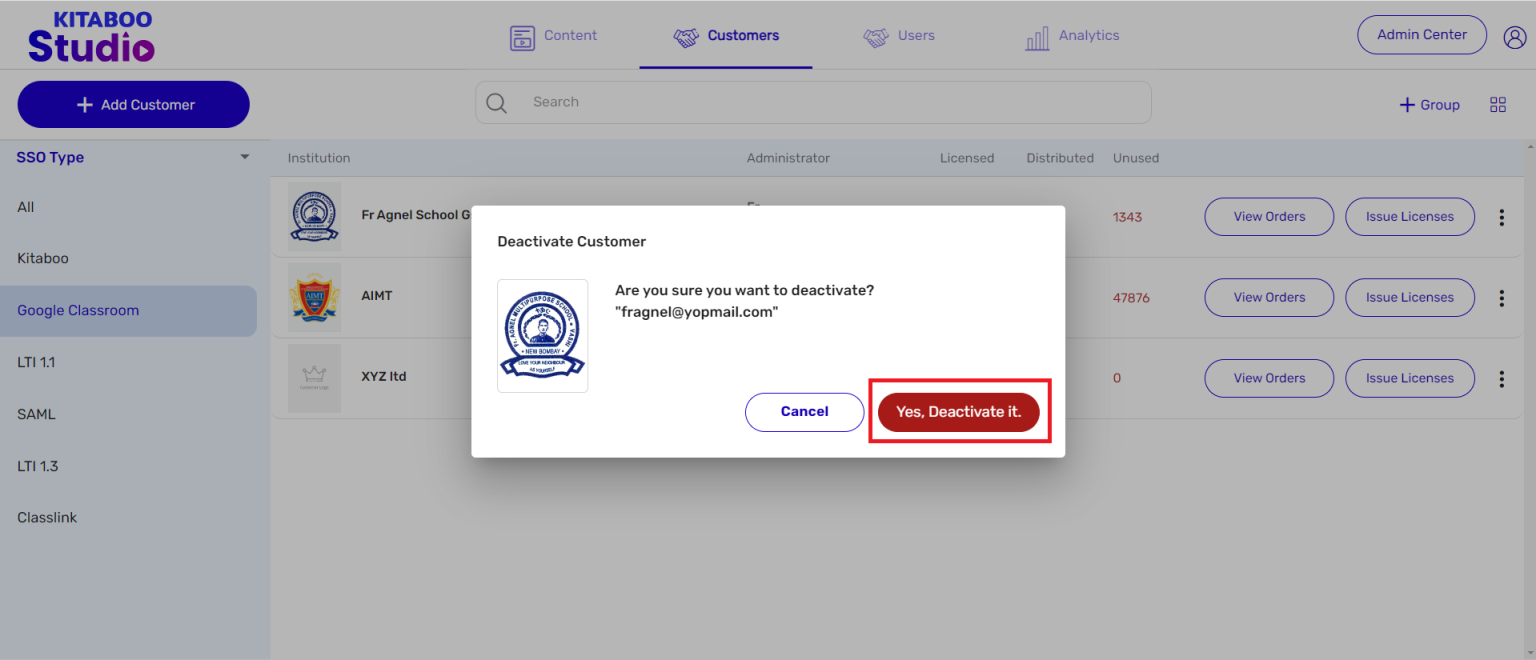
4. Click on Yes, Deactivate it.
NOTE: Remember that this action is irreversible. Once deactivated, you cannot restore the customer account.
5. The highlighted customer is now deactivated.
NOTE: Once you deactivate the customer account, the end user and access code of that account will not be functional. Users will see an empty bookshelf in that case.
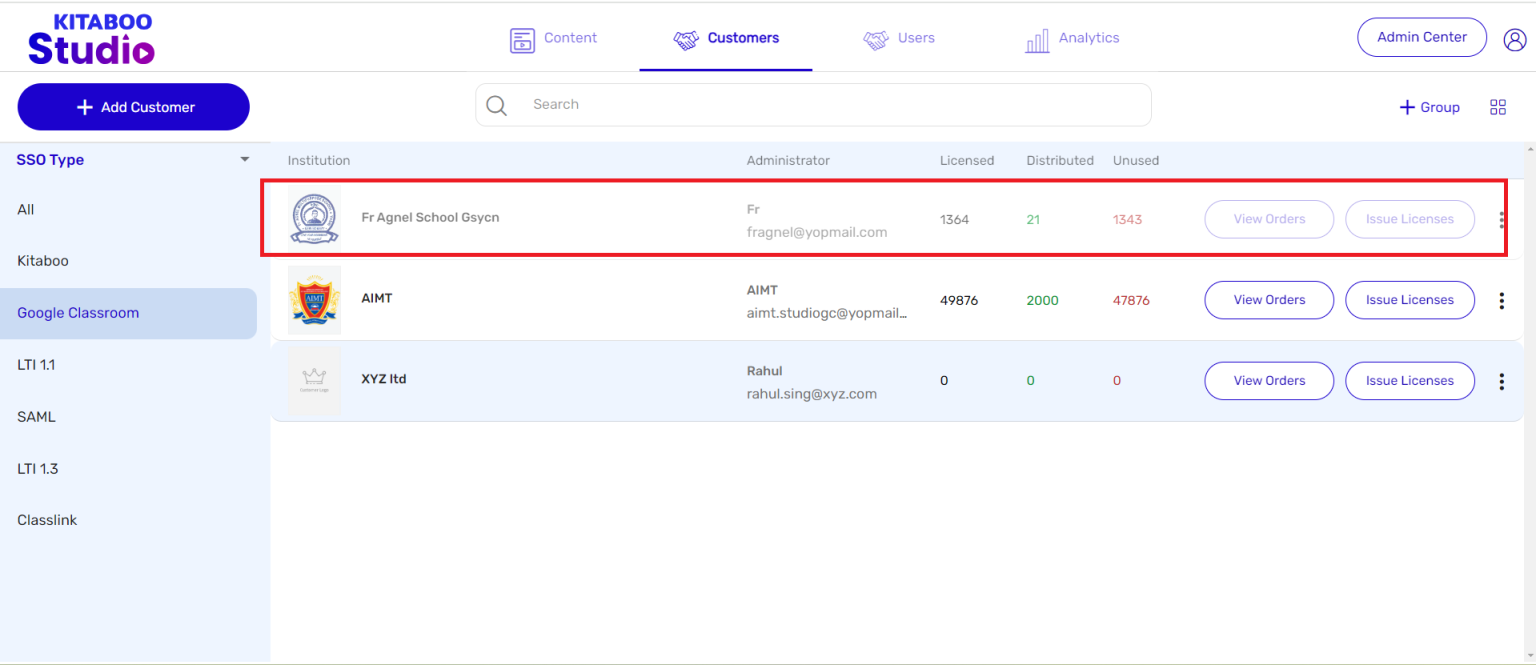
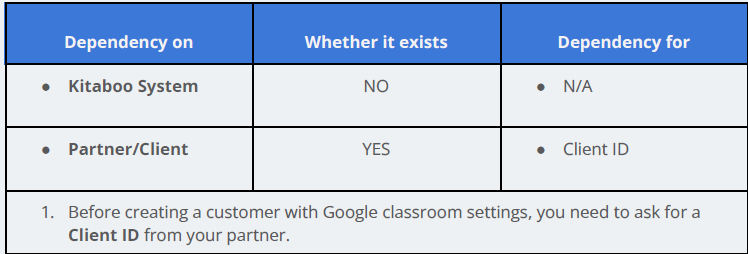
Adding a Google Classroom customer is also subject to a dependency on the Kitaboo system. It is important to be aware of the solitary dependency before you initiate the process.
Let us now see how to add a Google Classroom customer.
1. Sign in with your Partner Admin credentials.

2. On the Users tab, click on the Sync with Google Classroom hyperlink.
3. Next, select the Gmail Account that you used to create the Client ID during
customer setup for authentication.
4. Now, you need to select one of the Sync Type options – whether On Scroll or Load Full Data.
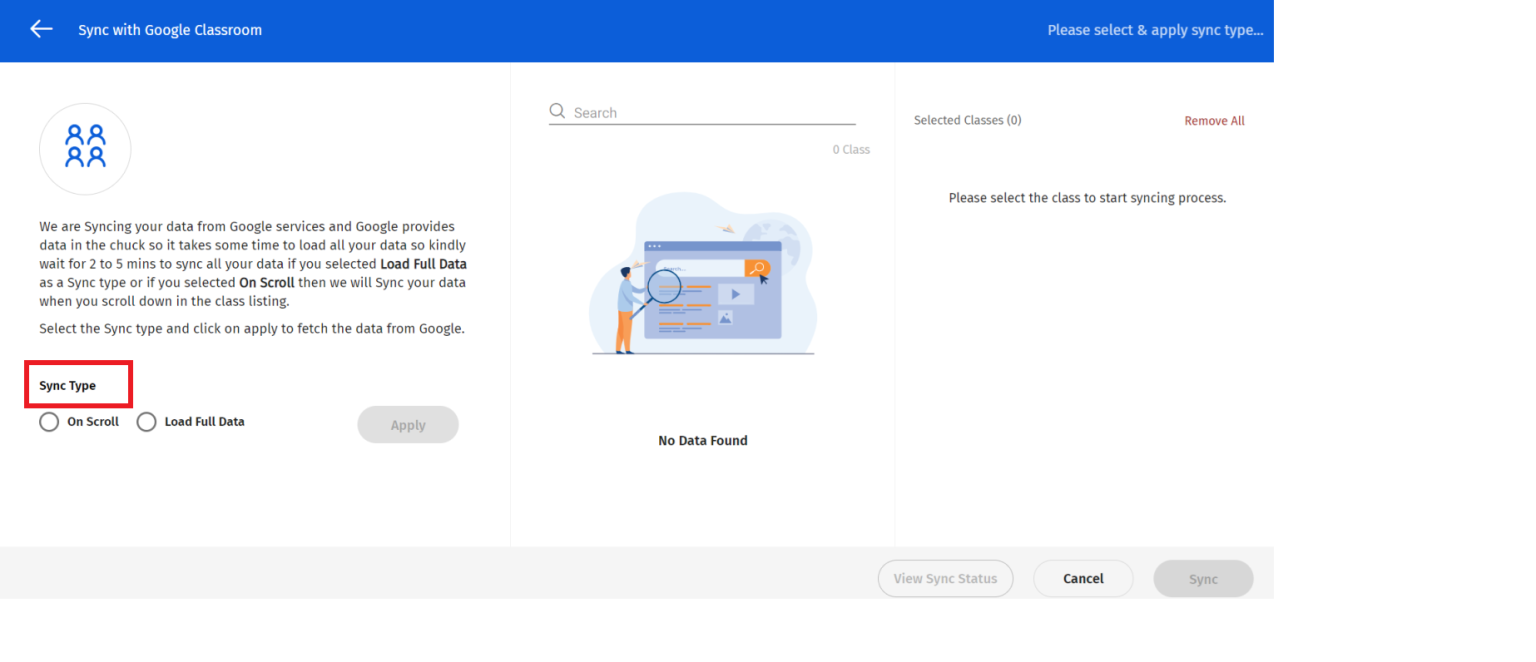
NOTE:
● The On Scroll option enables you to sync ninety-nine classes’ data at the maximum, even if you have checked the Select All box. For example, if there are one thousand classes data to be synced, you can sync a maximum of ninety-nine classes data by using the On Scroll option.
● Hence, if you want to sync more than ninety-nine classes’ data, you must select the Load Full Data option only.
5. Let’s select the On Scroll option first. > Click on the Apply button. Thus the On Scroll data sync type process will begin. Once completed, a message – On Scroll sync type applied. – will appear on the screen.
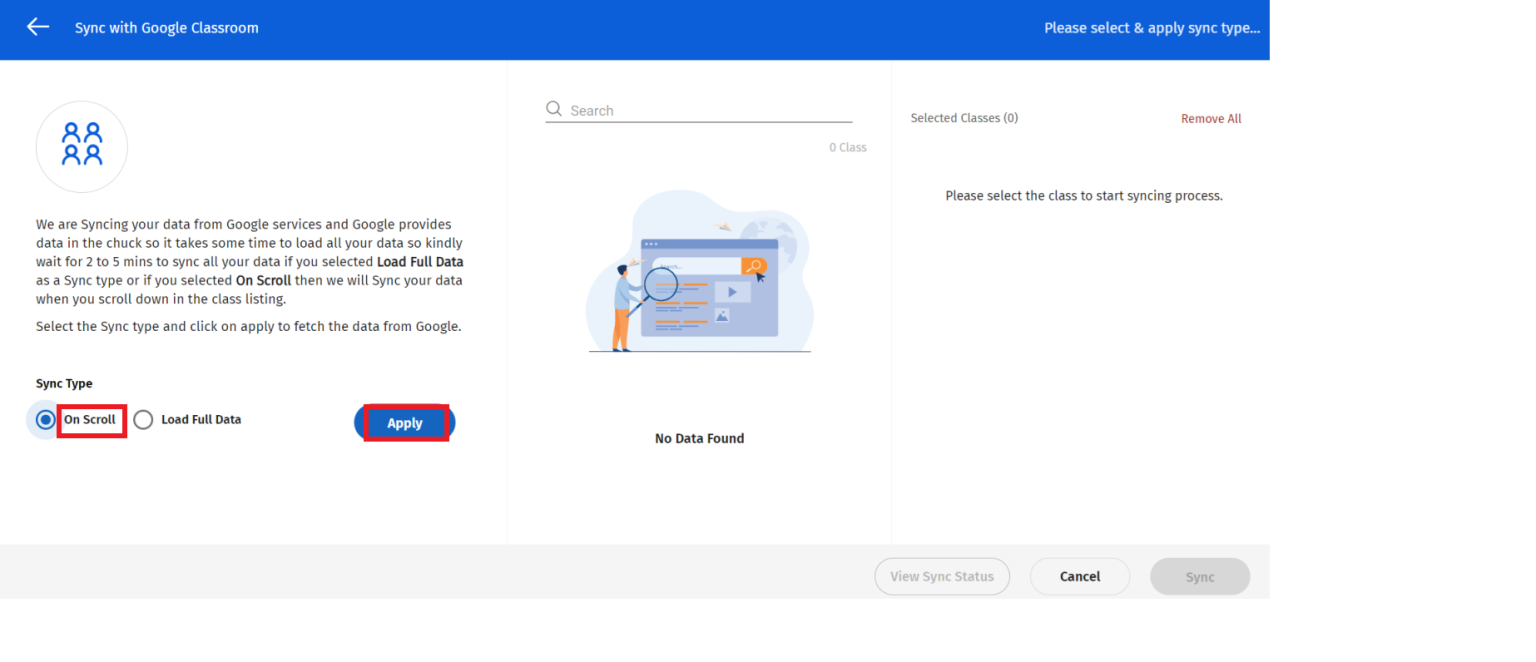
6. All the classes will consequently appear listed in the middle of the screen. The
data related to these classes will also get loaded in the backend as you scroll down. When this process is finished, a message – “Data loading completed. No more data to load.’’ – will appear on the screen.
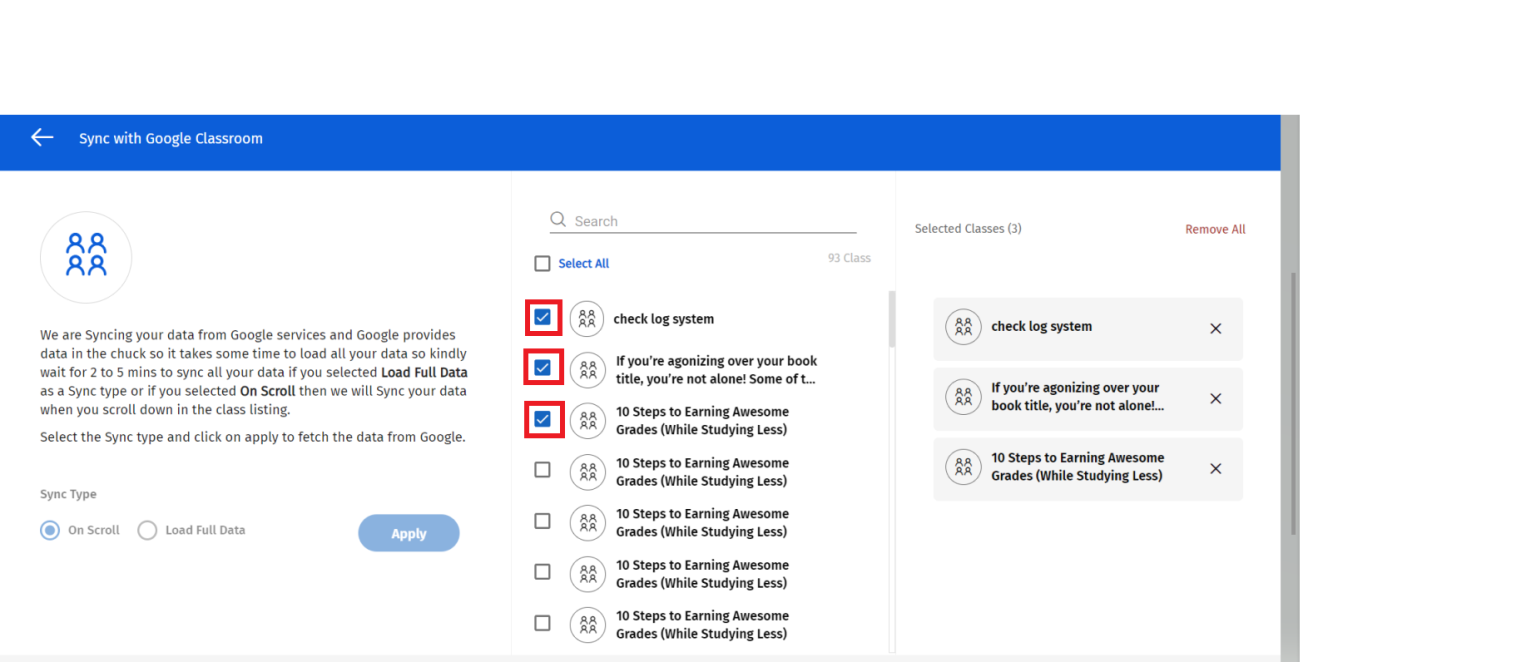
7. Now you have three options before you:
● If you want to sync all the displayed classes (at the max 99 only), check the Select All box.
● If you want to sync specific classes, you need to select those classes.
● If you want to sync a particular class, you can type its name in the Search field and press Enter.
NOTE: We have selected three classes for syncing in this example.
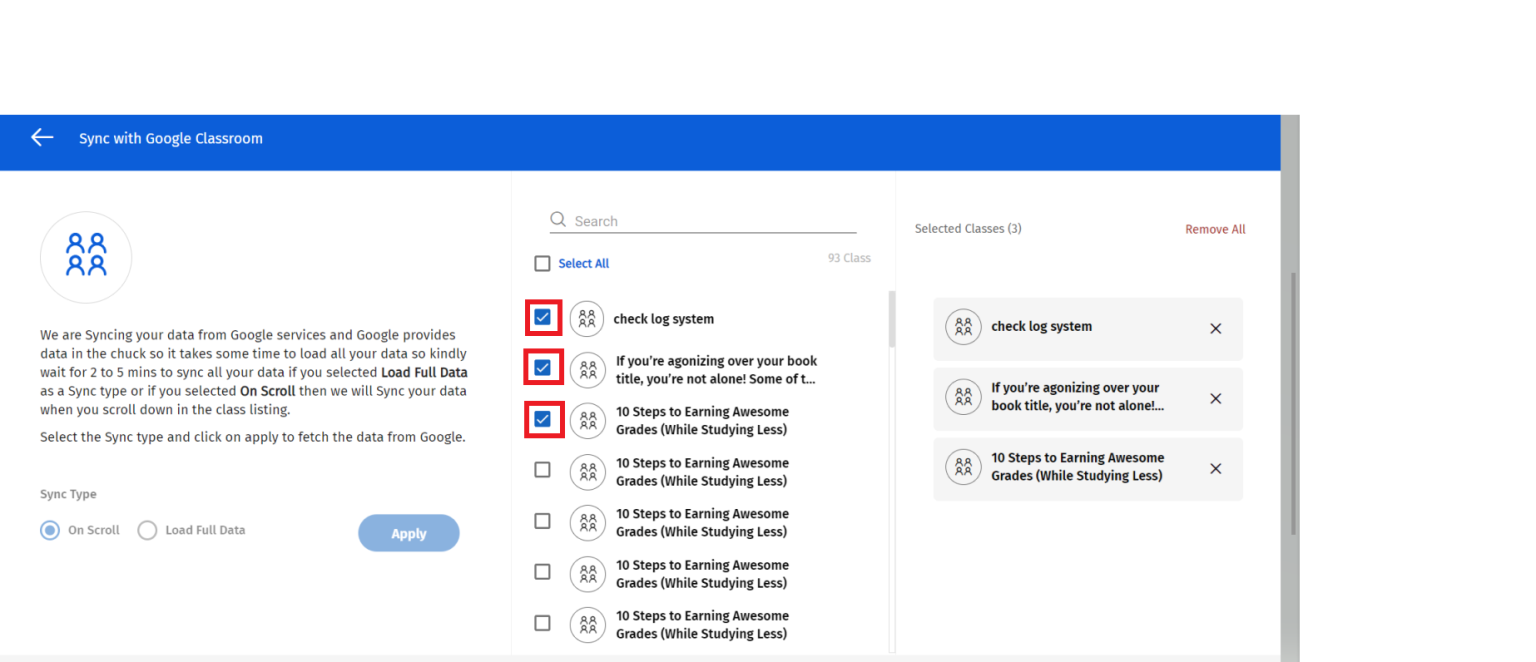
8. Finally, you should click on the Sync button.
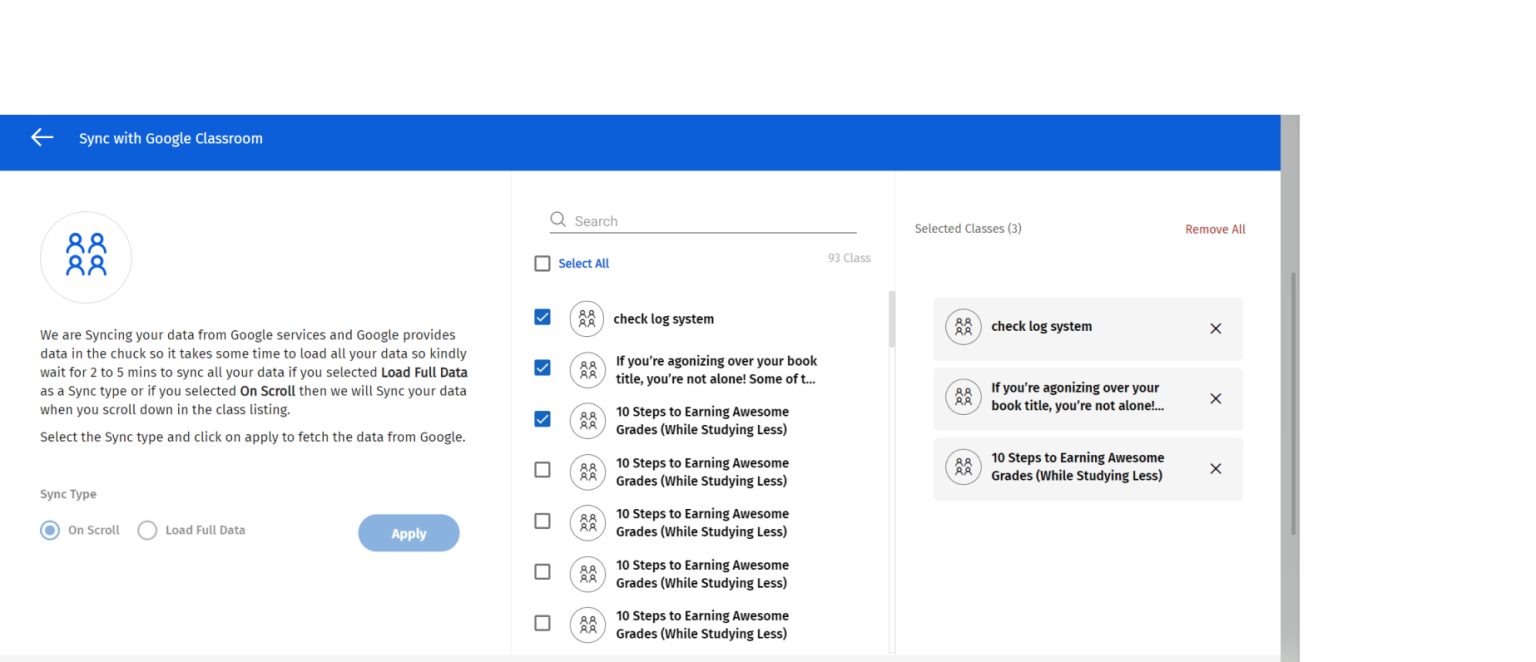
9. Alternatively, if you select the Load Full Data option and click the Apply button, the system will initiate uploading the entire data, irrespective of the number of classes.
A message – Load Full Data sync type applied. – will also appear in the end.
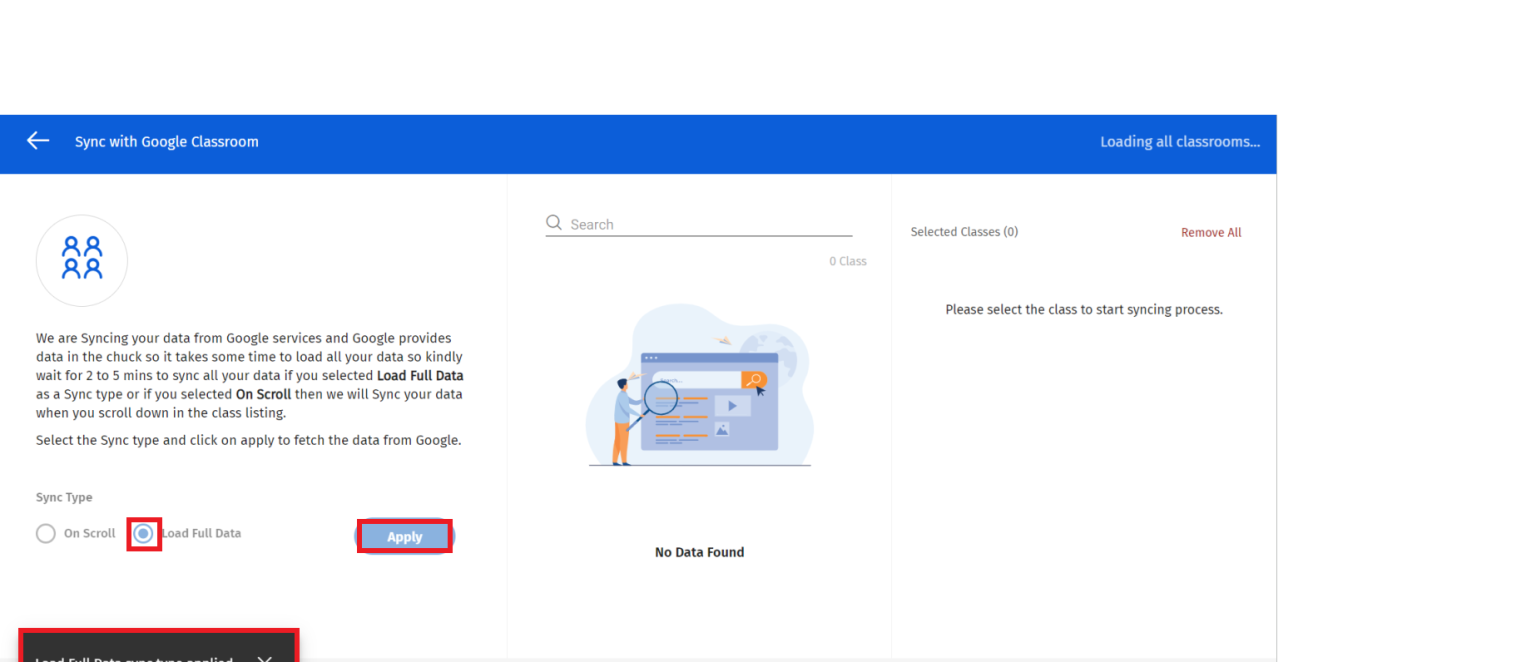
10. All the classes will appear listed in the middle of the screen. The data related
to these classes will also get loaded in the backend. When this process is finished, a message – “Data loading completed. No more data to load.’’ – will appear on the screen.
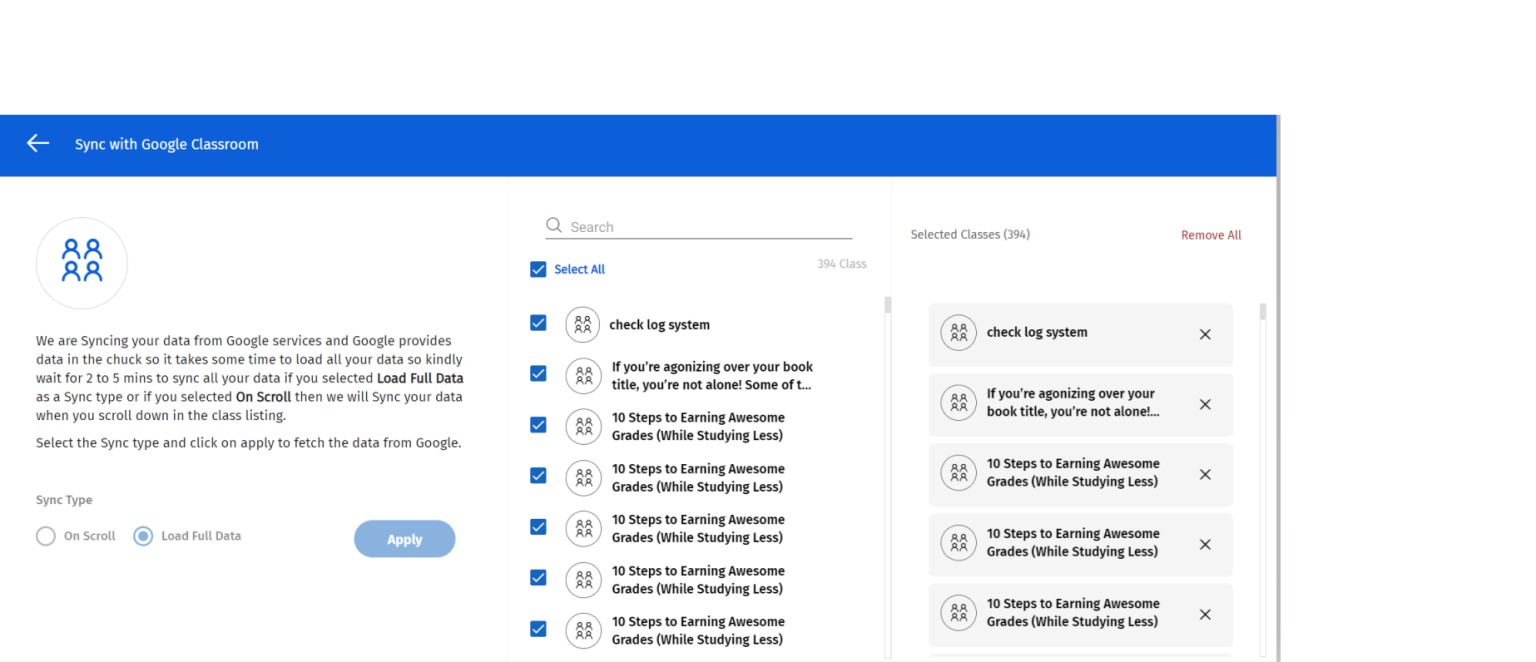
11. You can either select all the classes or a few specific classes for syncing. You
can also search and select a specific class for syncing by using the Search option.
NOTE: We have used the Select All option in this example.
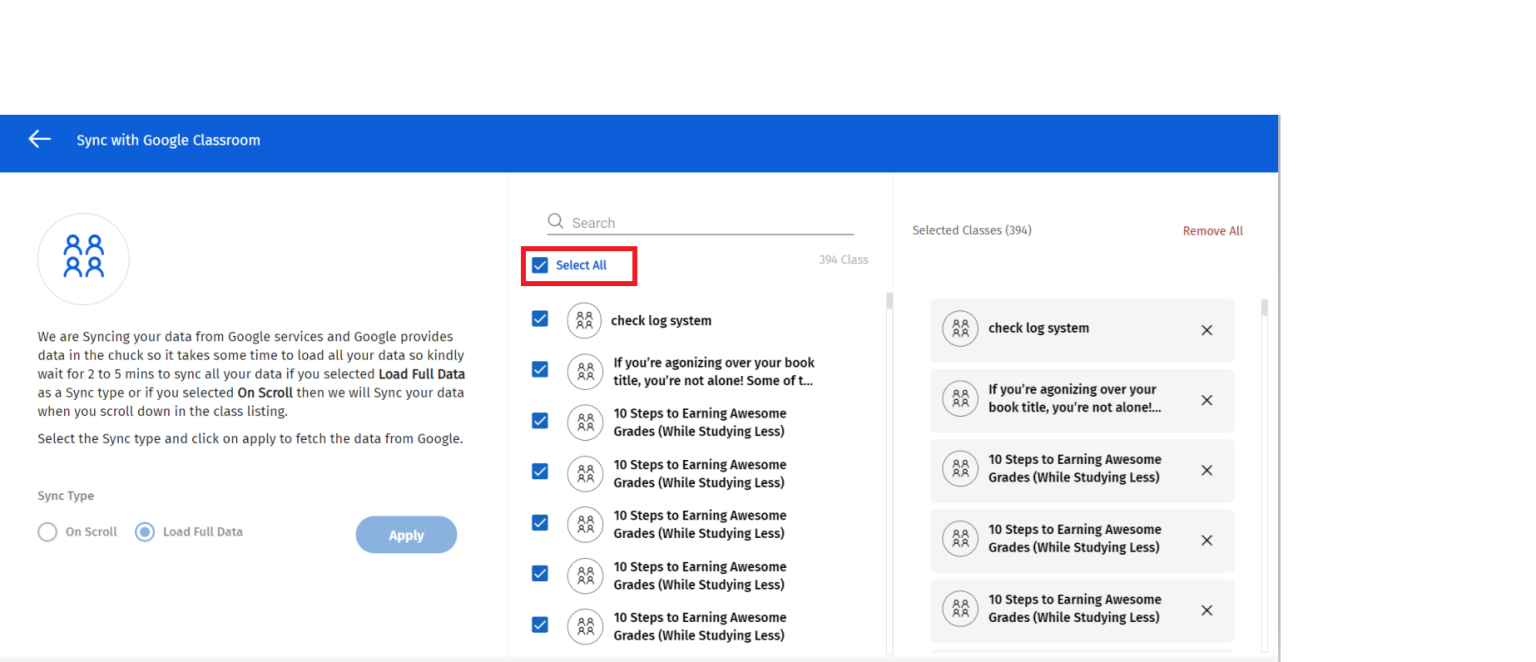
12. Next, you need to click on the Sync button. It will initiate the syncing process.
You will also get a confirmation message – Sync process started. – on the screen.
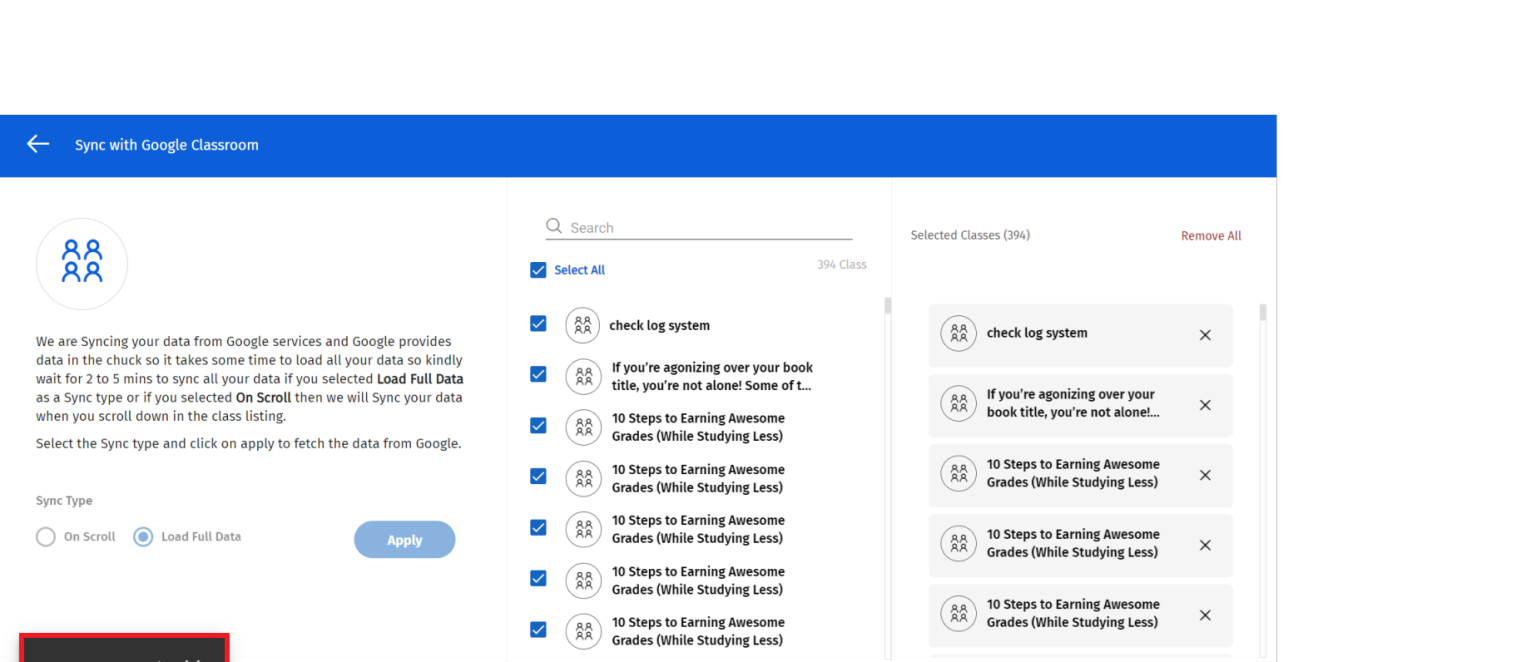
13. The syncing process will end with the message – Syncing process completed.
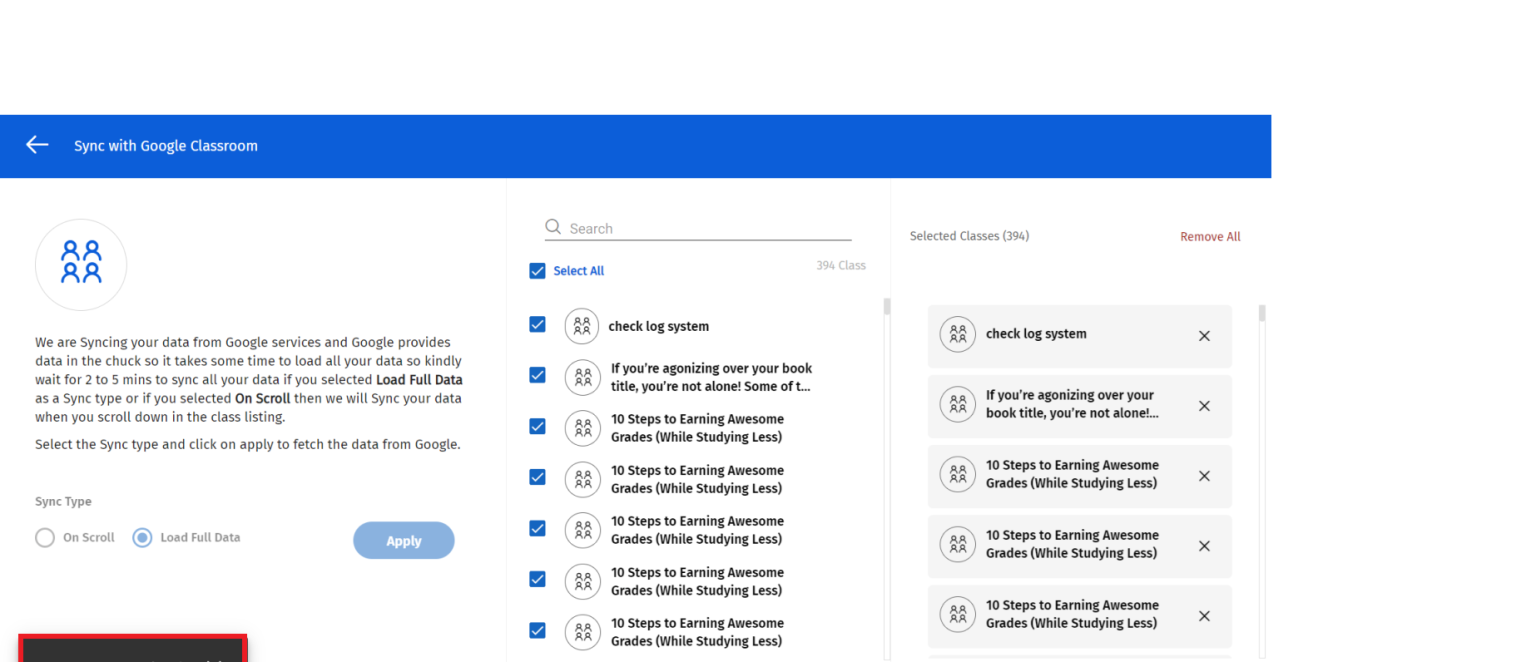
14. If you want to see the sync status, you need to click on the View Sync Status
button. The sync status will thus appear on your screen.
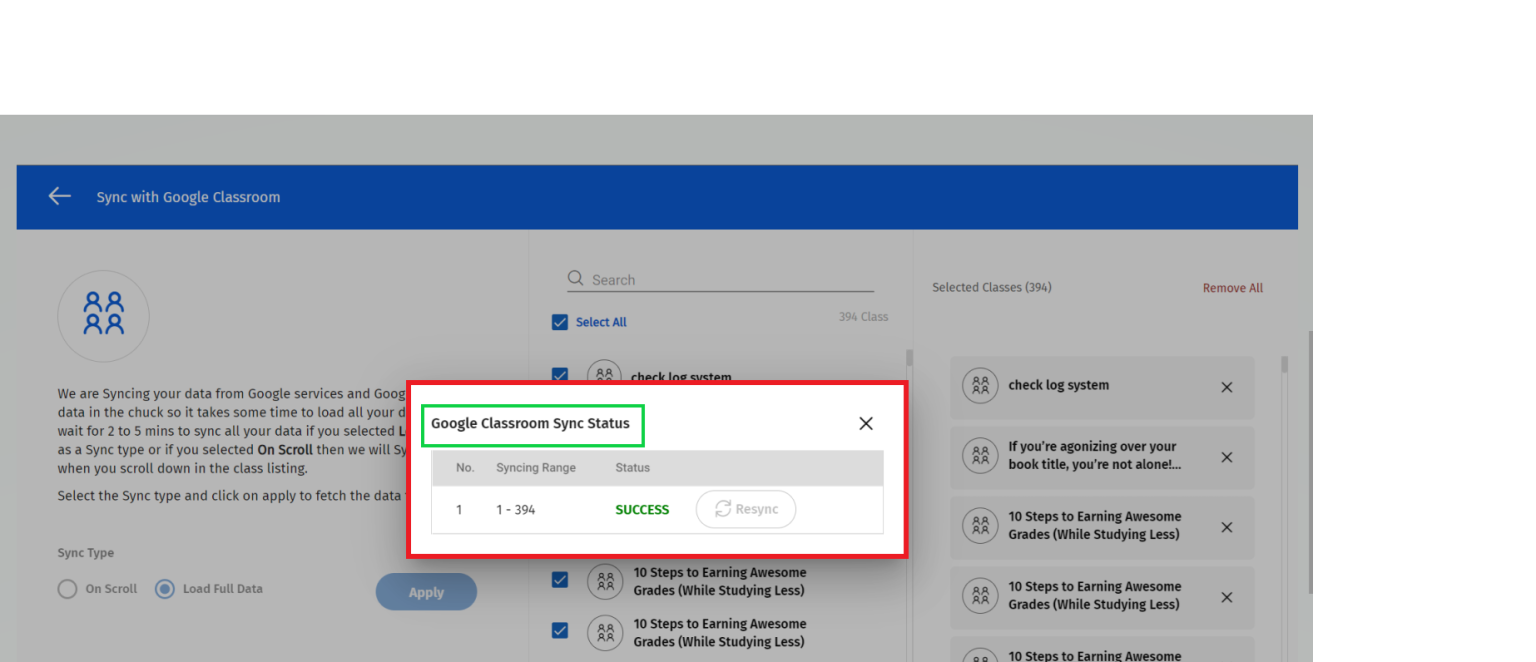
15. Once the syncing is successfully completed, go to the Content tab. > Select the Category of content on the left pane. > Select the Title you want to assign. > Click on Class.
NOTE: The content is being assigned to a class in this example.
16. Select the Class you want to assign the content from the dropdown list. > Check the View option box if you want to restrict view of the content to teachers only. > Select the Order No. > Click on Distribute.
17. Click on Users aligned to the title for assigning content to users.
18. Check the Boxes against the users you want to assign the content to.> Select
the Order No. > Click on Distribute.
19. The content has now been successfully assigned to the class as well as the users.
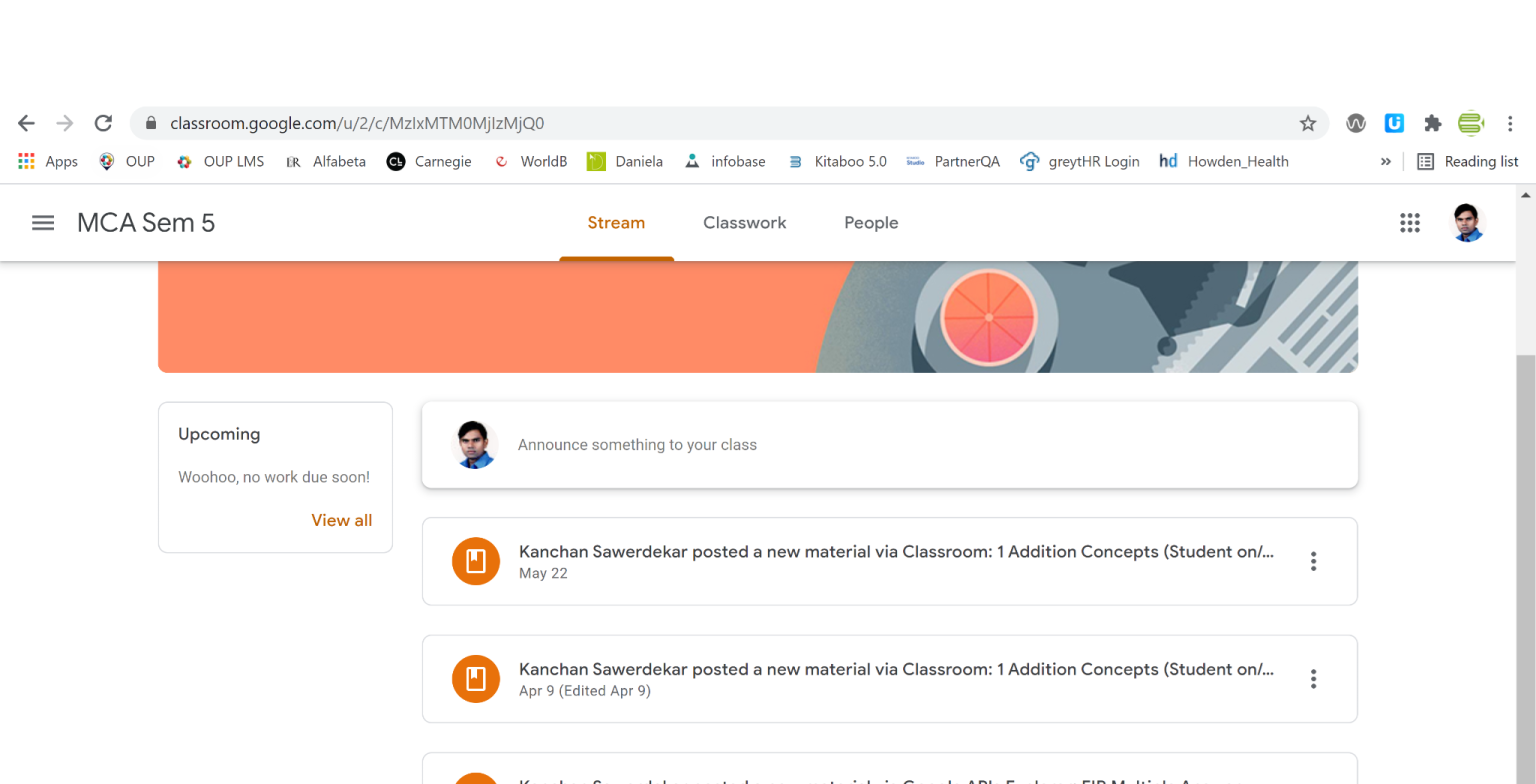
20. Go to the Google Classroom now. > Click on the Stream tab. > Check if anything new has been posted there. > Click on the More options icon against the post you want to announce to the users. > Select the Platform the new post can be accessed from.
Google Classroom URL:http://classroom.google.com
Adding a OneRoster customer also involves certain dependencies between the Kitaboo system and its partners/customers. Let’s list down those dependencies.
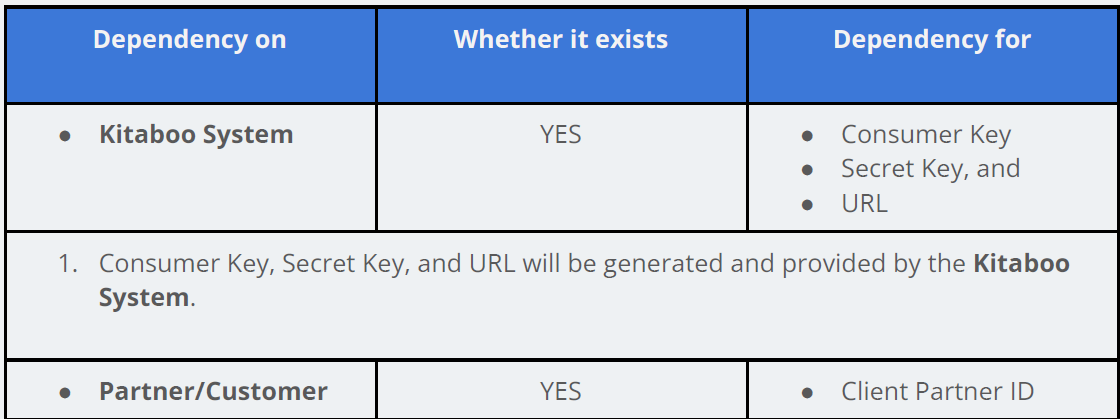
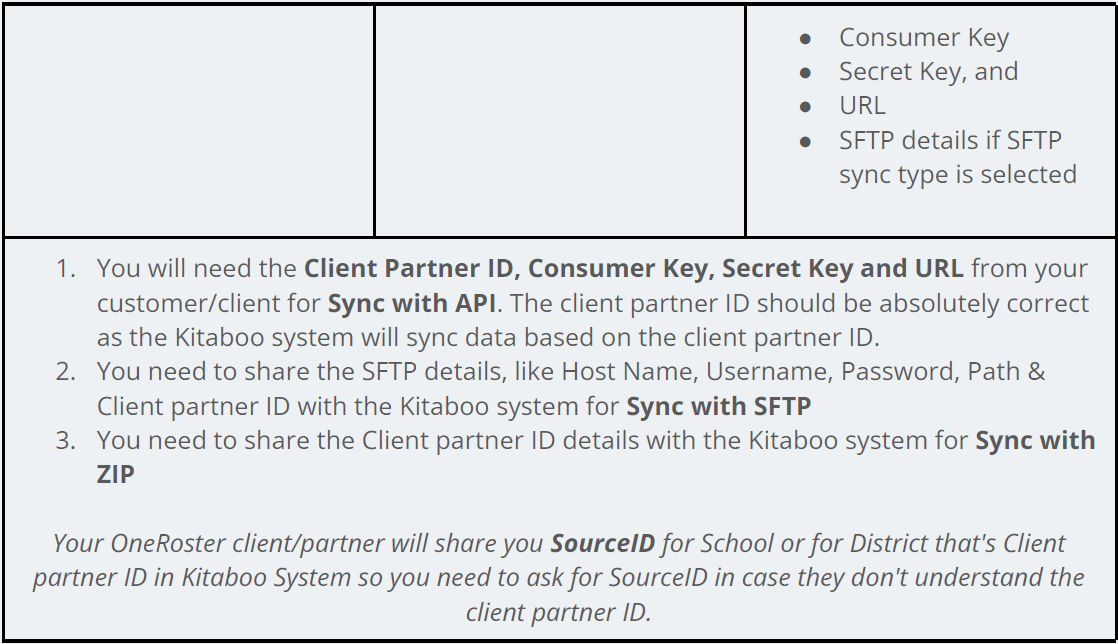
Let us now see how to add a OneRoster customer.
1. Sign in with your Enterprise Admin credentials.

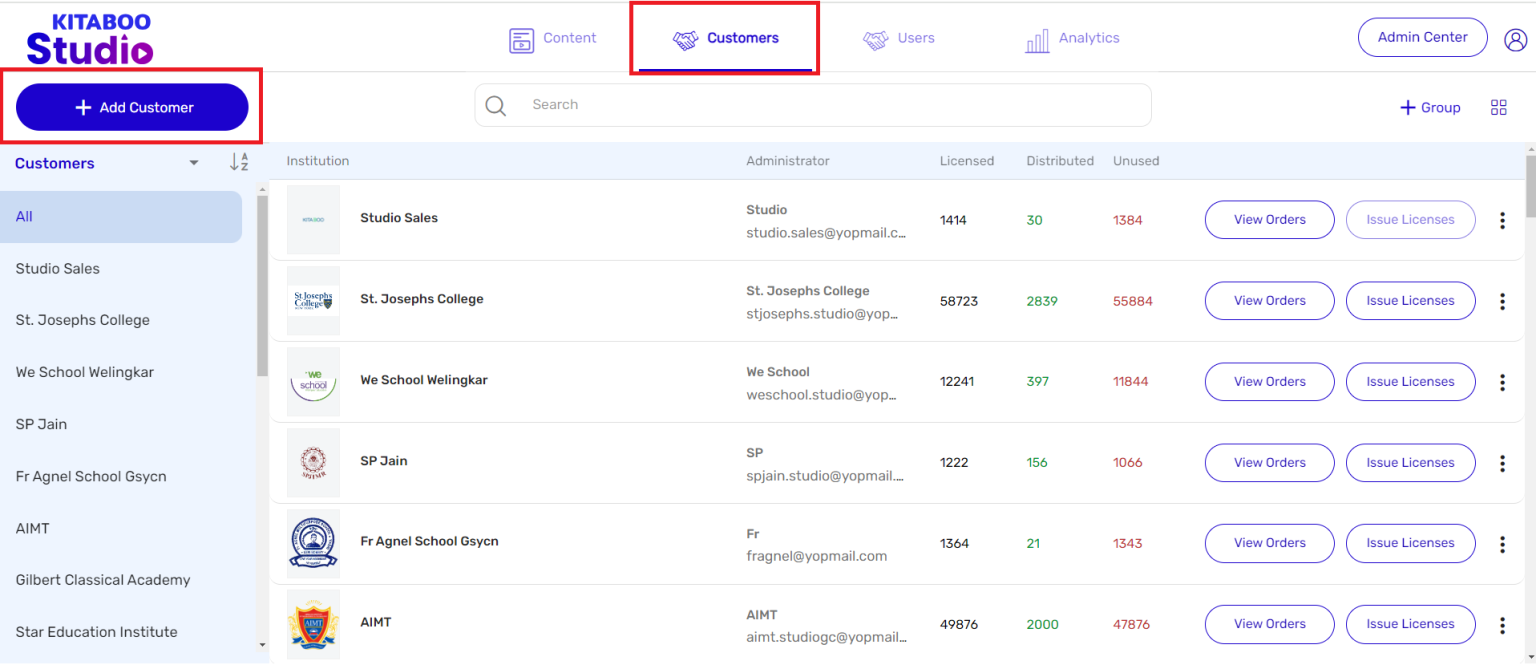
2. On the Customers tab, click on +Add Customer.
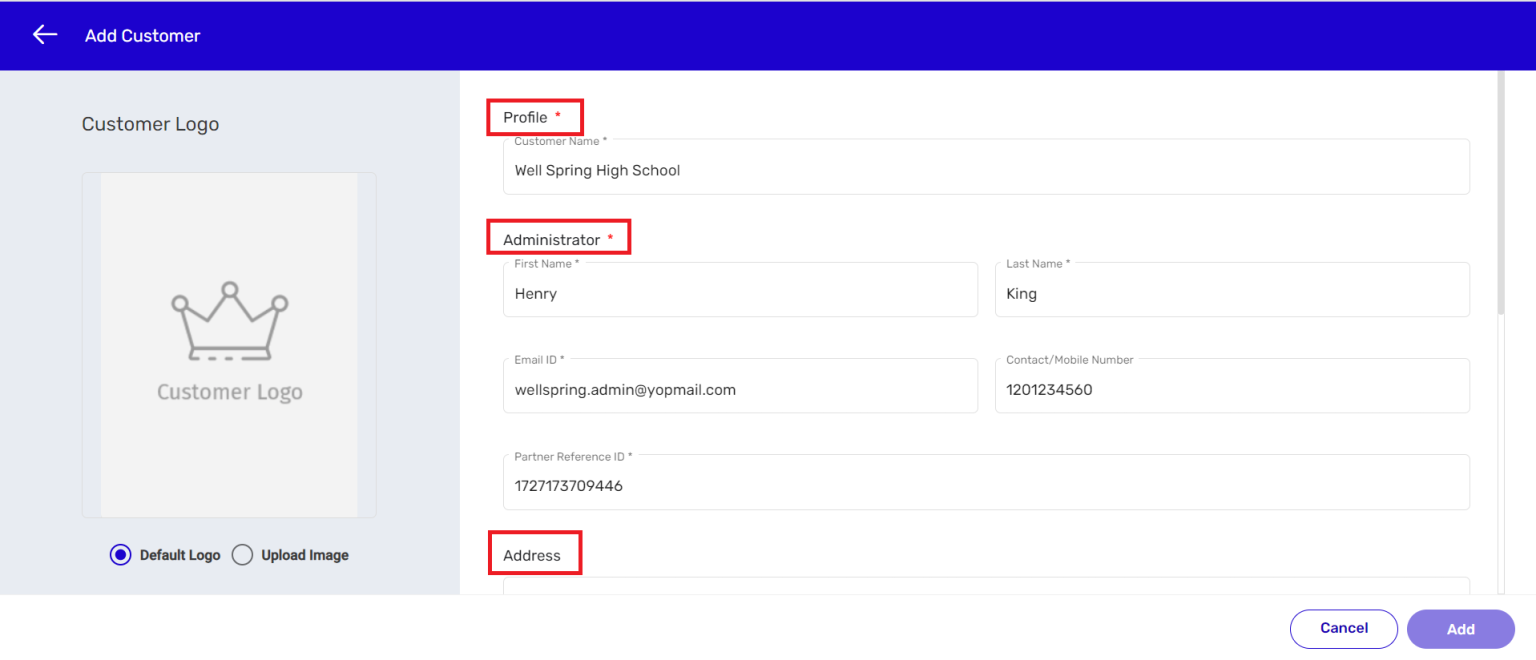
3. Enter the Profile, Administrator, and Address details of the customer you want to add.
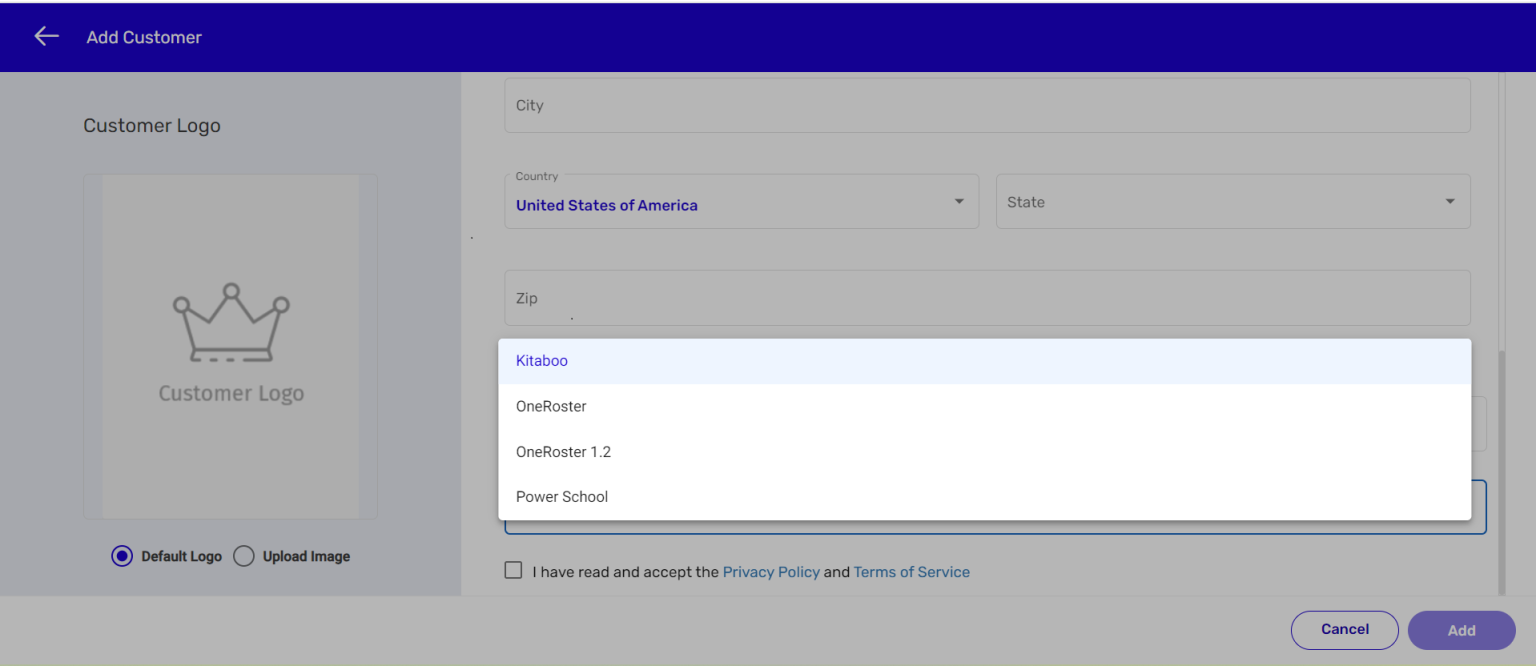
4. Select one of the Onboarding type options from the SSO Source dropdown menu. > Select OneRoster from the Rostering type menu.
We have selected the Kitaboo option as the Onboarding type in this example.
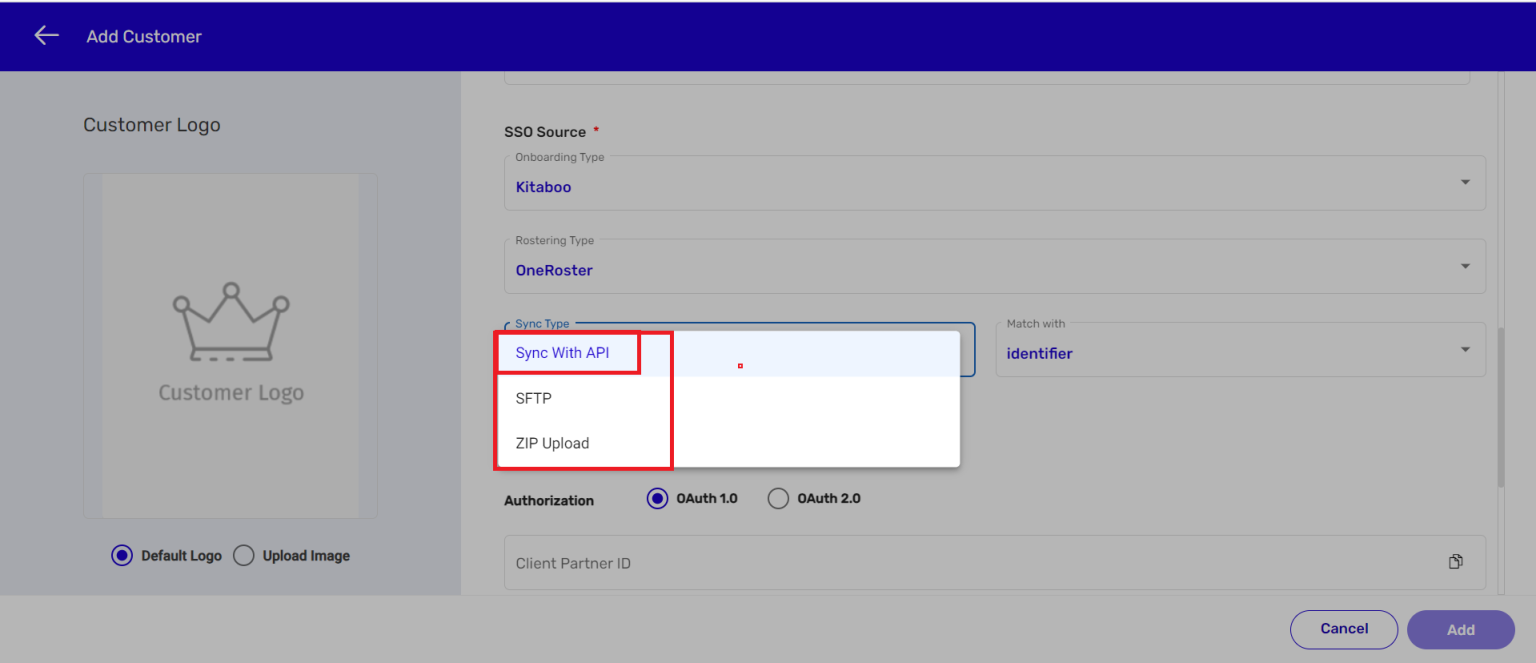
NOTE: The moment you select OneRoster as the Rostering type, new fields like Sync Type, Match with, Sync Frequency, and Client Partner ID will appear.
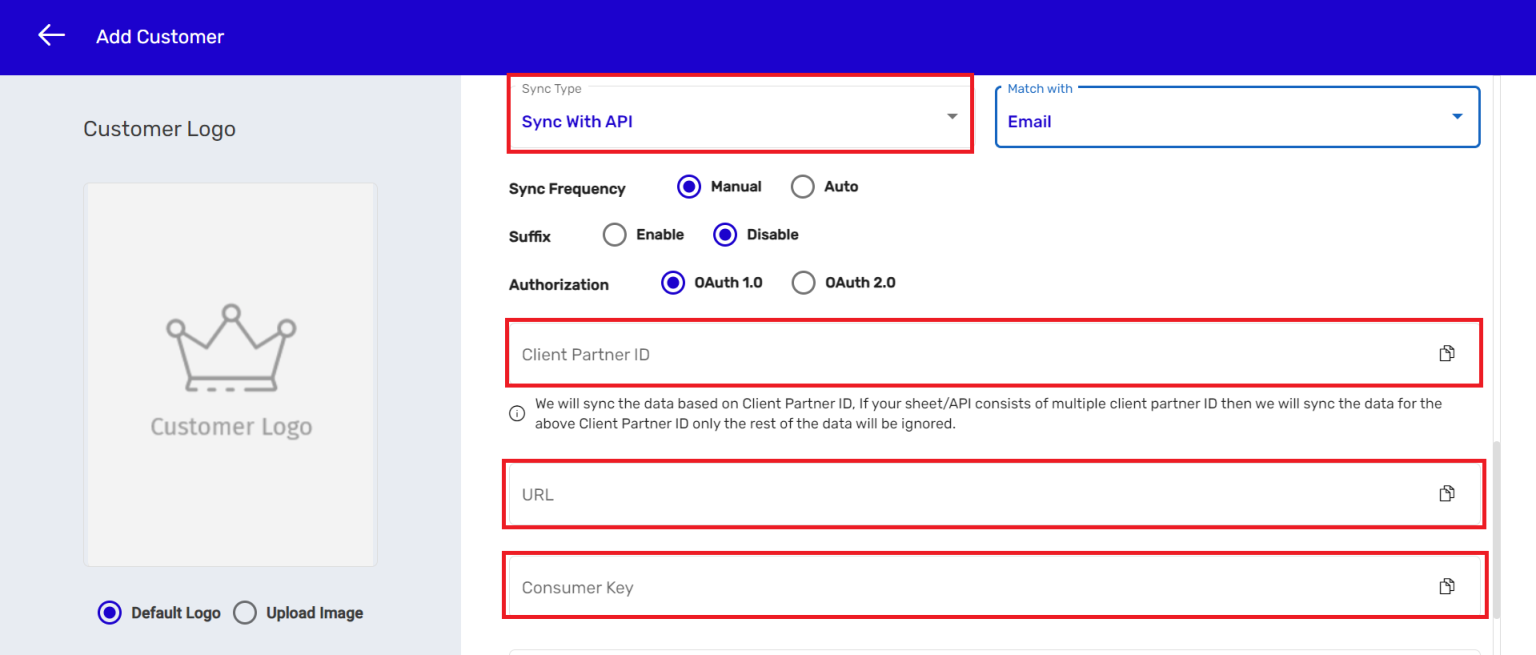
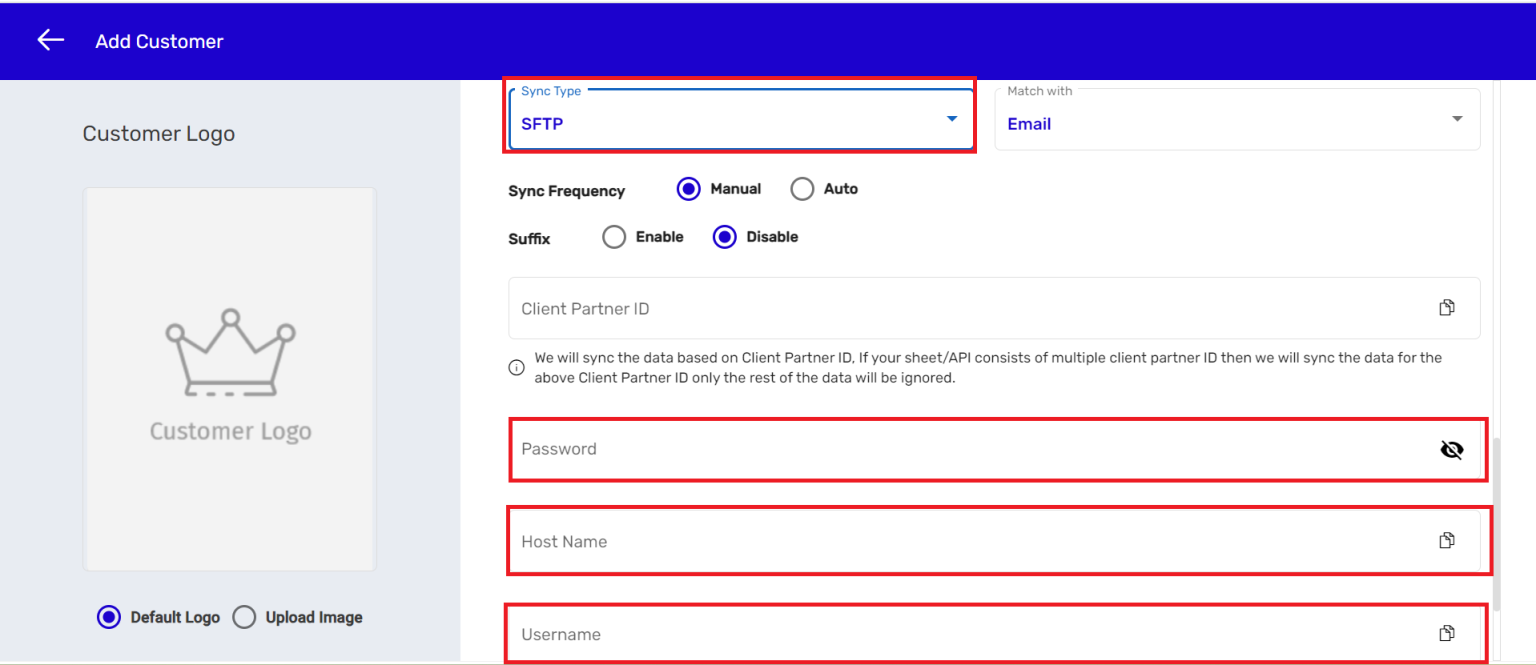
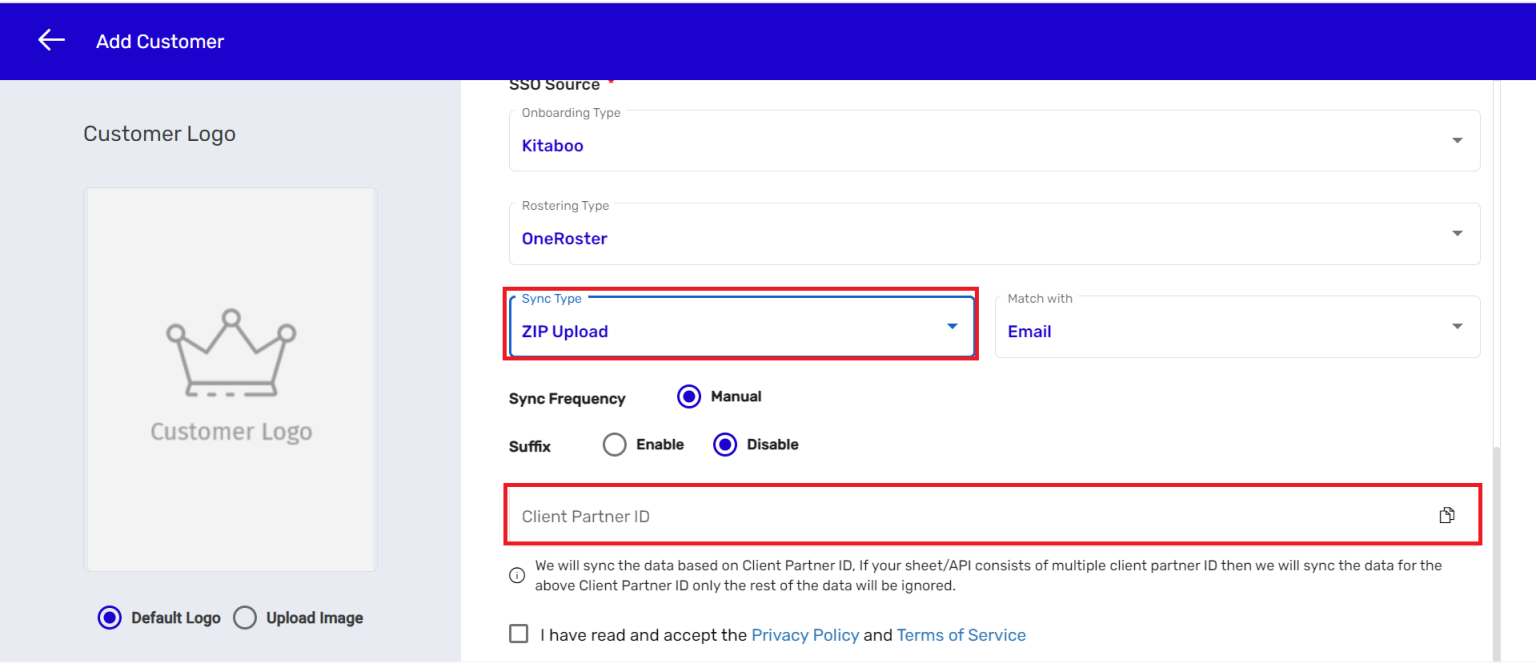
The Sync Type menu will have three options – Sync With API, SFTP, and Zip Upload.
● If you select the Sync With API option, OneRoster will do an API call and pull the
required data from the service. It will then create a partner, class, and a user. You can sync the OneRoster data by using the Sync with OneRoster hyperlink. You can also delete the OneRoster data on the server. The data will also get deleted from your system once you use the Update option.
● If you select the SFTP option as the sync type, the OneRoster file would not be uploaded automatically. You will have to provide the SFTP where you have placed your CSV file.The server will then pick the OneRoster file from the SFTP you provide and create a partner, class and a user.You can then assign the content to the desired class and user.
● If you select the Zip Upload option as the sync type, the user will be able to upload the OneRoster zip file to the server. The LMS will then create a class, and user aligned to the Partner ID you use. You can then assign the content to the desired class and user.
5. Select one of the options from the Sync Type dropdown menu. We have continued with the default Sync Type option, that is Sync With API, in this example.
6. You also need to select one of the options from the Match with menu. We have selected Email in this example.

7. As we have selected Sync With API as the Sync Type option, we will have to
provide details in the Client Partner ID, Consumer Key, Secret Key, and URL fields.
8. If you select the SFTP option from the Sync Type menu, you need to provide
details in the Client Partner ID, Host Name, Username, Password, and Path fields.
9. If you go by the ZIP Upload option, you need to provide the Client Partner ID only.
10. Next, you need to decide whether you want the data to be synced automatically by the system or you want to do it manually.
For this, select either Manual or Auto as the Sync Frequency option.
We have selected Manual in thisexample.
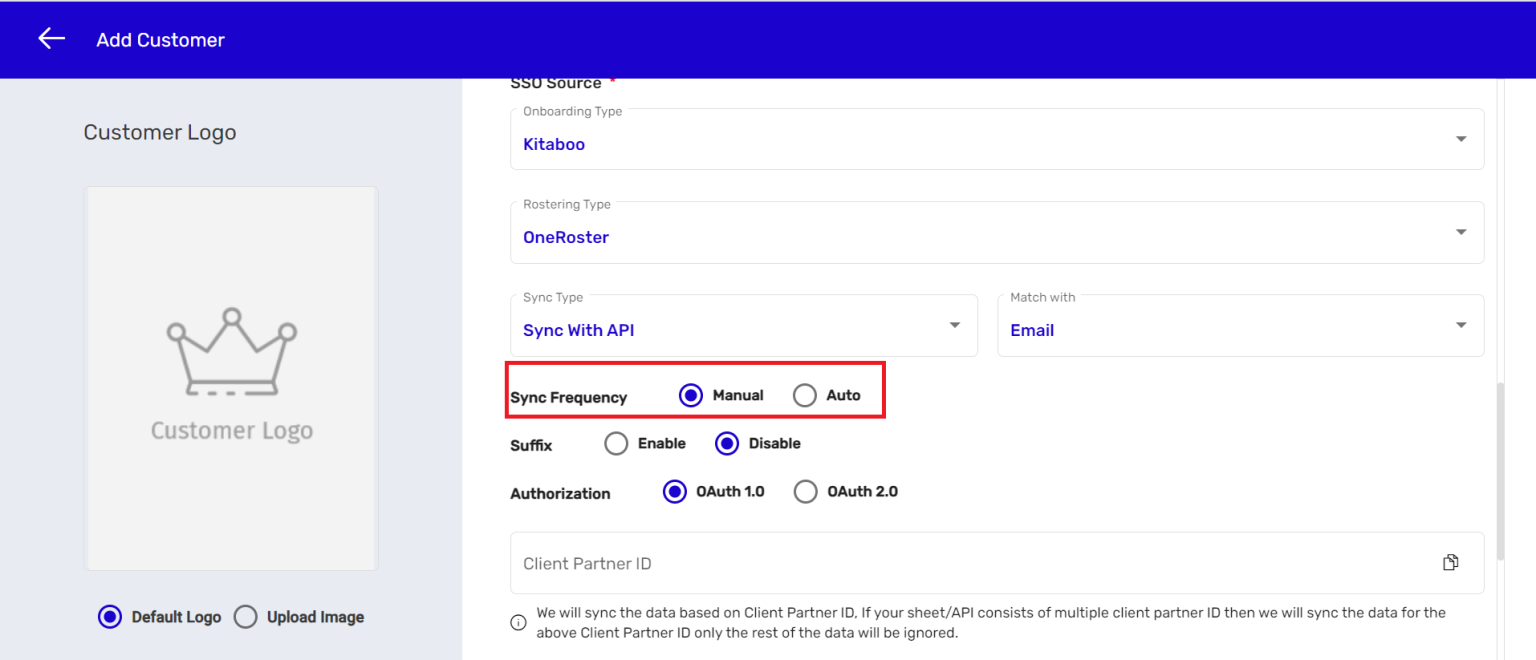
NOTE: Manual and Auto are the data syncing options.
● If you select Manual, you will have to manually sync the data.
● If you select Auto, the server will automatically sync the data through the API.
Remember that the Auto data syncing option will NOT be available, if you select the Zip Upload sync type option. This is because the only option you have for this Sync type is to sync the data manually.
11. Alternatively, you can select the Auto mode of Sync Frequency. If you select
the Auto mode, a new field by the name Period will appear. You need to select one of the options from the Period field. This will specify how frequently you want your data to be automatically synced.
We have selected the Weekly option in this example.
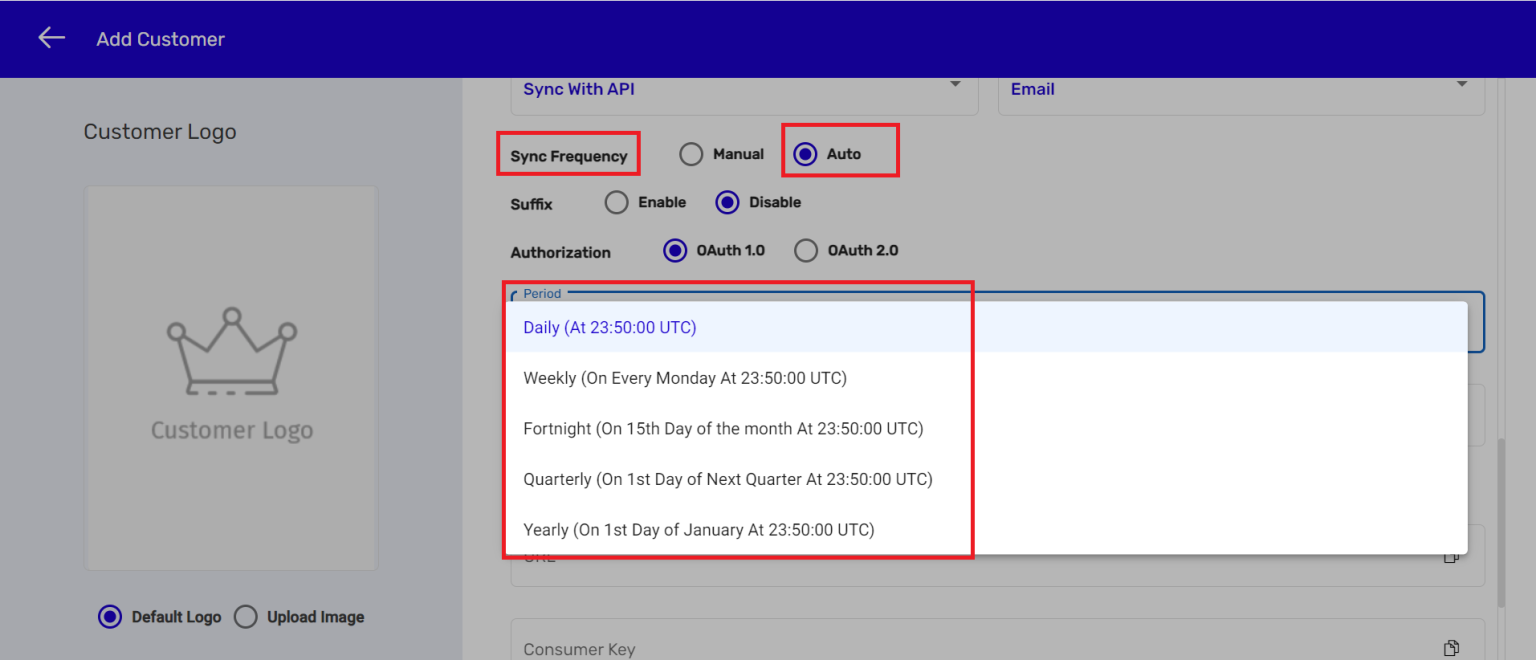
NOTE: The other periods currently available for the data syncing are: Daily, Fortnightly, Monthly, Half Yearly, and Yearly.
12. Enter details in the Client Partner ID, Consumer Key, Secret Key, and URL
fields. > Check the Privacy Policy and Terms of Service box. > Click on Add.
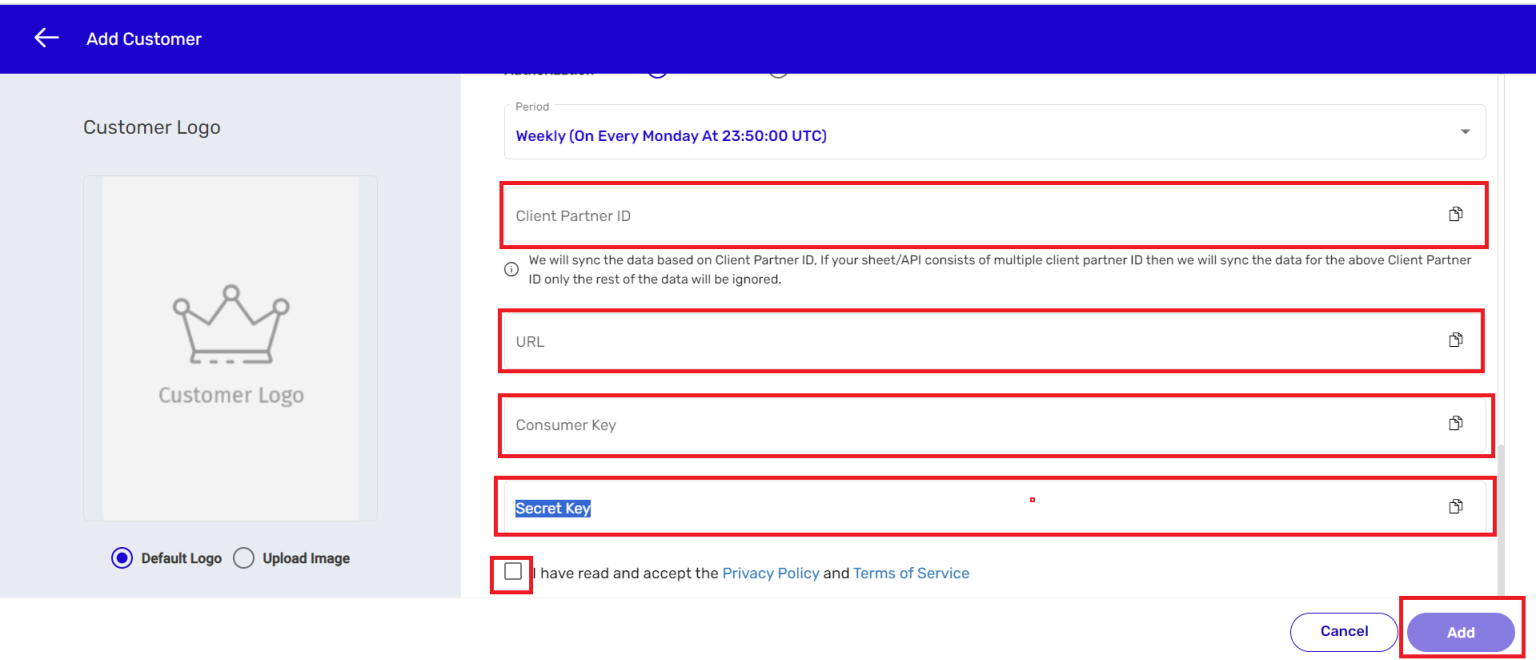
Finally, you will get a confirmation message: Sync up request is accepted.
13. After you receive the “Sync up request is accepted” message, you can login with the partner’s credentials you have just created and initiate the process for syncing with OneRoster API.Switch to the Users tab. > Click on Class.Click on the Sync with OneRoster – API button on the Class tab to initiate the data syncing process.

Let’s now explore the OneRoster data interchange file format and best practices for
implementation.
The method for integrating rostering data into Kitaboo requires that you submit a set of .csv (Comma Separated Value) files that comply with the IMS Global OneRoster format. The information given on the following pages will help you in understanding the IMS Global OneRoster best practices for implementation.
CSV Overview
Majority of schools/districts currently share their students’ roster information to the tool service providers and LMS/LOR vendors as .csv formatted files. In compliance with the OneRoster data interchange format, the following seven files/data tables are used by the schools/districts to exchange their roster information with the
vendors.
Schools/districts must upload their class rosters in .csv format. They must prepare their roster data, for both import and export, in the form of the seven files/data tables listed below. The files’ format is actually a model onto which your organization’s data can be mapped.
1. orgs.csv
2. users.csv
3. courses.csv
4. classes.csv
5. enrollments.csv
6. academicSessions.csv
7. demographics.csv
NOTE: Hurix is currently using the orgs.csv, users.csv, classes.csv, and enrollments.csv files/data tables.
Sample orgs.csv
The orgs data table describes the organizations, mostly schools or districts, to be included in the roster information. While preparing an orgs.csv data table, you must remember that each row is dedicated to one organization, school or district, only.
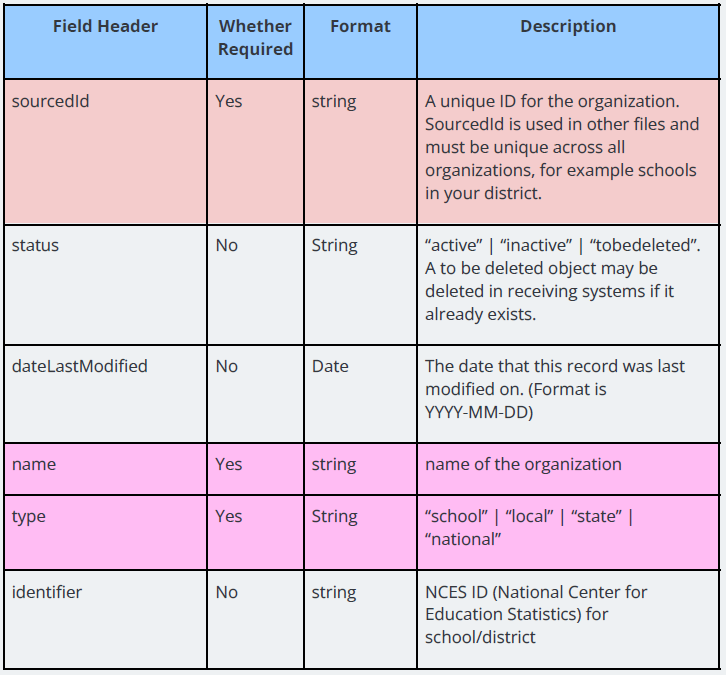
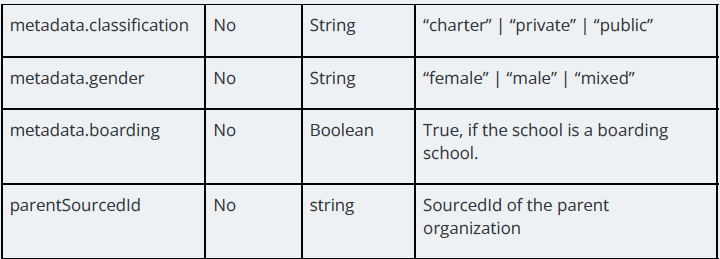
Sample users.csv
The users’ data table describes the various users of the organization, like teachers, students, administrators etc. The users’ data includes the actual names of the users, as well as their email addresses, login names, and other information. Remember that each row represents one user only.
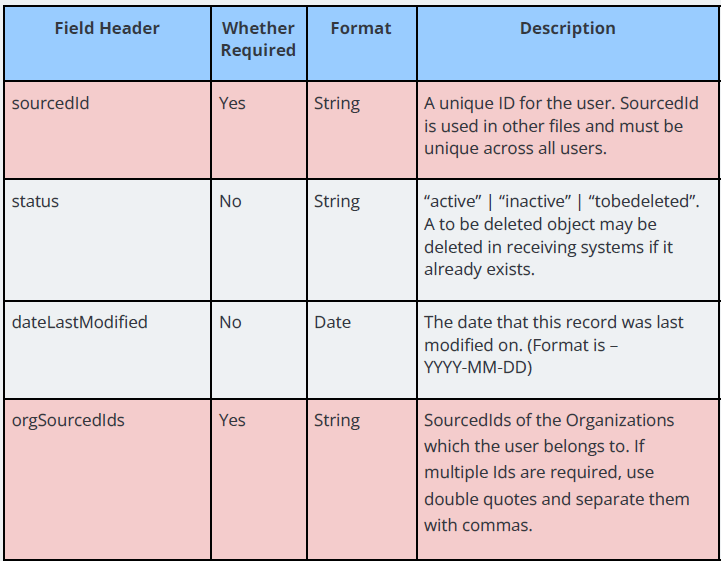
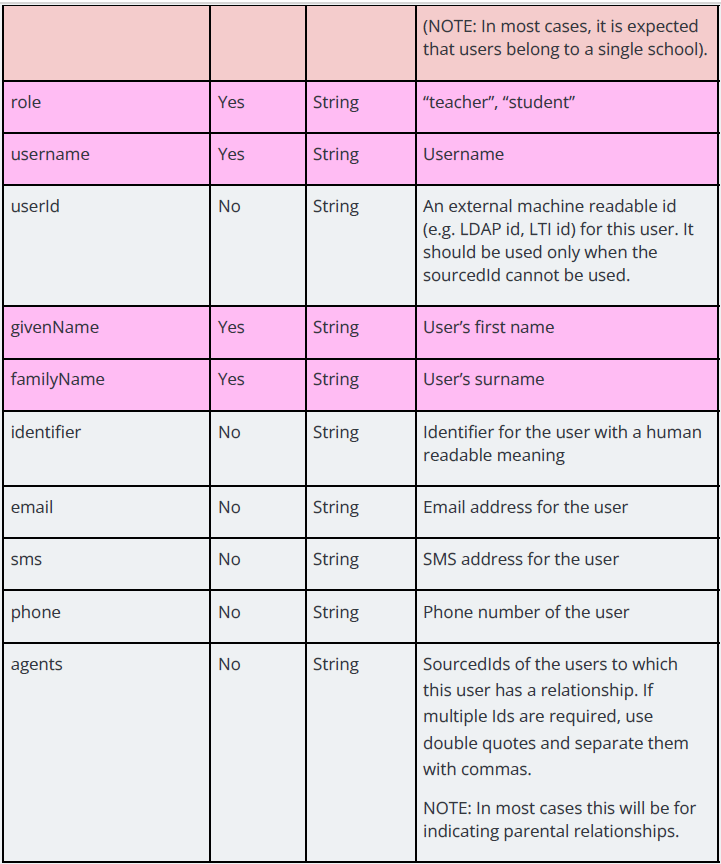
Sample classes.csv
The classes’ data table lists the classes taught for each course, including the grade level and the title of the class. Remember that each row represents one class only.
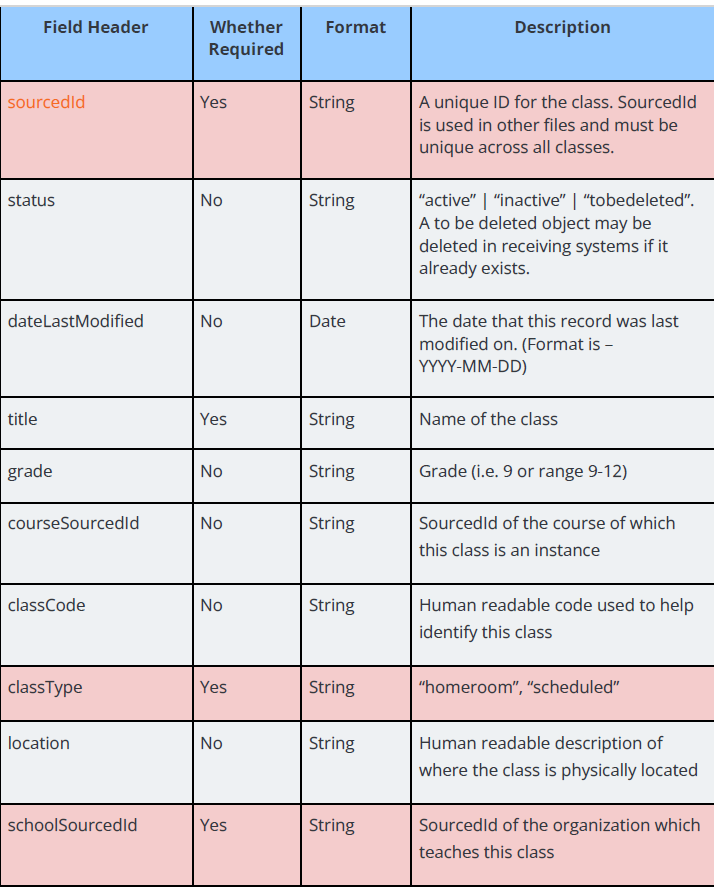
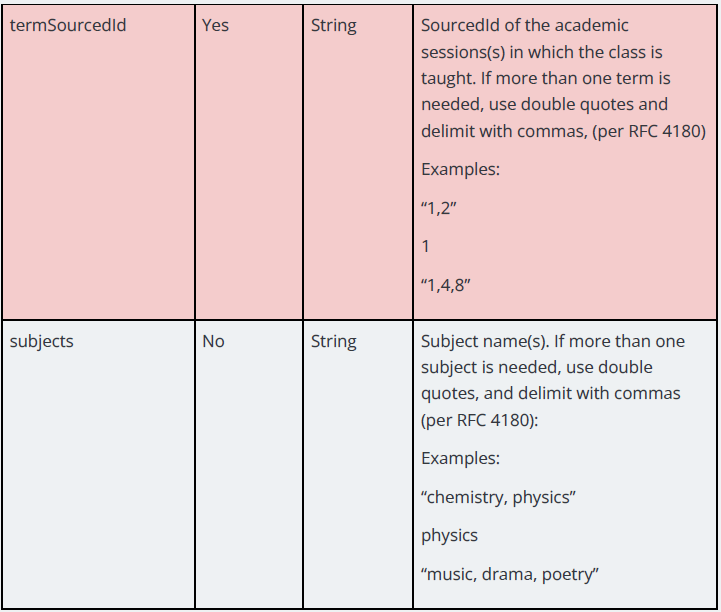
Sample enrollments.csv
The enrollments’ data table assigns users to their various classes. Each row designates one user belonging to one class.

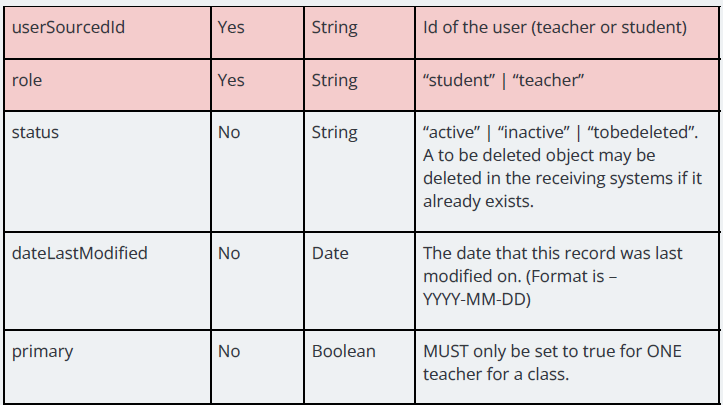
NOTE:
1. It is to be noted that the key values of each csv file are as per the IMS global standard, and therefore cannot be changed.
2. In the sample csv files shown above, fields which are marked in red are mandatory fields.
How it Works
1. A user has to upload users.csv, orgs.csv, classes.csv, and enrollments.csv files in a bundle, i.e. the user has to make a zip of all the files.
2. Once the .zip file is ready, login with the institute admin credentials, navigate to the Users menu, click on Upload Roaster File, and upload the .zip file.
3. After successfully uploading the .zip file and process completion, The user should be able to see the newly added users and classes under the Users and Class sections respectively.
4. Once a user and class is created through OneRoster, a partner can add and assign content to the user/class.
5. The newly created user should now be able to login to the reader.
6. If you sync the data again, without the old user entries, the Kitaboo system will delete the old user who is missing in the new zip file. Hence, please make sure that you are updating the last uploaded sheet at a regular interval to avoid the risk of deletion.
7. Please make sure you uploaded the zip file to the correct location of SFTP and the file name should be the same which you defined during the account creation process.
For more information, please refer to:
https://www.imsglobal.org/lis/imsOneRosterv1p0/imsOneRosterCSV-v1p0.html#_Toc421598314
Oneroster Sync : Delete Data with Sync
In this feature client admin have the ability to delete the user which are not required in the next sync. We have implemented a status check where client have to update the status column as “tobedelete” and the oneroster sync system will delete that data for you in the next sync. Another option we have is that you can share the next roster sync data without the user in it and when the next time sync happens the user will automatically get deleted or removed from the system.
Note:
1. Delete will work for the rostered user on the platform.
2. This feature needs to be enabled on the platform to work.
API SYNC Requirement:
● You will need the Consumer Key, Secret Key, URL and Access token URL from your
customer/client for Sync with API.
SFTP SYNC Requirement:
● You need to share the SFTP details, like Host Name, Username, Password, Path with the Kitaboo system for Sync with SFTP
Zip files need to be updated on the SFTP host.
For more details on Oneroster please refer the URL:
1. Sign in with your Enterprise Admin credentials.

2. On the Customers tab, click on +Add Customer
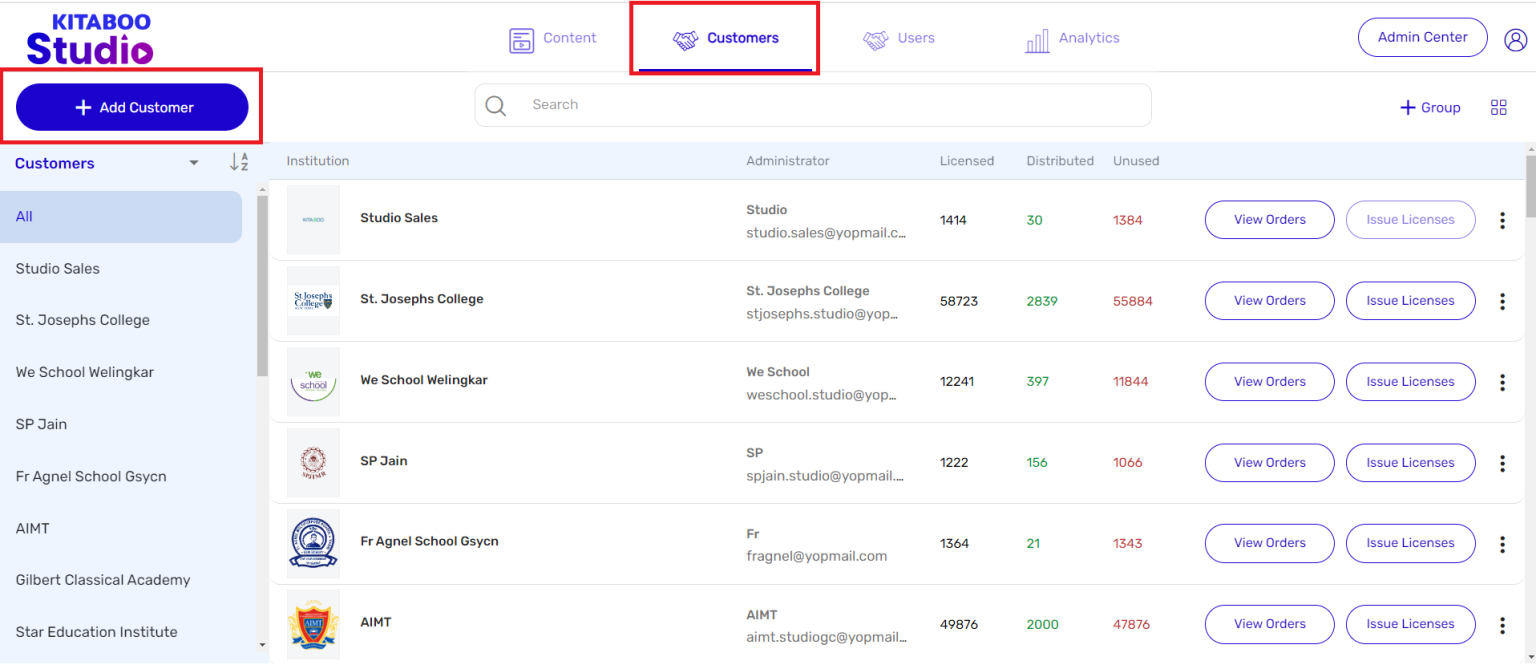
3. Enter the Profile, Administrator, and Address details of the customer you want
to add.
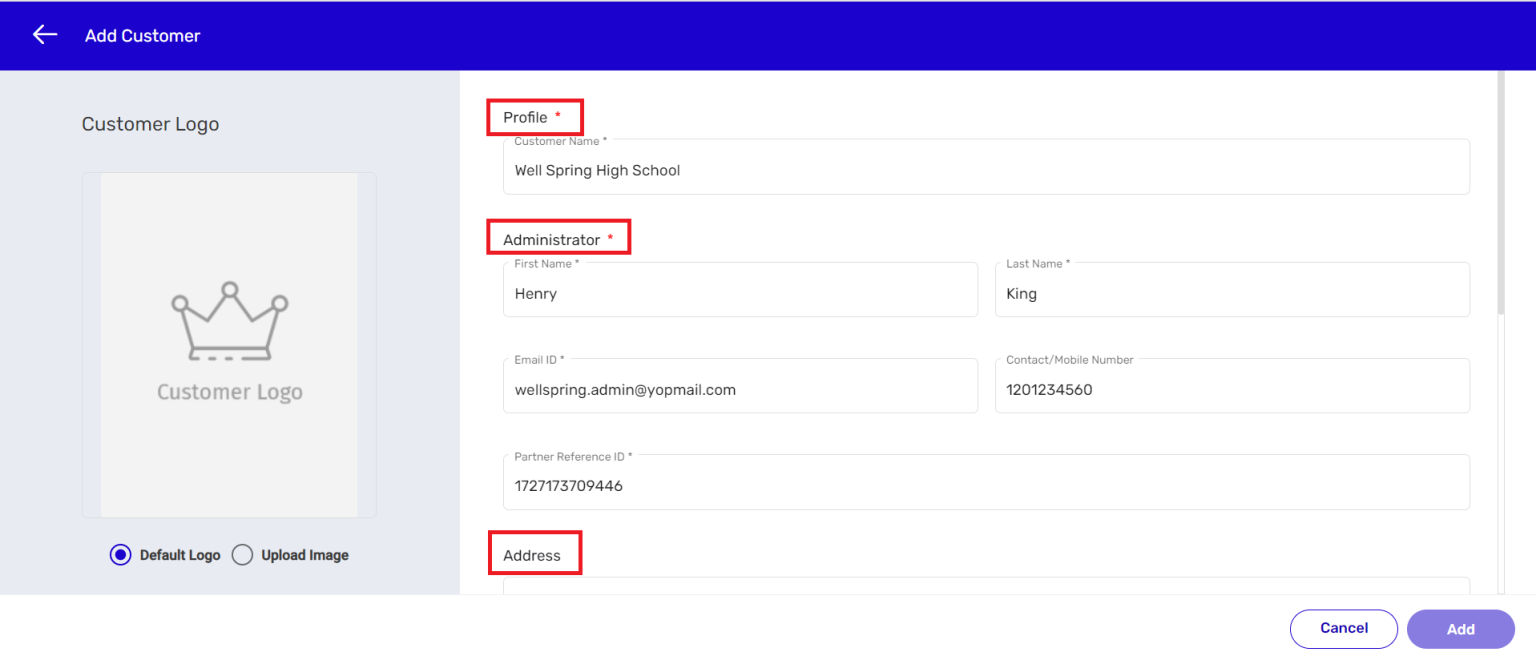
4. Select one of the Onboarding type options from the SSO Source dropdown menu. > Select OneRoster 1.2 from the Rostering type menu. We have selected the Kitaboo option as the Onboarding type in this example.
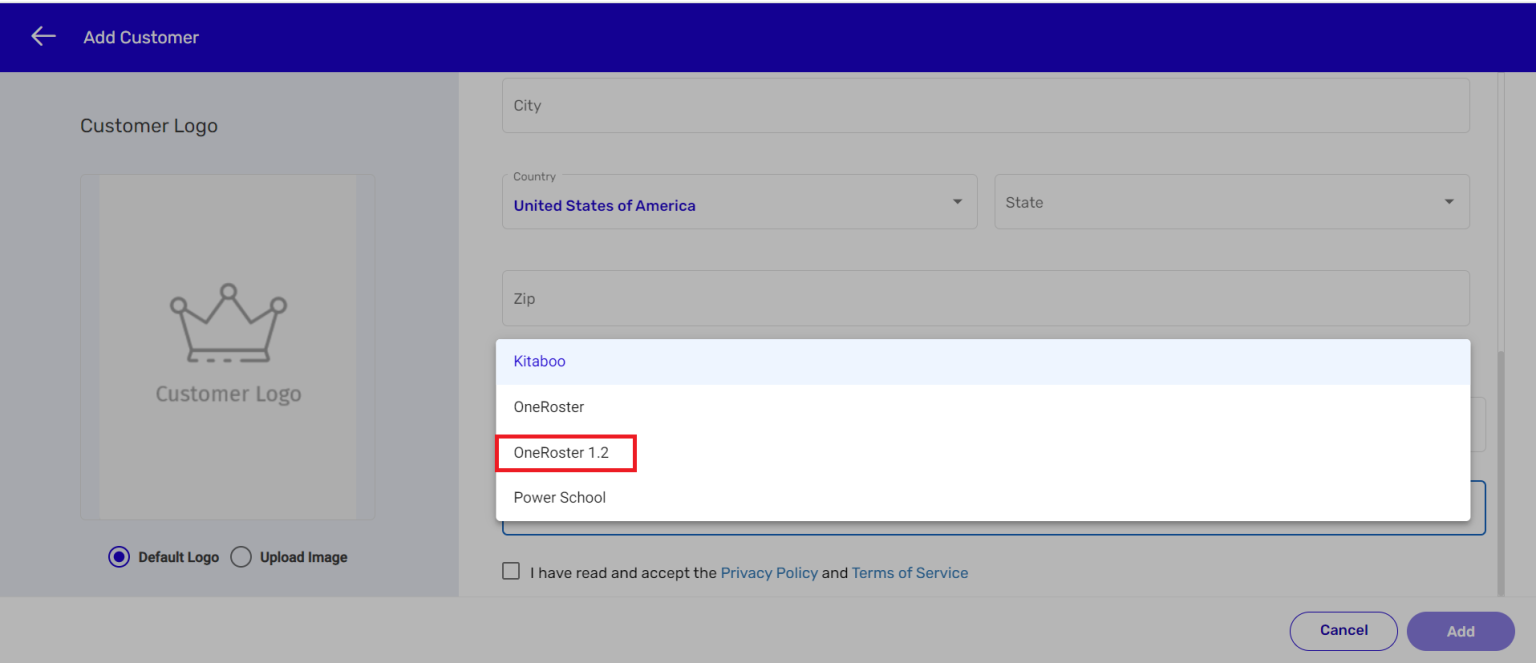
NOTE: The moment you select OneRoster 1.2 as the Rostering type, new fields like
Sync Type, Match with, Sync Frequency, Consumer Key, Secret Key, URL and
Access token URL will appear. For SFTP it will be Host Name, Username, Password,
Path.
In order to create a Group click on Add, and you will have to follow the same steps for creating a Group with One roster 1.2 .
Adding an LTI 1.3 customer with OneRoster as the Rostering type involves a much higher level of dependency between the Kitaboo system and its partner and vice-versa. ies. Let’s see what these dependencies are before setting up for LTI 1.3 integration.
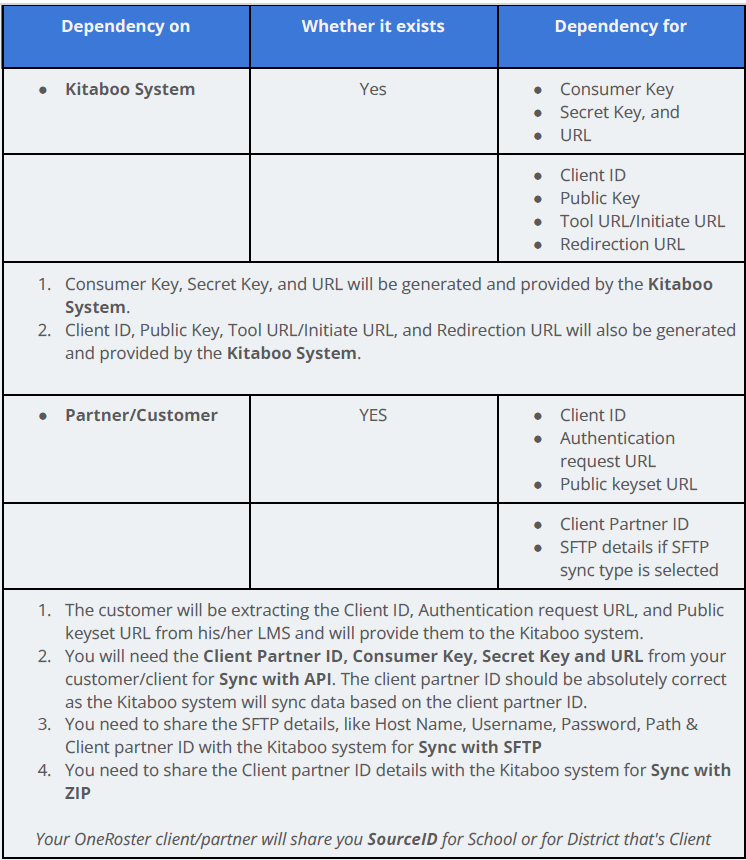
Partner ID in Kitaboo System so you need to ask for SourceID in case if they don’t understand the client partner ID.
Let’s now see how to add an LTI 1.3 customer with the other Rostering type option, that is OneRoster.
1. Sign in with your Enterprise Admin credentials.

2. On the Customers tab, click on +Add Customer.
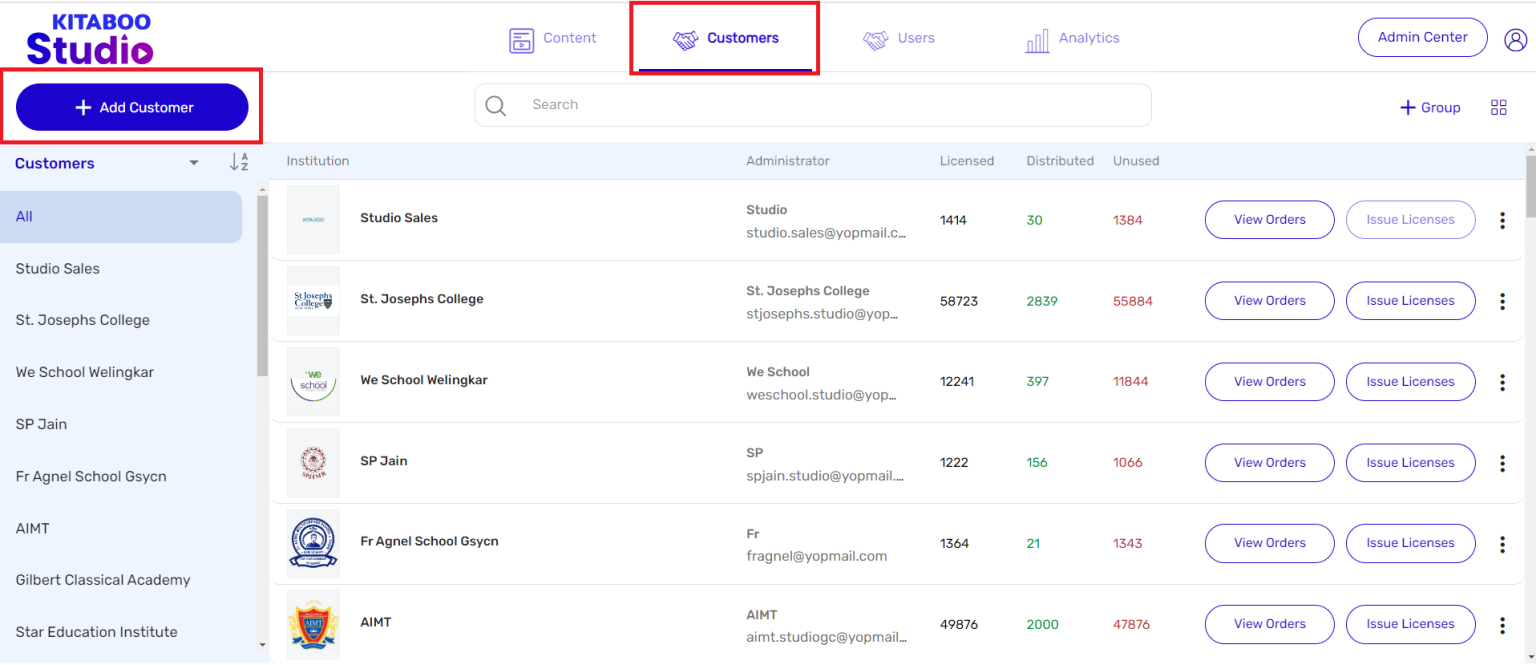
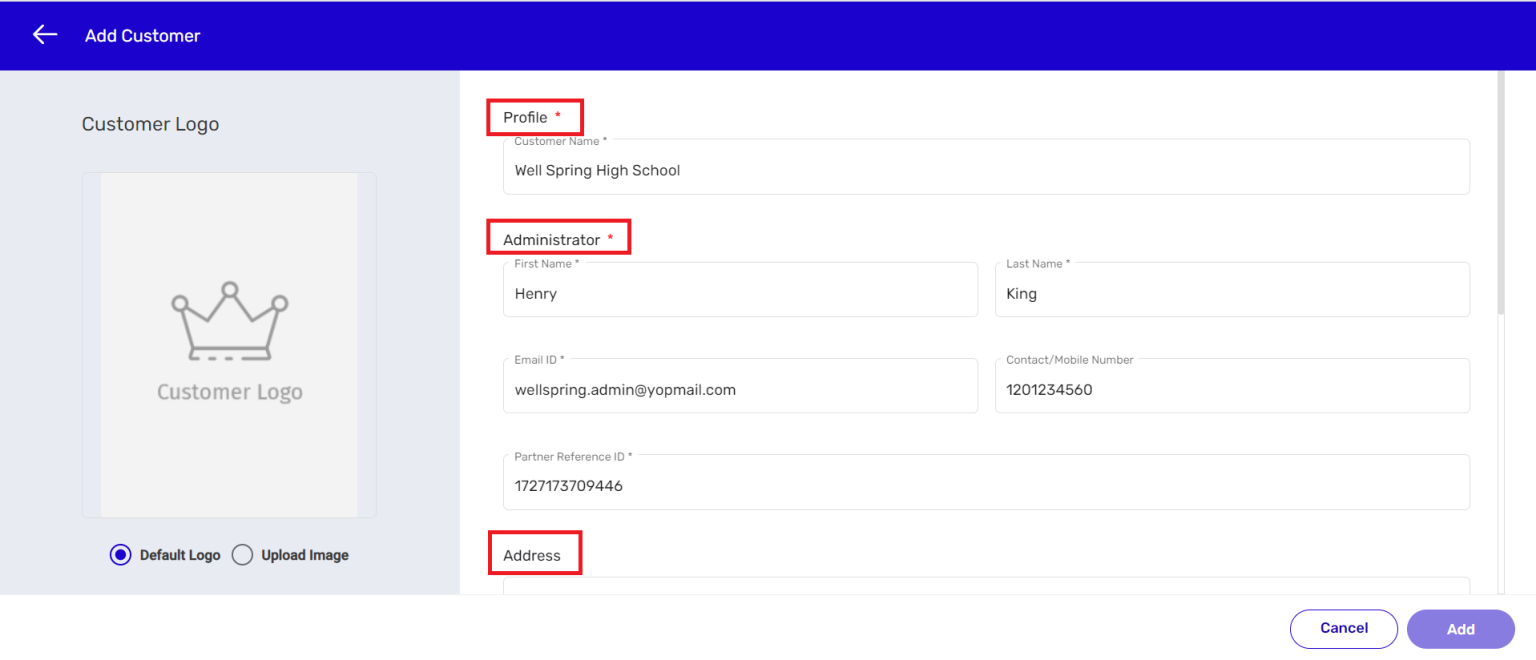
3. Enter the Profile, Administrator, and Address details of the customer you want to add.
4. Select LTI 1.3 as the Onboarding type from the SSO Source dropdown menu.
> Select one of the options from the Rostering type menu.
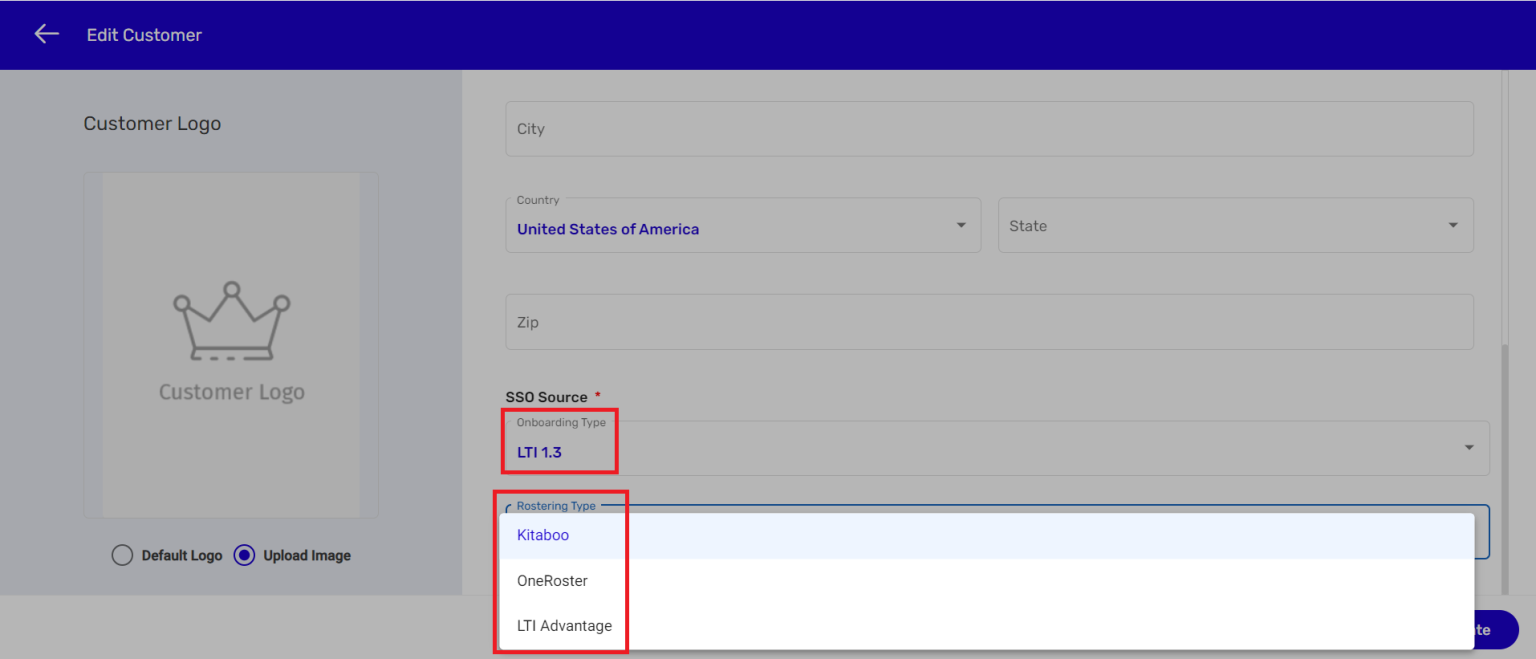
5. If you select OneRoster as the Rostering type, new fields like Sync Type, Match with, Sync Frequency, Suffix, Authorization, Client Partner ID, Consumer Key, Secret Key, and URL will appear.
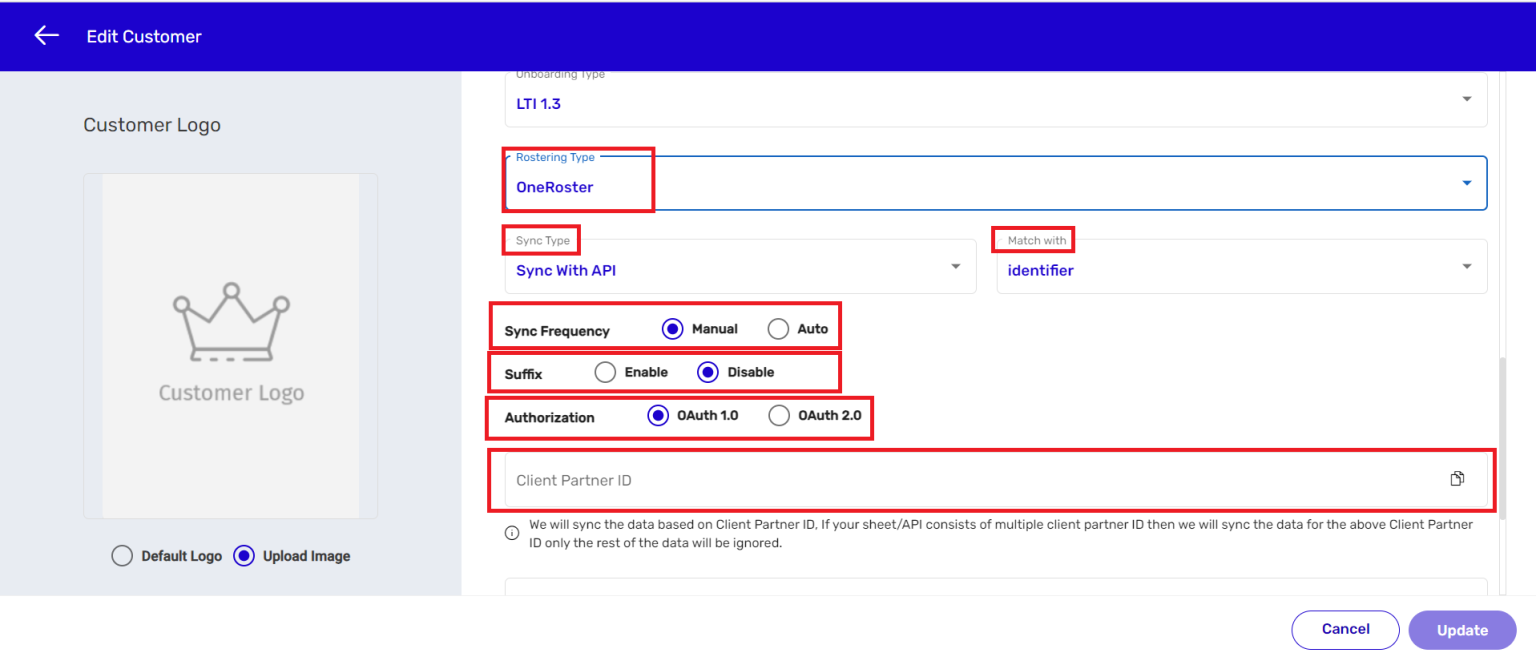
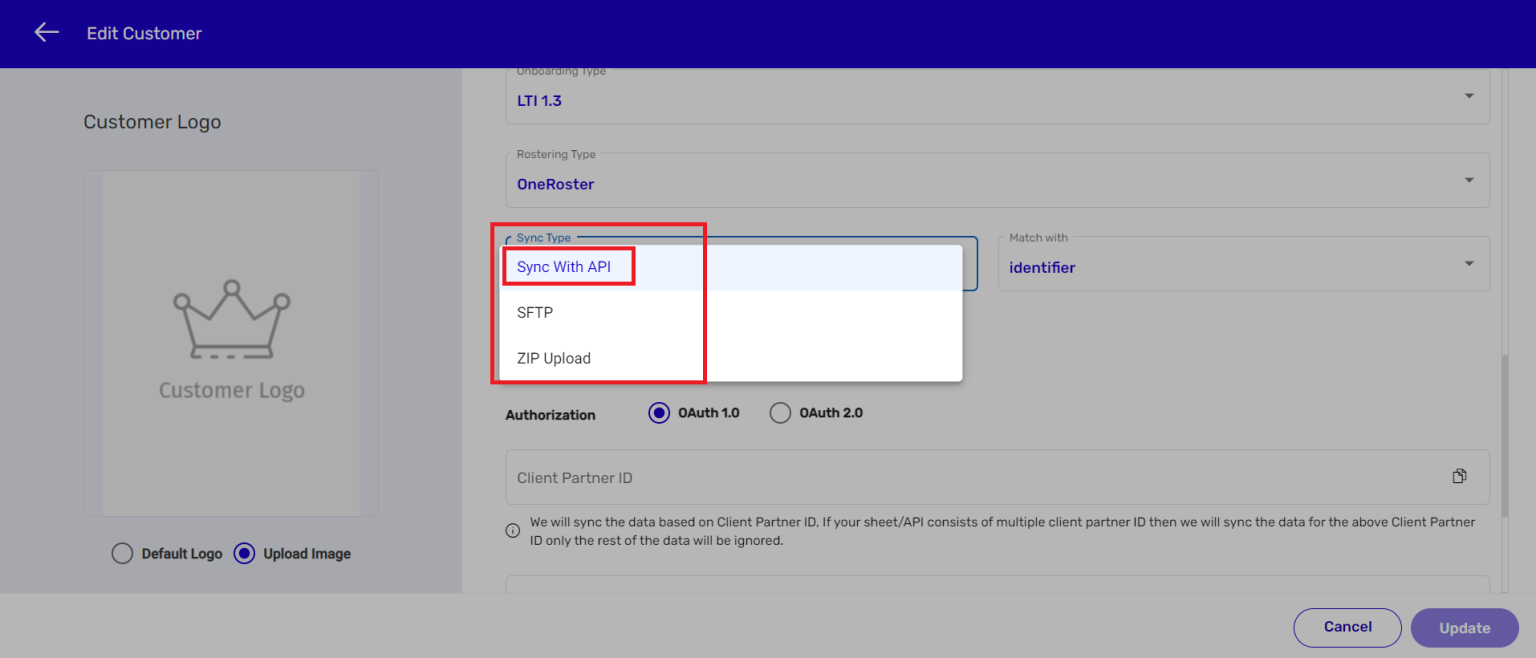
6. You need to select one of the Sync Type options from the dropdown menu.
We have selected the Sync With API option in this example.
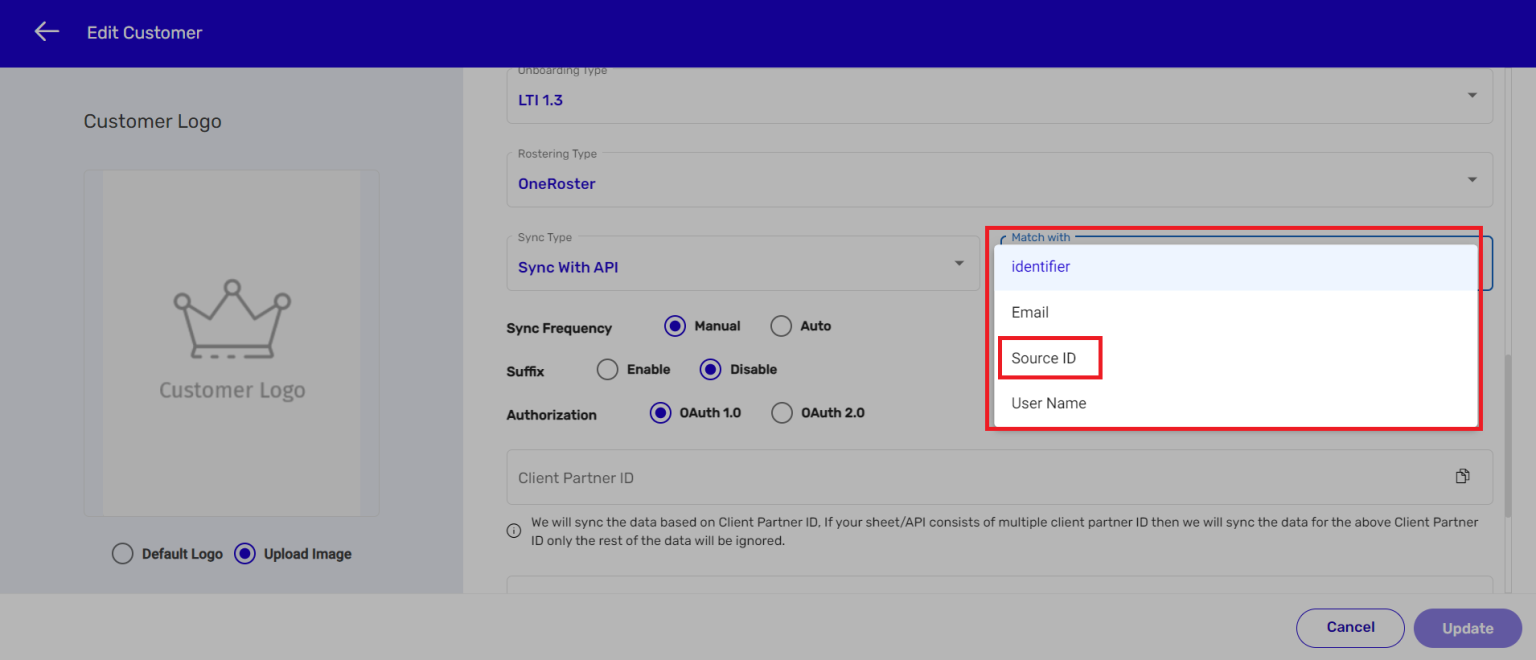
7. Select one of the Match with options.We have selected the Source ID option in this example.
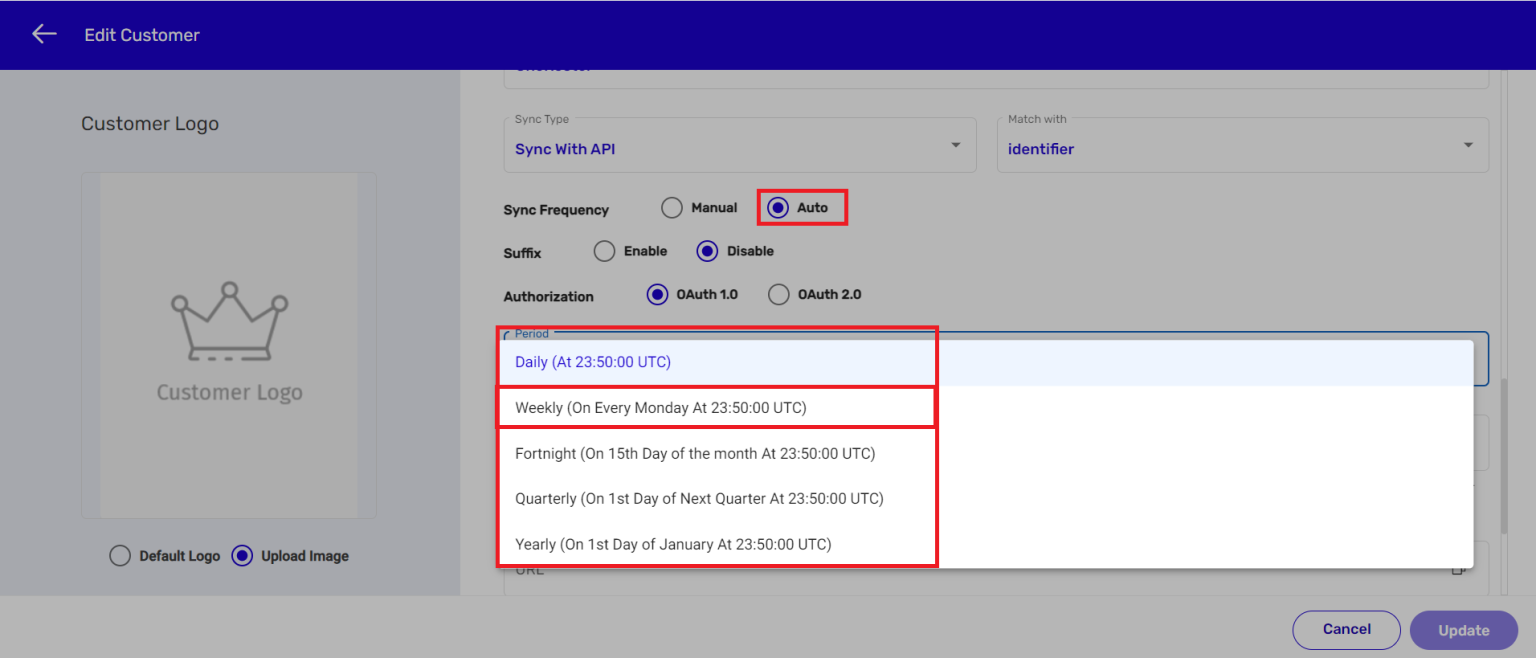
8. Next, select either Manual or Auto as the Sync Frequency. Let’s select the Auto mode of Sync frequency. In this case, you will have to define how frequently you want the system to automatically sync your data. Therefore, select one of the options on the Period menu. We have selected the Weekly option in this example.
9. Next, enter details in the Client Partner ID, Consumer Key, Secret Key, and URL fields. > Check the Privacy Policy and Terms of Service box. > Click on Add.
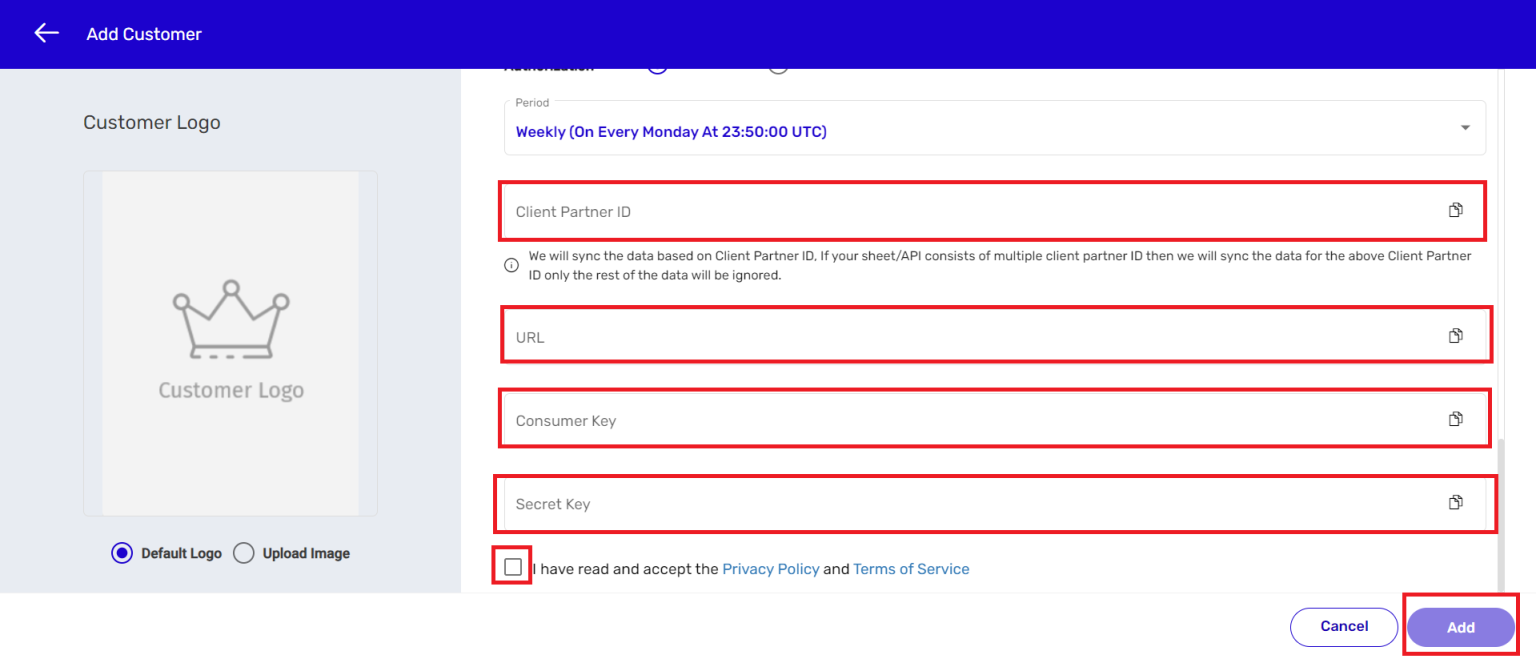
10. If you select the ZIP Upload option for Sync type, the Auto Sync Frequency
button will disappear. This is because the only option to sync the data in this case is to do it manually. You also need to provide the Client Partner ID. > Check the Privacy
Policy and Terms of Service box. > Click on Add.
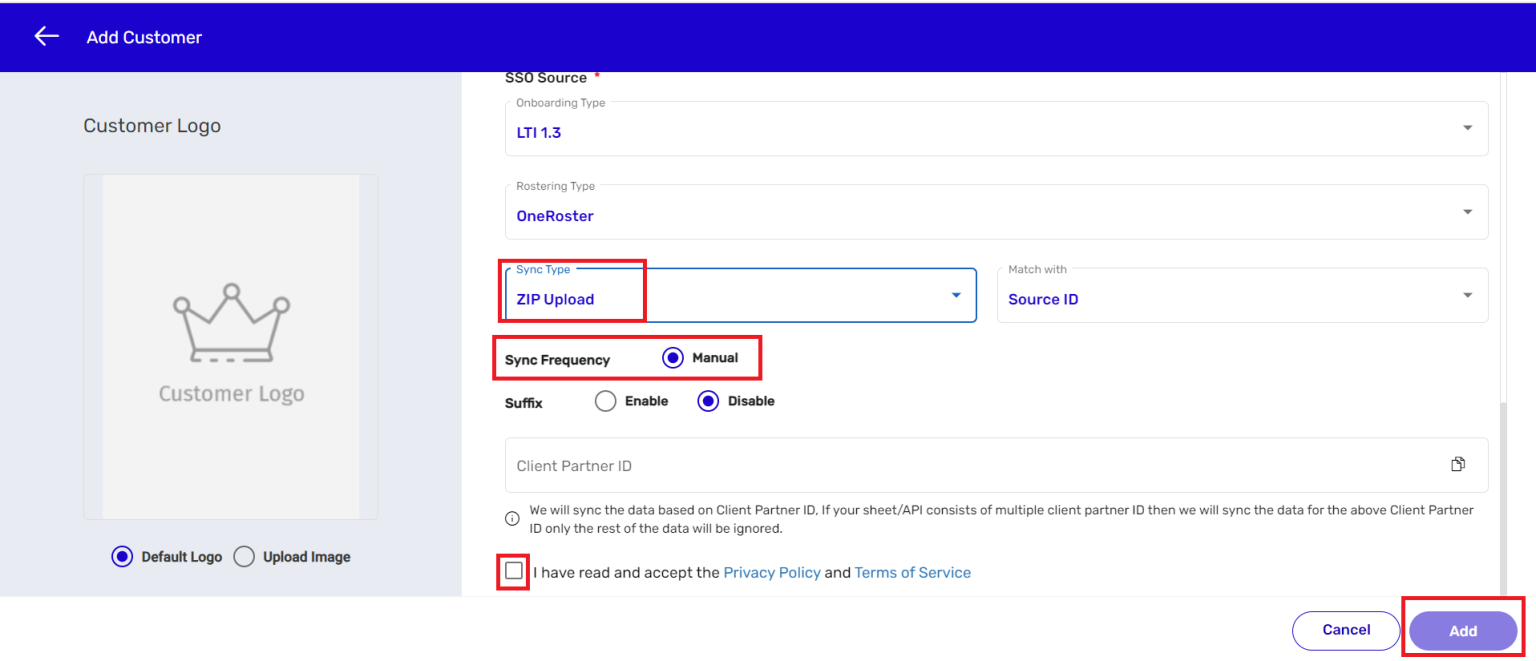
11. Once you have completed the LTI 1.3 customer with OneRoster addition process, you need to login with the partner’s credentials you have just created and initiate the process for syncing with OneRoster. Switch to the Users tab. > Click on Class.Click on the Sync with OneRoster –API button on the Class tab to initiate the data syncing process

NOTE:
1. It is to be noted that the key values of each csv file are as per the IMS global standard, and therefore cannot be changed.
2. In the sample csv files link, fields which are marked in red are mandatory fields.
How it Works
1. A user has to upload users.csv, orgs.csv, classes.csv, and enrollments.csv files in a bundle, i.e. the user has to make a zip of all the files.
2. Once the .zip file is ready, login with the institute admin credentials, navigate to the Users menu, click on Upload Roaster File, and upload the .zip file.
3. After successfully uploading the .zip file and process completion, The user should be able to see the newly added users and classes under the Users and Class sections respectively.
4. Once a user and class is created through OneRoster, a partner can add and assign content to the user/class.
5. The newly created user should now be able to login to the reader.
6. If you sync the data again, without the old user entries, the Kitaboo system will delete the old user who is missing in the new zip file. Hence, please make sure that you are updating the last uploaded sheet at a regular interval to avoid the risk of deletion.
7. Please make sure you uploaded the zip file to the correct location of SFTP and the file name should be the same which you defined during the account creation process.
For more information, please refer to:
https://www.imsglobal.org/lis/imsOneRosterv1p0/imsOneRosterCSV-v1p0.html#_Toc421598314
Kitaboo LMS Integration Using LTI
Kitaboo offers seamless integration with your Learning Management System (LMS) using the Learning Tools Interoperability (LTI) standard. Through this integration, you can launch specific digital books directly from within your LMS environment, ensuring a unified and efficient learning experience.
Key Features:
- Book-Specific Access: You can configure the integration to launch a particular book by passing the unique Book ID in the LTI launch parameters.
- Deeper Navigation: For enhanced integration, you can also specify a Page Number, allowing users to open the book at a particular section. This is especially useful for aligning book content with specific lessons or assignments.
- Full Book Access: While a specific page can be designated as the launch point, users will still have access to the entire book. This ensures they can freely navigate beyond the specified page, promoting broader learning.
This integration supports a more contextual and content-rich learning experience, making it easier for educators to align digital books with curriculum objectives while maintaining the flexibility learners need.
Let me know if you’d like it customized for a specific audience—such as technical teams, educators, or decision-makers.
Kitaboo Studio is also compatible with the LTI 1.3 ecosystem. As in the case of LTI 1.1, you need to define the Rostering type for securely sharing class rosters and related data for adding LTI 1.3 customers as well. You can either select Kitaboo or OneRoster from the Rostering type dropdown menu. Let’s see how to move forward with either of the two options.
Now Let’s see the process:
Adding aLTI 1.3 Customer
Adding aLTI 1.3 Customer
The level of dependency between the Kitaboo system and its partner and vice-versa while adding an LTI 1.3 customer is slightly higher as compared to adding an LTI 1.1 customer. Let’s see what these dependencies are.
Let us now see how to add an LTI 1.3 customer with Kitaboo as the Rostering type.
1. Sign in with your Enterprise Admin credentials.

2. On the Customers tab, click on +Add Customer.
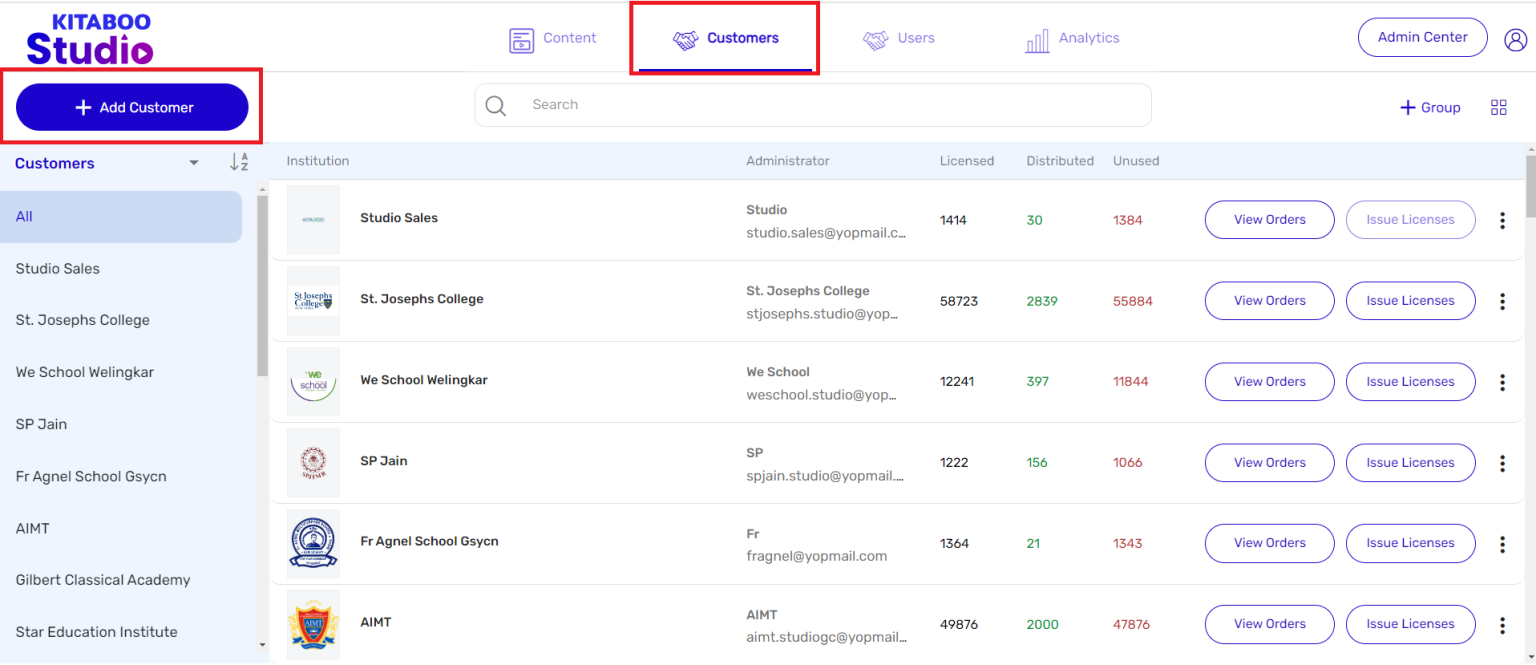
3. Enter the Profile, Administrator, and Address details of the customer you want to add.
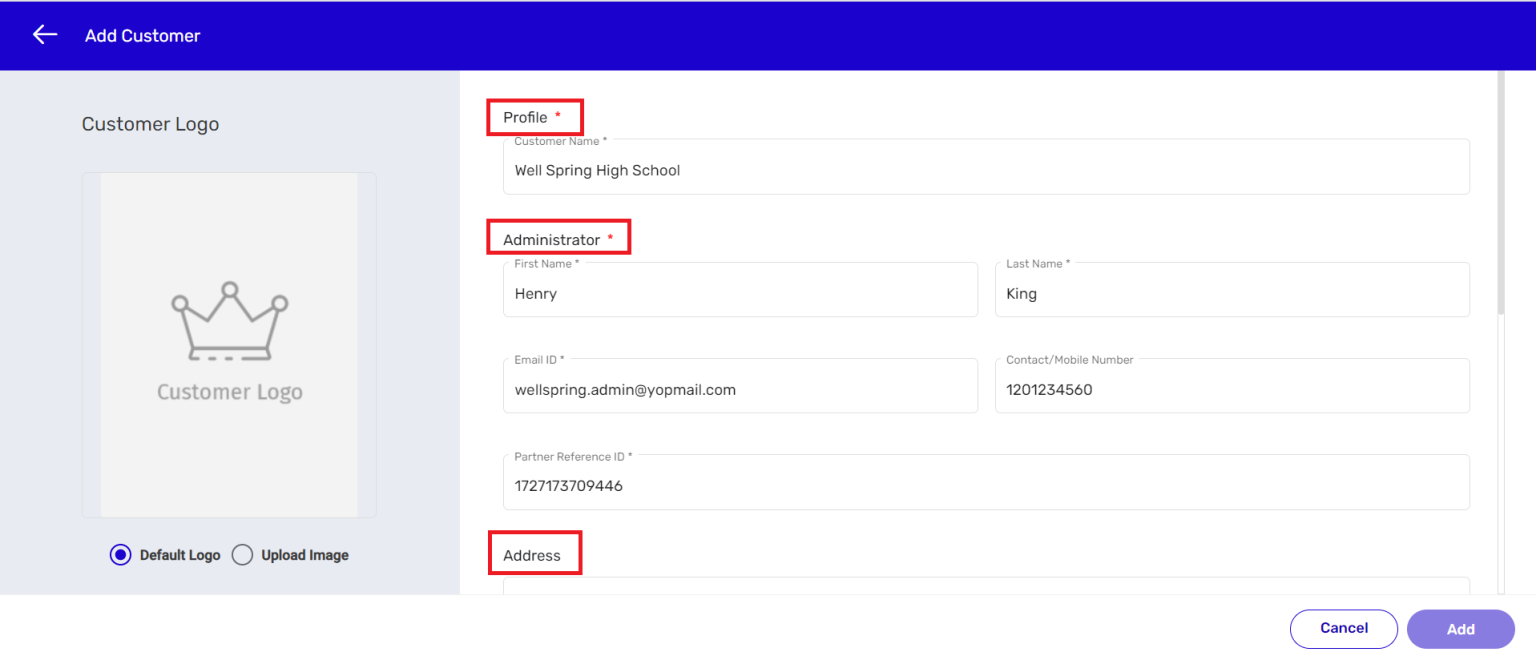
4. Select LTI 1.3 as the Onboarding type from the SSO Source dropdown menu.> Select one of the options from the Rostering type menu.
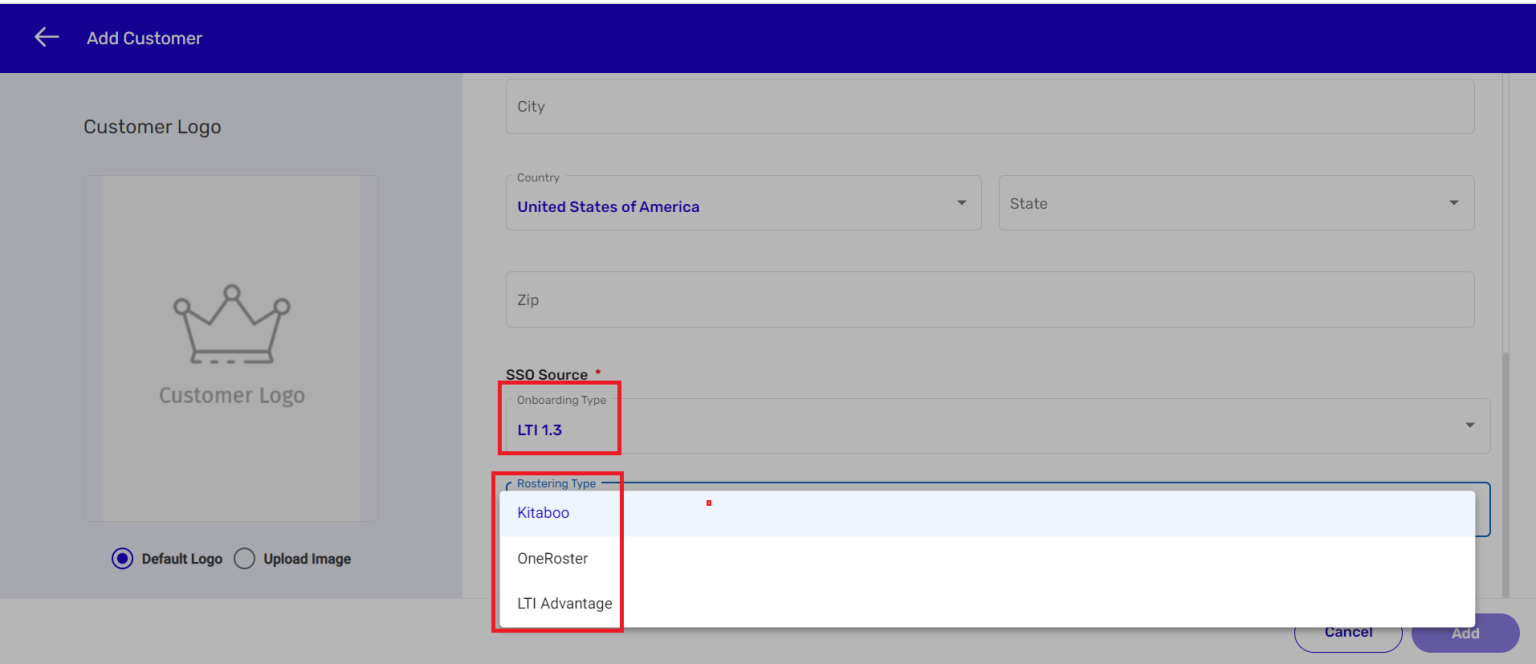
5. Check the Privacy Policy and Terms of Service box. > Click on Add. We have selected the Kitaboo option from the Rostering type menu in this example.
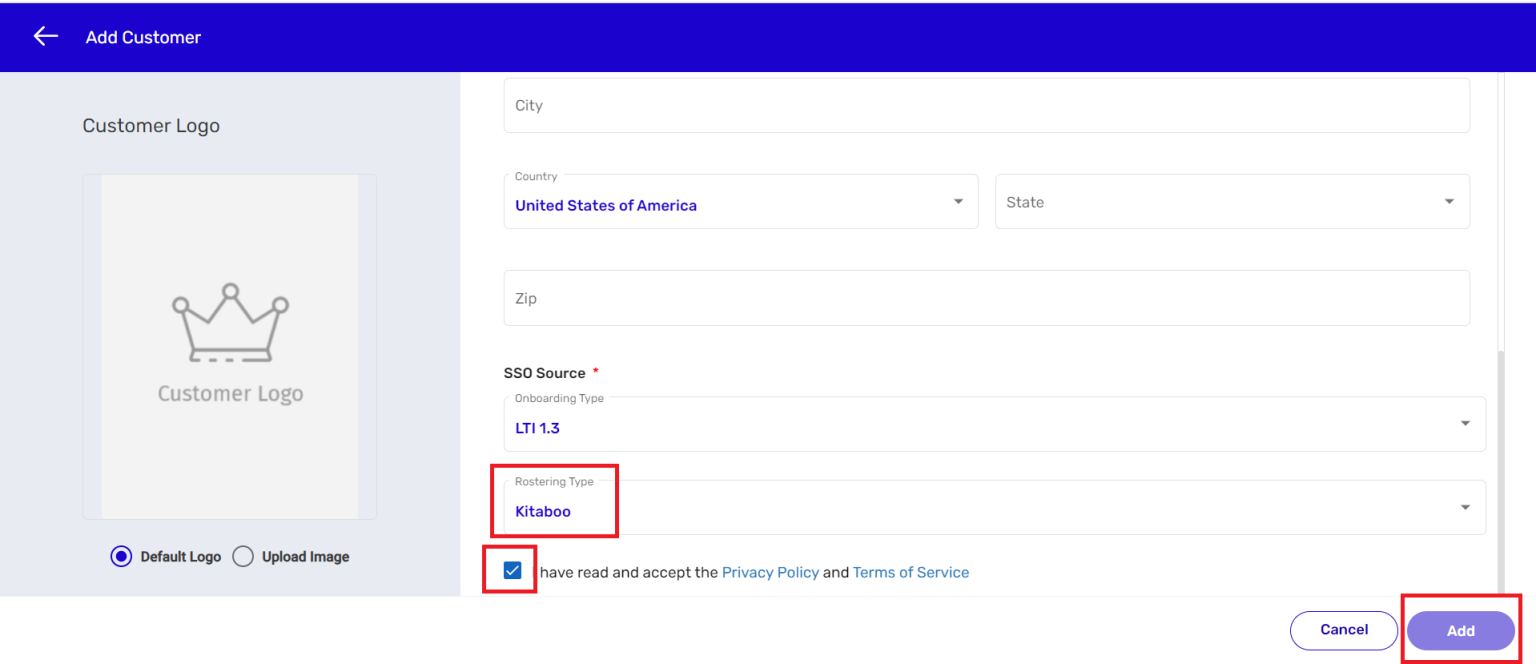
Once you’ve added an LTI 1.3 customer, the LTI needs to be integrated with the Kitaboo system. Let’s see how to do it.
6. Click on the Customers filter. > Select SSO Type from the list.
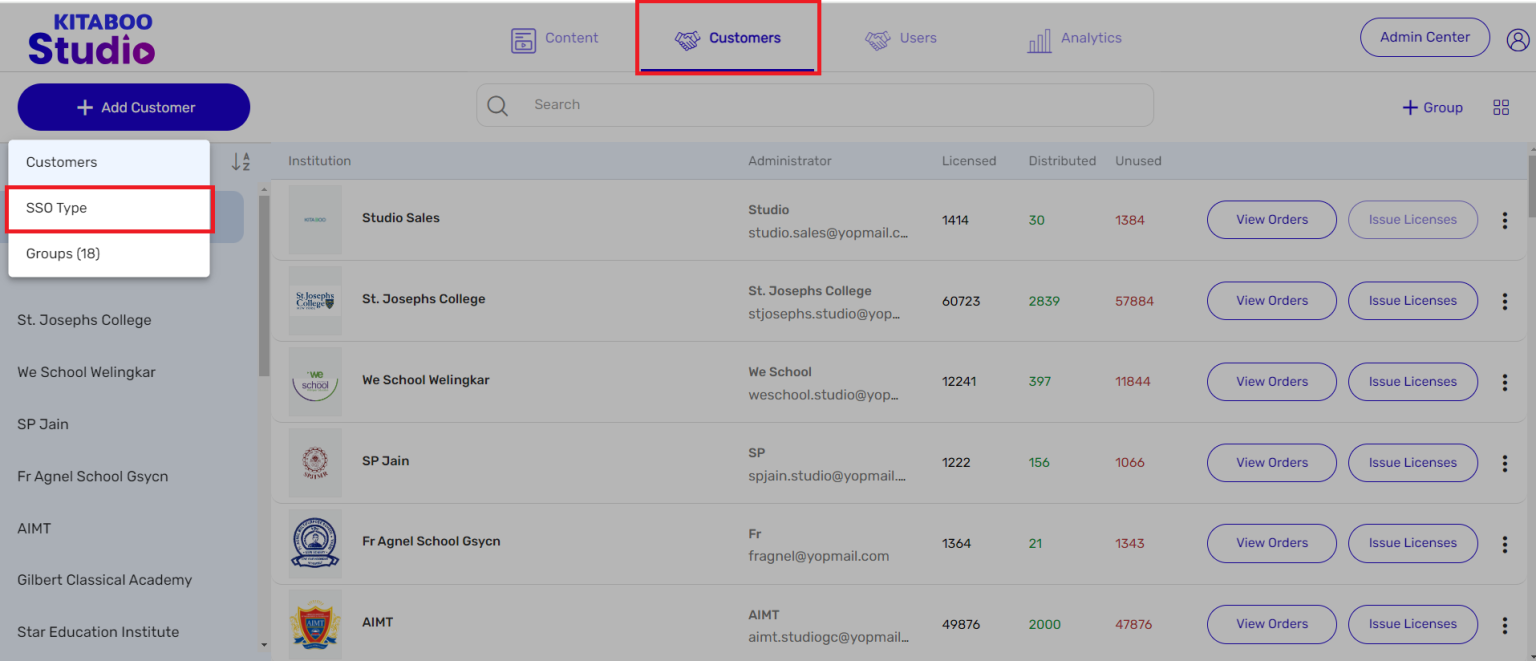
7. Click on the SSO Type filter. > Select LTI 1.3 from the list.
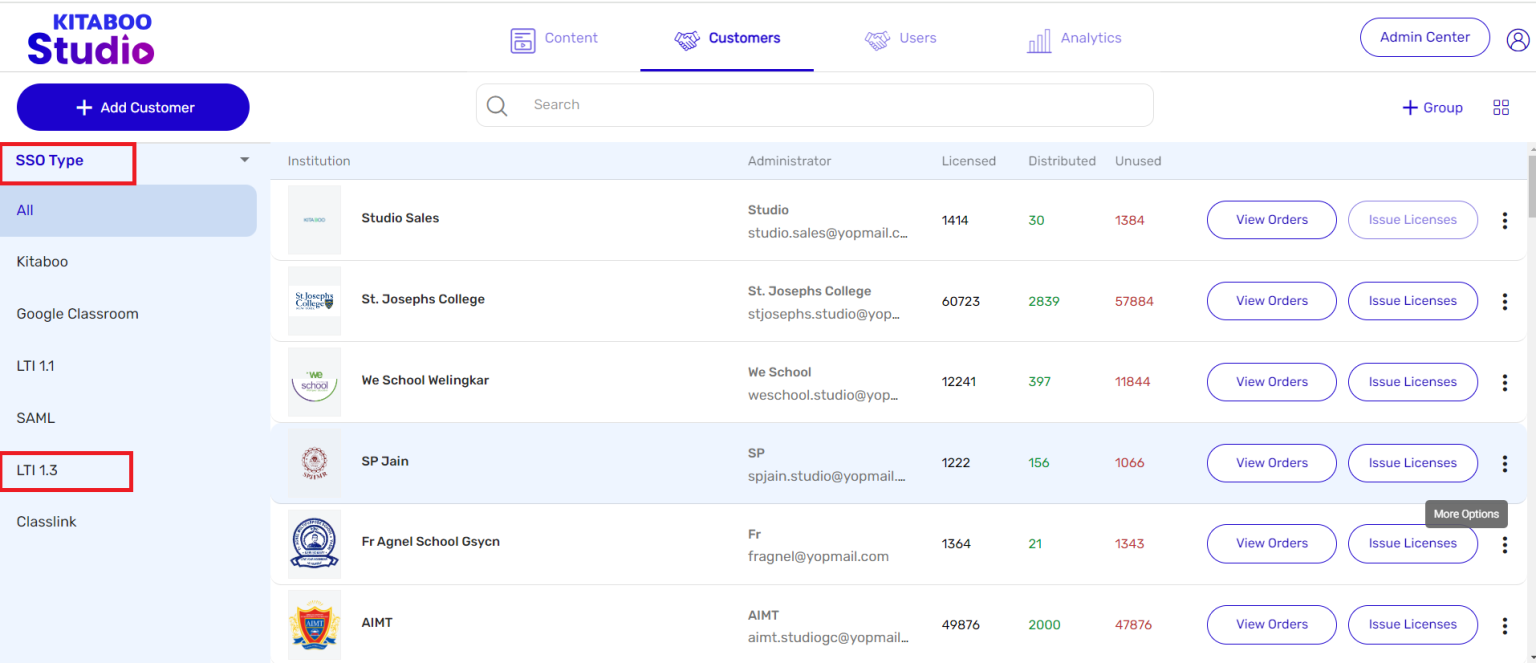
8. Click on the More options icon against the customer you’ve added. > Select the Get LTI Key option.
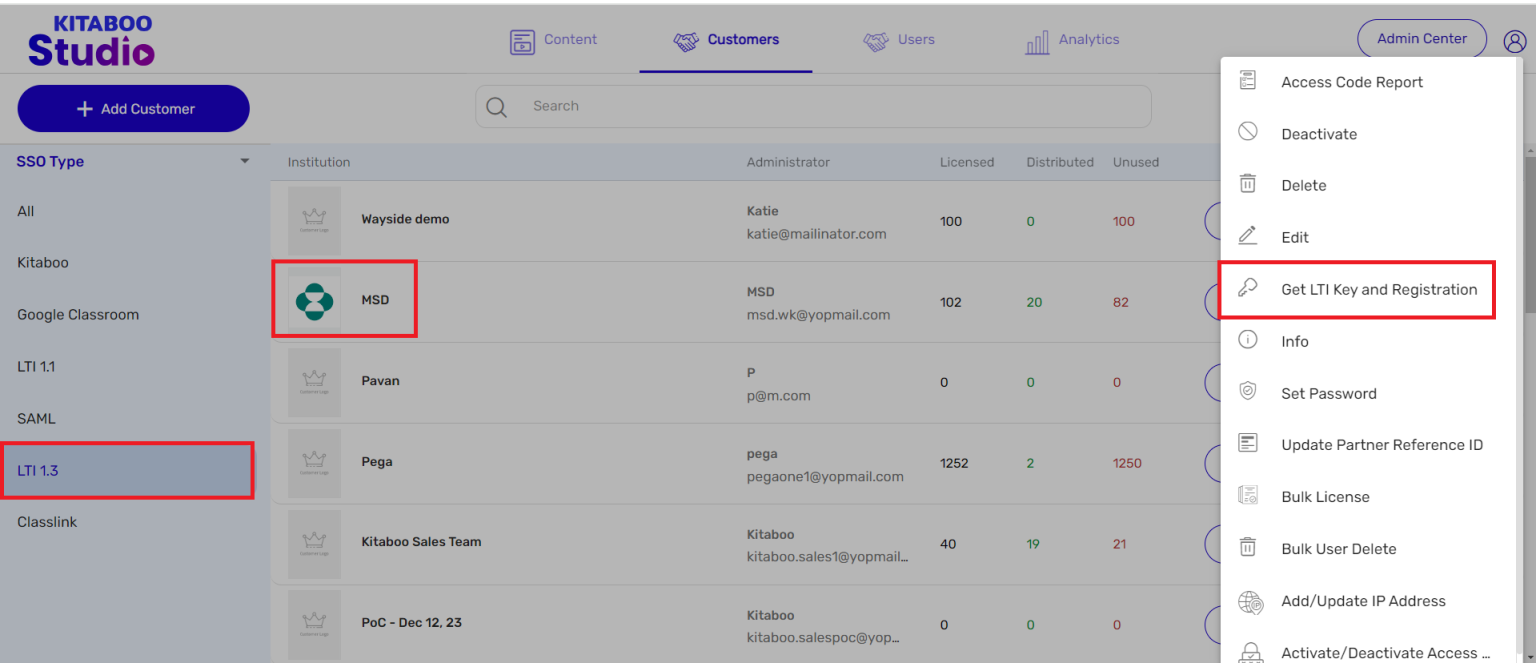
9. Page 1 of 2 of the Registration page. The information related to the highlighted fields, like Client ID, Public Key, Tool URL/Initiate URL, and Redirection URL will be generated by Kitaboo. However more information about the customer will be required for completing the registration process.
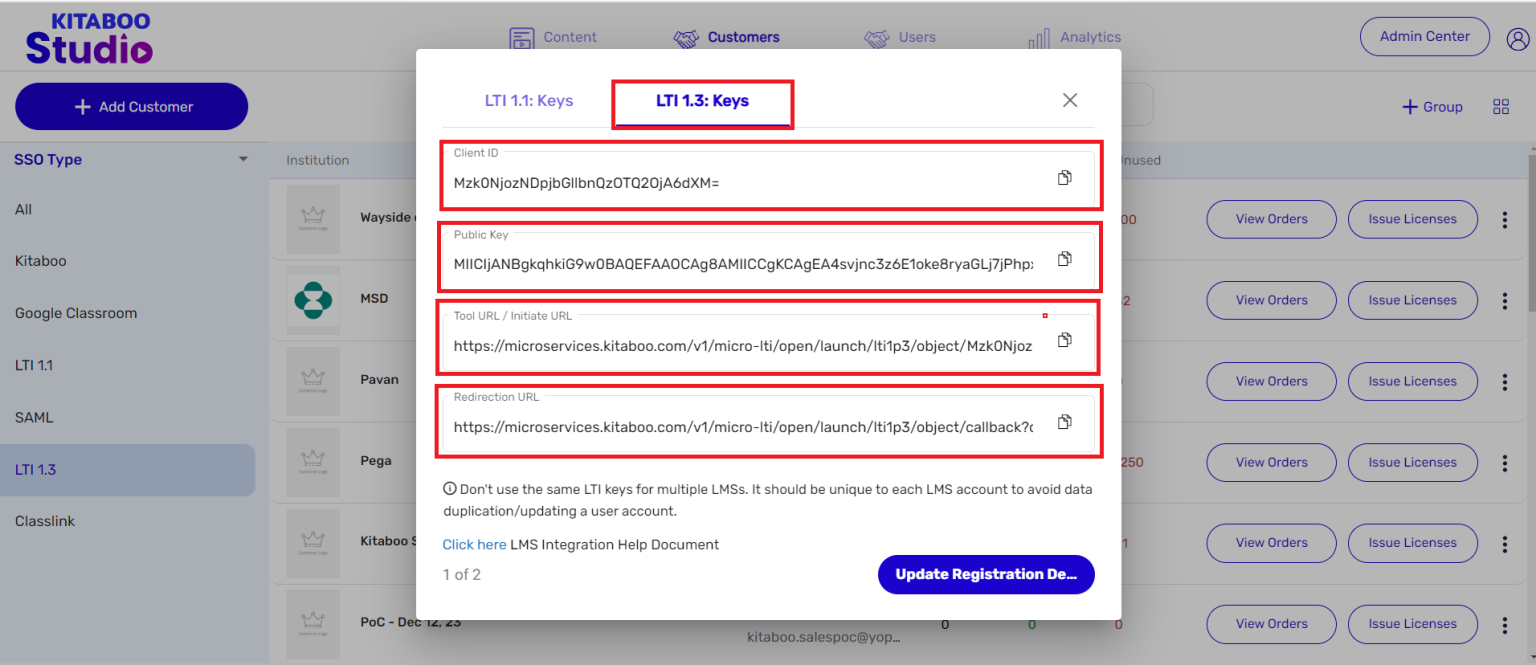
10. Click on Update Registration Details to move to the next page.
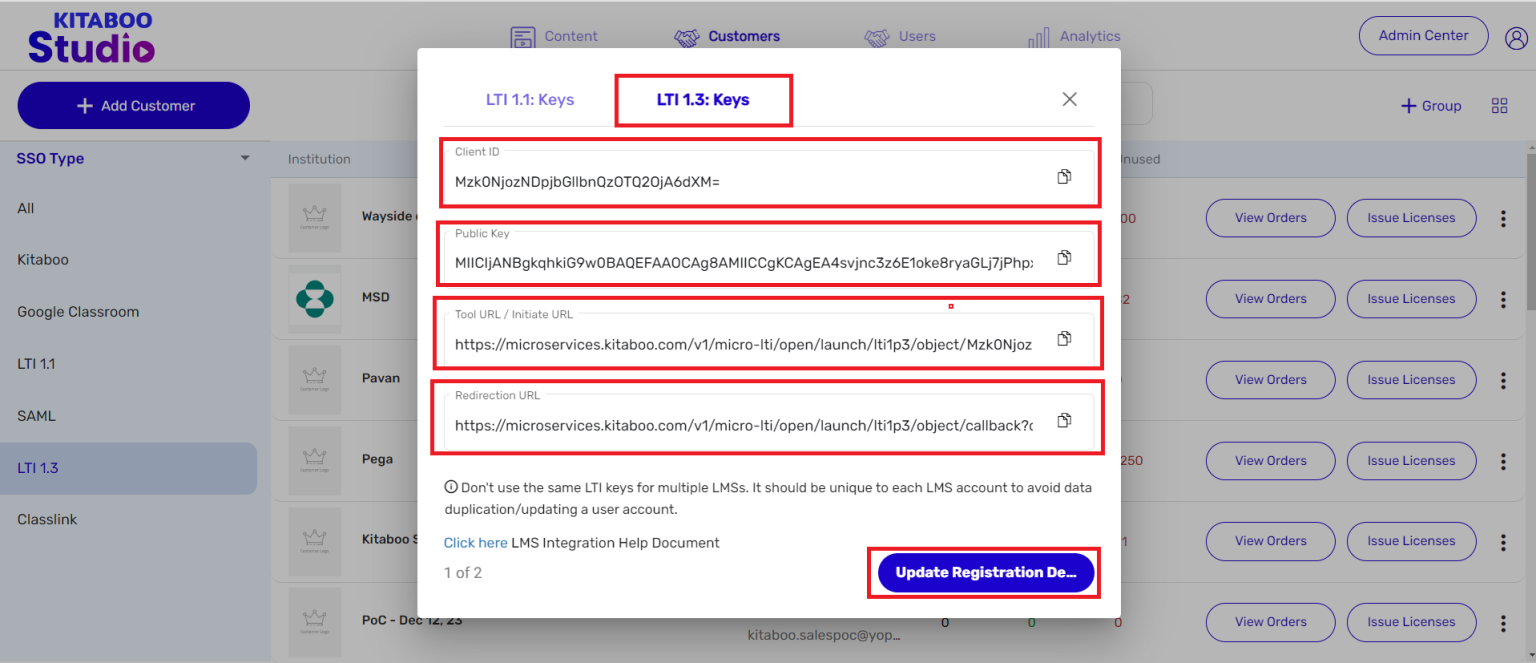
11. The customer will go to the Admin section of his/her LMS and click the More icon on the tool that represents View configuration details.
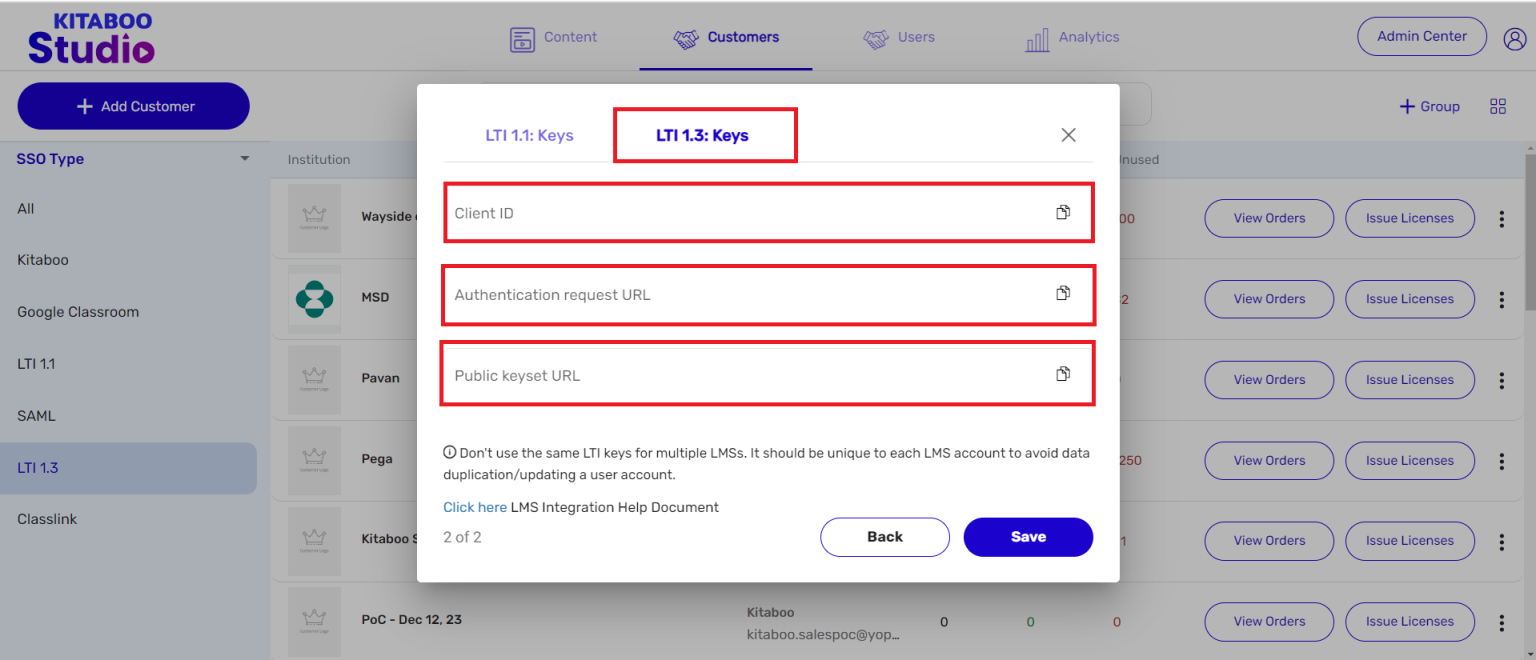
NOTE: Configuration details, like Client ID, Authentication Request URL, and Public Keyset URL will be pulled from the LMS and passed on to Kitaboo by the customer.
Let’s see how to extract the configuration details and complete the registration process.
12. Sign in the LTI Moodle LMS with your admin credentials. > Click on Site
administration on the left navigation pane.
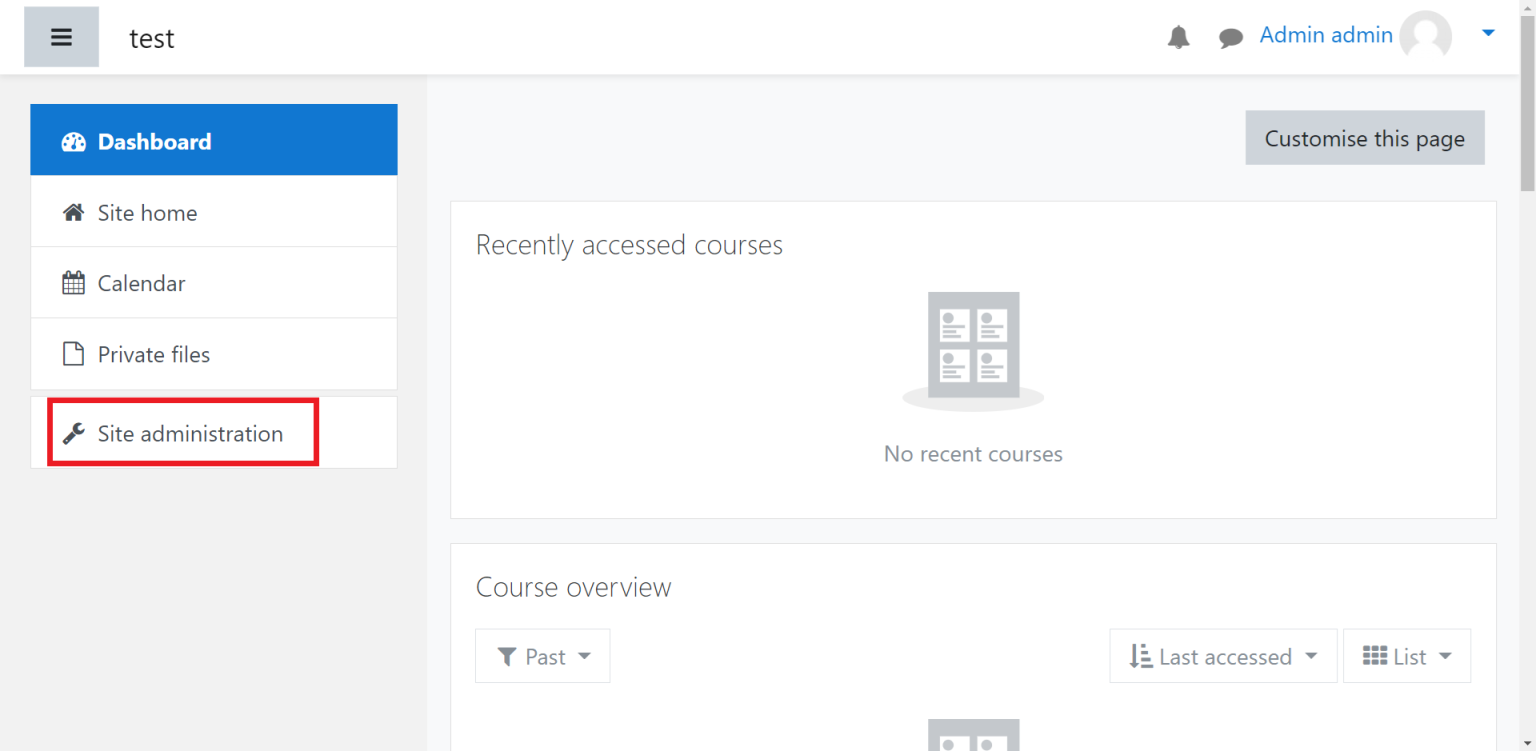
13. Select Plugins.
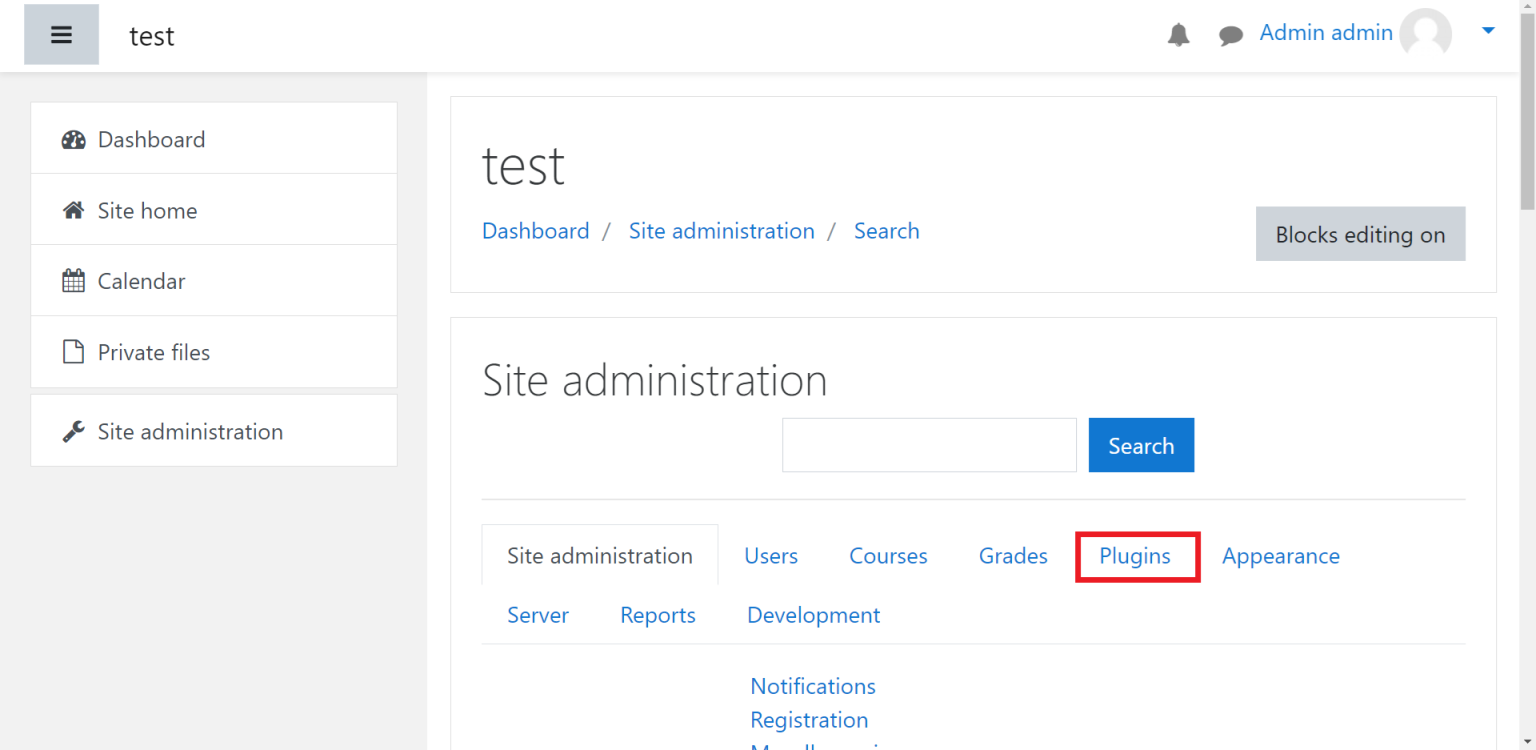
14. Under Activity modules, click on Manage tools.
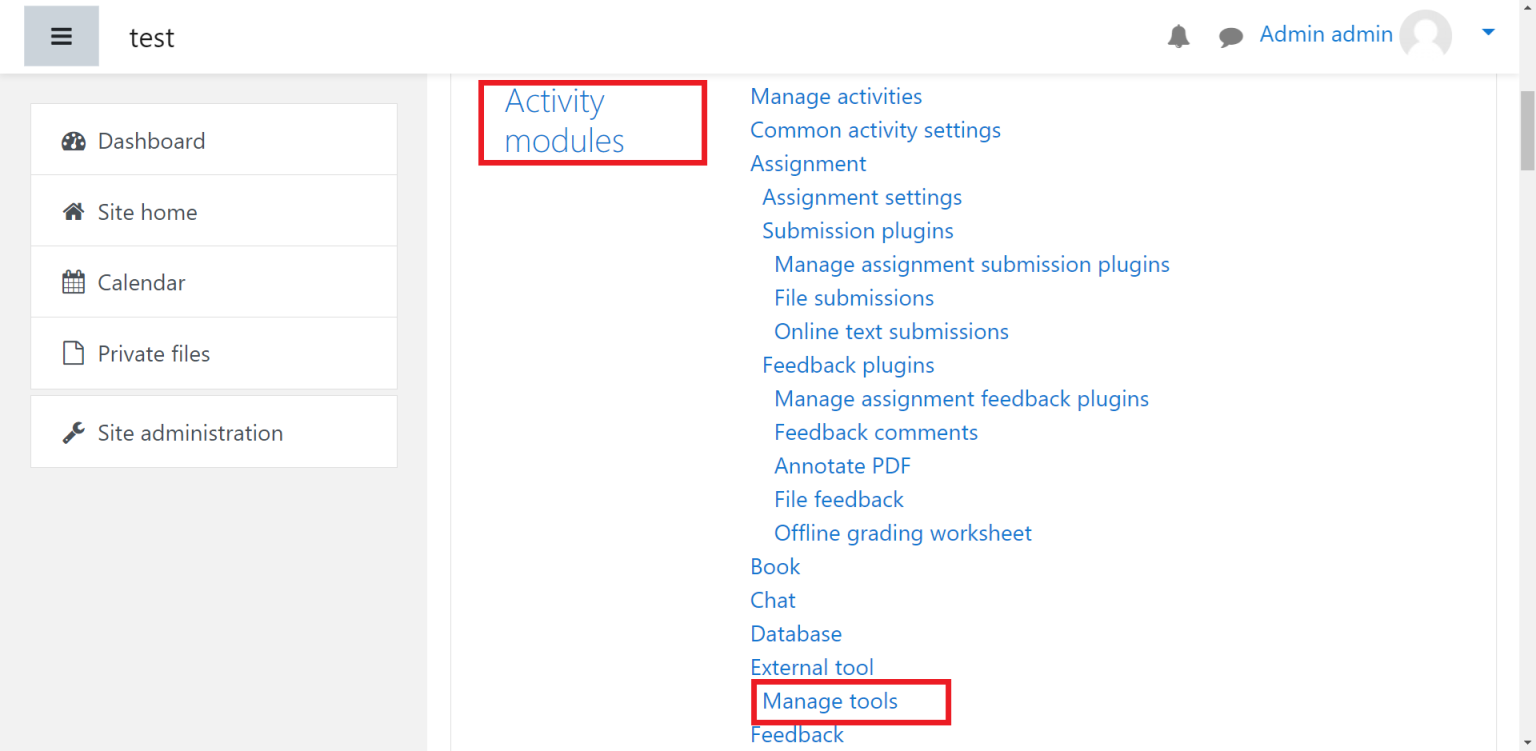
15. Click on configure a tool manually.
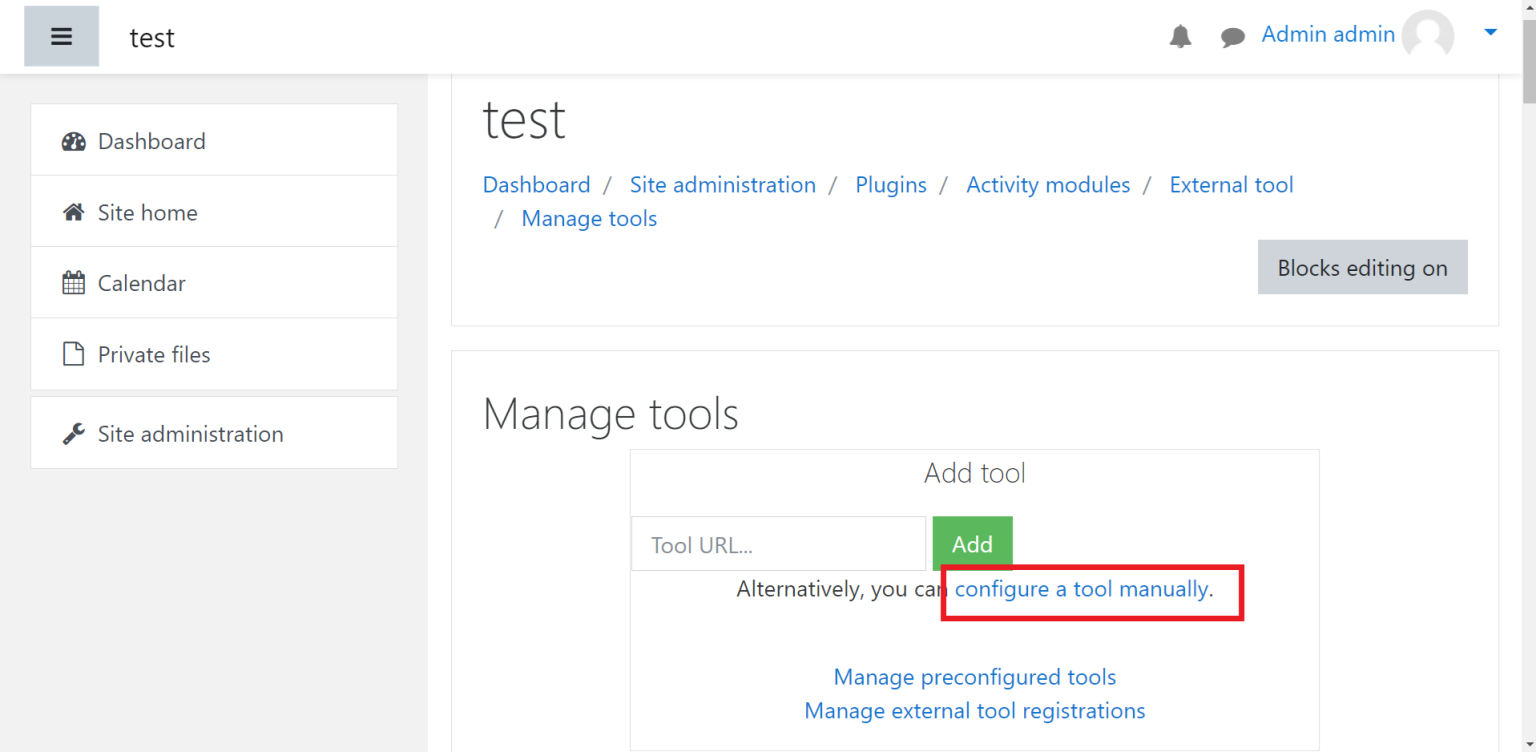
16. Under Tool settings, enter the following information.
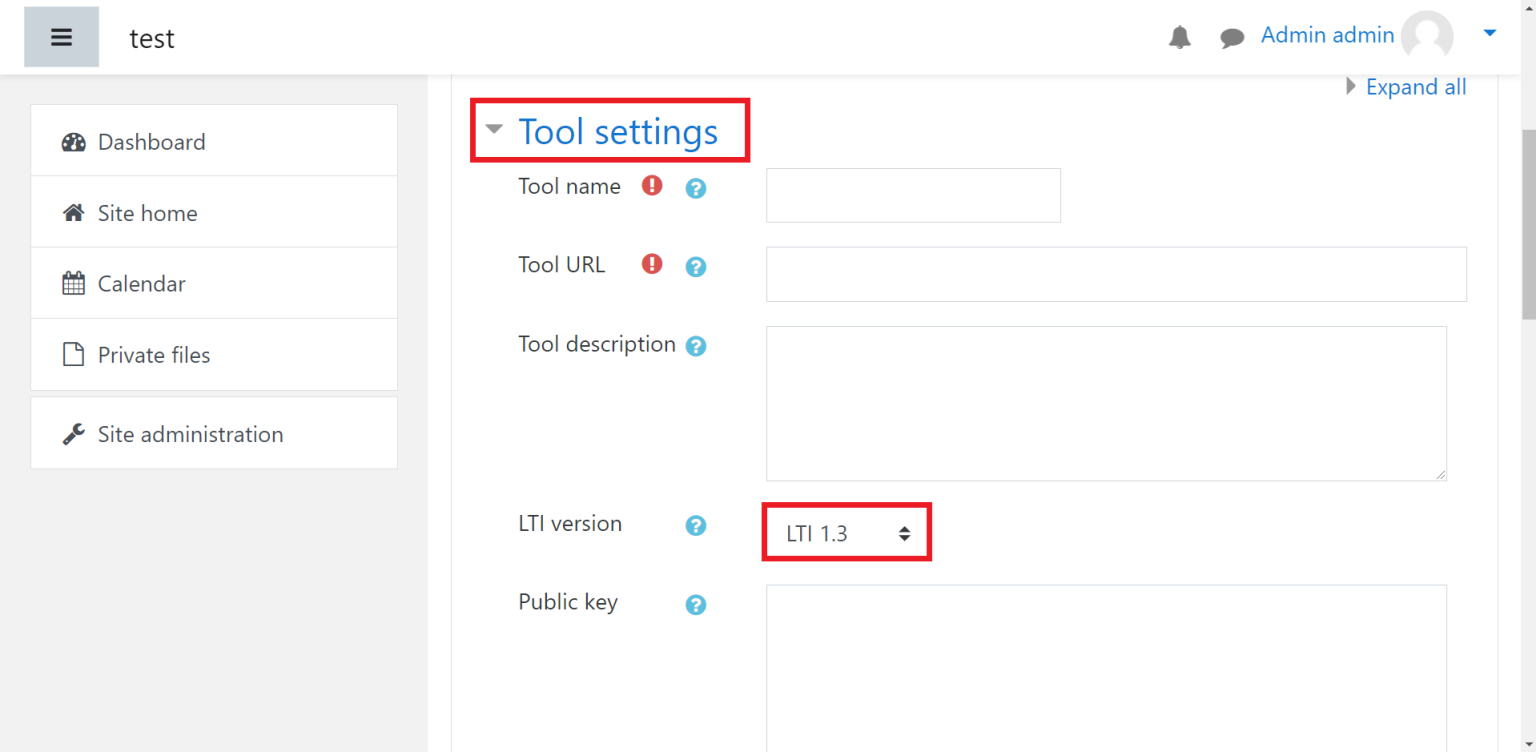
● Tool name: Give the tool a name of your choice. For example: “We Learn”.
● Tool URL: enter the “Launch URL” from the We Learn LTI application’s registration page.
● LTI version: LTI 1.3
● Public key type: Keyset URL
● We recommend using the Keyset URL as the Public Key type.
● Public keyset: Enter “Public JWK Set URL” from the We Learn LTI application’s
registration page.
● If you select RSA key, instead of Keyset URL, as Public key type, you can enter the
“Public Key” from the We Learn LTI application’s registration page instead of the “Public JWK Set URL”.
● Initiate login URL: Enter “Login URL” from the We Learn LTI application’s registration page.
● Redirection URI(s): Enter the “Launch URL” from We Learn LTI application’s registrationpage.
● Default launch container: New window
17. Next, select Show as preconfigured tool when adding an … from the Tool
configuration usage dropdown. > Move to the Services section to complete the registration process.
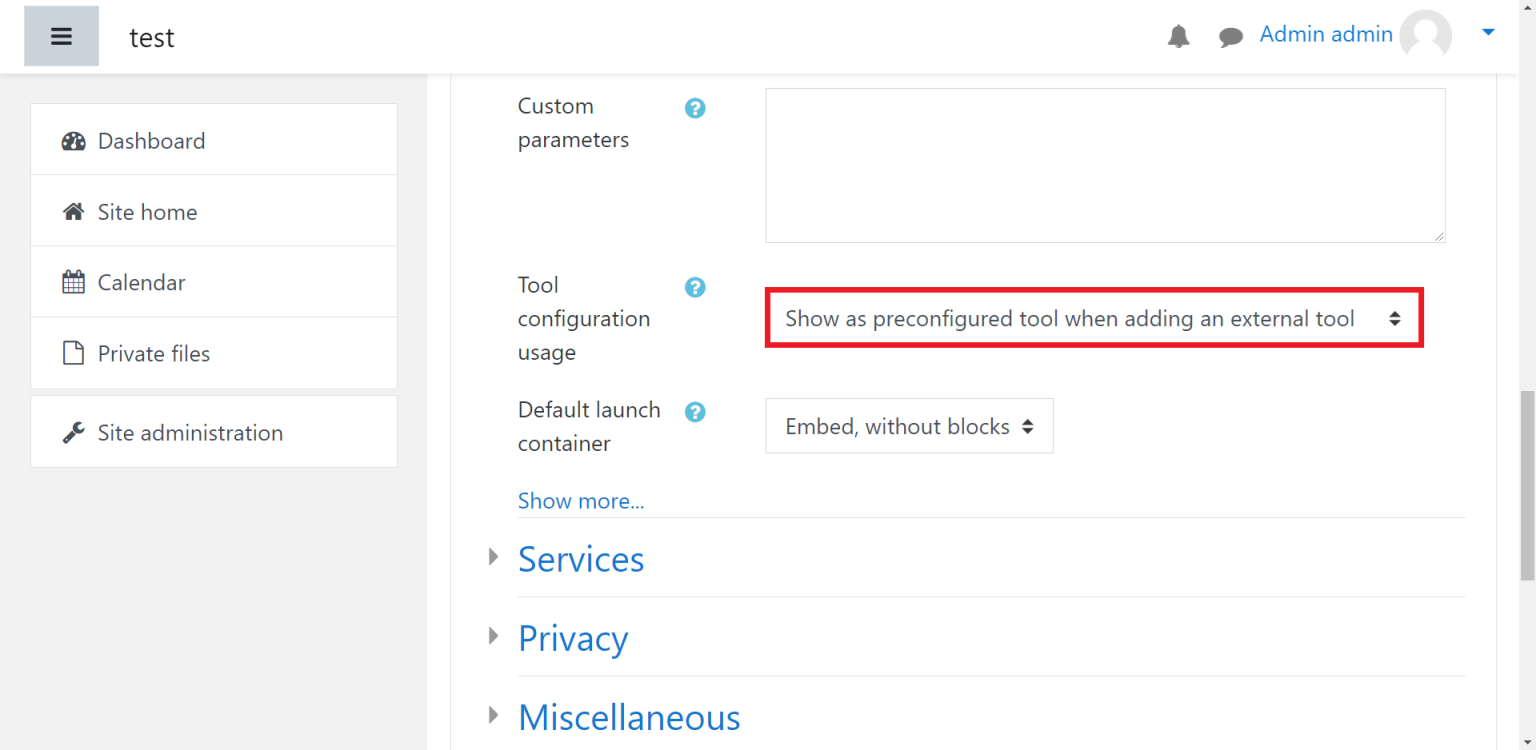
18. It is Important to note that Kitaboo supports the following Custom parameter options that you can usein the Custom parameters box:
● Leave the Custom parameter box blank – It will take a user (Teacher or Student) to the Kitaboo Studio library.
● bookid – It will directly open the specific book for the users.
● collectionid – It will directly open the specific collection for the users.
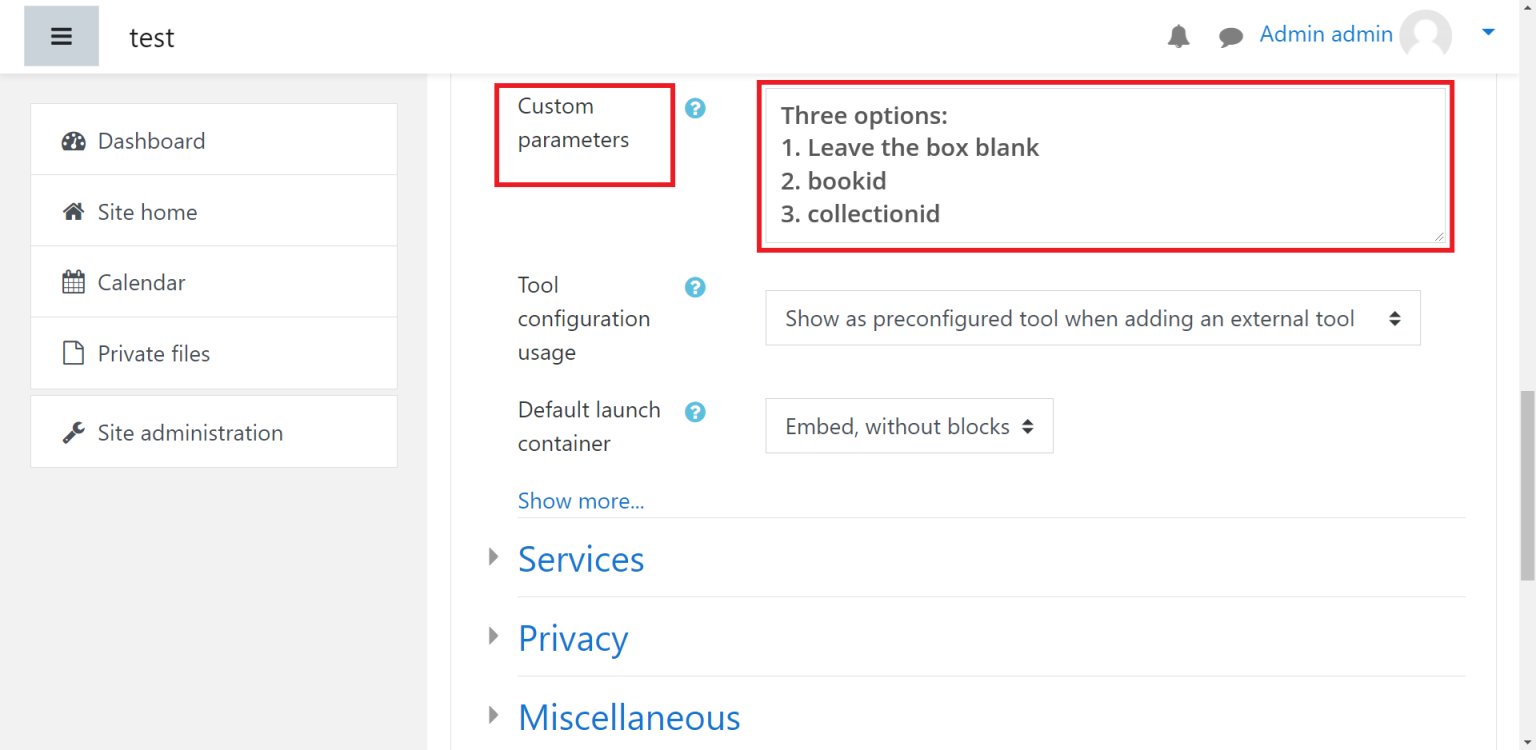
Important: Remember that the custom parameter options are case sensitive. Hence use them the way they have been shown in the list above.
19. Click on Services. > Select Use this service to retrieve members’ information as per privacy settings from the IMS LTI Names and Role Provisioning dropdown. > Move to the Privacy section.
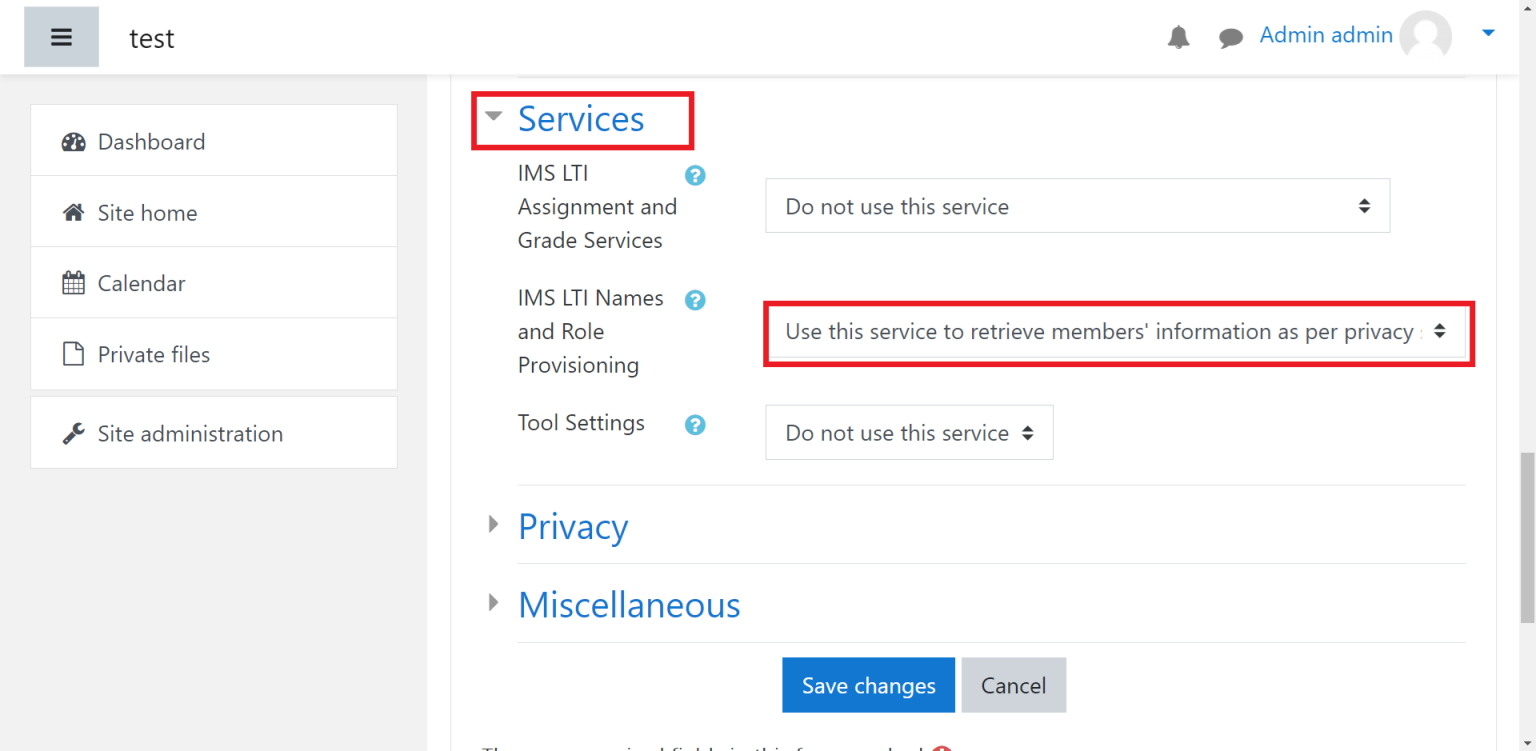
20. Click on Privacy. > Select the following options:
● Share launcher’s name with tool: Always
● Share launcher’s email with tool: Always
● Accept grades from the tool: Always
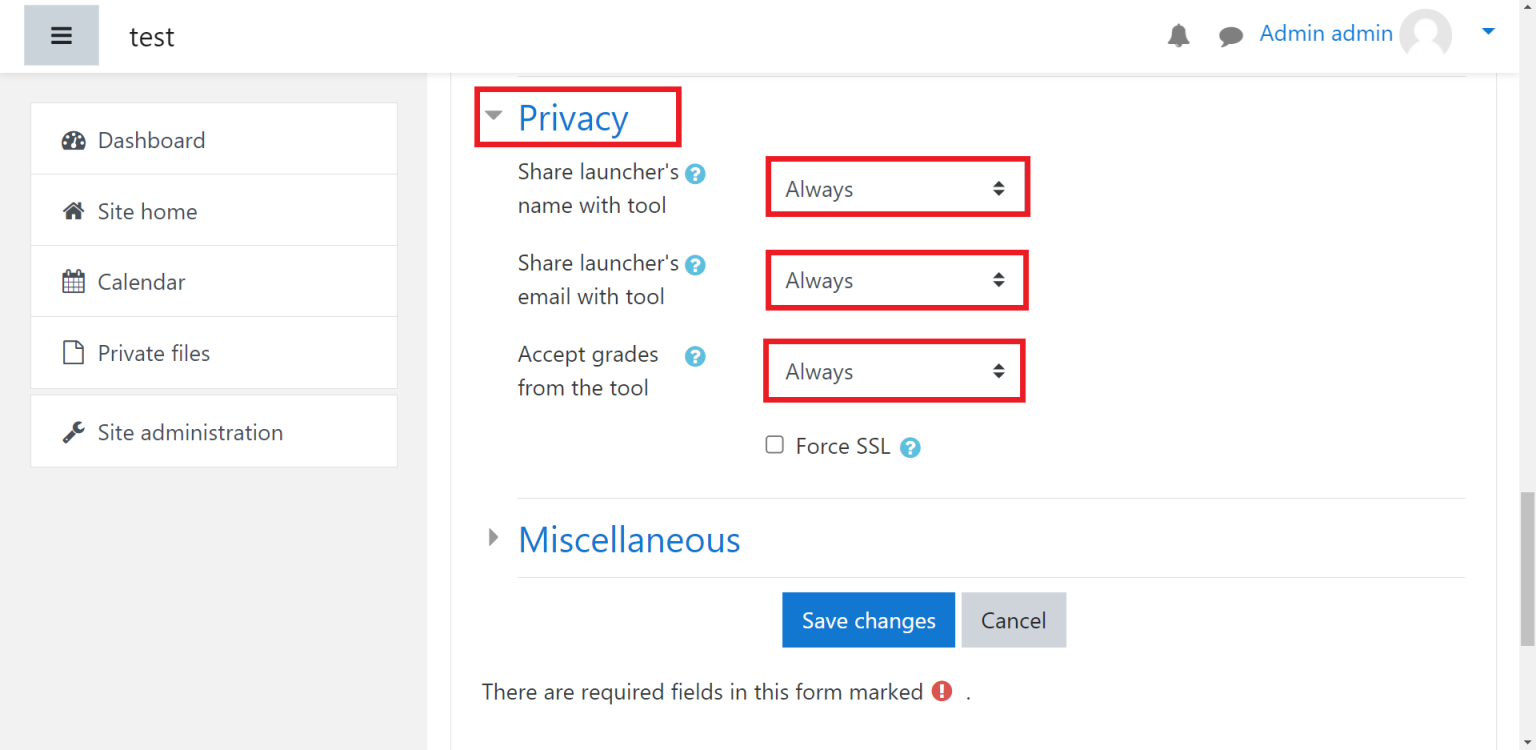
21. Click on Save changes. The tool will now appear and listed with the name (We Learn) you provided.
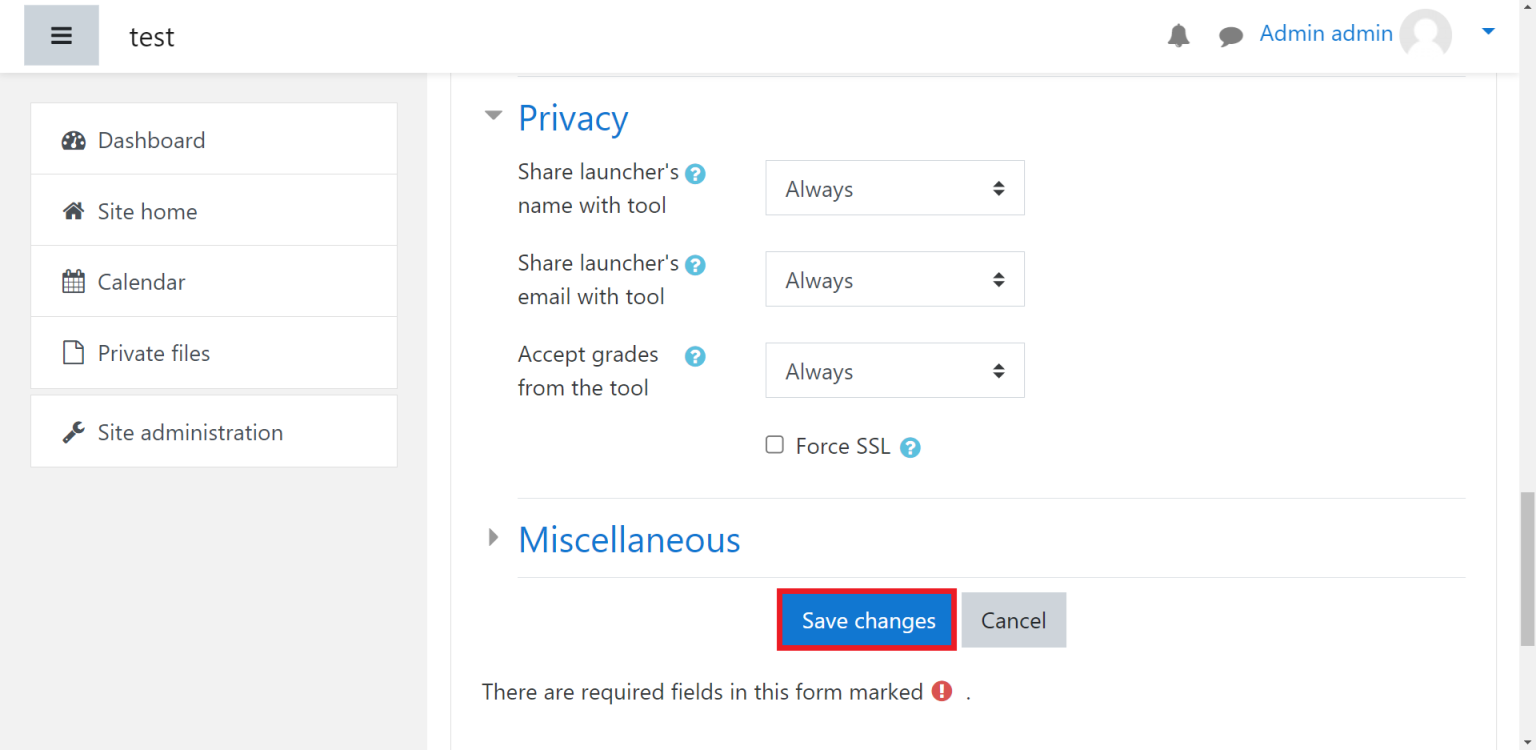
22. Click on the icon on the tool that represents View configuration details.
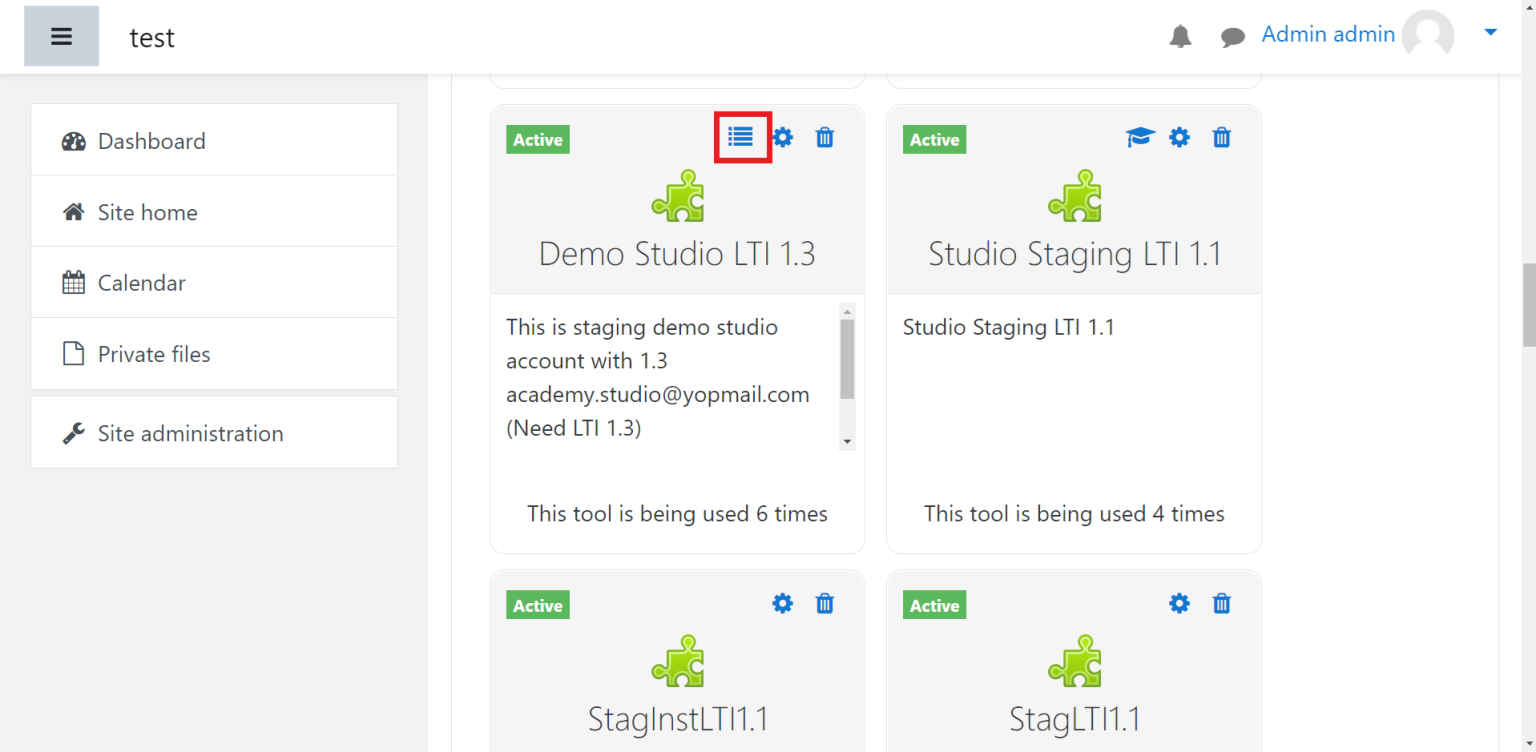
23. Note down the following parameters:
● Platform ID
● Client ID
● Public keyset URL
● Access token URL
● Authentication request URL
Continue to configure the We Learn LTI application, by registering the parameters back in the Learn LTI application’s registration pages.
24. Page 1 of 2 of the Registration page
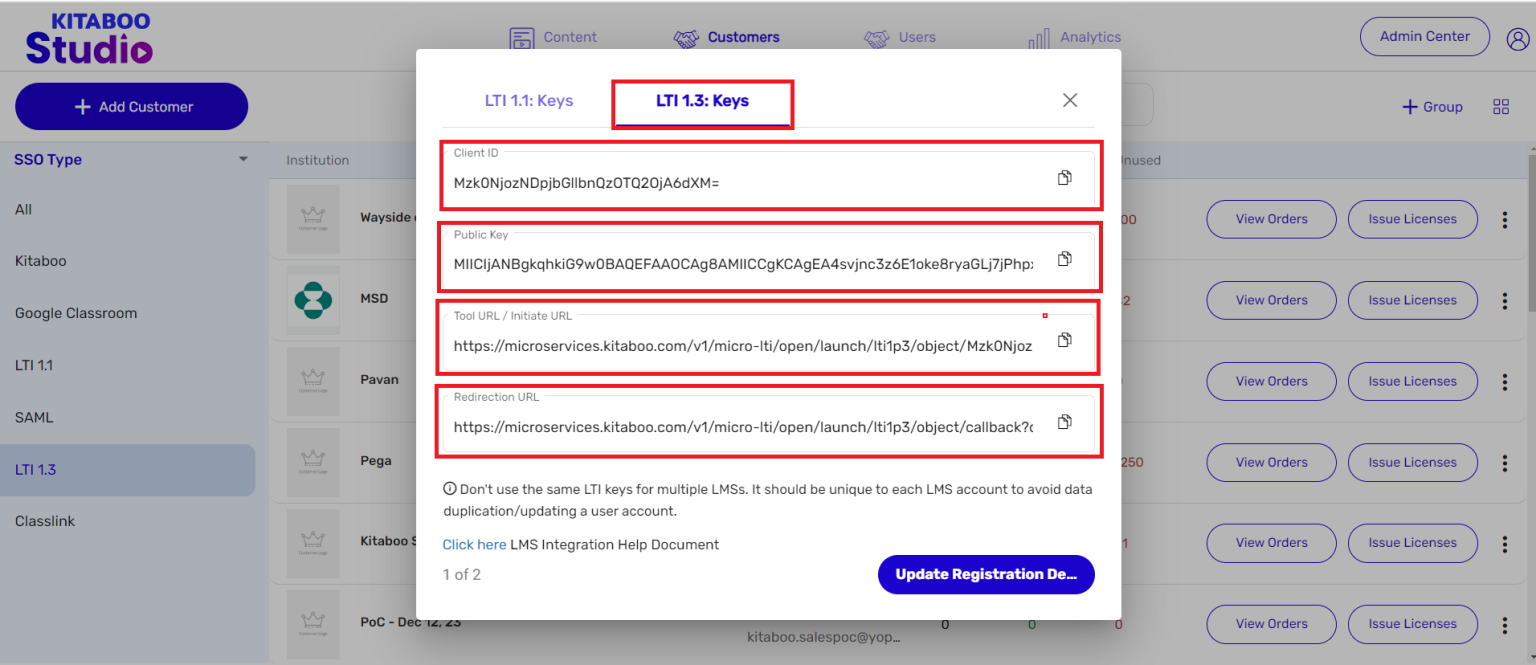
25. Page 2 of 2 of the Registration page. Enter the information in relevant fields. > Click on Save to complete the registration process.
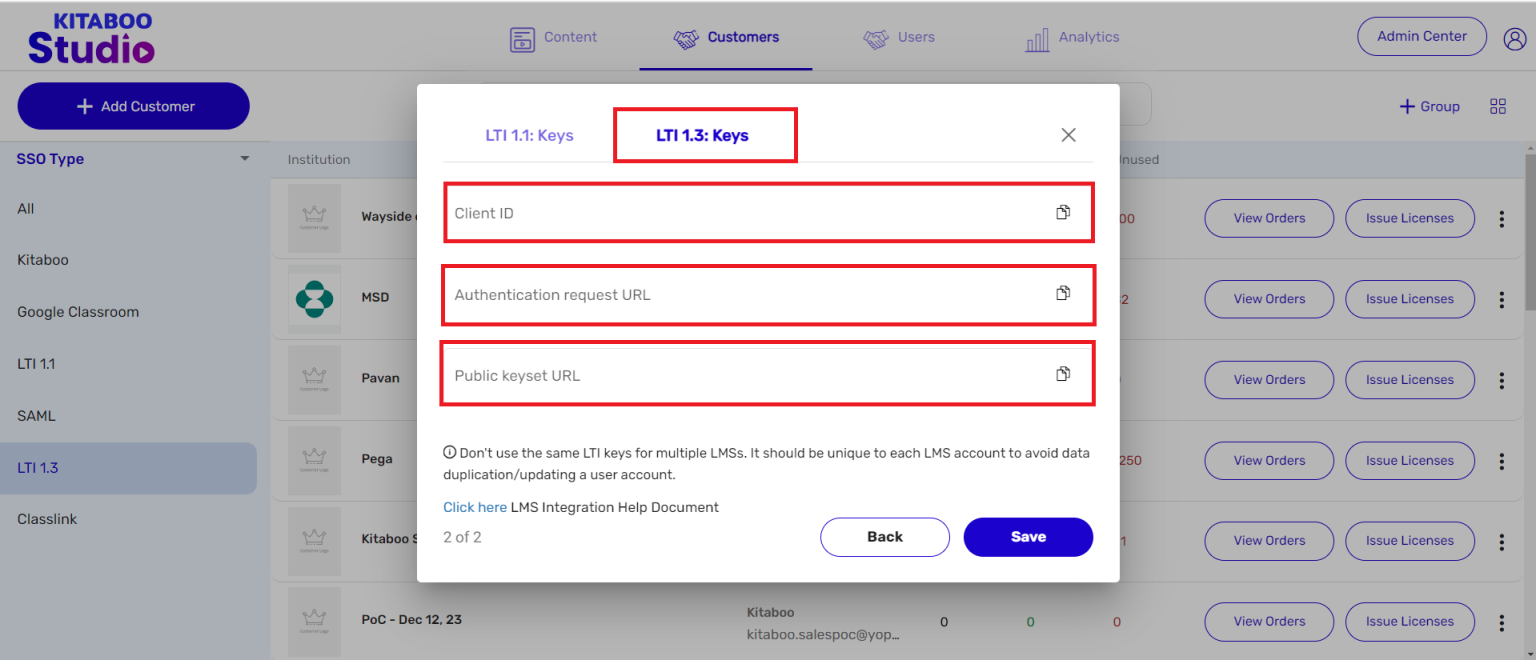
Now, teachers and students can login to your LMS and launch a Digital Content. Let’s see how a user can launch a book on the Kitaboo Reader.
26. Navigate to the LTI Moodle website and log in with your User (Teacher)
credentials. > Click on the This is for IMS menu on the left navigation panel.
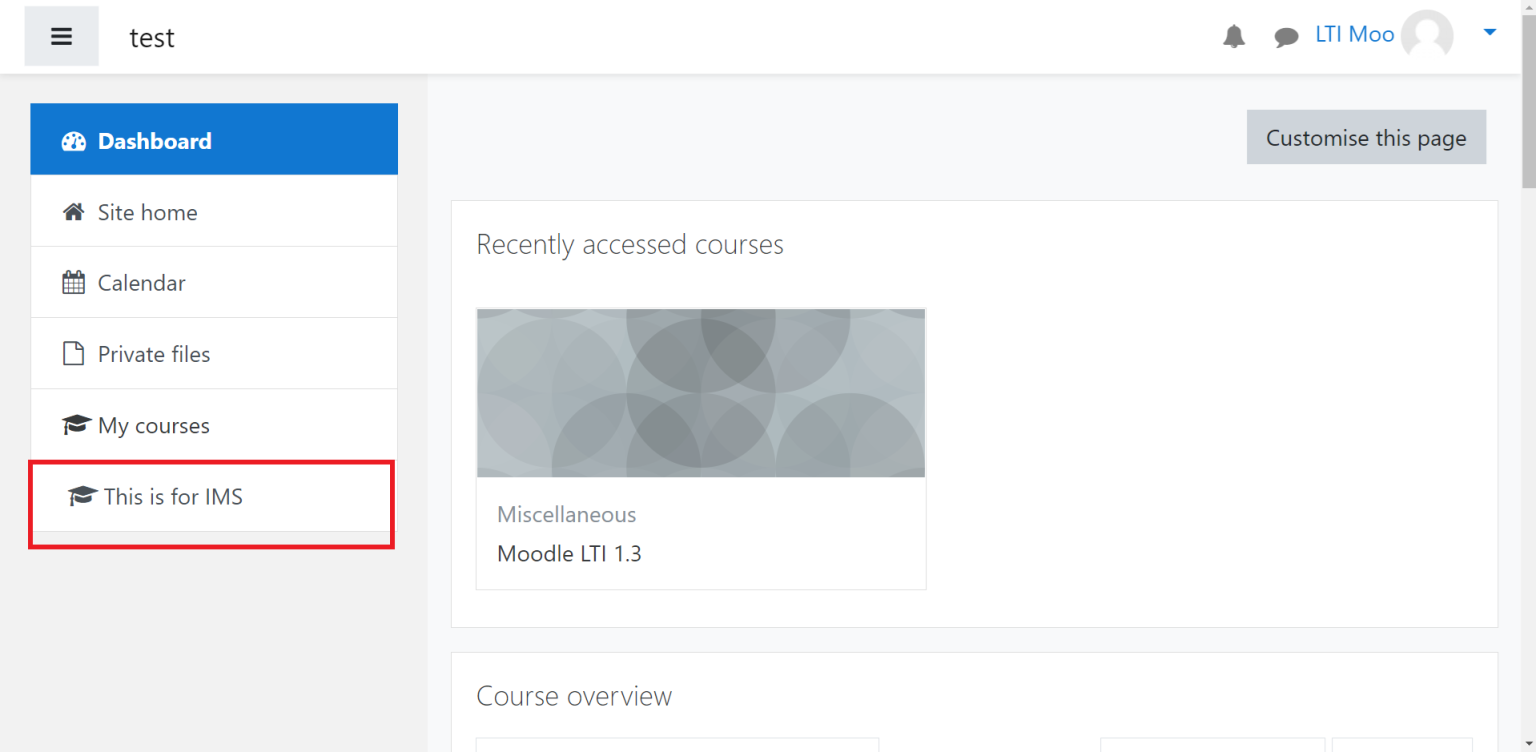
27. On the This is for IMS page, click on the book you want to launch. A sample book has been selected in this example.
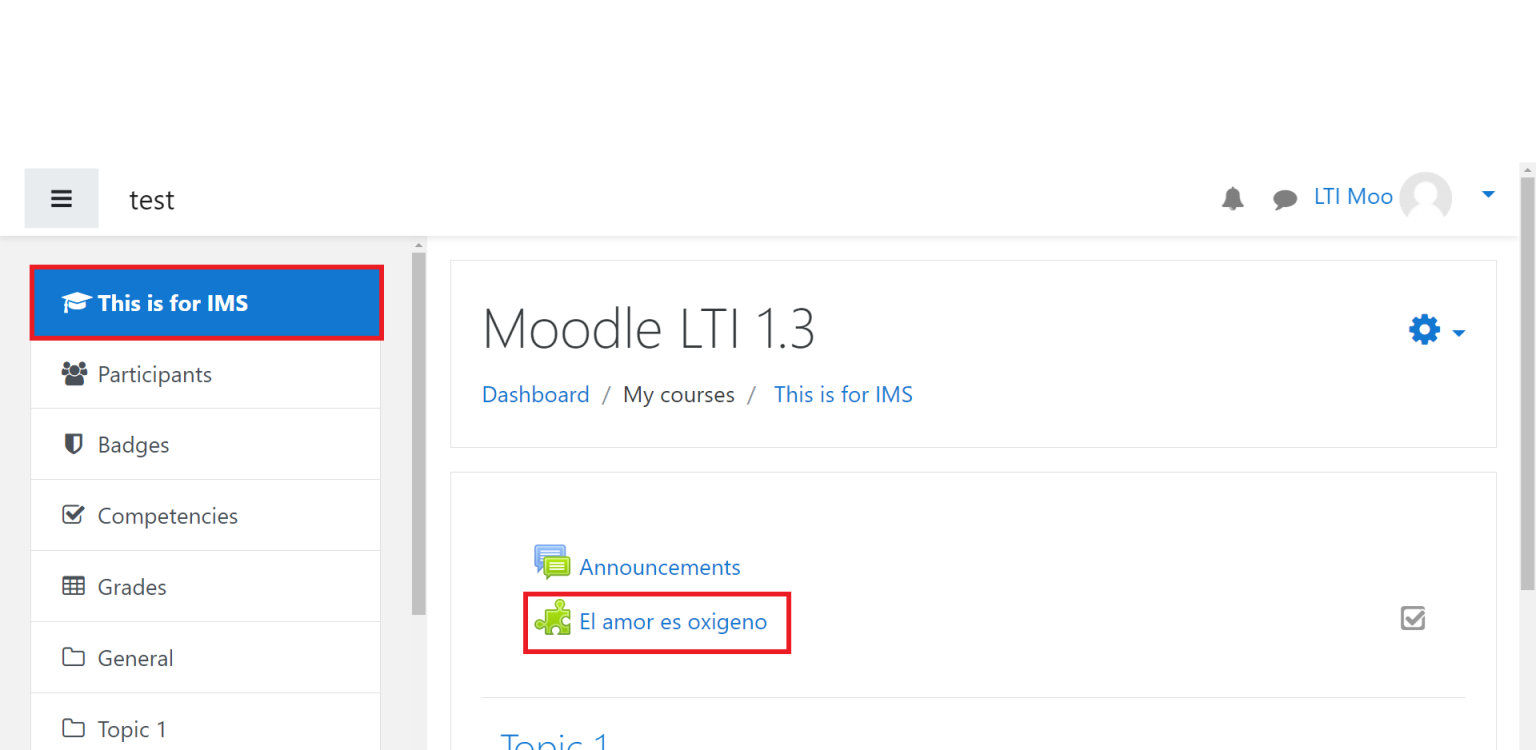
28. The book has now been launched on the Kitaboo Reader.
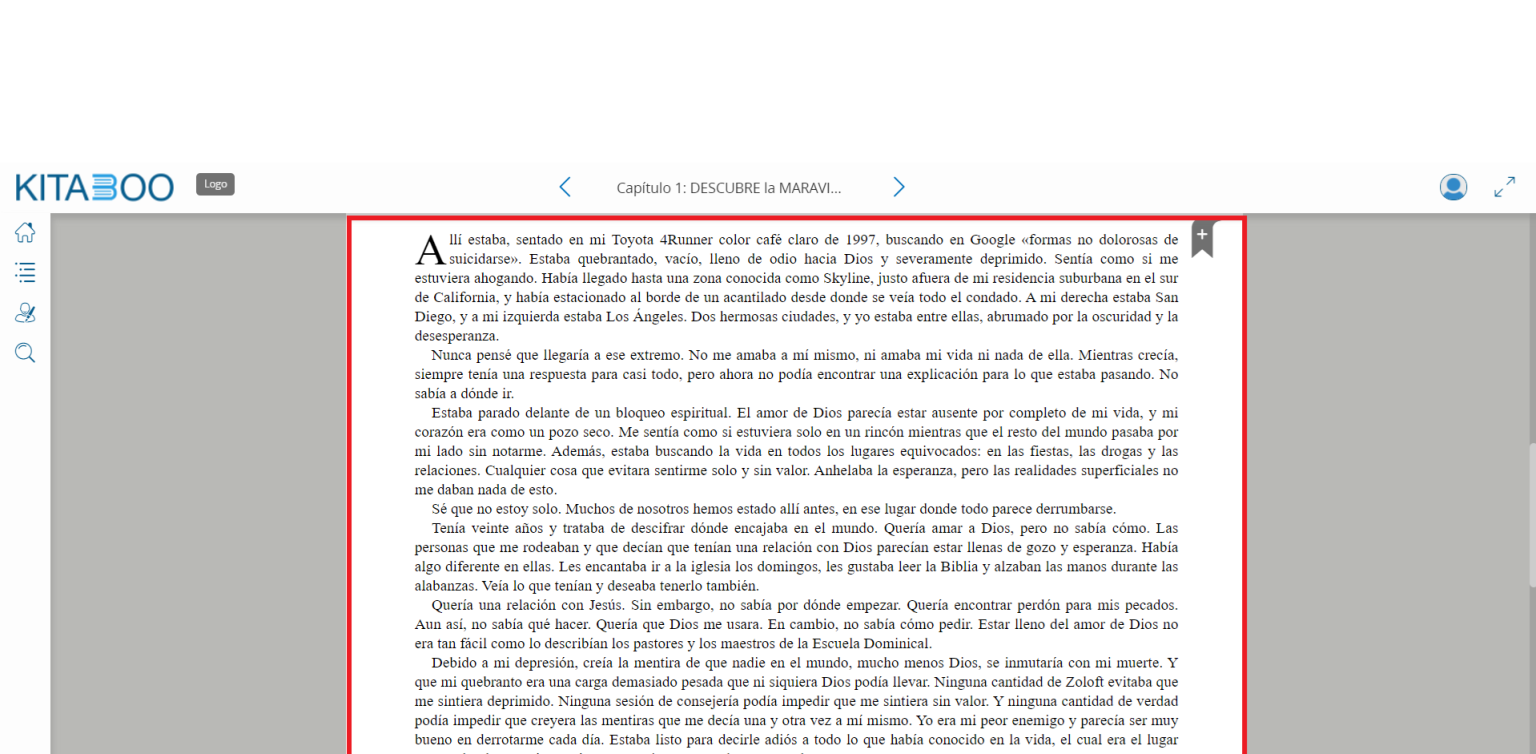
Adding an LTI 1.1 customer with OneRoster as the Rostering type is also subject to certain dependencies. Let’s see what these dependencies are before setting up for LTI 1.3 integration.
Let’s now see how to add an LTI 1.1 customer with the other Rostering type option, that is OneRoster.
1. Sign in with your Enterprise Admin credentials.

2. On the Customers tab, click on +Add Customer.
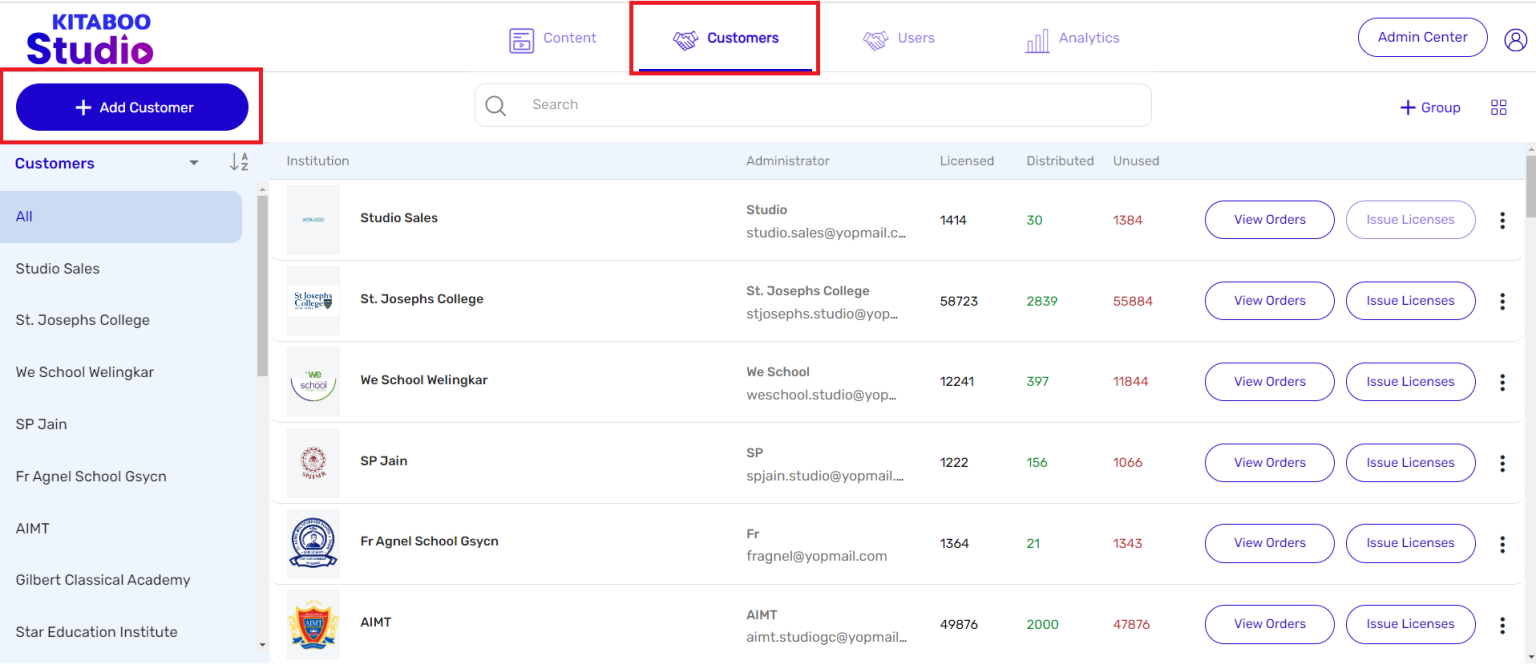
3. Enter the Profile, Administrator, and Address details of the customer you want to add.
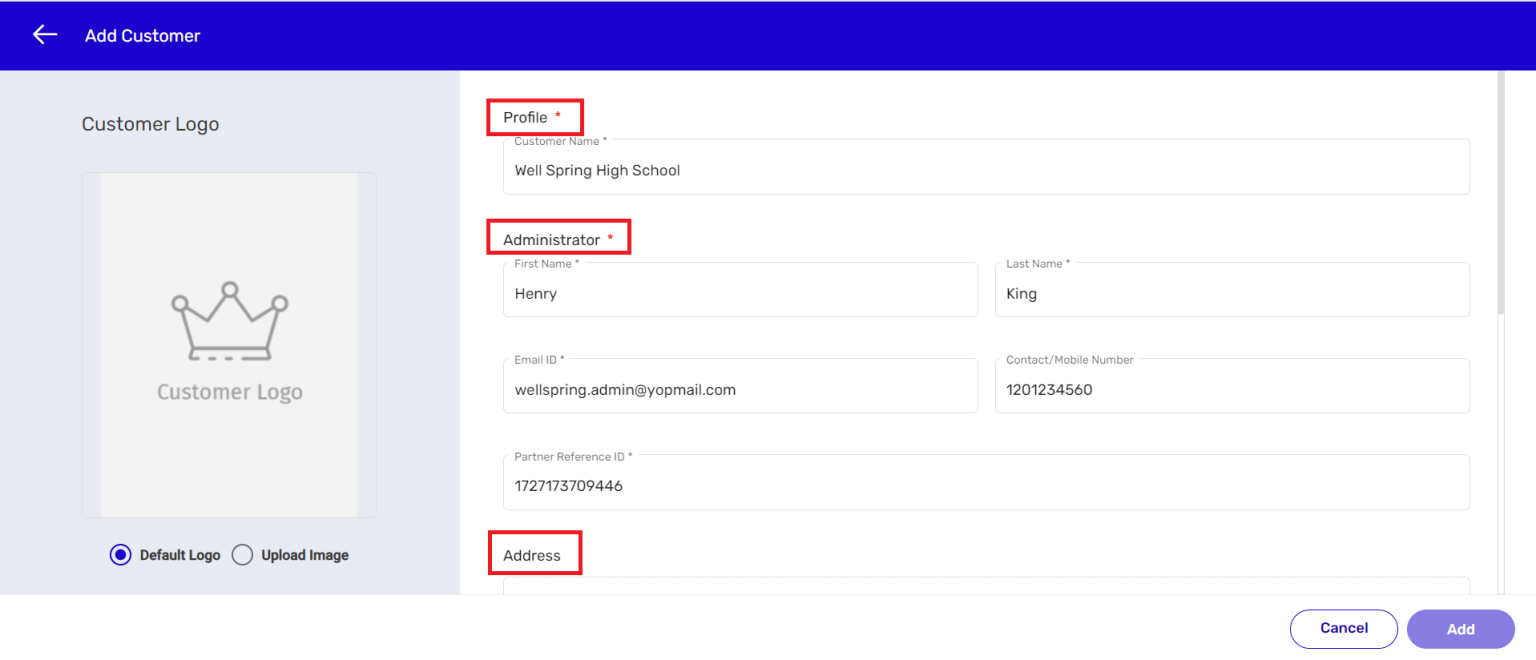
4. If you select OneRoster as the Rostering type, new fields like Sync Type, Match with, Sync Frequency, Suffix, Authorization, Client Partner ID, Consumer Key, Secret Key, and URL will appear.
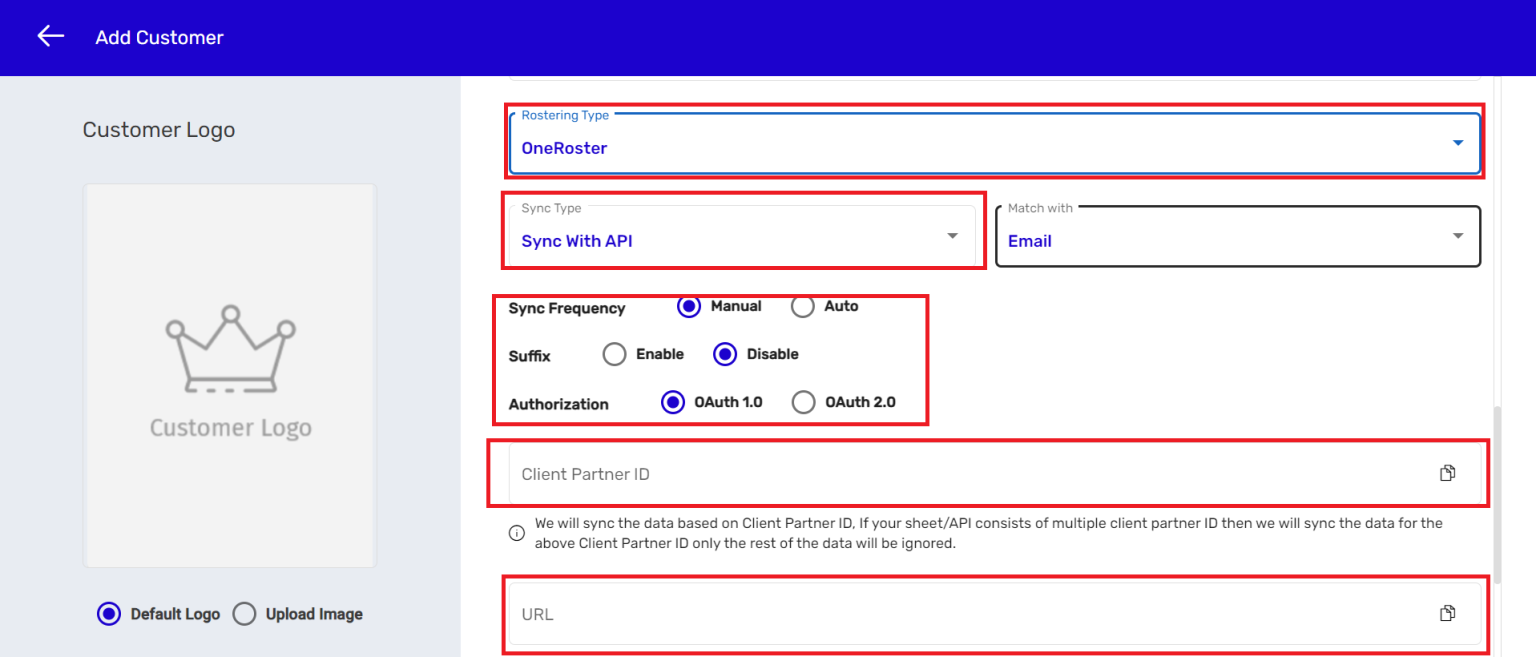
5. The Sync Type menu has three options– Sync With API, SFTP, and ZIP Upload.
You need to select one of them.
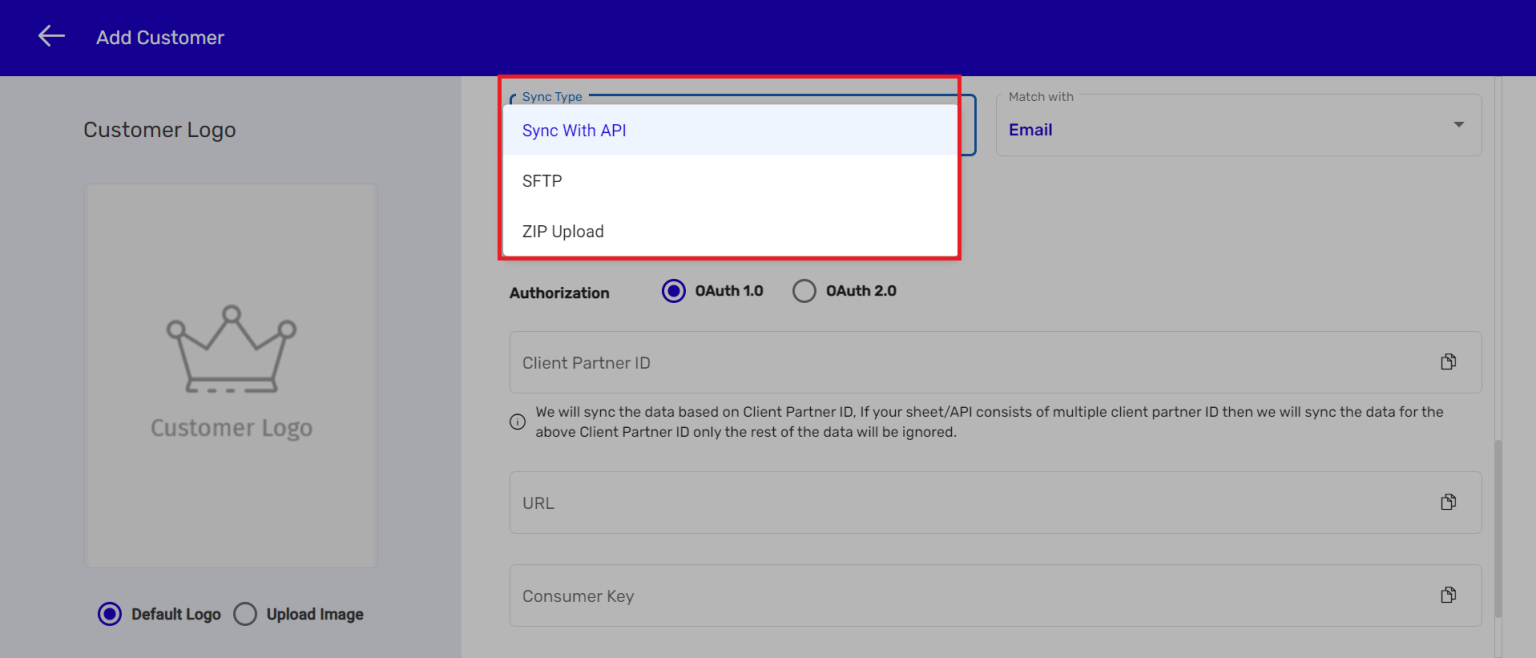
6. There are four options on the Match with menu. You need to select one of them.
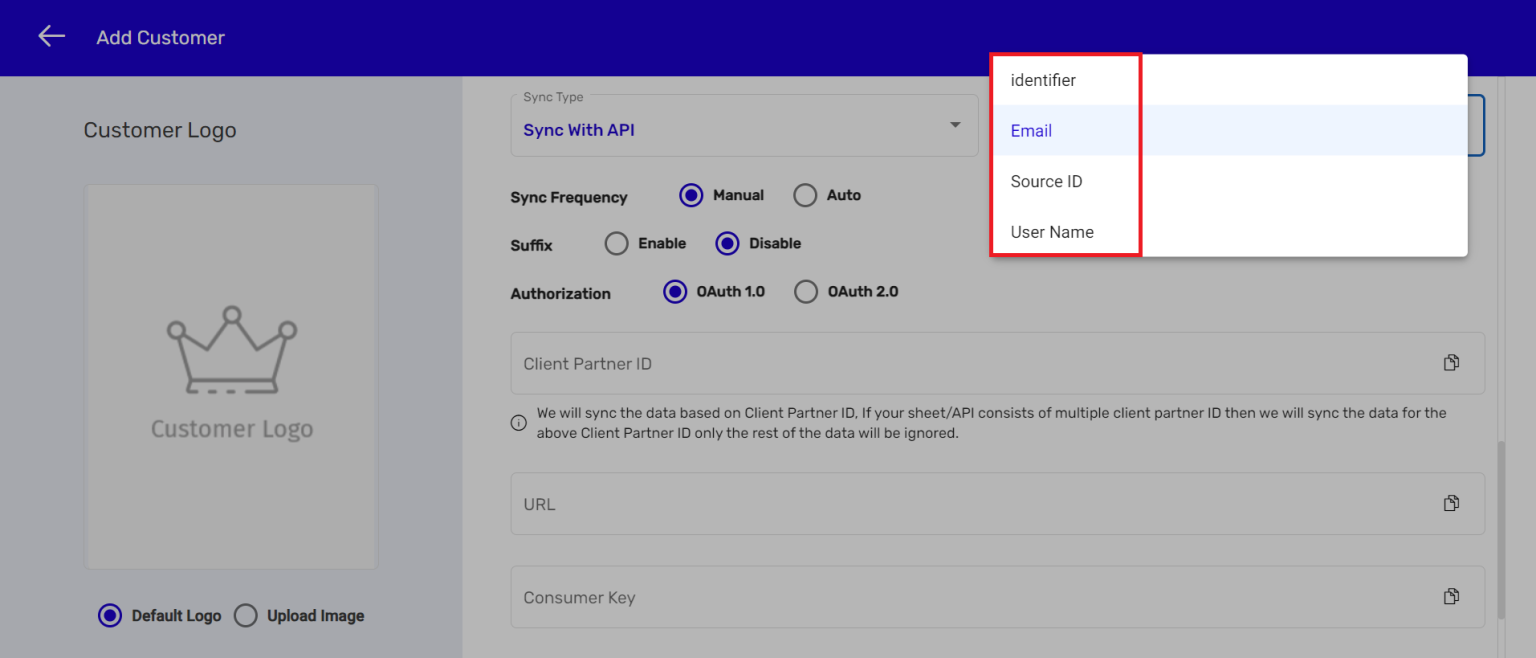
7. Enter the other details in the respective fields. We have selected SFTP as the Sync type and Identifier as the Match with option in this example.
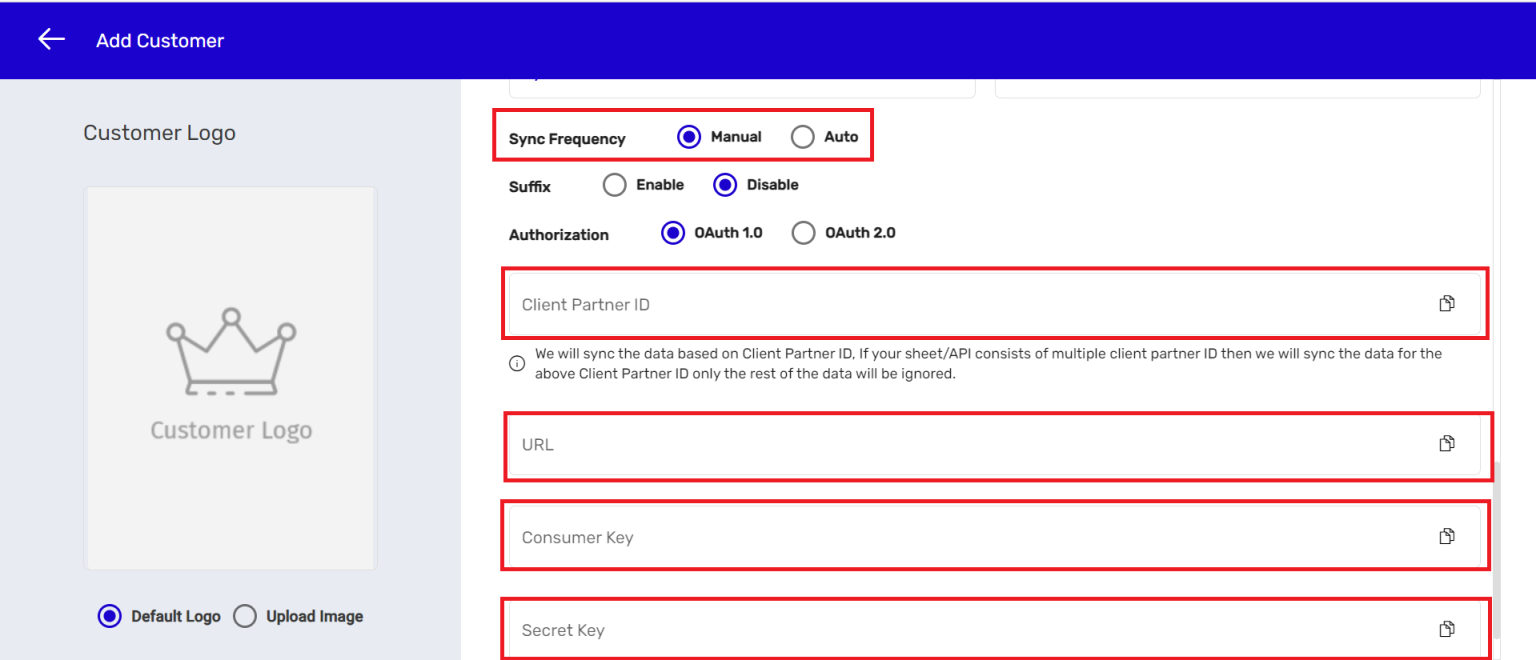
8. If you select the ZIP Upload option for Sync type, the Auto Sync Frequency
button will disappear. This is because the only option to sync the data in this
case is to do it manually. You also need to provide the Client Partner ID.
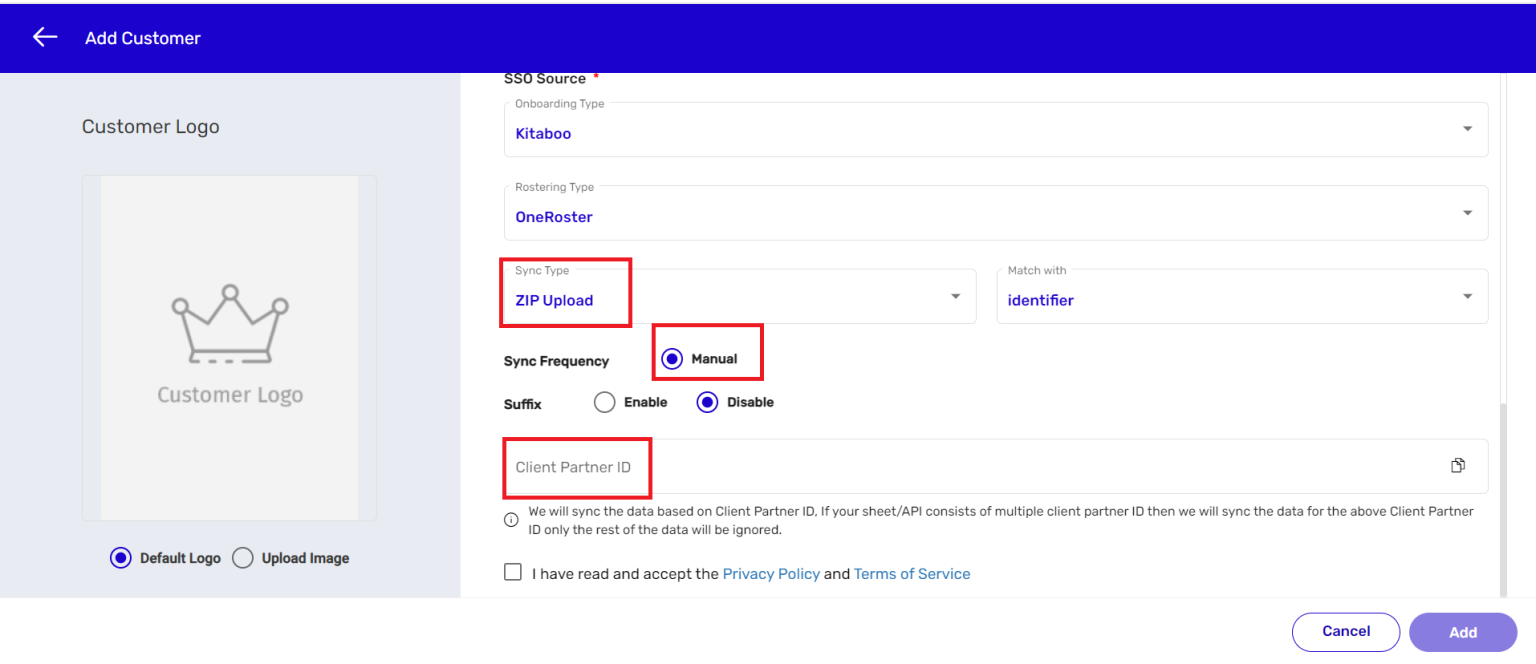
9. Let’s consider SFTP as the Sync Type and Auto as the Sync Frequency option.
When you select the Auto button, a new field by the name Period will appear. The Period field specifies how frequently you want the system to automatically sync the data. Currently there are six options available on the Period menu.
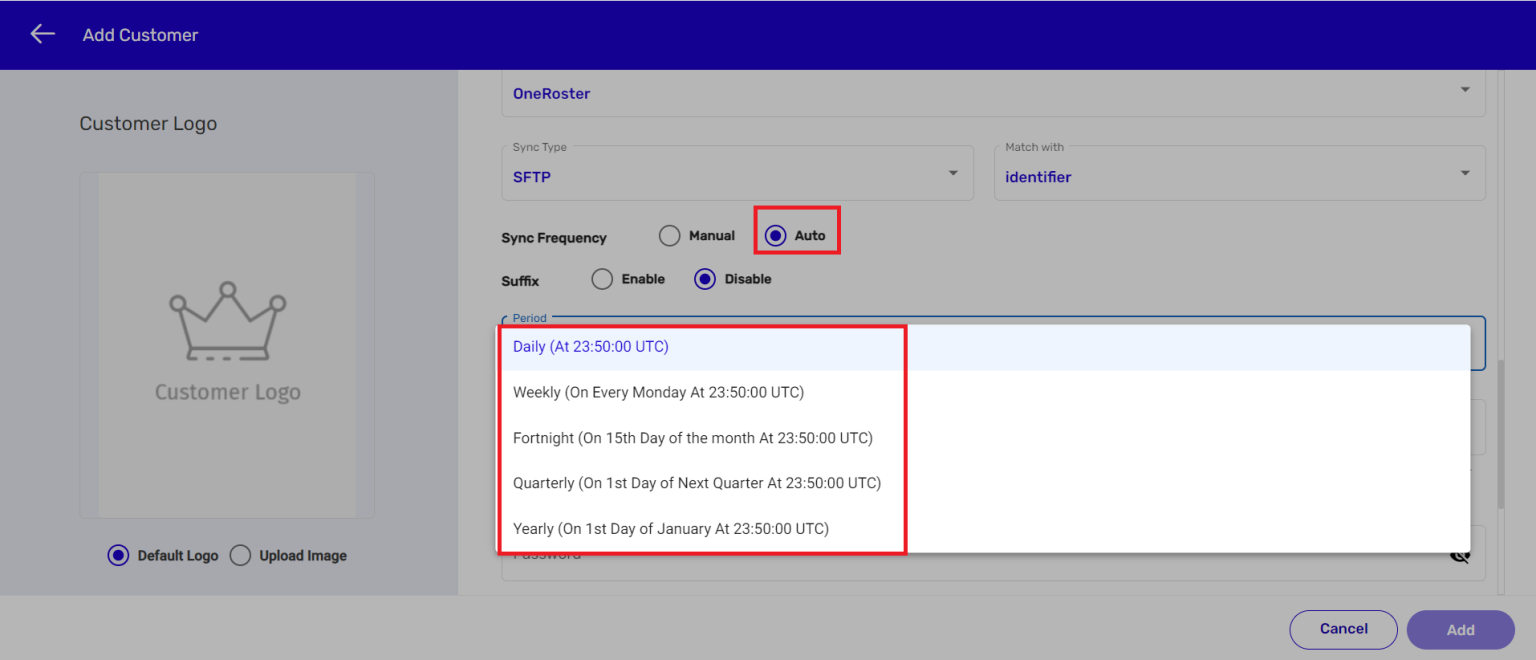
10. You also need to enter details in the Client Partner ID, Host Name, and Username fields.
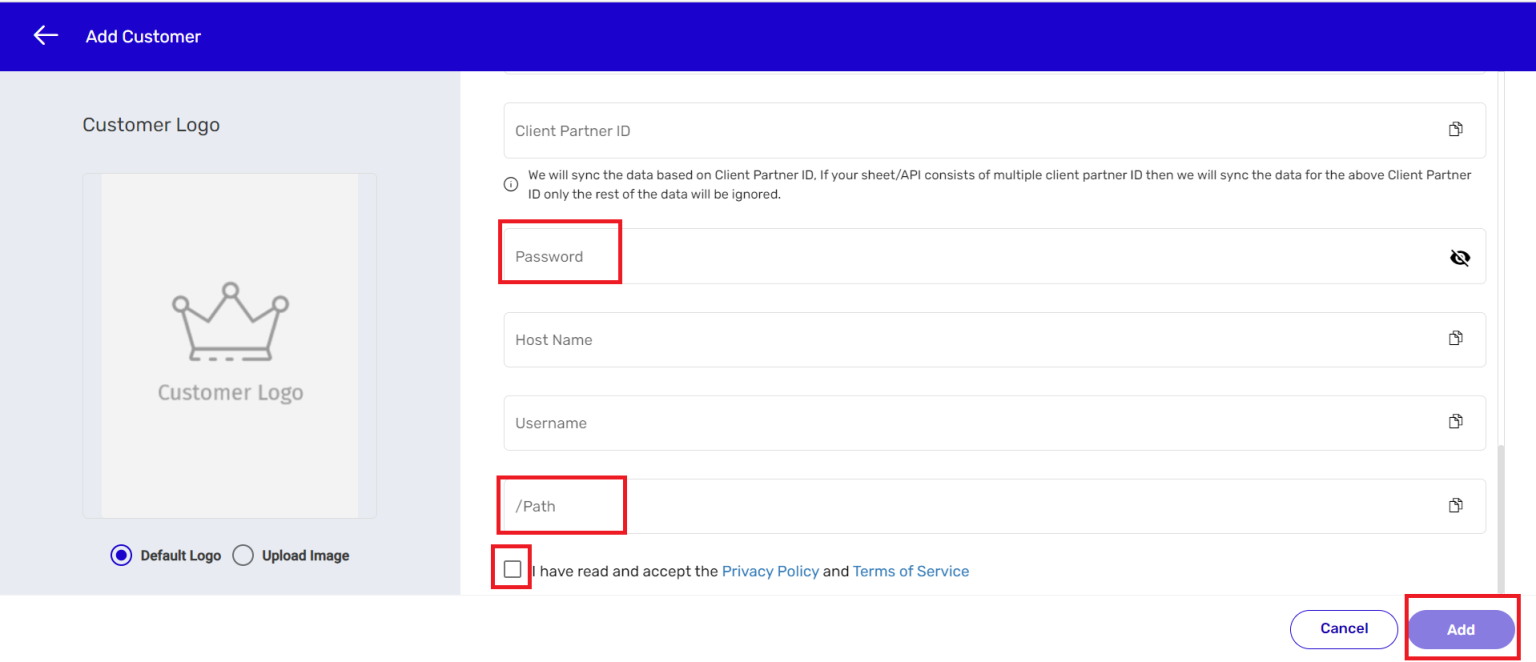
11. Next, enter details in the Password and Path fields. > Check the Privacy Policy and Terms of Service box. > Click on Add.
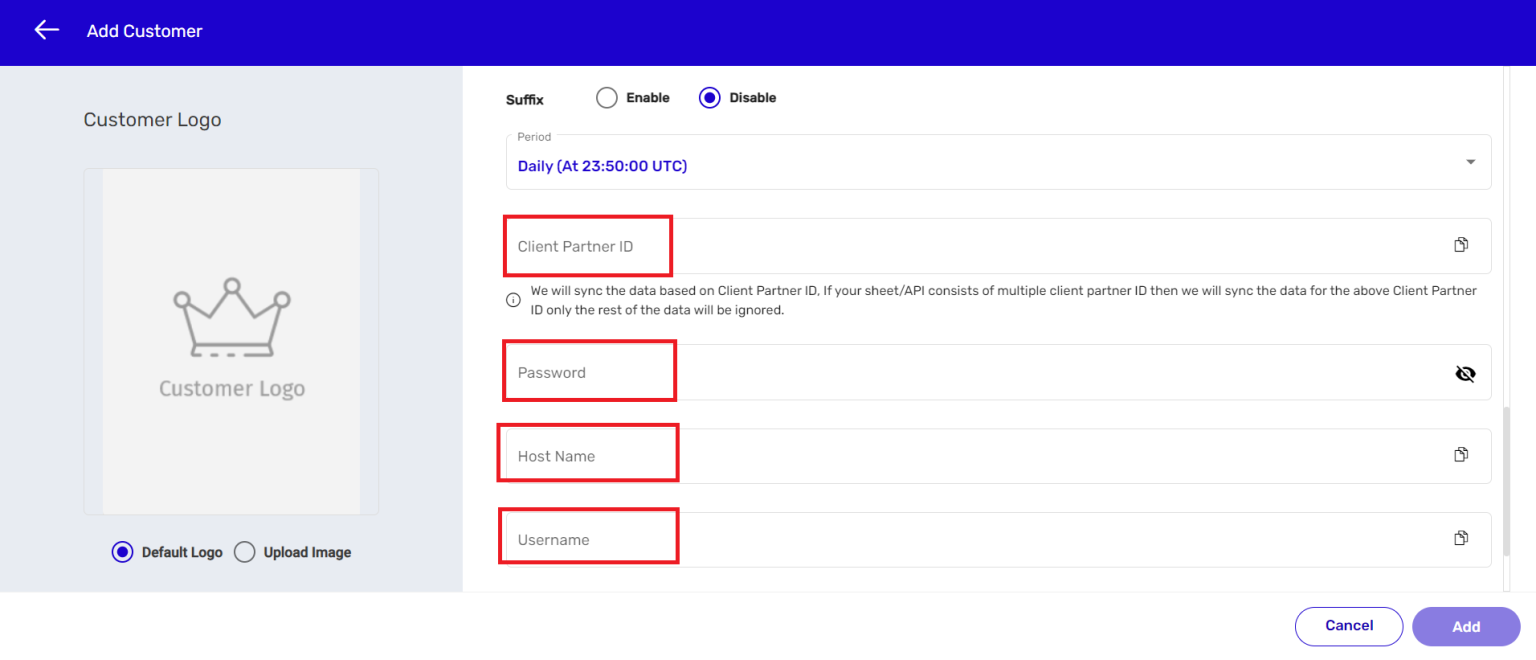
12. Once you have completed the LTI 1.1 customer addition process, you need to login with the partner’s credentials you have just created and initiate the process for syncing with OneRoster. Switch to the Users tab. > Click on Class.Click on the Sync with OneRoster – API button on the Class tab to initiate the data syncing process
How it Works
1. A user has to upload users.csv, orgs.csv, classes.csv, and enrollments.csv files in a bundle, i.e. the user has to make a zip of all the files.
2. Once the .zip file is ready, login with the institute admin credentials, navigate to the Users menu, click on Upload Roaster File, and upload the .zip file.
3. After successfully uploading the .zip file and process completion, The user should be able to see the newly added users and classes under the Users and Class sections respectively.
4. Once a user and class is created through OneRoster, a partner can add and assign content to the user/class.
5. The newly created user should now be able to login to the reader.
6. If you sync the data again, without the old user entries, the Kitaboo system will delete the old user who is missing in the new zip file. Hence, please make sure that you are updating the last uploaded sheet at a regular interval to avoid the risk of deletion.
7. Please make sure you uploaded the zip file to the correct location of SFTP and the file name should be the same which you defined during the account creation process.
For more information, please refer to:
https://www.imsglobal.org/lis/imsOneRosterv1p0/imsOneRosterCSV-v1p0.html#_Toc421598314
The Kitaboo Studio system enables you to add LTI 1.1 customers as well. Once you add an LTI 1.1 customer to the Kitaboo system, you also need to define the Rostering type for securely sharing class rosters and related data. You can either select Kitaboo or OneRoster from the Rostering type dropdown menu. Let’s see how to move forward with either of the two options.
Adding an LTI 1.1 Customer
You are all set to add an LTI 1.1 customer with Kitaboo as the Rostering type. However, it is crucial to be aware of certain dependencies at the outset before setting up for LTI 1.1 integration.
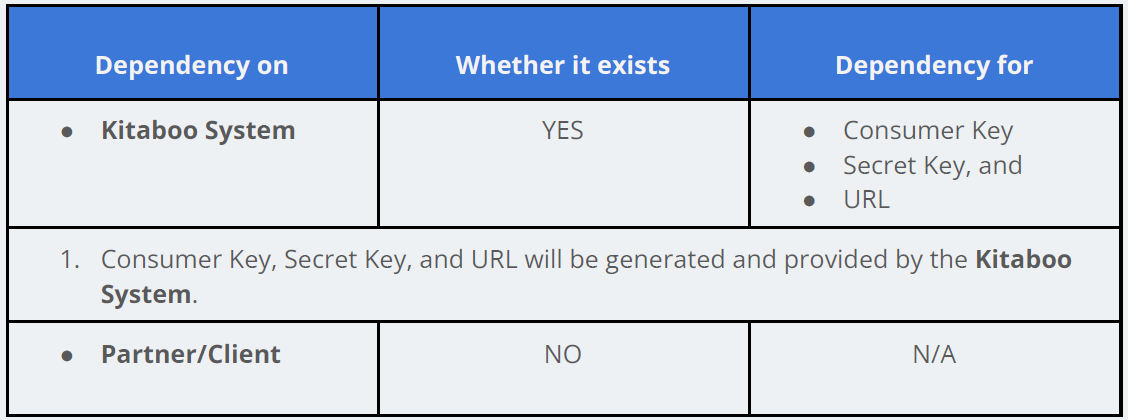
Let us now see how to add a customer to an LTI 1.1 class with Kitaboo as the Rostering type.
1. Sign in with your Enterprise Admin credentials.

2. On the Customers tab, click on +Add Customer.
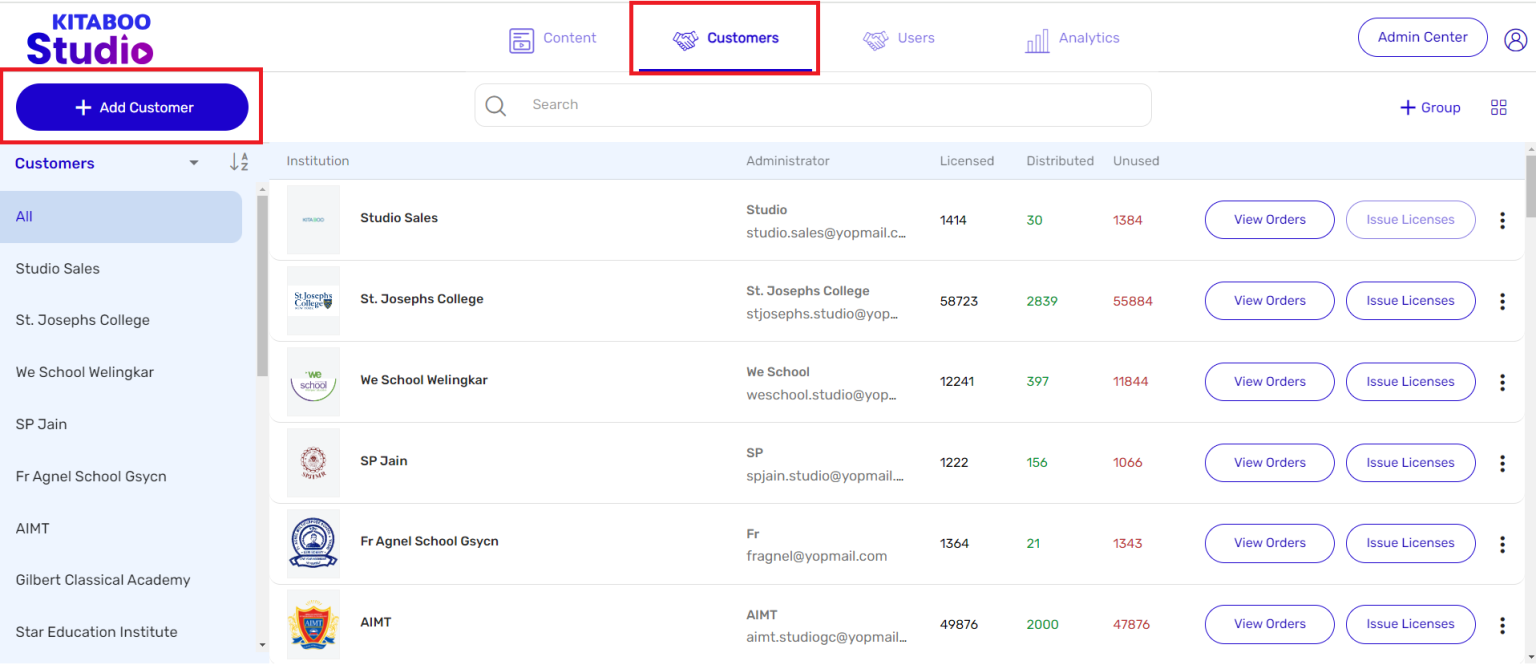
3. Enter the Profile, Administrator, and Address details of the customer you want to add.
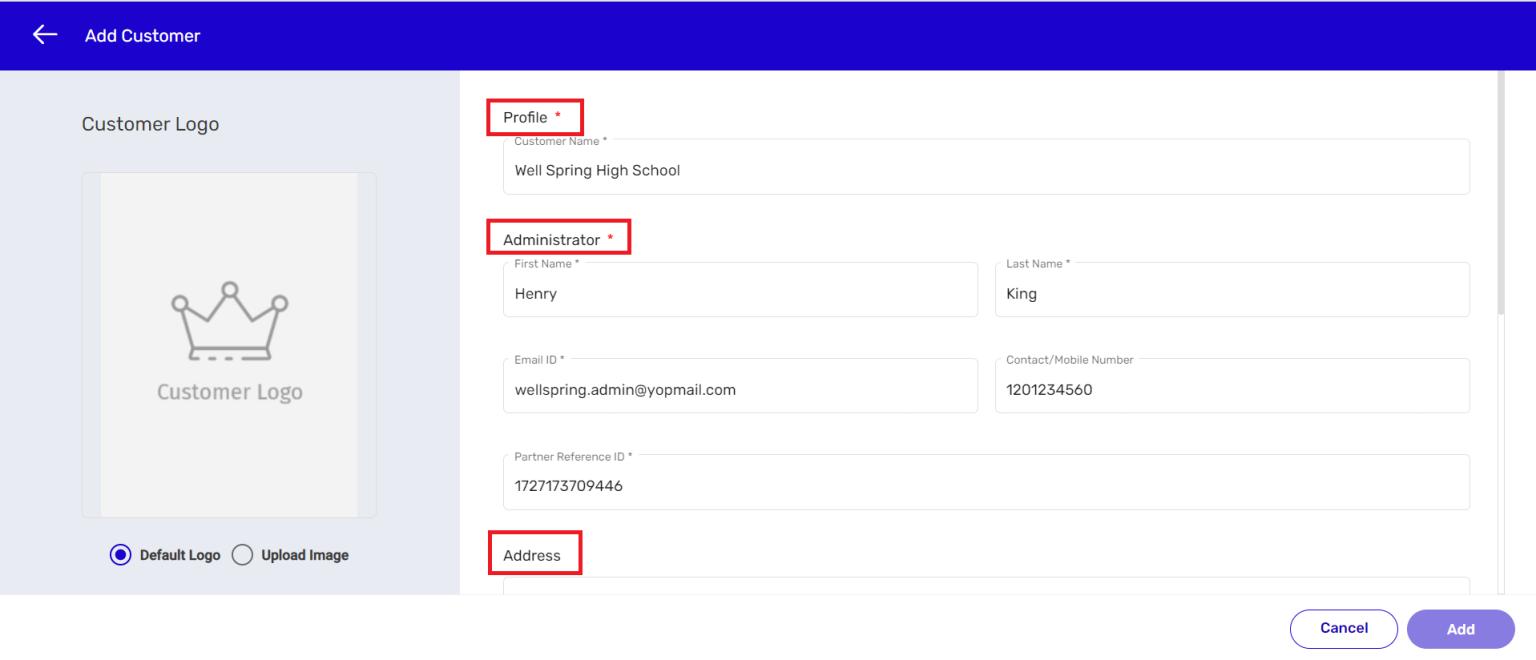
4. Select LTI 1.1 as the Onboarding type from the SSO Source dropdown menu. > Select the Rostering type. > Check the Privacy Policy and Terms of Service box. > Click on Add. We have selected the Kitaboo option from the Rostering type menu.
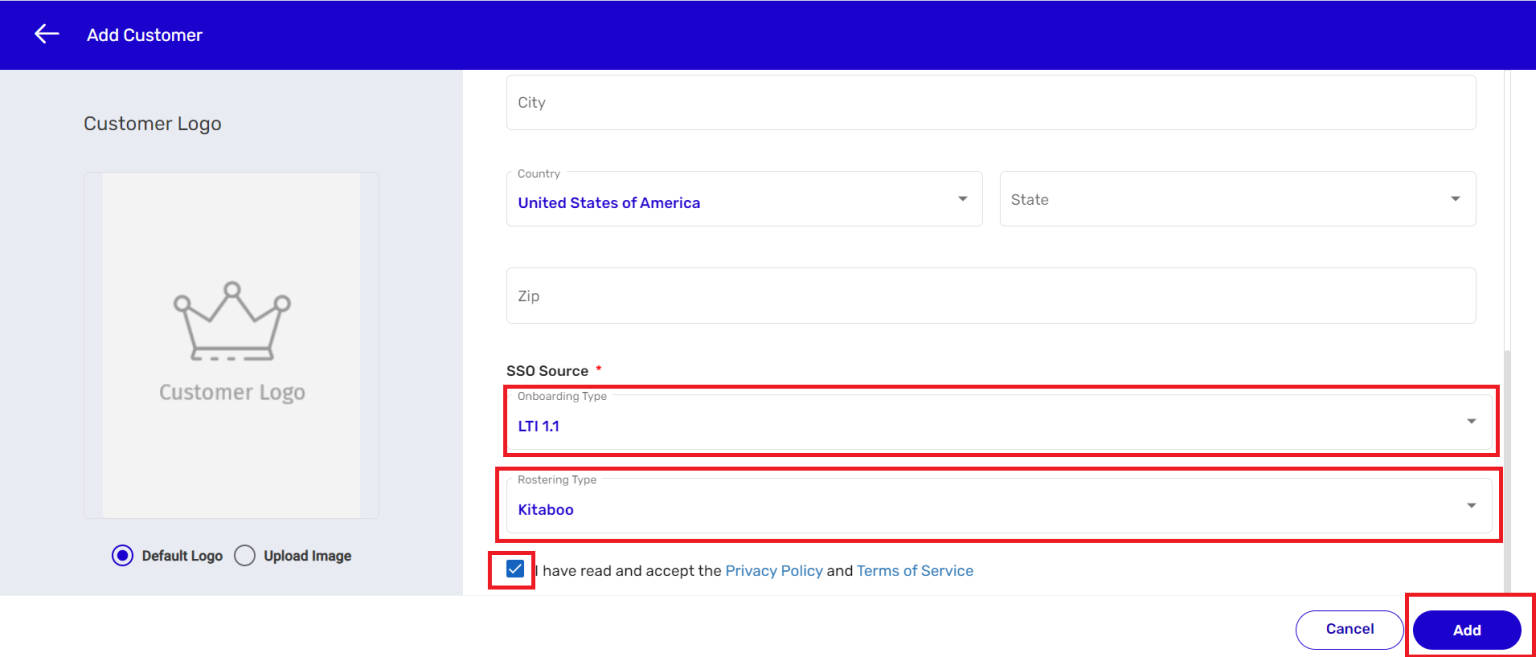
Once you’ve added an LTI 1.1 customer, the LTI needs to be integrated with the Kitaboo system. Let’s see how to do it.
5. Click on the Customers filter. > Select SSO Type from the list.
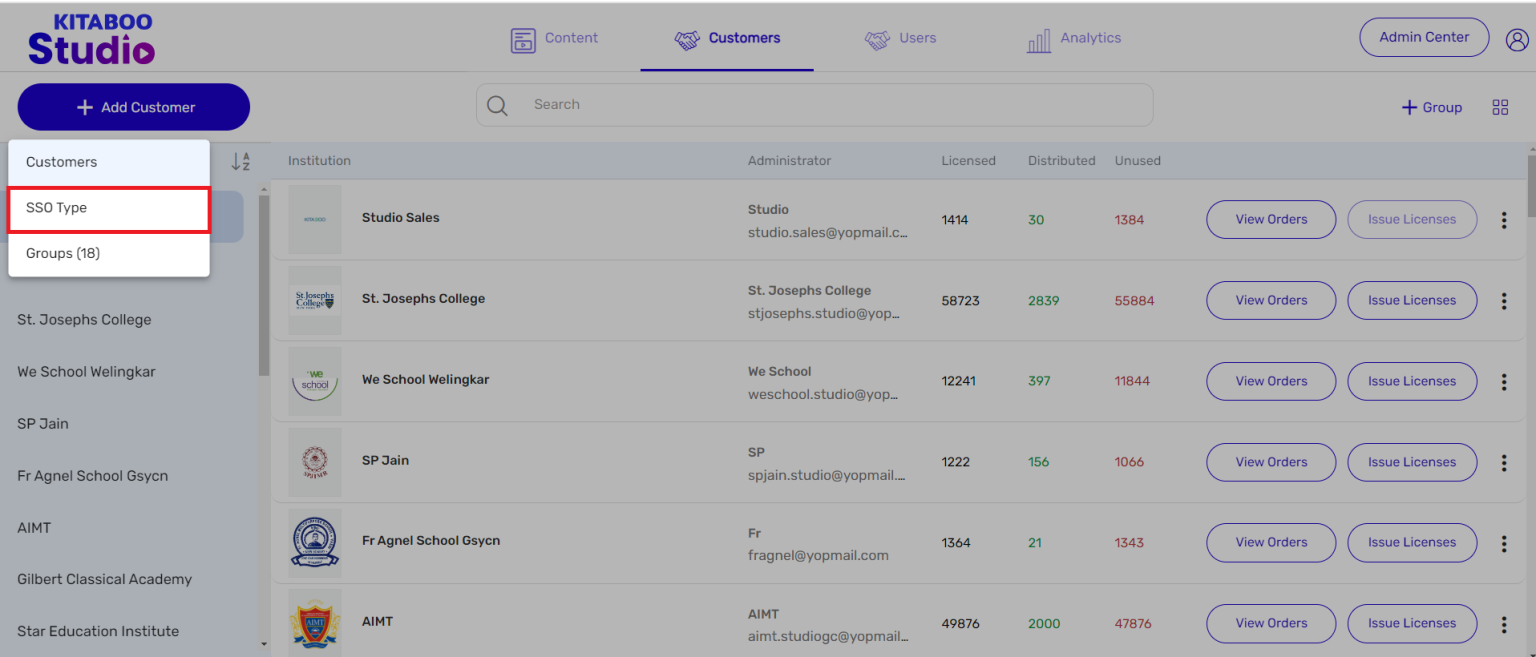
6. Click on the SSO Type filter. > Select LTI 1.1 from the list.
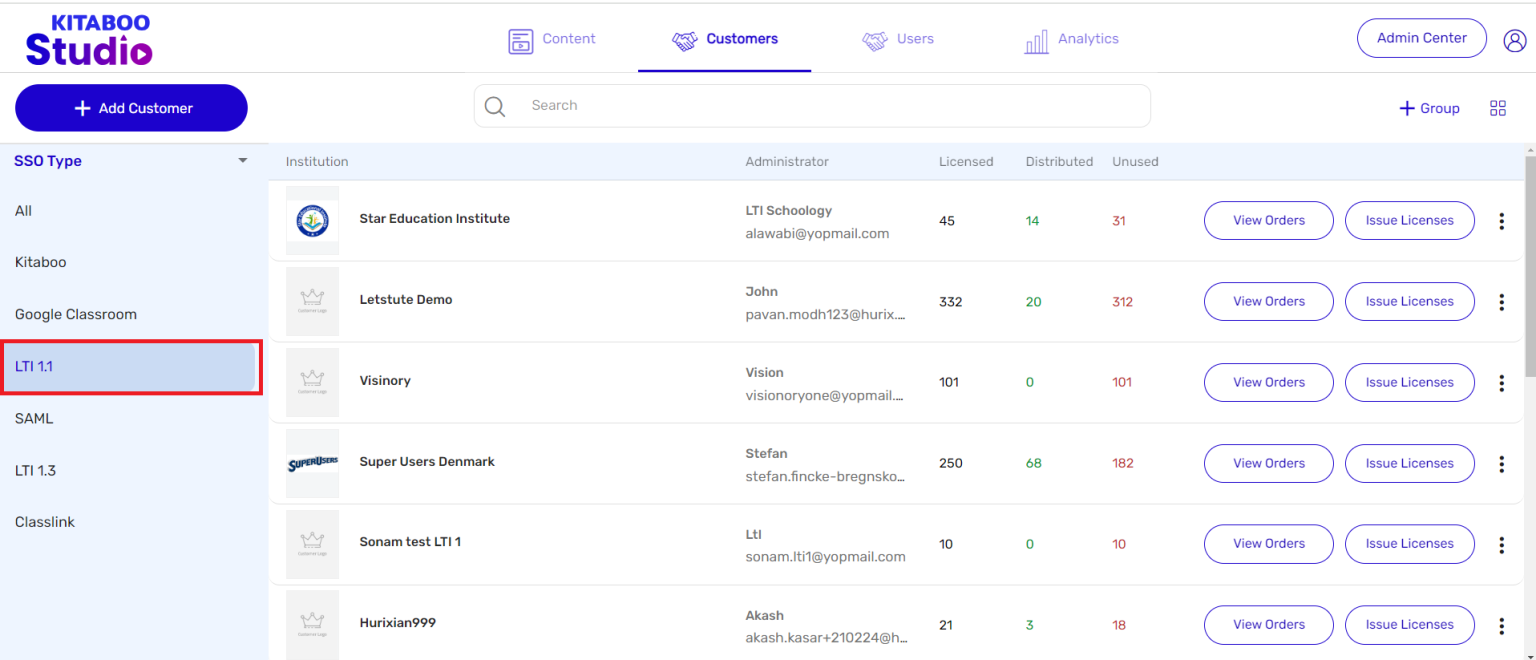
7. Click on the More options icon against the customer you’ve added. > Select the
Get LTI Key option.
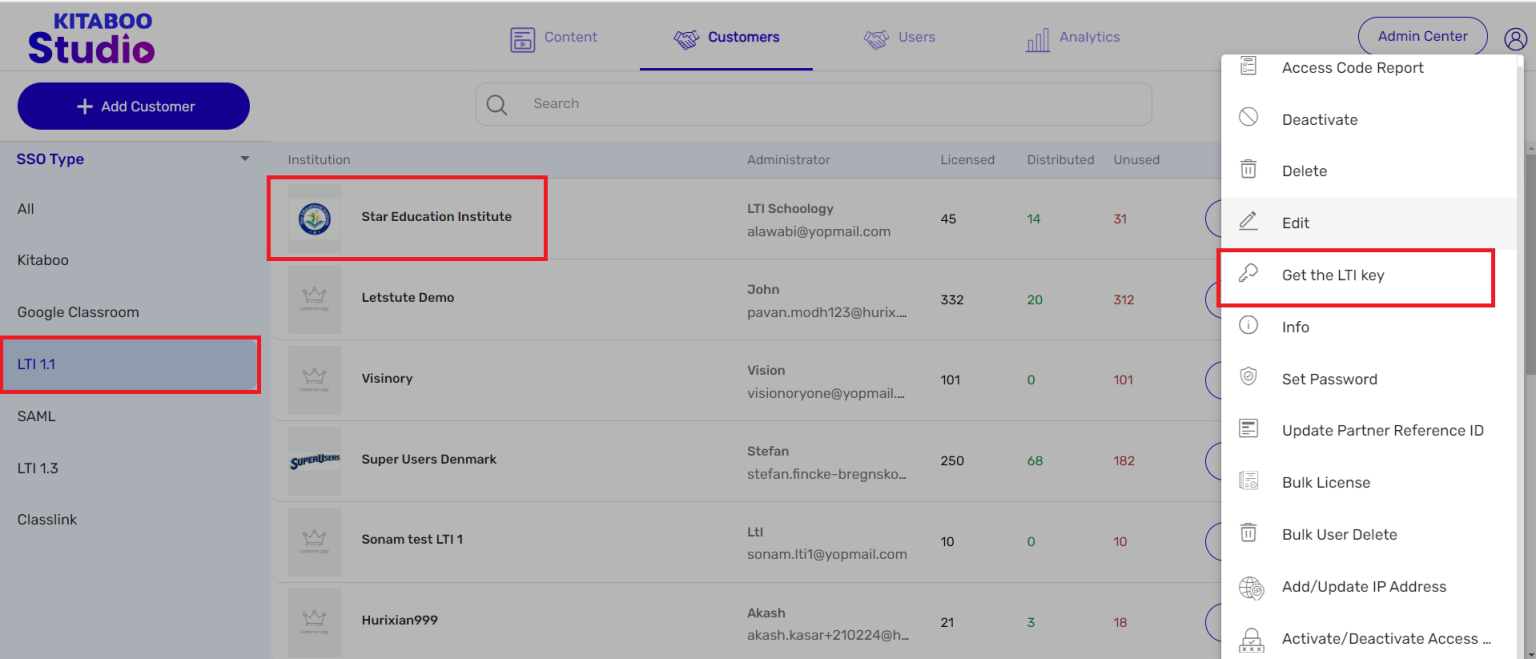
8. The information related to the highlighted fields, like Customer Key, Secret Key, URL will be generated by Kitaboo.
NOTE: Please click on the link below to know more about LTI integration.
Kitaboo_LTI_integrtion_2020
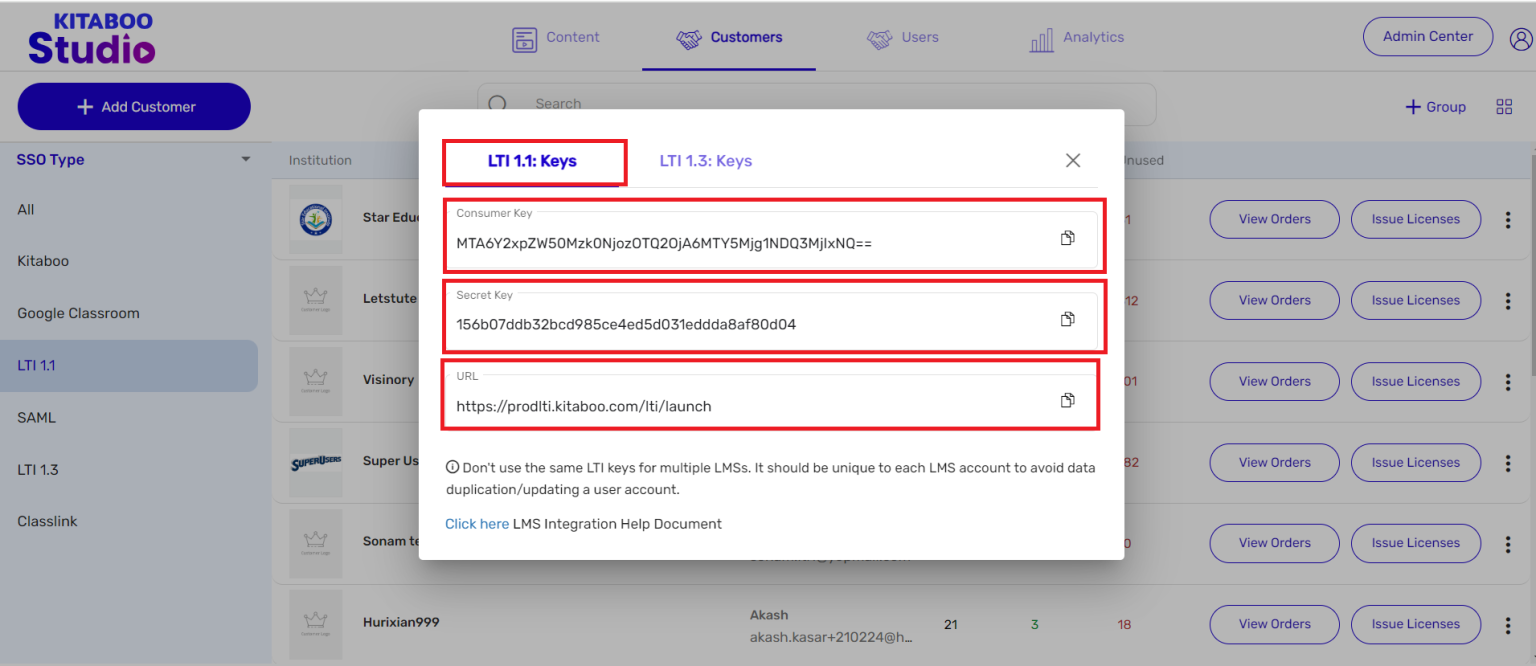
Important: You should not use the same LTI keys for multiple LMS. It should be unique to each LMS account to avoid data duplication or update for a user account.
Let’s now see how to integrate LTI 1.1 with Moodle.
9. Navigate to the LTI Moodle LMS and sign in with the admin credentials.
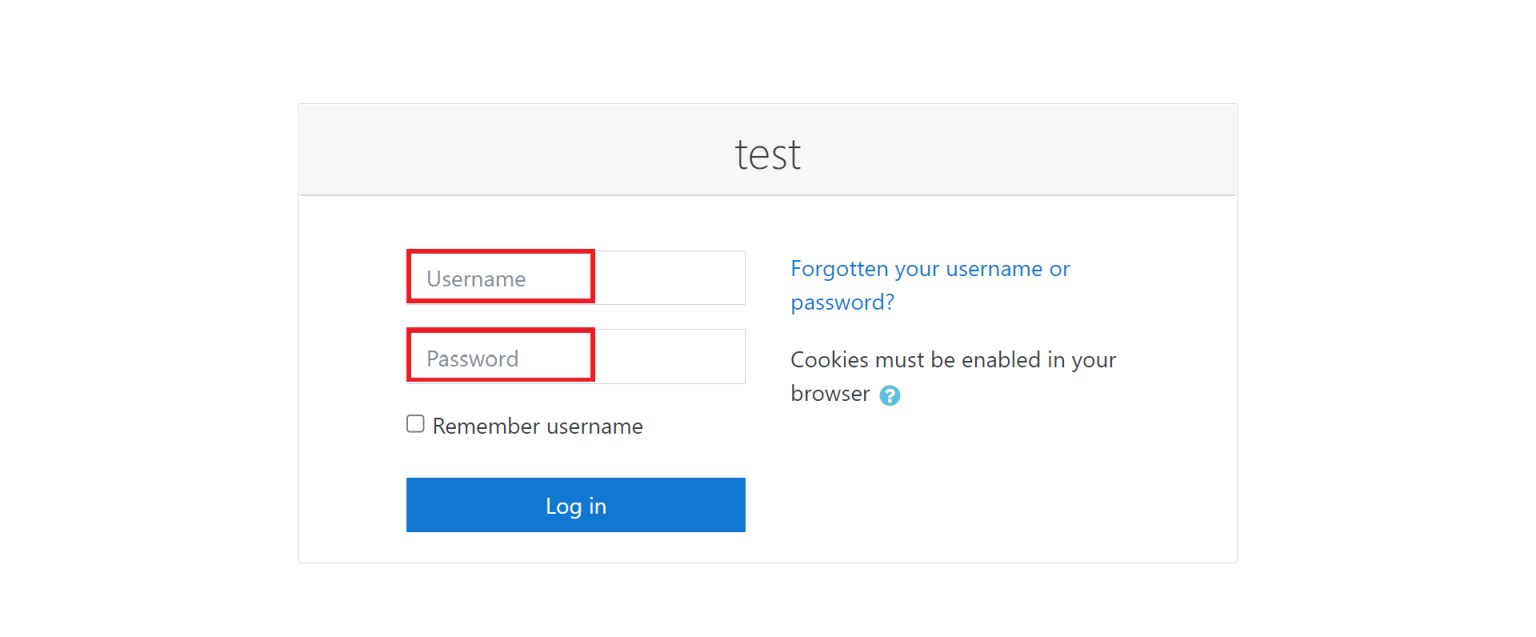
10. Click on Site administration on the left navigation pane.
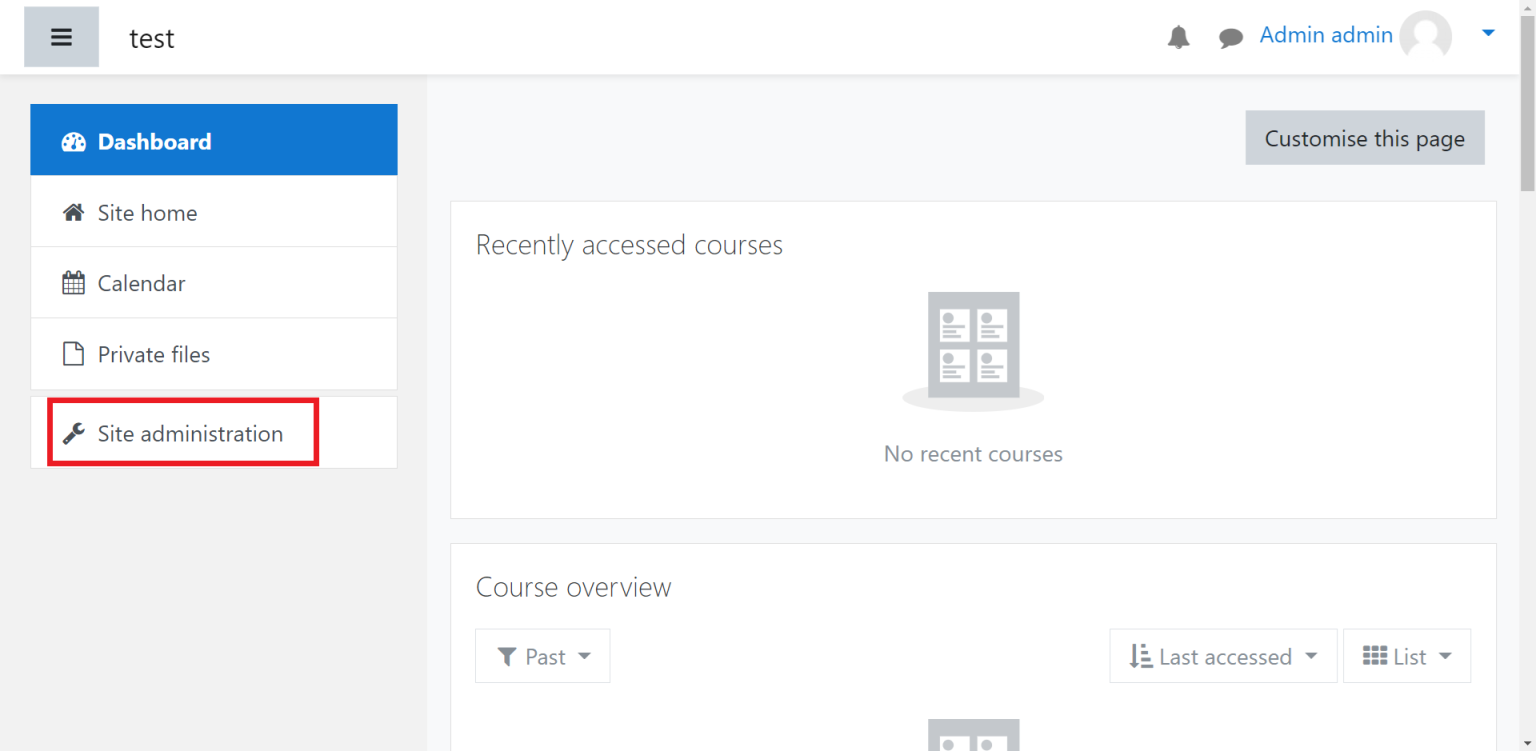
11. Select Plugins.
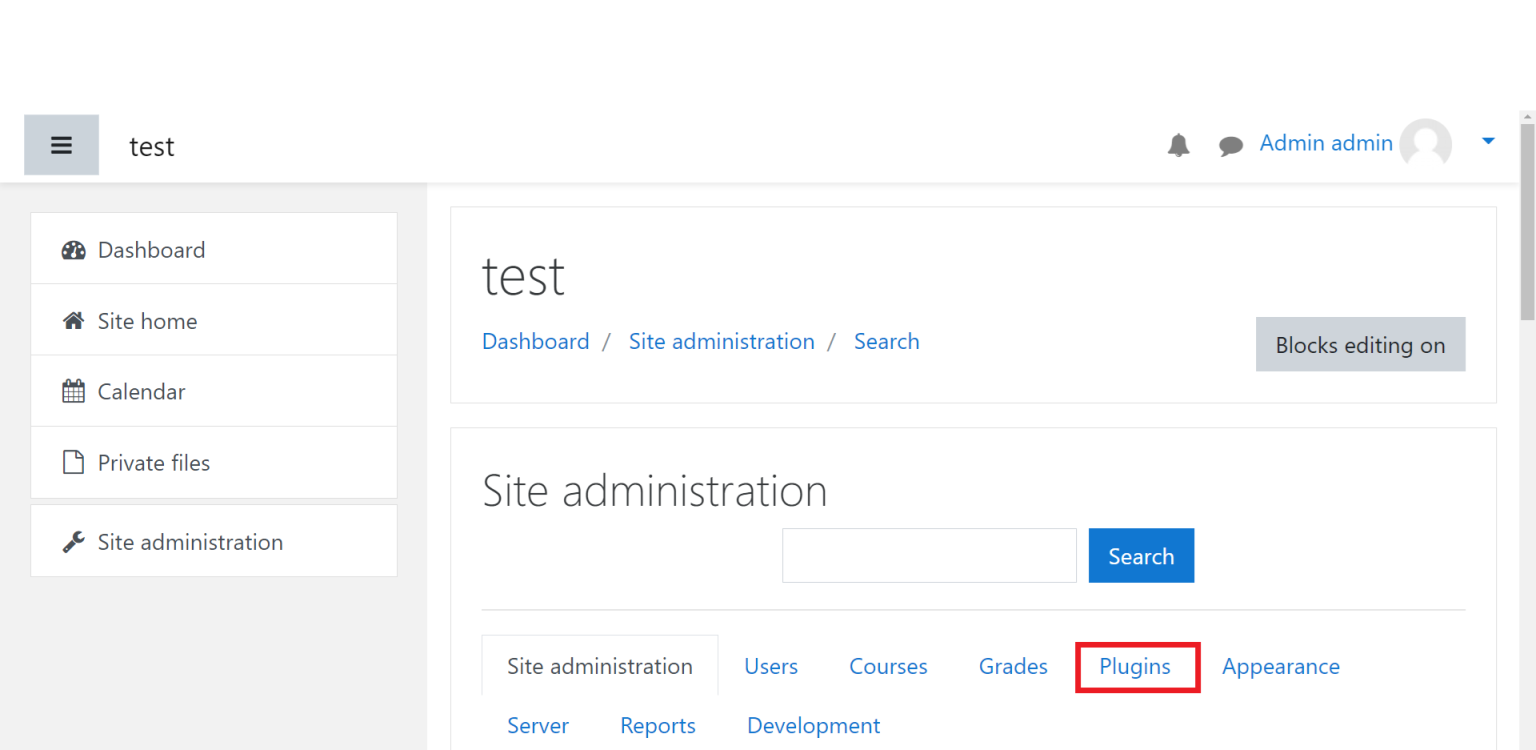
12. Under Activity modules, click on Manage tools.
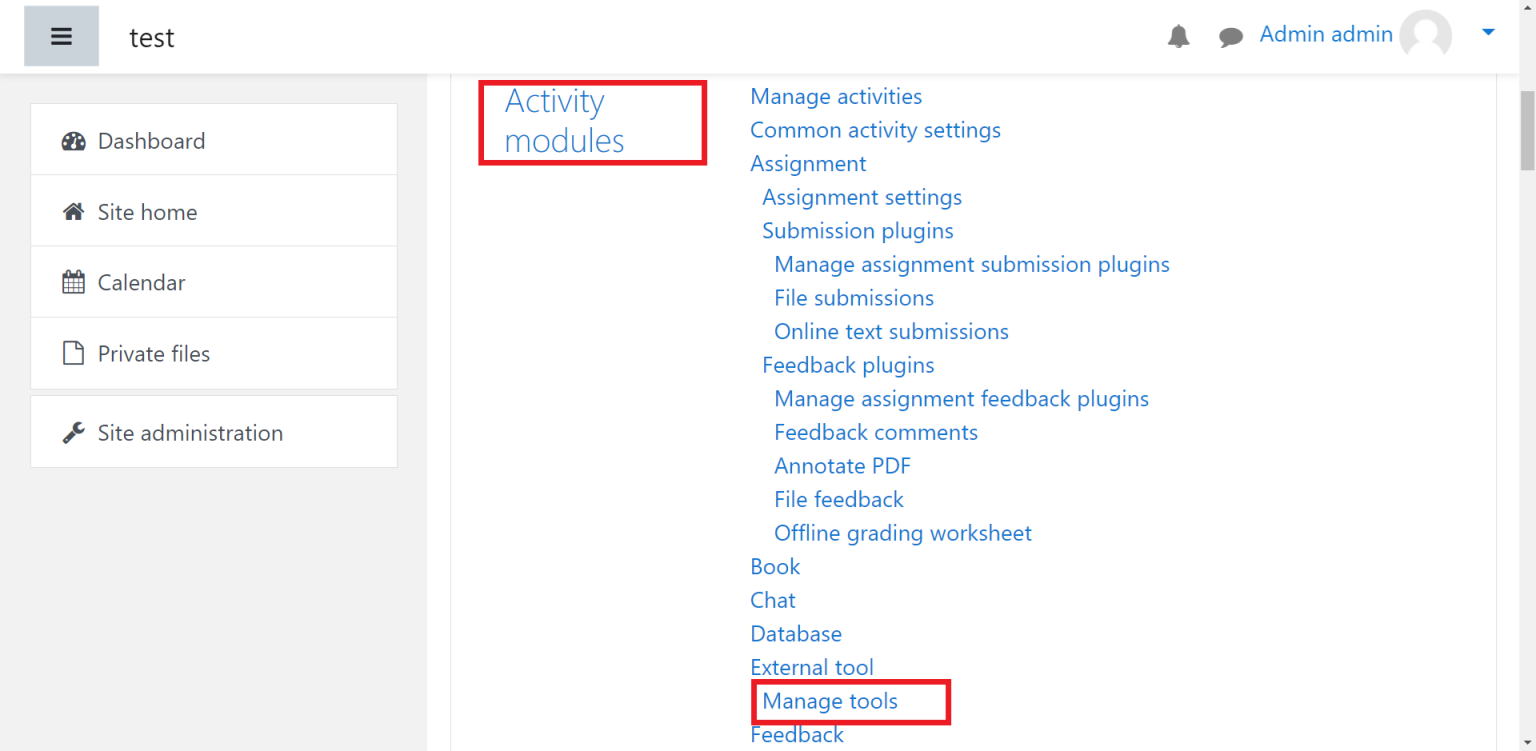
13. Click on Configure a tool manually.
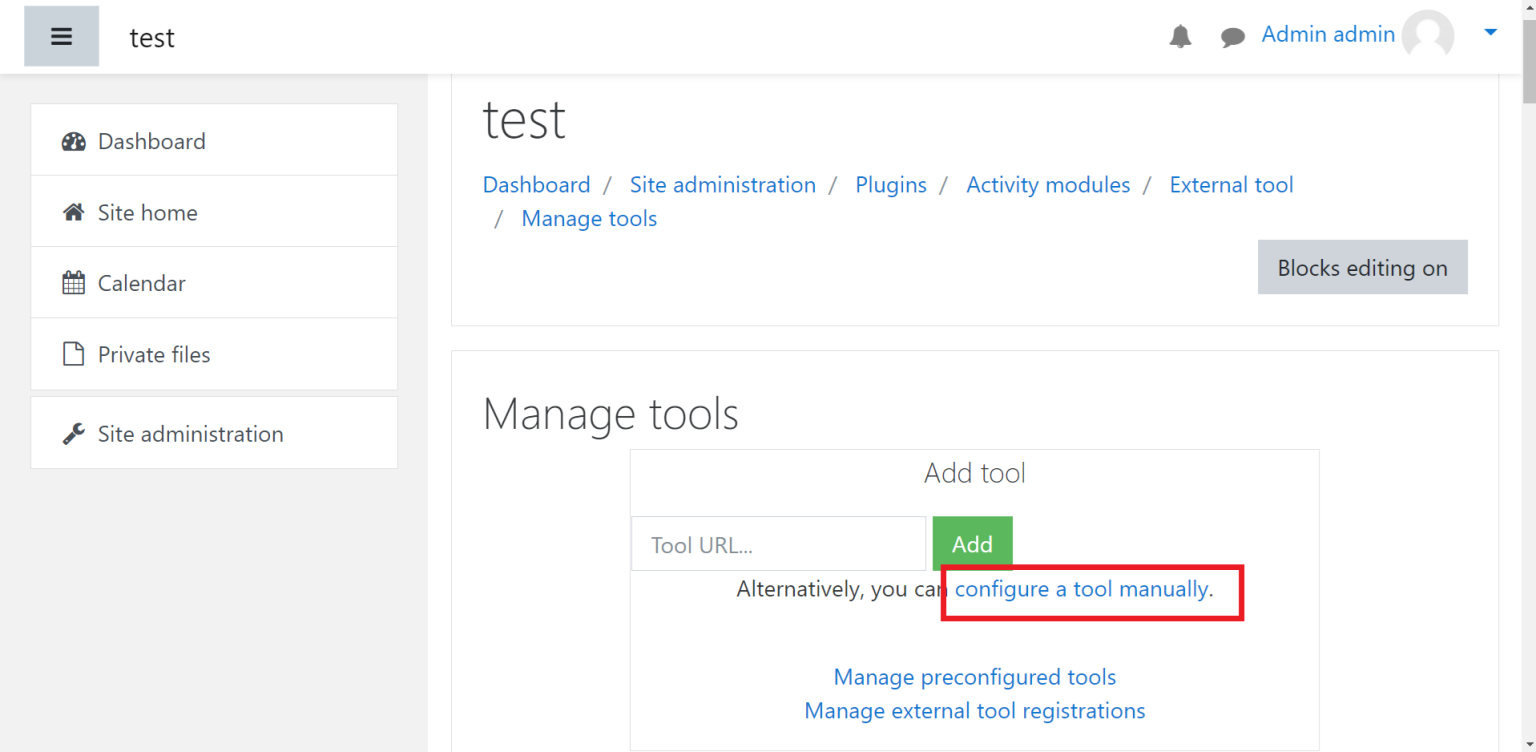
14. Under Tool settings, enter the following information.
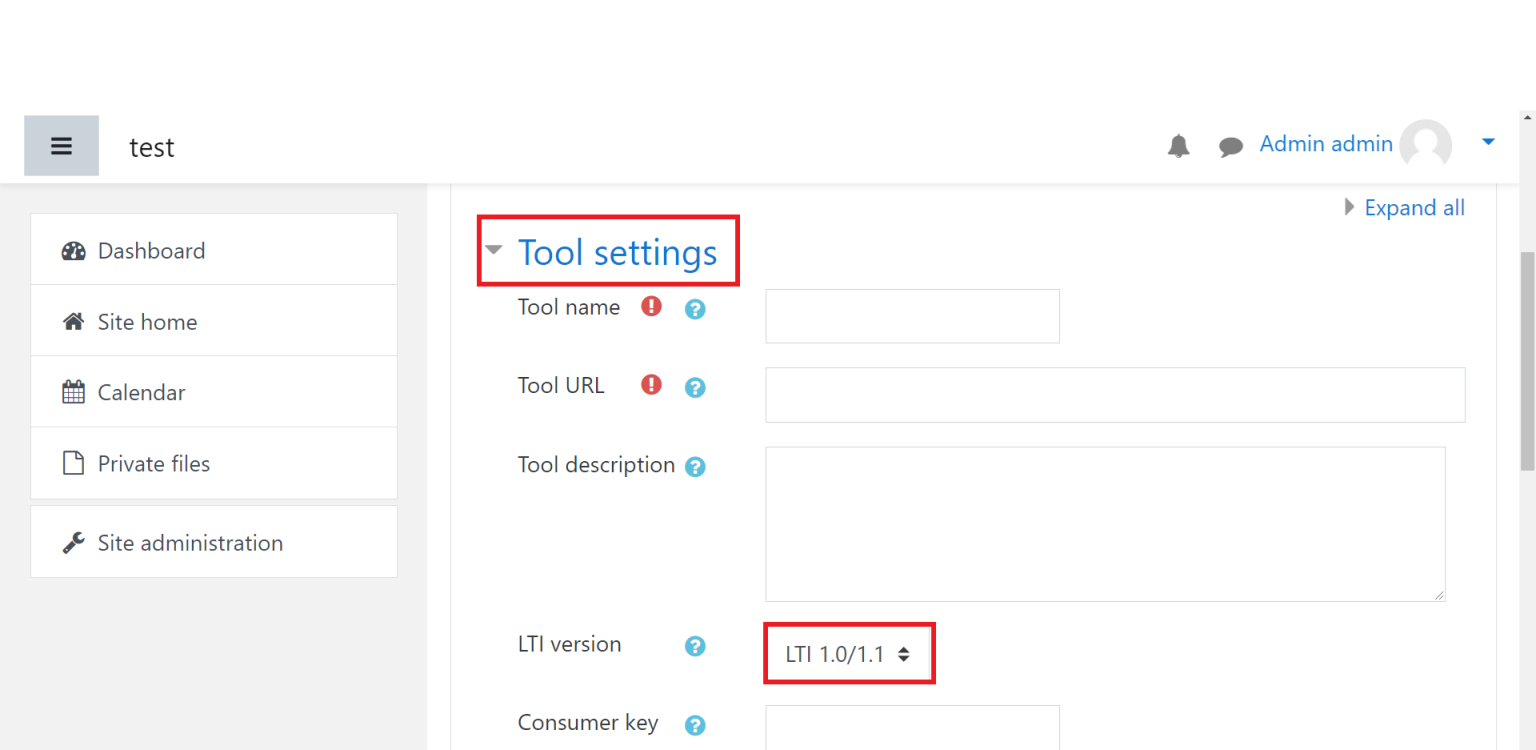
● Tool name: Give the tool a name of your choice. For example: “We Learn”.
● Tool URL: enter the “Launch URL” from the We Learn LTI application’s registration page.
● LTI version: LTI 1.1 [NOTE: LTI 1.0/1.1 will be the default selection.]
● Consumer Key, Secret Key, and URL will be generated and provided by the Kitaboo
system, kindly refer to point number 8.
15. Next, select Show as preconfigured tool when adding an … from the Tool
configuration usage dropdown. > Move to the Services section to complete the registration process.
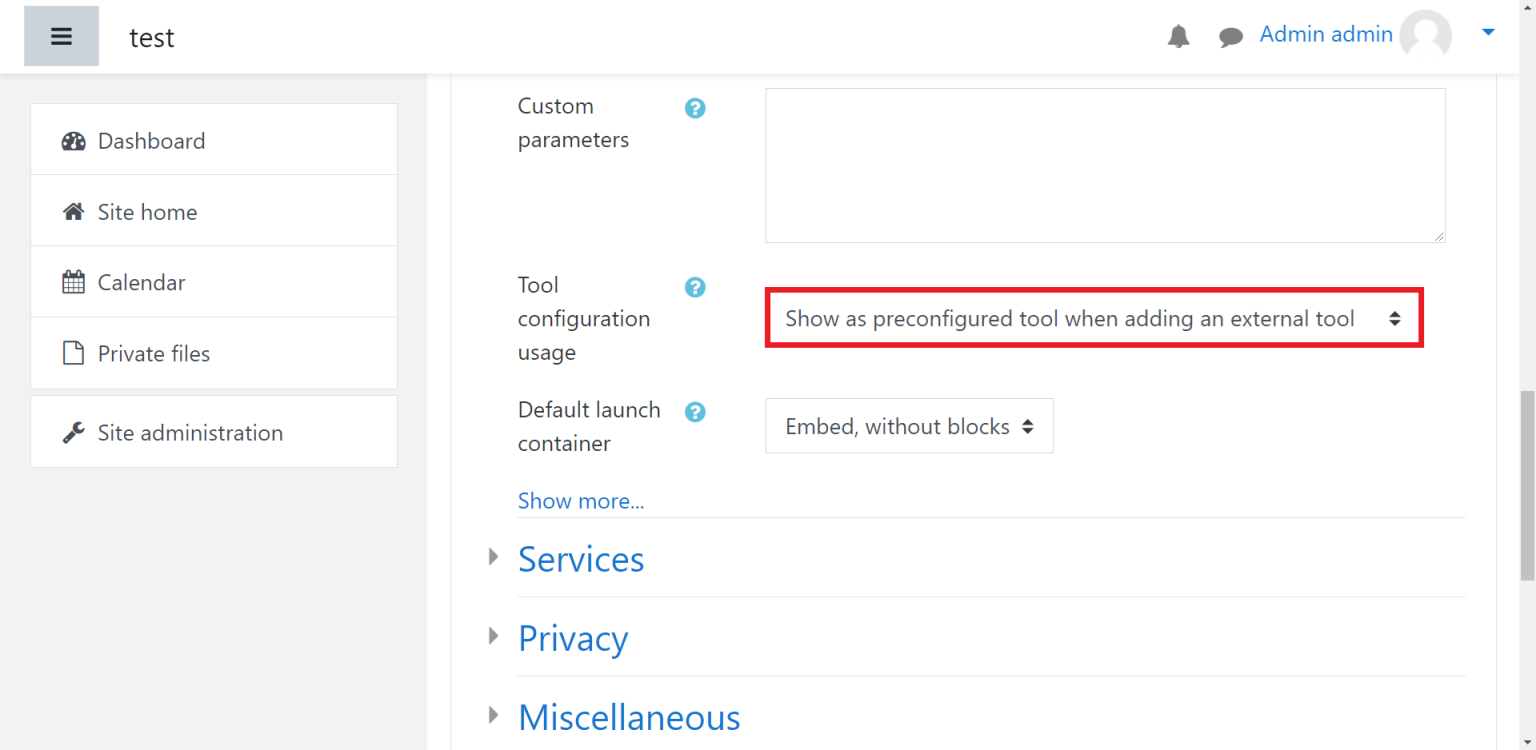
16. It is Important to note that Kitaboo supports the following Custom parameter options that you can use in the Custom parameters box:
● Leave the Custom parameter box blank – It will take a user (Teacher or Student) to the Kitaboo Studio library.
● bookid – It will directly open the specific book for the users.
● collectionid – It will directly open the specific collection for the users.
Important: Remember that the custom parameter options are case sensitive. Hence use them the way they have been shown in the list above.
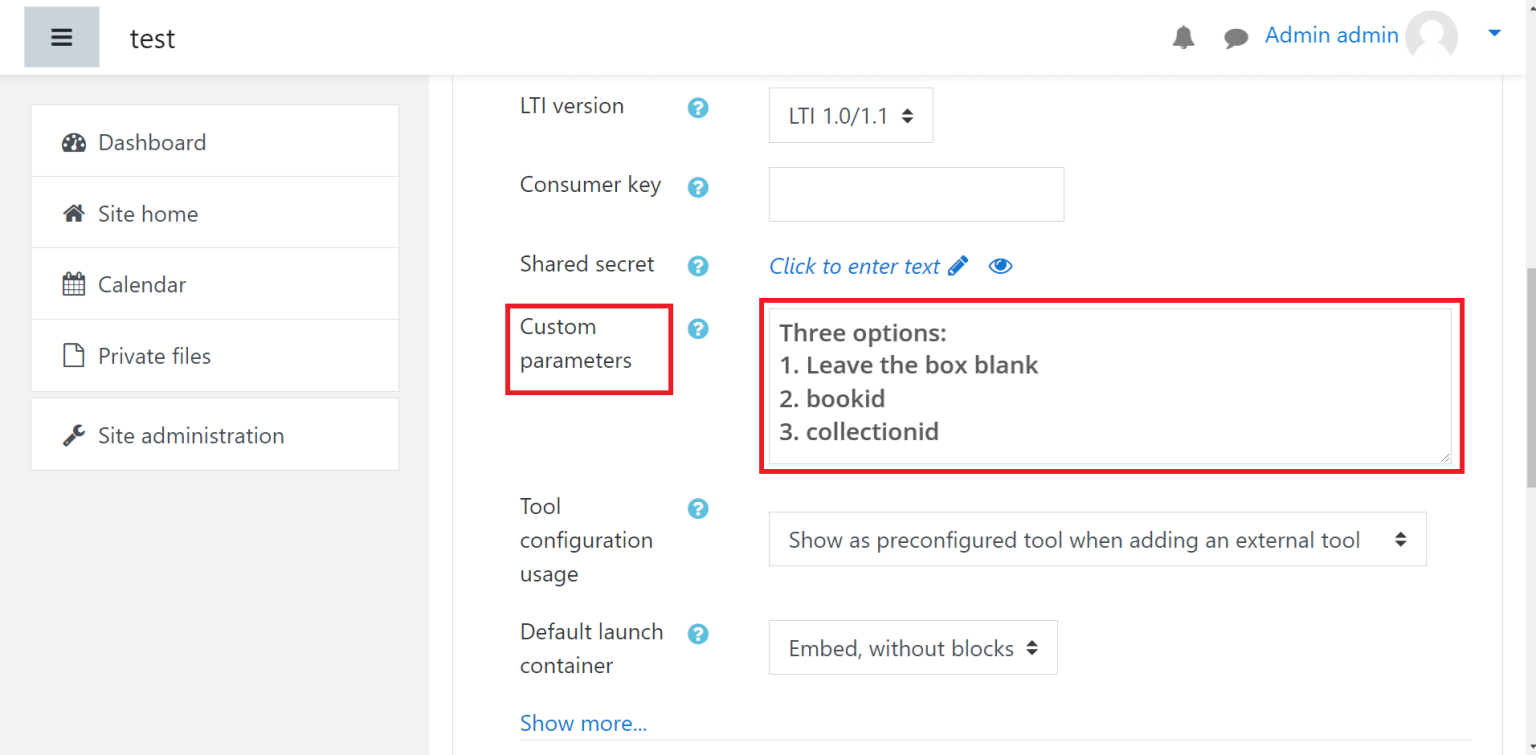
17. Click on Services. > Select Use this service to retrieve members’ information as per privacy settings from the IMS LTI Names and Role Provisioning dropdown.
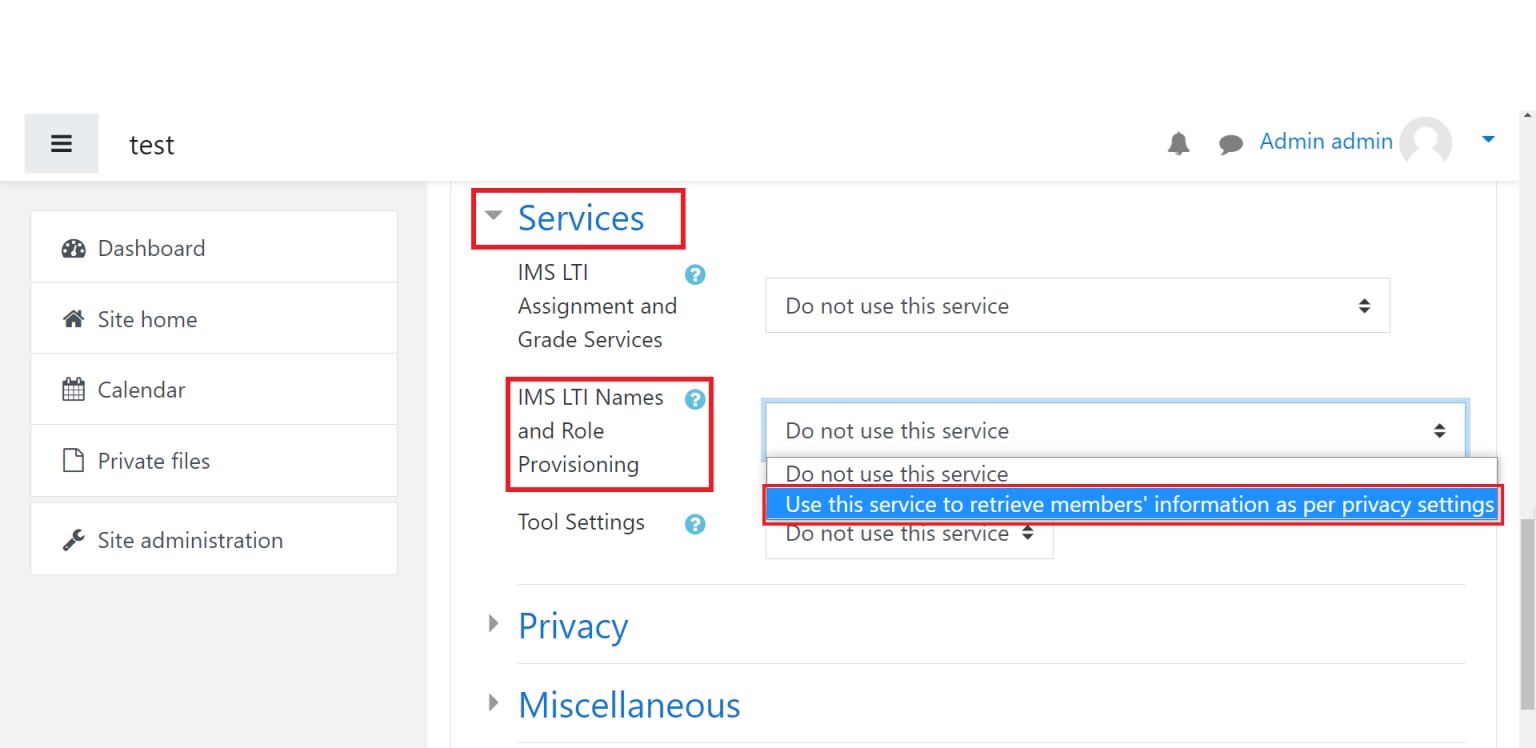
18. Click on Save changes. The tool will now appear listed with the name (We Learn) you provided.
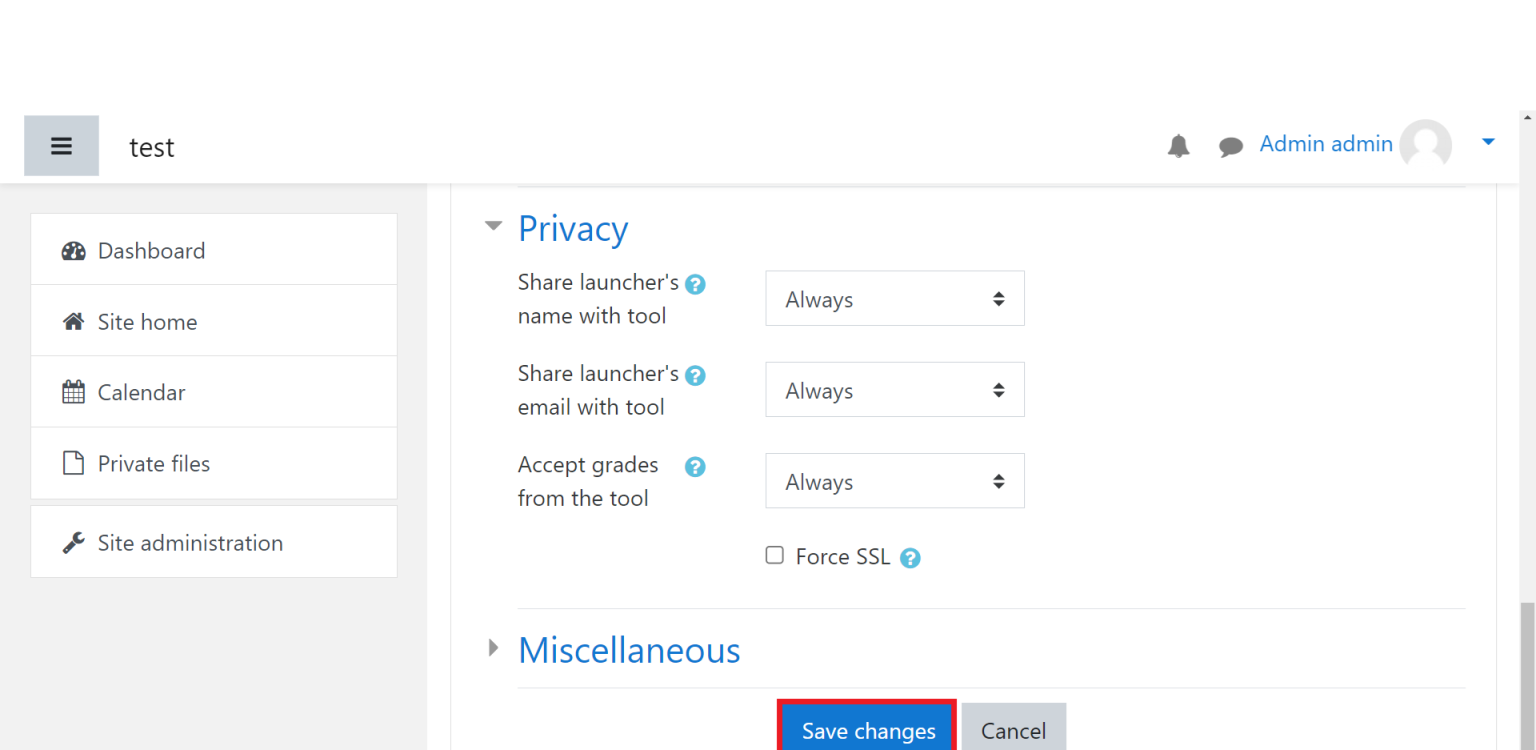
Let’s consider the following use case scenario when a book is launched from Customer’s LTI enabled LMS.
Type: POST
Request Header:
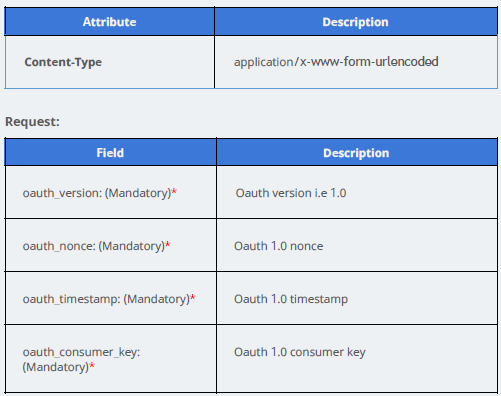
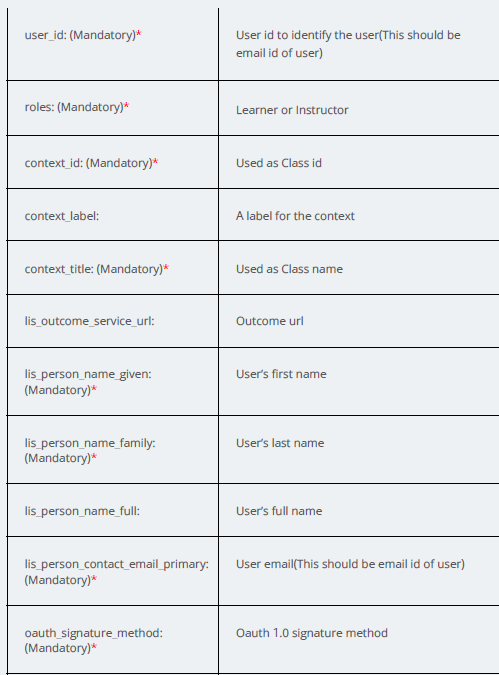
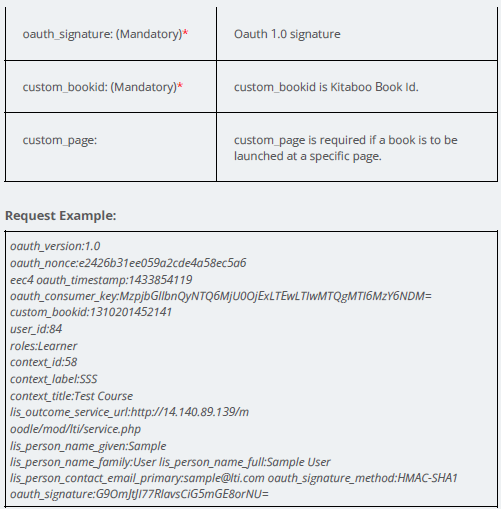
Teachers and students can login to your LMS and launch a Digital Content. Let’s see how a user can launch a book on the Kitaboo Reader.
19. Navigate to the LTI Moodle website and log in with your User (Teacher)
credentials. > Click on the This is for IMS menu on the left navigation panel.
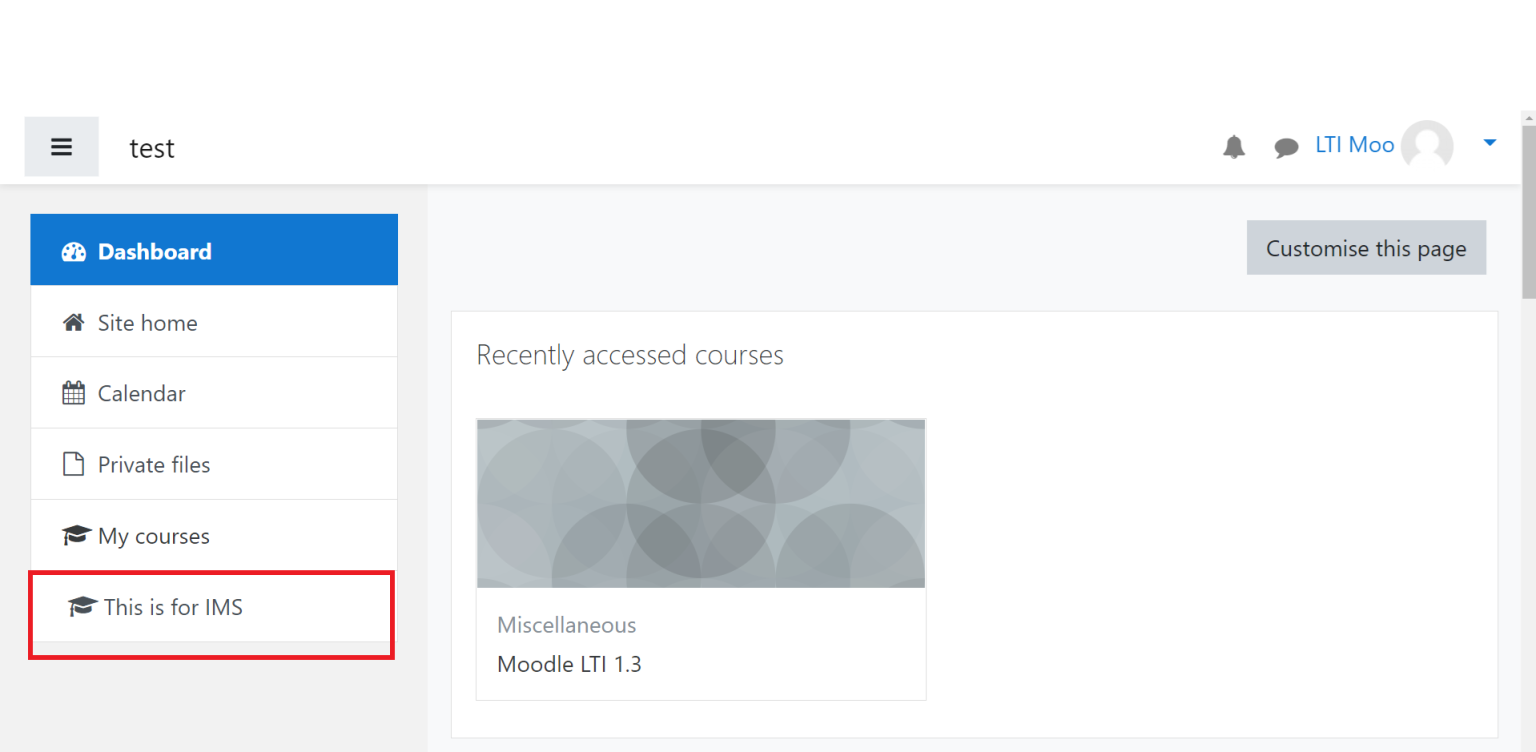
20. On the This is for IMS page, click on the book you want to launch. A sample book has been selected in this example.
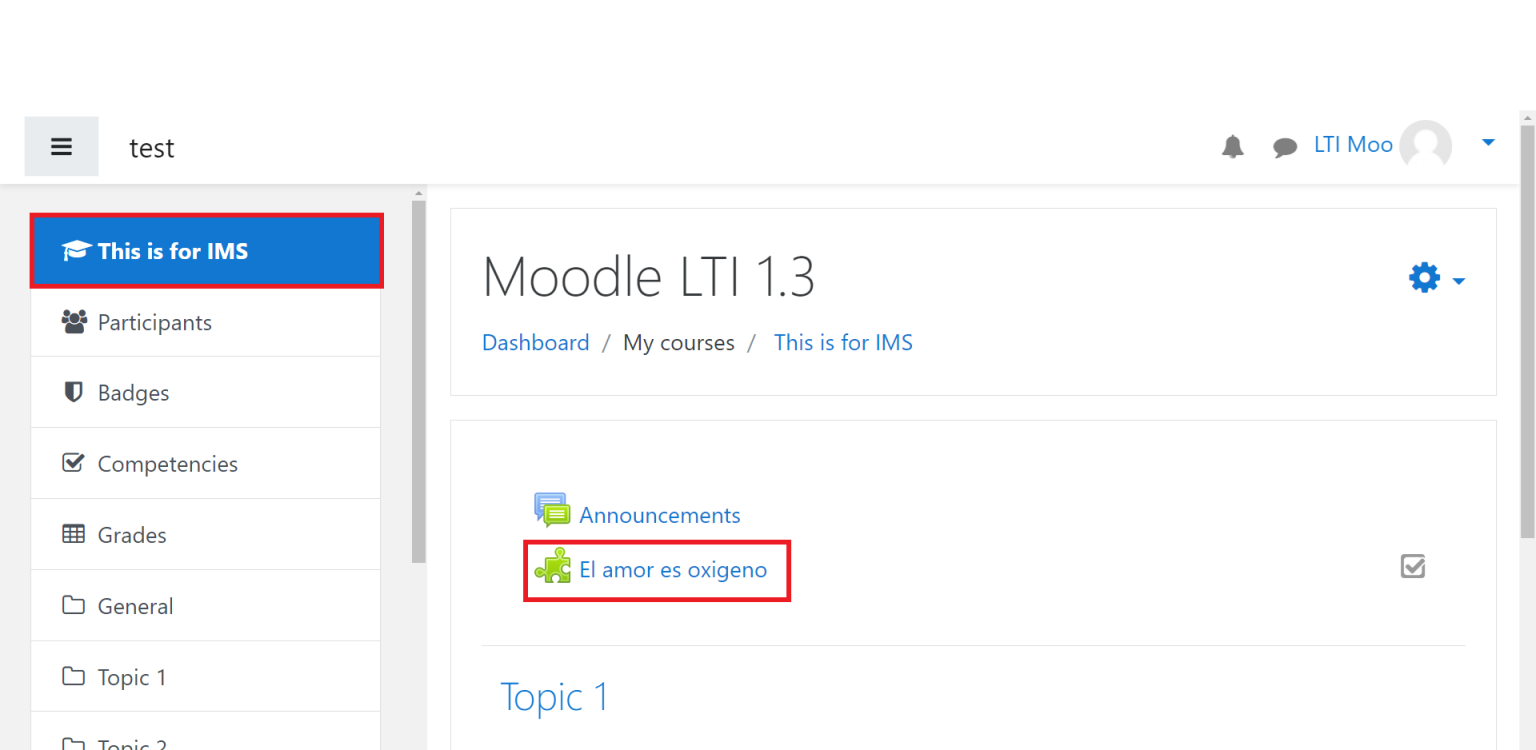
21. The book has now been launched on the Kitaboo Reader.
The Kitaboo Studio allows you to sort Customers and Groups using various options, such as alphabetical order or creation date, in both ascending and descending order.
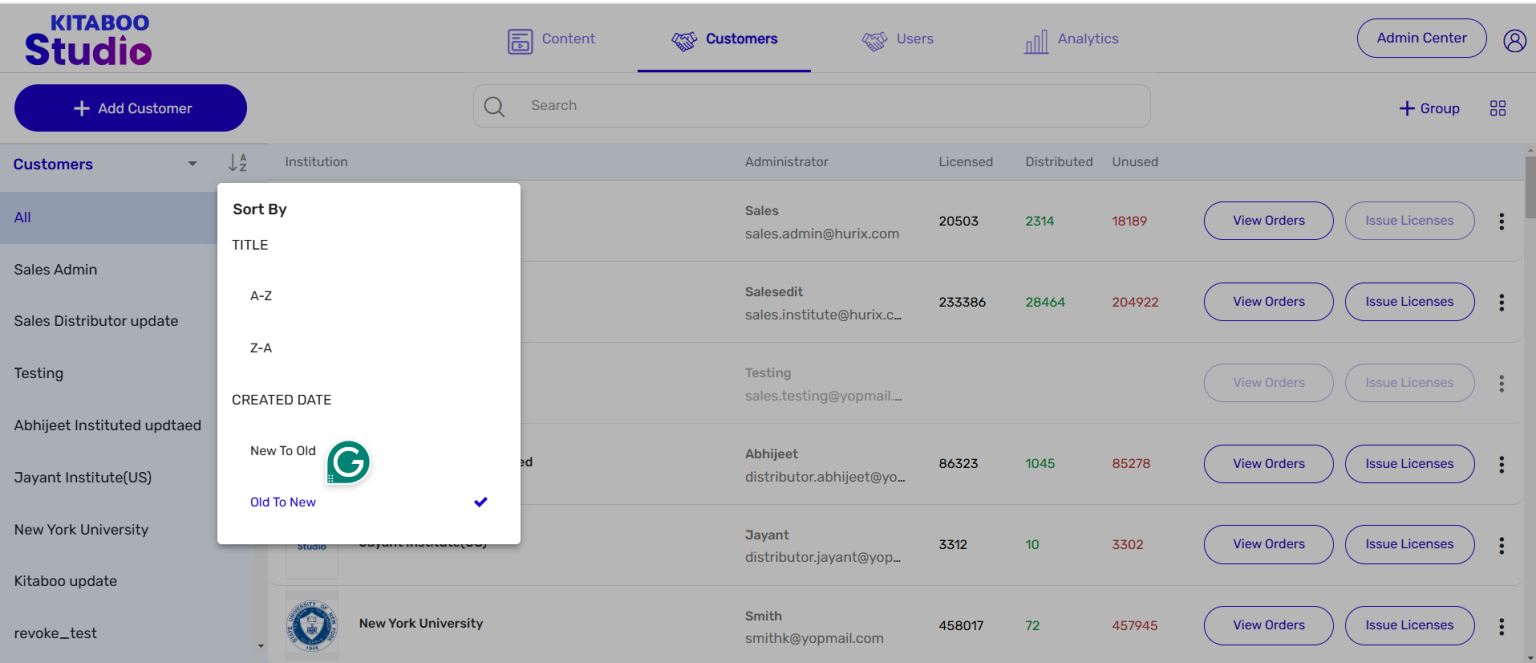
Users may sometimes prefer to access content of similar nature or the content spread out in
multiple series in a group. Kitaboo enables you to create a collection of digital content for
such users. Let’s see how to create a collection.
1. Sign in with your Enterprise Admin credentials.

2. Switch to the Contents tab. > Click on Collections.
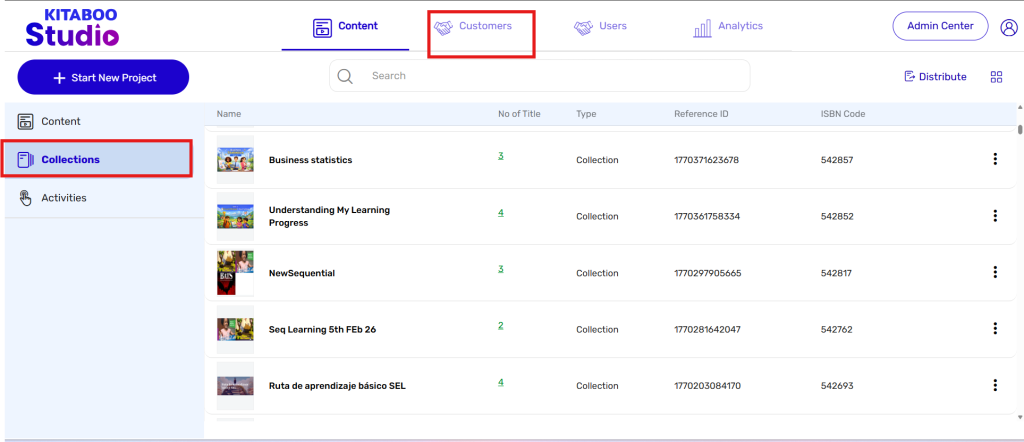
3. Click on the Start New Project button.

4. Click on Create. The Collection button will appear selected by default.
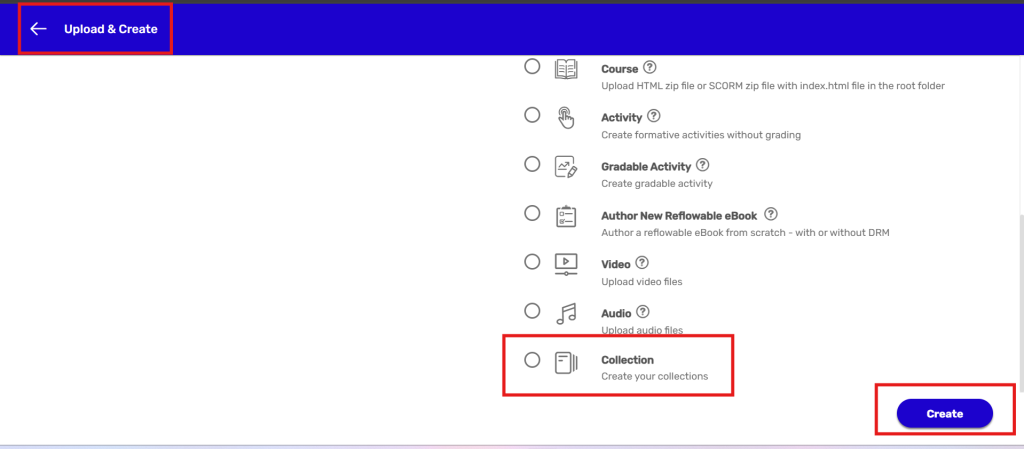
5. On the Create Collection Page, select the Titles (content) you want to display under one collection. > Provide a name to your collection. > Select the Restricted to Teacher checkbox(es) against the titles, if you want to restrict access to a title to teachers.
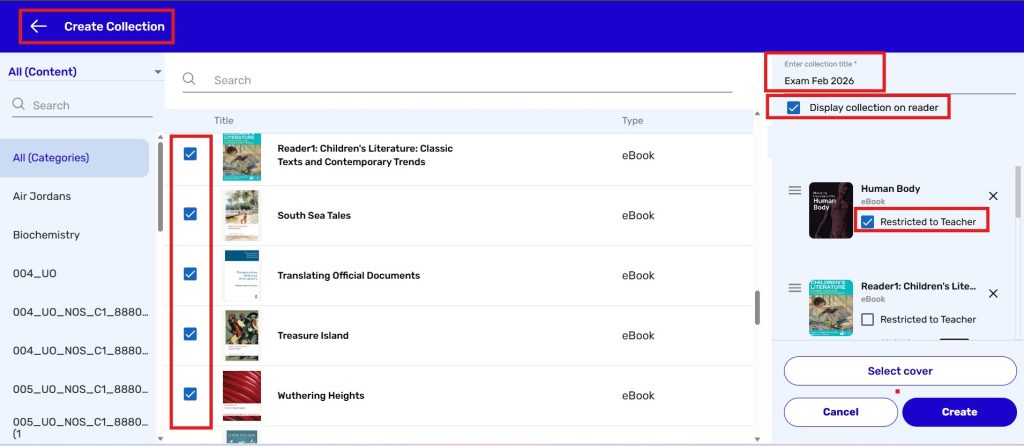
6. If you want the titles to appear on the Reader in a different order, reshuffle them like you do in a drag & drop activity.Click on Select cover. > Select any of the options related to the cover image.> Click on Save.
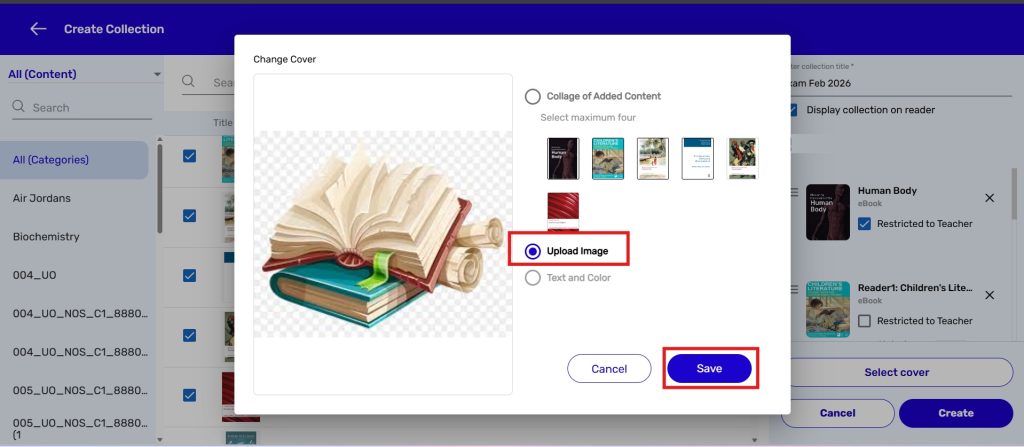
7. Click on Create.
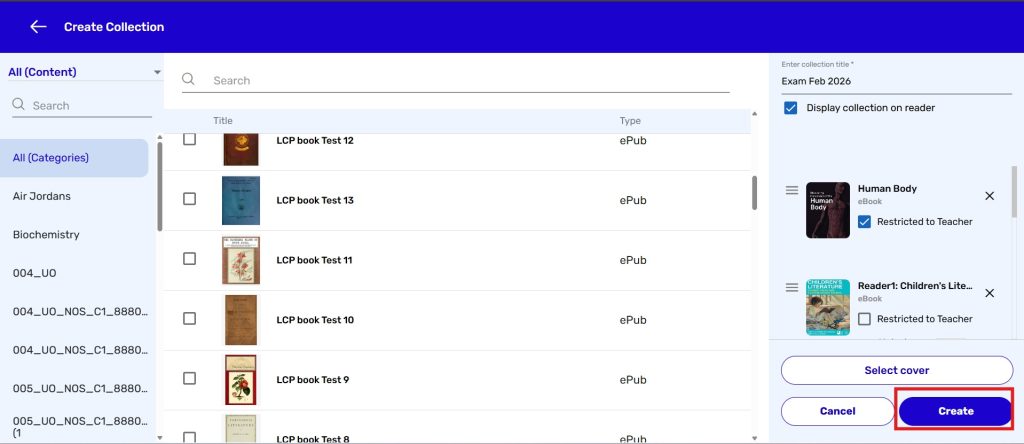
8. You can see the collection you have just created.
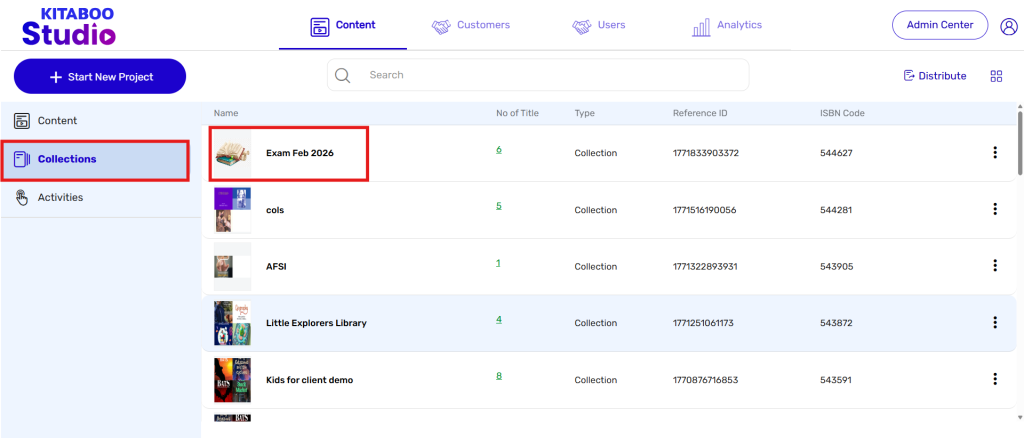
9. You can also edit or delete a collection. If you want to edit a collection: Click on the More options icon against the collection you want to edit. > Select the Edit option. > Do the desired edit. > Click on Update.

10. If you want to delete a collection: Click on the More options icon against the collection you want to delete. > Select the Delete option. > Confirm your decision by clicking on Yes, Delete it. > Click on Update
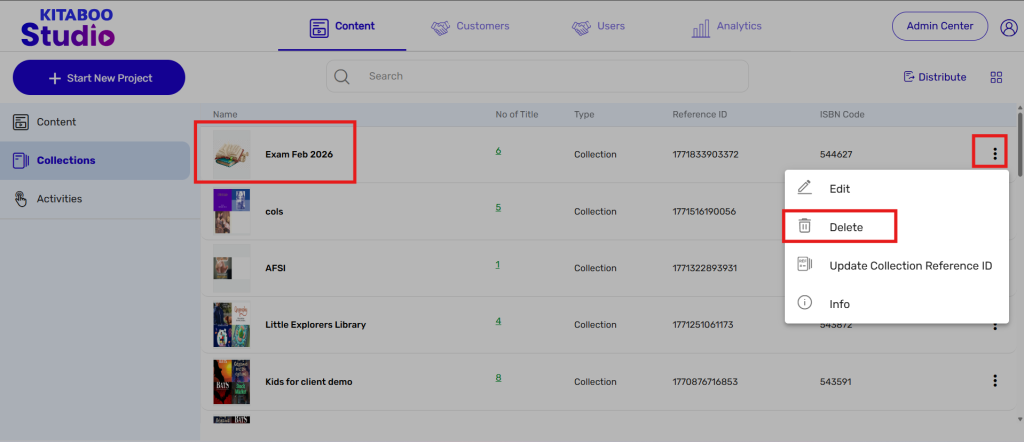
11. If you want to know more about a collection: Click on the More options icon against the collection you want to know more about. > The More Info pop-up will appear on the screen.
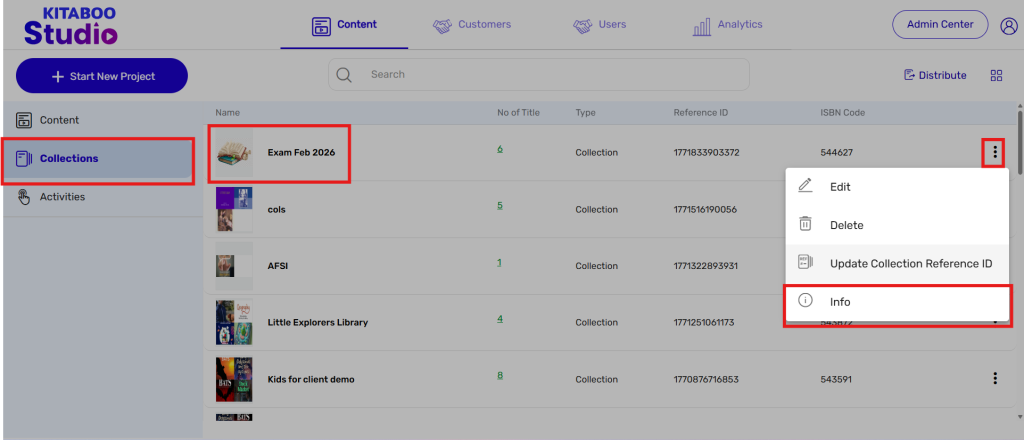
12.To update a Collection Reference ID:
Click on the Update Collection Reference ID option icon against the respective collection. A pop-up window will appear where you can enter the new Reference ID and click on the Update button to save the changes.
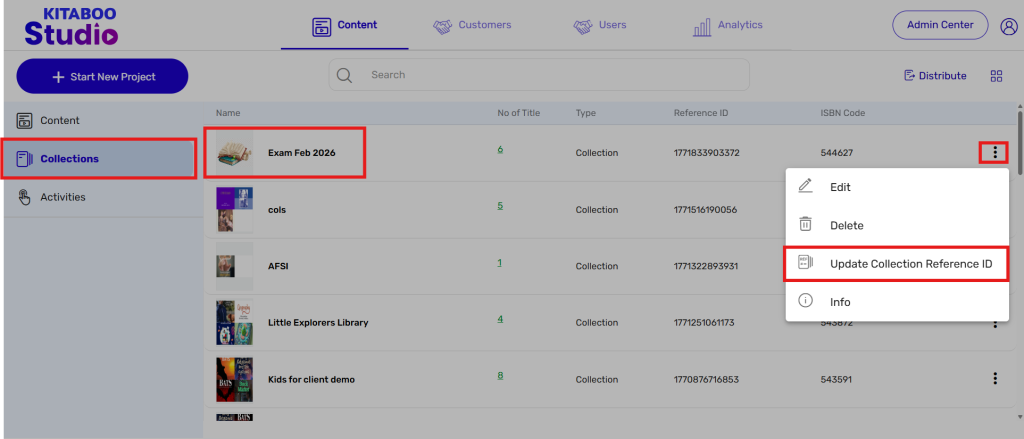
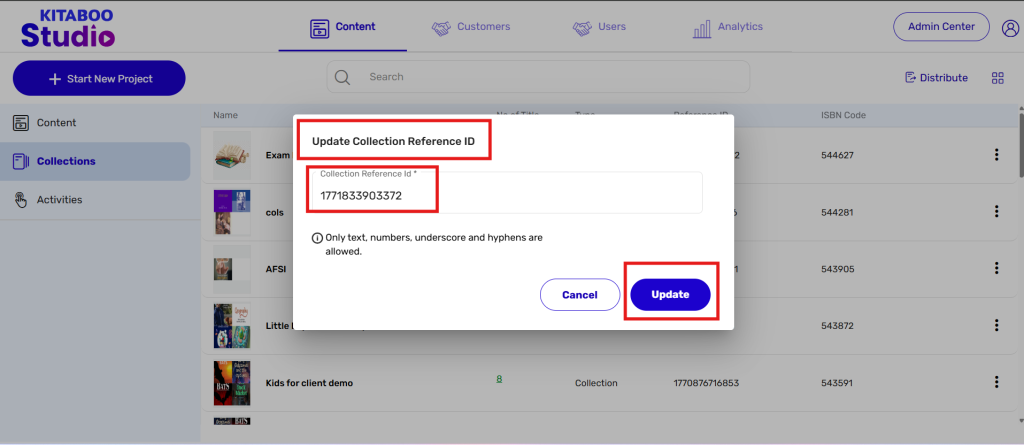
Enable K-AI at the content level, configurable per user –
- Create a content Fixed-Layout Kitaboo eBook from Studio Platform and make it Live/Archive
Note:
While creating the content, make sure to select the appropriate language. For example, if the PDF is in German, you should select “German” from the language dropdown during the content creation process.
To select the language, click on the “Advanced Metadata” option. You will then see a “Language” dropdown, where you can choose the language based on the PDF.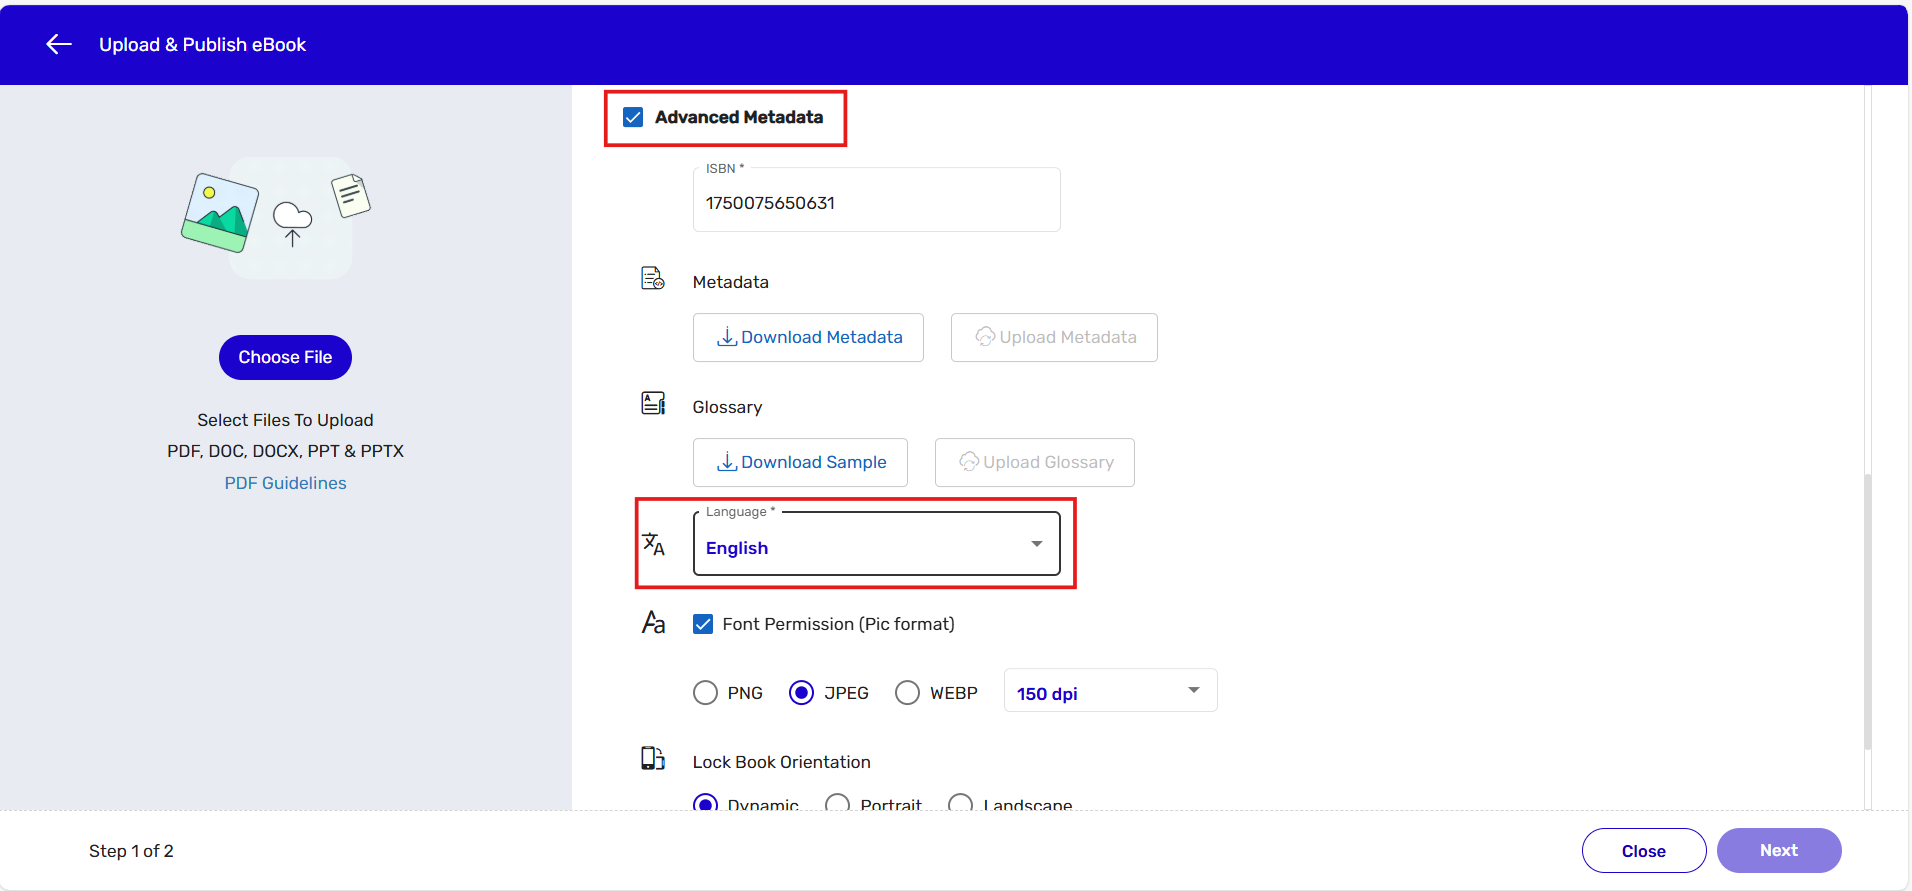
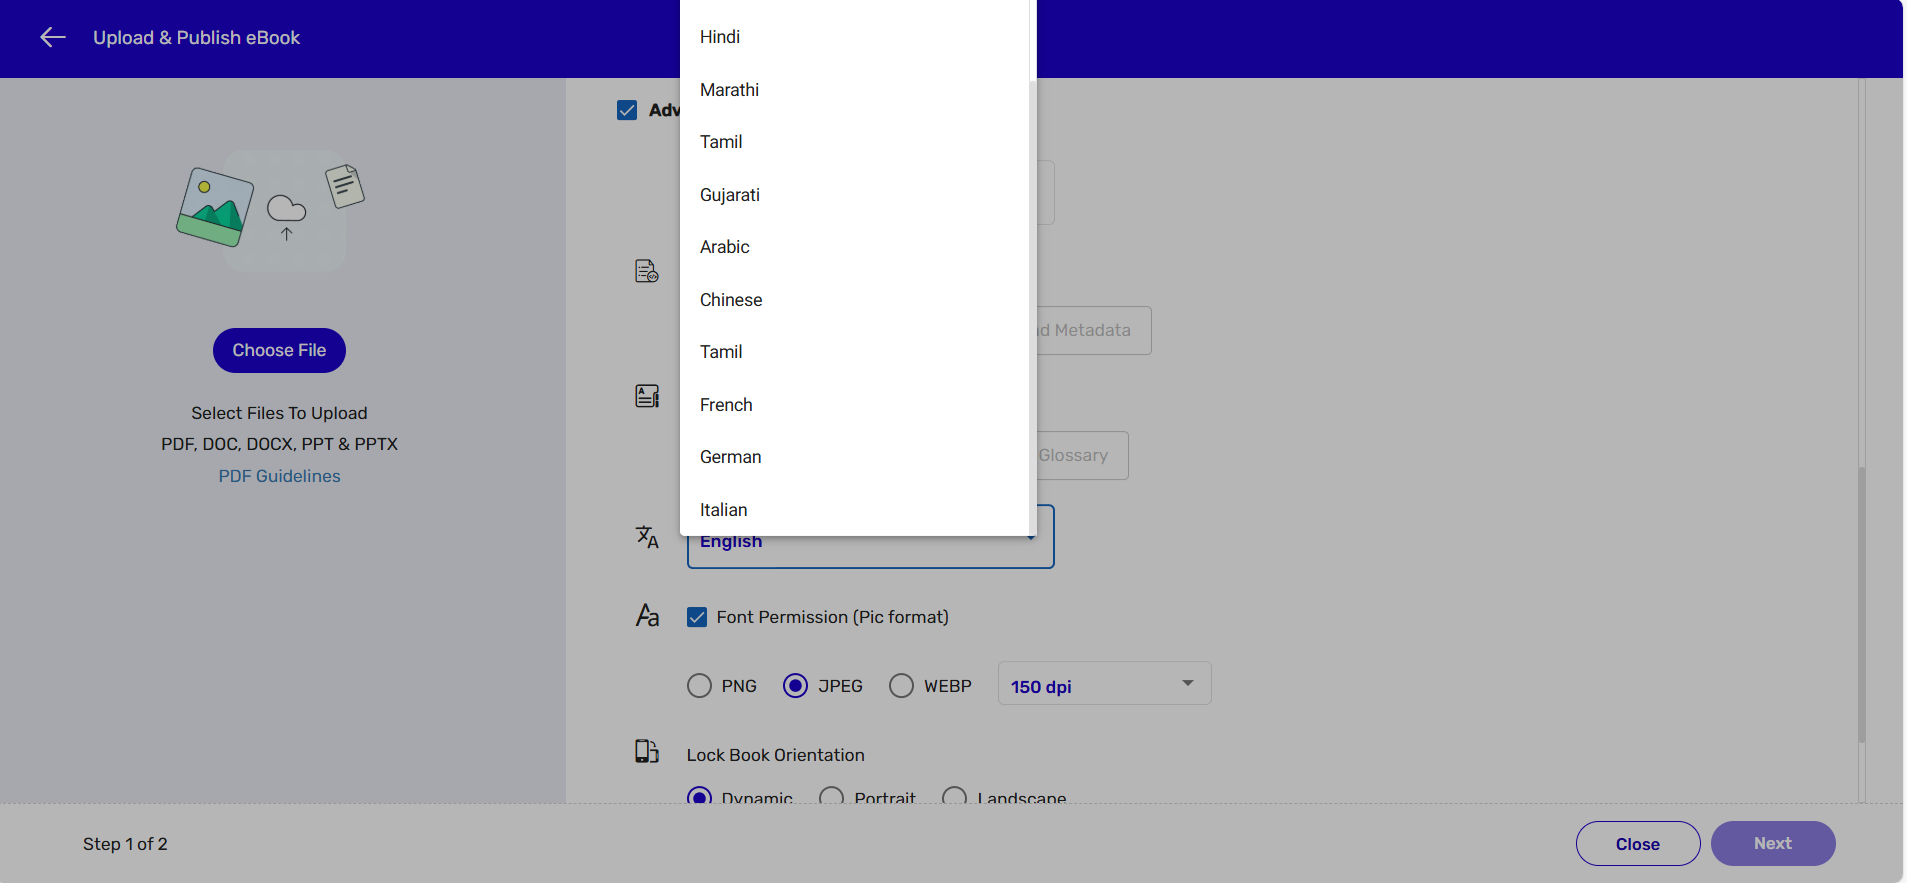
- Once the content is archived then click on the More option and select the “K.AI Enable” option from the list –
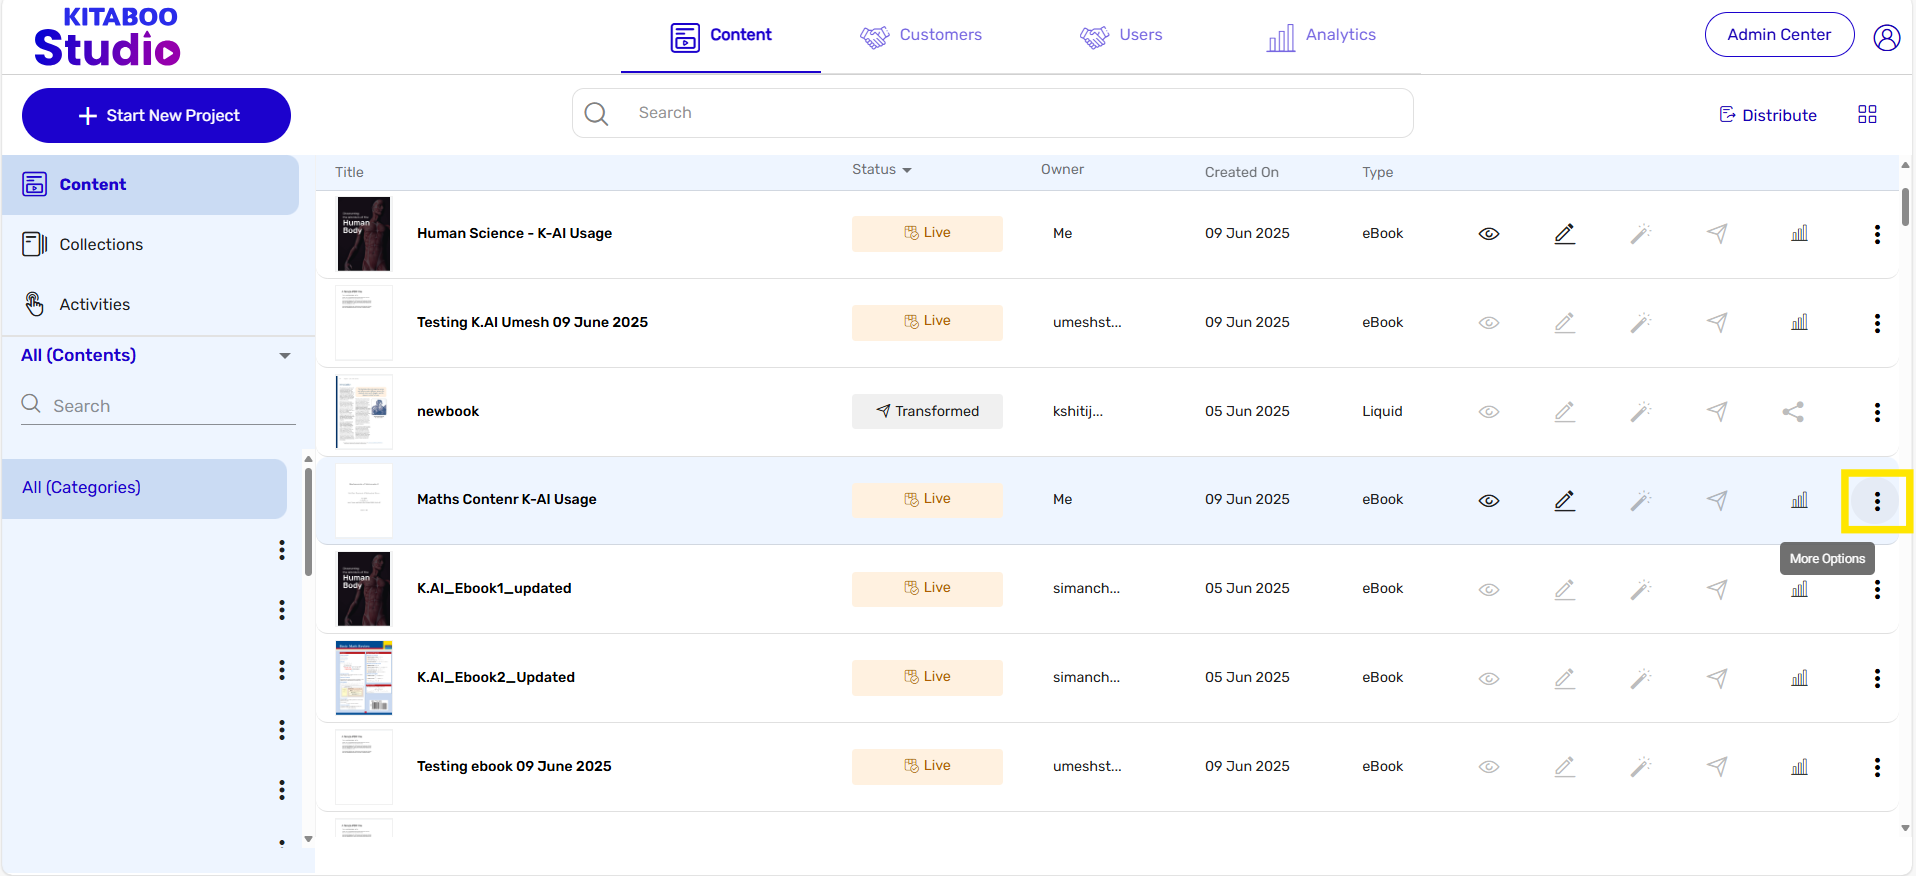
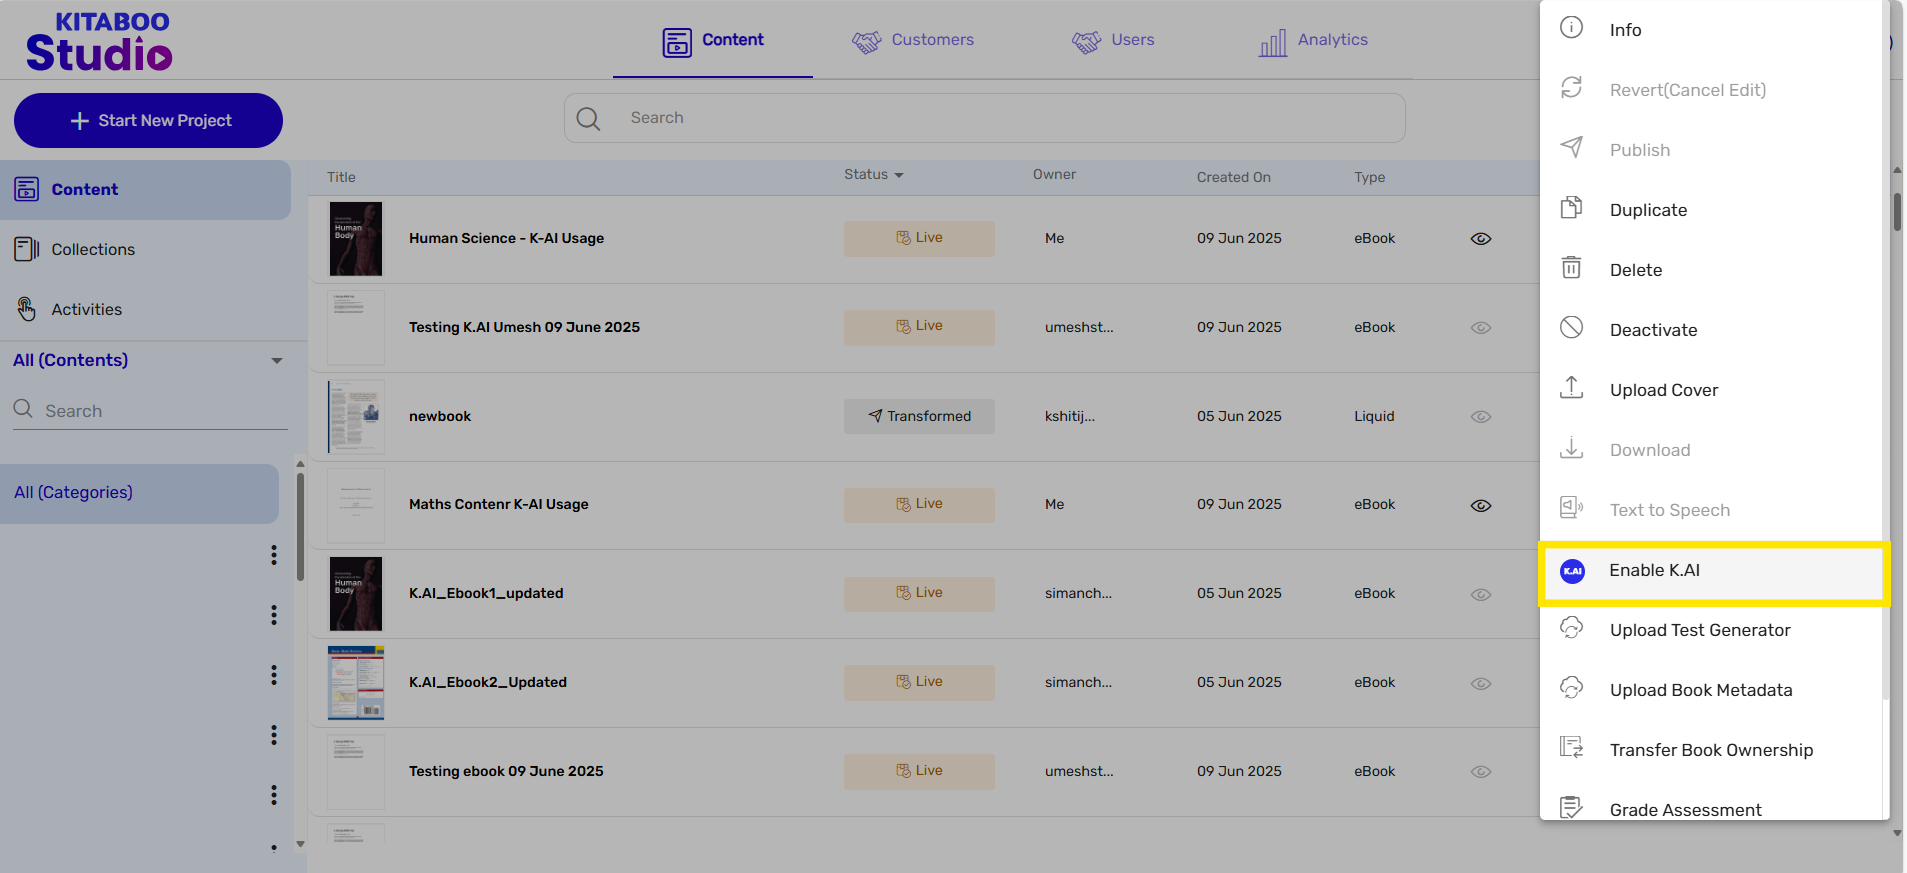
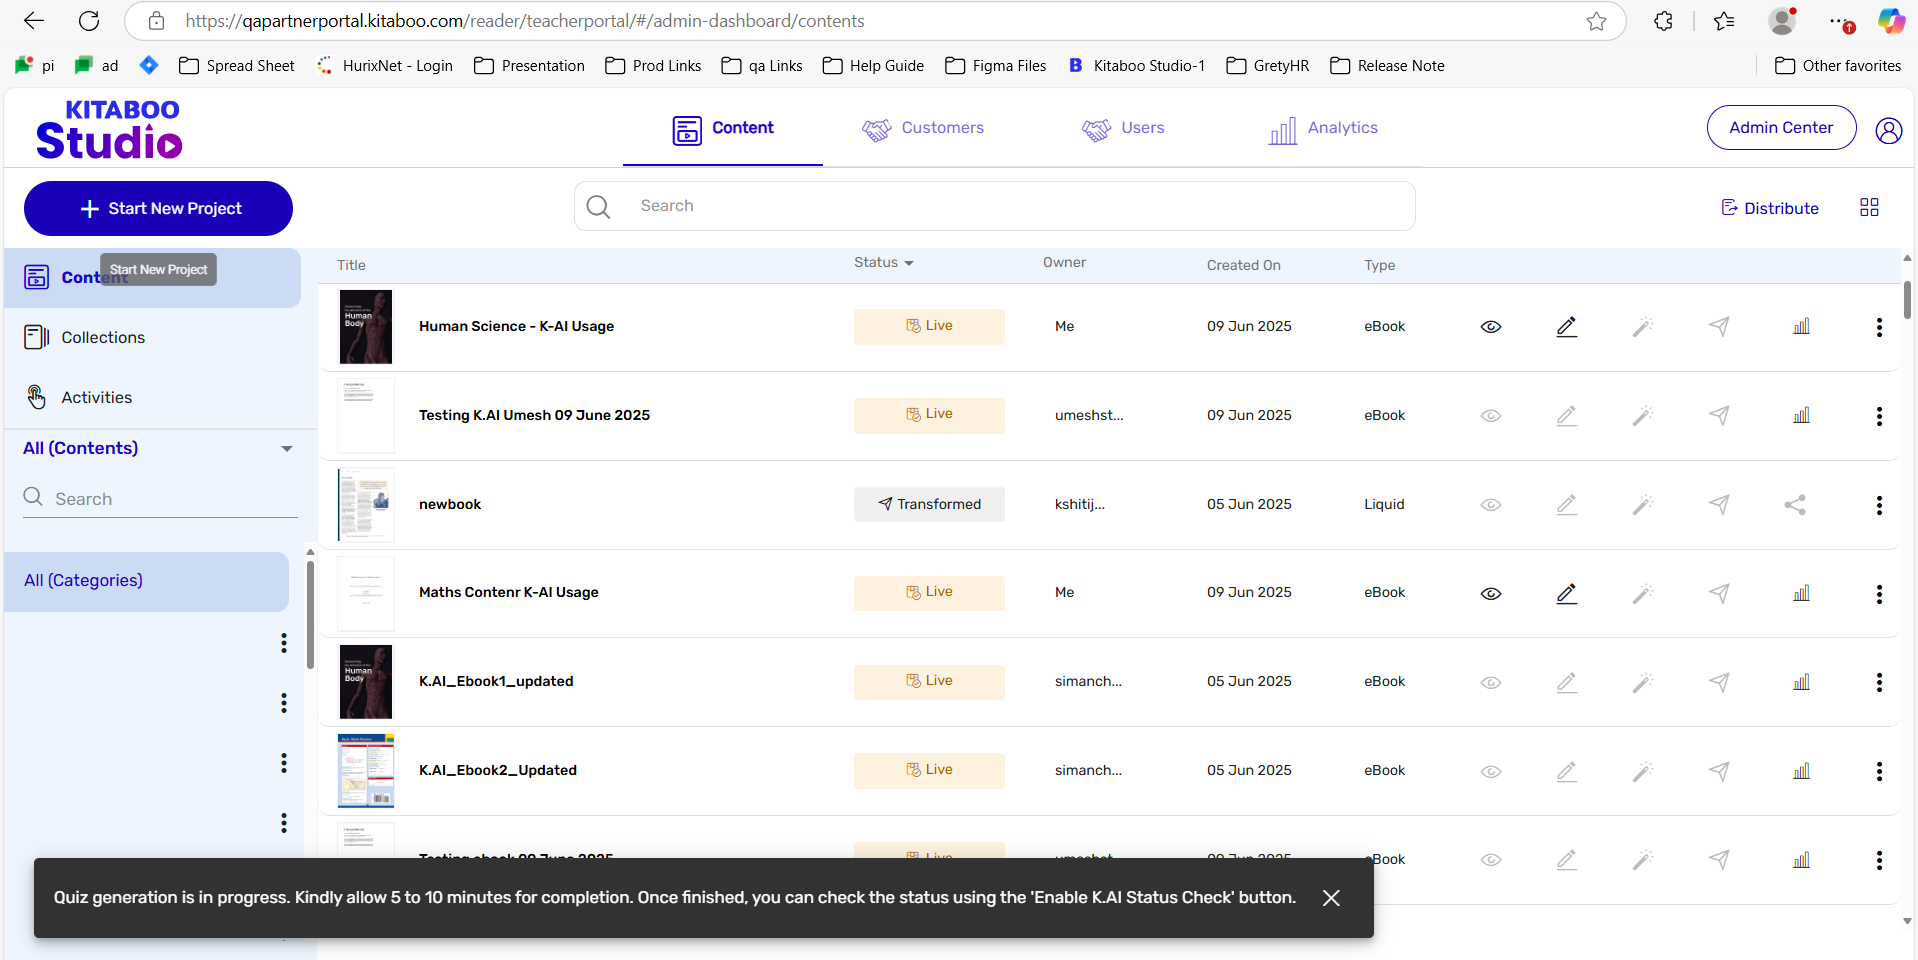
- You can check whether K-AI is enabled for the selected content by clicking on the “More” option again and then selecting “Enable K.AI Status Check.”
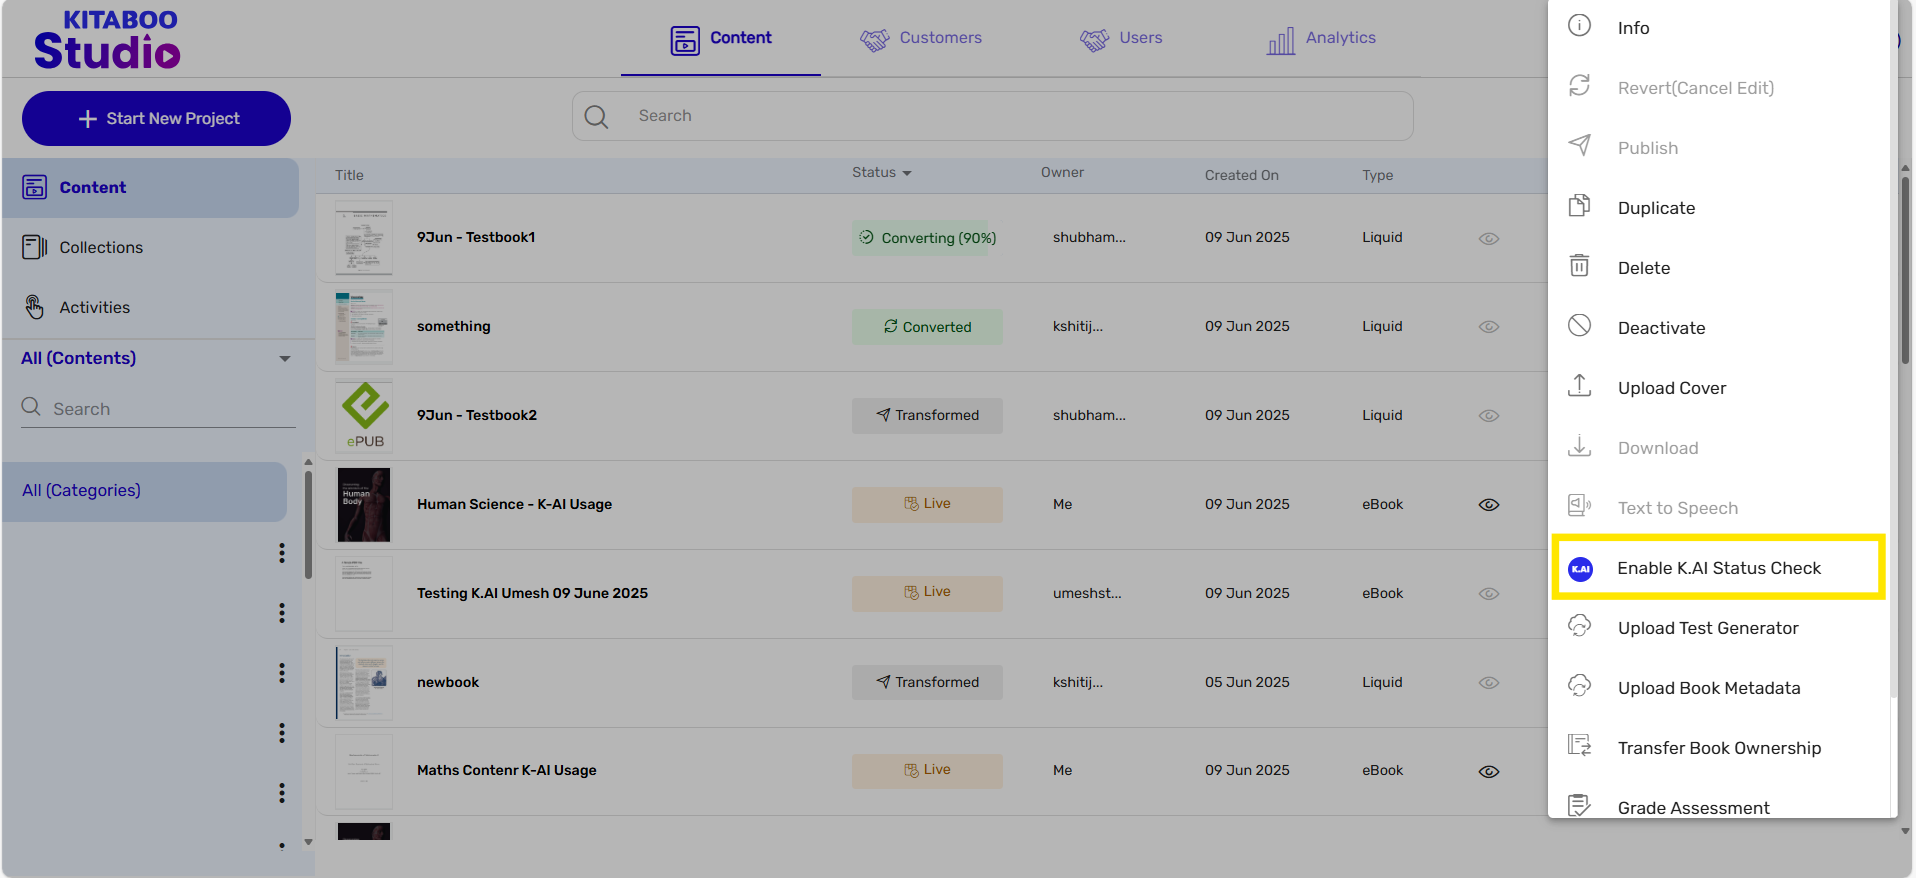
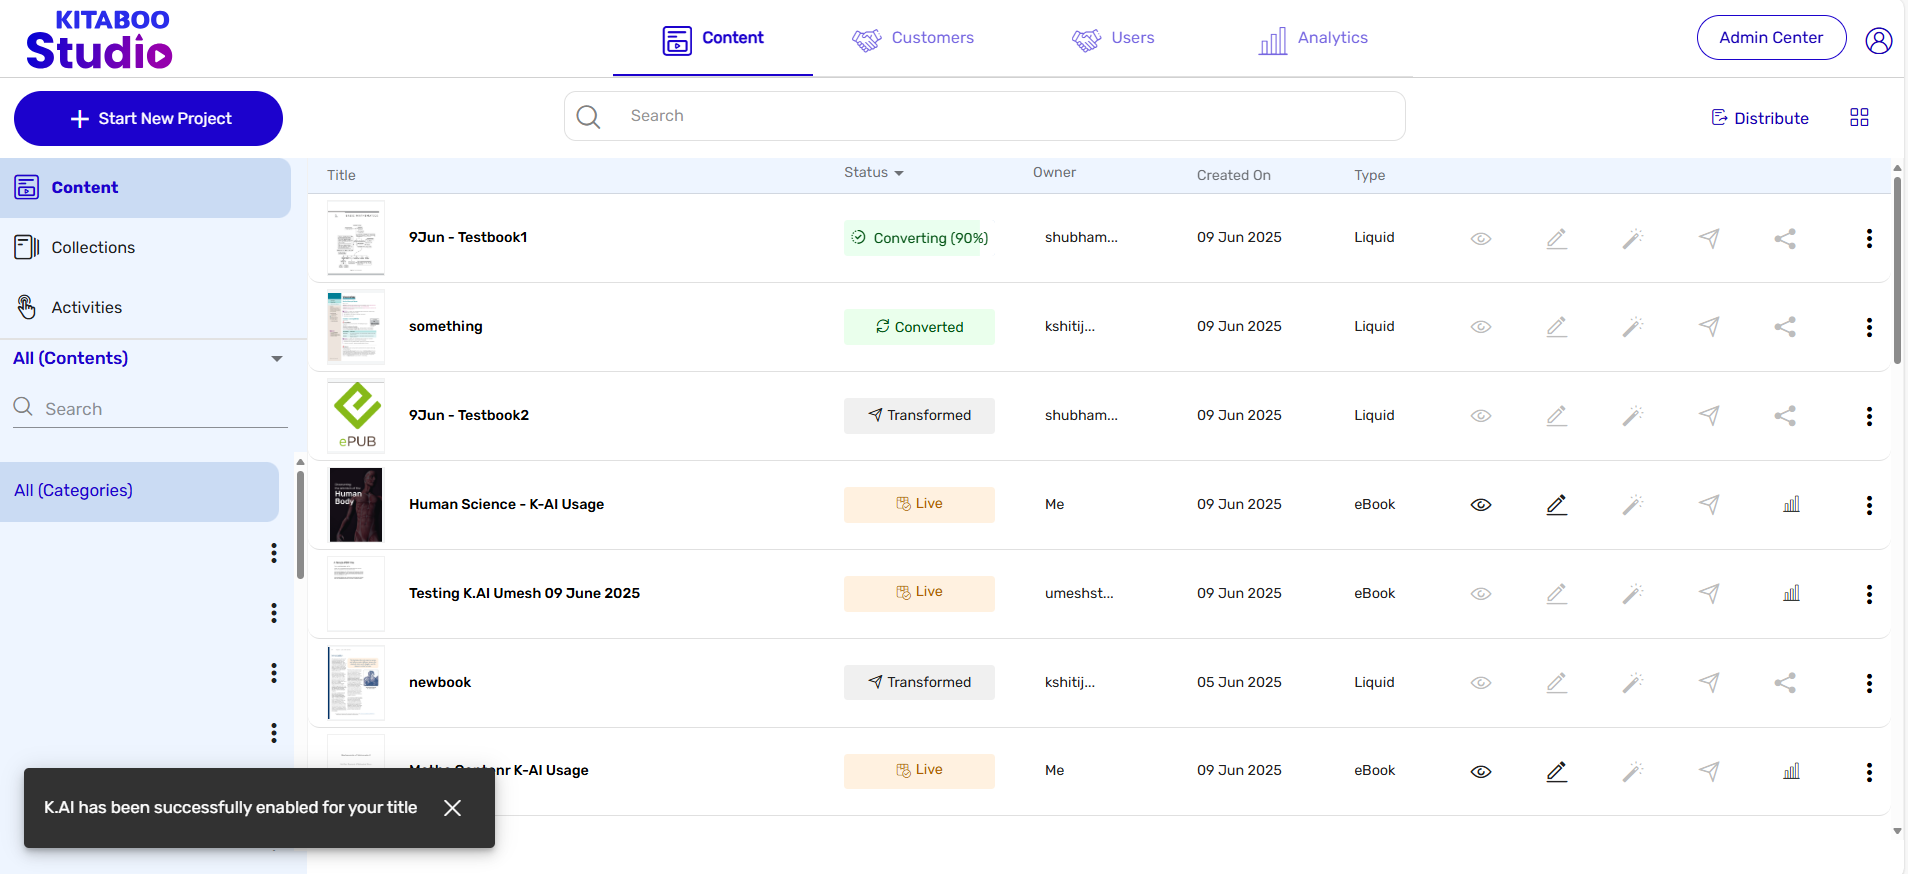
- Now distribute this content to customers or institutes by clicking on “Issue License” for the content with K.AI enabled.
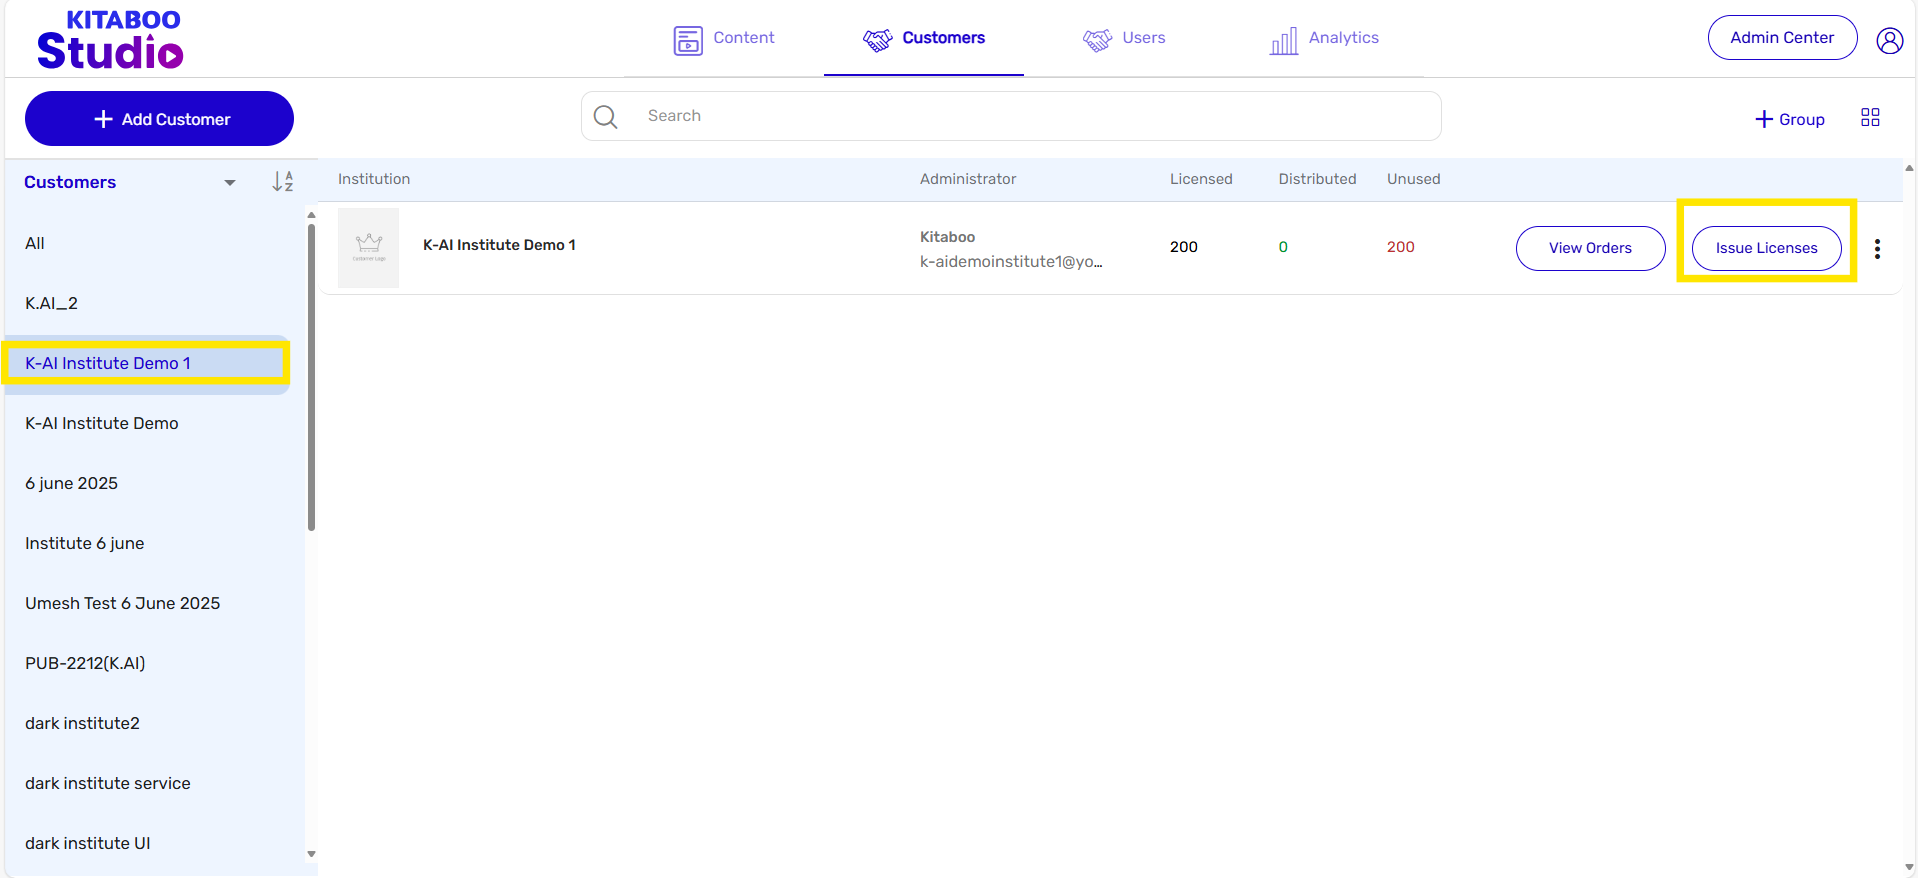
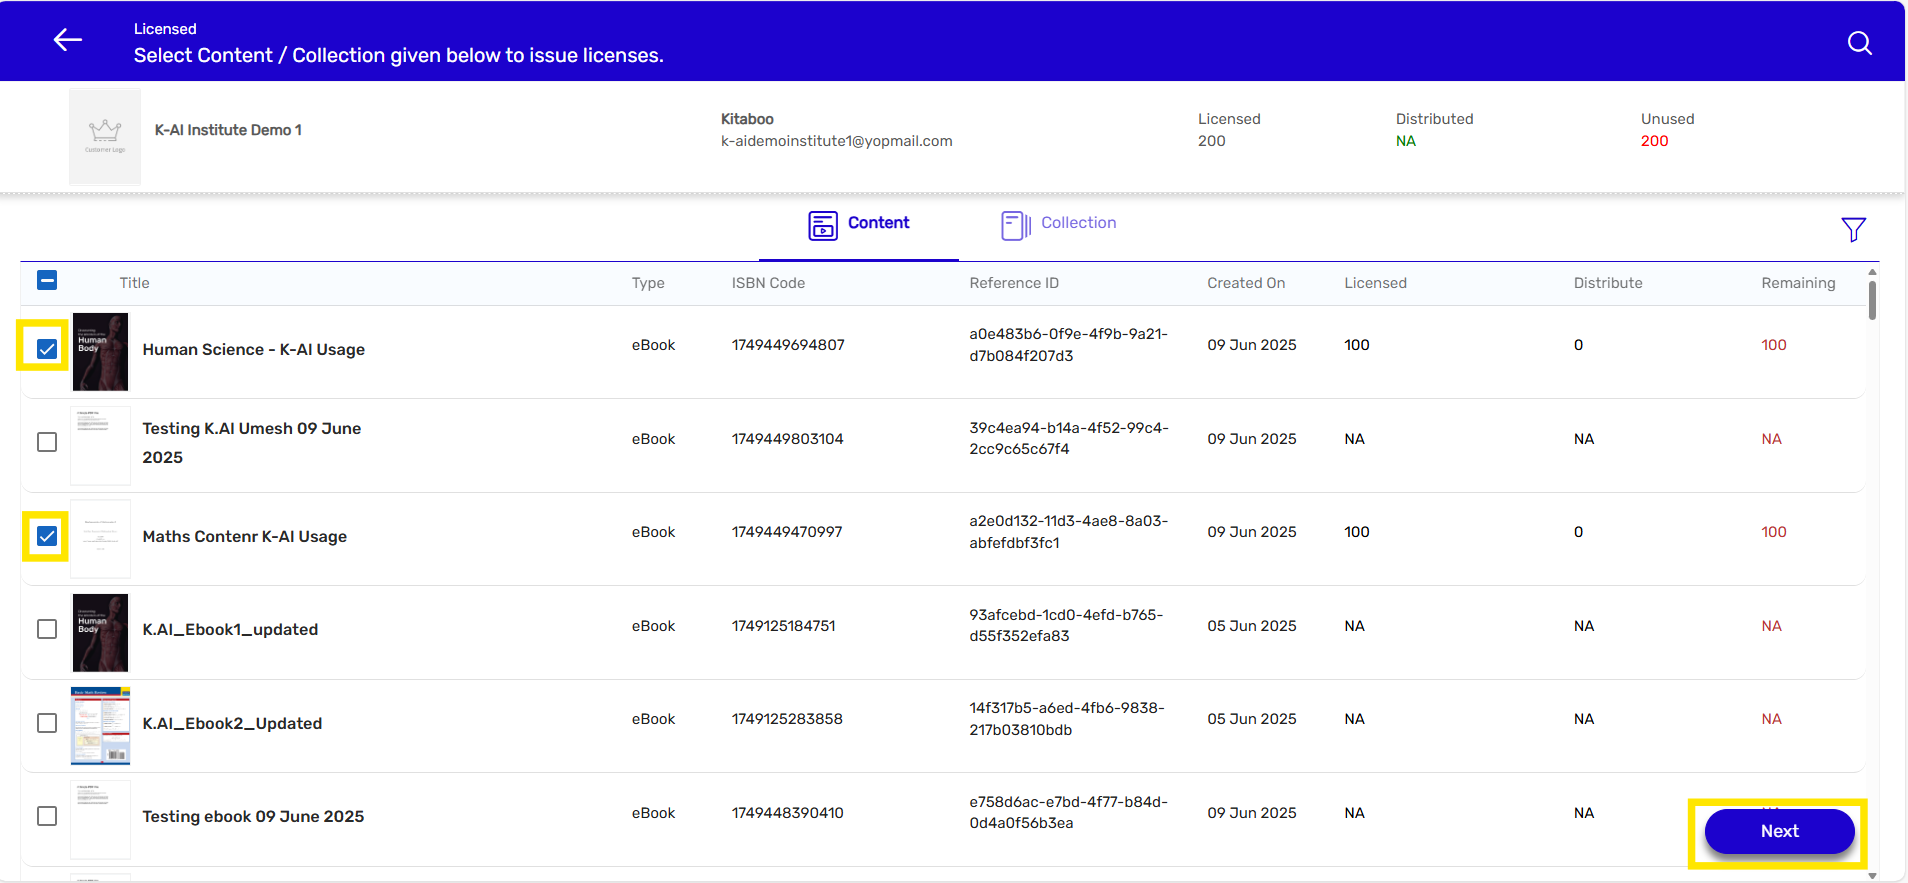
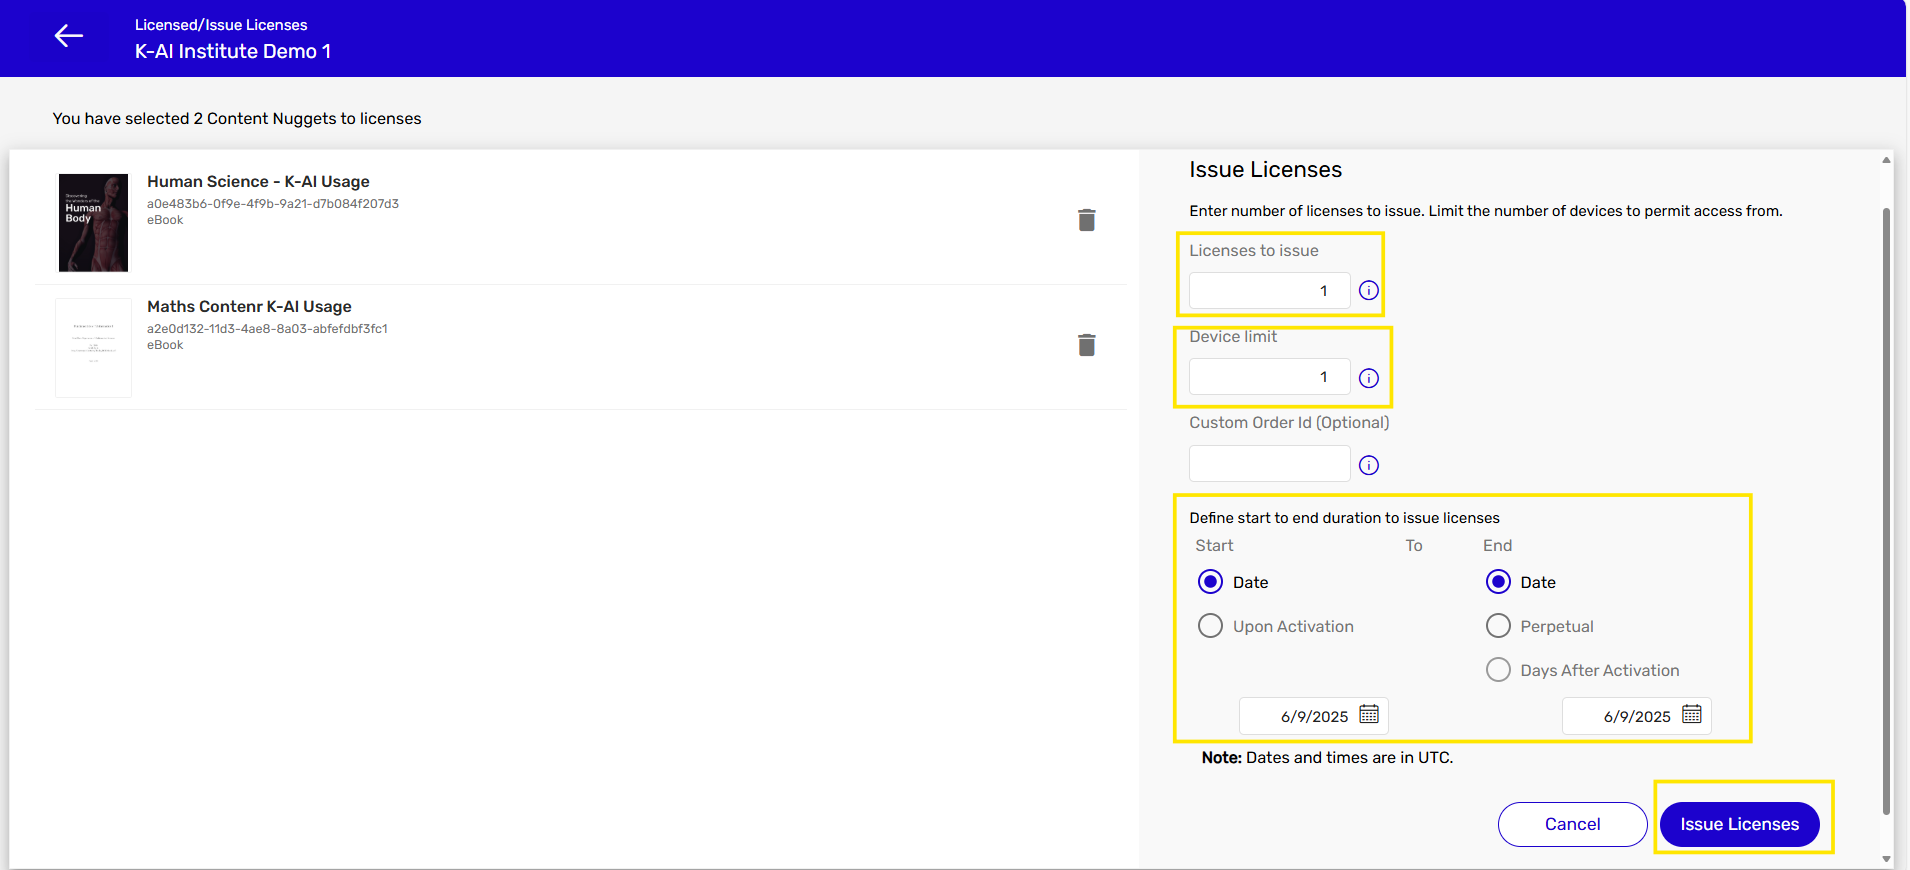
Select the content for which you have enabled K.AI from the list, then click the “Next” button.
Enter the required details such as:Number of licenses to issue
Device limit
Start and end dates for the license validity
After filling in all the details, click the “Issue Licenses” button.
Now log in to the institute account for which you have issued licenses for K.AI-enabled content. Go to the “Users” tab, where you will see the list of users associated with the institute. If you want to create a new user and enable K.AI during the creation process, you will see an option to “Enable K.AI“—you can enable it from there.
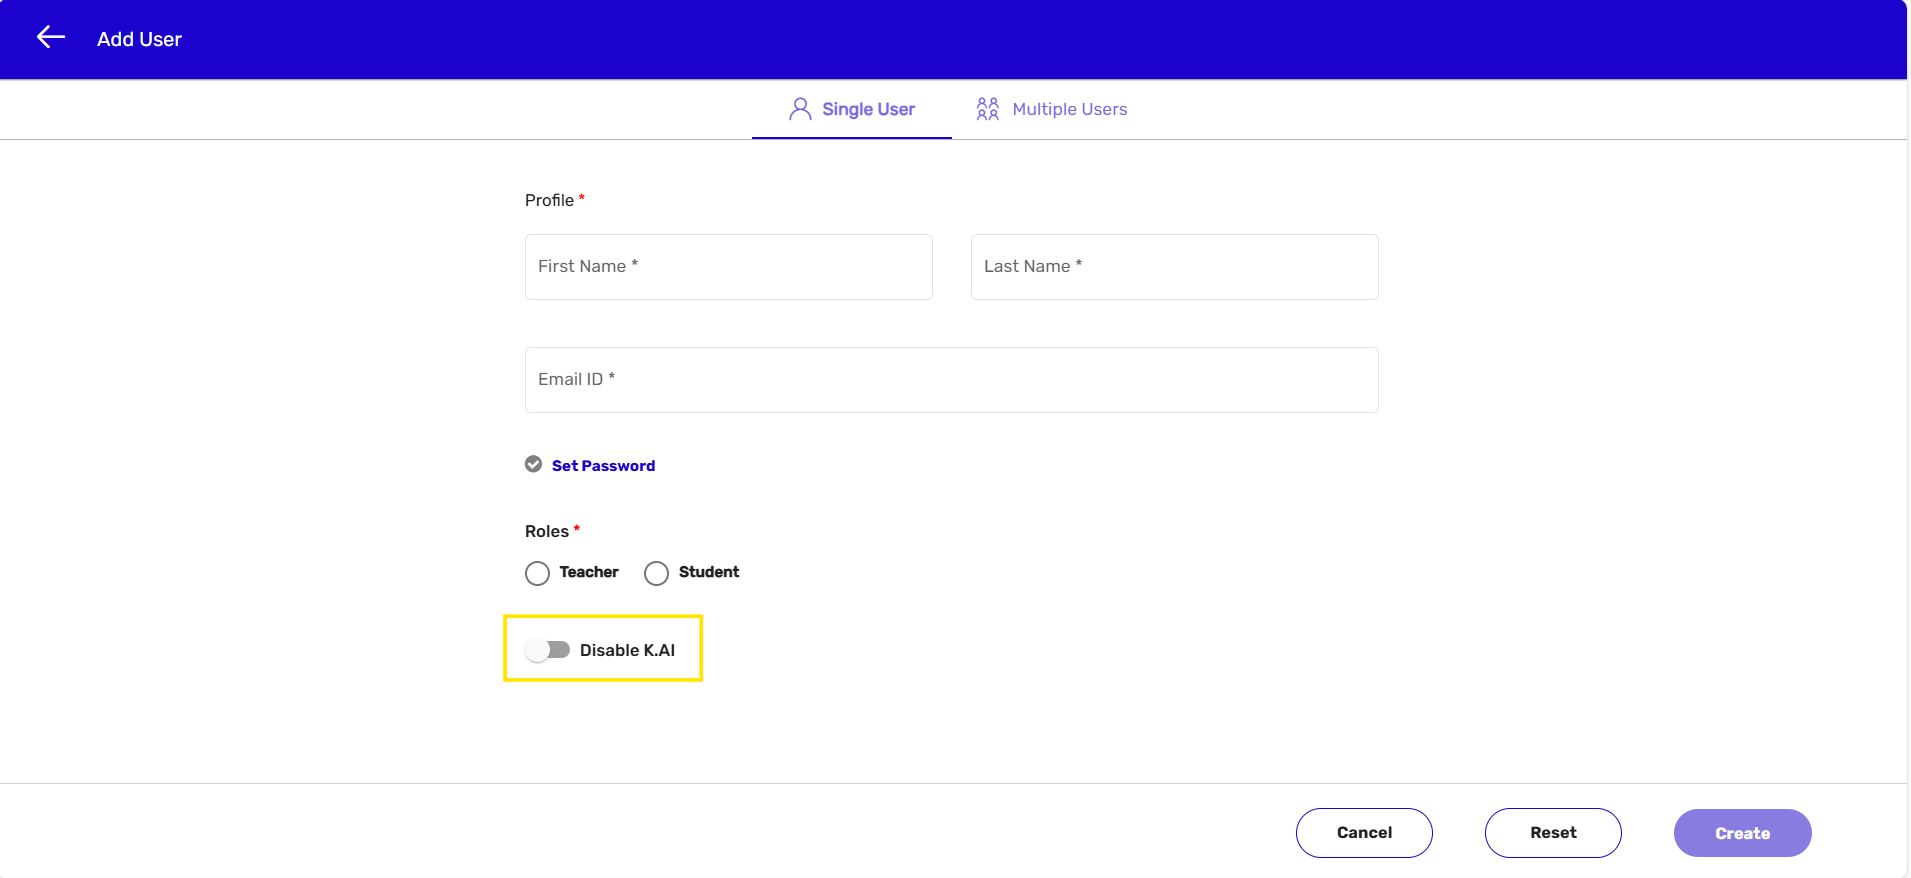
If you want to enable it for an existing user, go to the “User” tab, search for or select the user you want to enable it for, and then click on “Enable K.AI“.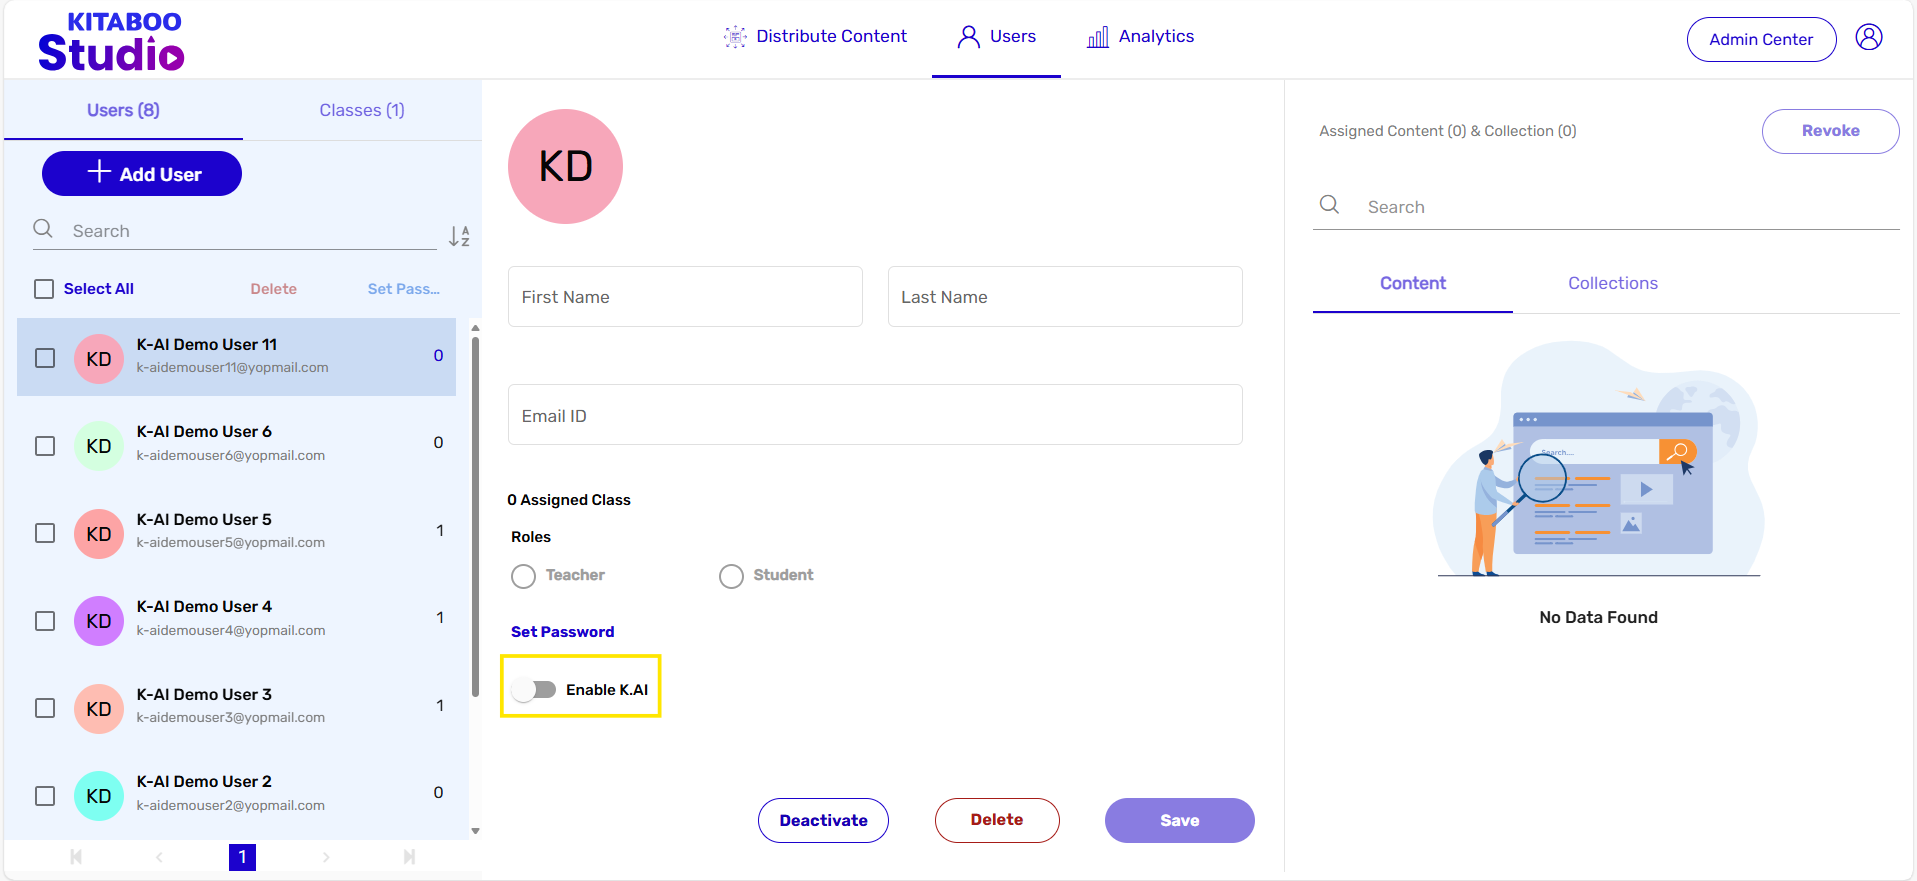
Similarly, if you want to enable K.AI while creating a new class or for an existing class, you need to follow the same steps as explained above for users.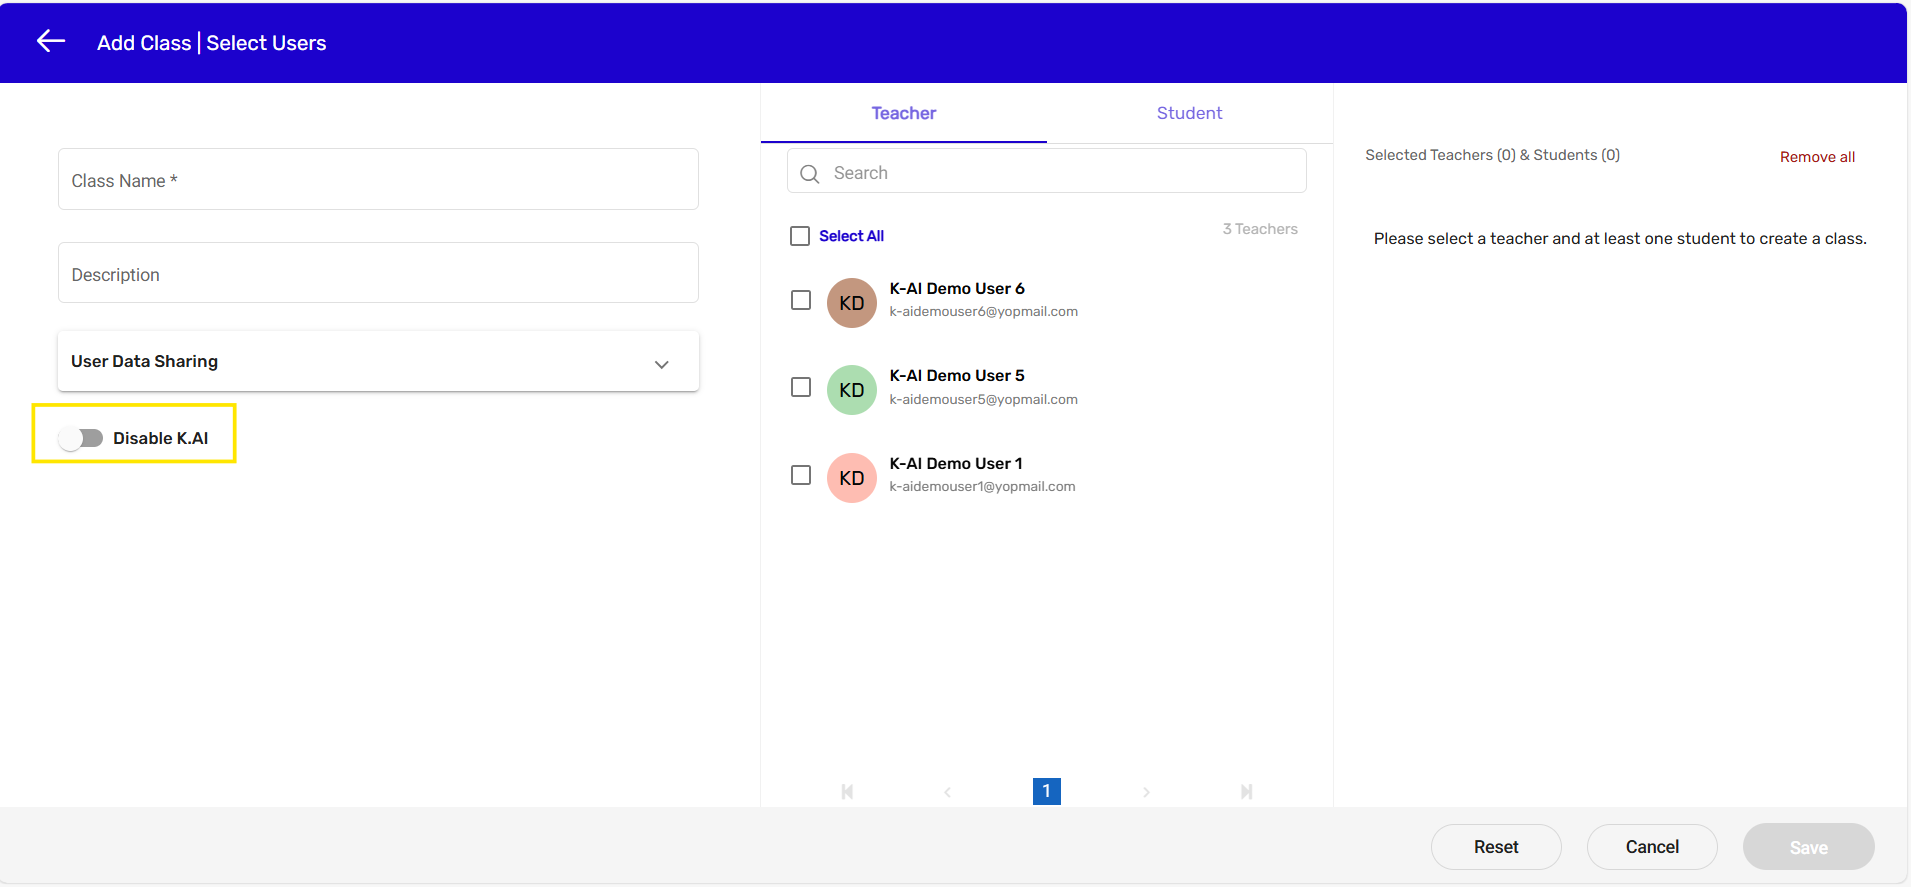
Existing Class –
Now that you have enabled K.AI for the users or class, go to the “Distribute Content” tab. Distribute the content for which K.AI is enabled by clicking on either “Users” or “Classes.”
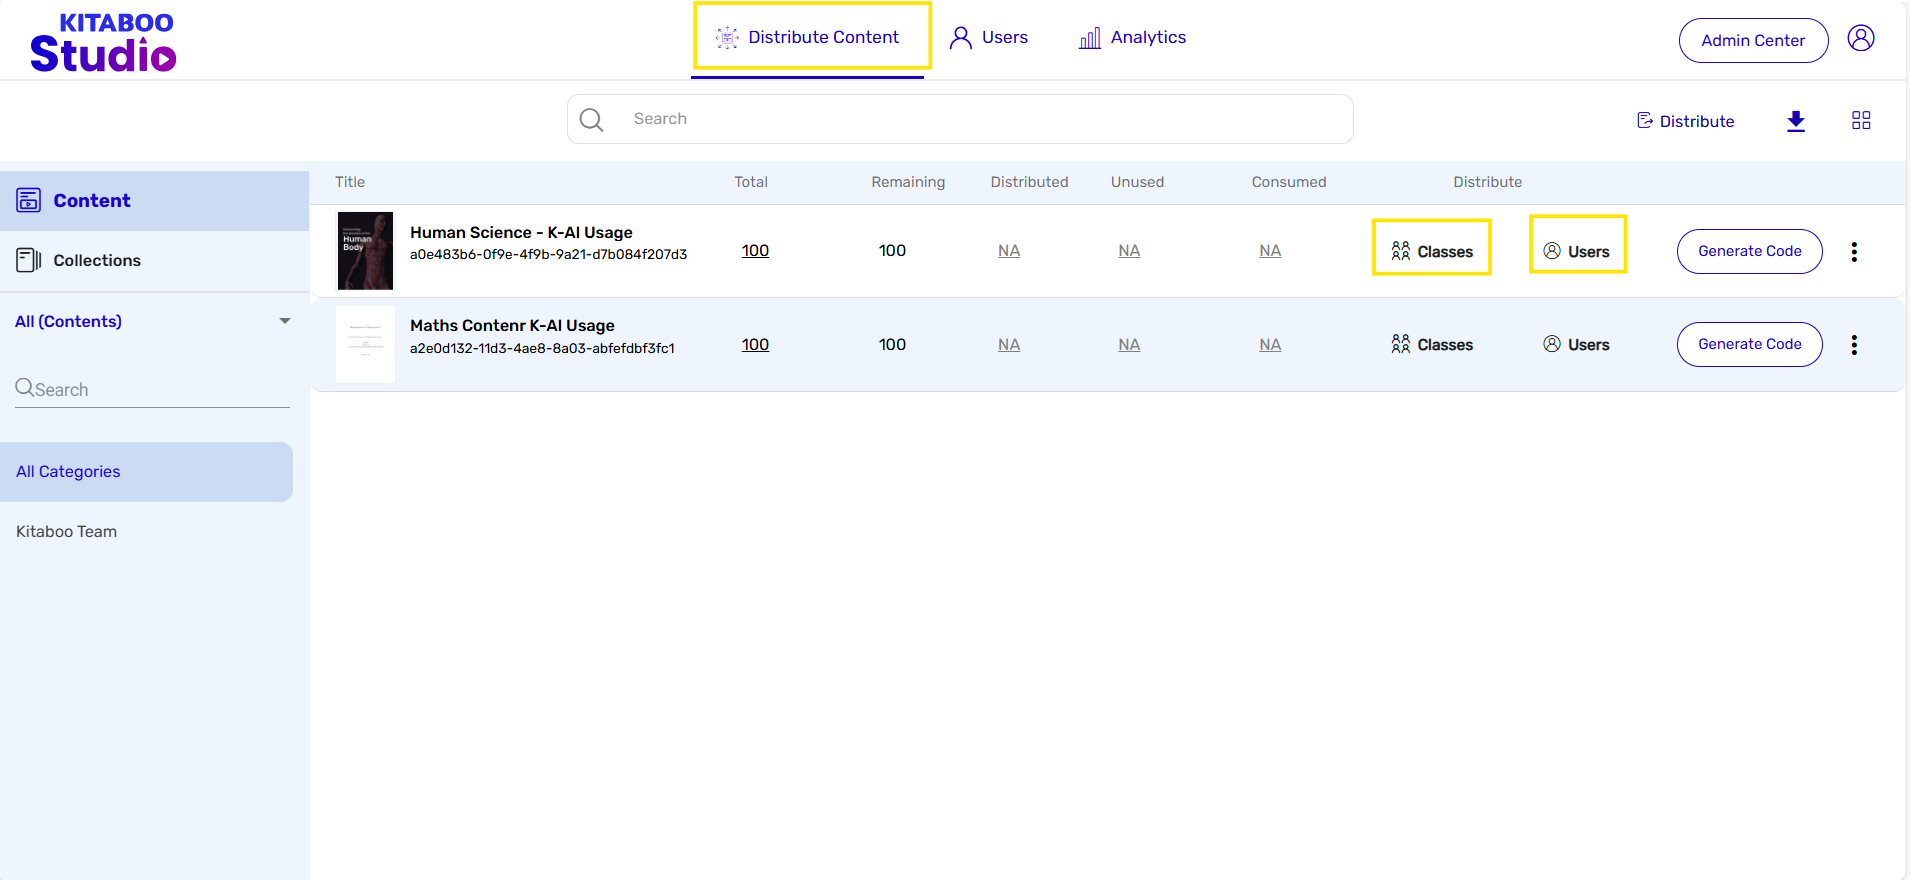
- After that, select the users or classes from the list to whom you want to distribute the content. If there are multiple orders, choose the appropriate one, and then click on “Distribute.”
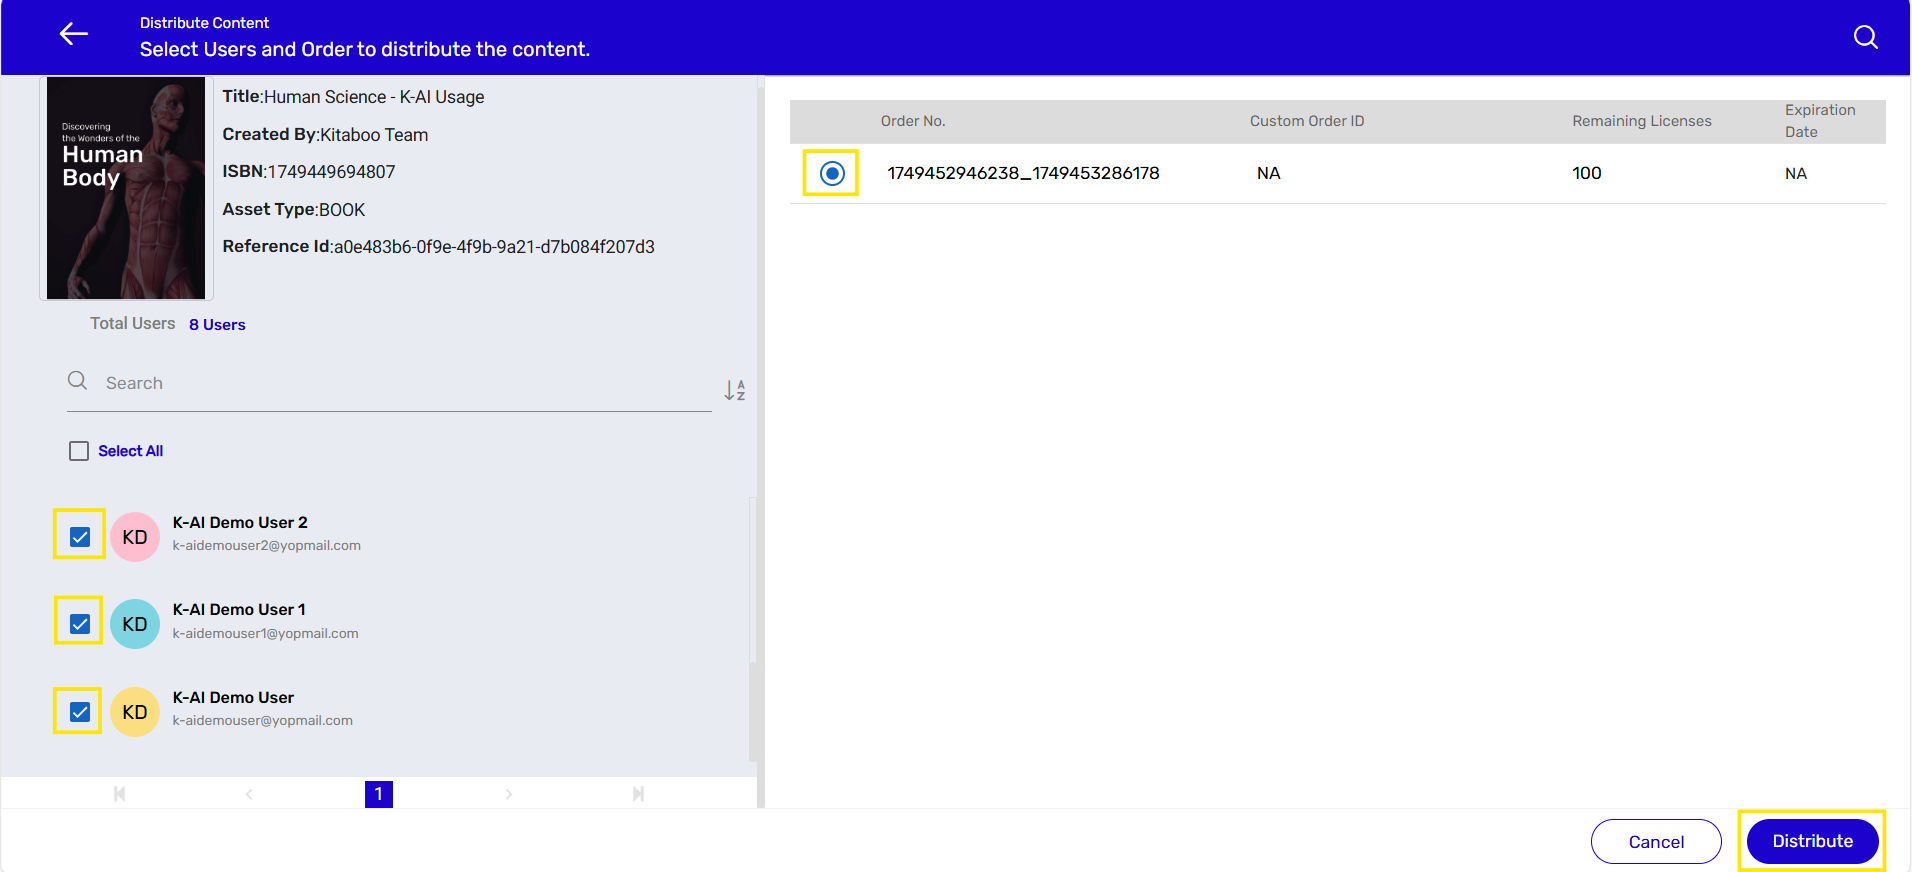
Now log in to the Reader platform and open the content. You will see the K-AI button—click on it.

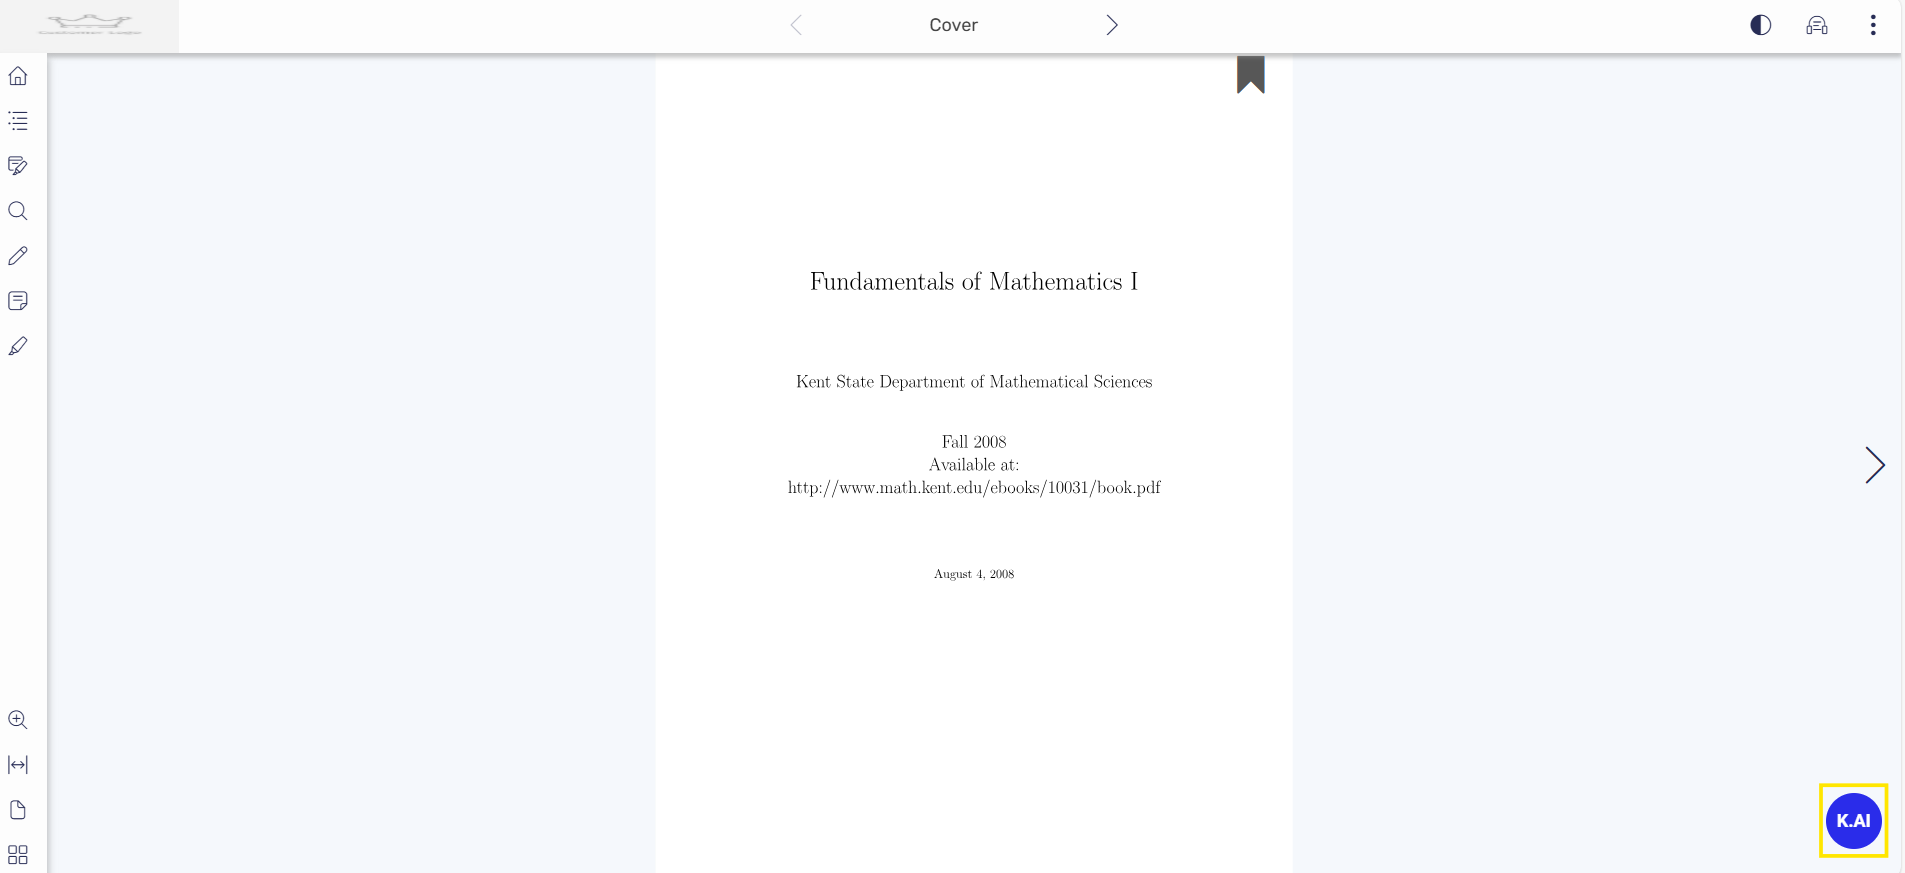
K-AI Enable Partner/Customer/Institute level –
The process for enabling K-AI at the content level is the same as described above. However, instead of enabling K-AI individually at the user or class level, you can enable it at the Partner/Institute/Customer level. The steps to do so are shown below:
- Log in to your account and navigate to the Customer tab –

- Locate and select the customer for whom you want to enable K-AI at the Partner, Institute, or Customer level. Once you’ve found the customer, click on “More Options” and then select the “Enable K-AI” button from the dropdown list.


- Once you log in to a Partner/Institute/Customer account where K-AI is enabled, you will no longer see the option to enable K-AI at the user or class level—this applies to both new and existing users/classes.
In this scenario, you simply need to assign the content with K-AI already enabled directly to the end user or class.

K-AI enabled at the content level during the converted state
- Create the content from the Studio Platform and move it to the Converted state.
For example, I have created content titled K.AI Math’s Book and set it to the converted state. Click on the More option, where you will find the K.AI button.
- Now click on the K.AI button to start the process. It takes approximately 5–10 minutes, as indicated on the UI, so that the client is aware. Please refer to the screenshot below.


- While the process is ongoing, you can check the status by clicking the Enable K.AI Status Check button, available under the More option.
If the process is still running, the UI will display a message indicating that the request is still being processed. Kindly wait.

- Once the process is completed, clicking on the Enable K.AI Status Check button again will display the completion status on the UI.

- After successfully enabling K.AI in the converted state, you can validate it by creating an activity. To do so, click on Start New Project, select the Activity content type, and fill in all the required metadata. After entering the metadata, click on the Add Widget button.


- Once the activity is created, click the Start Authoring button.

- Upon clicking Start Authoring, the authoring window will open. Inside the window, click on the K.AI button.

- After clicking the K.AI button, a pop-up will appear asking what type of questions you wish to generate — such as Objectives, Summary, MCQs, FIBs, or Flashcards. Click on the Next button.

Another pop-up will then appear, prompting you to select the grade for which the quiz should be generated and the desired level of complexity.
Click Next to proceed.
- A list of all available content will now be displayed. You can search for your book using the search option. Then, select whether you want to enable K-AI for the entire book or a specific chapter. After making your selection, click the “Generate” button.


- After clicking on “Generate,” a pop-up will appear indicating that the generation is in progress.

- The generation is now complete, and you can view the questions based on your selections, such as MCQ, FIB, etc. Scroll down to review all the generated questions.
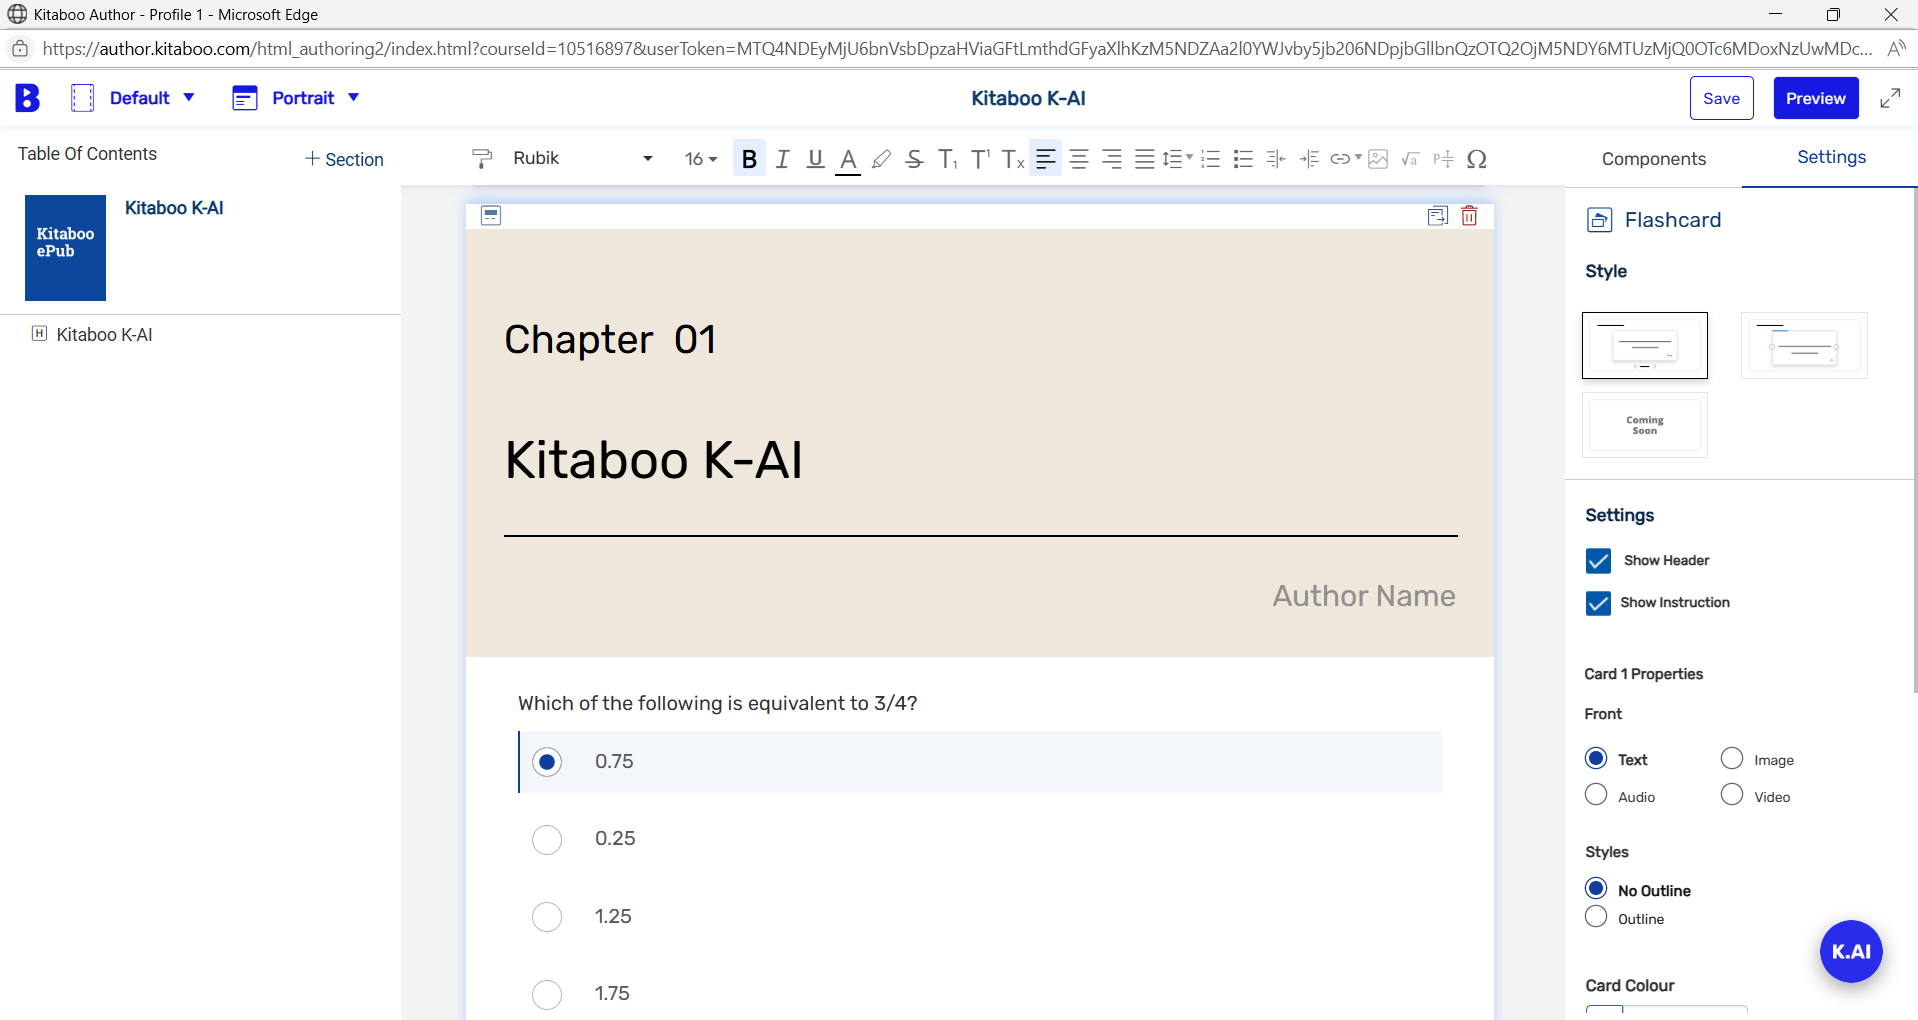
- Now you can click on “Save” and then preview how it will appear on the reader. You can also attempt the questions and check whether the provided answers are correct.
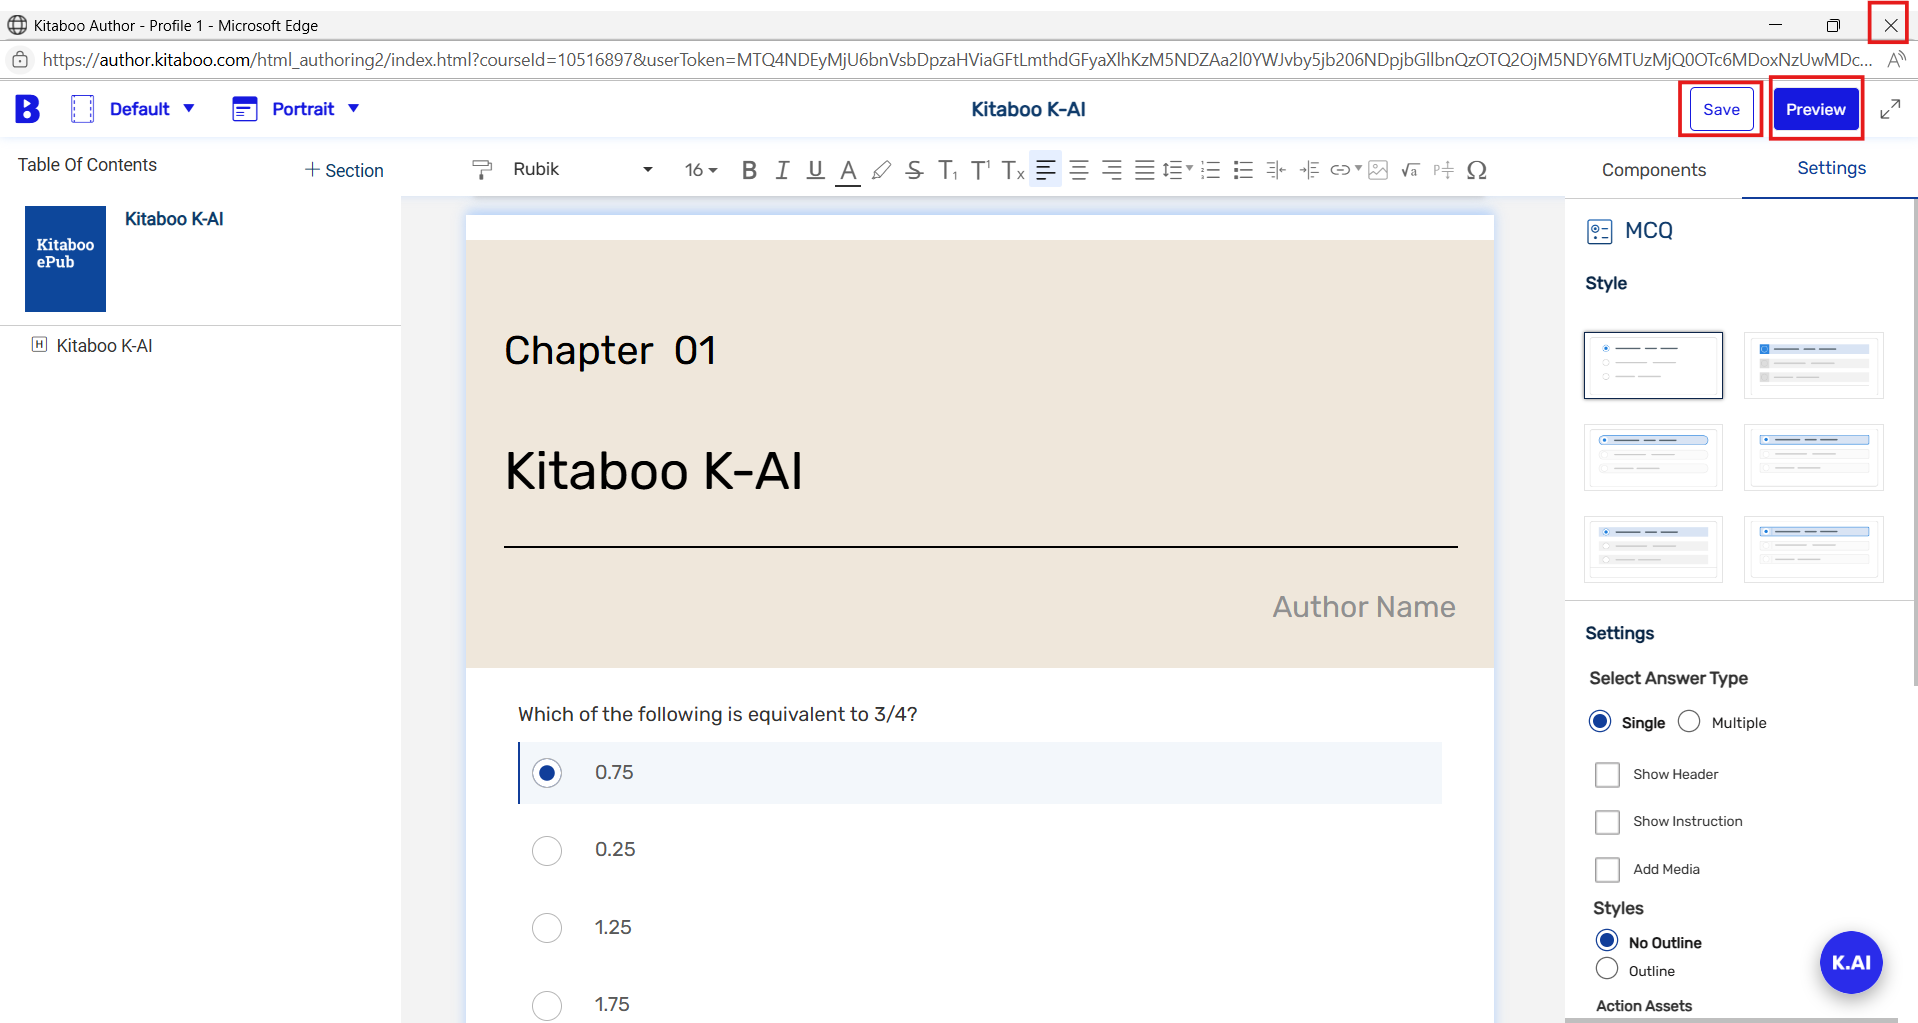
- After saving, you can close the window. Then, click on the “Publish” button to publish the activity. Within a few seconds, the activity will be published and will be available for use if you want to add it to any eBook using the Enrichment Tool.

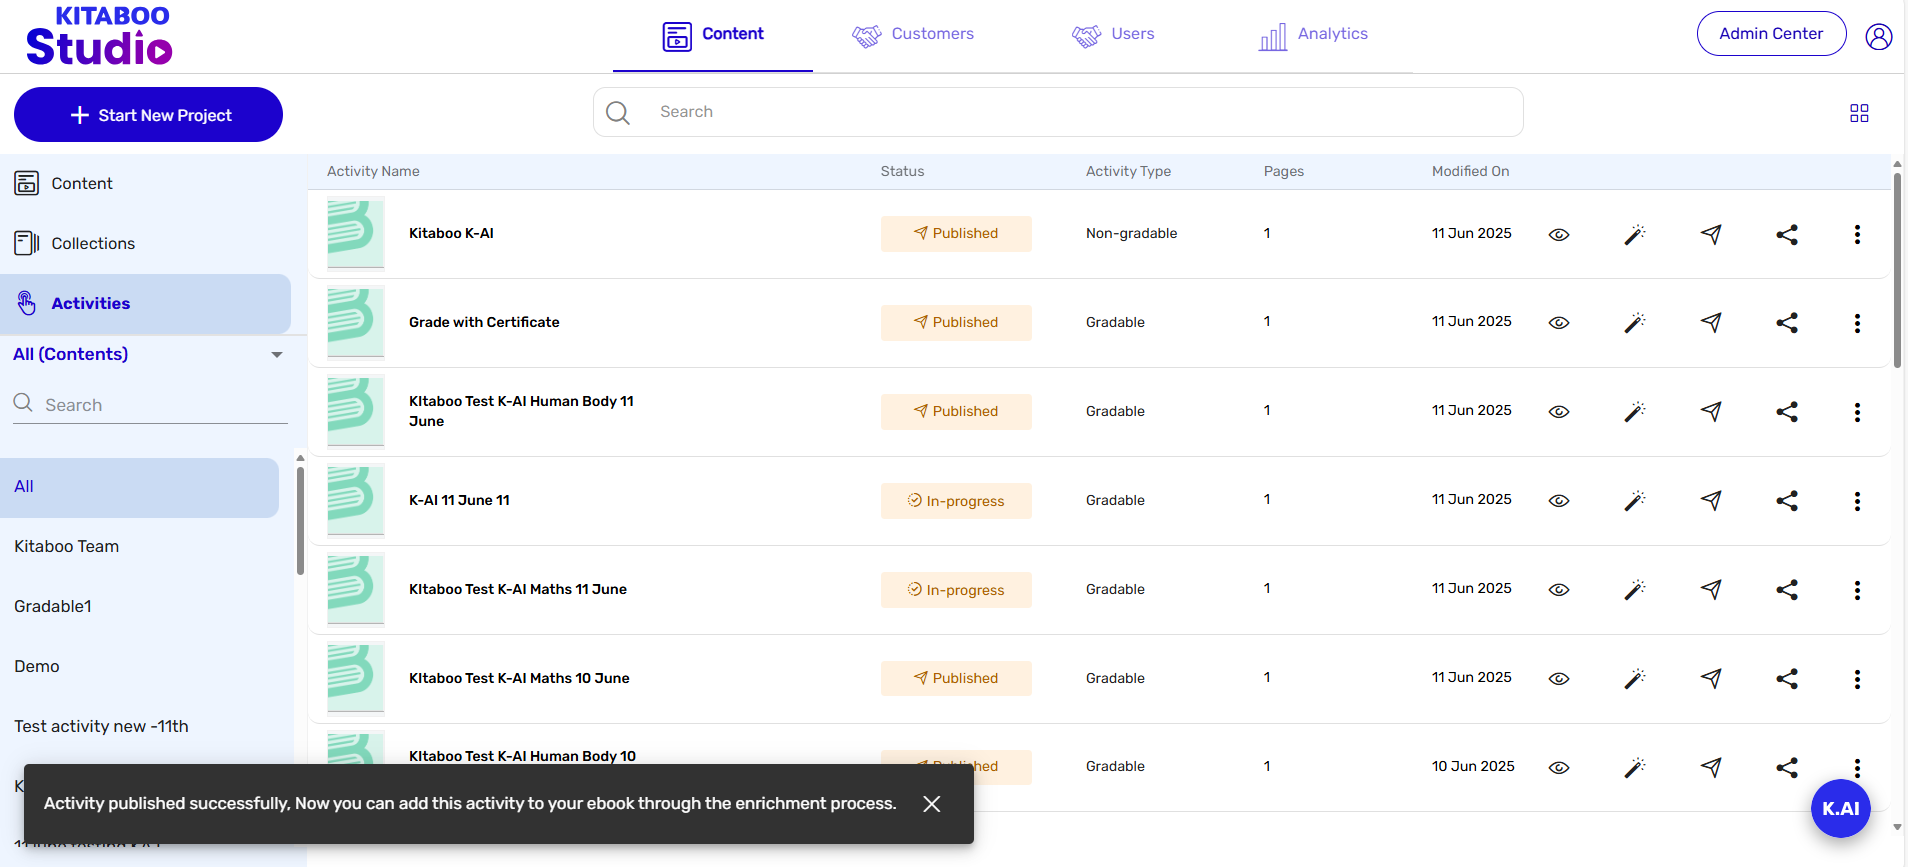
In this way, the client can generate content in the Converted state. However, please ensure that K-AI is re-enabled after the content is archived/live. If K-AI is enabled in the Converted state but not re-enabled after archiving, it will not function properly.
In the Converted state, K-AI is useful only for the Author of the book—not for end users. For end users, K-AI must be enabled again once the book goes live.
Important Notes:
- The K.AI functionality works only with Kitaboo Fixed Book (eBook) content.
- AI must be enabled both at the content level and for the end user. If it is not enabled in either case, the feature will not function.
- AI usage can be viewed by the Client Admin or Super Admin through the Report Section.
Navigate to Admin Centre > Reports > K-AI Usage.
Note: The report is available for a maximum of one month at a time. - When enabling K.AI for content by clicking the K.AI button, do not click it again. The system takes approximately 45–60 seconds to process and add all necessary entries in the backend. After this duration, you can check the status to confirm whether the process is complete.
- The K.AI feature does not support user creation via Bulk Upload User creation using an Excel sheet or Direct Distribution from the following roles:
Client (Super) Admin
Institute Admin
District (Group) Admin
FAQ:
Q1. Does the AI generate quizzes based on the title and chapter?
Answer: Yes, the AI generates quizzes based on the chapter selected by the user within the same title. It does not generate quizzes outside the syllabus.
Q2. Does the AI generate quizzes in other languages?
Answer: Yes, the AI generates quizzes in the language of your PDF file, as identified during the conversion process.
Q3. What languages does the AI currently support for quiz generation?
Answer: Currently, the AI supports English, Spanish, Norwegian, Italian, German, French, and Portuguese—based on the title’s language.
Q4. What happens if the language selected during conversion is English, but the title PDF is in German?
Answer: In this case, the AI may not generate the quiz accurately and will likely return an error.
Q5. Will the AI always generate the number of quizzes as instructed?
Answer: The AI tries to generate the number of quiz questions as per the user’s instructions. However, in some cases, it may generate fewer or even zero questions if the selected chapter lacks sufficient content.
Q6. What happens if the chapter contains only two pages of content? Will the AI still generate a quiz?
Answer: If the chapter has limited content—typically less than 500 words—the AI may not be able to generate a quiz.
Q7. Will the AI always generate new or unique questions?
Answer: Not necessarily. In some cases, repeated attempts may result in the same questions being generated.
Q8. Are the AI-generated quizzes gradable or trackable in Kitaboo?
Answer: No, the AI-generated quizzes are practice quizzes only. They are downloadable as PDFs and are not gradable or trackable within Kitaboo.
Q.9 Can K.AI be enabled for all types of content?
Answer: No, K.AI is available only for eBook-type content.
- Sign in with your Enterprise Admin credentials.
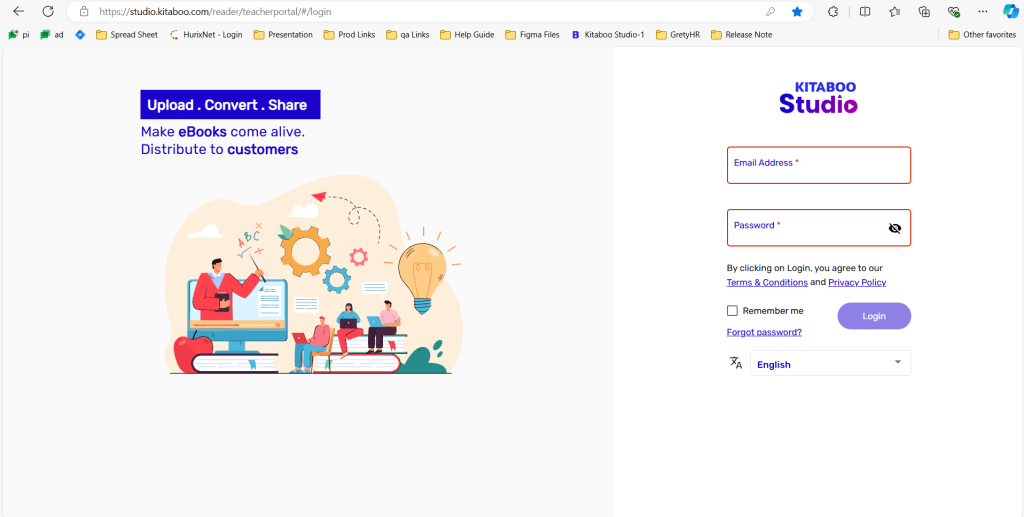
- Switch to the Content tab. > Click on the Start New Project button.
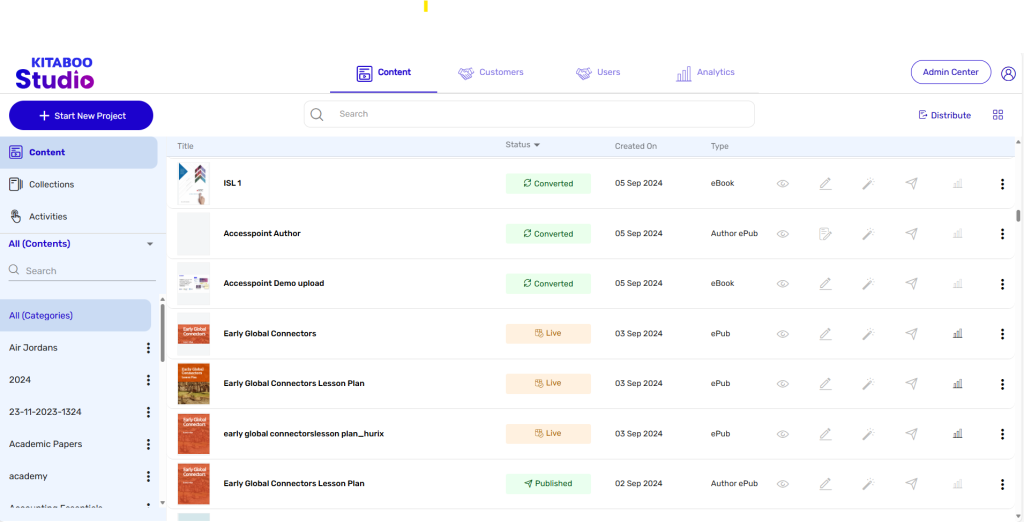
- On the Upload & Create page, select the Fixed eBook option from the Create Content list. > Click on the Create button.
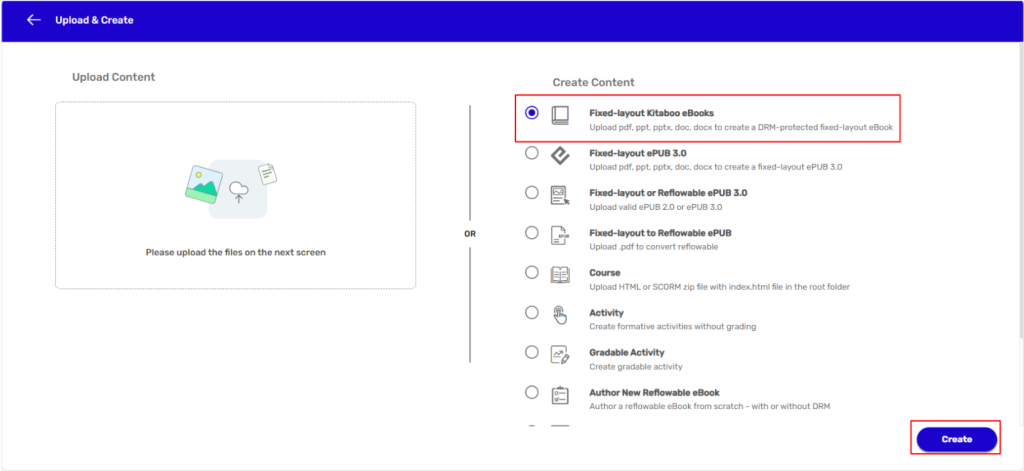
- Enter details in the Title, Author, Description, and Category , and Keywords fields in the Upload Details section also upload a file in the specified format which is mentioned.
NOTE:
1. Several categories have already been added to the Category list. You can either select one of them or add a new category to the list, if required.
2. If you want to add a new category, enter a relevant name for the category, and click on the +icon.
3. Keywords and Tags should be relevant to the content of the eBook you’re going to create.
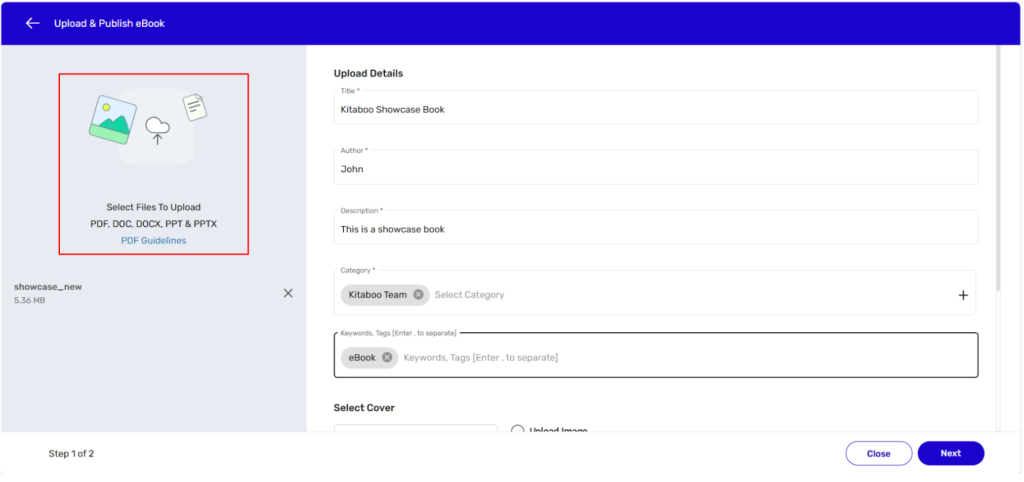
- Scroll down and select a cover image, if any, for the to-be-created eBook. > Check the Advance Metadata checkbox.
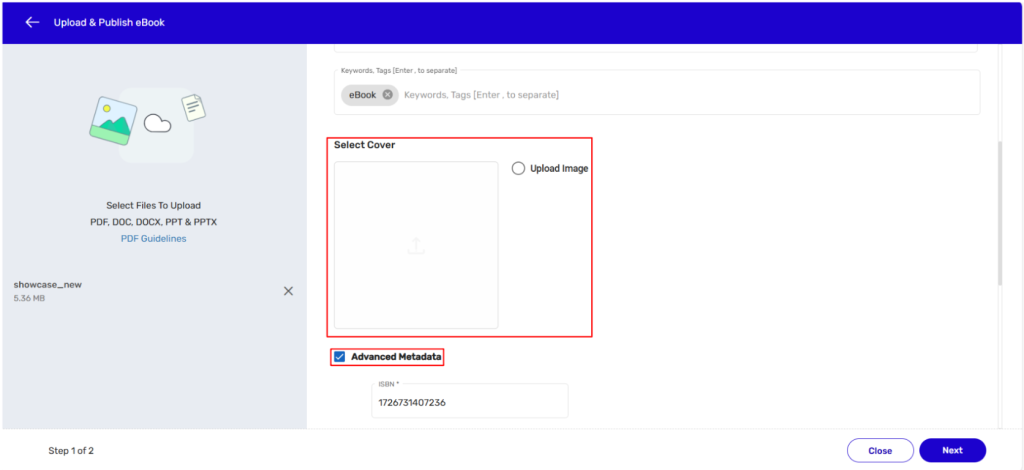
- Provide details in the ISBN field and select the desired options for Font Permission, Lock Book Orientation, and Book Type that appear after selecting the Advance Metadata checkbox. > Click on the Next button.
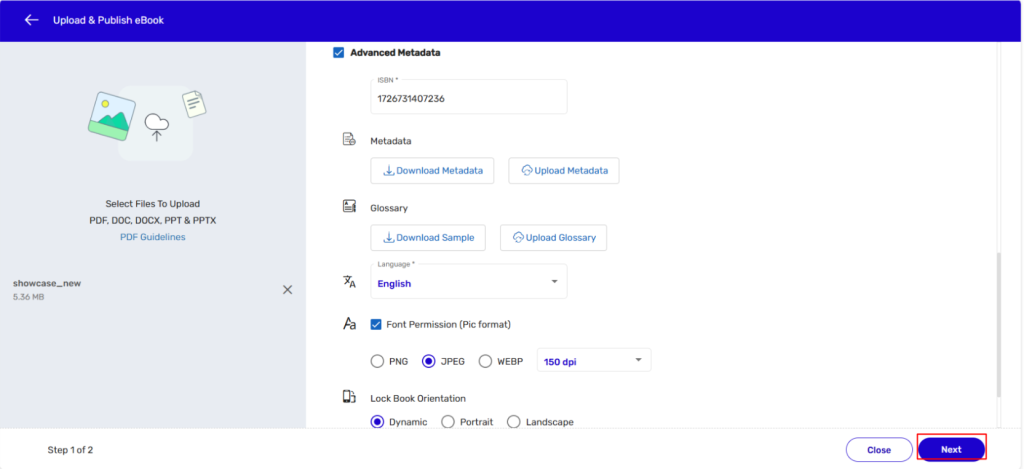
- On the Add Table of Contents page, you can add a Table of Contents (TOC), define a title for your eBook, define page range for various chapters, topics, sections, etc., and also generate folios for them. > Click on Convert.
NOTE:
1. You can enter a title for your eBook in this field.
2. The system will automatically display your file name(s) in this field.
3. The system will automatically display page range(s) for chapters, topics, sections, etc. in this field.
4. The system will automatically display folios in this field. You can manually modify them and generate a final table of folios by clicking the Generate Folio button. Once an eBook has been successfully created, you can issue licenses and distribute the eBook.
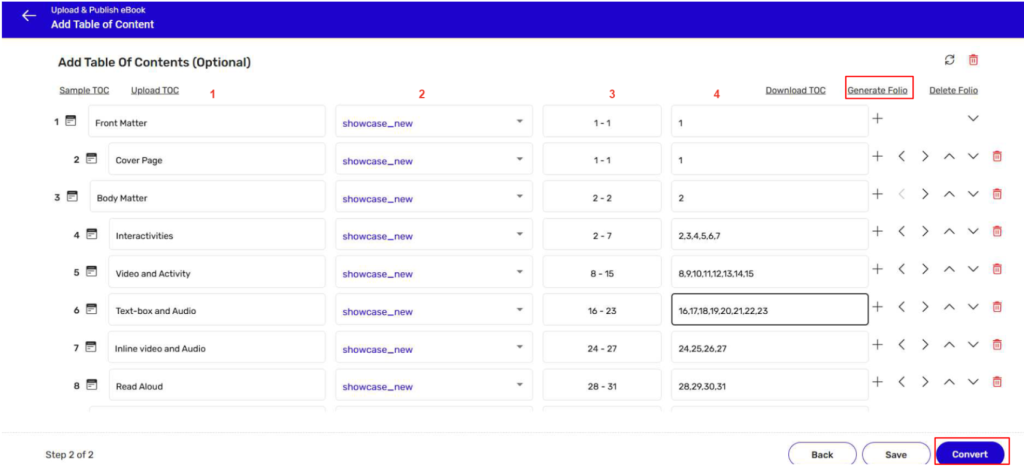
- Sign in with your Enterprise Admin credentials.
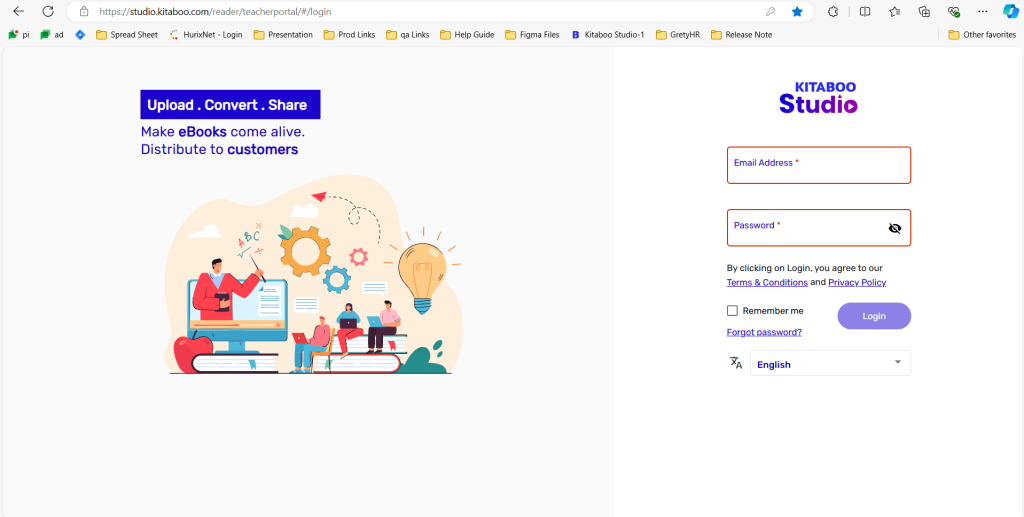
- Switch to the Content tab. > Click on the Start New Project button.
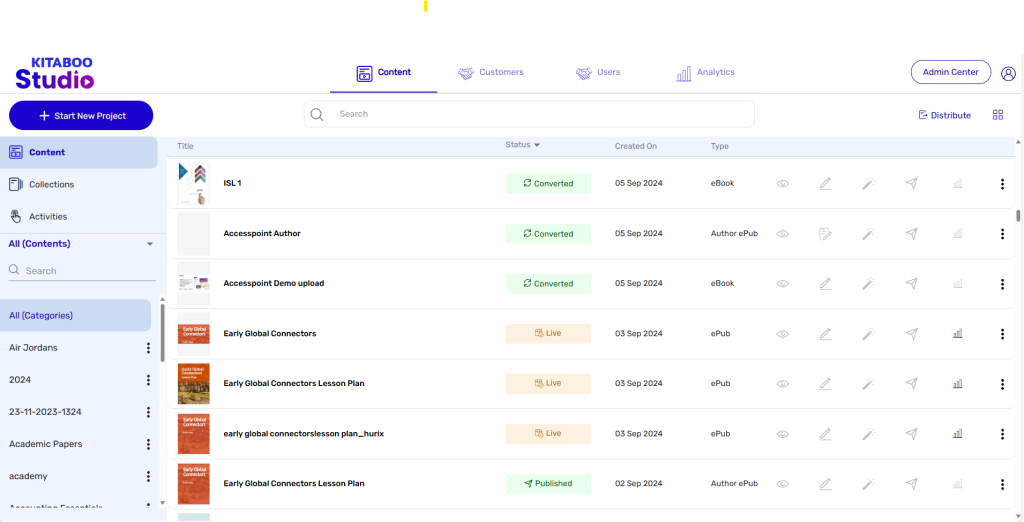
- On the Upload & Create page, select the Fixed ePub option from the Create Content list. > Click on the Create button.
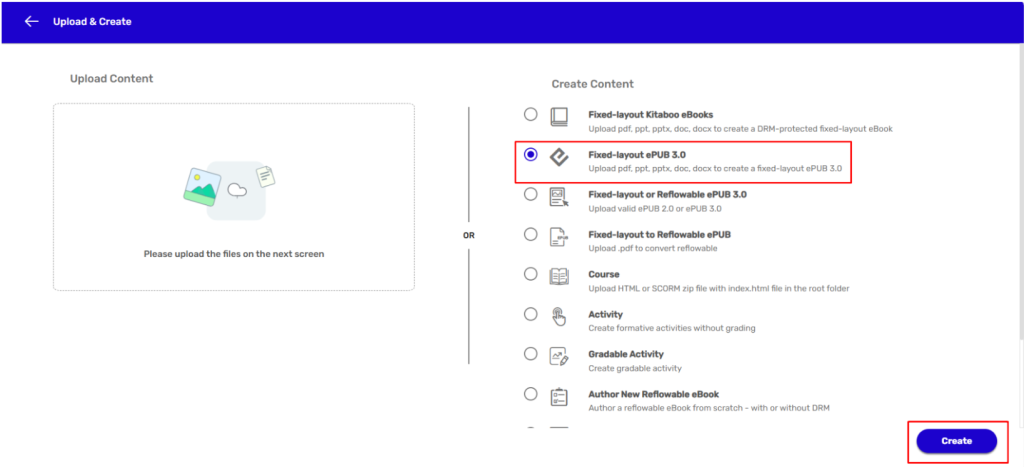
- On the Upload & Publish ePub page, enter a title for your ePub and upload a cover image, if any.
NOTE : - At this stage, you can also upload your ePub file in PDF, DOC, or PPT formats.
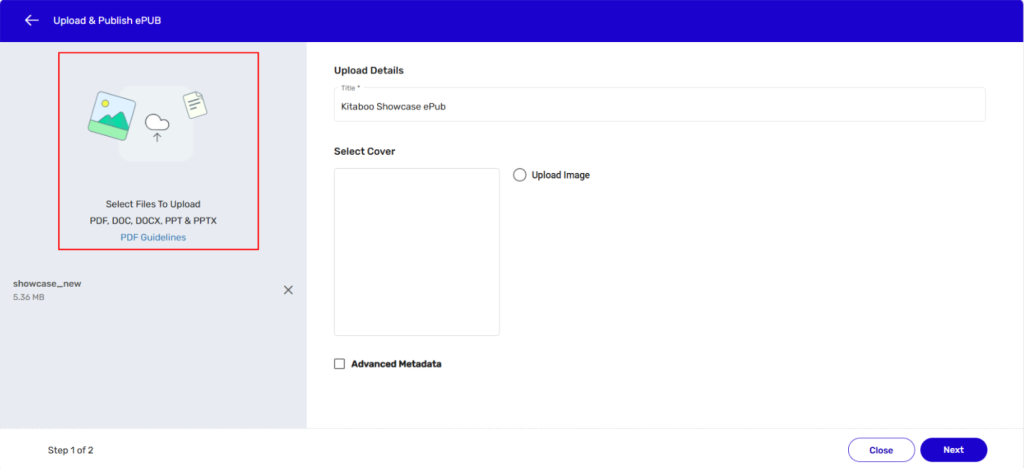
- Scroll down and check the Advance Metadata box. > Select the desired options in the various fields that appear. > Click on the Next button.
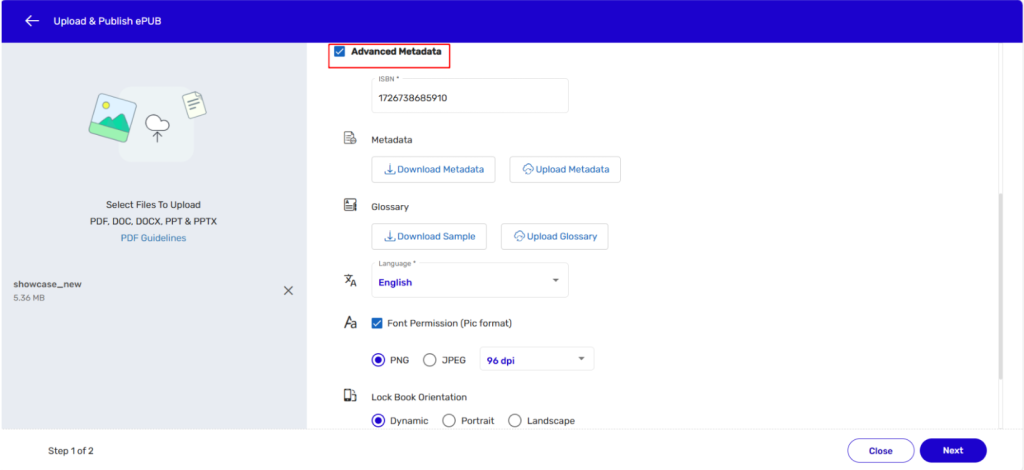
- On the Add Table of Contents page, you can add a Table of Contents (TOC), define a title for your eBook, define page range for various chapters, topics, sections, etc., and also generate folios for
them. > Click on Convert.
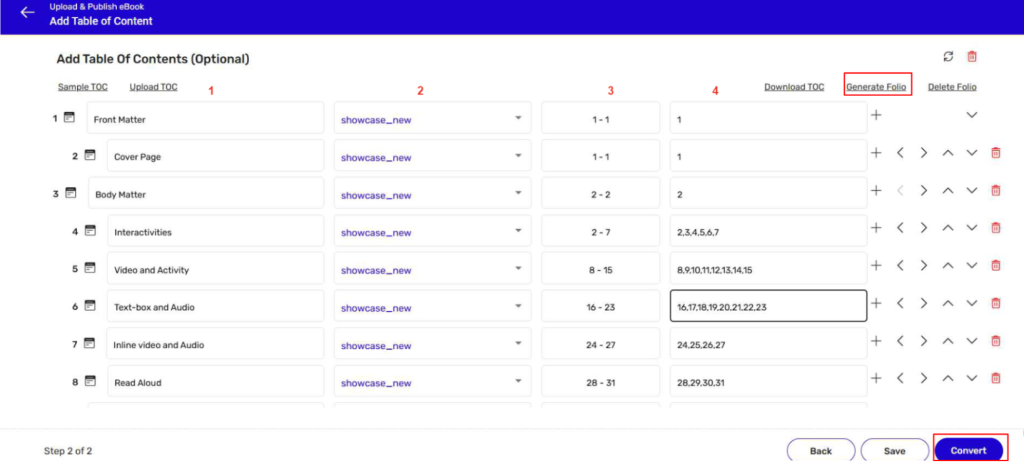
NOTE:
1. You can enter a title for your ePub in this field.
2. The system will automatically display your file name(s) in this field.
3. The system will automatically display page range(s) for chapters, topics, sections, etc. in this field.
4. The system will automatically display folios in this field. You can manually modify them and generate a final table of folios by clicking the Generate Folio button. Once an ePub has been successfully created, you can issue licenses and distribute the ePub
- Sign in with your Enterprise Admin credentials.
- Switch to the Content tab. > Click on the Start New Project button.
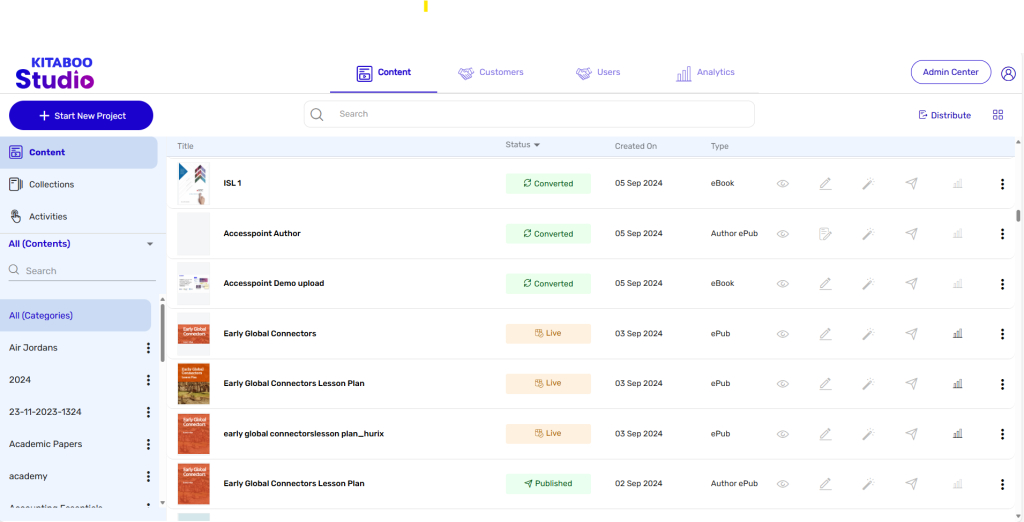
- On the Upload & Create page, select the Creating Fixed-layout or Reflowable ePUB 3.0 option from the Create Content list. > Click on the Create button.
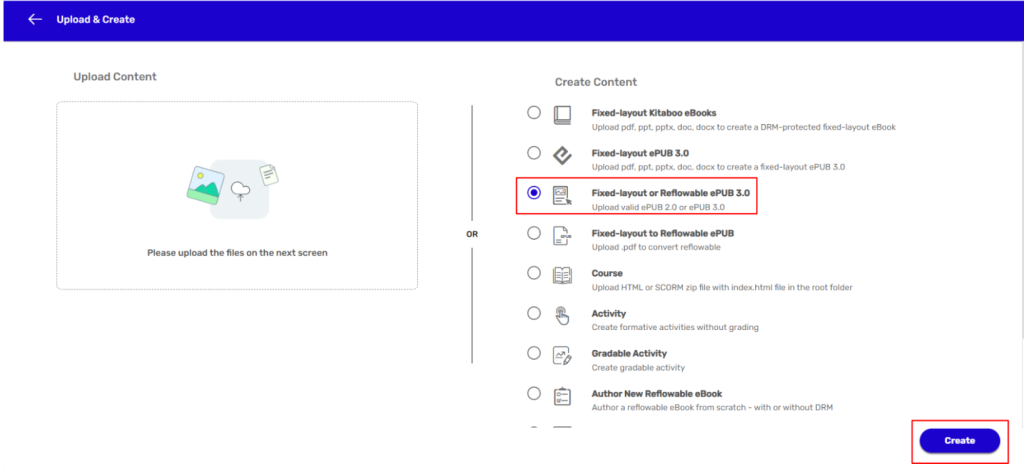
- On the Upload & Publish Reflow ePUB page, enter the upload details like Title, Author, Description, ISBN Code, and Category.
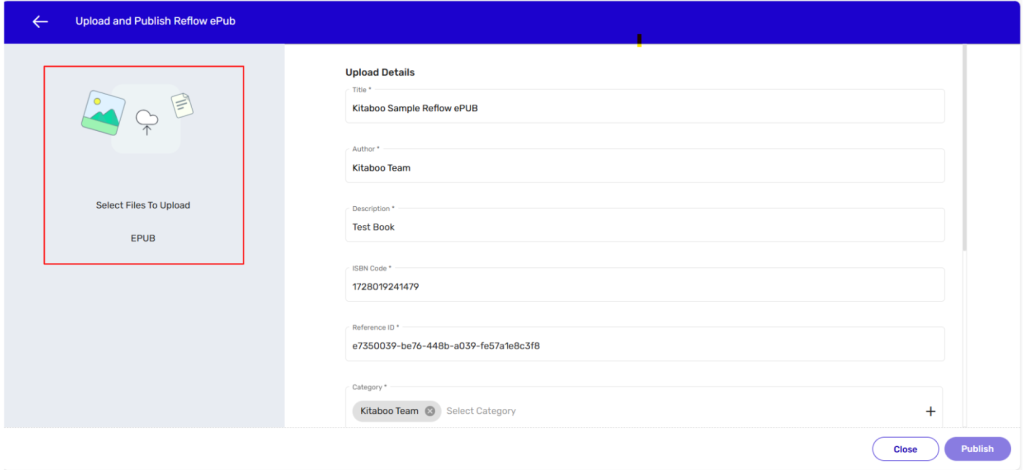
- NOTE:
● You can either continue with the system generated ISBN Code or modify it.
● Several categories have already been added to the Category list. You can either select one of them or add a new category to the list if required.
● If you want to add a new category, enter a relevant name for the category, and click on the + icon. - Scroll down and enter a few keywords/tags relevant to your content. > Select a cover image, if any, for the to-be-uploaded ePUB.
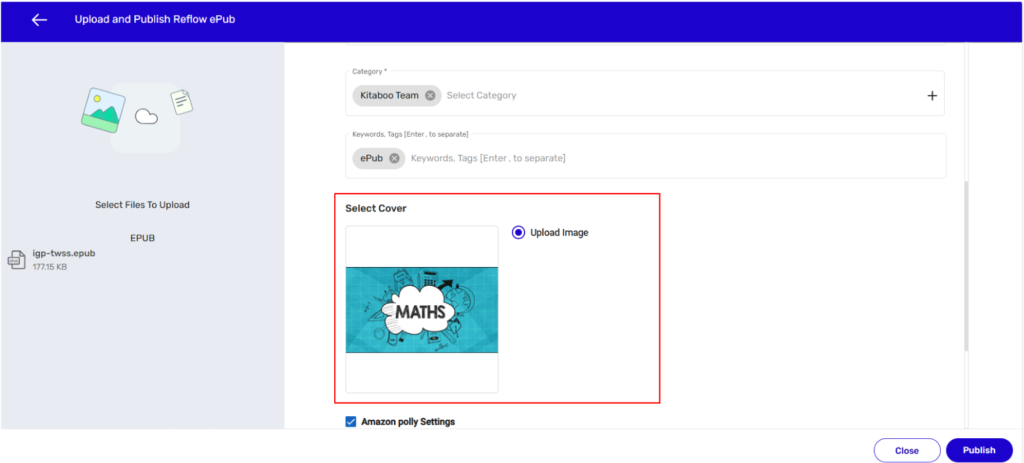
- NOTE:
- Keywords and Tags should be relevant to the content of the ePub you’re going to upload.
- Click on the Publish button. Once an ePub has been successfully published, you can issue licenses and distribute the ePub.
- Kitaboo support only Valid ePub so kindly make sure your epub file is valid as per idpf guidelines.
- Sign in with your Enterprise Admin credentials.
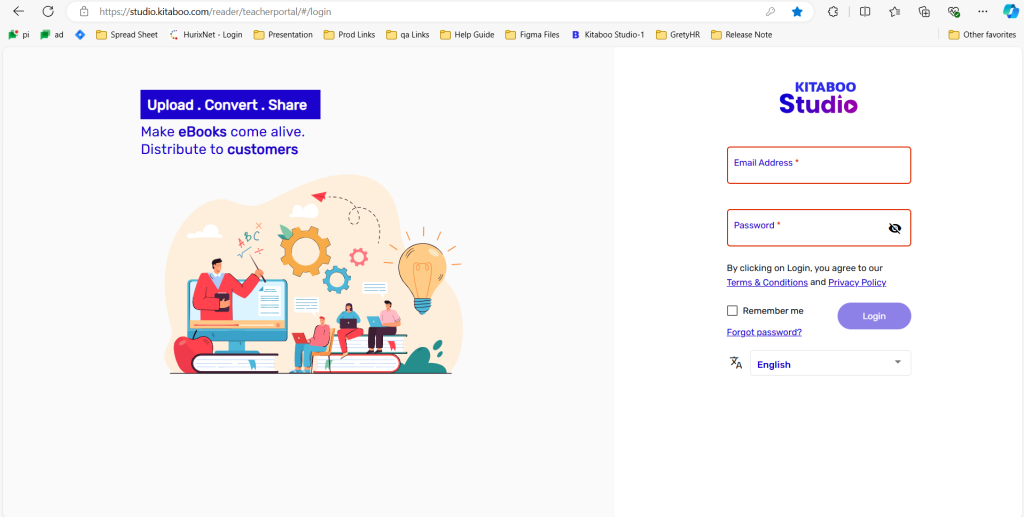
- Switch to the Content tab. > Click on the Start New Project button.
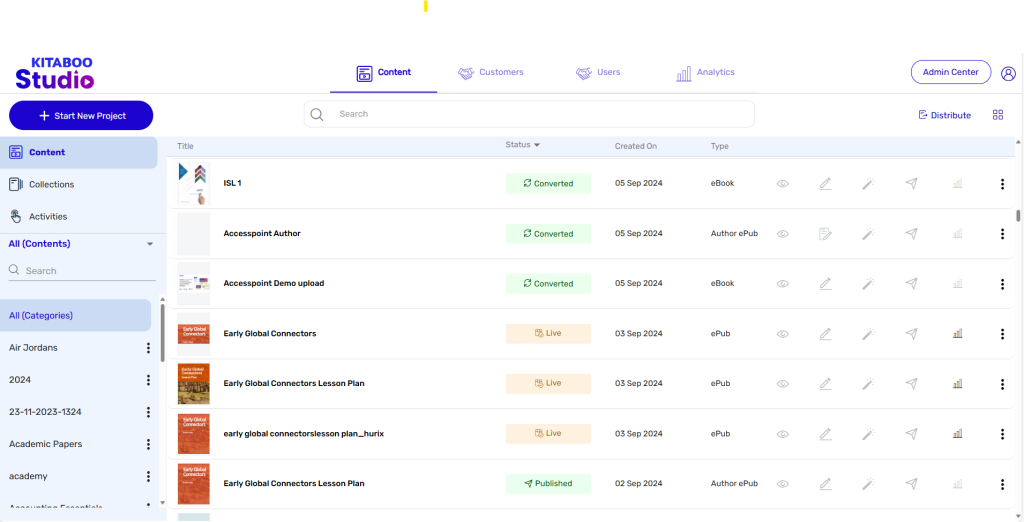
- On the Upload & Create page, select the Course Option option from the Create Content list. > Click on the Create button.
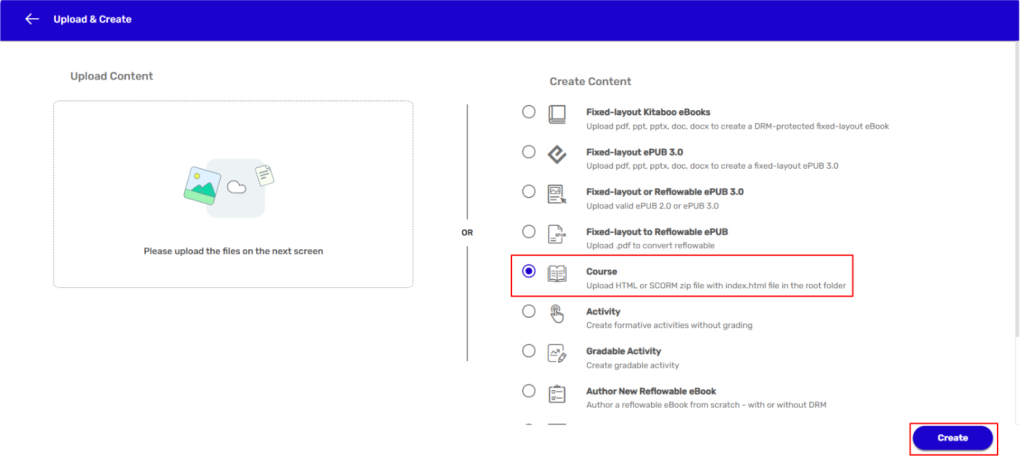
- Enter details in the Title, Author, Description, ISBN Code, and Category fields in the Upload Details section.
Note:
● Users can create two types of courses by using the Kitaboo system. They are – the HTML course and the SCORM course.
● The system will automatically generate an ISBN Code for the to-be-created course.You can either retain the same code or modify it.
● Several categories have already been added to the Category list. You can either
select one of them or add a new category to the list, if required.
● If you want to add a new category, enter a relevant name for the category, and click on the + icon.
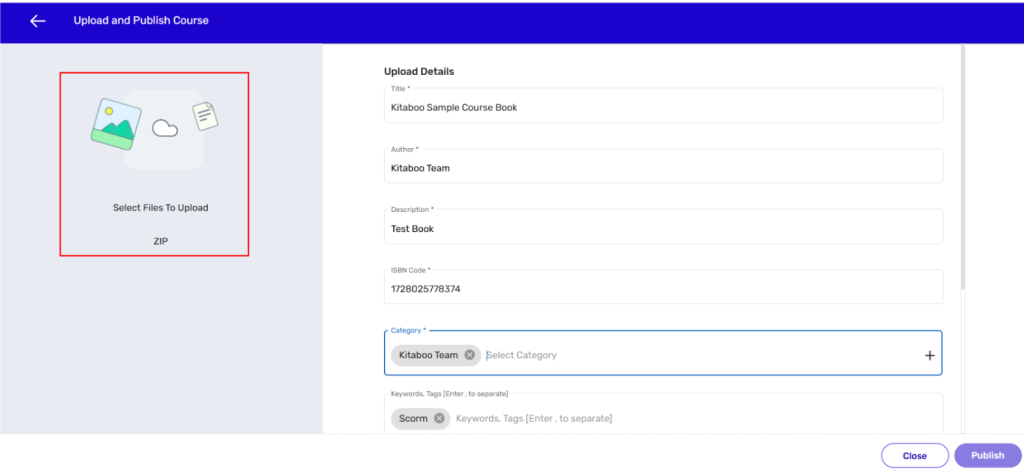
- Scroll down and enter Keywords and comma-separated Tags. > Next, select a cover image for your course. > Upload a relevant file for the to-be-created course. > Click on the Publish button.
NOTE:
index.html, and the same file name should be referenced in the imsmanifest.xml.● Keywords and Tags should be relevant to the content of the course you’re going to create.
● The file you want to upload for the course creation should be in the ZIP format only. You can also drag and drop or paste a relevant file.
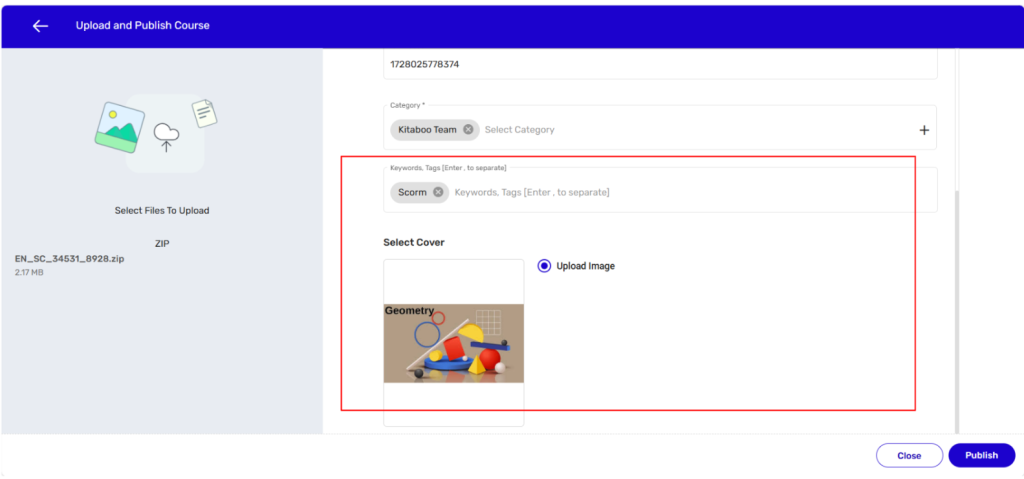
- Sign in with your Enterprise Admin credentials.
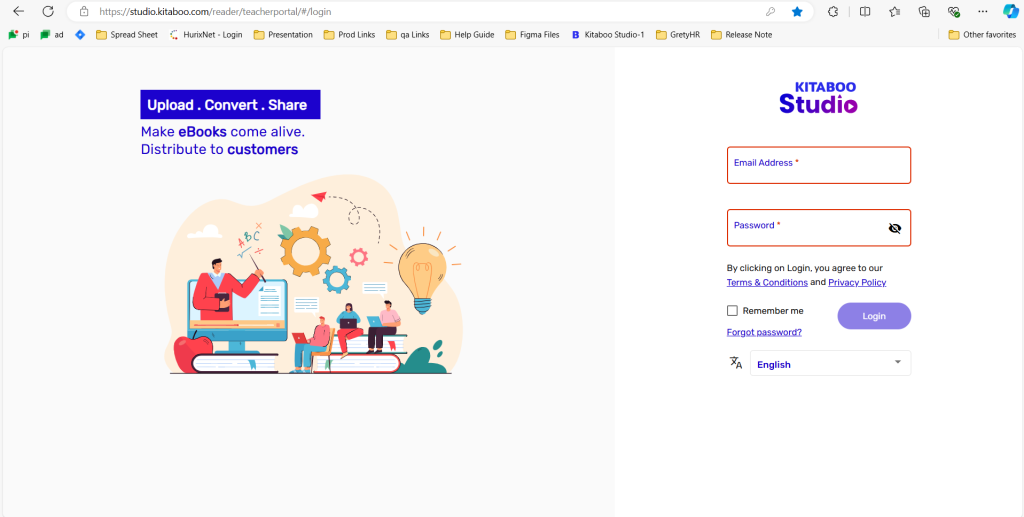
- Switch to the Content tab. > Click on the Start New Project button.
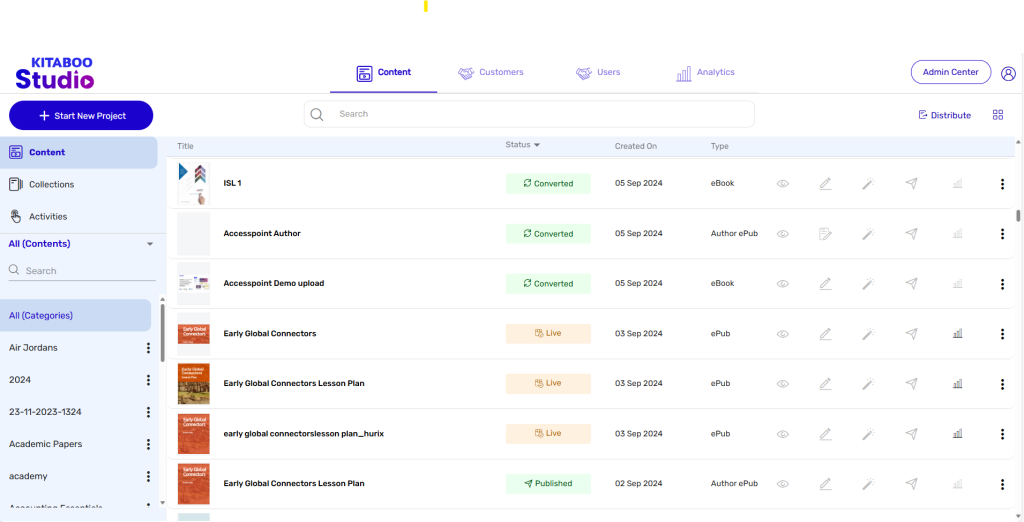
- On the Upload & Create page, select the Activity Option option from the Create Content list. > Click on the Create button.
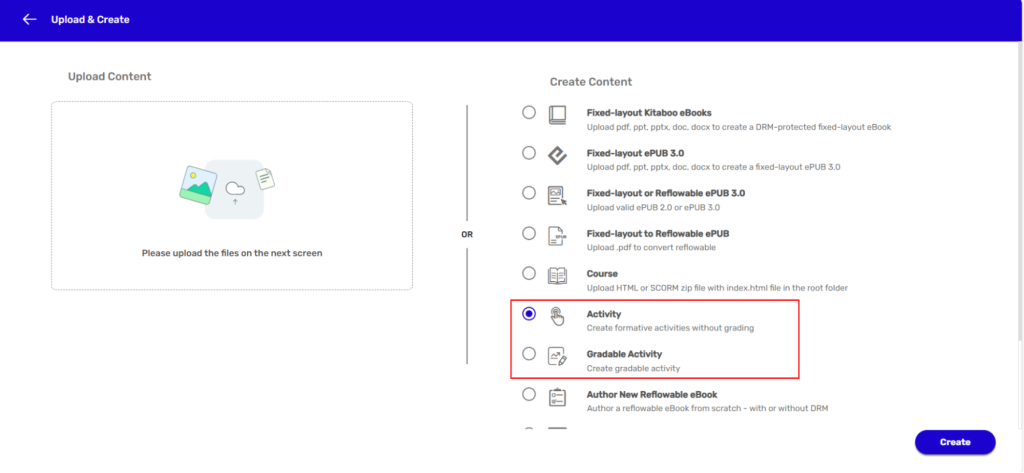
- Enter details in the Title, Description, Tag IDs, and Category fields in the create Author Widget section along with Cover Image and then click on Add Widget.
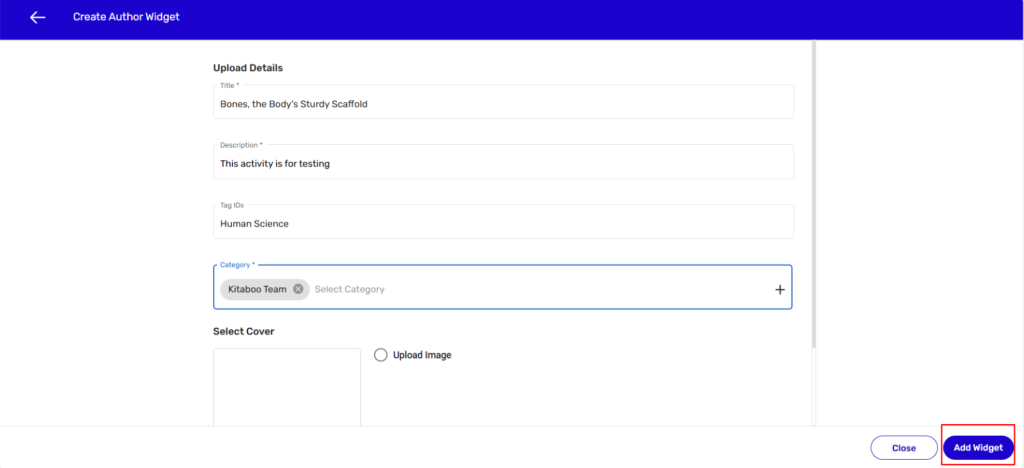
- Once you click on Add Widget Button, you will redirected to Activities tab and you have to click on Resume Authoring.
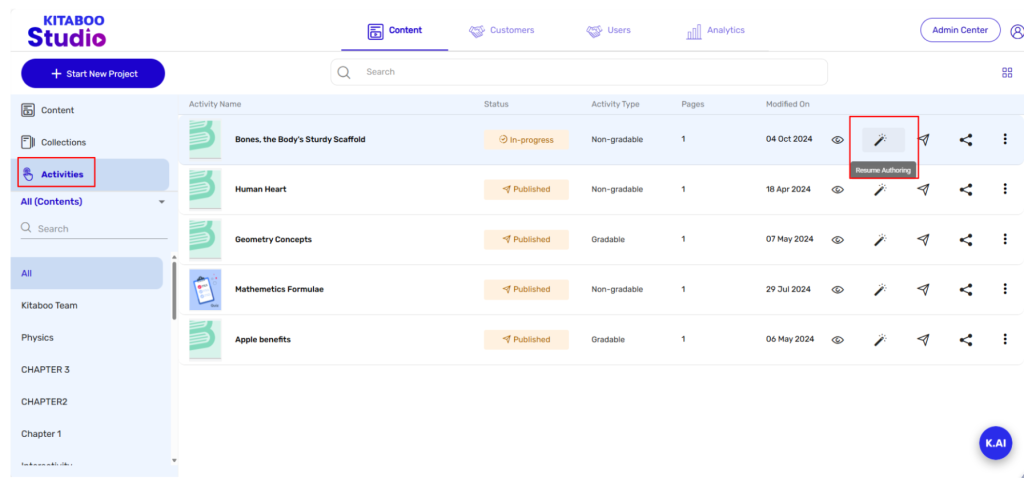
- A new page will thus appear. You can add a TOC and define various components like layouts, elements, widgets, etc.
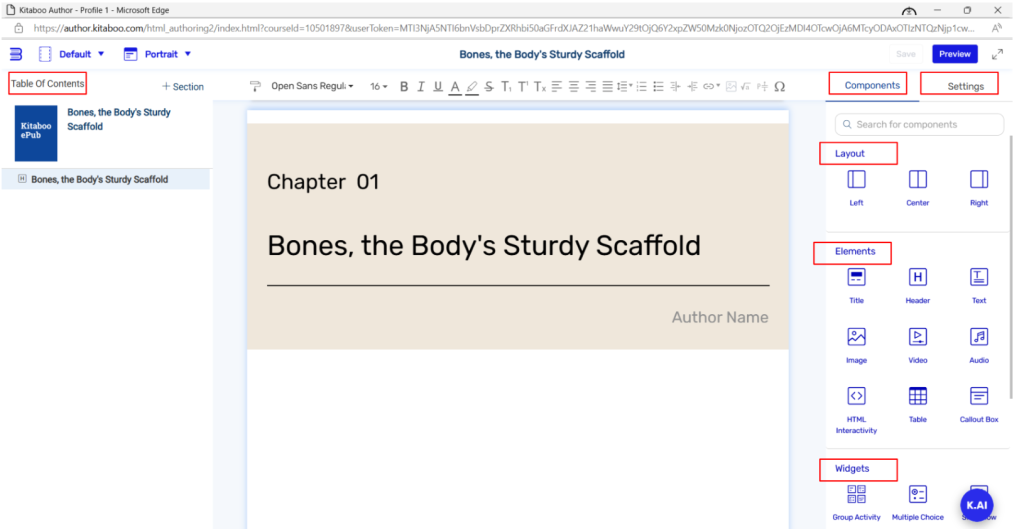
- From the Settings tab, you can select a template from the list of templates for the title of your Activity. > Click on the Save button.
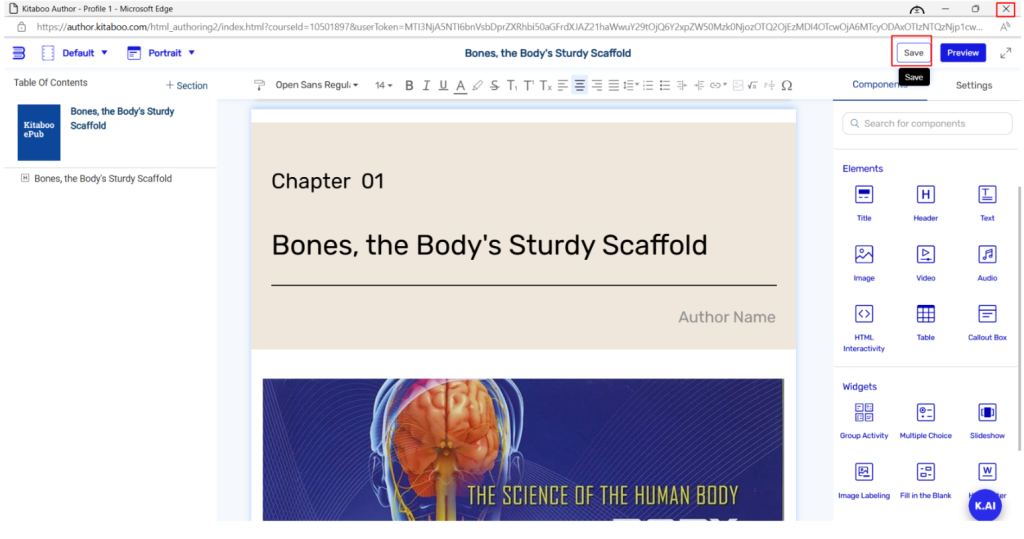
- Once you close the page, you can also relaunch it later by clicking the Resume button. The Publish button let you publish the activity.
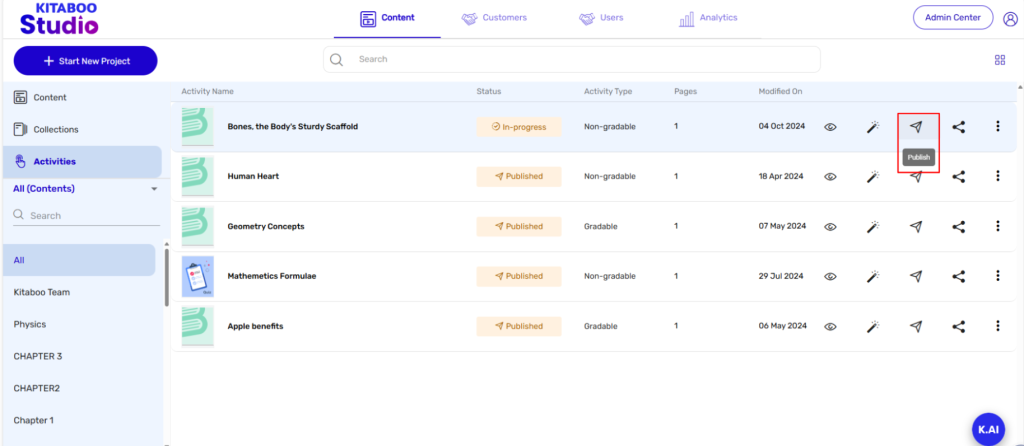
- Sign in with your Enterprise Admin credentials.
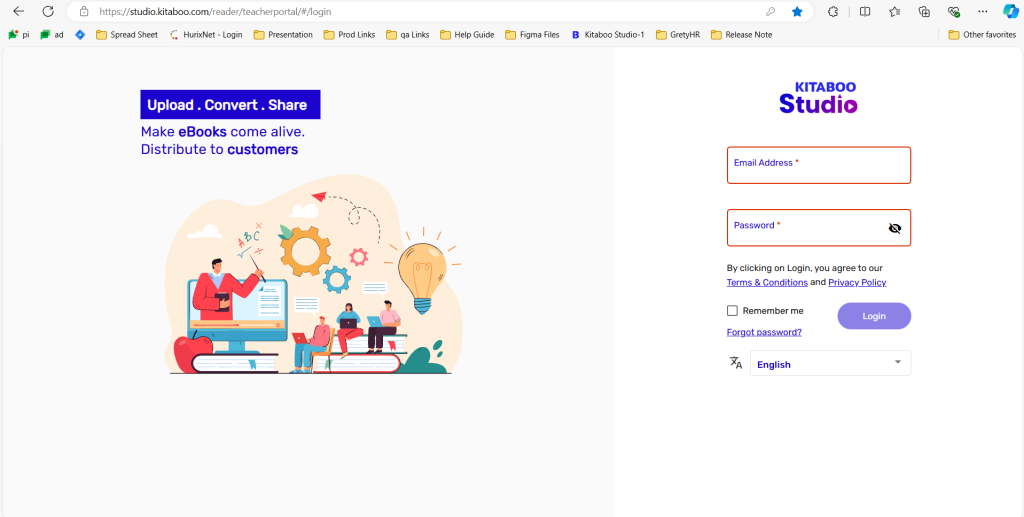
- Switch to the Content tab. > Click on the Start New Project button.
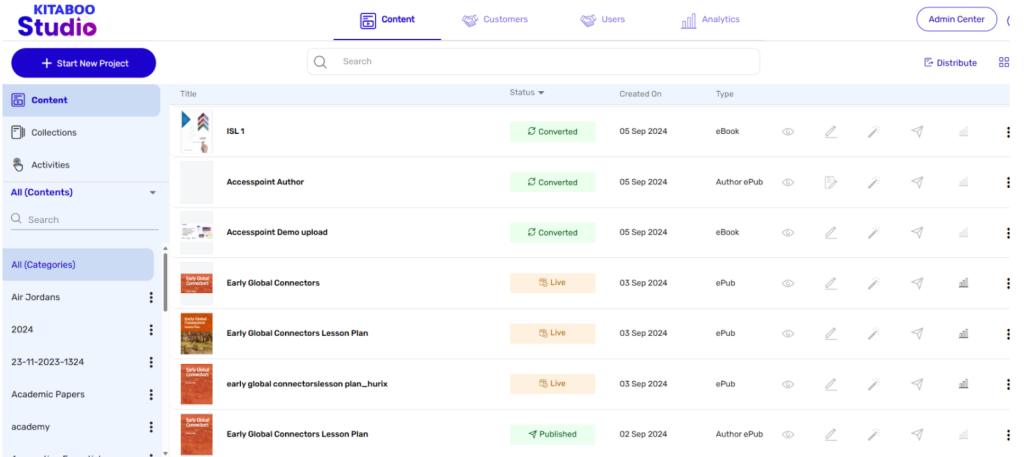
- On the Upload & Create page, select the Author New Reflowable eBook option from the Create Content list. > Click on the Create button.
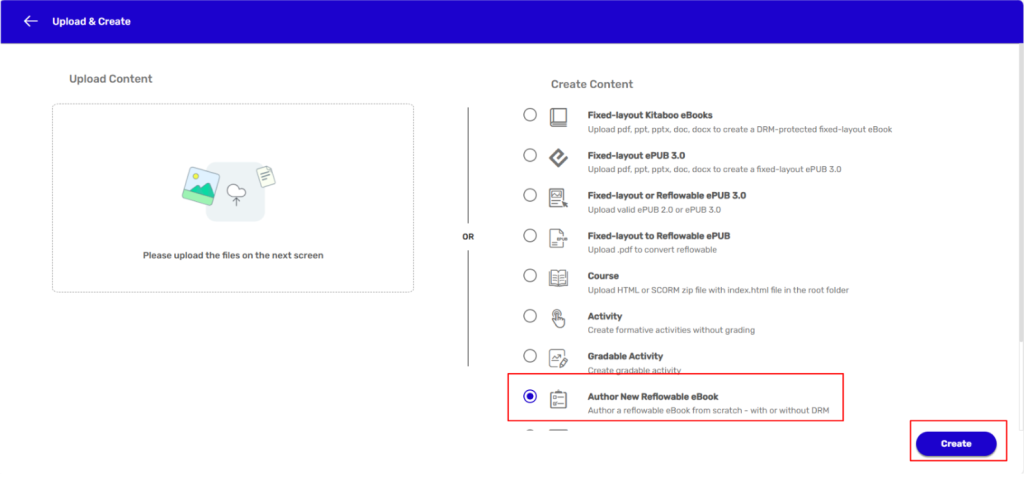
- Enter details in the Title, Author, Description, ISBN Code, and Category fields in the Upload Details section.
NOTE:
● The system will automatically generate an ISBN Code for the to-be-created course. You can either retain the same code or modify it.
● Several categories have already been added to the Category list. You can either select one of them or add a new category to the list if required.
● If you want to add a new category, enter a relevant name for the category, and click on the + icon.
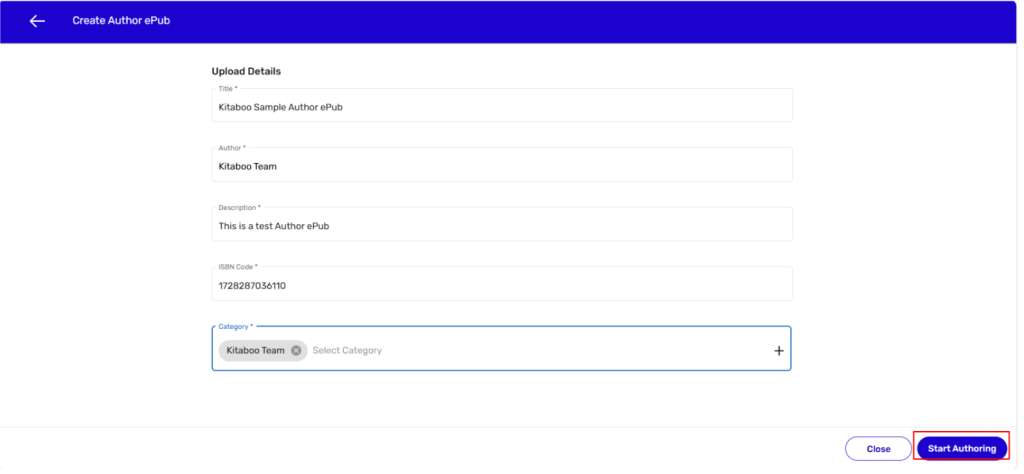
- A new page will thus appear. You can add a TOC and define components like layouts, elements, widgets etc. of your to-be-authored ePub on this page.
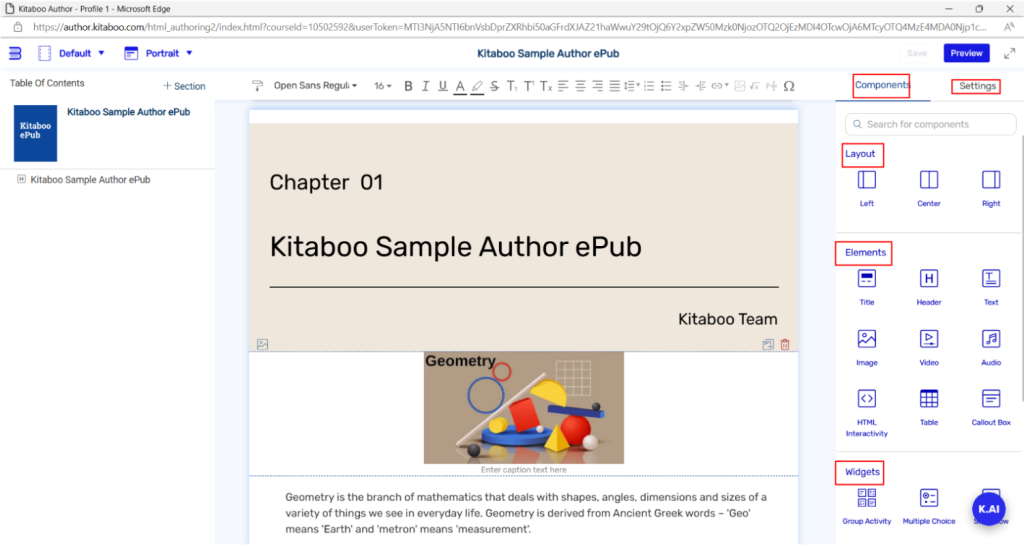
- From the Settings tab, you can select a template from the list of templates for the title of your ePub. > Click on the Save button.
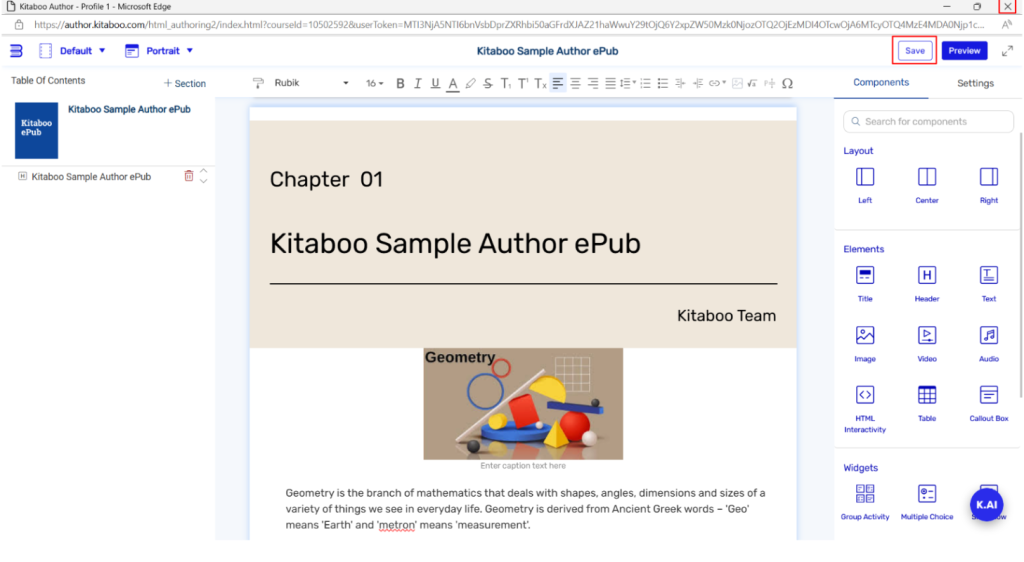
- By clicking on the Preview button, you can also preview the page on a Desktop, Tablet, or Mobile. You can also preview it on the Kitaboo Reader.
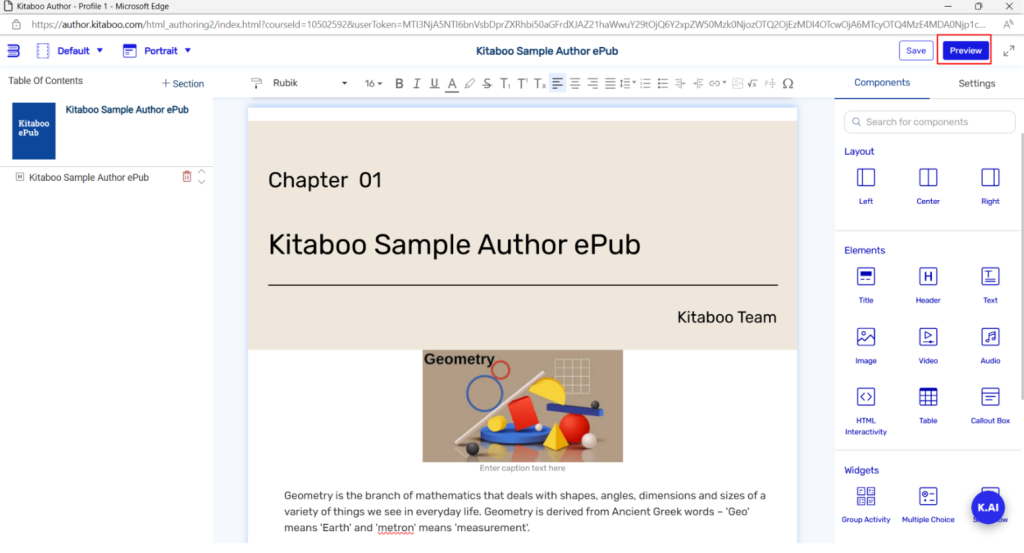
- Once you close the page, you can also relaunch it later by clicking the Resume button. The Publish and Archive buttons let you publish or archive the ePub.
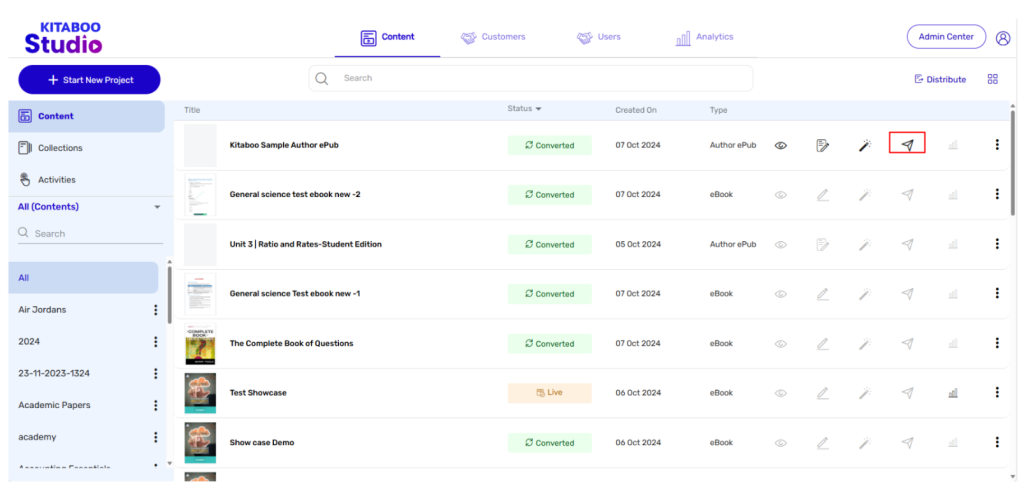
- Once The Author ePub is Published, you can archive it by clicking on More Option and select Make it live.
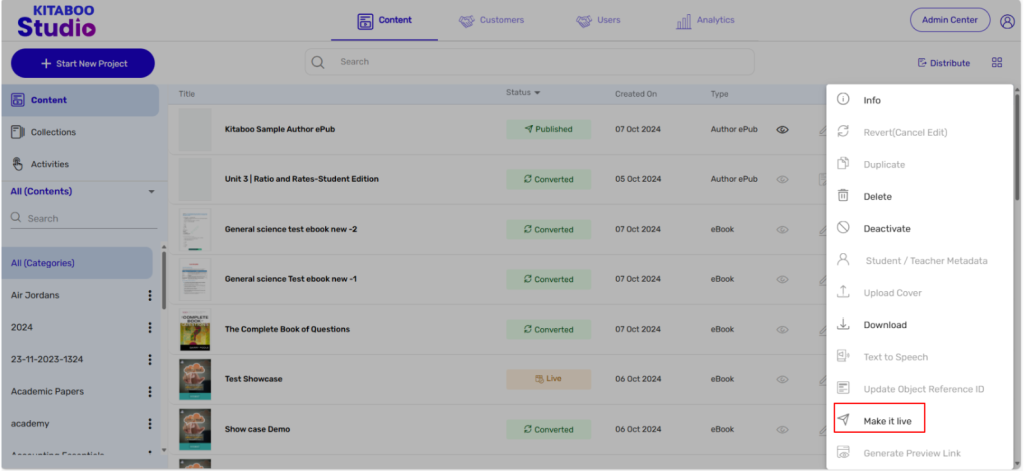
- Sign in with your Enterprise Admin credentials.
- Switch to the Content tab. > Click on the Start New Project button.
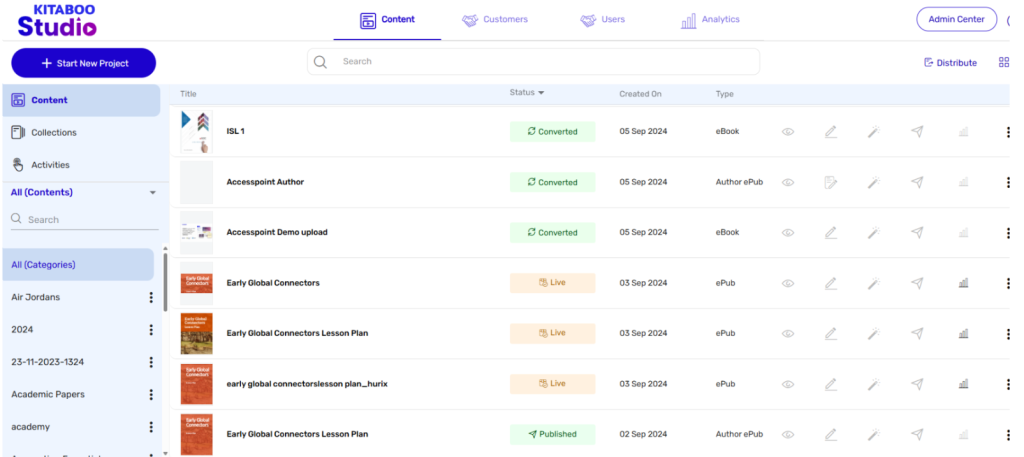
- On the Upload & Create page, select the Video option from the Create Content list. > Click on the Create button.
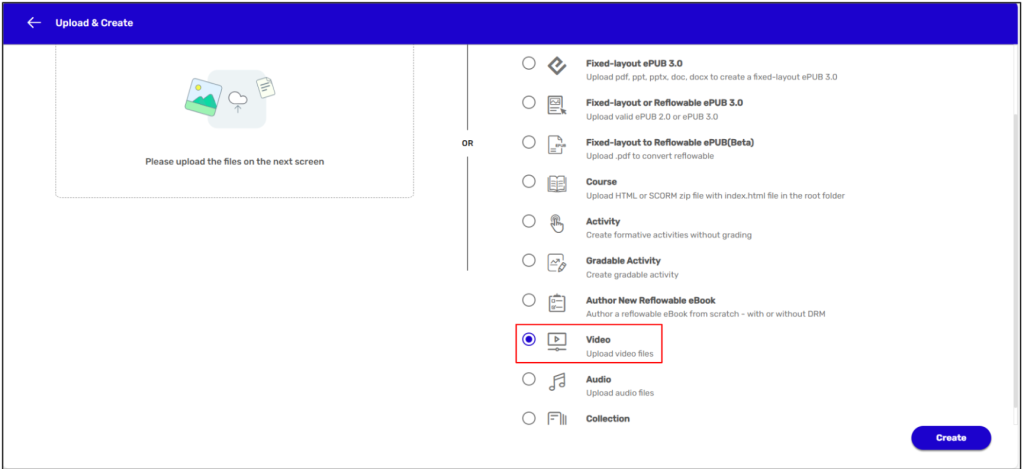
Enter details in the Title, Author, Description, ISBN Code, and Category fields in the Upload Details section.
NOTE:
● The system will automatically generate an ISBN Code for the to-be-created video book. You can either retain the same code or modify it.
● Several categories have already been added to the Category list. You can either select one of them or add a new category to the list, if required.
● If you want to add a new category, enter a relevant name for the category, and click on the + icon.
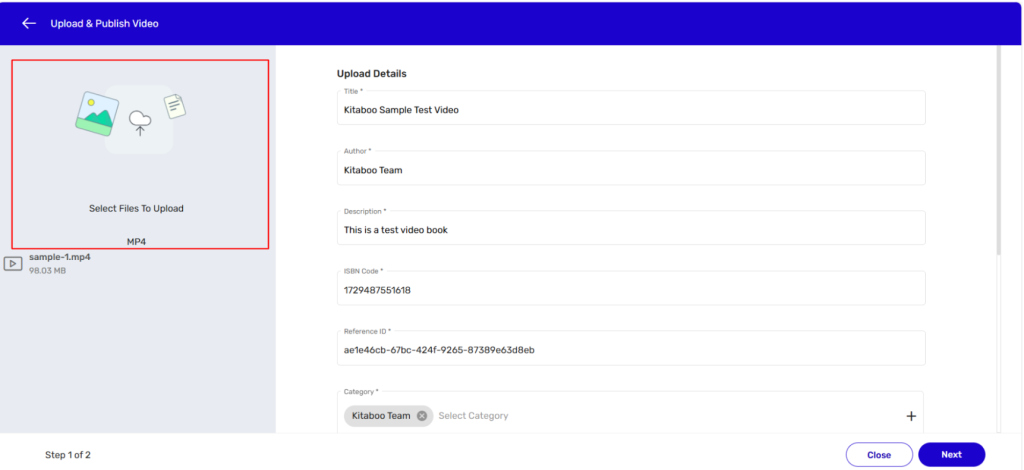
- Scroll down and enter Keywords and comma-separated Tags. > Next, select a cover image for your video book.
NOTE: Keywords and Tags should be relevant to the content of the video book you’re going to create.
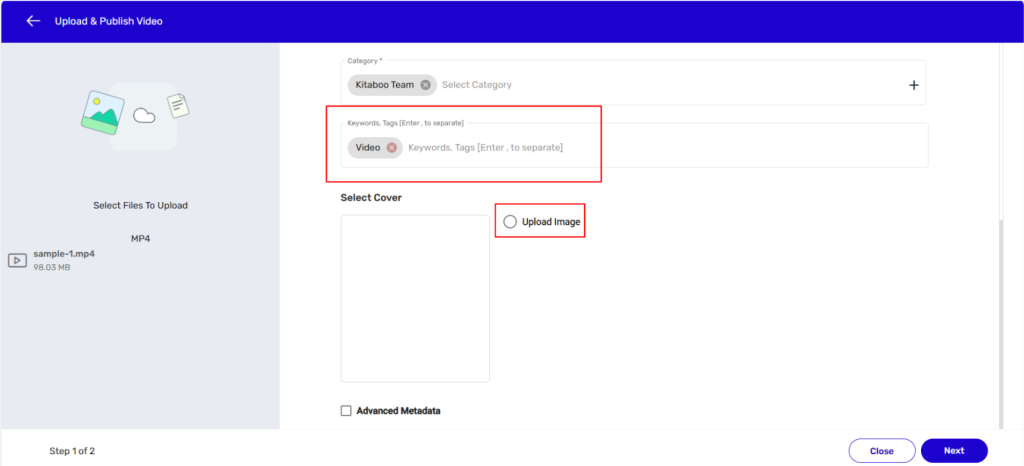
- Scroll down further and check the Advance Metadata checkbox. > Select the CC/Transcript
(Beta)button and upload the Close
Caption (CC) or the transcript file of the video you want to create. > Upload a relevant file for the to-be-created video book. > Click on the Next button.
NOTE:
● The file you want to upload for the video book creation should be in the mp4 format
only. You can also drag and drop or paste a relevant file.
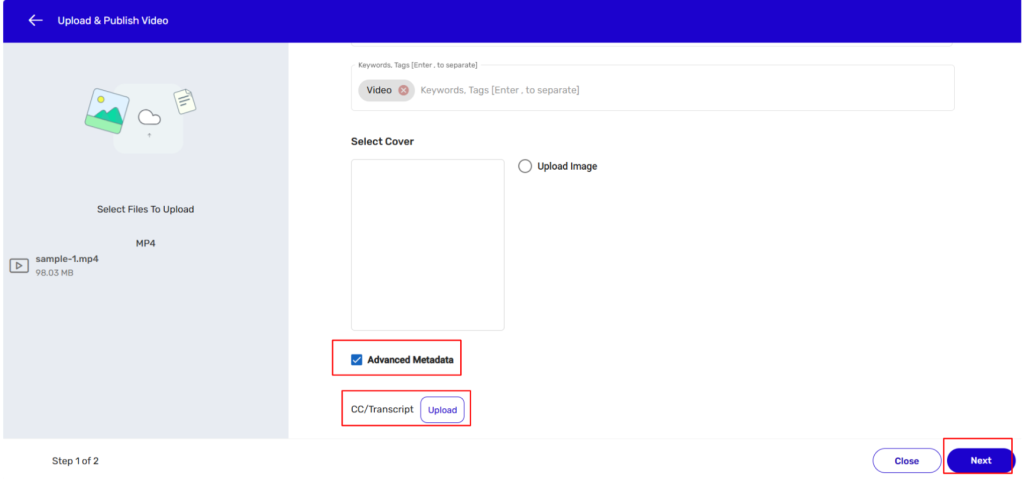
- Add a TOC (Table of Content) for the video book. However, this is optional. > Click on the Publish button. You can add TOC manually or you can use the upload TOC icon to add TOC in bulk. Adding to the point you can also download the sample TOC file.
NOTE:
● If you want to add chapter names to the TOC, you can find the start time of each chapter and its name by dragging the slider of the video book on the left panel.
● Based on the names on the video book, keep on adding the chapter names. Once a video book has been successfully created, you can issue licenses and distribute the book.
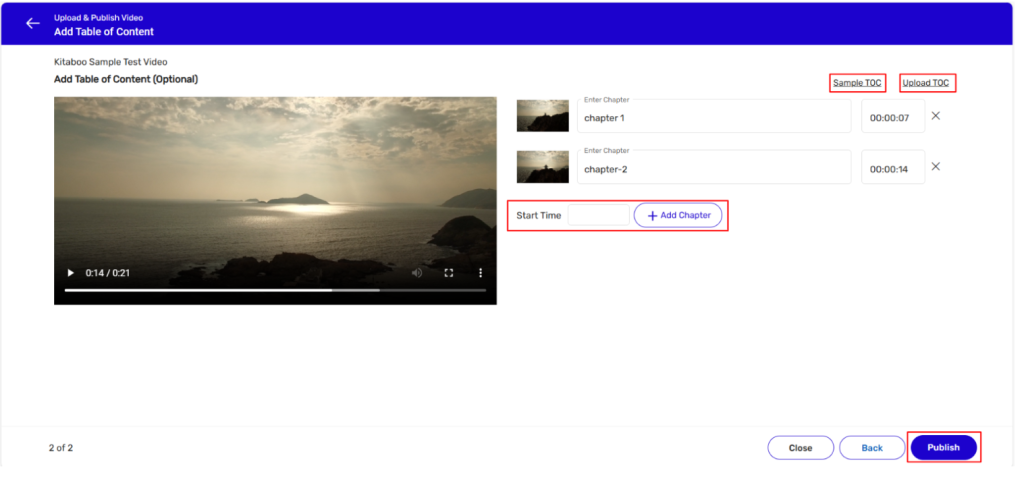
Specification:
• The Video files to be ingested should be in MP4 format.
• Supported Encoding: H264
• Maximum Video Size – 1.5 GB
• Maximum Video Length – 12hrs
• For each title, you can upload only a single MP4 file during the videobook creation process. If you have multiple chapter-wise video files, please merge them outside the Kitaboo system and then upload them as a single file.
- Sign in with your Enterprise Admin credentials.
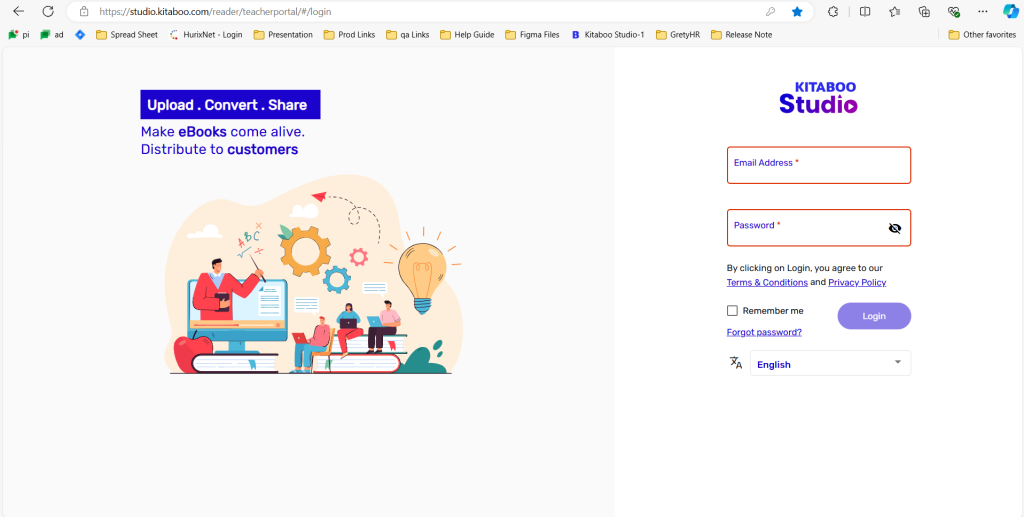
- Switch to the Content tab. > Click on the Start New Project button.
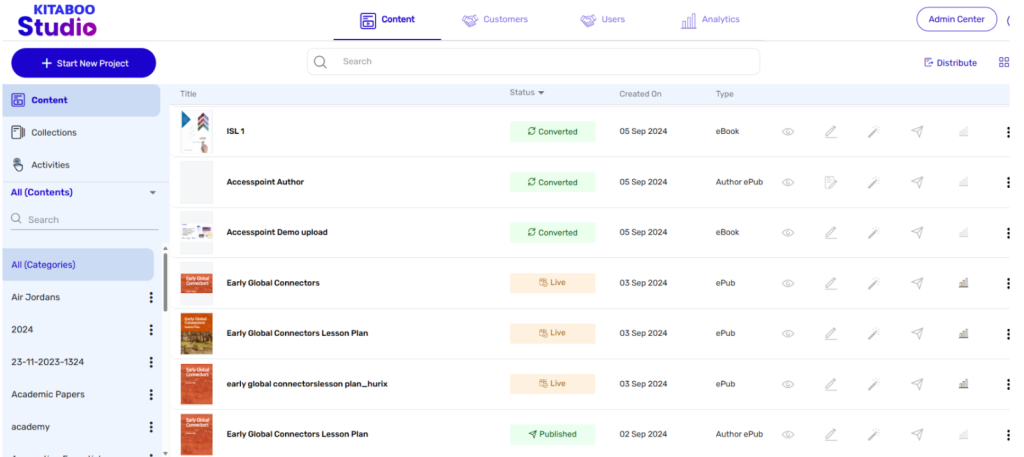
- On the Upload & Create page, select the Audio option from the Create Content list. > Click on the Create button.
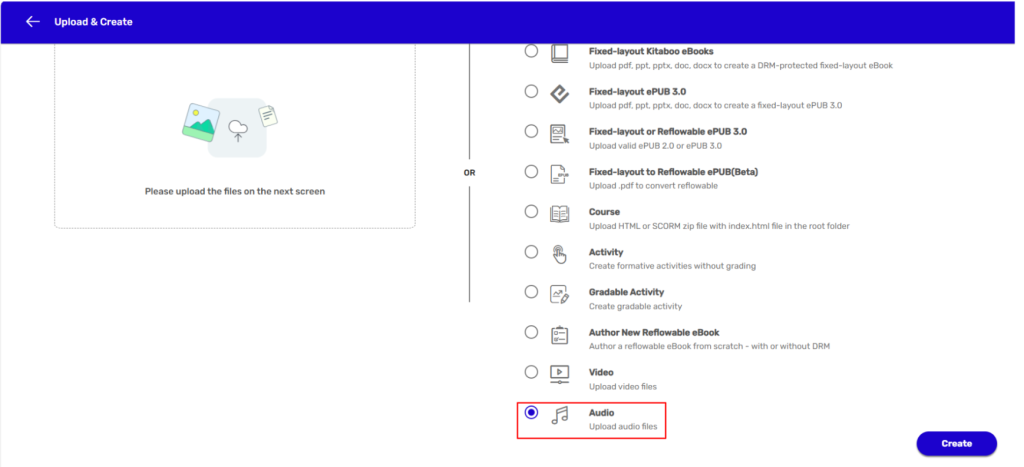
- Enter details in the Title, Author, Description, ISBN Code, and Category fields in the Upload Details section.
NOTE:
● The system will automatically generate an ISBN Code. You can either retain the same code or modify it.
● Several categories have already been added to the Category list. You can either select one of them or add a new category to the list if required.
● If you want to add a new category, enter a relevant name for the category, and click on the + icon
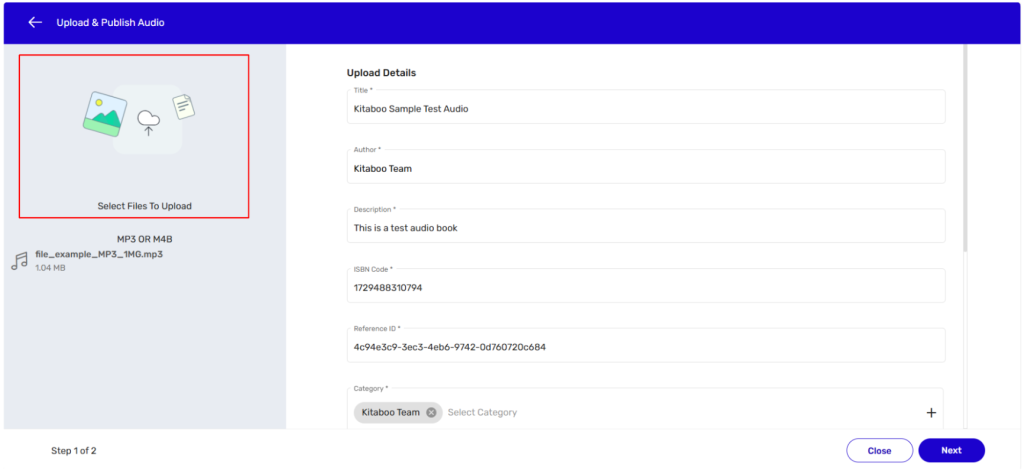
- Scroll down and enter Keywords and comma-separated Tags. > Next, select a cover image for the audiobook.
NOTE: Keywords and Tags should be relevant to the content of the audiobook you’re going to create.
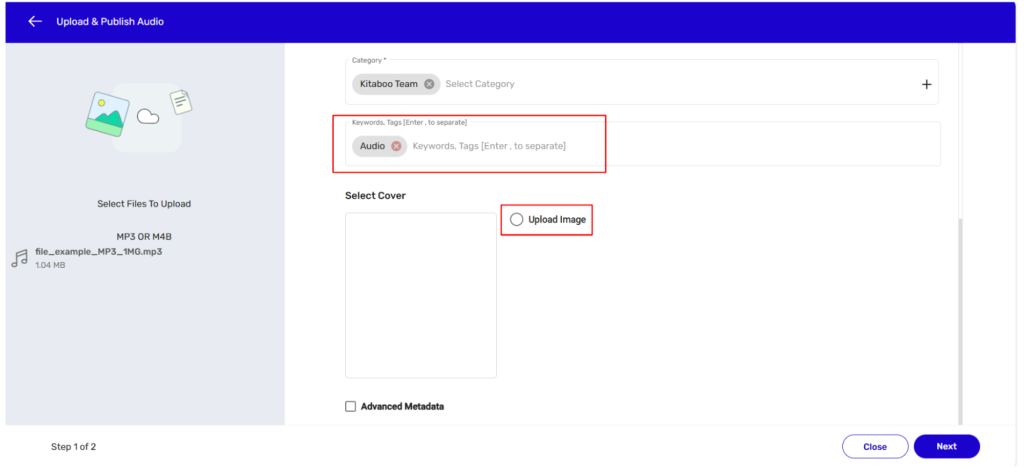
- Scroll down further and check the Advance Metadata checkbox. > Select the CC/Transcript (Beta) button and upload the Close Caption (CC) or the transcript file of the audiobook you want to create. > Upload a relevant file for the to-be-created audiobook. > Click on the Next button. The file you want to upload for the audio book creation should be in the mp3, M4B format only. You can also drag and drop or paste a relevant file.
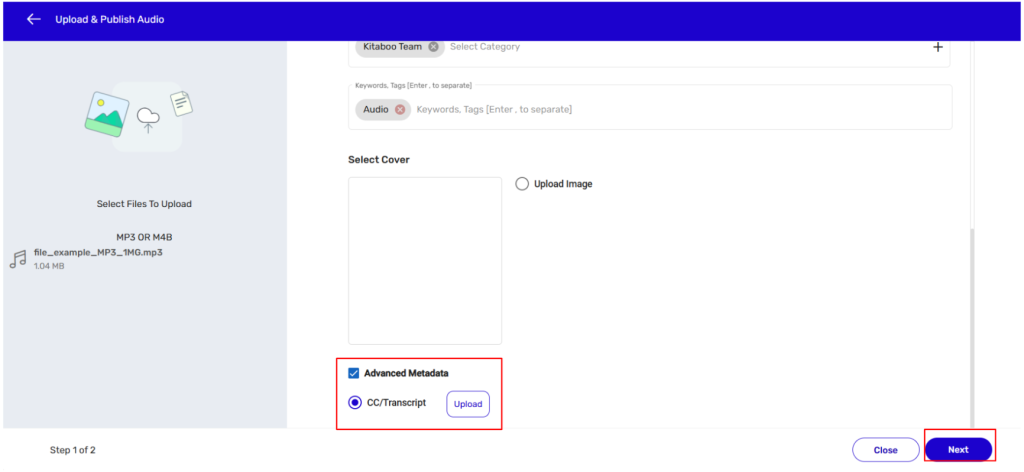
- You can add TOC manually or you can use the upload TOC icon to add TOC in bulk. Adding to the point you can also download the sample TOC file.
NOTE:
● If you want to add chapter names to the TOC, you can find the start time of each chapter and its name by dragging the slider of the audio book on the left panel.
● Based on the content of the audio book, keep on adding the chapter names.
● If the file is in M4B format, the TOC will generate automatically by clicking on Auto Generate TOC. Once an audio book has been successfully created, you can issue licenses and distribute the book.
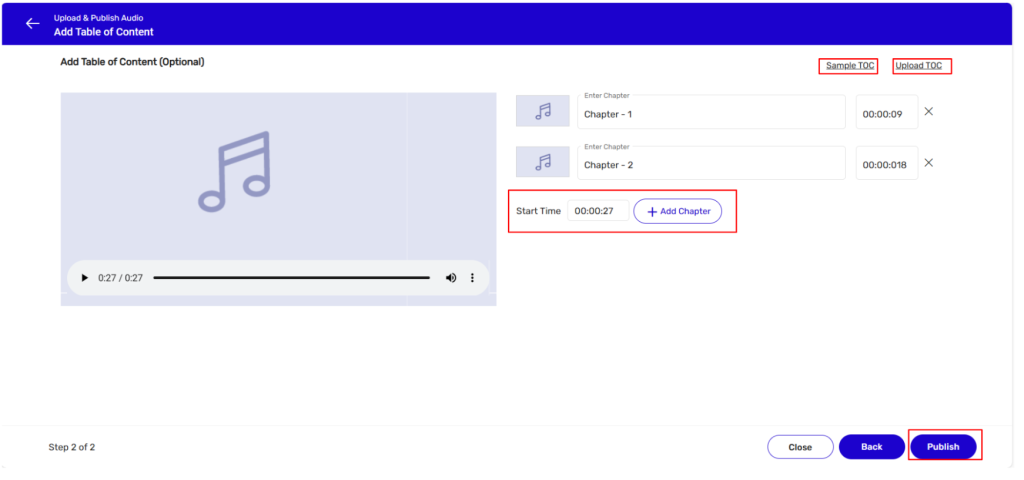
Specification:
• The Audio files to be ingested should be in MP3, M4B format only.
• Recommended Bit Rate is 64 – 256 kbps
• Maximum Audio size – 1.5 GB
• For each title, you can upload only a single MP3/M4B file during the audiobook creation process. If you have multiple chapter-wise audio files, please merge them outside the Kitaboo system and then upload them as a single file.
The Kitaboo system also allows you to update the cover image of content in an intuitive way. Let’s see how to update the cover image on the Kitaboo system.
- Sign in with your Enterprise Admin credentials.
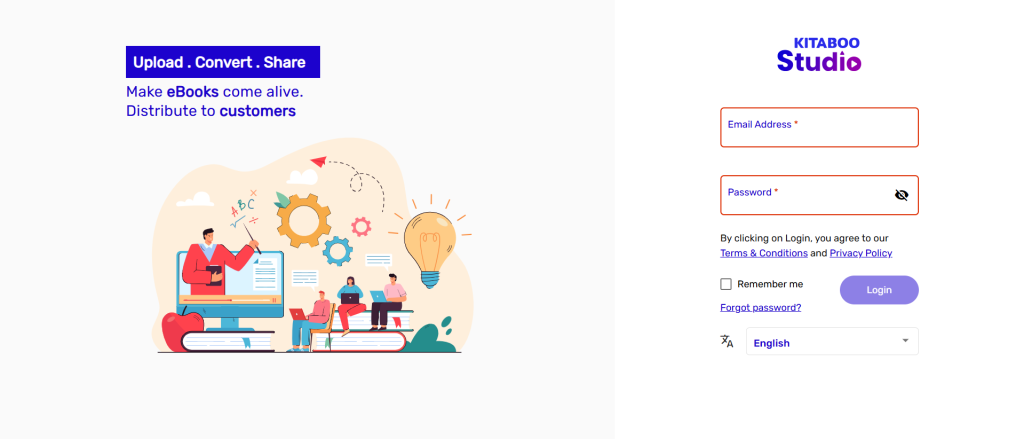
- Switch to the Content tab. > Click on the More options icon next to the content for which you want to update the cover image.
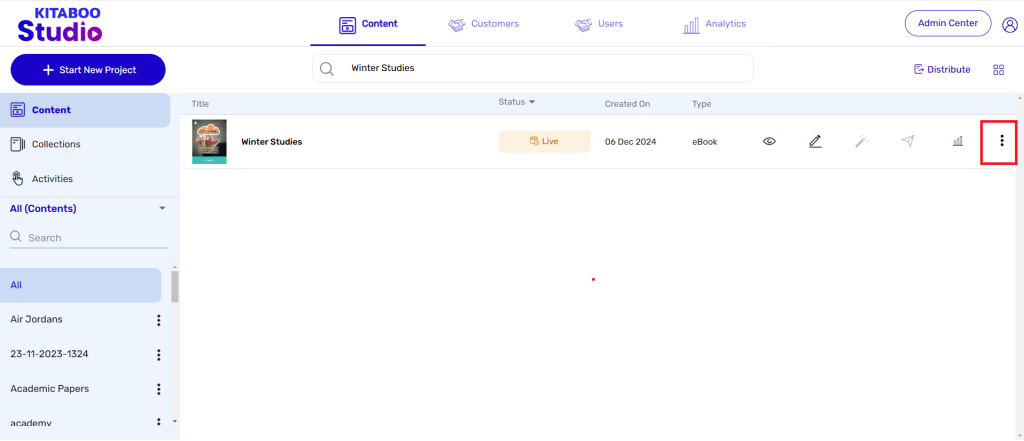
- To update the cover image, click on the “Upload Cover” icon in the pop-up.
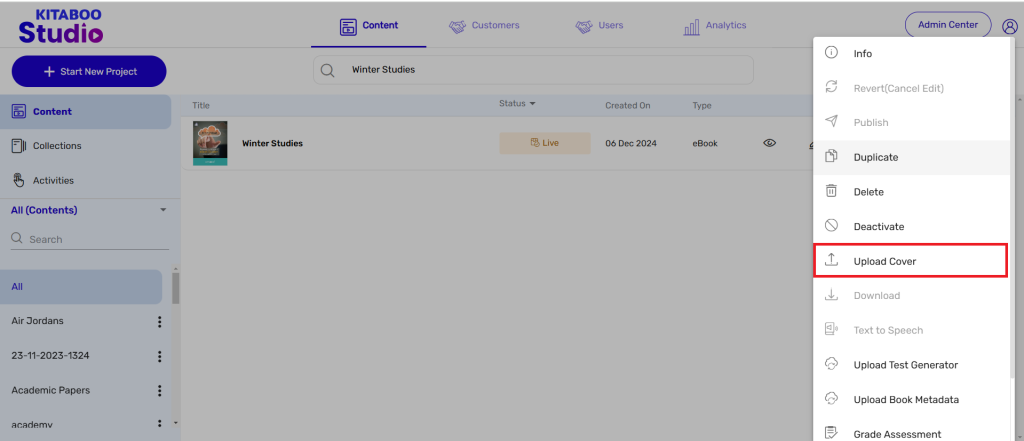
- Here, you can upload both high-resolution and low-resolution images. Once uploaded, click the “Submit” button to update the cover image.
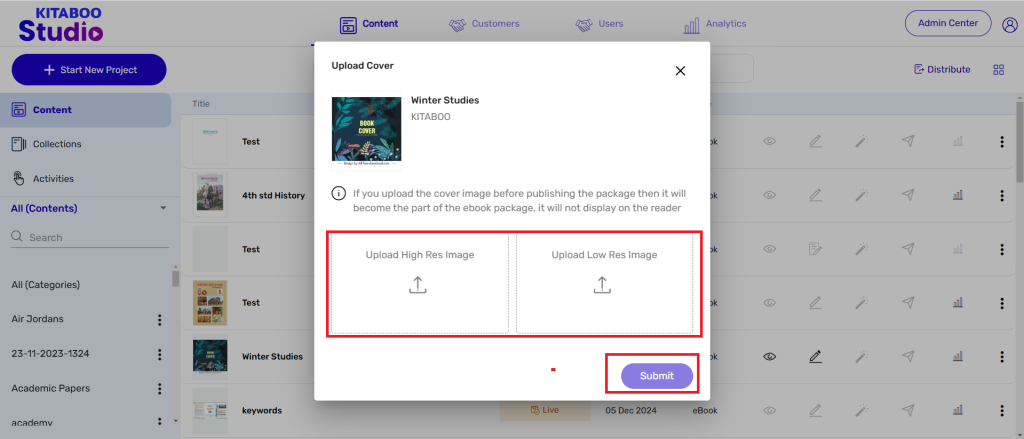
The Kitaboo system also allows you to edit Fixed eBook content in a simple way. Let’s see how to edit Fixed eBook content on the Kitaboo system.
- Sign in with your Enterprise Admin credentials.
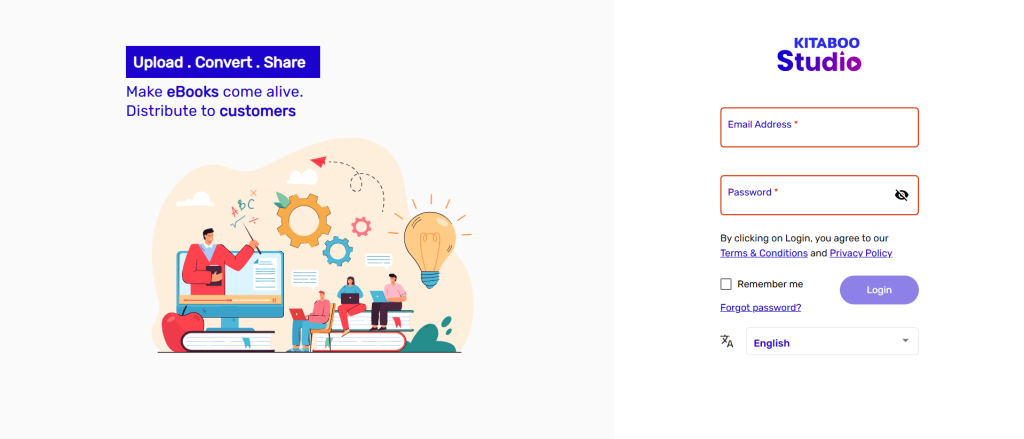
- Switch to the Content tab. > Click on the Search button and search for the ebook which want to edit.
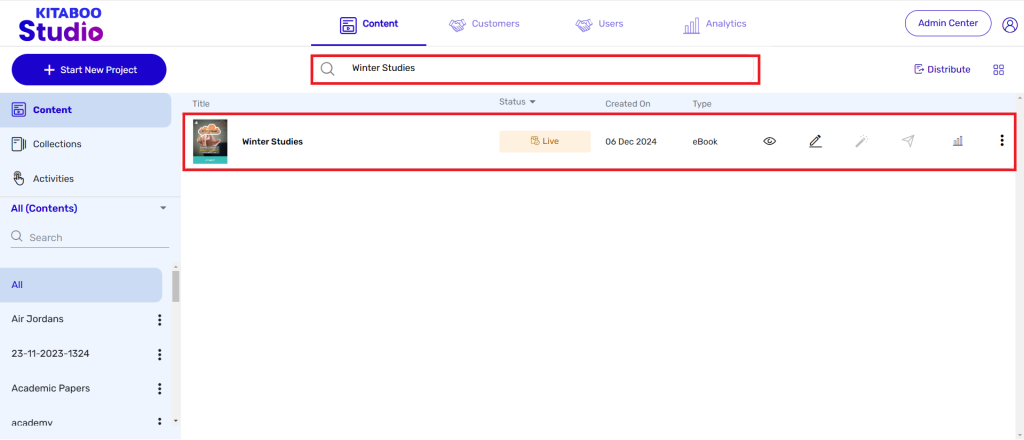
- Click on Edit button (Pencil button) for editing the eBook
Note: After clicking on edit button the book will be in conversion state and once conversion is done user can edit the eBook.
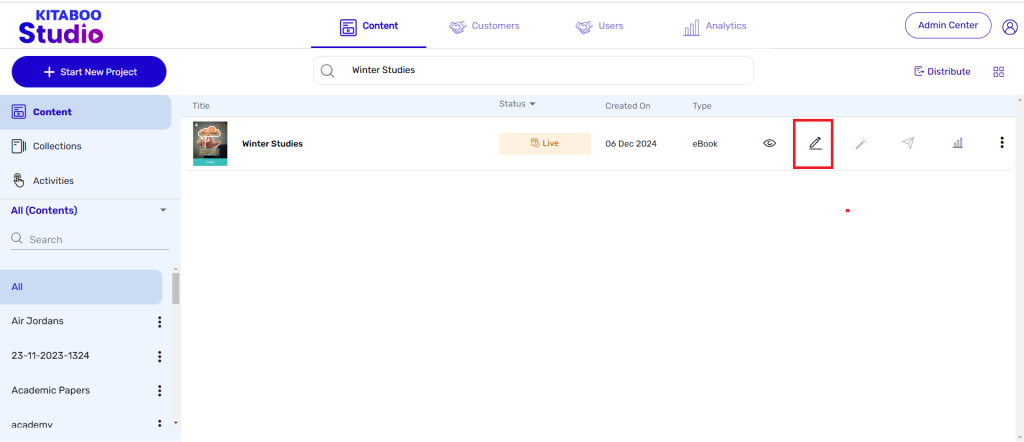
- Click on Resume Editing Button for Editing the eBook.
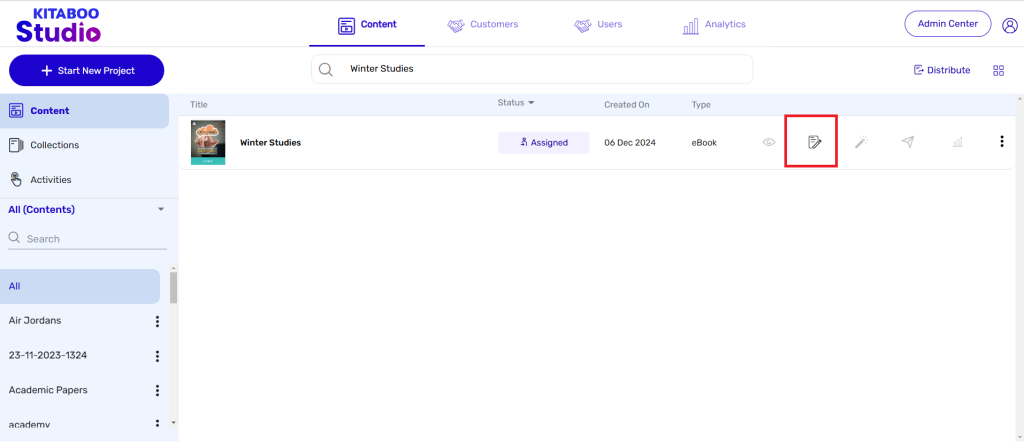
- Enter details which needs to be updated in the Title, Author, Description, and Category, and Keywords fields in the Upload Details section.
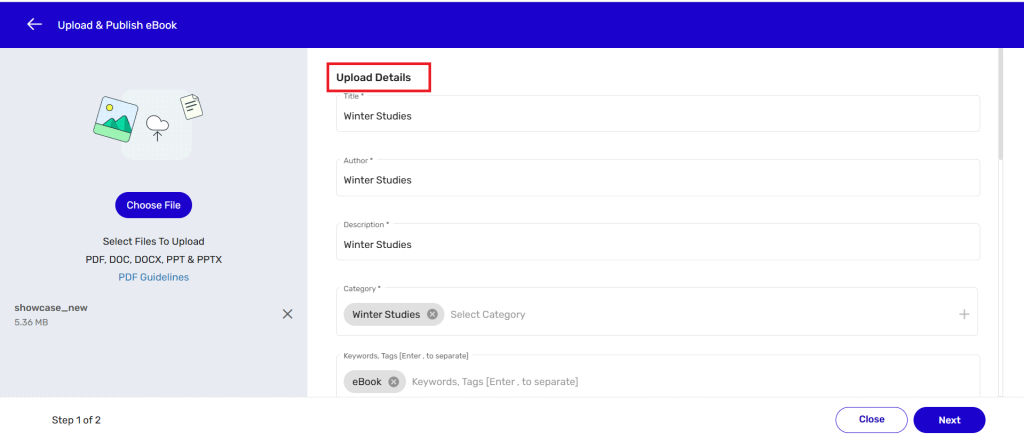
- NOTE:
1. Several categories have already been added to the Category list. You can either
select one of them or add a new category to the list, if required.
2. If you want to add a new category, enter a relevant name for the category, and
click on the + icon.
3. Keywords and Tags should be relevant to the content of the eBook you’re
going to create.
- Scroll down and select a cover image, if any, for the to-be-created eBook. > Check the Advance Metadata checkbox.
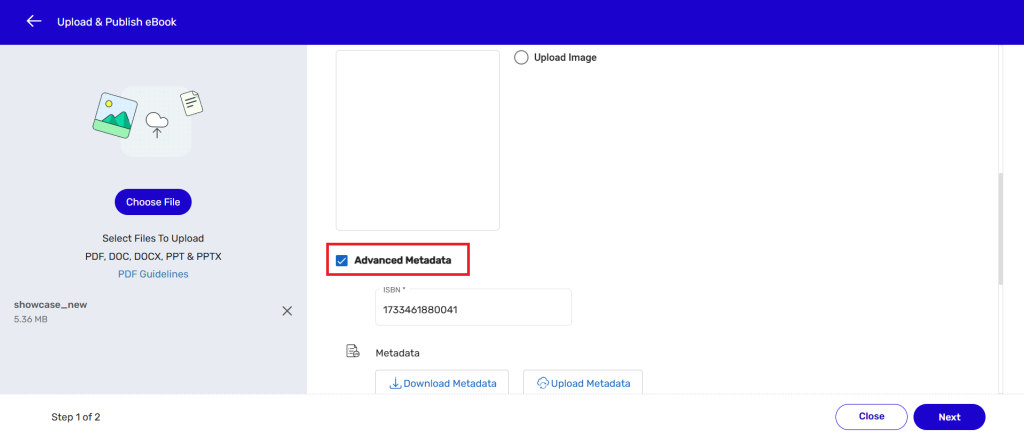
- Provide details in the ISBN field and select the desired options for Font Permission, Lock Book Orientation, and Book Type that appear after selecting the Advance Metadata checkbox. > Click on the Next button
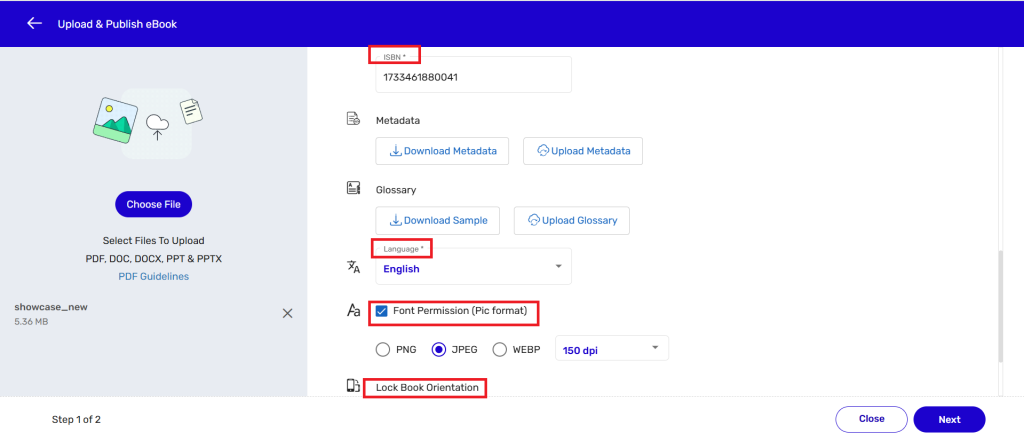
- On the Add Table of Contents page, you can add/update a Table of Contents (TOC), define a title for your eBook, define page range for various chapters, topics, sections etc., and also generate folios for them. > Click on Convert.
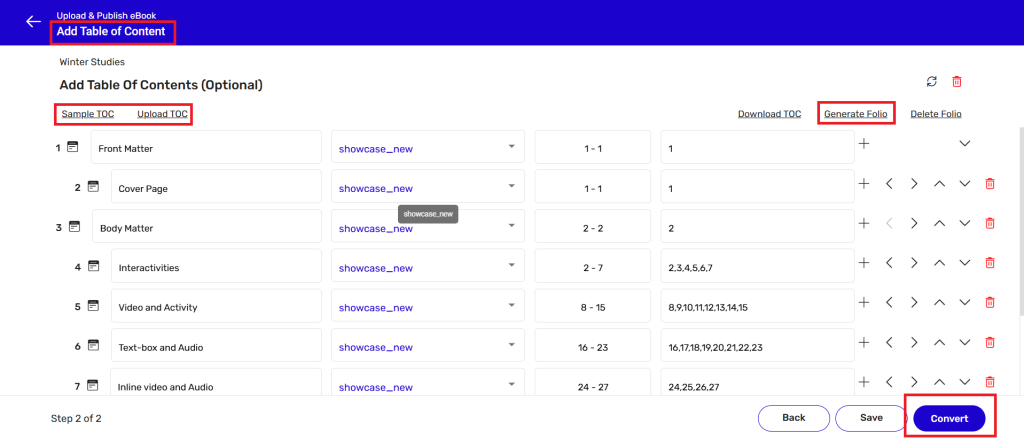
NOTE:
1. You can enter a title for your eBook in this field.
2. The system will automatically display your file name(s) in this field.
3. The system will automatically display page range(s) for chapters, topics,
sections etc. in this field.
4. The system will automatically display folios in this field. You can manually
modify them and then generate a final table of folios by clicking on the
Generate Folio button.
5. User can edit the Fixed eBook in Converted, Published, and Archive state when
the process of Conversion, Publish and Archive is completed.
6. User cannot edit the Fixed eBook when the process of Conversion, Published
and Archive is in process of Conversion, Publish, Archive.
Once an eBook has been successfully updated/edited, you can issue licenses and
distribute the eBook.
The Kitaboo system also allows you to delete or deactivate content in an intuitive way. Let’s see how to delete or deactivate content on the Kitaboo system.
- Sign in with your Enterprise Admin credentials.
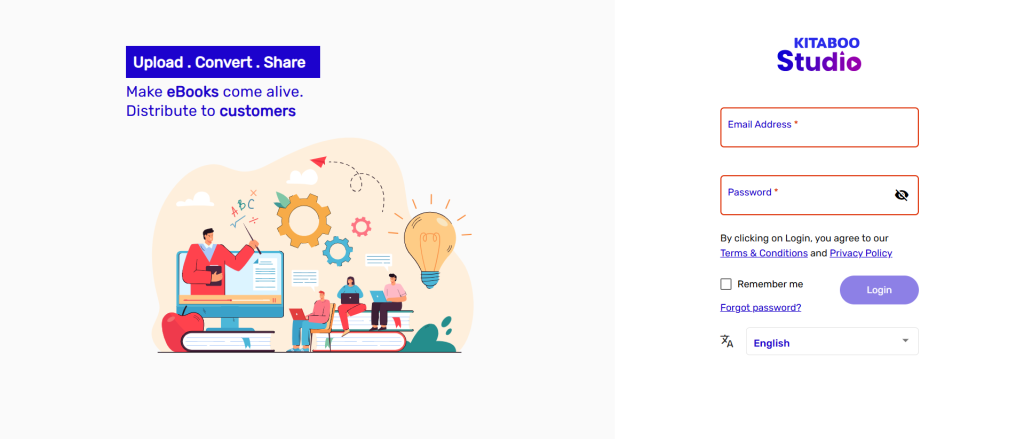
- Switch to the Content tab. > Click on the More options icon against the content you want to delete or deactivate.
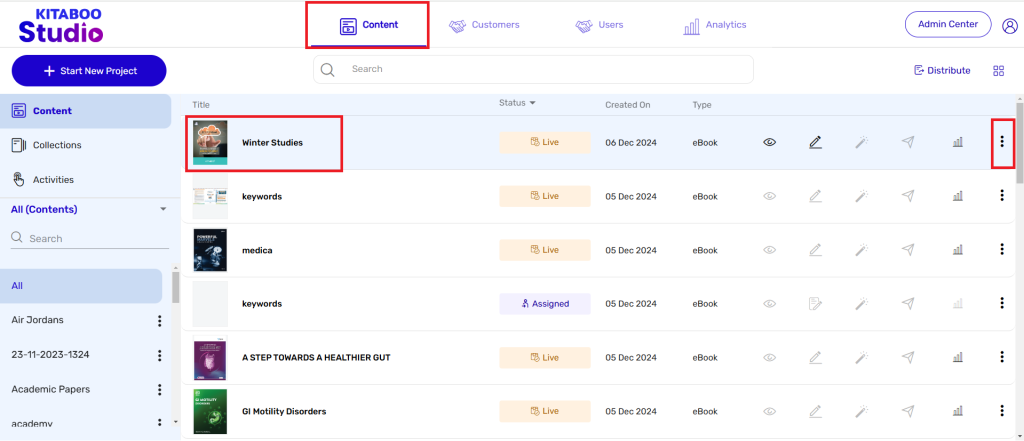
- If you want to delete a content, click on the Delete icon on the pop-up.
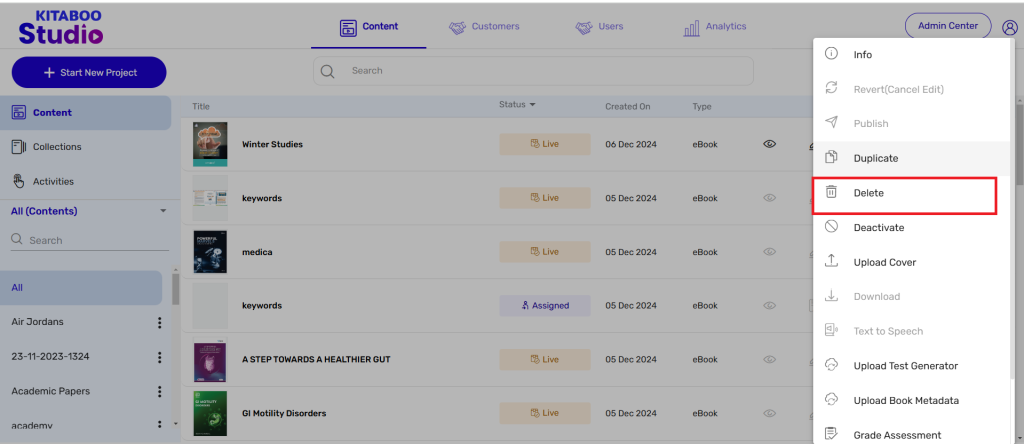
- To confirm your action, click on Yes, Delete it. on the Delete Content pop-up.
- Once confirmed, the system will delete the content.
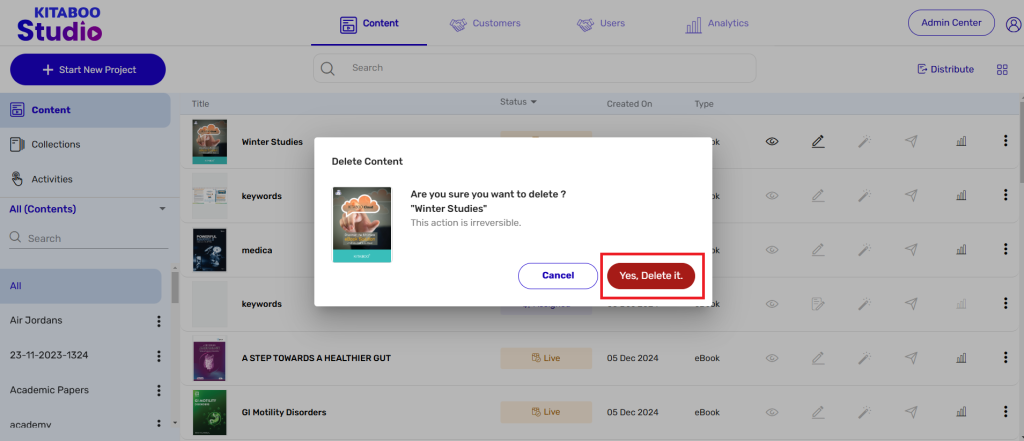
Important: Once you delete a content, it will also get deleted from the users’ account it was assigned to. Users will no longer be able to access the specific content.
- If you want to deactivate a content, click on the Deactivate icon on the pop-up.
- Once you click on the deactivate icon, the system will deactivate the content.
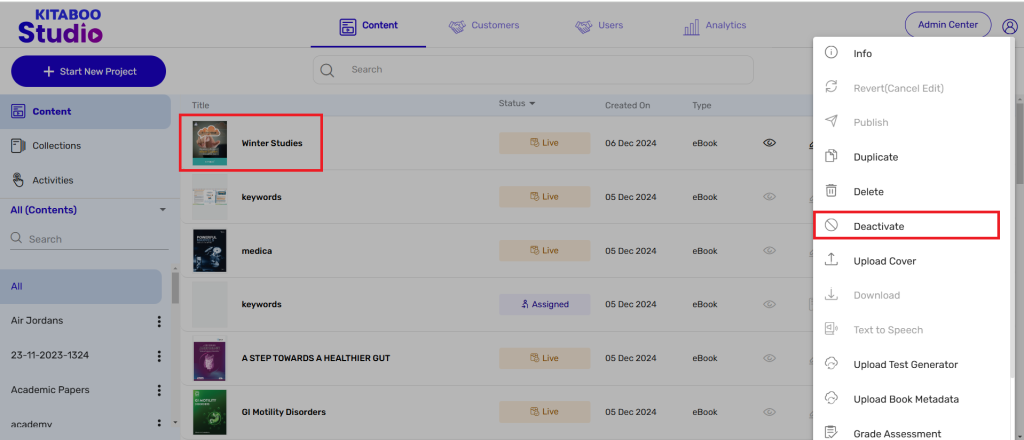
Important: A deactivated content can still be accessed by the users it was assigned to until the license for the content expires. However, new licenses for the content cannot be issued as long as it is in the deactivated state. You will have to re-activate the content for issuing any new licenses for the same.
The Kitaboo system also allows you to add user and class in the Administrator default account. Let’s see how you can add the user and class on the Kitaboo system.
The Users Tab: Users
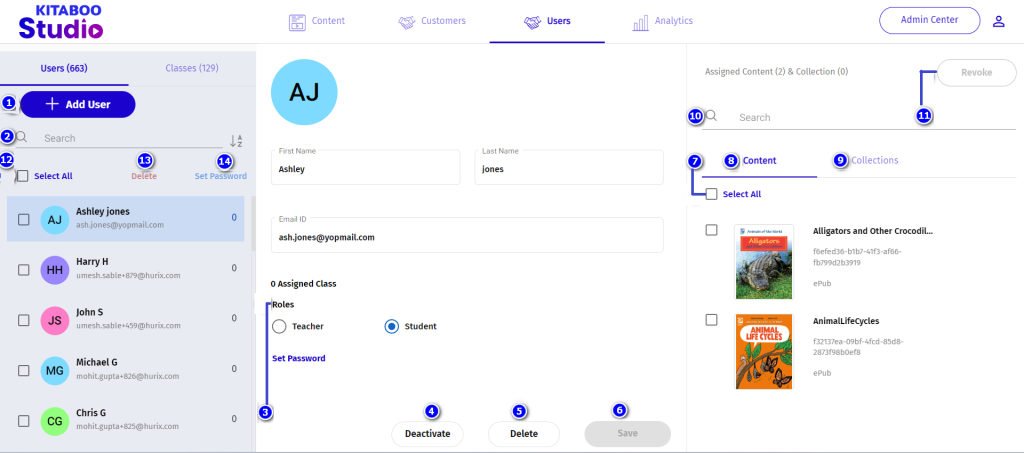
1. Add User – Enables you to add a new user or multiple users to the Kitaboo system into the default institute.
2. Search – Enables you to do a quick search of an existing user.
3. Roles – Lets you define the role of the to-be-added user – whether a teacher or a
student.
4. Deactivate – Enables you to deactivate or suspend an existing user. A deactivated user exists on the Kitaboo system, but will not be able to access content until he/she remains deactivated. He/she can be restored.
5. Delete – Enables you to delete or remove a user from the Kitaboo system. A deleted user cannot be restored.
6. Save – Lets you save the edits.
7. Select All – Lets you select all the listed pieces of content/collections if you want to revoke all of them from a user.
8. Content – Displays a list of content assigned to a user.
9. Collections – Displays a list of collections assigned to a user.
10. Search – Enables you to do a quick search of a content or a collection.
11. Revoke – Enables you to revoke the selected pieces content or collections from access by a user.
12. Select all – Lets you select all the listed users if you want to select all of them/few of them from the users list.
13. Delete Selected Users – Lets you delete all the listed users if you want to delete all of them/few of them from the users list.
14. Set Password – Enable you to set password for selected user or All user.
The Users Tab: Class
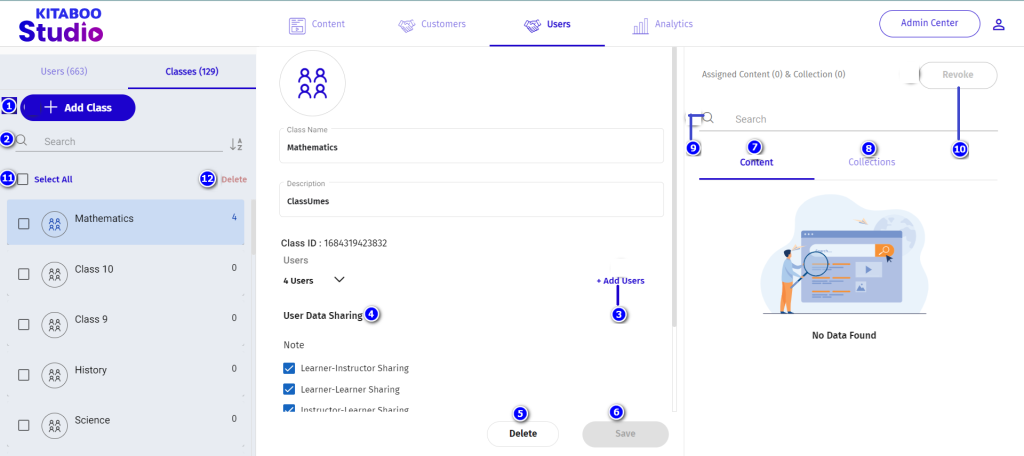
1. Add Class – Enables you to add a new class to the Kitaboo system into the default institute.
2. Search – Enables you to do a quick search of an existing class.
3. Add Users – Lets you add new users to an existing class.
4. User Data Sharing – Lets you define the data like notes and highlights sharing
options by selecting the relevant checkboxes.
5. Delete – Enables you to delete or remove an existing class from the Kitaboo system. A deleted class cannot be restored.
6. Save – Lets you save the edits.
7. Content – Displays a list of content assigned to a class.
8. Collections – Displays a list of collections assigned to a class.
9. Search – Enables you to do a quick search of a content or a collection.
10. Revoke – Enables you to revoke the selected pieces content or collections from
access by a class.
11. Select all – Lets you select all the listed classes if you want to select all of them/few of them from the class list.
12. Delete Selected Class– Lets you delete all the listed classes if you want to delete all of them/a few of them from the class list.
Note: If the class is created using the ”Access Code” users cannot be added manually.
The Kitaboo system also allows you to edit and delete categories of content in an intuitive way. Let’s see how to edit and delete categories on the Kitaboo system.
- Sign in with your Enterprise Admin credentials.
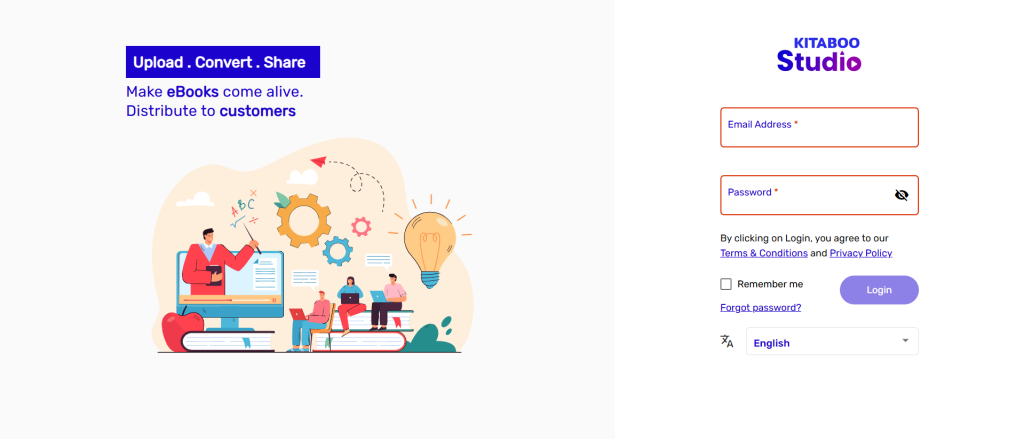
- Navigate to the Content tab and click on the More Options icon next to the category you wish to edit or delete.
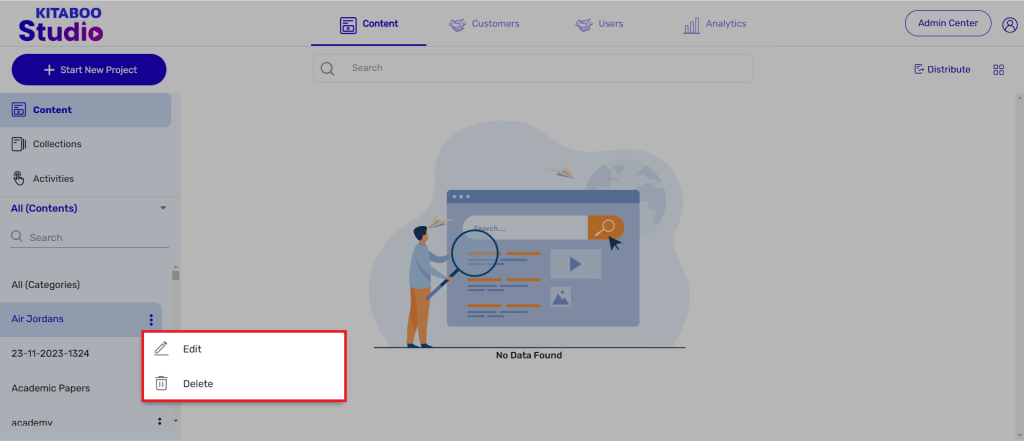
To edit a category, click on the Edit icon in the pop-up and then click the Update button.
Note: Updating a category name will automatically update the name across all associated content, reflecting the changes for users.
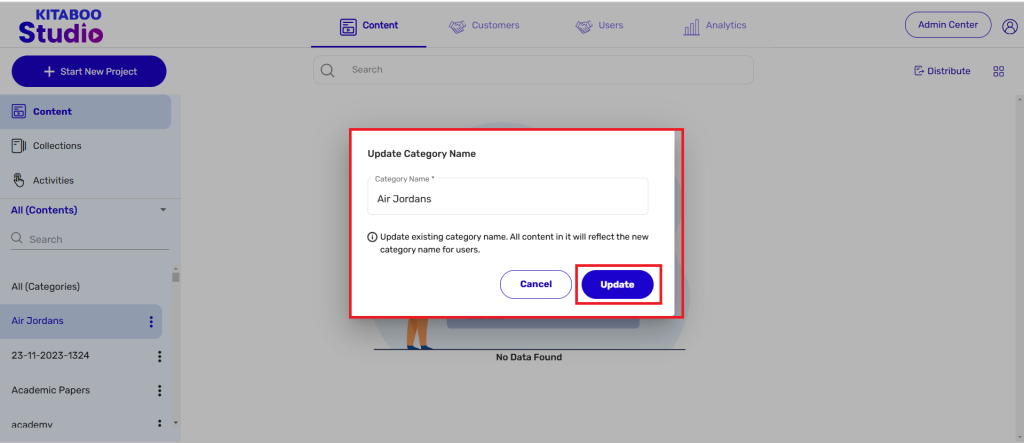
- To delete a category, click on the Delete icon in the pop-up and then click the Yes, Delete It button.
Note:
- Deleting a category will make any books assigned to it invisible on the platform and inaccessible to readers.
- It is recommended not to delete a category if it has mapped titles. Once deleted, the books will no longer be visible to end users until they are reassigned to a new category.
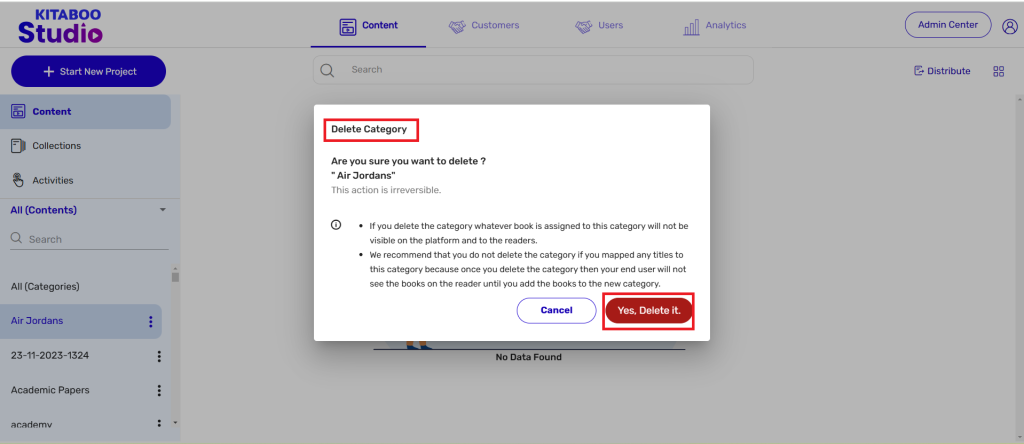
Steps to Configure Clever Integration on the Studio Platform:
- Login as Administrator:
Access the Studio platform using your administrator credentials.
- Create a Customer Group:
Navigate to the Customer tab.
Click on the +Group option.
Fill in the metadata, ensuring that the Client Group ID is unique and does not start with the word “clever” (must be alphanumeric).

- Set Up SSO Source:
Select SSO Source as “Clever (Beta)”.
Enter the Clever data obtained from the Clever site, including:
District ID
Auth Token
Client ID
Client Secret
- Add the Group:
Once all the required data is correctly filled, click the Add button.

- Sync Data:
Return to the Customer tab.
Filter the data by Group and select the recently created district from the list.
Click on Sync all data-API. To track the synchronization status, check the Status option.

- Generate Licenses:
After the data is properly synced, you can generate licenses for specific schools.

- Distribute Content:
District/School administrators can now log in and distribute content to users.

Configure Redirection URL on Clever Site:
- On the Clever site, configure the redirection URL as follows:
- URL, i.e. (https://microservices.kitaboo.com/v1/clever-management/clever/KITABOO_CLIENT_ID/CLEVER_CLIENT_ID/CLEVER_CLIENT_SECRET/clever/redirect)

- Access Content:
- Copy the Instant Login URL and provide it to students and teachers to access all assigned content.

District Guide:
Login as District Administrator:
Access the Studio platform using your district administrator credentials.
Select School Account:
Select the school from the top right corner.
Assign Content:
Navigate to the Distribute Content tab.
Click on User or Class to distribute the respective content.
Select the users and Order ID.
Click on the Distribute button.


- Revoke Content:
Navigate to the Users tab.
Select the user or class from which you want to revoke the content.

District/School FAQ:
Q1: Can district/school admins add new users or classes directly in Studio?
No, as it’s a Clever sync, user creation and updates need to be done in the Clever portal. You must request the main admin to resync the data in Kitaboo so that the district admin can see the latest roster changes.
Q2: Can district/school admins set/reset passwords for users in Studio?
No, since we use single sign-on with Clever, password management needs to be performed in the Clever portal. In Studio, they can only assign or remove content to/from users or classes and view the analytics reports for the content.
Q3: Can district admins delete users/classes using Studio?
Yes, but whenever an auto sync occurs, the users and classes will be recreated.
Q4: Can district/school admins assign content to users beyond the license limit?
No, they can only distribute content within the limits allocated by the main admin. If additional licenses are needed, they should reach out to the main admin to increase the license count.
Q5: Can district admins control the license count school-wise?
Yes, district admins can manage license counts from the “Distribute Content” tab by selecting the title from the order and managing it under the “More” section.


- API Endpoints Used
/v3.0/schools
/schools/{schools_ID}/sections
/schools/{schools_ID}/users?role=teacher
/schools/{schools_ID}/users?role=student
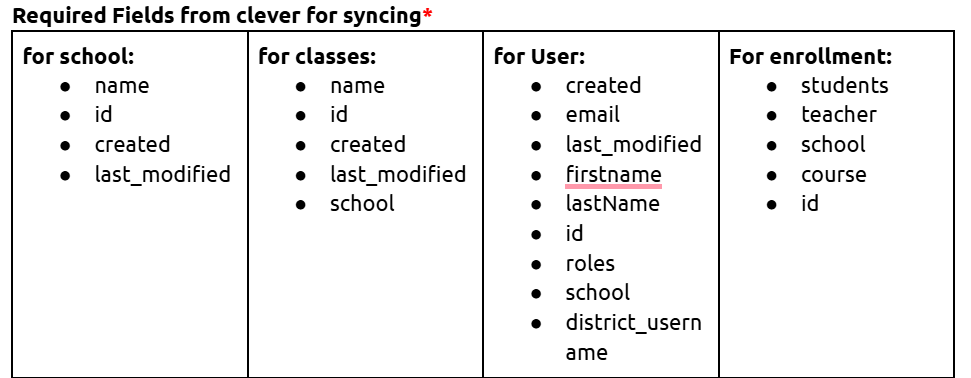
What Roles Kitaboo Supports:

This document will guide you through the Classlink Sync process and Content Assignment.
Help Video: https://youtu.be/ogG-o0sv048
Steps to Configure Classlink Integration on the
Studio Platform:
- Login as Administrator:
Access the Studio platform using your administrator credentials.
- Create a Customer Group:
Navigate to the Customer tab.
Click on the +Group option.
Fill in the metadata, ensuring that the Client Group ID is unique. (must be numeric).

- Set Up SSO Source:
Select SSO Source as “Classlink”
Select Rostering Type as “OneRoster”
Select Sync Type as Sync with API
Match With “Source ID”
Suffix Should be Enabled
Authorization Should be OAuth 1.0
Enter the Classlink data obtained from the Classlink site, including:
URL
Consumer Key
Client Secret
Tenant ID

- Add the Group:
Once all the required data is correctly filled, click the Add button.

- Sync Data:
Return to the Customer tab.
Filter the data by Group and select the recently created district from the list.
Click on Sync all data-API. To track the synchronization status, check the Status option.

- Generate Licenses:
After the data is properly synced, you can generate licenses for specific schools or at district level directly which will provide licenses to each school.

- Distribute Content:
District/School administrators can now log in and distribute content to users.

- Configure Redirection URL on Classlink Site:
On the Classlink site, configure the Launch URL as follows: (Kindly use URL encoder, Example : https://launchpad.classlink.com/cltest
Green Highlighted Key is Kitaboo reader key
Yellow highlighted key is Classlink Client ID
- Kitaboo Setting Note: (For Kitaboo Team)
The Kitaboo Team also need Save the Client ID and Secret against the client account.
Reload config is mandatory to view the changes (Kitaboo team can help you)

- Access Content:
Use the launchpad url to access the assigned content

- District Guide:
- Login as District Administrator:
Access the Studio platform using your district administrator credentials.
- Select School Account:
Select the school from the top right corner.
- Assign Content:
Navigate to the Distribute Content tab.
Click on User or Class to distribute the respective content.
Select the users and Order ID.
Click on the Distribute button.


- Revoke Content:
Navigate to the Users tab.
Select the user or class from which you want to revoke the content.

District/School FAQ:
Q1: Can district/school admins add new users or classes directly in Studio?
No, as it’s a Classlink sync, user creation and updates need to be done in the Classlink portal. You must request the main admin to resync the data in Kitaboo so that the district admin can see the latest roster changes.
Q2: Can district/school admins set/reset passwords for Student/Teacher in Studio?
No, since we use single sign-on with Classlink, password management needs to be performed in the Classlink portal. In Studio, they can only assign or remove content to/from users or classes and view the analytics reports for the content.
Q3: Can district admins delete users/classes using Studio?
Yes, but whenever an auto sync occurs, the users and classes will be recreated, it’s always better to manage roster from classlink side.
Q4: Can district/school admins assign content to users beyond the license limit?
No, they can only distribute content within the limits allocated by the main admin. If additional licenses are needed, they should reach out to the main admin to increase the license count.
Q5: Can district admins control the license count school-wise?
Yes, district admins can manage license counts from the “Distribute Content” tab by selecting the title from the order and managing it under the “More” section.


Required Fields from Classlink for syncing*
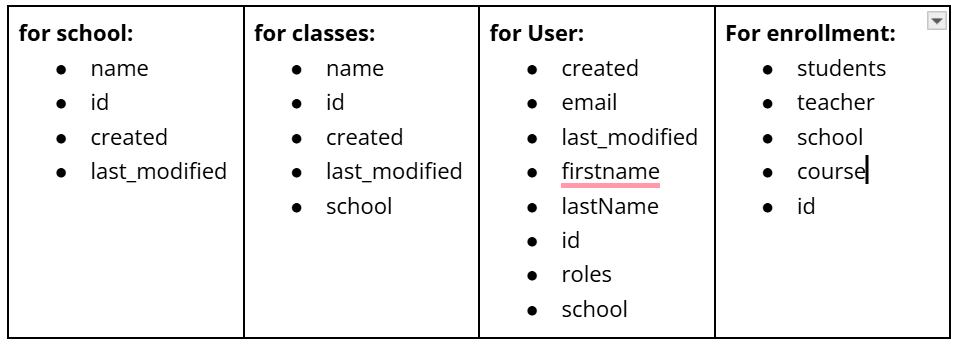
What Roles Kitaboo Supports:

1. Navigate to the canvas LMS portal
(https://canvas.instructure.com/login/canvas#tab-tools) and login with the admin credentials.
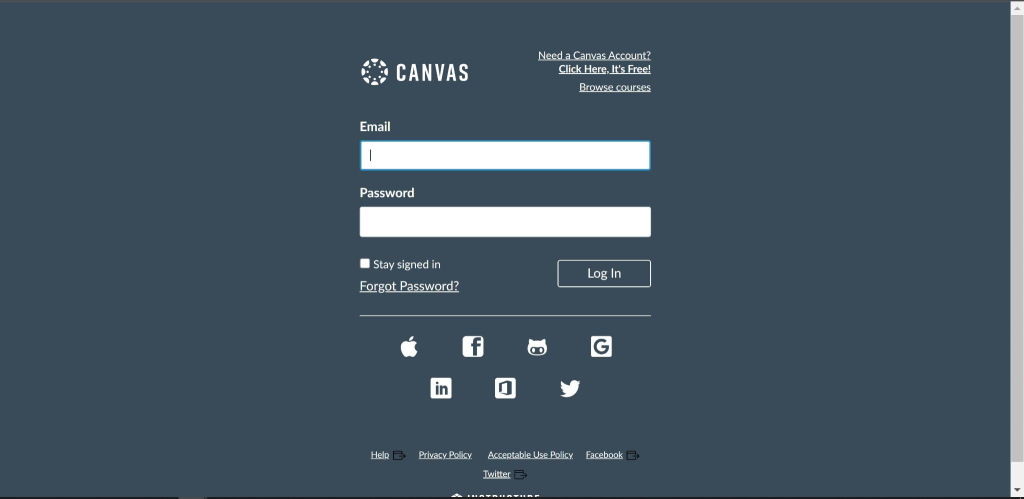
2. Click on the “COURSES” tab located in the left navigation panel.
3. Click on “HISTORY”, scroll down and then click on “SETTINGS”.
4. Under SETTINGS, click on “APPS”, and then click on “VIEW APP CONFIGURATION” (it will be located just under the APPS tab).
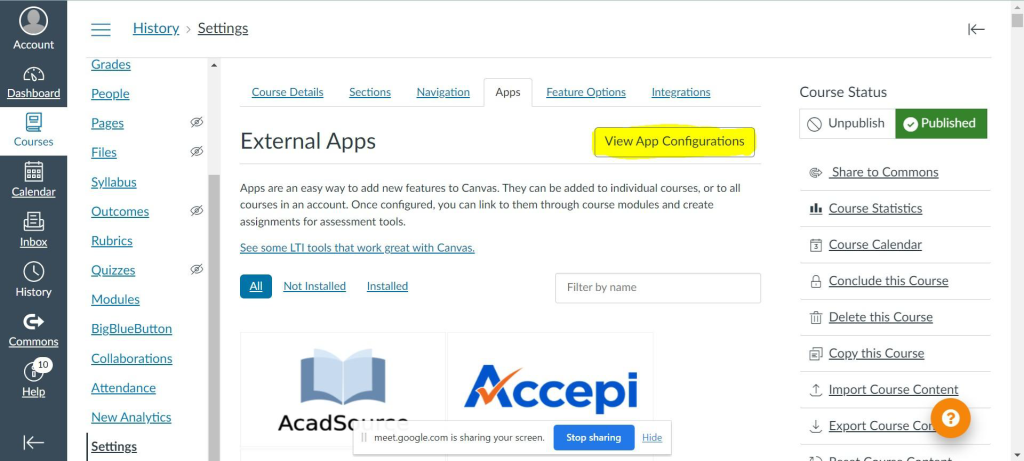
5. CLick on “+APP”.
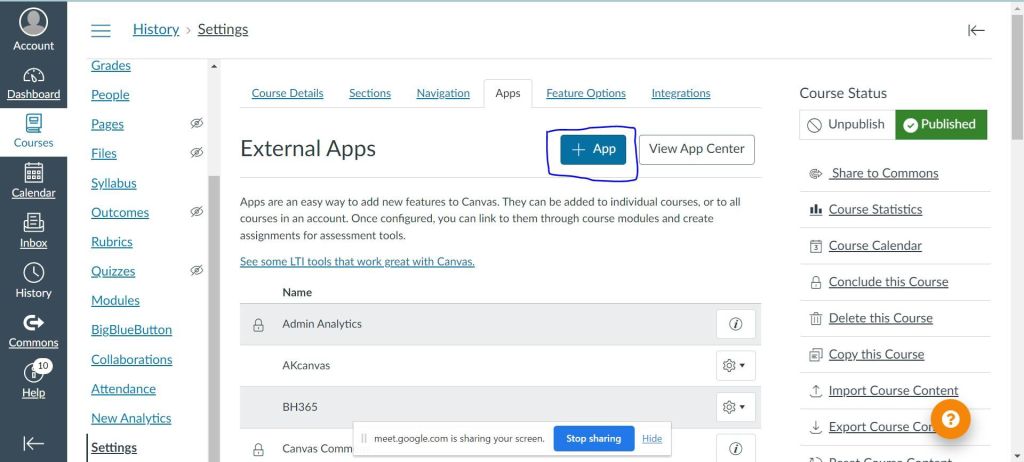
6. Fill all the required details (as mentioned in the screenshot below).
It is important to note that Kitaboo supports the following Custom parameter that you can use in the Custom parameters box:
● bookid – It will directly open the specific book for the users (these parameters are case sensitive).
After this, scroll down and click on “SUBMIT”, Your app will be created.
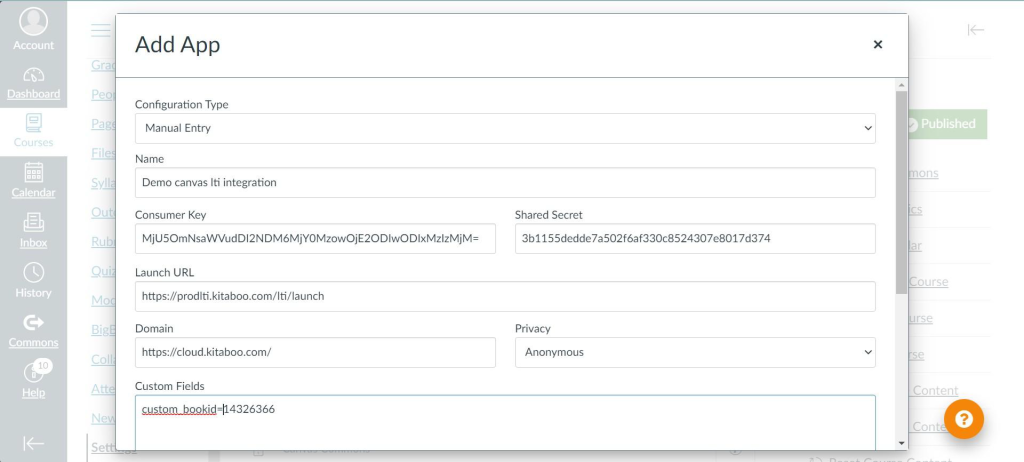
7. Go to “MODULES” (bottom left side of the screen), and click on “+ MODULE”.
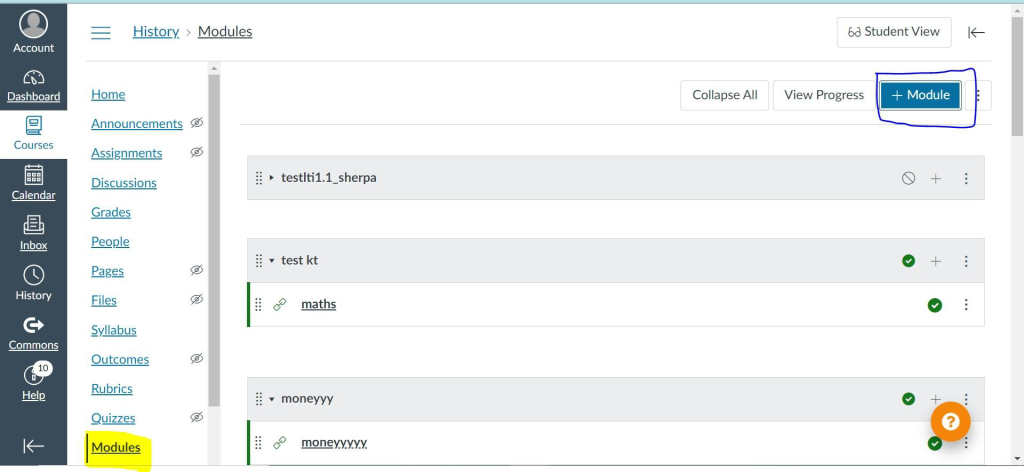
8. Fill the name field, enter a name of your choice and click on “ADD MODULE”.
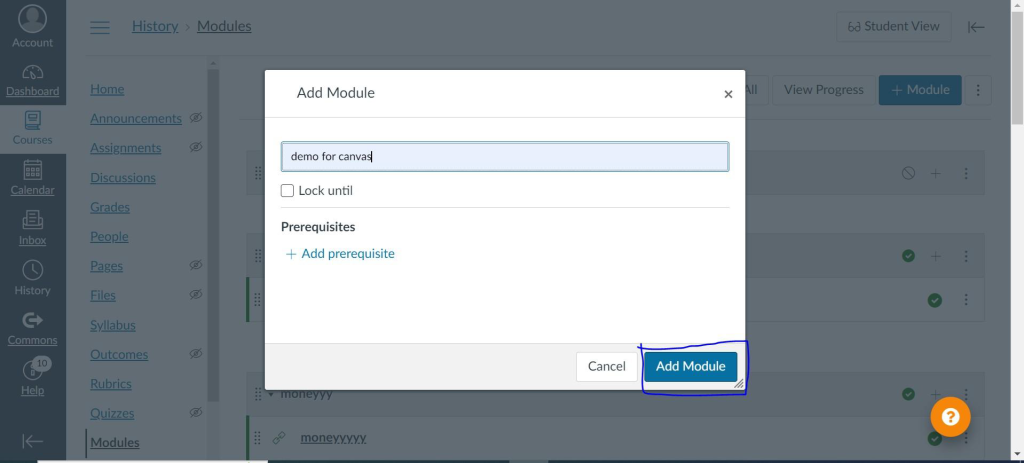
9. Once your module is created, you can scroll to the bottom of the page and you will see your module there. Moving further click on the “+” sign, in your module.
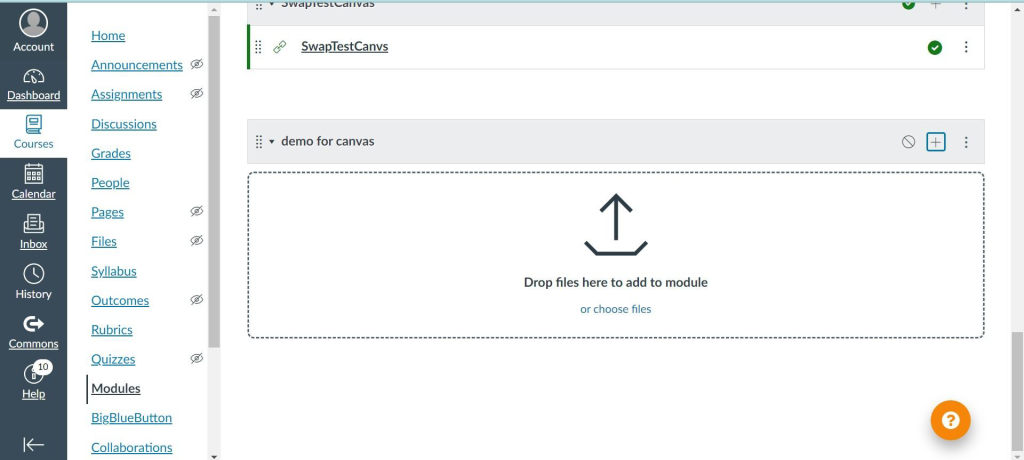
10. A window will appear, add EXTERNAL TOOLS from the dropdown menu. Once you have selected external tool,a list of existing apps will appear, click on the App that you have created in the above steps.
Click on “ADD ITEM”.
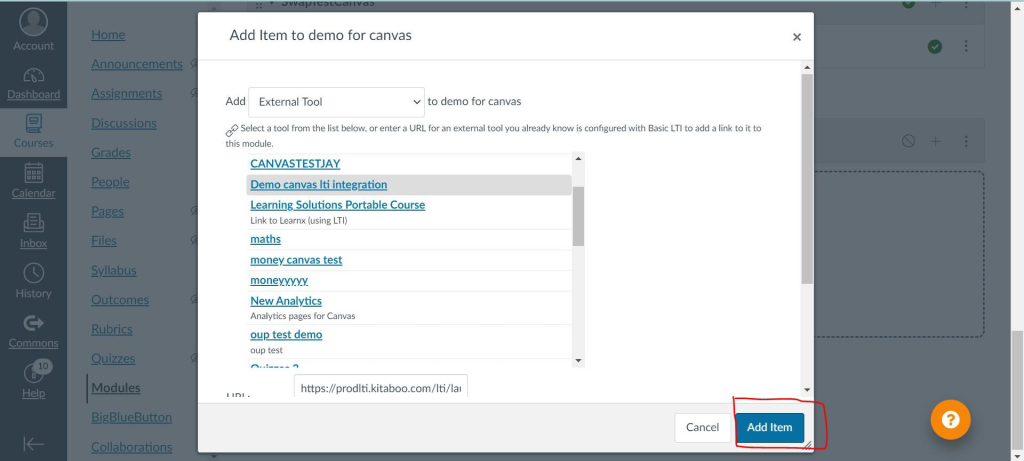
11. Once you have done the above step, it would appear like shown in the below screenshot.
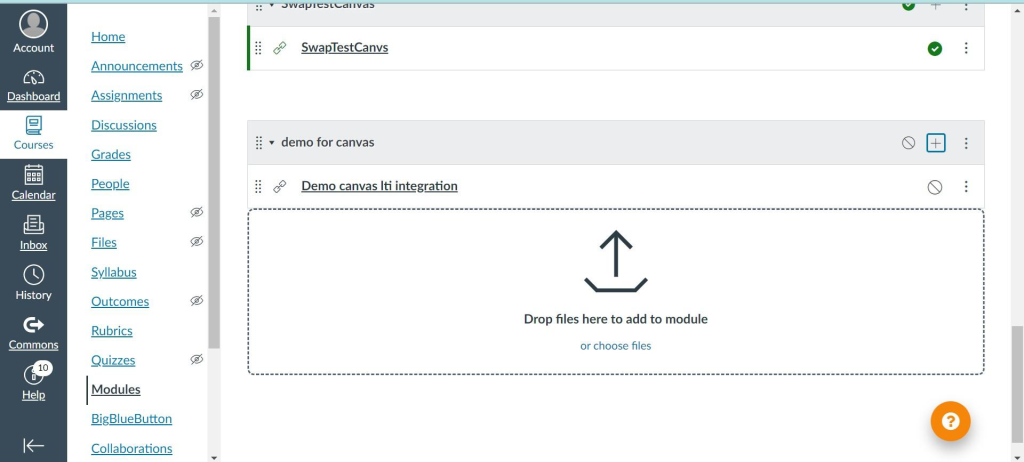
12. Click on the icon highlighted below, to publish the app and module.
Demo canvas lti integration – This is your app.
demo for canvas – this is your module.
First publish the app, and then publish the module.
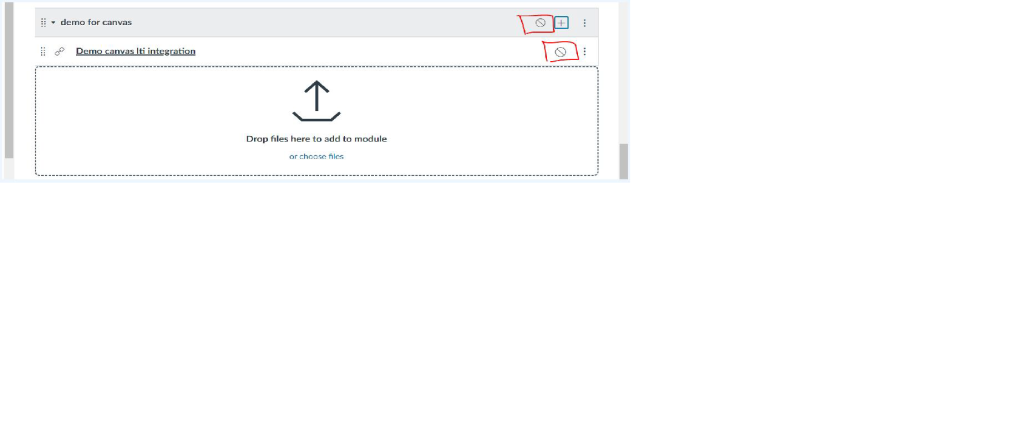
Once the app and module is published it will look like this.
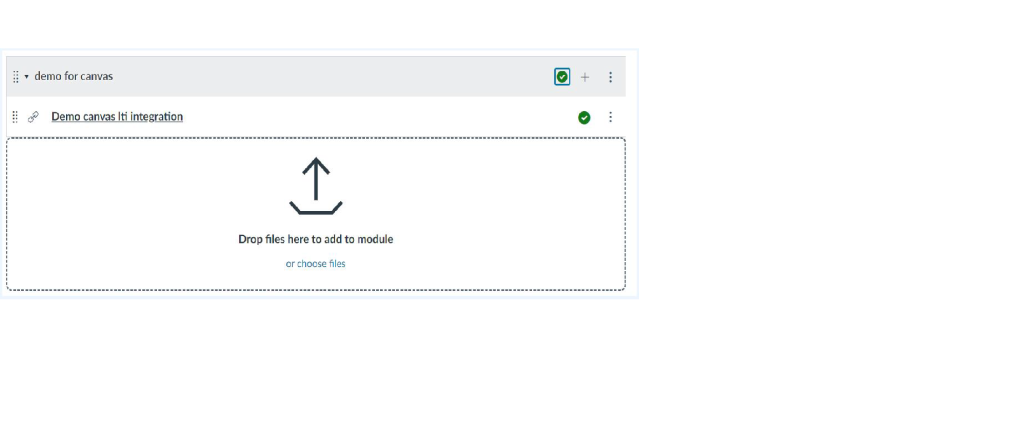
13. Scroll to top of the page and click on “STUDENT VIEW” (Top right corner of the module section).
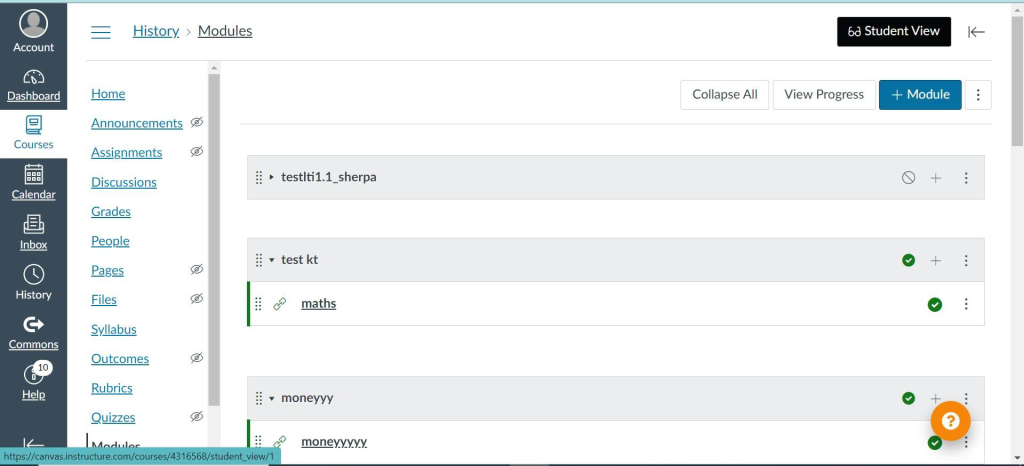
14. Once you have selected a student view, your page will be transformed into a student view.
Scroll down to the bottom of the page, you will see your module and app, Click on your app.
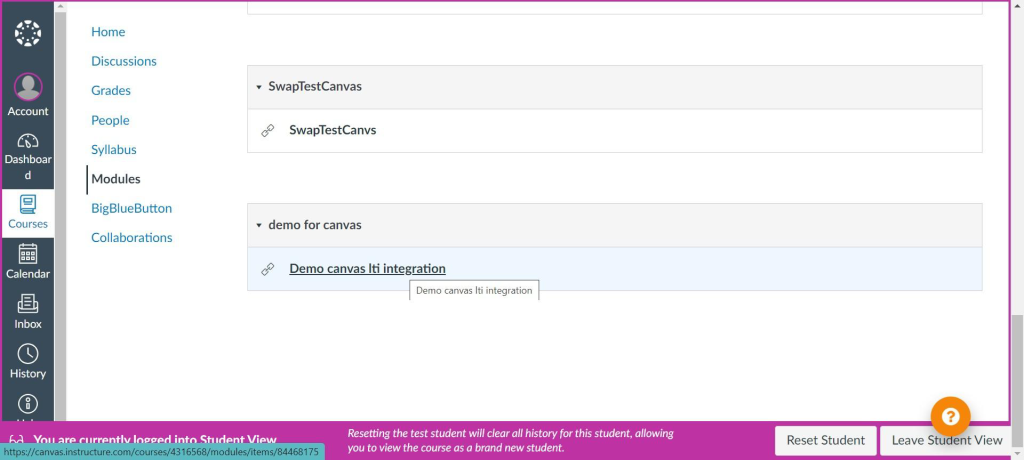
15. Once you click on app i.e. “Demo canvas lti integration”, you will be redirected to the page, as shown below. CLick on “Load Demo canvas lti integration in a new window”.
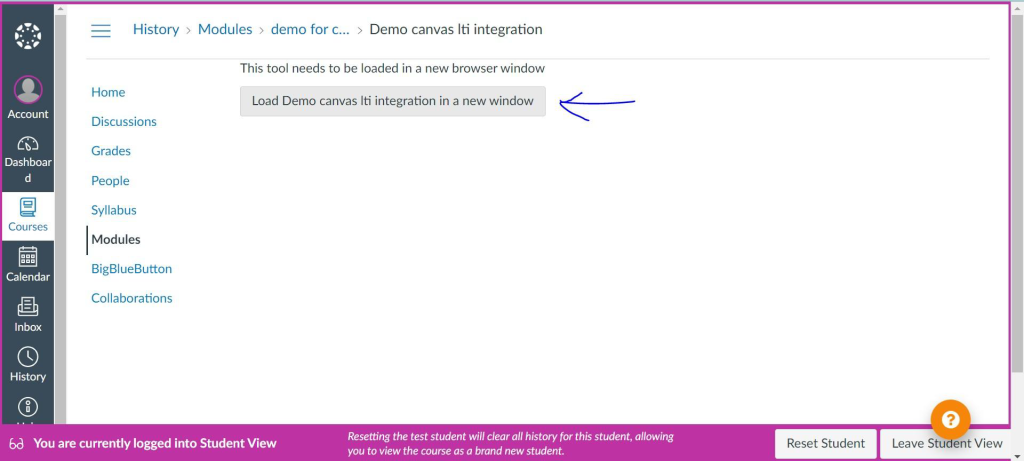
16. Once you click on it, a new tab will be opened, and you will be able to view the book.
Generating the Web Links Audit Links Report
Generating the Web Links Audit Links Report
The Kitaboo system enables you to examine the links you have used for creating specific books or all the books created using your credentials. You can download the Weblink Audit report and analyze how many of them are http links, how many are https links, and how many are broken links, i.e., not as per the standard format. You can also find suggestions on how the broken URLs should have been used in. Let’s see how to get the Weblink Audit report and what the different columns are about in the report.
1. Sign in with your Enterprise Admin credentials.
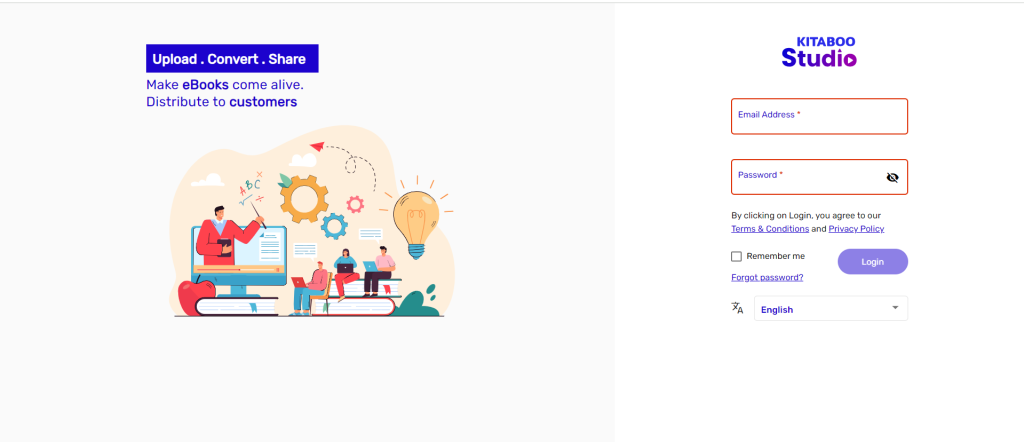
2. Click on Admin Center on the Contents tab.
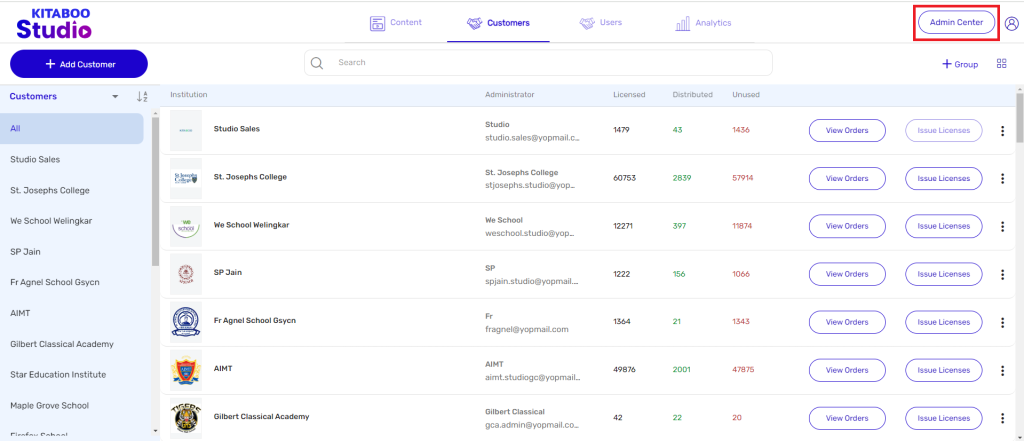
3. On the Admin Center page, click on Broken Link.
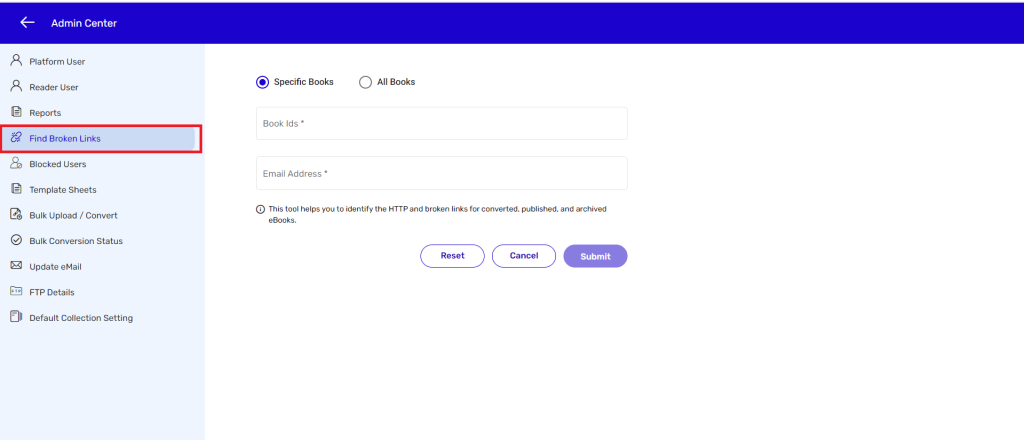
4. Enter Book ID and email ID in the relevant fields. > Click on Submit.
A report will be sent to the given email ID.
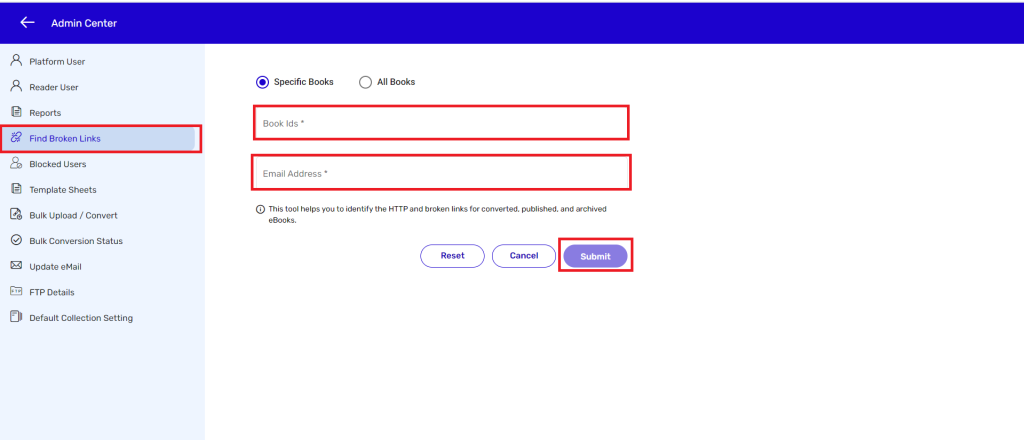
NOTE:
● You can use multiple book IDs in the Book IDs field. The book IDs must be separated by a comma.
● You can also generate a report for all the books created in your account by selecting the All Books.
● Ideally a user should provide the email ID he/she has logged into the Kitaboo system. Else another email ID can also be used for getting a report.
5. Log in to the email account you provided for getting the report. > Download the report.
You will find a detailed report for the books you have provided the IDs.
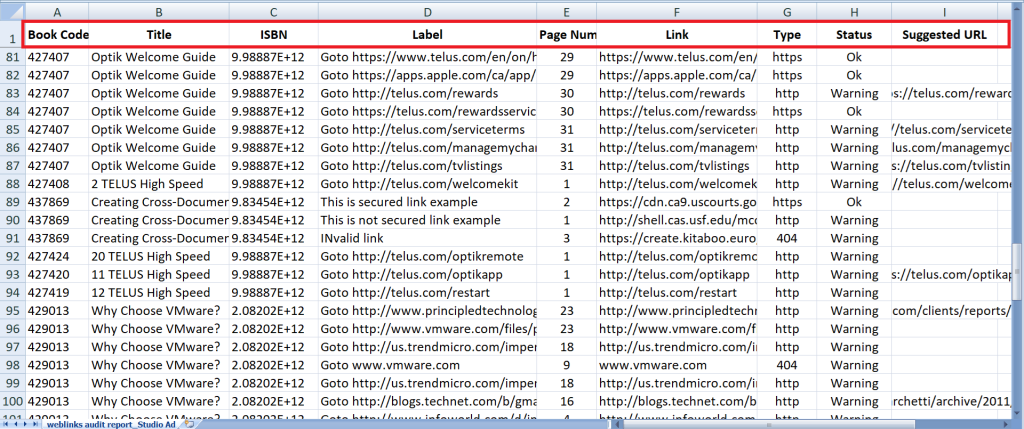
6. On the Status column of the Weblink Audit report, you will find that some of the links are Ok as they are. But there are a few with the 404 error code. You will also find suggestions on how the links should have been used in the Suggested URL column.
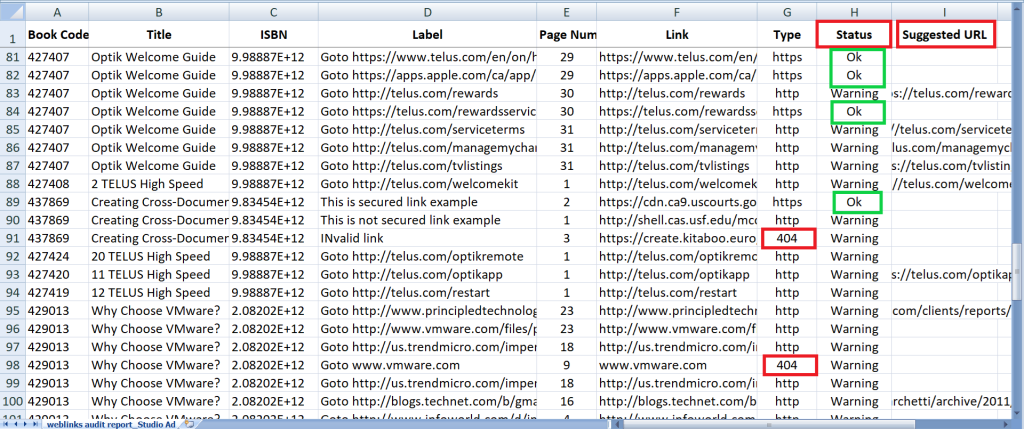
Downloading a Sample Sheet
As a Kitaboo platform user, you may need to create various types of sheets for uploading data to the system. We have defined certain formats in which various types of data should be filled and uploaded to the Kitaboo system. As a user, you need to download a sample sheet as per your requirement, enter your data, and upload it to the system. Let’s see what the different categories of sample sheets are.
1. Sign in with your Enterprise Admin credentials.
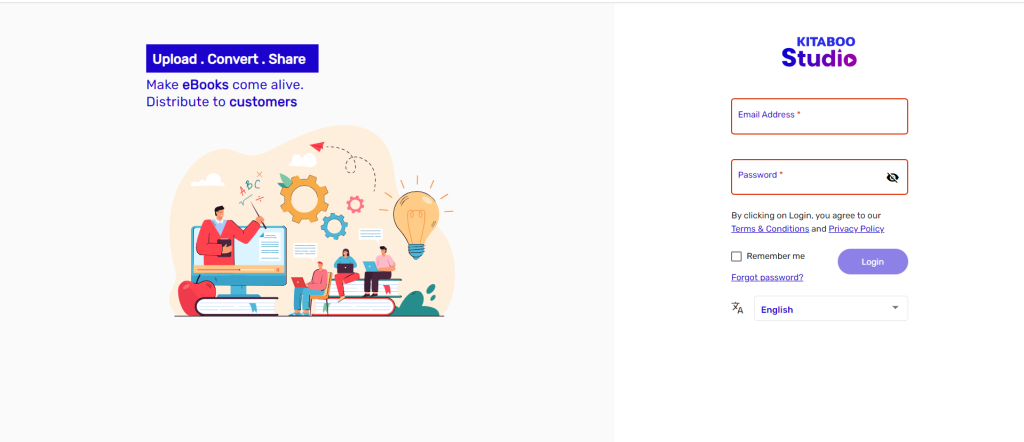
2. Click on Admin Center on the Contents tab.
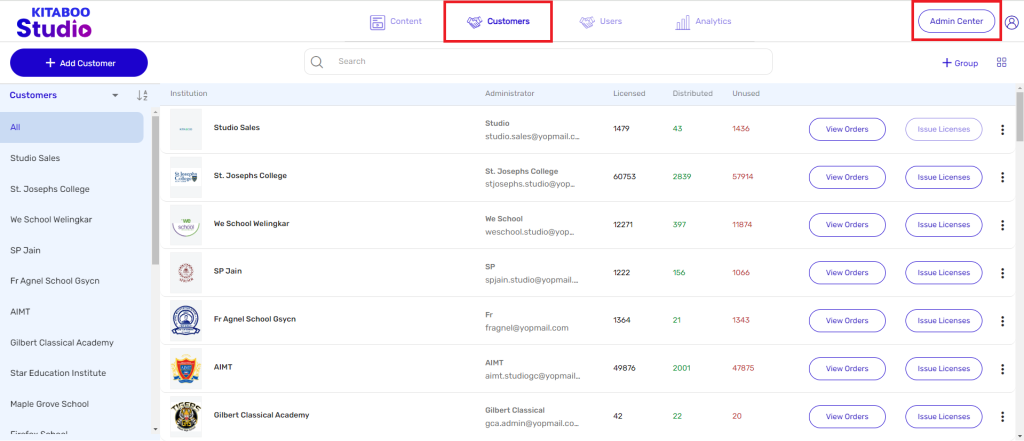
3. On the Admin Center page, click on Sample Sheet.
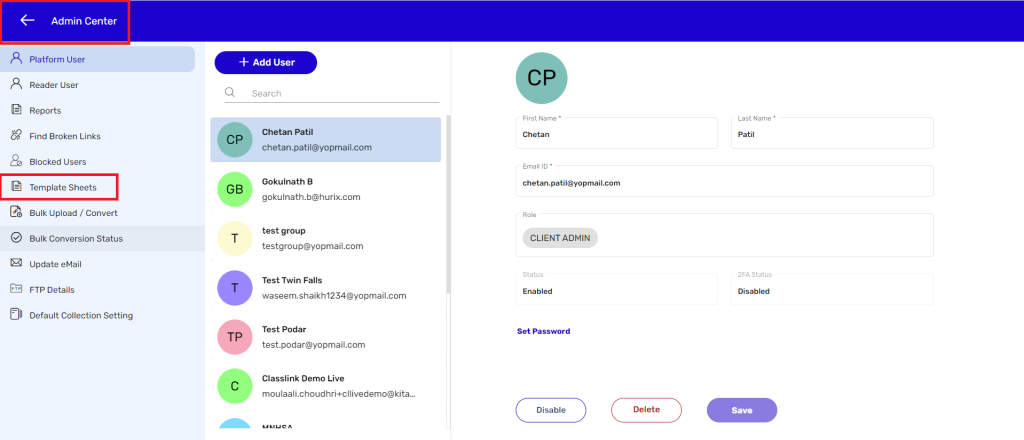
4. You can download any of the sample sheets, like the Content Bulk Conversion sheet, the Reader Bulk User Creation sheet, the Platform Bulk User Creations sheet etc. by clicking on Download.
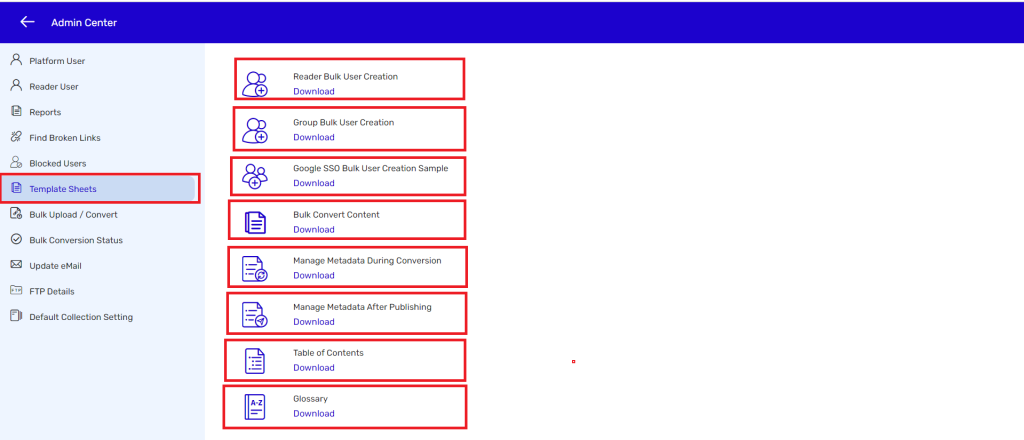
NOTE:
You must adhere to the prescribed formats for processing of data. Once you
download a sample sheet, you must fill in your data in the prescribed format.
Bulk Upload
The Kitaboo platform enables you to convert books/content into desired formats such as PDFs, ePubs etc., and then to upload them in bulk. The platform also allows 3rd party ePubs in bulk. You need to follow and use the Kitaboo prescribed templates for successfully completing the bulk upload process. Let’s see what those templates are and how to use them.
1. Sign in with your Enterprise Admin credentials.
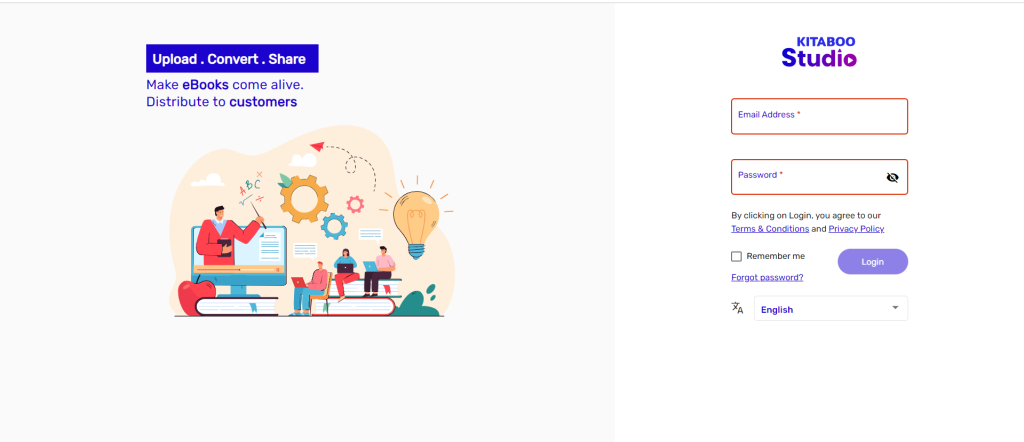
2. Click on the Admin Center button on the top right corner of the screen.
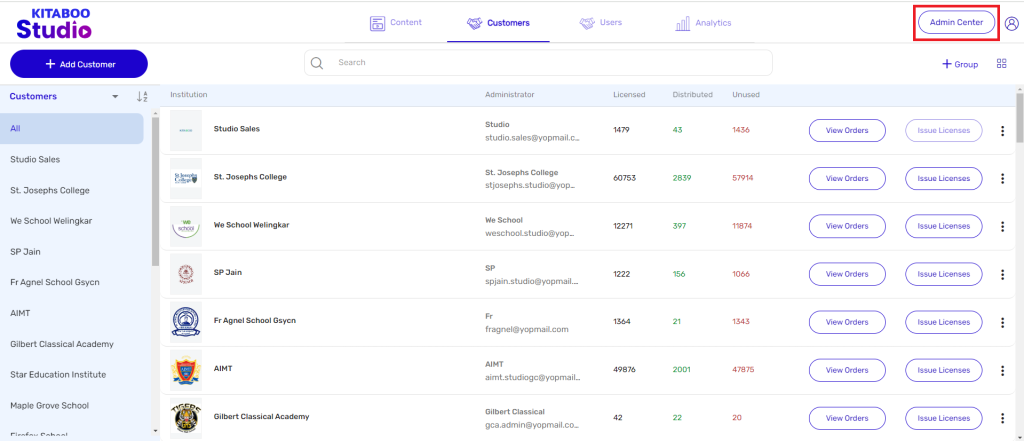
3. Click on Bulk Upload/Convert on the Admin Center page.
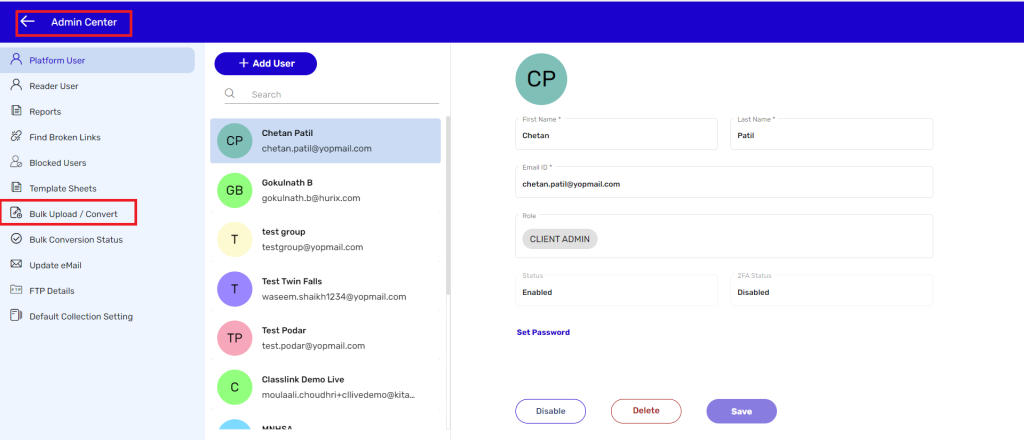
4. You will find below categories of bulk-conversion links on this page.
● Kitaboo Book Bulk Conversion
● Fixed ePub Bulk Conversion
● Upload 3rd Party ePub in Bulk
Based on your requirement, you need to click the Download Sample link under each category.
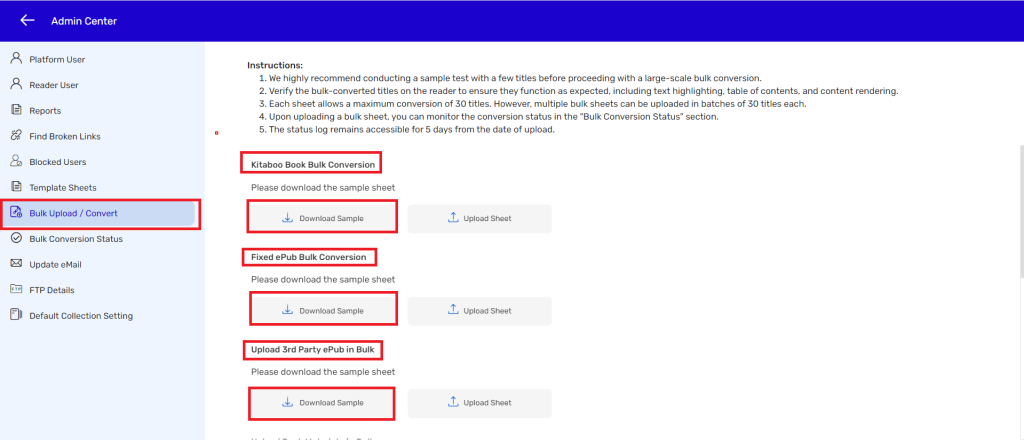
● Upload Book Metadata in Bulk
●Bulk Collection Creation
●Bulk Audiobook Creation
●Bulk Videobook Creation
Based on your requirement, you need to click the Download Sample link under each category.
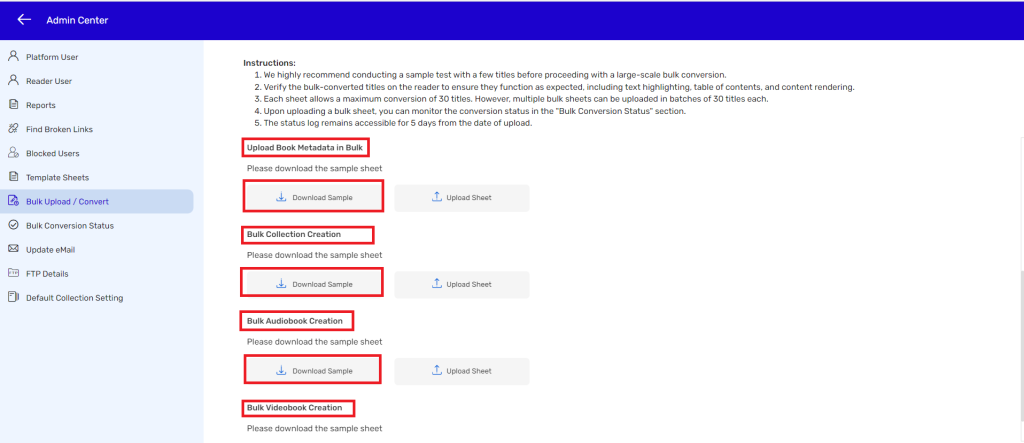
5. If you click the Kitaboo Book Bulk Conversion link, a spreadsheet with a set of instructions at the top and a table with multiple rows and columns below the instructions will get downloaded to your system.
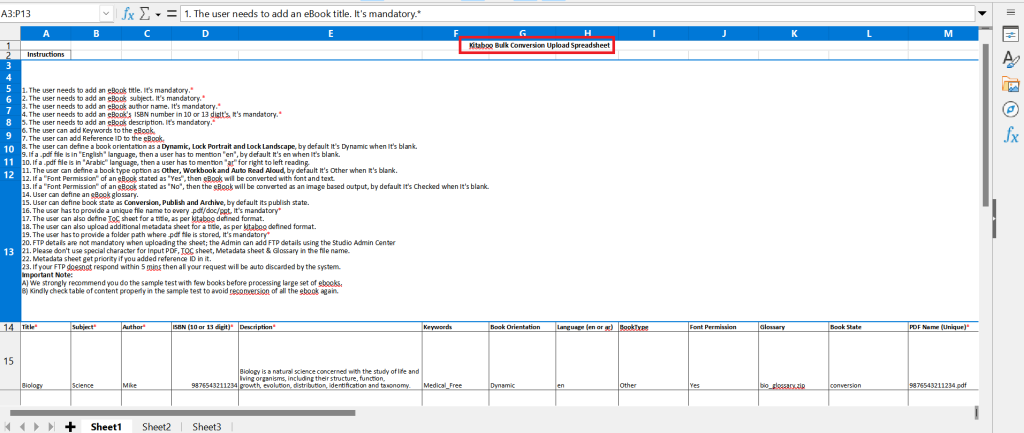
IMPORTANT:
● You need to strictly follow the instructions for successfully completing the bulk upload process.
● In the interest of your time and effort, it is advisable to upload a single book/content first, and then go for a bulk uploading of books/content.
6. Once you have entered details under the relevant labels in the table, click on the Upload Sheet link.
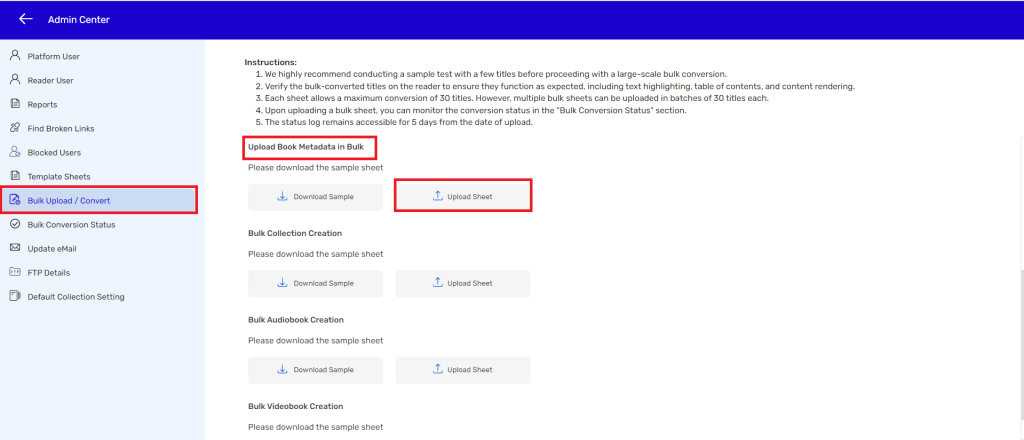
7. If there is any interruption in the bulk conversion and uploading process, you
can see the kind of error occurred under the Error column of the error report spreadsheet.
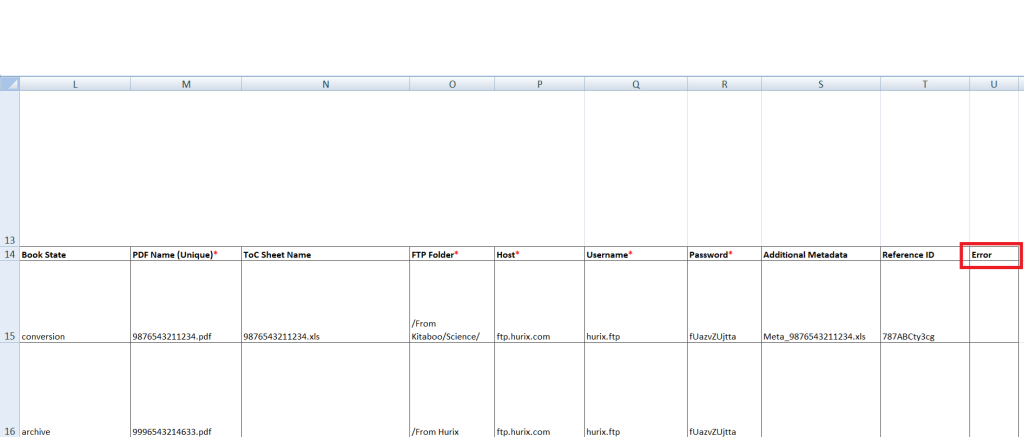
NOTE:
You need to follow similar steps for completing the Fixed ePub Bulk Conversion or the Upload 3rd Party ePub in Bulk process.
8. Fixed ePub Bulk Conversion spreadsheet sample
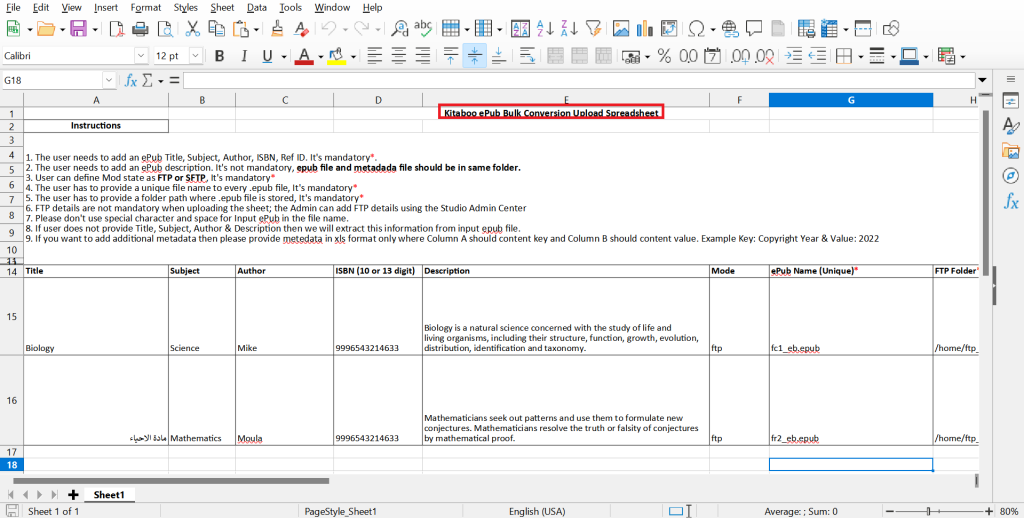
9. Upload 3rd Party ePub in Bulk spreadsheet sample
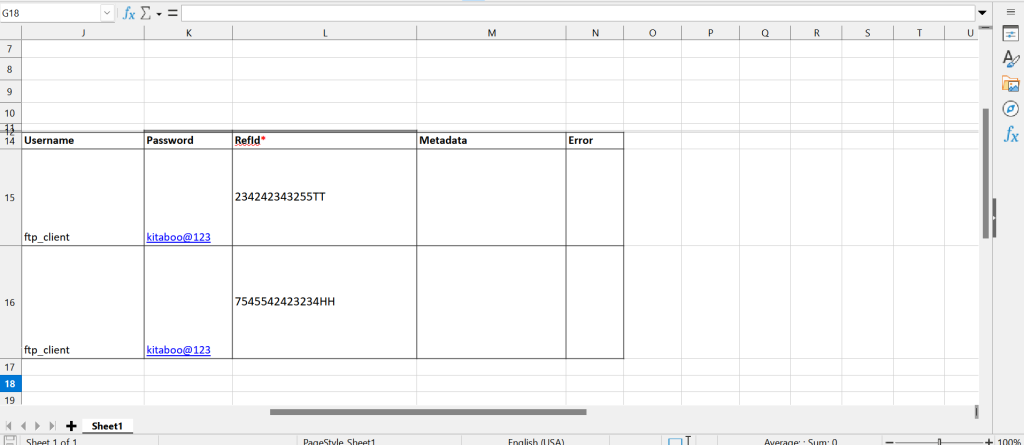
10. Upload Book Metadata in Bulk spreadsheet sample.
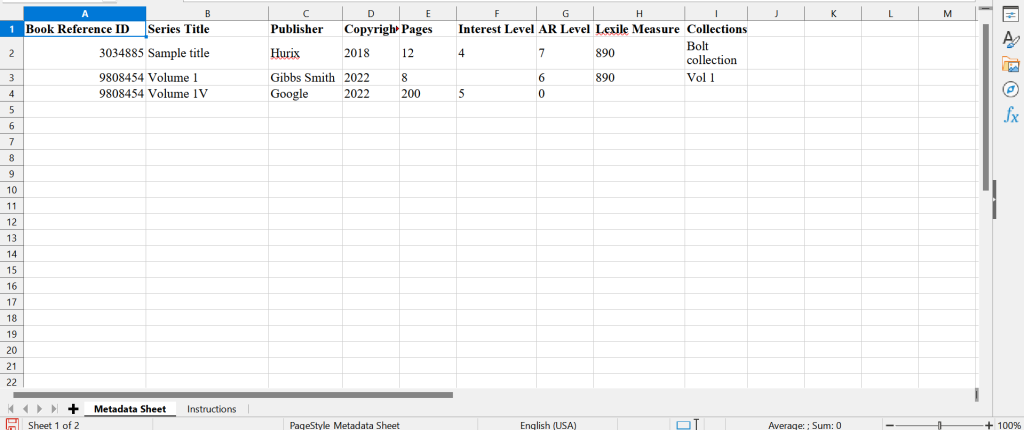
11. Bulk Collection Creation spreadsheet sample.
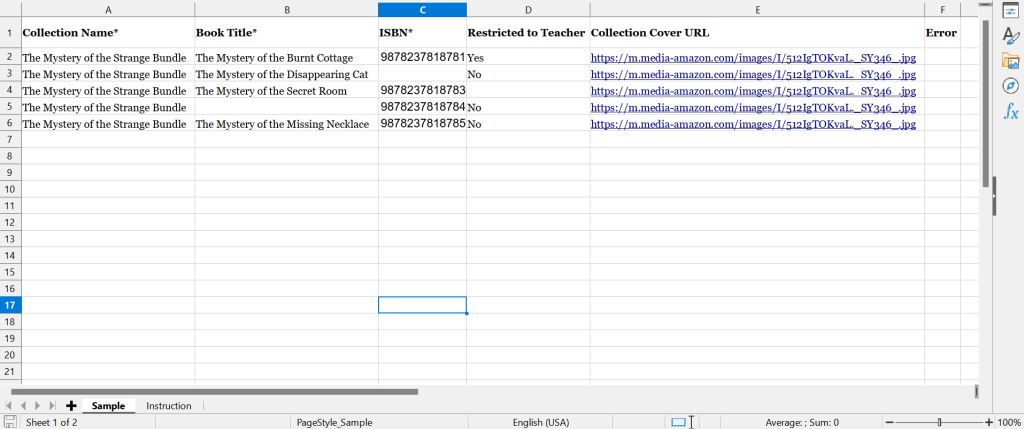
12. Bulk Audiobook Creation spreadsheet sample.
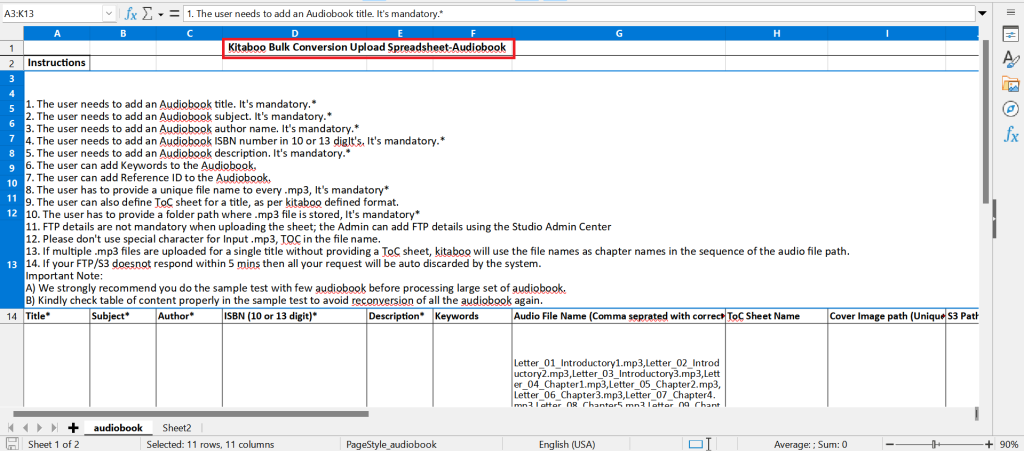
13.Bulk Videobook Creation spreadsheet sample.
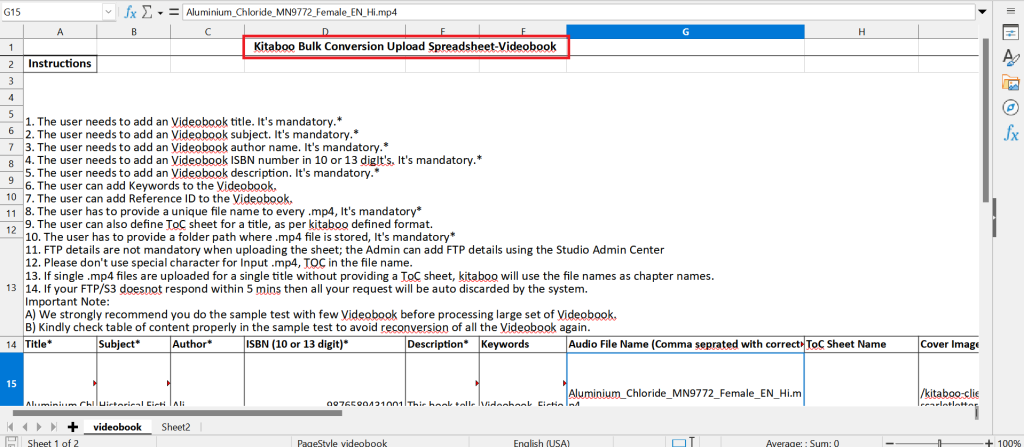
The Kitaboo system also allows you to Visualize and analyze your data in an effective way.
Let’s see how you can analyze your data effectively on the Kitaboo system.
1. Sign in with your Enterprise Admin credentials.
2. On the Dashboard, Click on Analytics Tab, to view analysis of your data. Click on
Customer Dropdown, to sort your customers or Click on Search Bar, to Search for your customer for whom you want to view data.
Note-: By default it’s showing data for all the Customers.
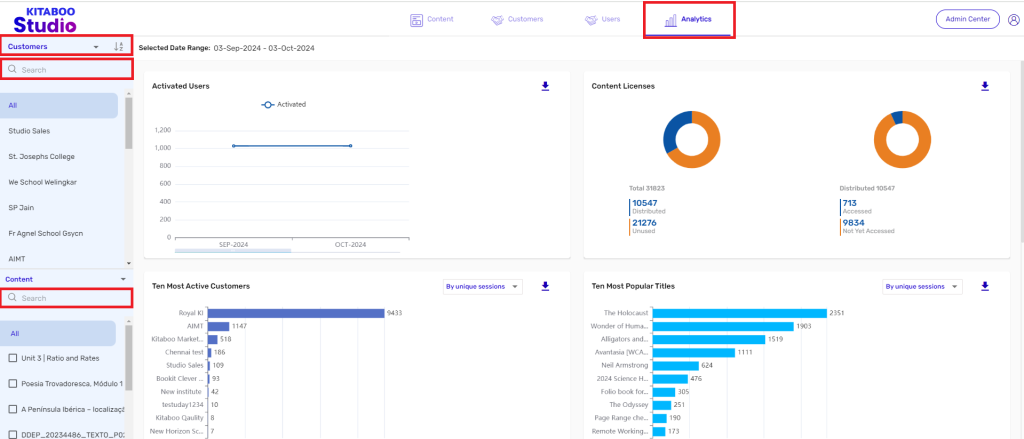
3. Click on Customers dropdown in the left side panel, you can sort your customers into Groups or Individual Customers.
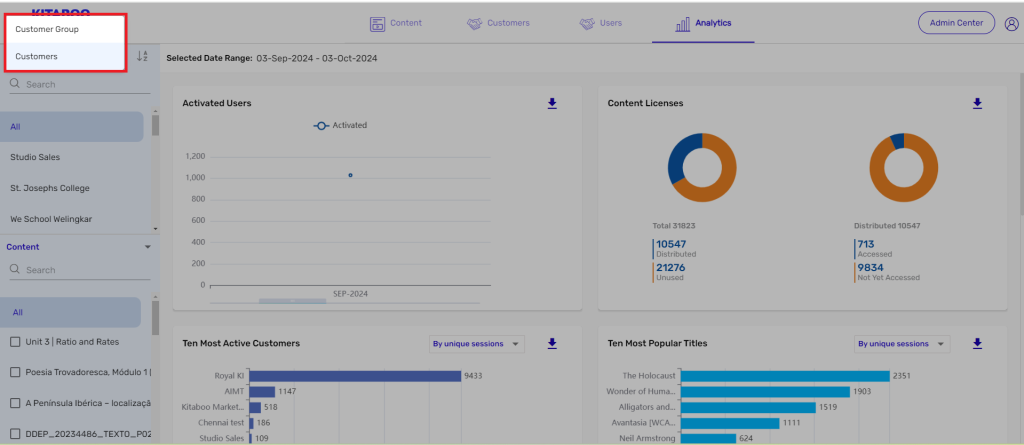
4. Click on Content Dropdown to sort your asset according to Content, Collection and Content type.
Note -: By default All is selected which shows data for all the content.
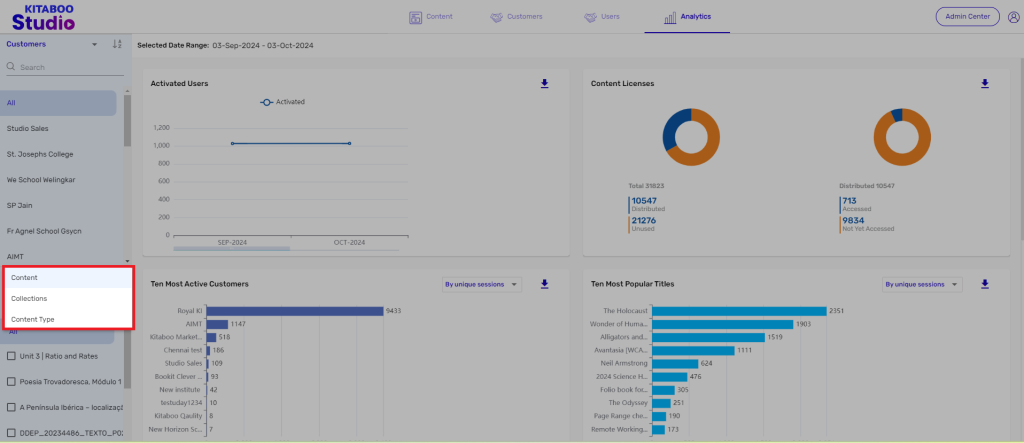
5. Click on Dates of Selected Date Range, to select the date and view data from Custom Range or select the pre-defined Time Period to view the data.
Note-: Only past 1 year data will be shown here.

6. You can Visualize your data according to Activated Customers, Content License,
Ten Most Active Customers, Ten Most Popular Titles. Click on Download Icon to download the Analytics Reports.

7. Furthermore, by Content Coverage, User Interaction, Web Player: Usage by Format and Usage by Geography also, you can visualize your data. Click on Download Icon to download the Analytics Reports.
Note-: Only data for Web Reader/Player is shown in Usage by format.
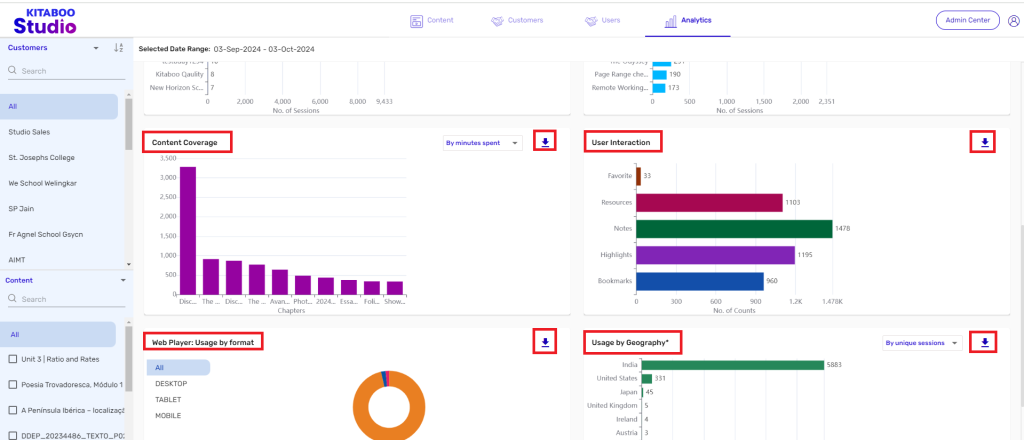
Being an Enterprise Admin, you can add a customer or multiple customers whom you want to get onboard to the Kitaboo portal. It is to be noted here that the institutions or the employees associated with you are actually your customers or partners.
1. Sign in with your Enterprise Admin credentials.

2. On the Customers tab, click on +Add Customer.
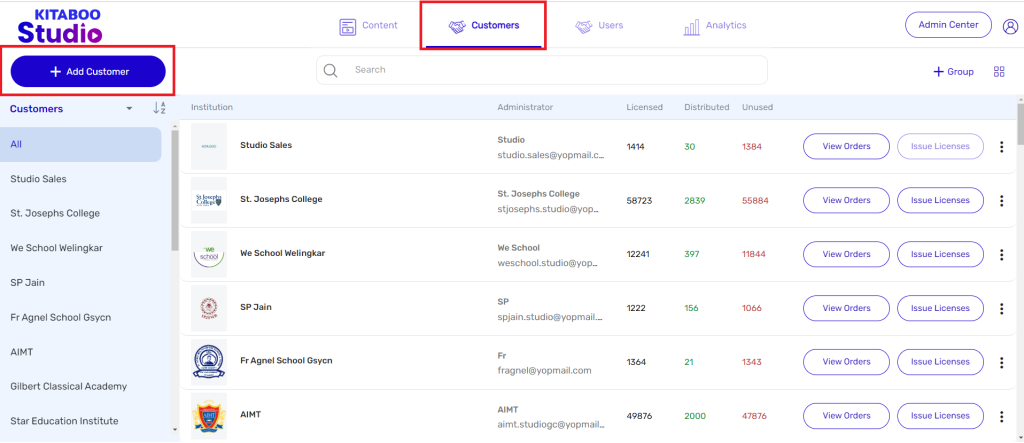
3. Enter the Profile, Administrator, and Address details of the customer you want to add.
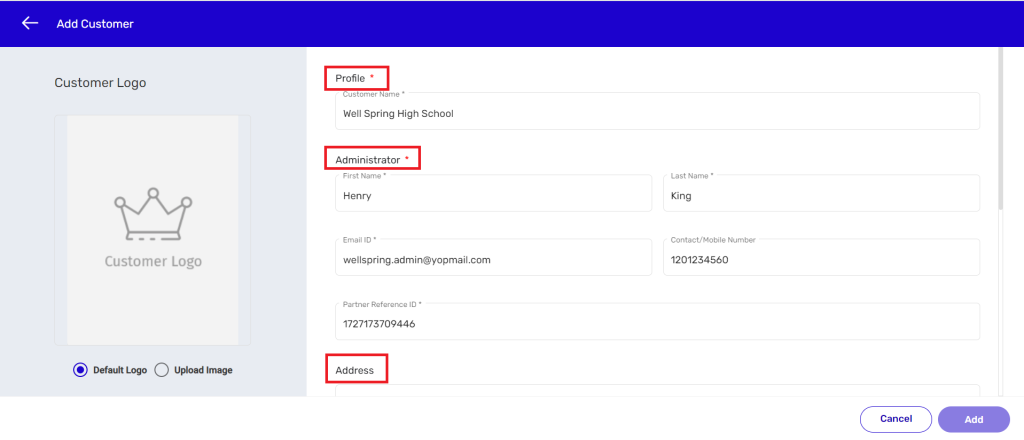
4. Next, select any of the Onboarding types from the SSO Source dropdown menu.
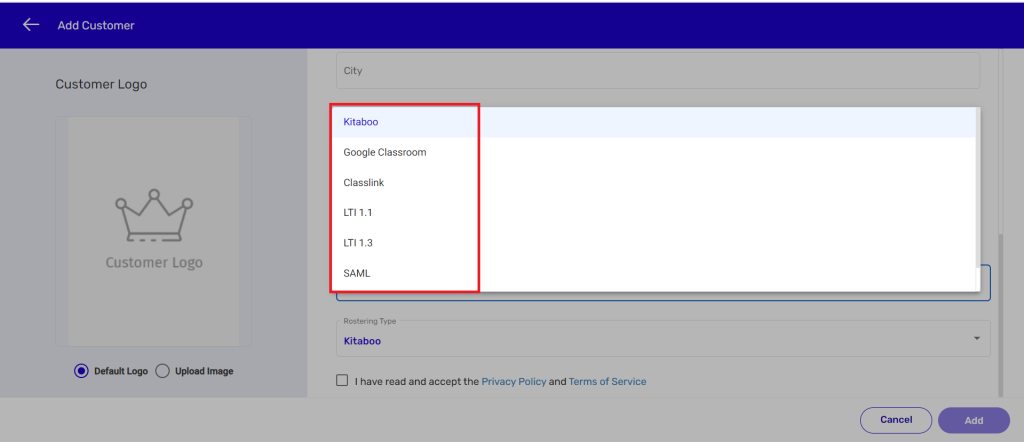
NOTE: We use the SSO (Single Sign-on) authentication method that enables you to
securely authenticate with our multiple applications by using just one set of credentials.
Presently, Kitaboo Studio supports the following onboarding types.
● Kitaboo
● Google Classroom
● LTI 1.1
● LTI 1.3
● Clever
● Classlink
● Azure, and
● SAML
5. Select the Rostering Type from the dropdown menu. We have selected Kitaboo as the Onboarding type as well as the Rostering type in this example.
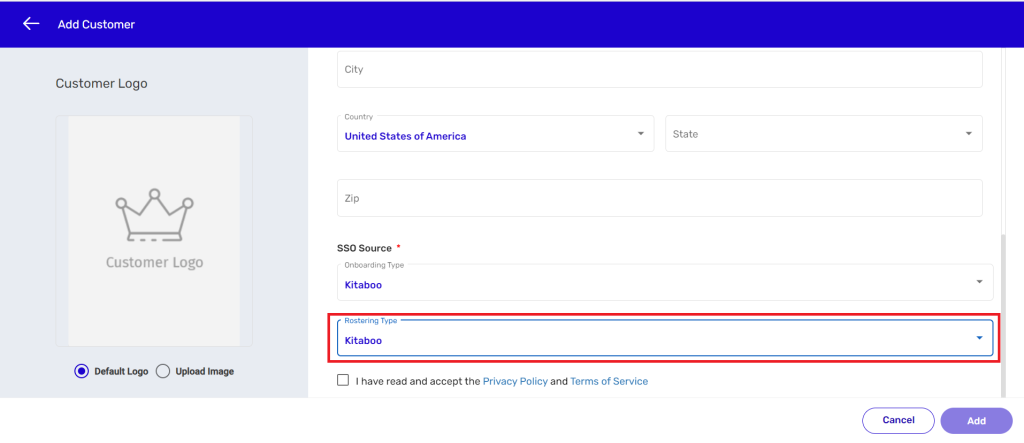
NOTE: Several Rostering type options are available corresponding to each Onboarding type. This information has been summarized in the table given below.
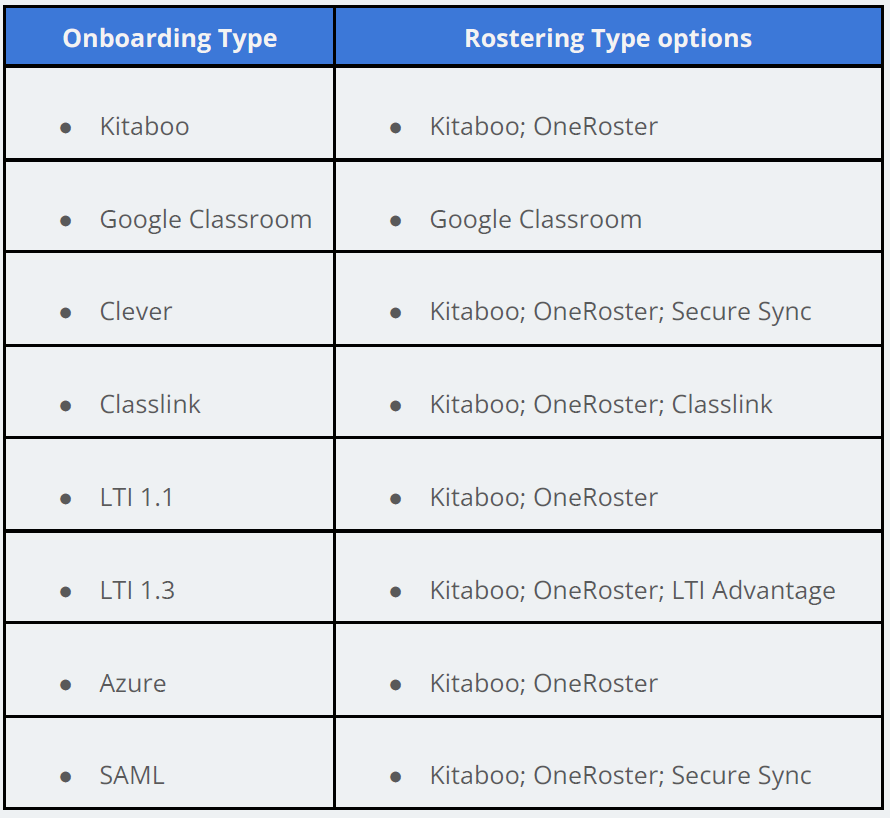
6. Check the Privacy Policy and Terms of Service box. > Click on Add.
This is how you can add a customer.
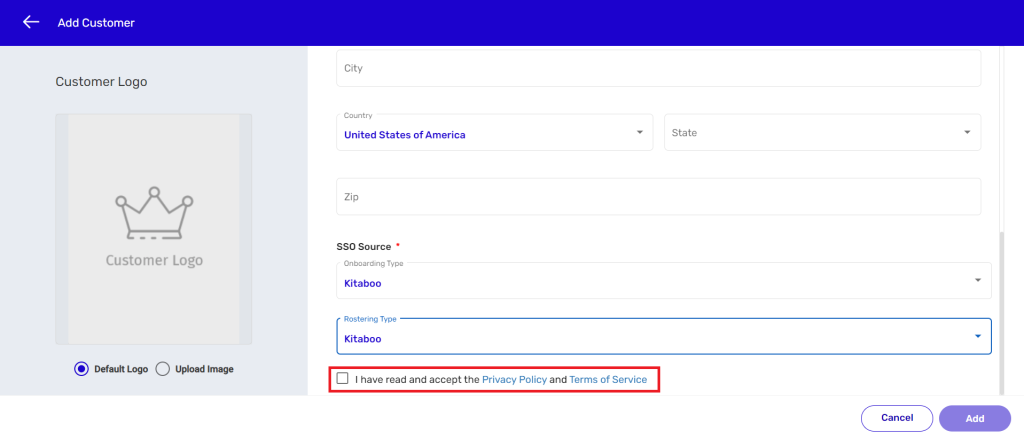
Let’s now explore how to add a customer with another Rostering type option, that is
OneRoster.
7. If you select OneRoster as the Rostering type, new fields like Sync Type, Match with, Sync Frequency, Suffix, Authorization, Client Partner ID, Consumer Key, Secret Key, and URL will appear.
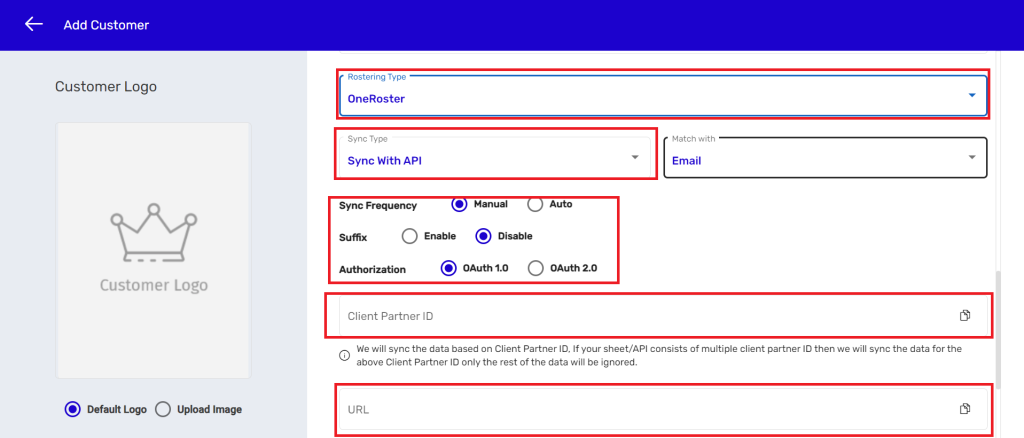
8. Select one of the options from the Sync Type dropdown menu. We have selected Sync With API as the Sync Type in this example.
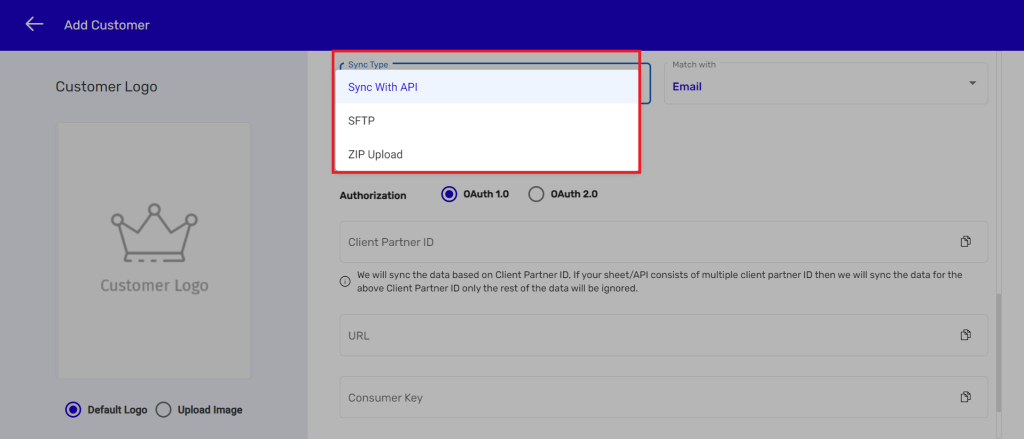
9. Select any of the options from the Match with dropdown menu. We have selected Identifier from the Match with list in this example.
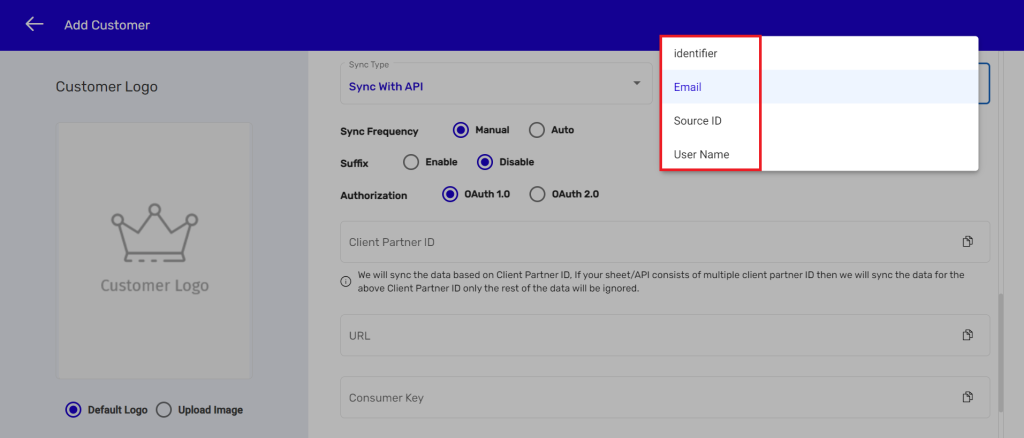
10. Enter the other details in the respective fields. We have continued with the default Sync Frequency option, that is Manual, in this example.
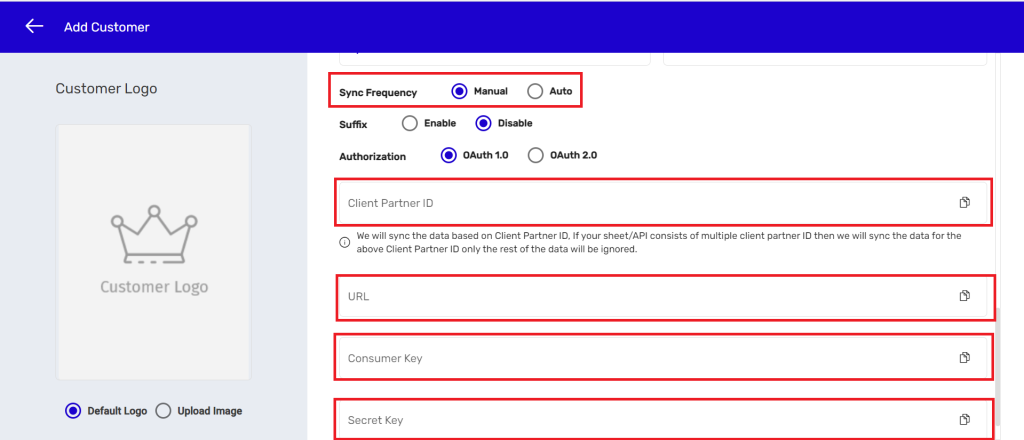
11. Check the Privacy Policy and Terms of Service box. > Click on Add.
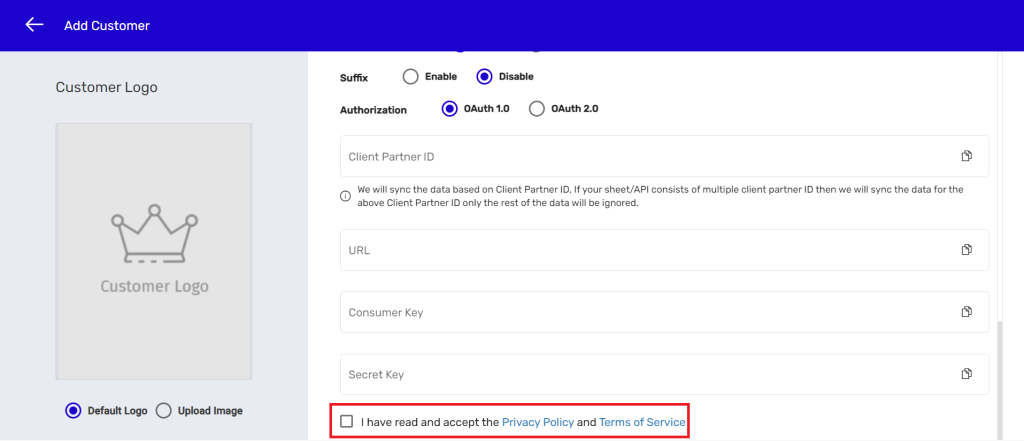
The Kitaboo Studio enables an Enterprise Admin to create an admin account within his/her account for a partner as well as a group admin. By using the Admin Center, you can create an admin account for a single user or for multiple users. The process for creating an admin account is quite simple and intuitive. Let’s see how to create an admin account for a single user
Creating an Admin Account for a Single User
- Navigate to the Kitaboo Studio Reader login page and enter your login credentials.
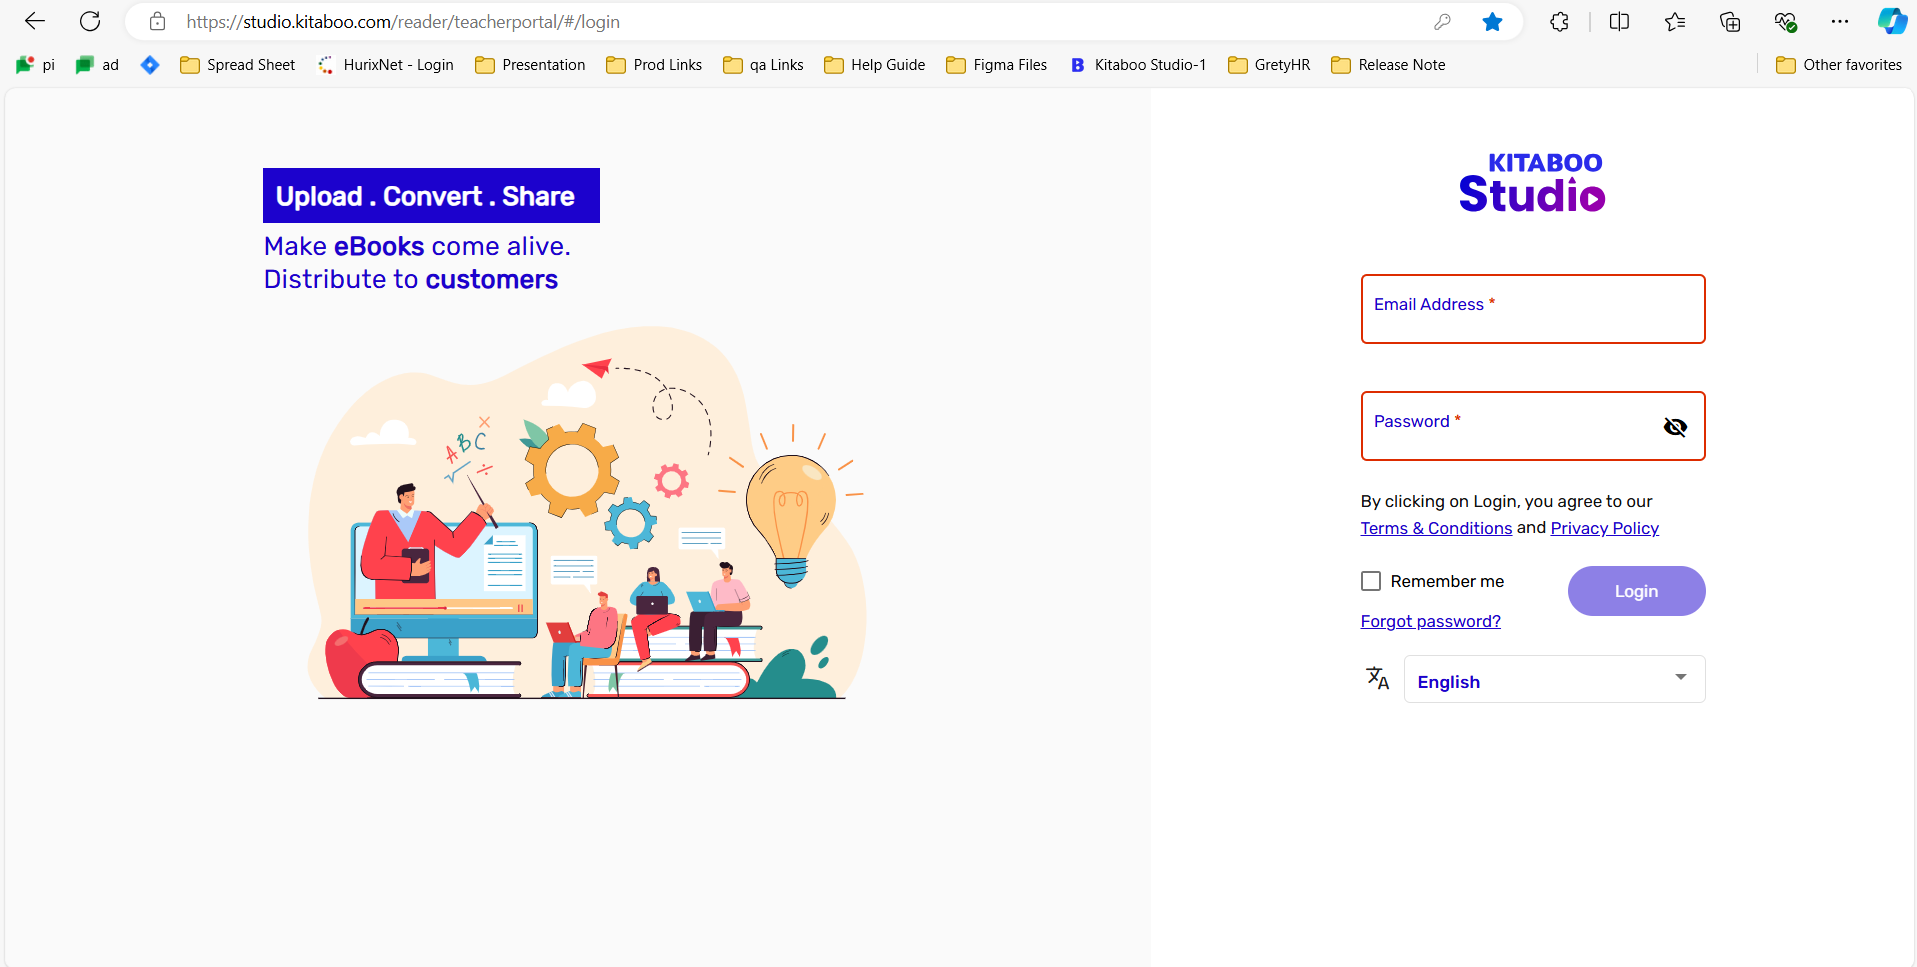
- Click on the Admin Center button on the top right corner of the screen.
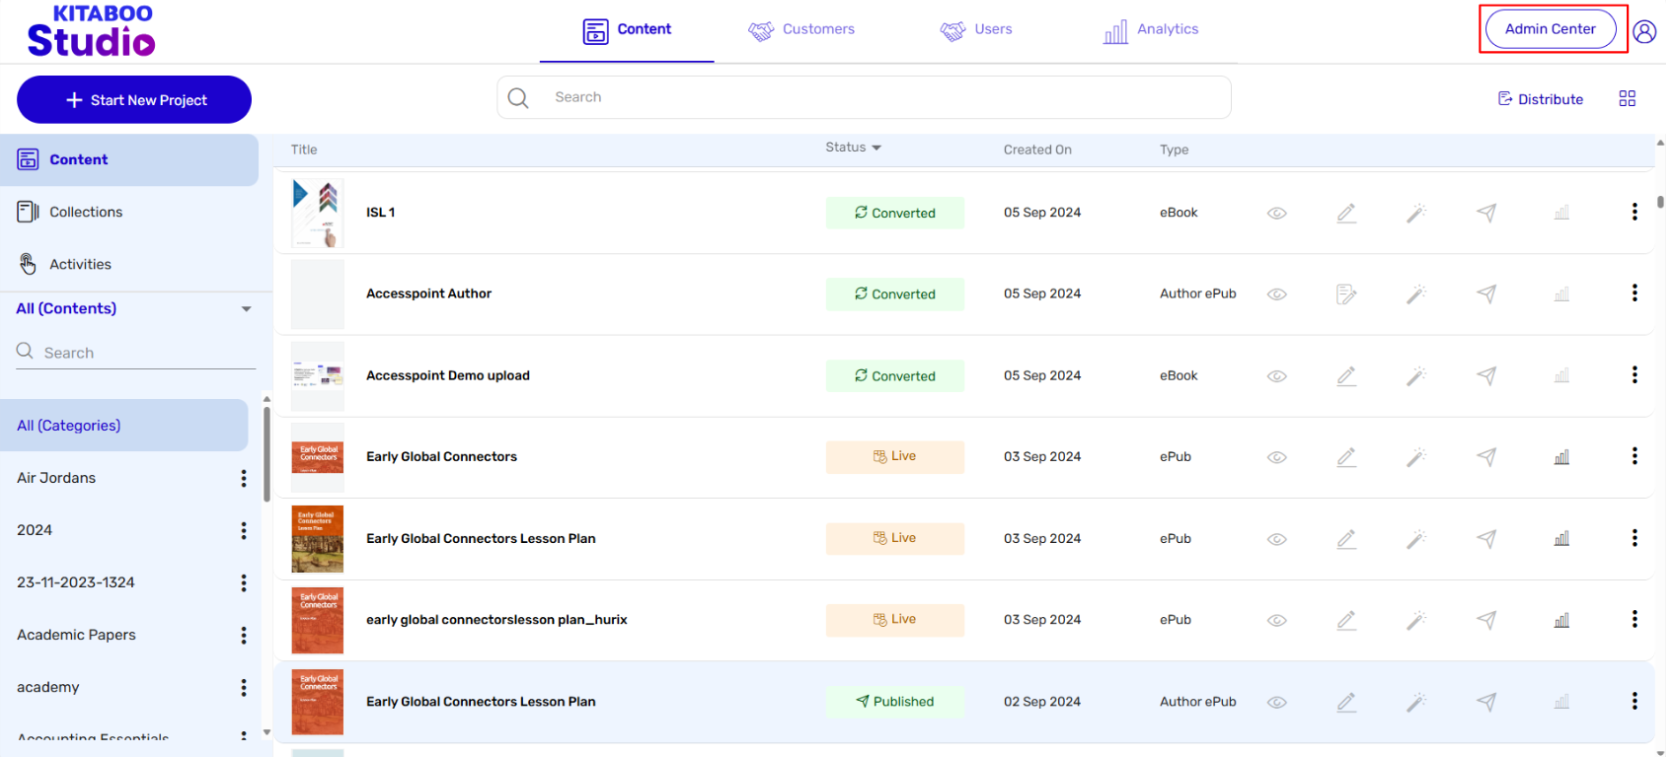
- On the Admin Center page, click on the Add User button.
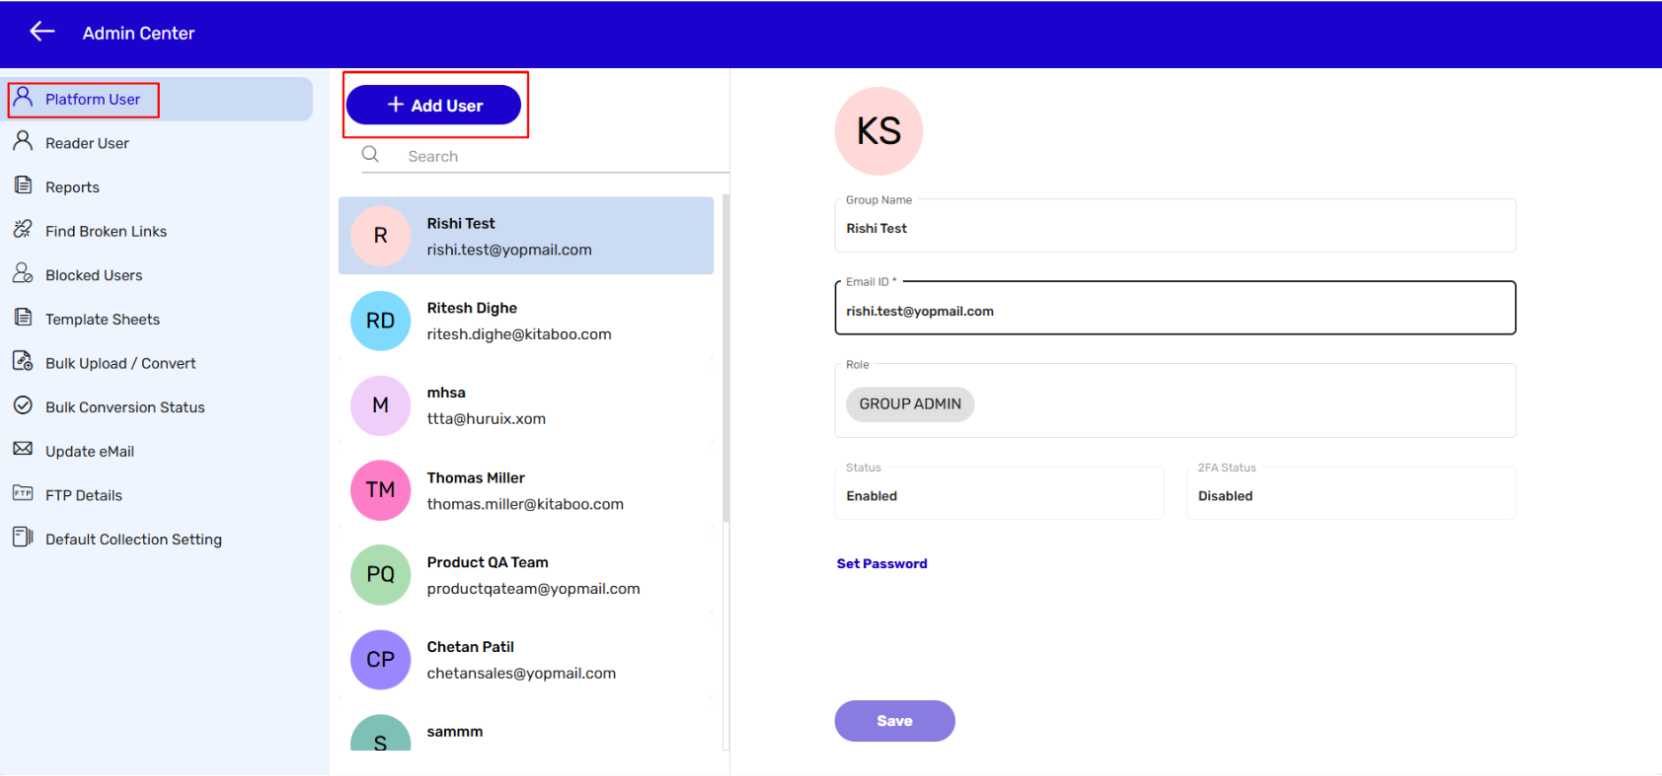
- Enter details like the First and Last names and email ID/Username on the Add User page. > Click on the Create button.
NOTE: The Roles button will appear selected by default. It will show Client Admin as the selected role.
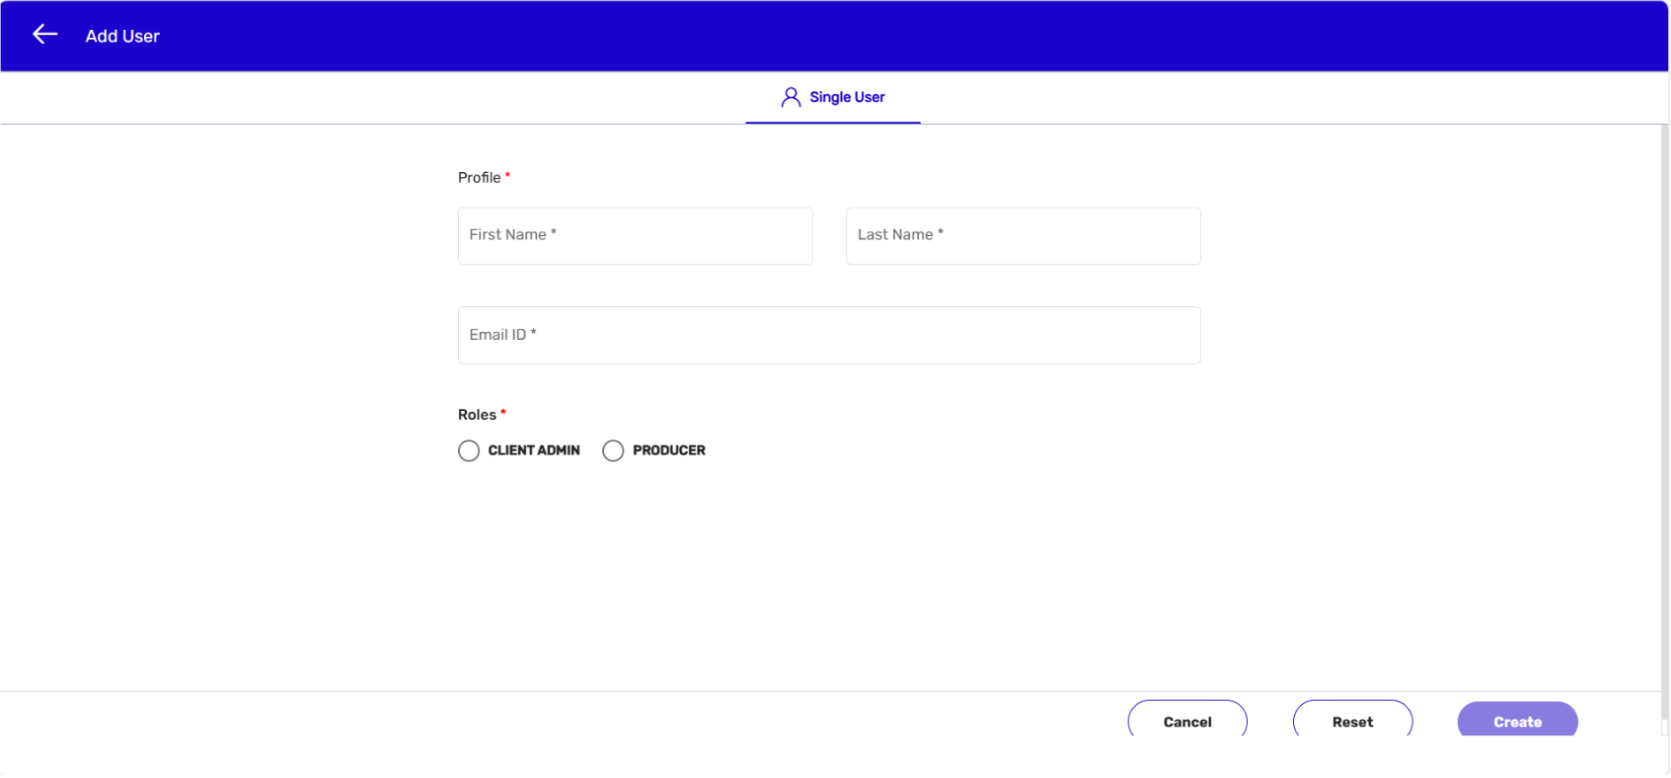
- This is how you can create a new admin account.
- You can also edit, delete, or disable an admin account. For editing an admin account: Navigate to the Admin Center page. > Select the account you want to edit. > Edit details in the desired fields. > Click on Save.
NOTE: You cannot edit details in the Role and Status fields.
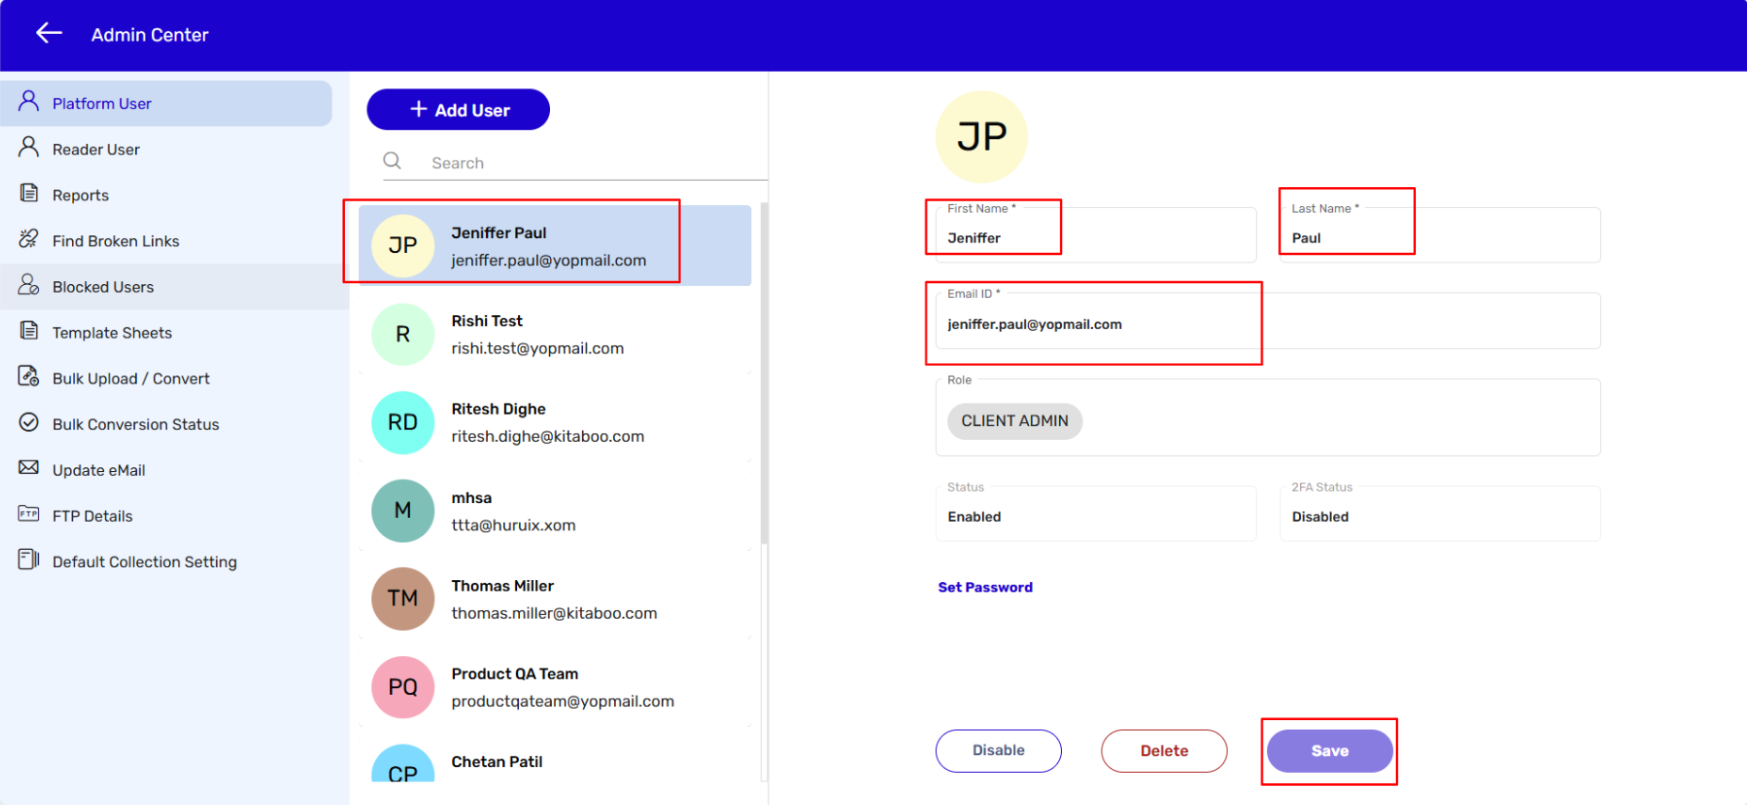
- For deleting an admin account: Navigate to the Admin Center page. > Select the account you want to delete. > Click on the Delete button.
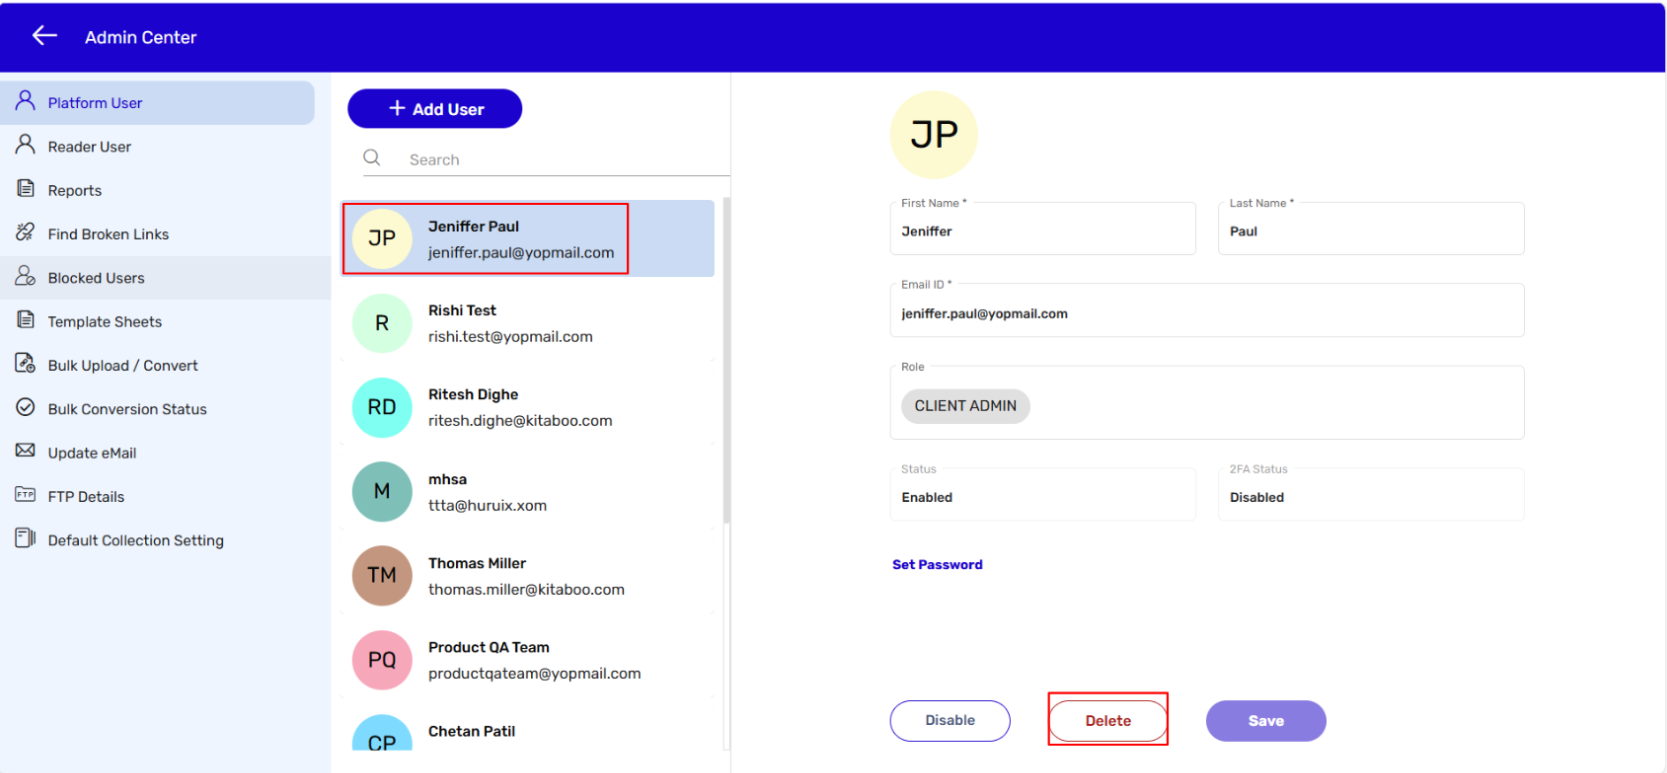
- Click on the Delete button on the pop-up. > click on Save.
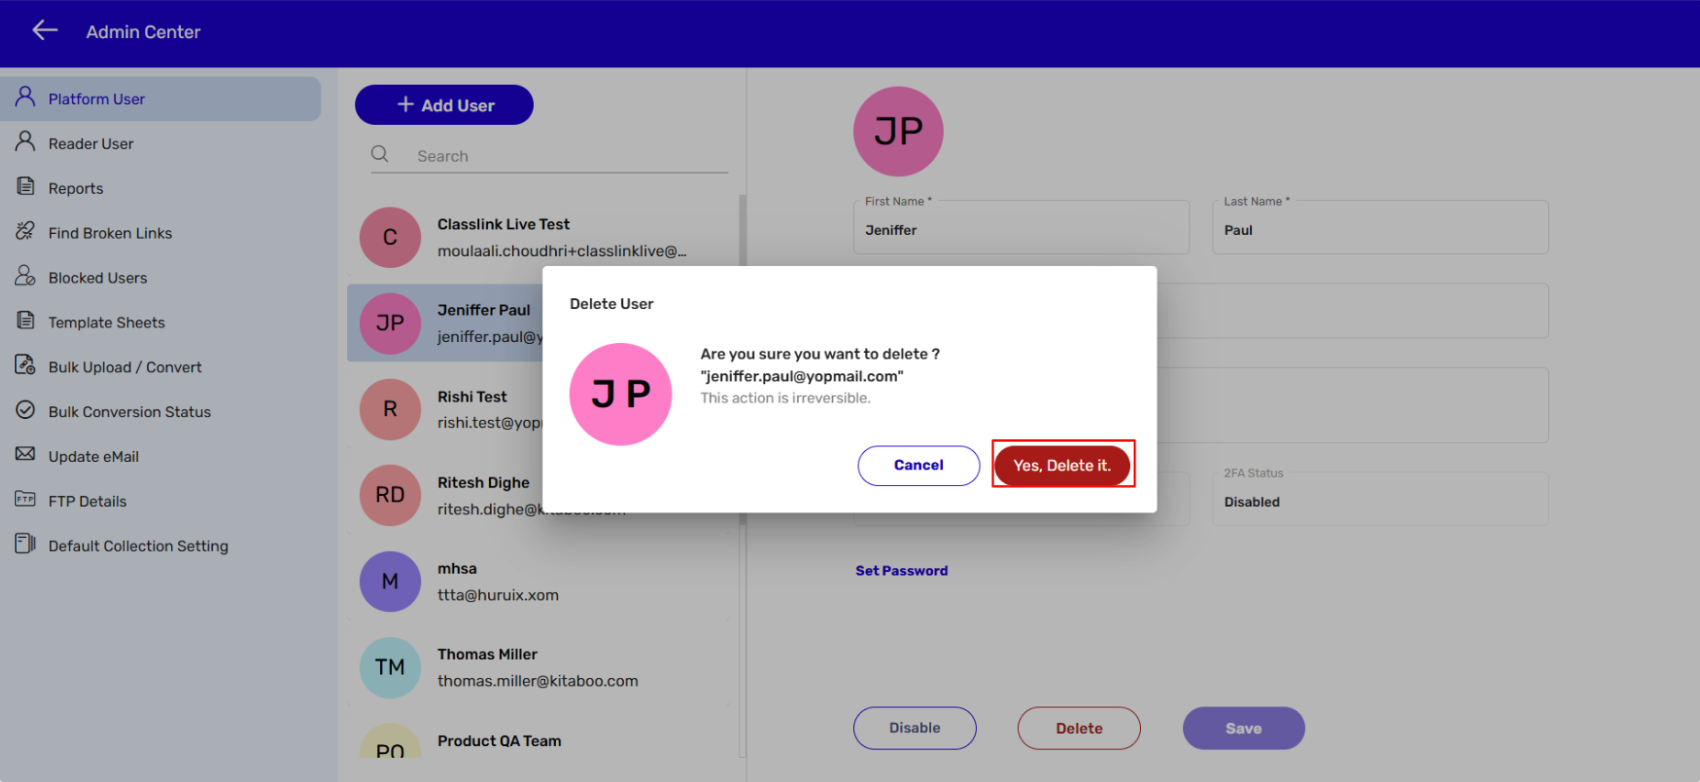
- If want to disable an account: Navigate to the Admin Center page. > Select the account you want to disable. > Click on the Disable button. > Click on Save.
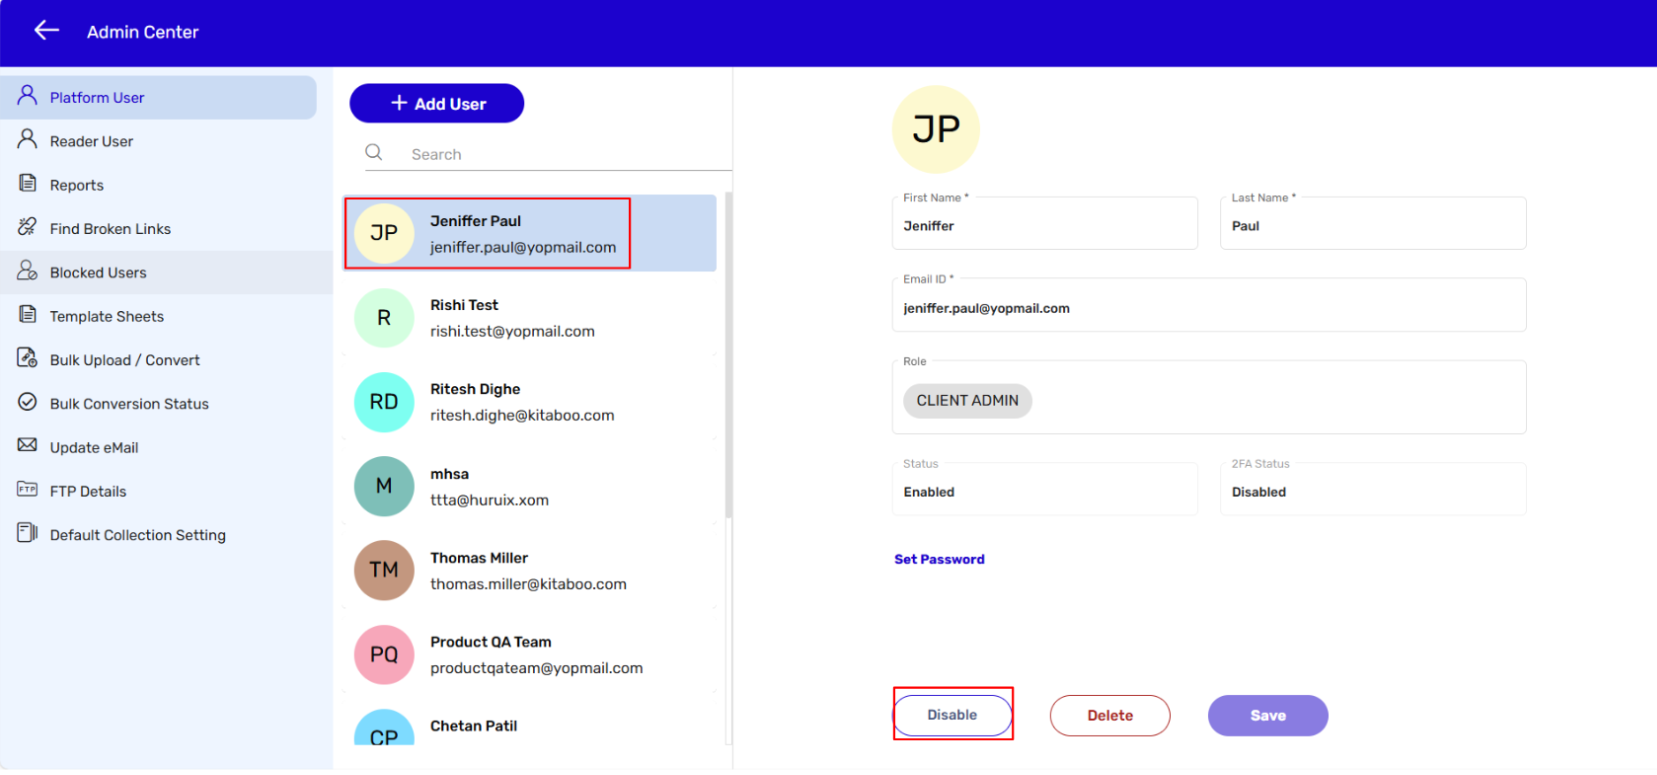
- Kitaboo Studio also enables you to restore a disabled account. If you want to restore a disabled account you need to follow the above process for enabling the account.
1. K-AI Assisted Content Experience –
With our K-AI assisted content creation, Admins, Producers, and Widget Authors can effortlessly craft engaging quizzes tailored to their titles using Kitaboo AI. In just minutes, these quizzes can be seamlessly embedded into their books for optimal user consumption.
Link for the Demo : https://youtu.be/fdx5Ep9nKjM
2. Unlock Insights with Advanced Access Code Reporting! –
Our advanced access code reporting feature empowers admins to gain comprehensive insights into access code usage. Track redemption statuses, identify redeemed users, and pinpoint redemption timings effortlessly.
Link for Demo – https://youtu.be/Ukme-pVvpms
3.Enhance Learning with Gradable Quizzes! –
Admins, Producers, and Widget Authors can now create interactive, gradable activities to enrich the learning experience. With the ability to monitor student progress, teachers and admins can ensure effective comprehension and engagement.
Link for Demo – https://youtu.be/PT-1_iBT3wY
4. Empower Educators with Teacher Control and Grading! –
Empower Educators with Teacher Control and Grading!: Empower educators with the ability to create quizzes and assign them to classes or individual users. Effortlessly track progress and performance to tailor instruction and support student success.
Link for Demo – https://youtu.be/HuDcGDFjM3o
5. Streamline Content Distribution with Direct Distribution! –
Simplify content distribution for platform admins with our direct distribution feature. Instantly assign live content to multiple users with just a single click, eliminating the need for manual license creation.
Link for Demo – https://youtu.be/VP__DScn1G4
1. K-AI Assisted Content Experience –
Offer users an unparalleled learning experience with our K-AI assisted content feature. Generate quizzes based on chapters effortlessly, including Fill-in-the-Blank, Multiple Choice, Flashcards, Learning Objectives, and Summaries.
Video for Demo – https://youtu.be/LrXaa7xgEIk
2. Upgrade to the 6th Generation Reader for Lightning-Fast Performance! –
Experience lightning-fast content rendering and a user-friendly interface with our latest Kitaboo reader. Say goodbye to lagging pages and hello to seamless reading experiences
Video for Demo – https://youtu.be/VDM5MF5rT9E
3. Immerse in Multilingual Content with Auto Text-to-Speech! –
Enhance accessibility with our auto text-to-speech feature, allowing users to listen to content in multiple languages effortlessly. Seamlessly switch between languages based on the title language, without any additional production efforts.
Video for Demo – https://youtu.be/1J-gDdxiaA8
The Kitaboo system allows you to directly distribute content using the user’s email address. The system will automatically create the user and distribute the selected content to the provided email, while also sending a notification email confirming the successful content distribution.
- Sign in with your Customer Admin credentials.
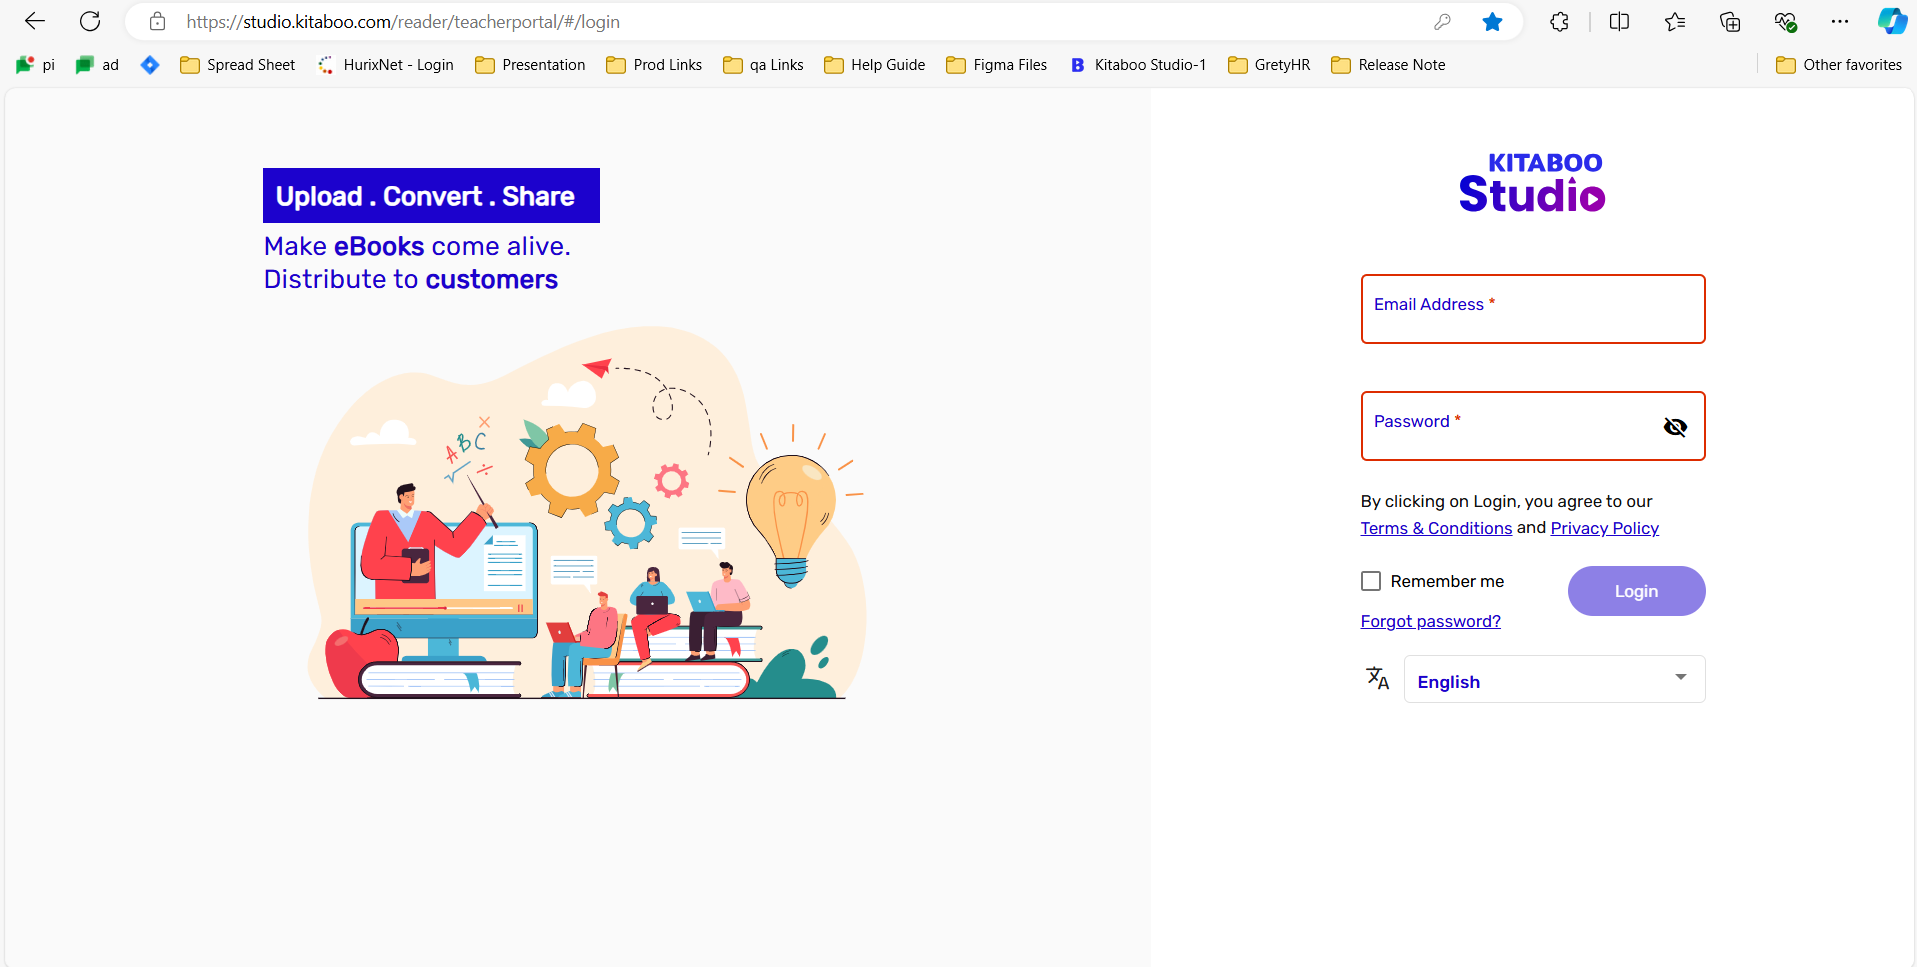
- On the Dashboard, Click on Distribute.
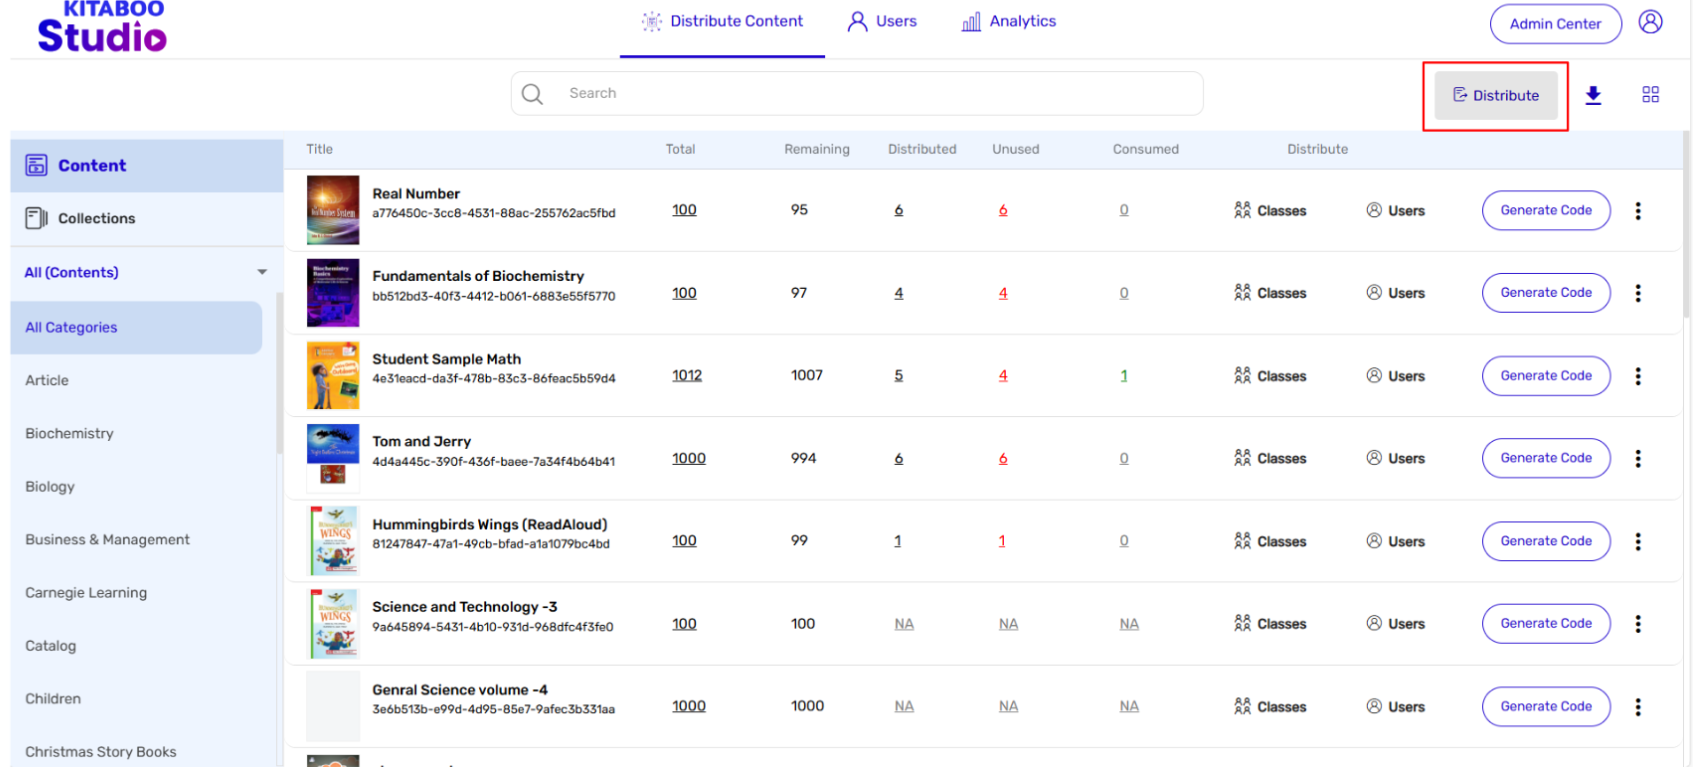
- Please select the content/collection you wish to distribute. Now, click on “Share via email” once you have selected the desired content.
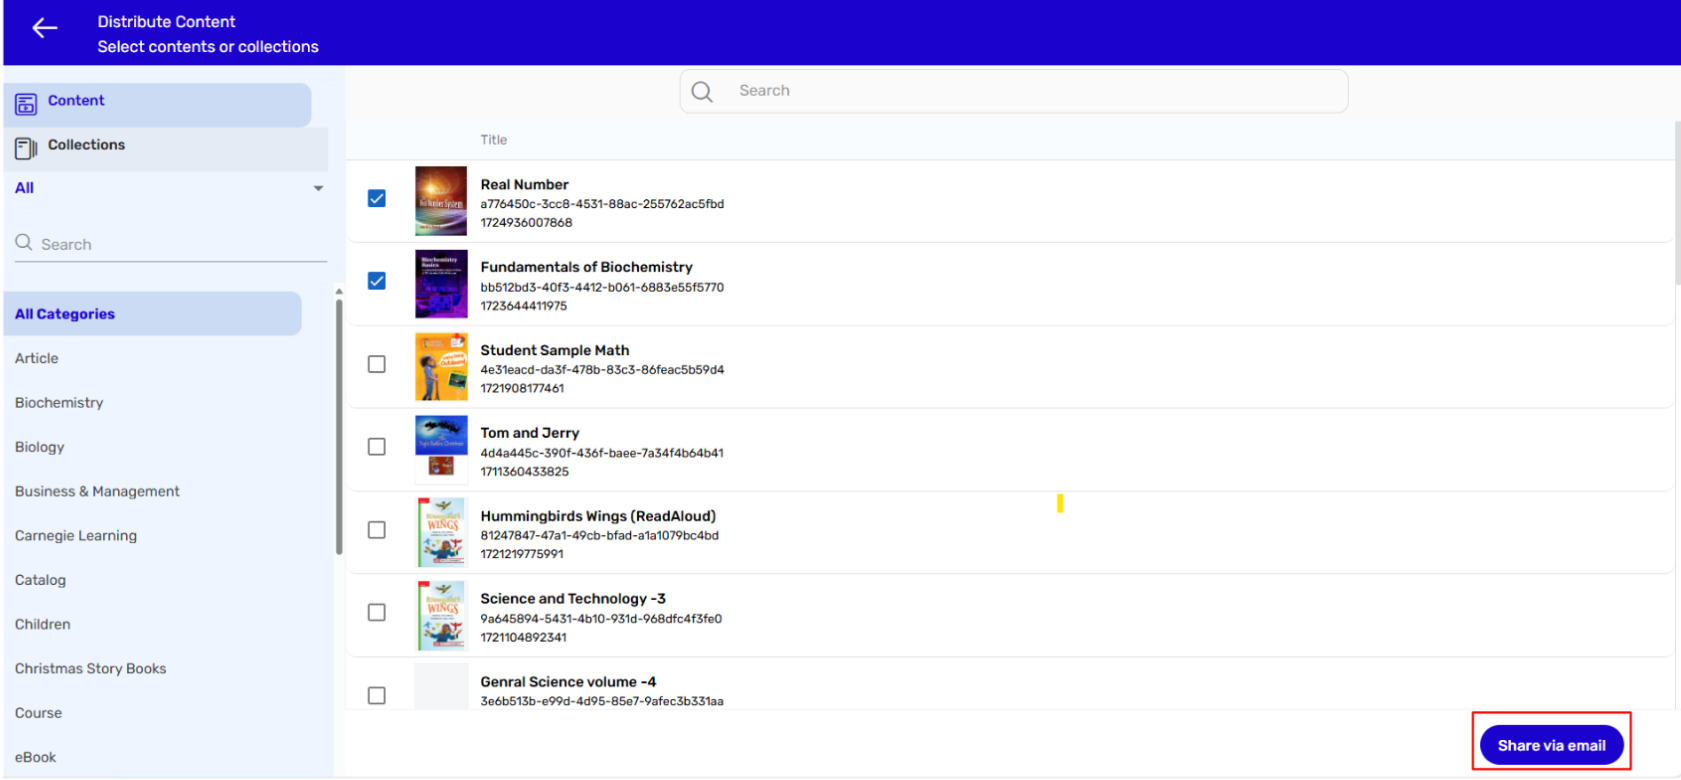
- Select the order number from which you want to share the selected content with the user.
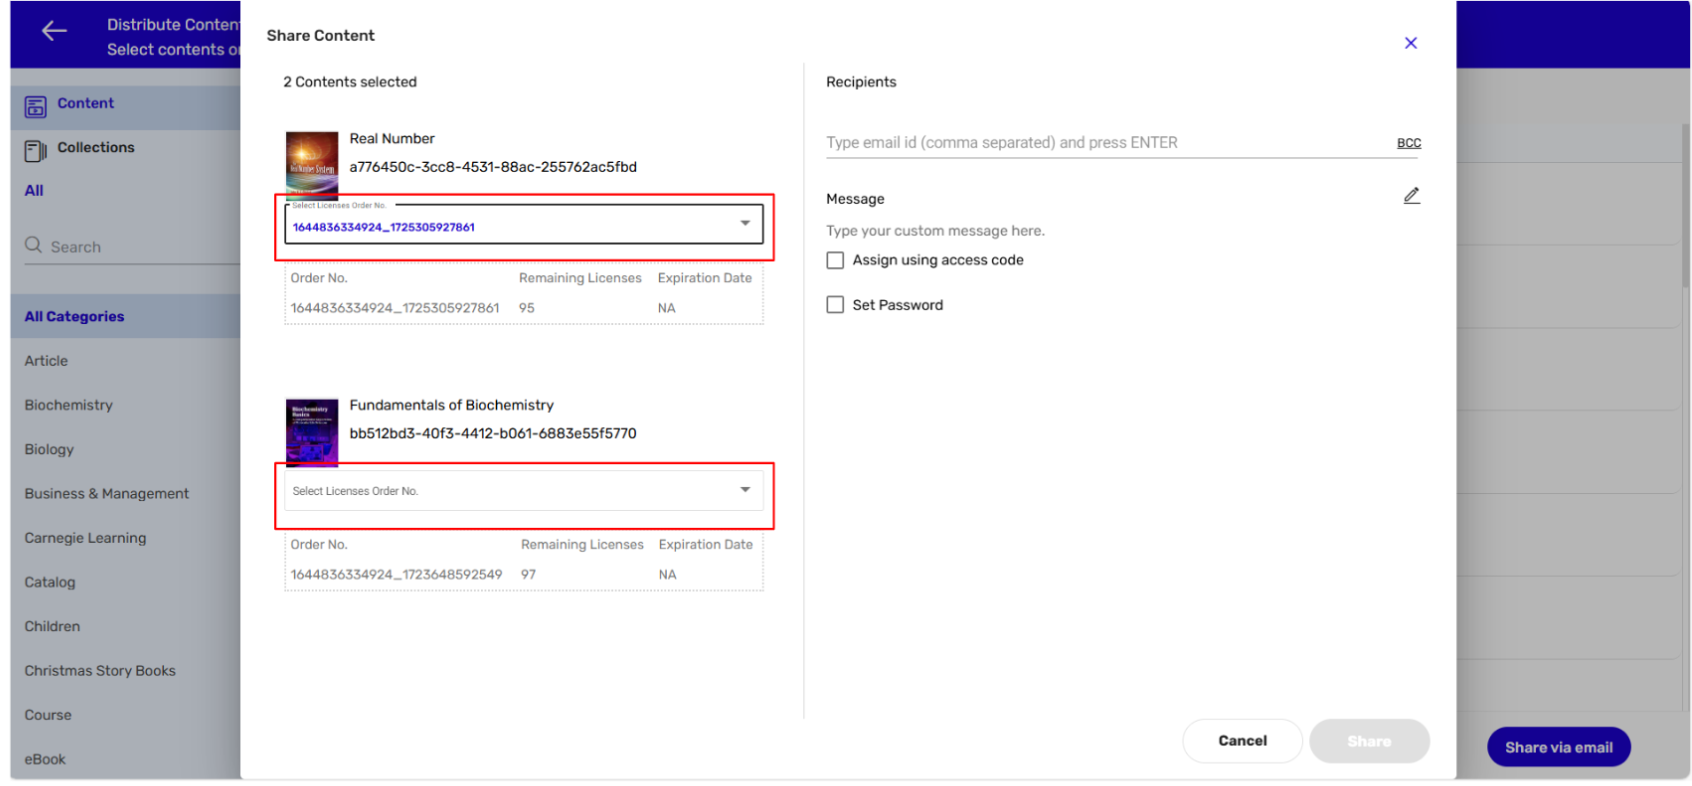
- Enter the “email address” of the users to whom you wish to distribute content. You also have the option to “Add BCC and a custom message to the email notification.
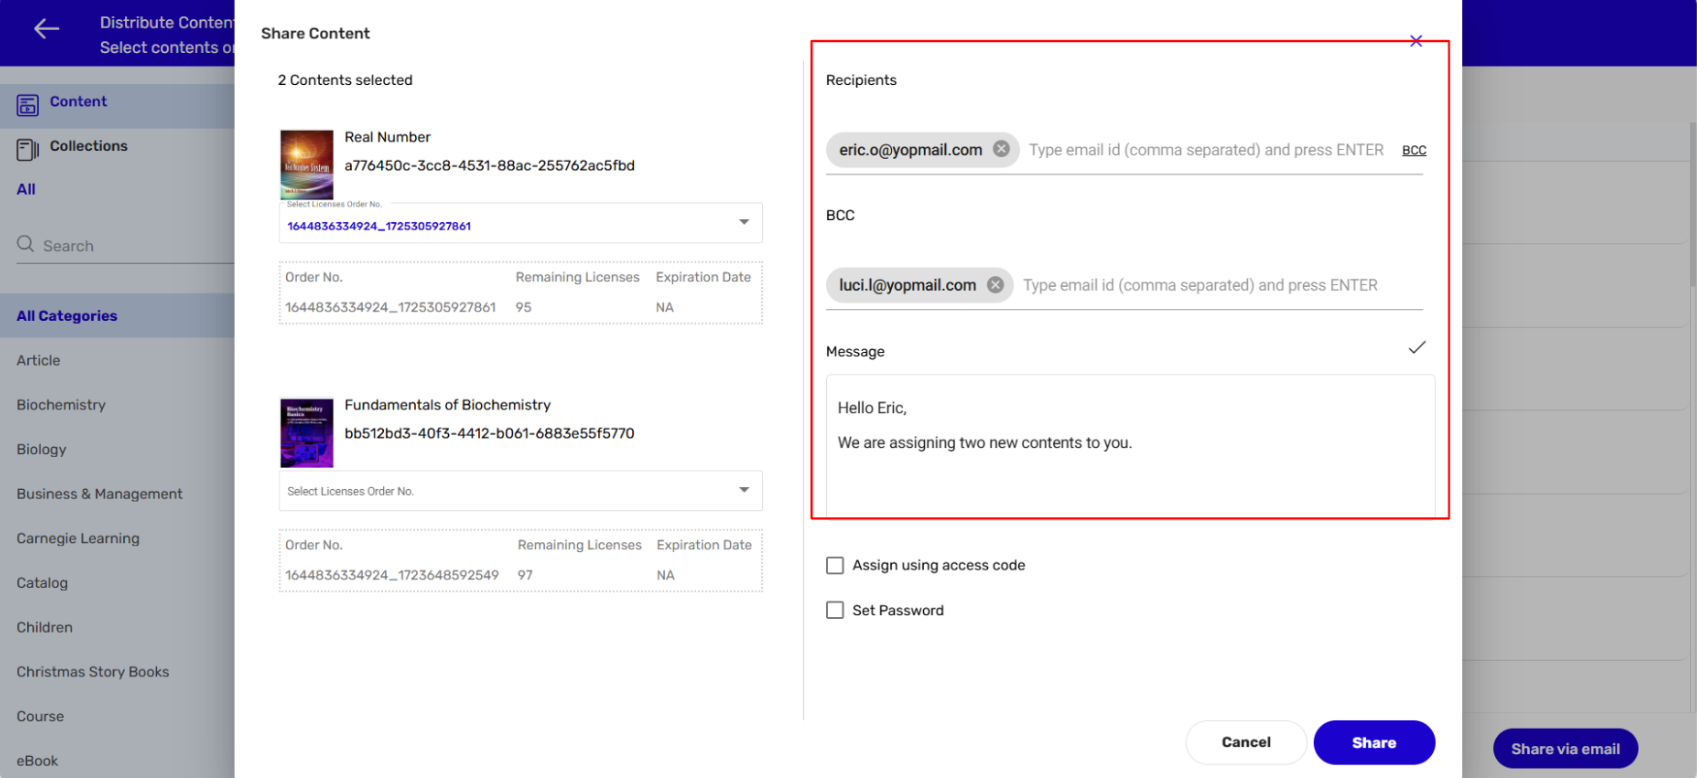
- After successfully adding the user’s emails, you can now “Set password”, and “share an access code” for the content.
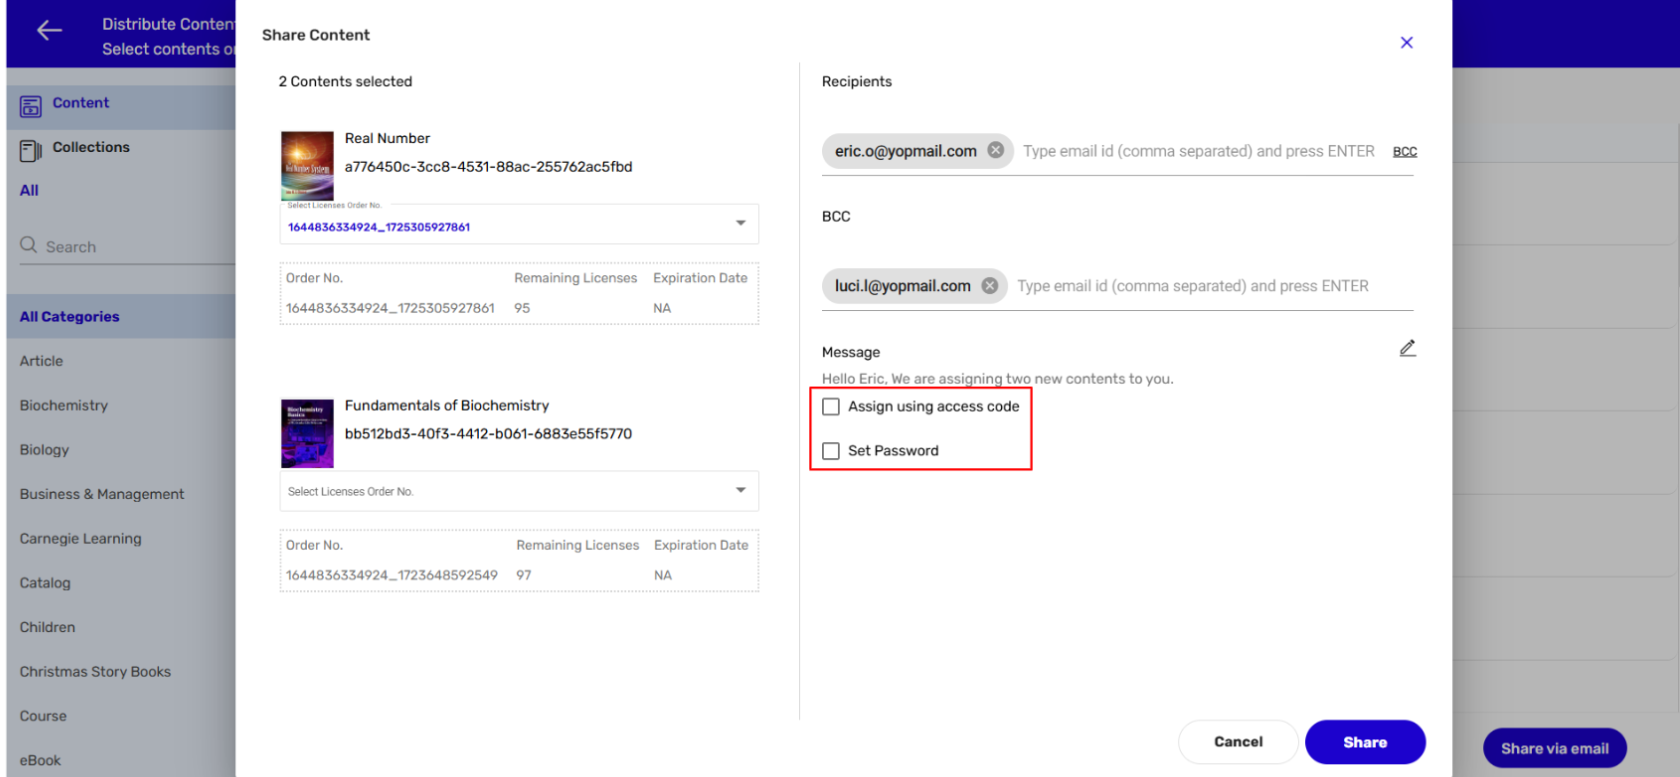
- After filling in all the required fields, you can now click on “Share”.
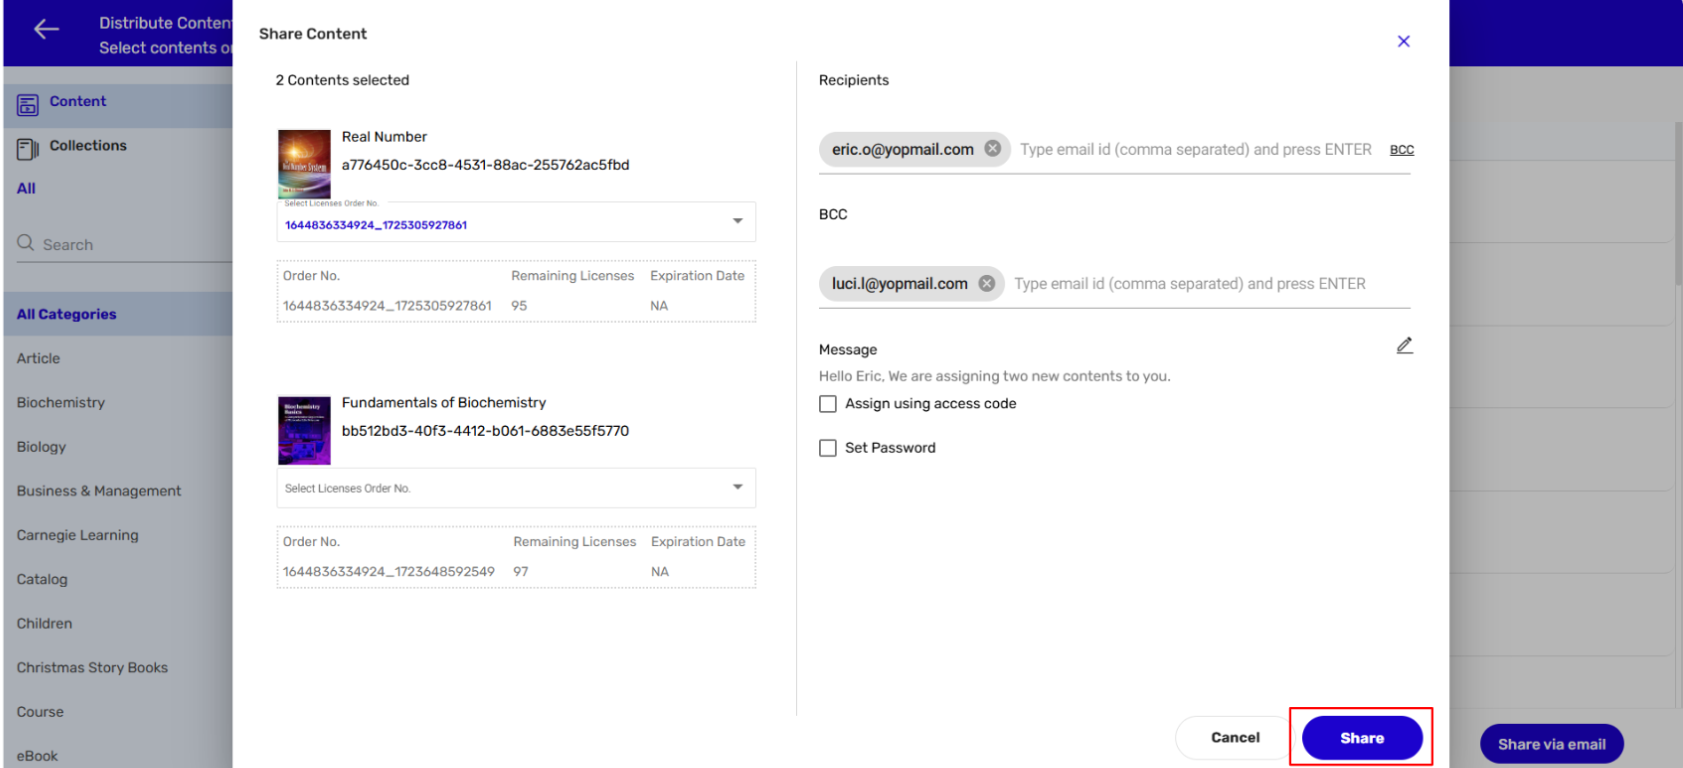
Note:
1.Users will receive an email notification once the content has been successfully distributed.
2. This feature will only work for the customer/partner from which you have logged in . If we attempt to add a user from a different partner, an error message will be displayed: “User exists in another partner
3. This feature by default will not be available. It is an add-on feature, kindly connect with the respective CSM to know the process for enabling the feature.
The portal empowers you to revoke the access of content for all users or all classes or all students or all teachers in one-go. Once done, the user or the class will no longer be able to access the content on the Reader.
- Sign in with your Customer Admin credentials.
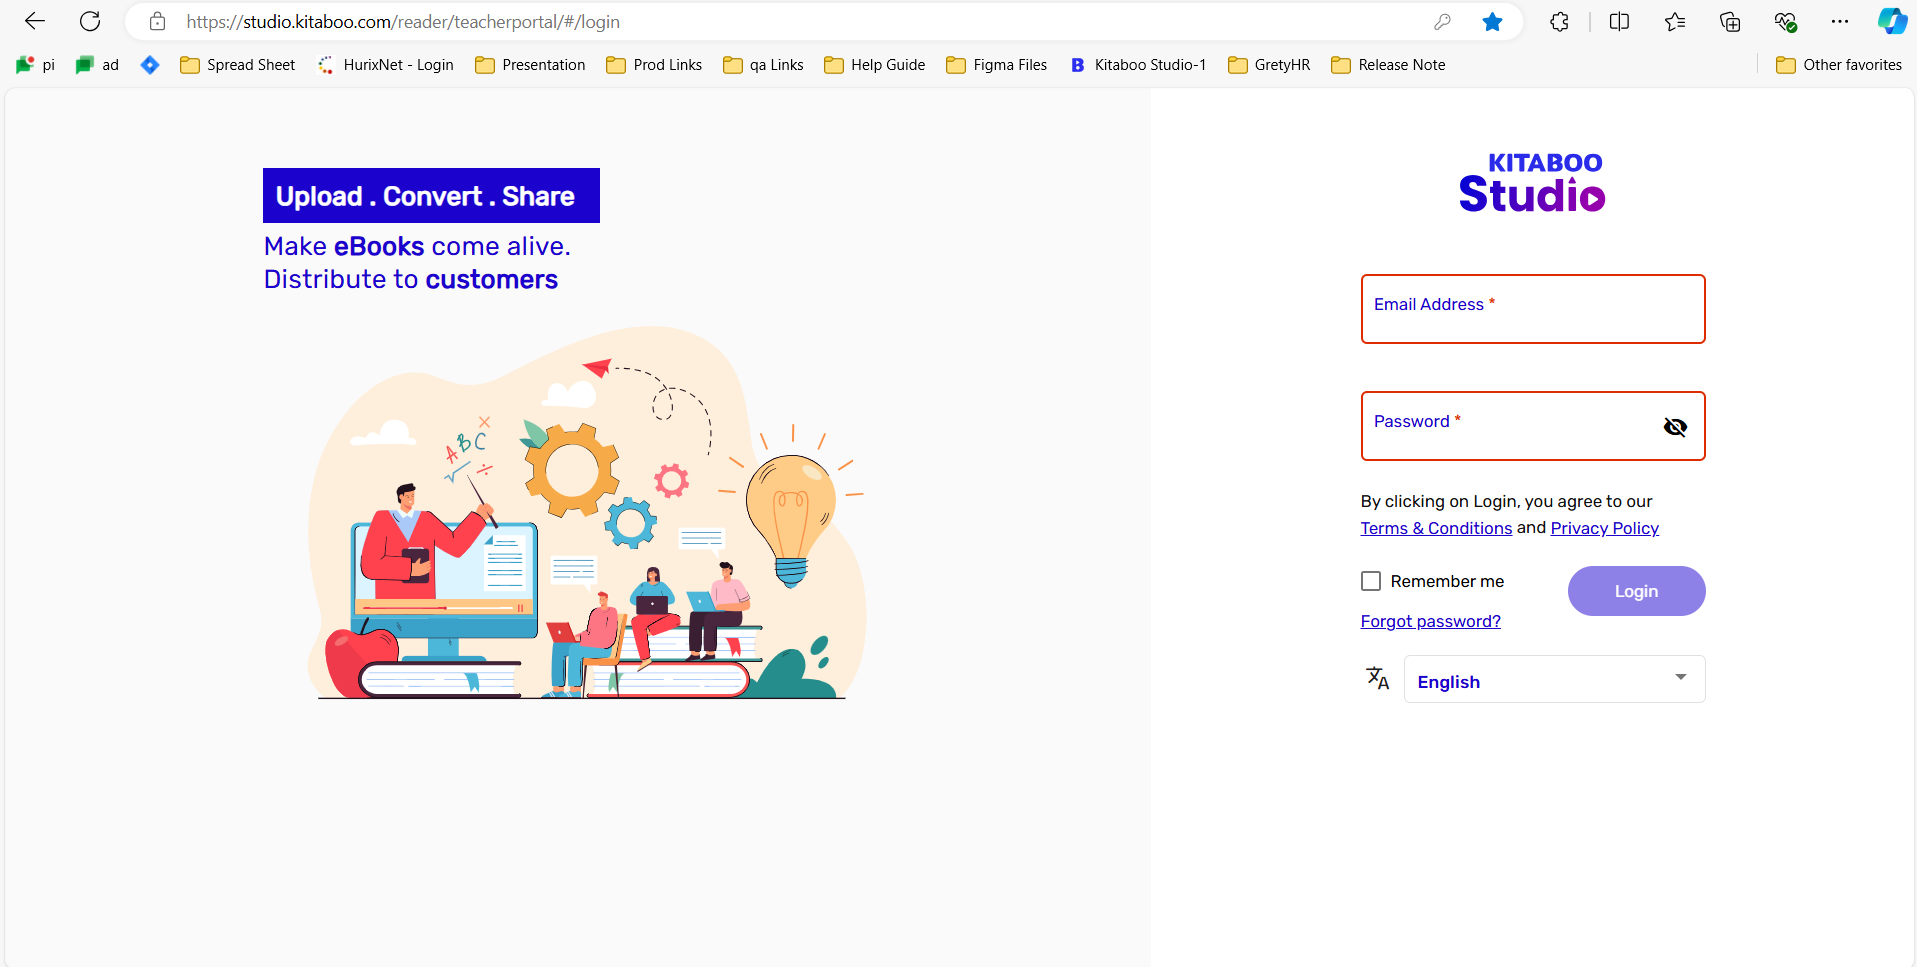
- On the Distribute Content tab, click on more options against the title you want to revoke and select Bulk Revoke.
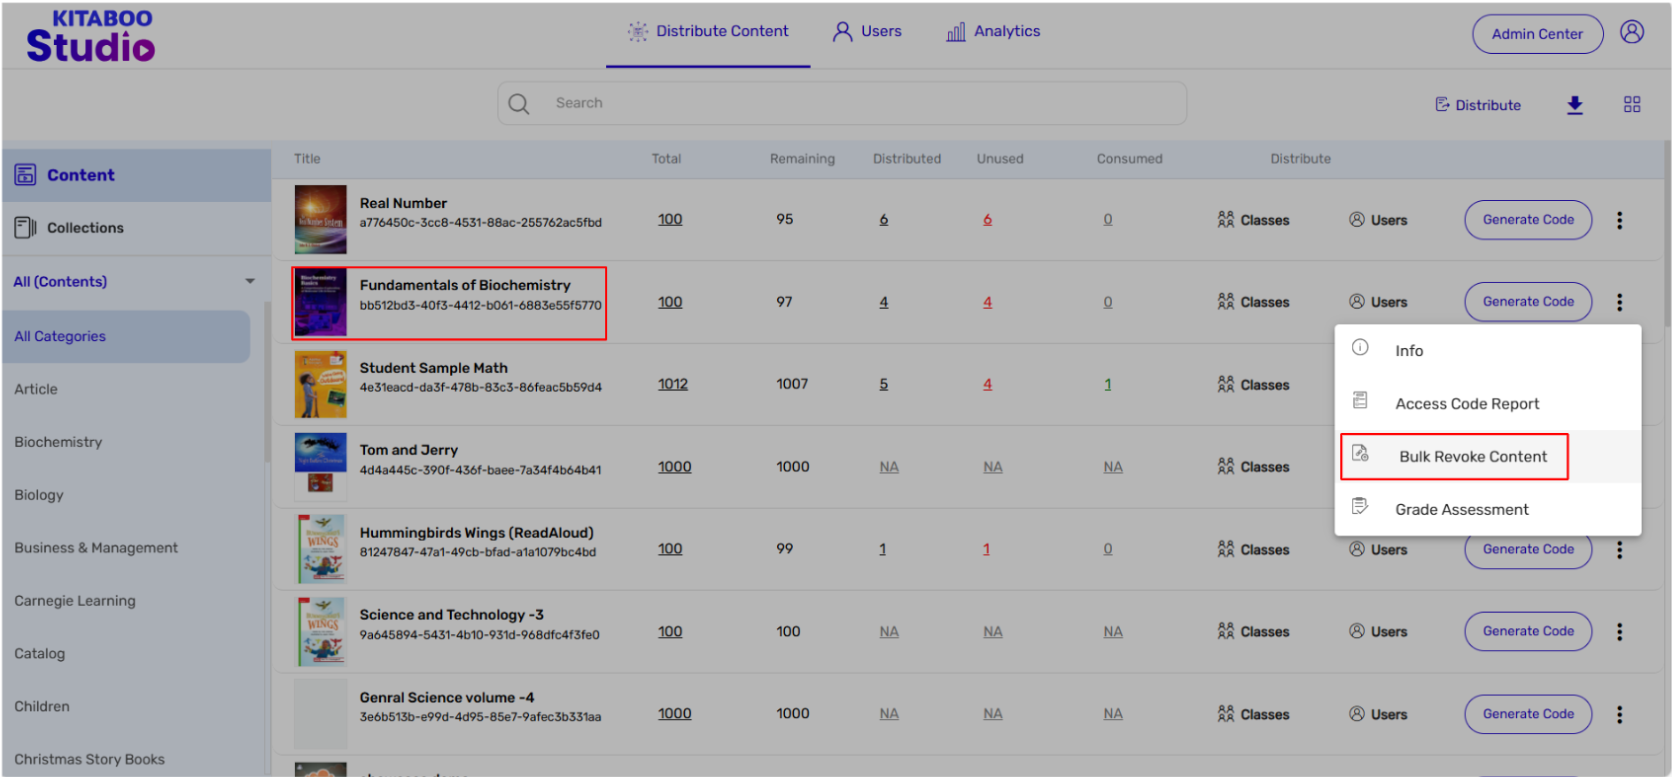
- Select the role for whom you want to revoke content e.g. all users or all classes or all students or all teachers > Click on Next.
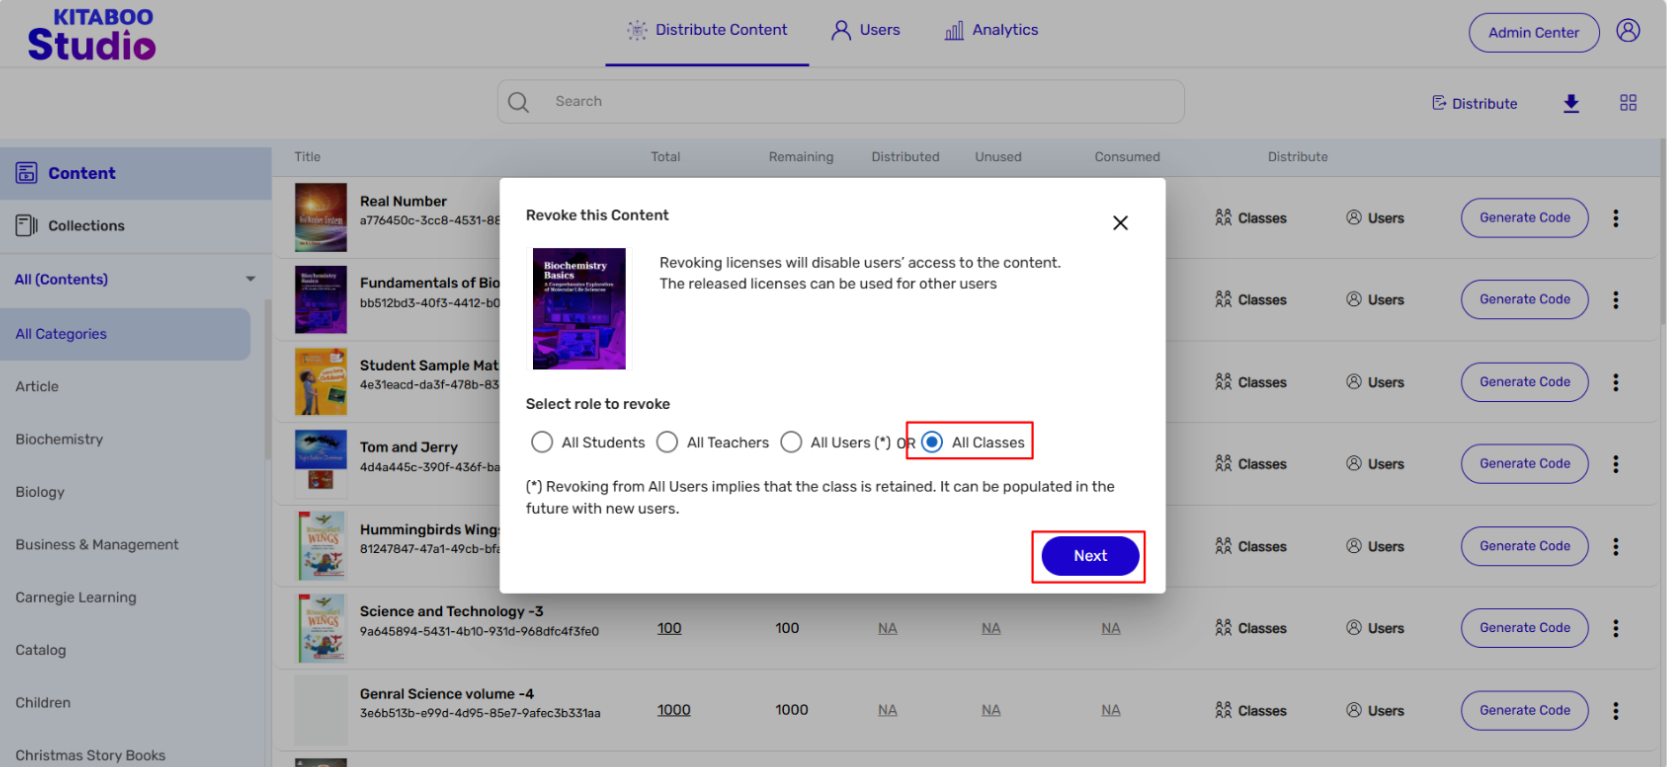
- Click on Proceed to confirm.
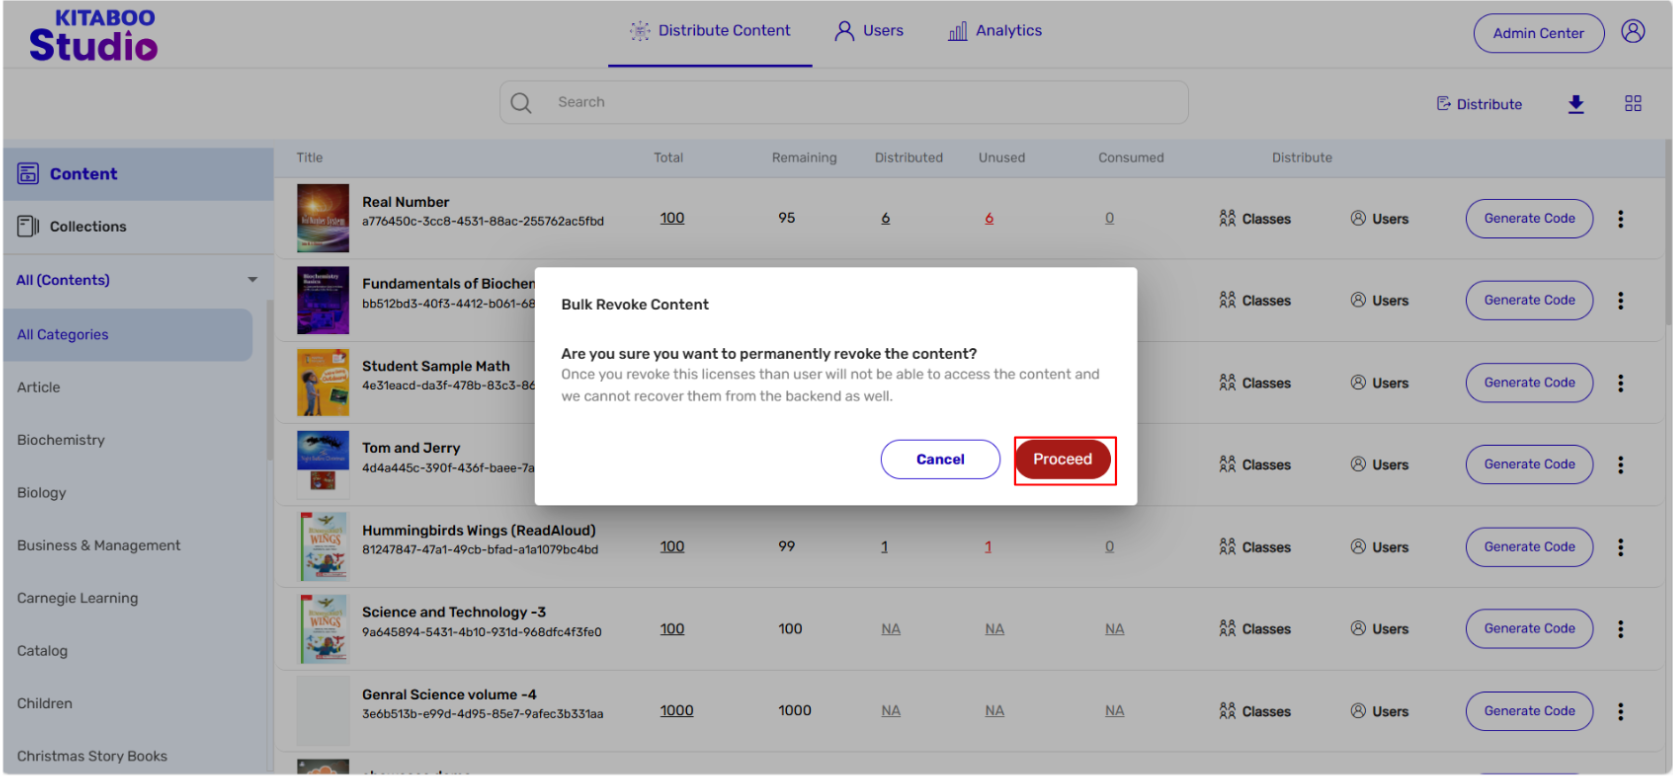
The portal empowers you to revoke the access of content for a user or a class. Once done, the user or the class will no longer be able to access the content on the Reader.
1.1 Revoking Content from a User
- Sign in with your Customer Admin credentials.
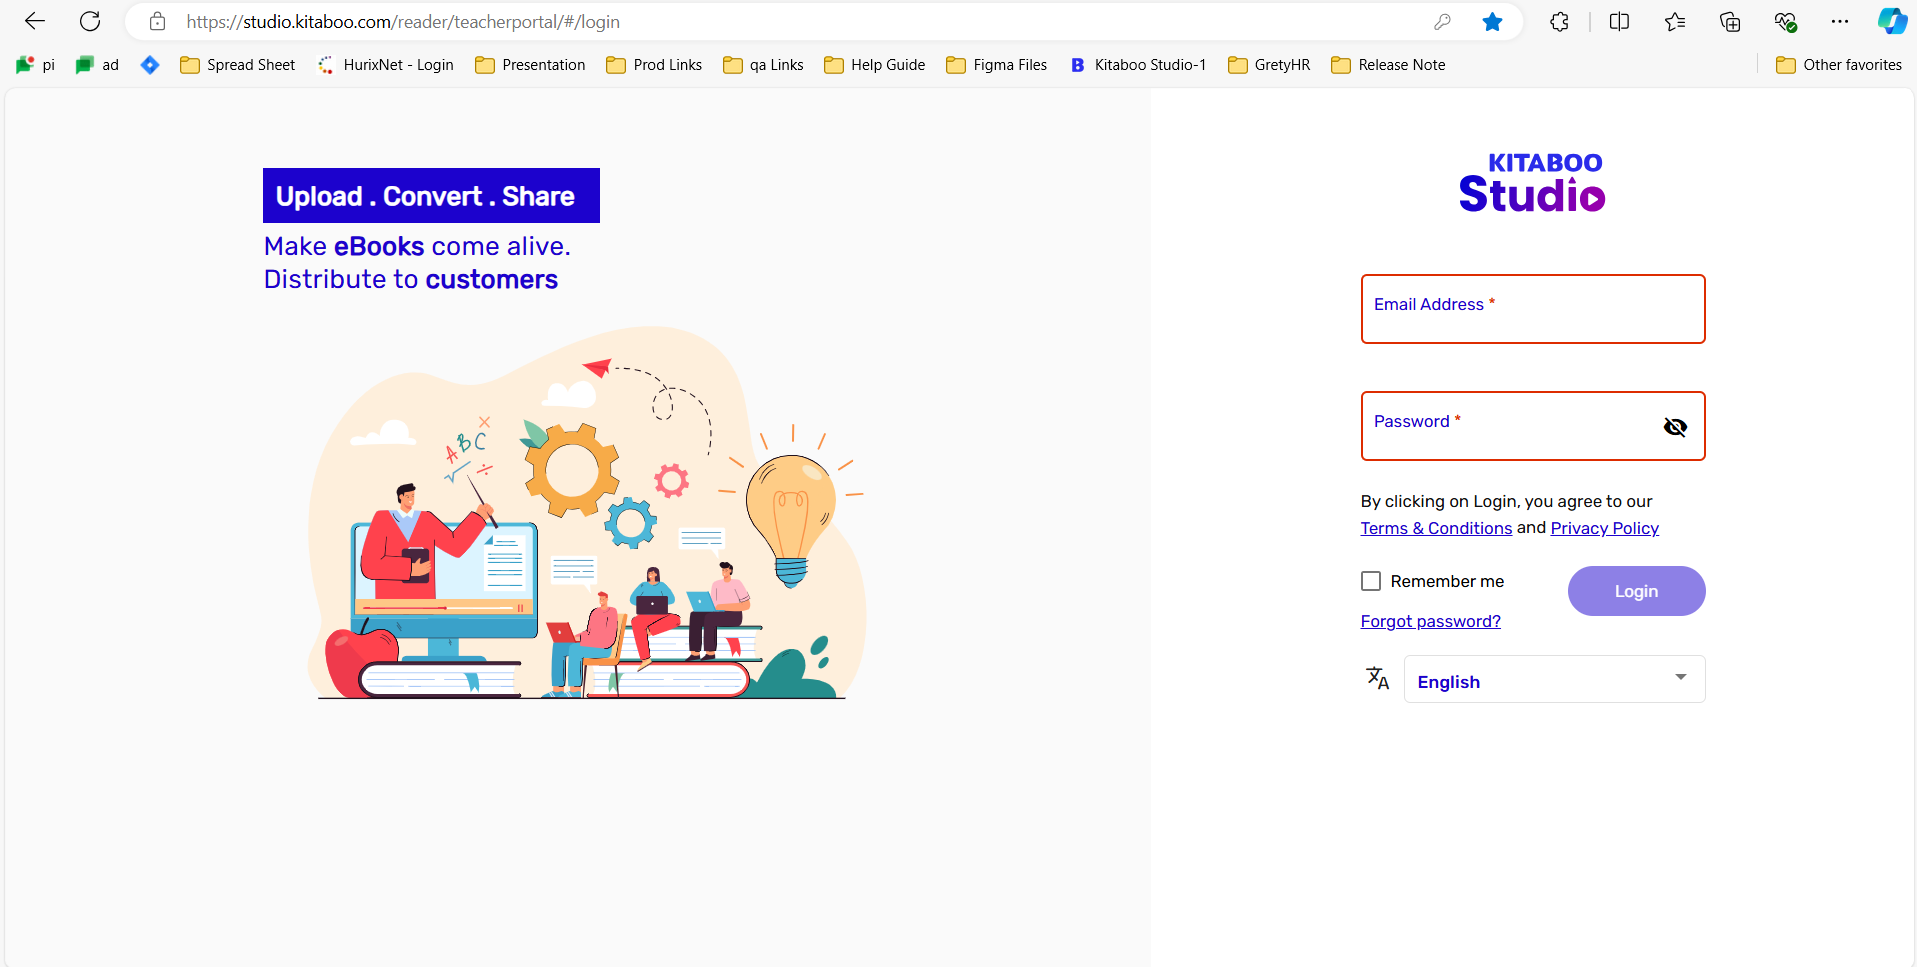
- Go to the Users tab.
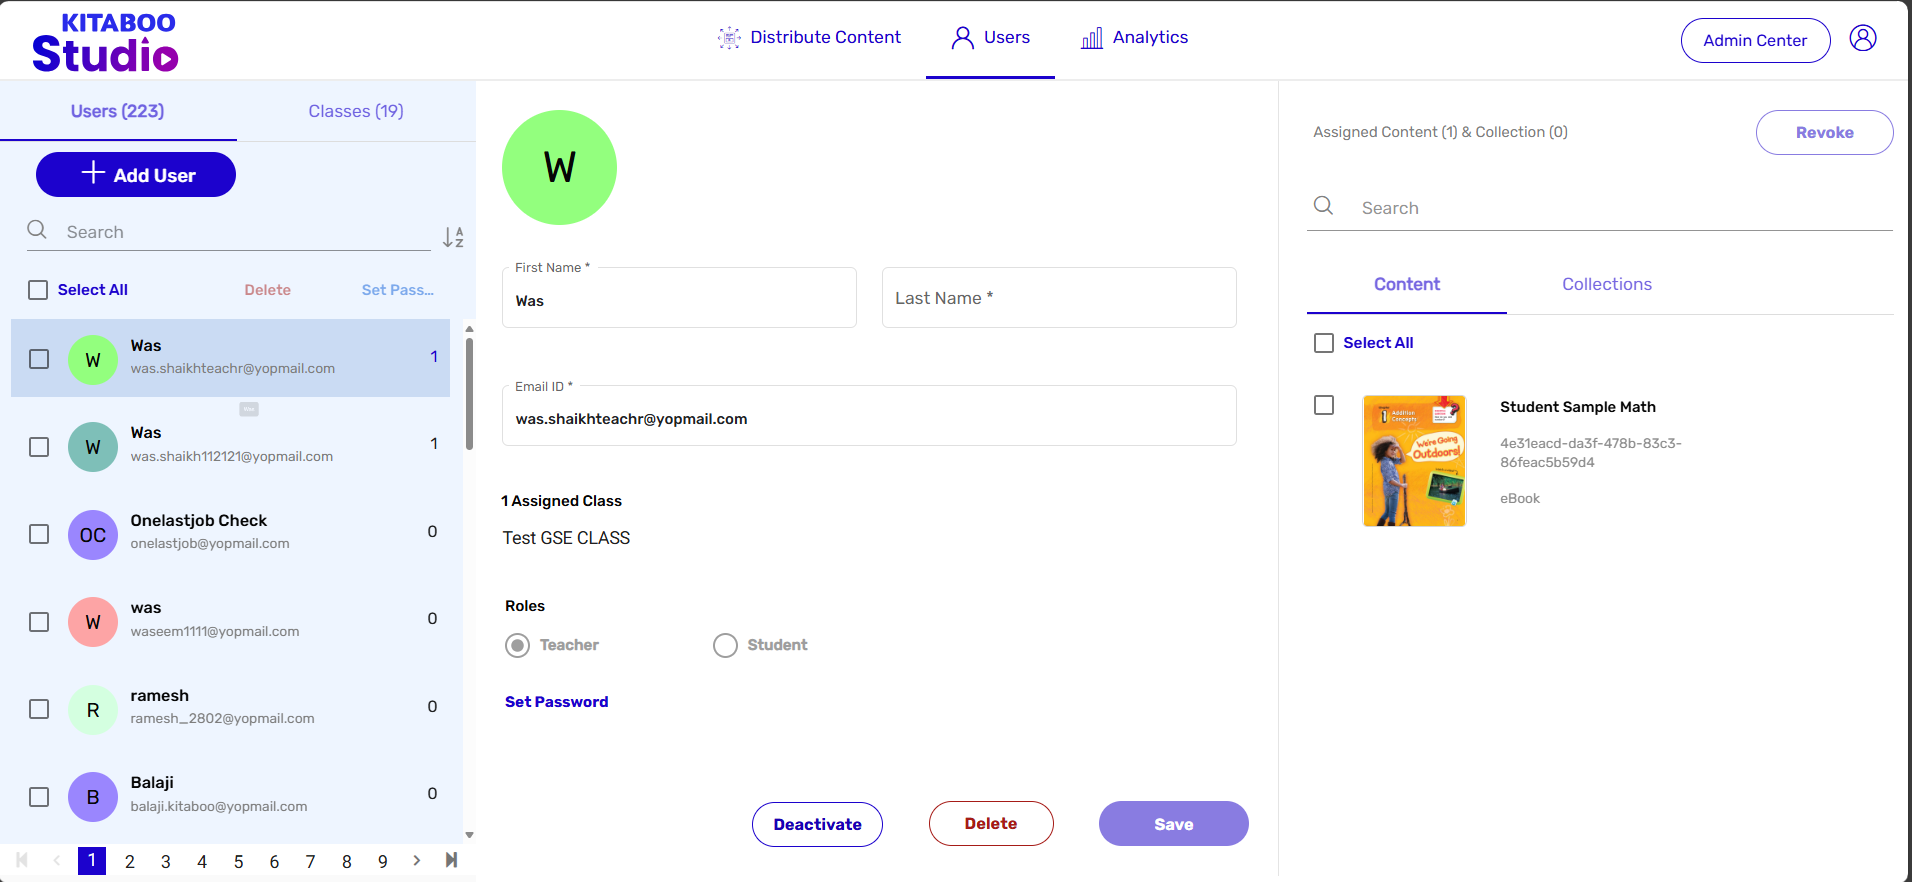
- Select the User from the list for whom you want to revoke content. > Select title(s) listed under Contents. > Click on Revoke.
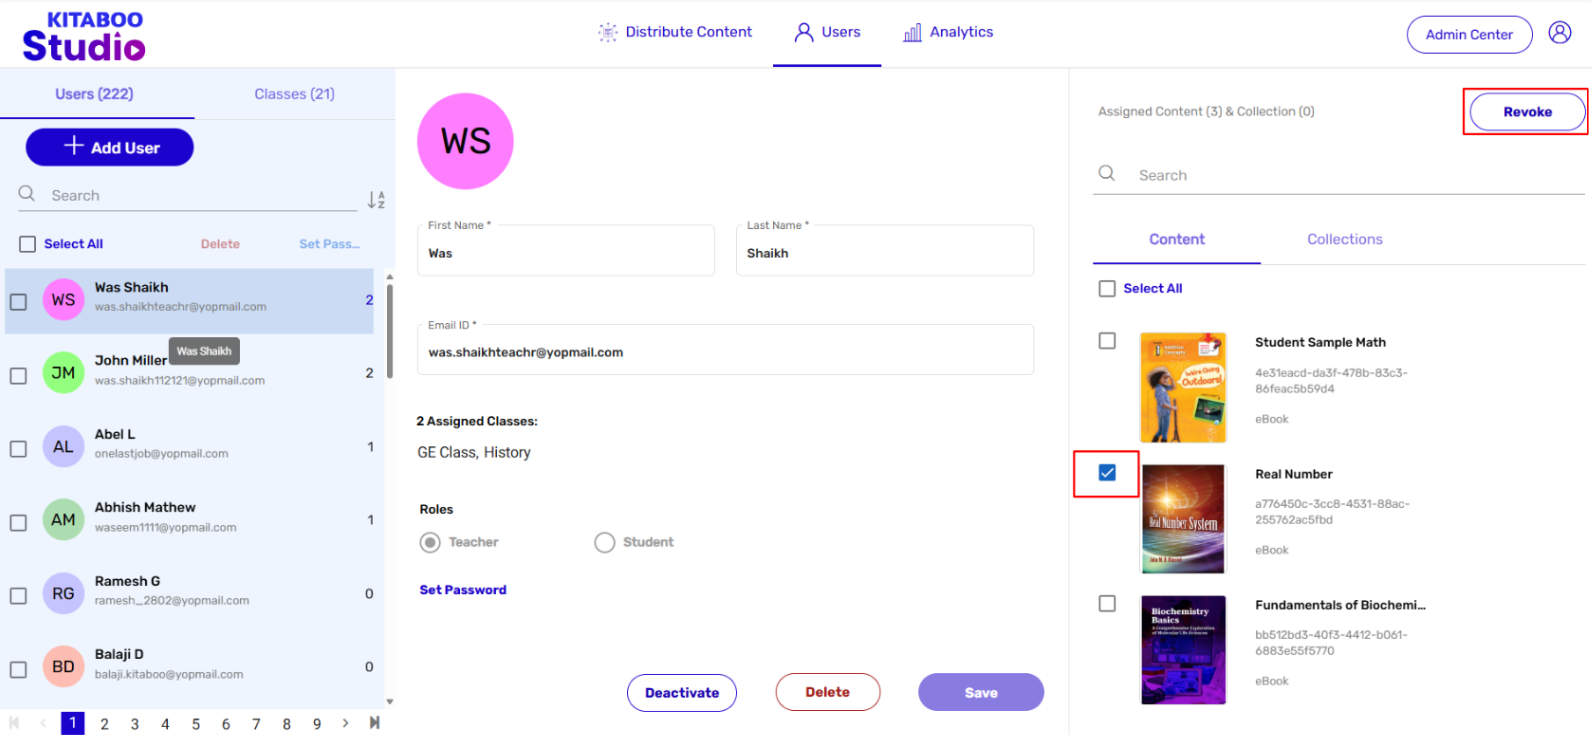
- Click on Yes, Revoke it to confirm.
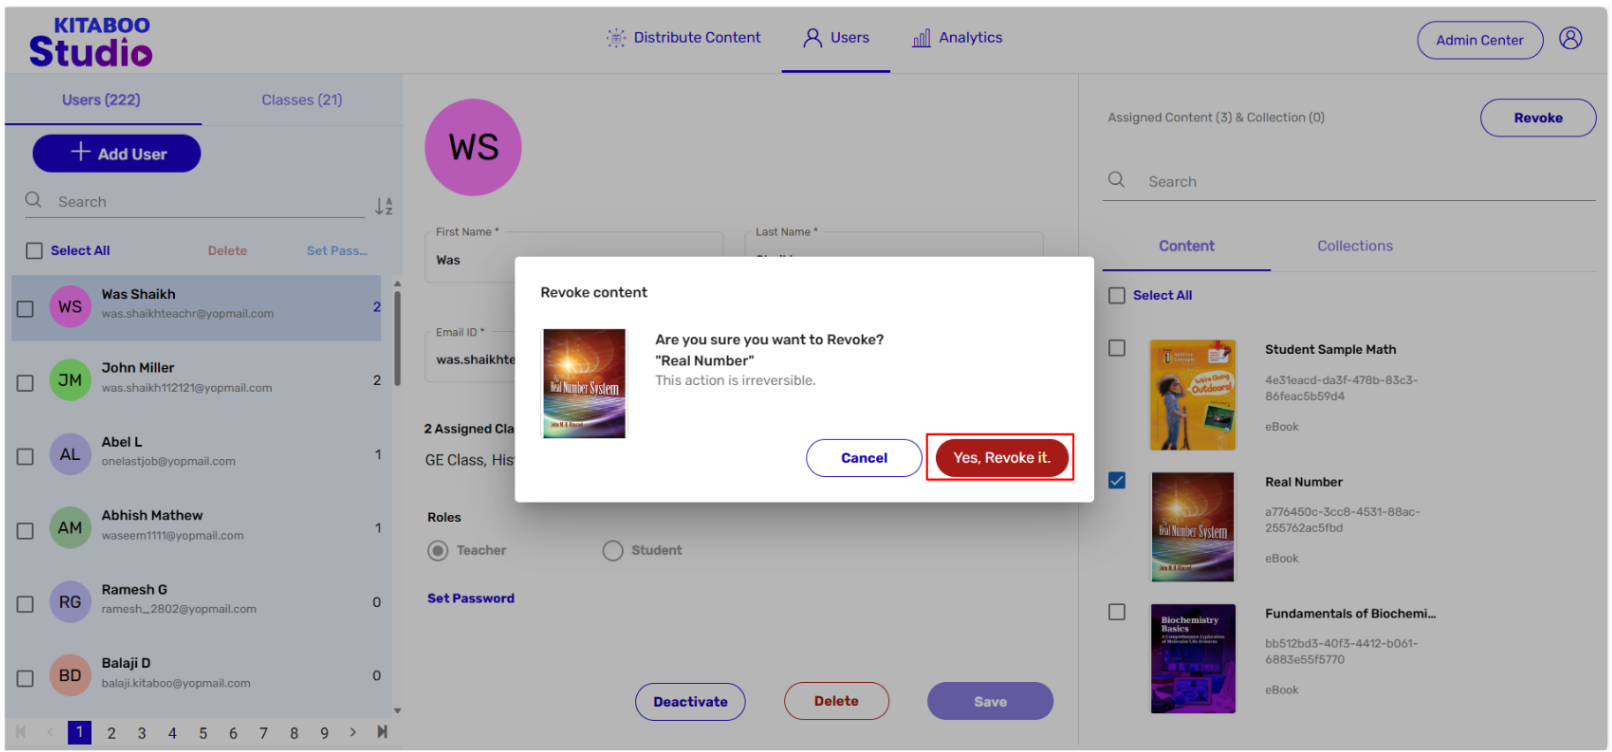
1.2 Revoking Content from a Class
- Sign in with your Customer Admin credentials.
- Go to the Users tab. > Click on Class
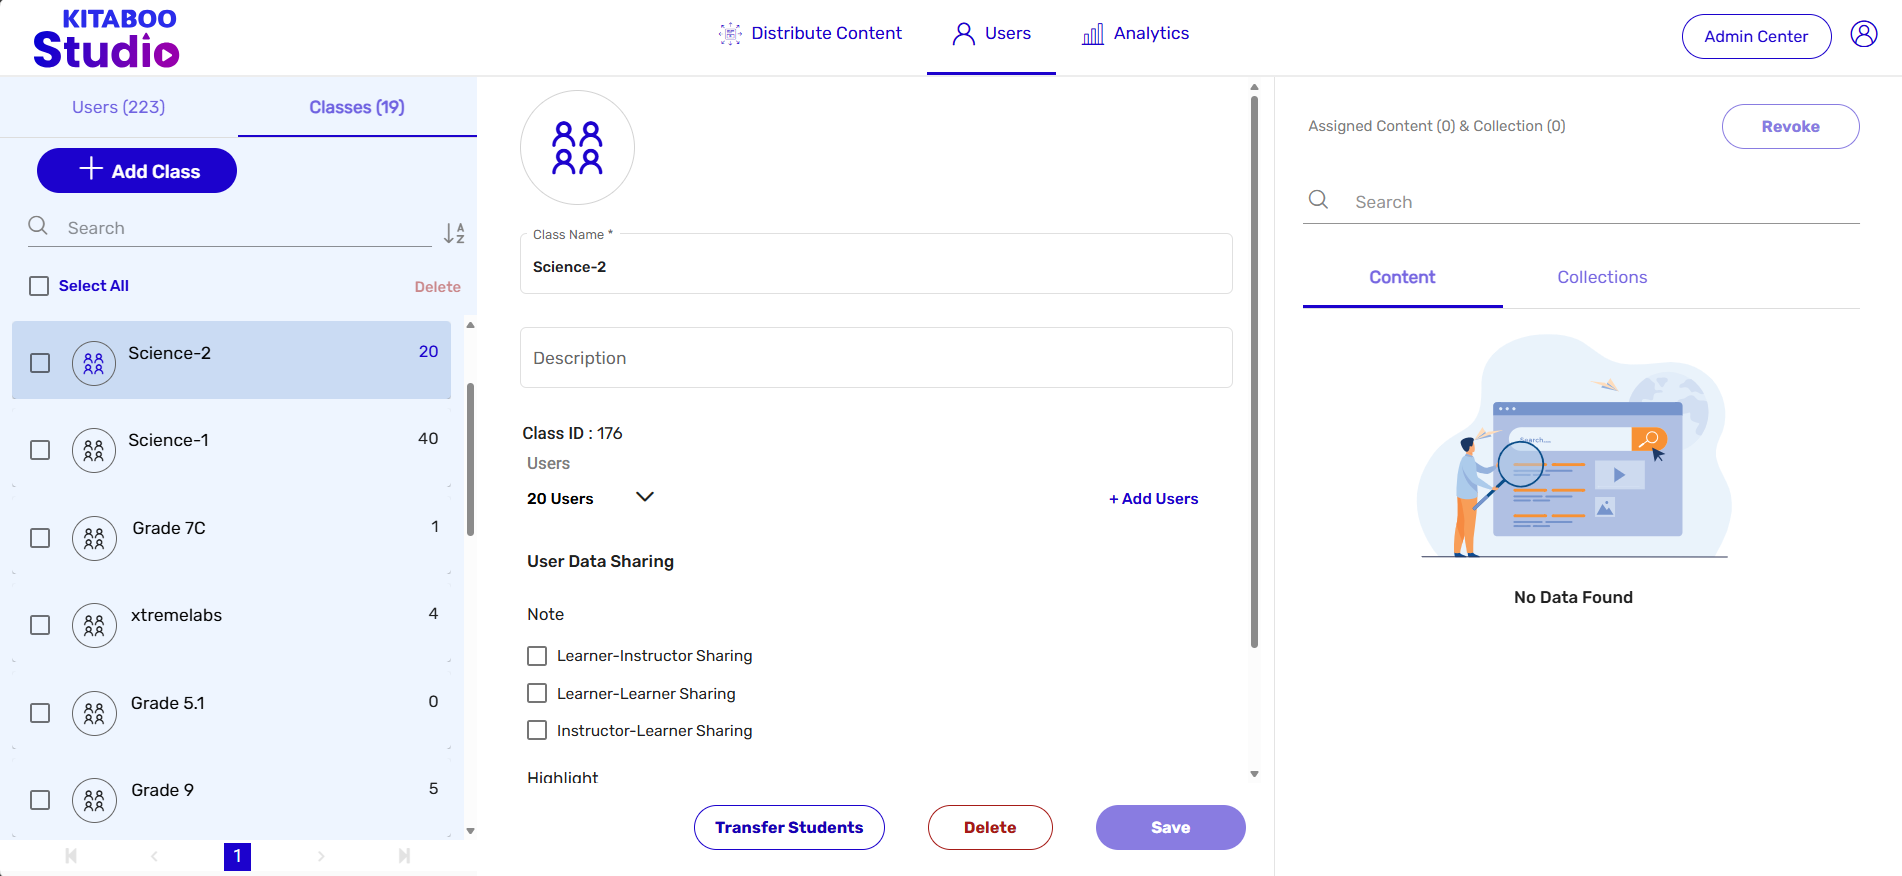
- Select the Class from the list for which you want to revoke content. > Select title(s) listed under Contents. > Click on Revoke.
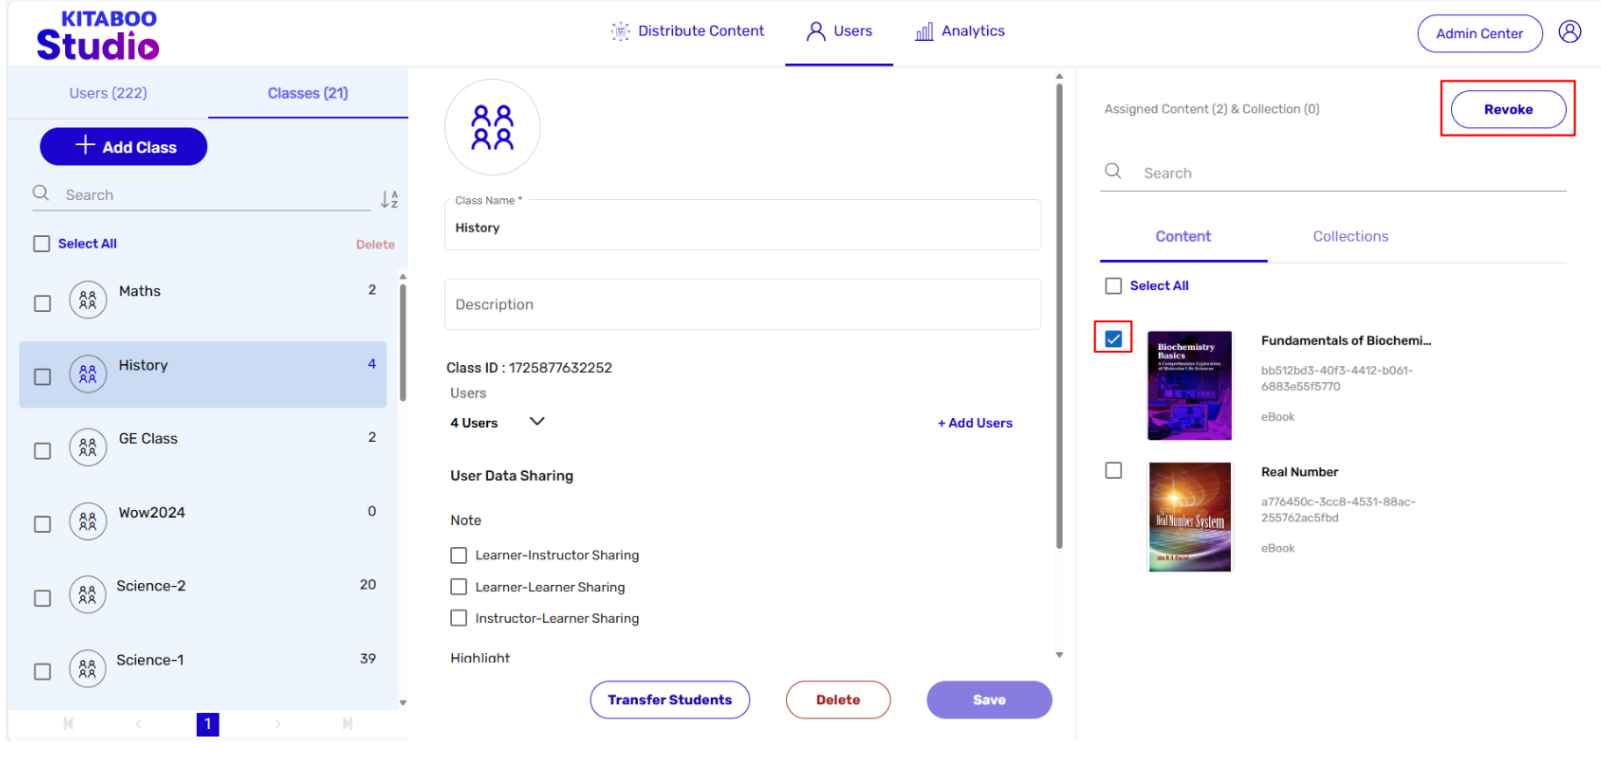
- Click on Yes, Revoke it for your confirmation.
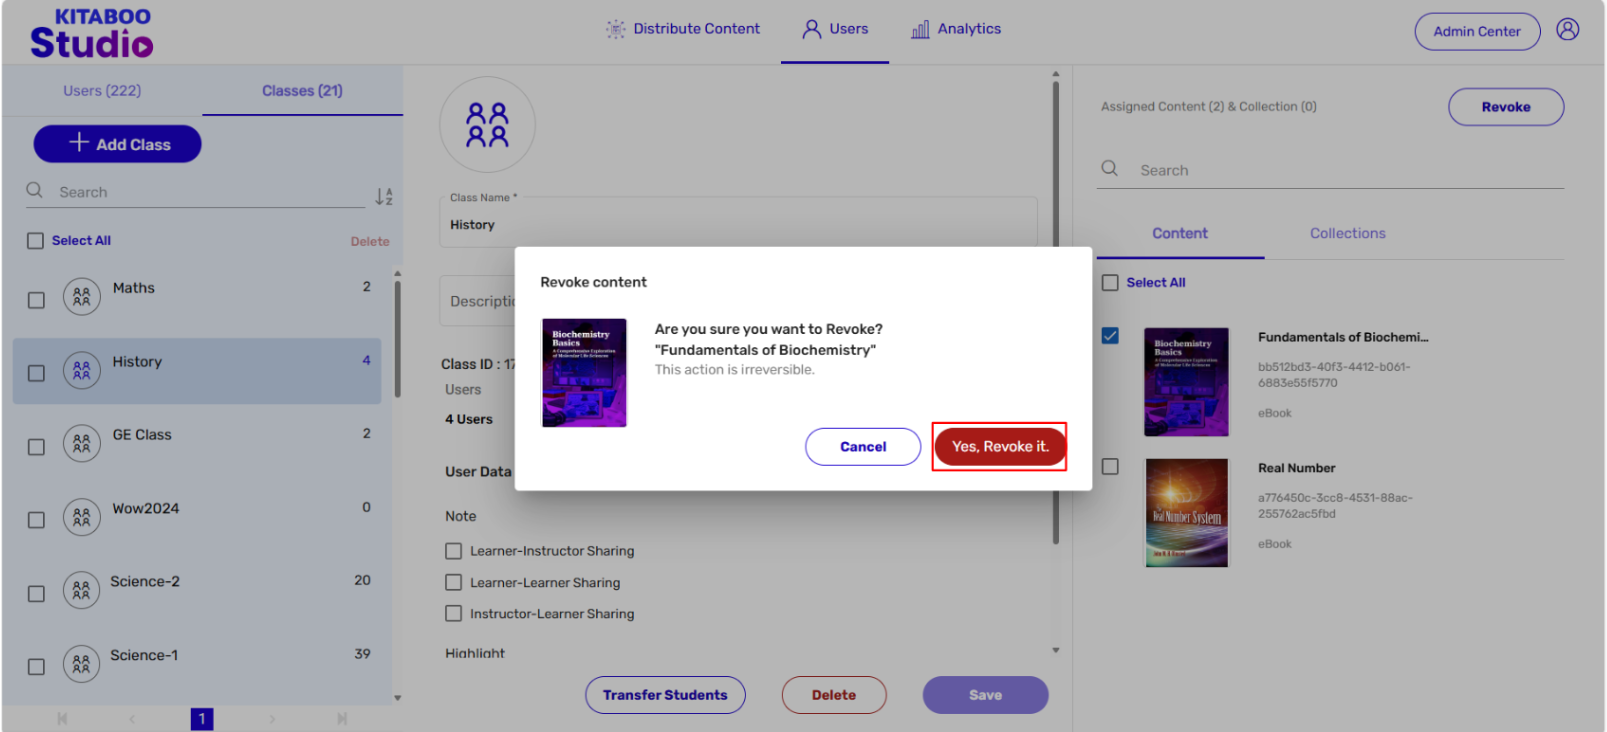
The Kitaboo portal also provides you to promote students from one to another class. You just
need to follow a few steps for promoting the users..
- Sign in with your Customer Admin credentials.
- On the Users tab, click on Class.
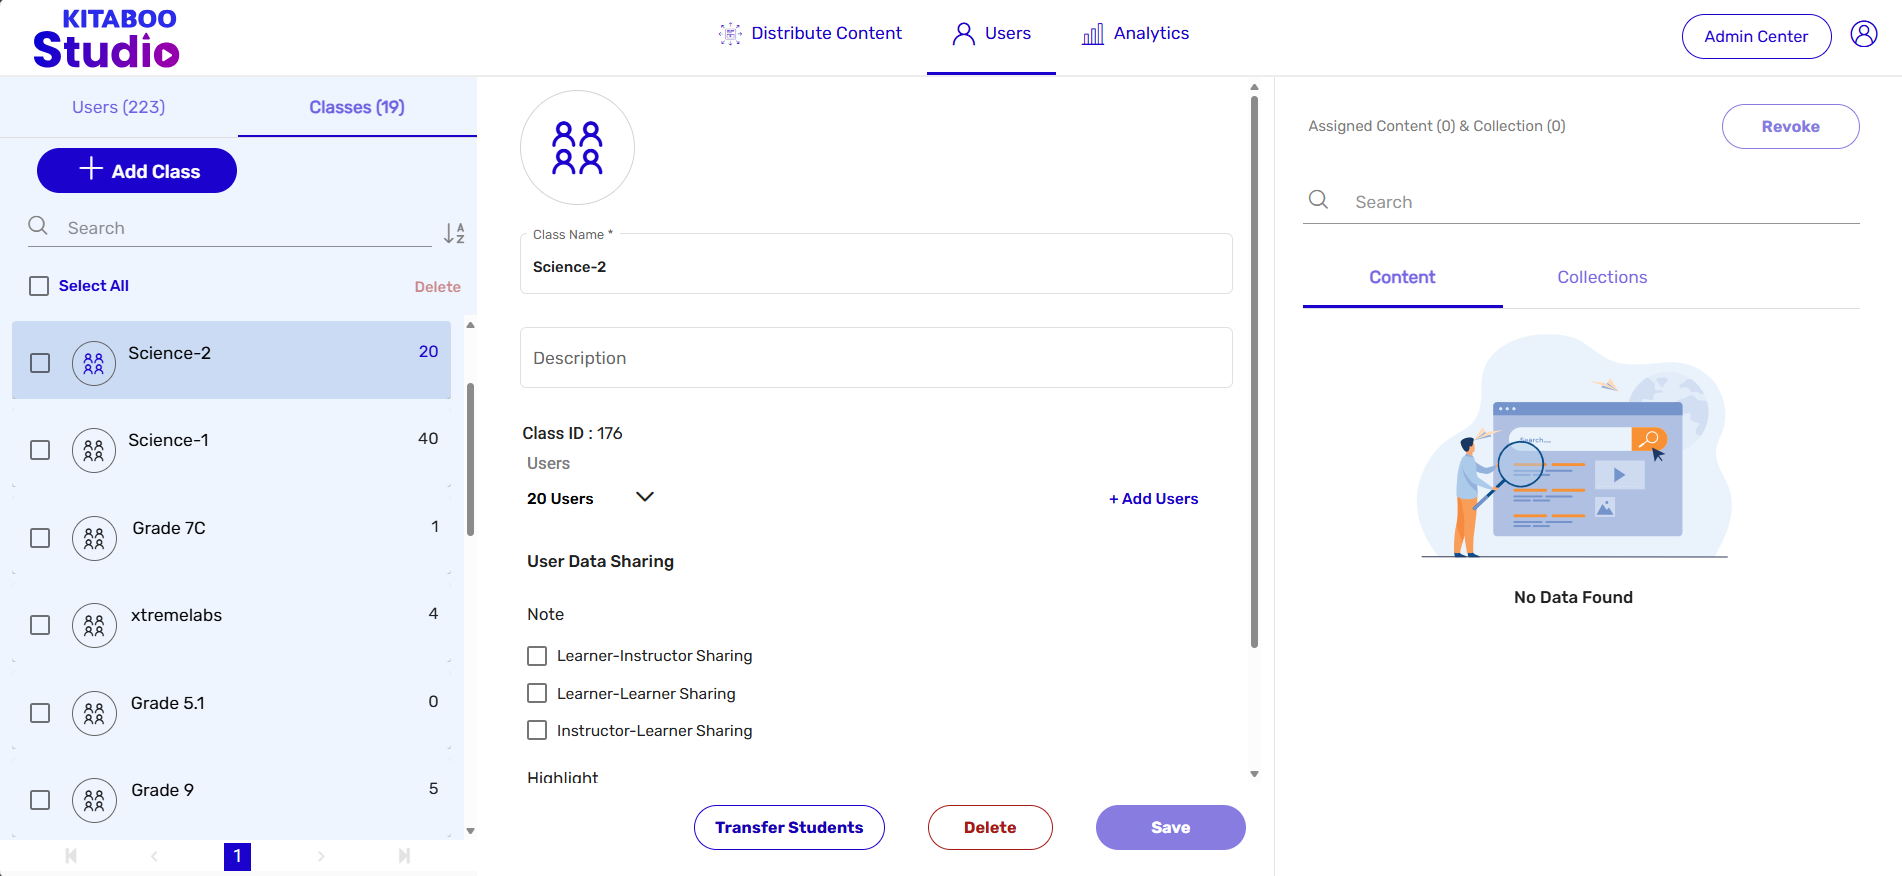
- Select the Class you want to Promote > then click on Transfer Students Button > After you click, It will show the list of existing classes. Select the Class from the list and then click on Next.
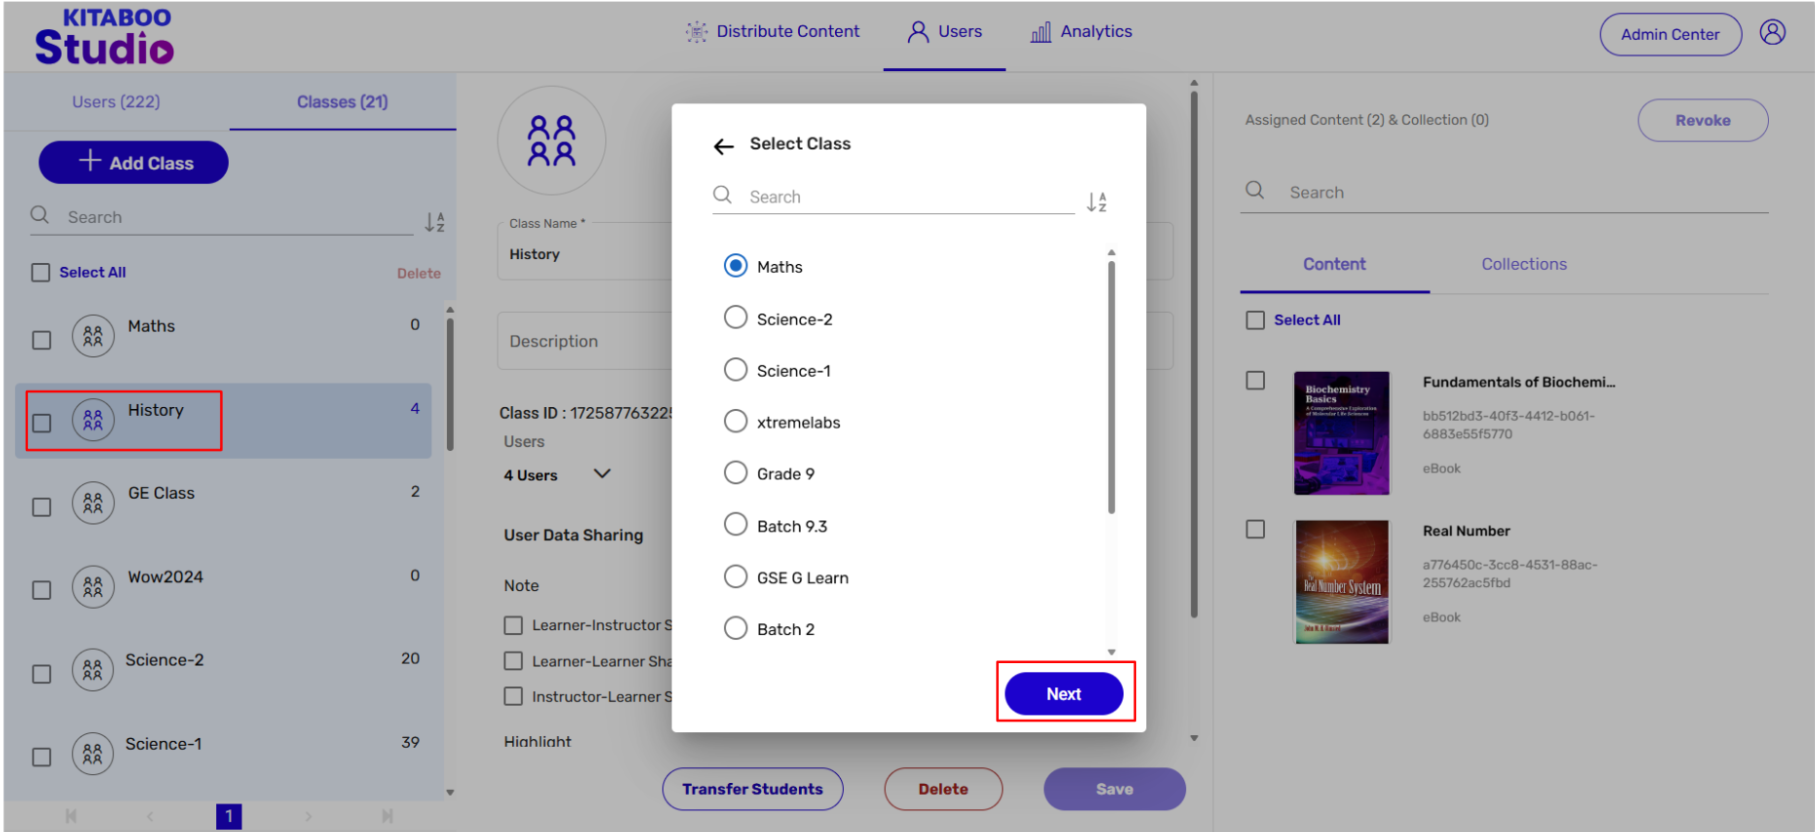
- You will see a Disclaimer popup up before you promote the users to another Class. Kindly confirm to Promote.
Note: Promoted Successfully” message will appear.
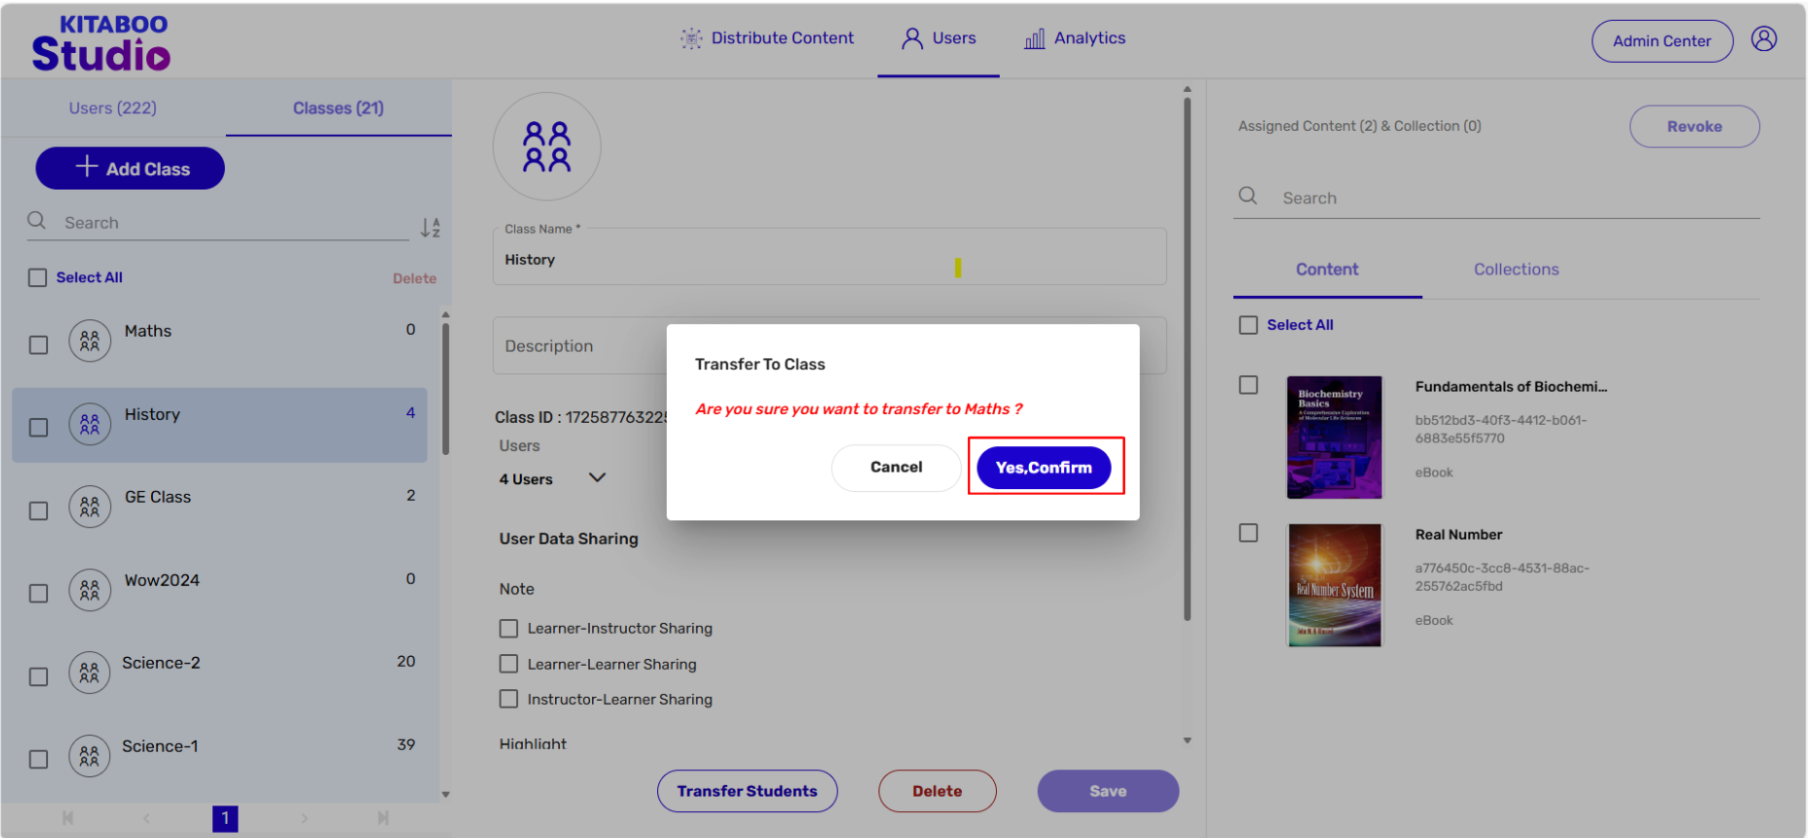
NOTE:
● Teachers will not be promoted, only students will be promoted to selected class.
● License will be auto revoked from e.g. Class A and content which is already assigned to e.g. Class B will be auto distributed to newly promoted students.
● If Class A does not have any content and you promote Class B users, it will be promoted.
● If Class A does not have sufficient licenses for promoting users from Class B, In this case not a single user will be promoted.
1. Create Class –
Kitaboo Studio empowers you to create a class for your users. You can create a class by
following a few simple steps.
- Sign in with your Customer Admin credentials
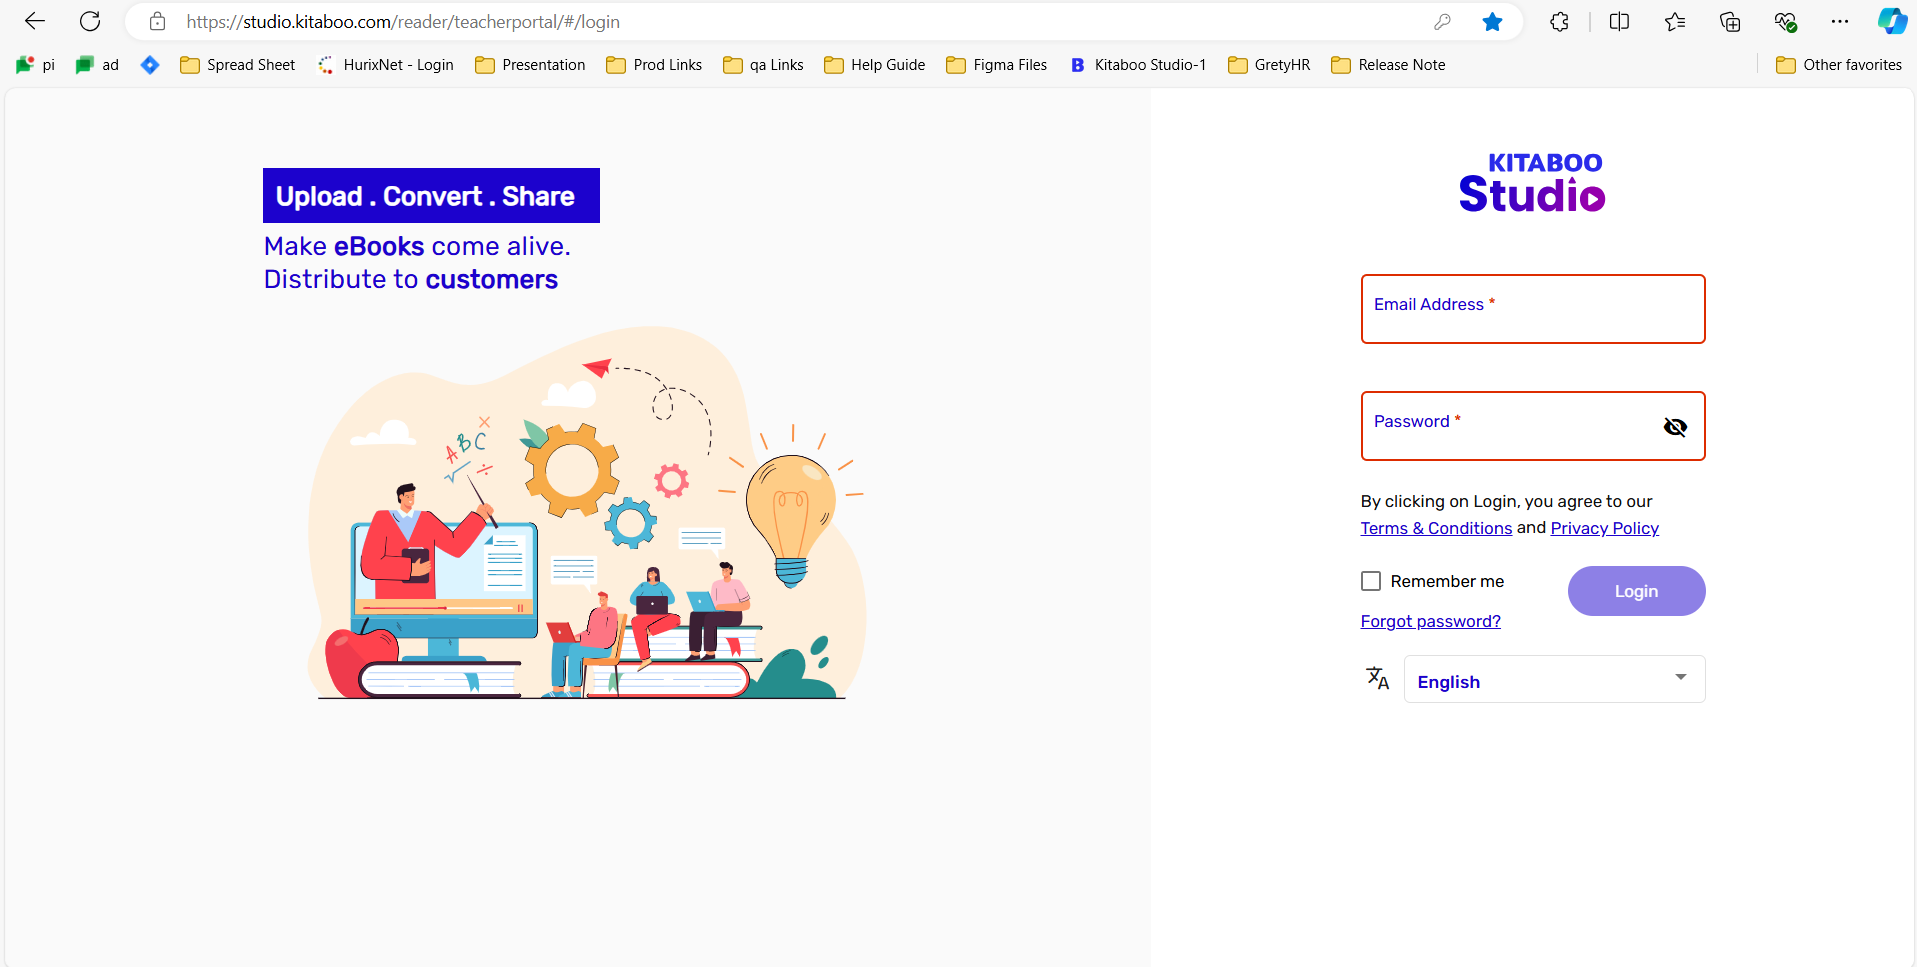
- Switch to the Users tab, click on Class on the Users tab
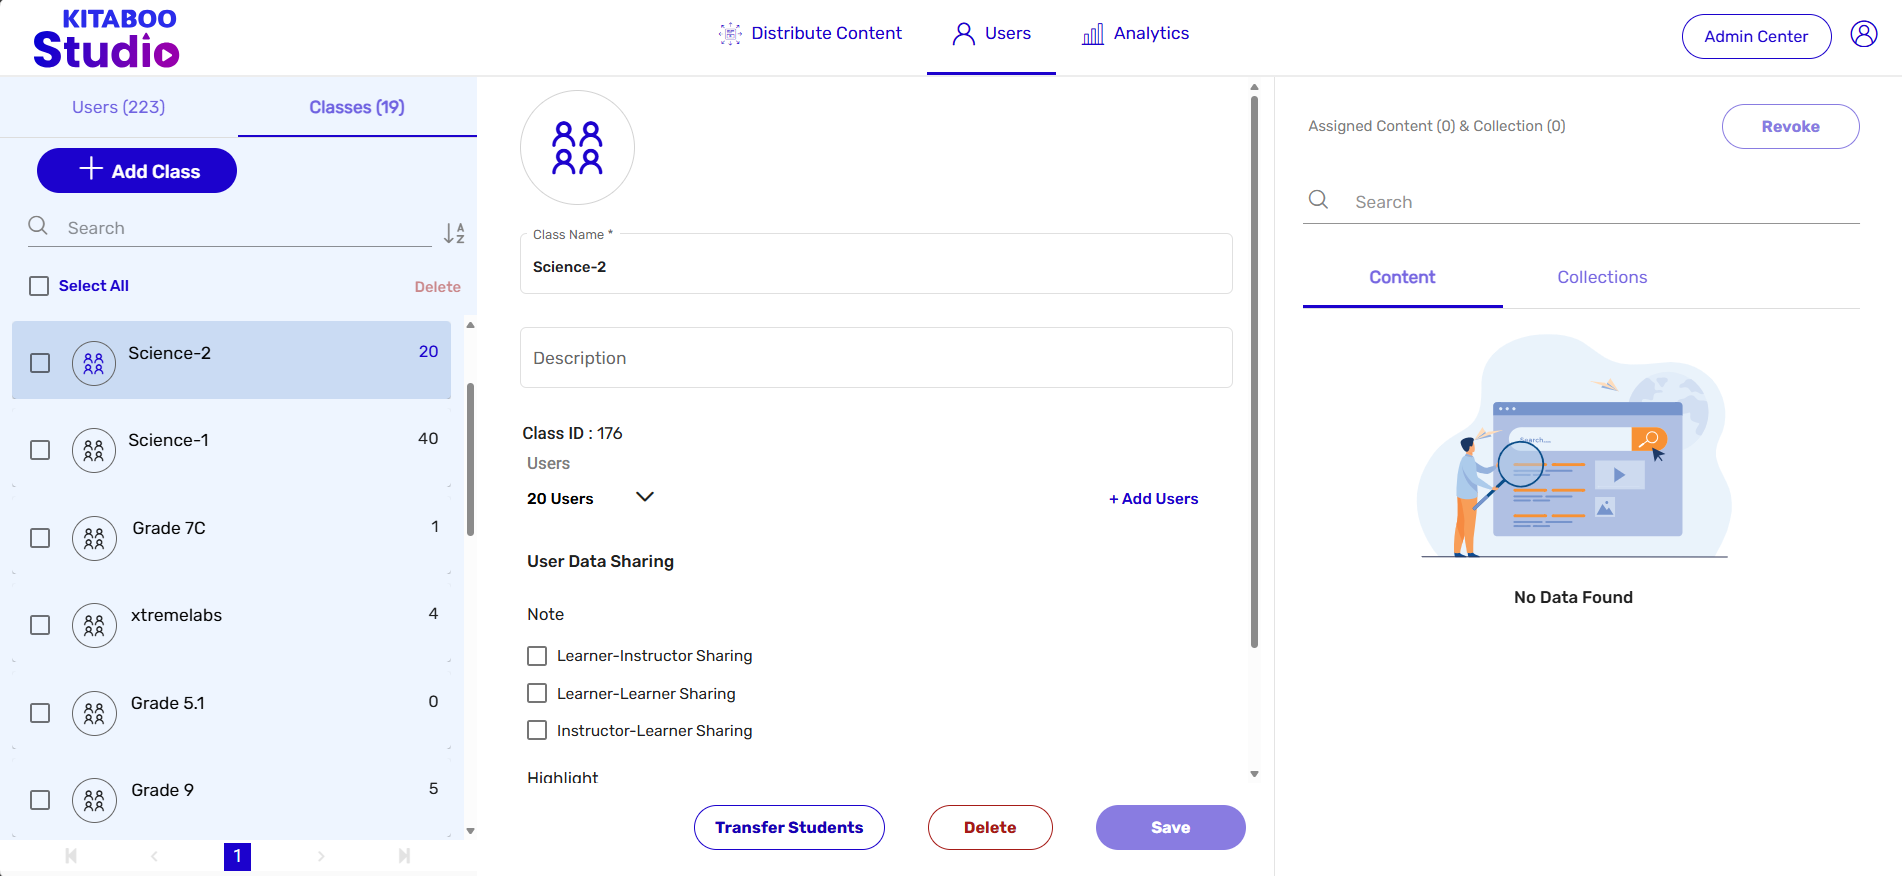
- Enter details in the Class Name and the Description fields. > Expand the User Data Sharing drop-down menu and check the set of data-sharing pairs in terms of notes-sharing and viewing of highlights. > Select Teacher(s) from the list of teachers.
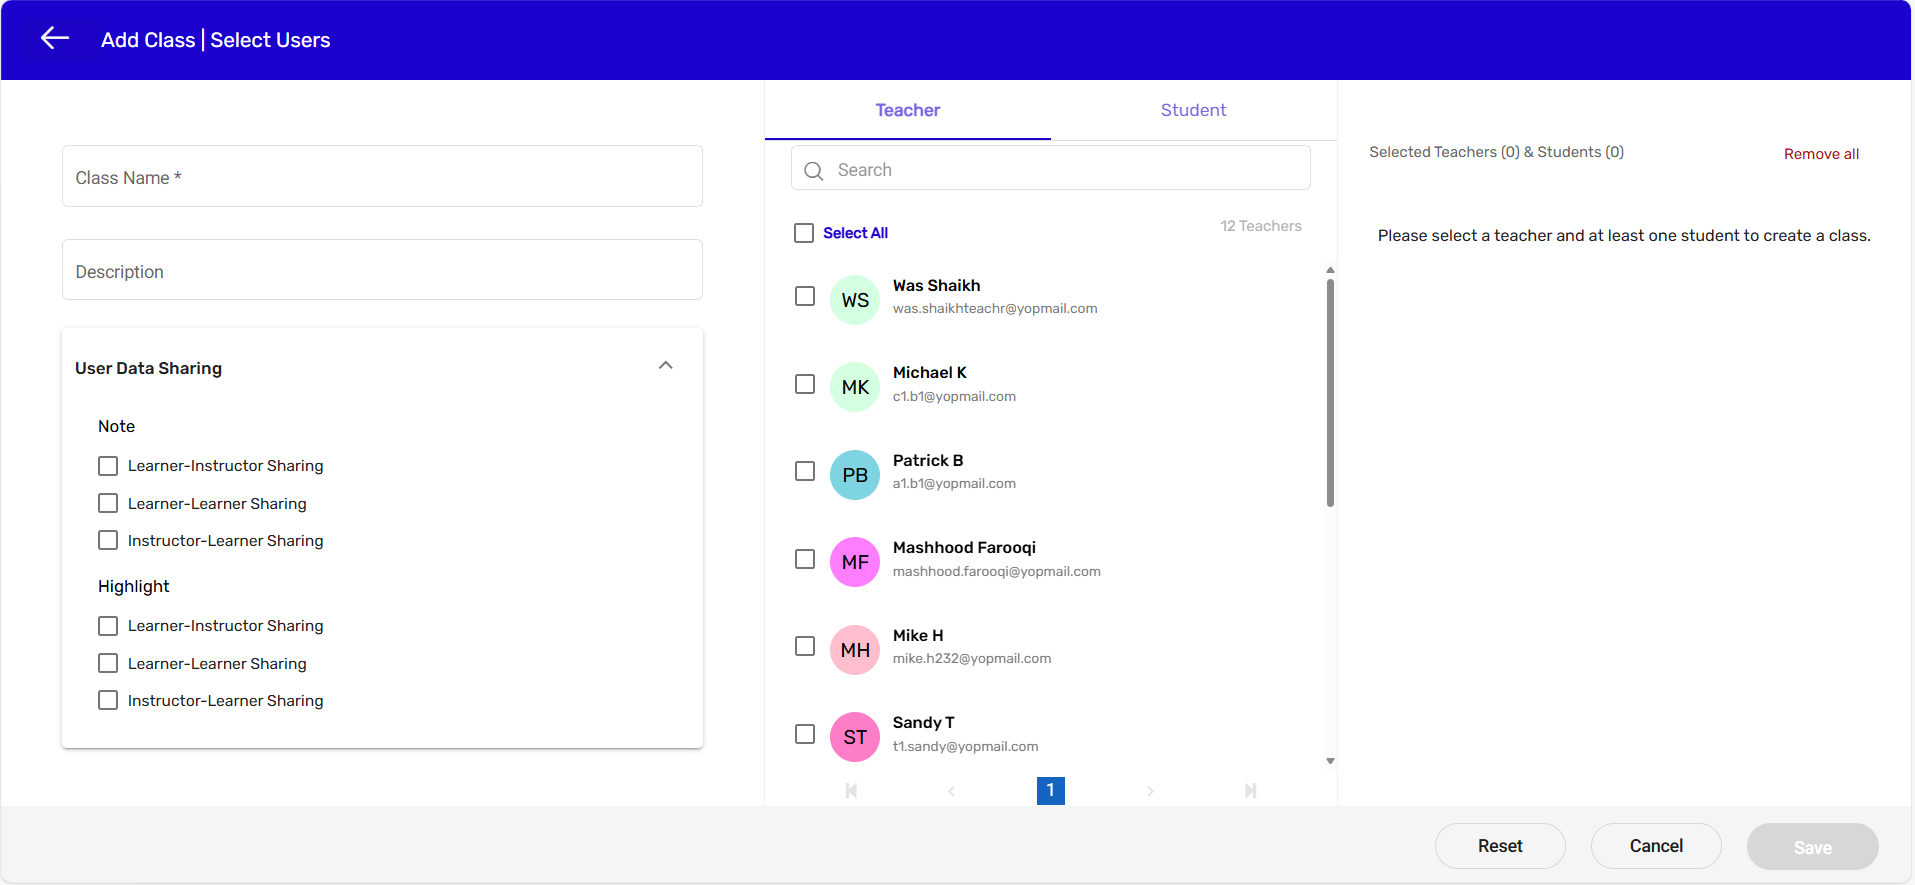
- Switch to the Student tab. > Select Student(s) from the list of students. > Click on the Save button.
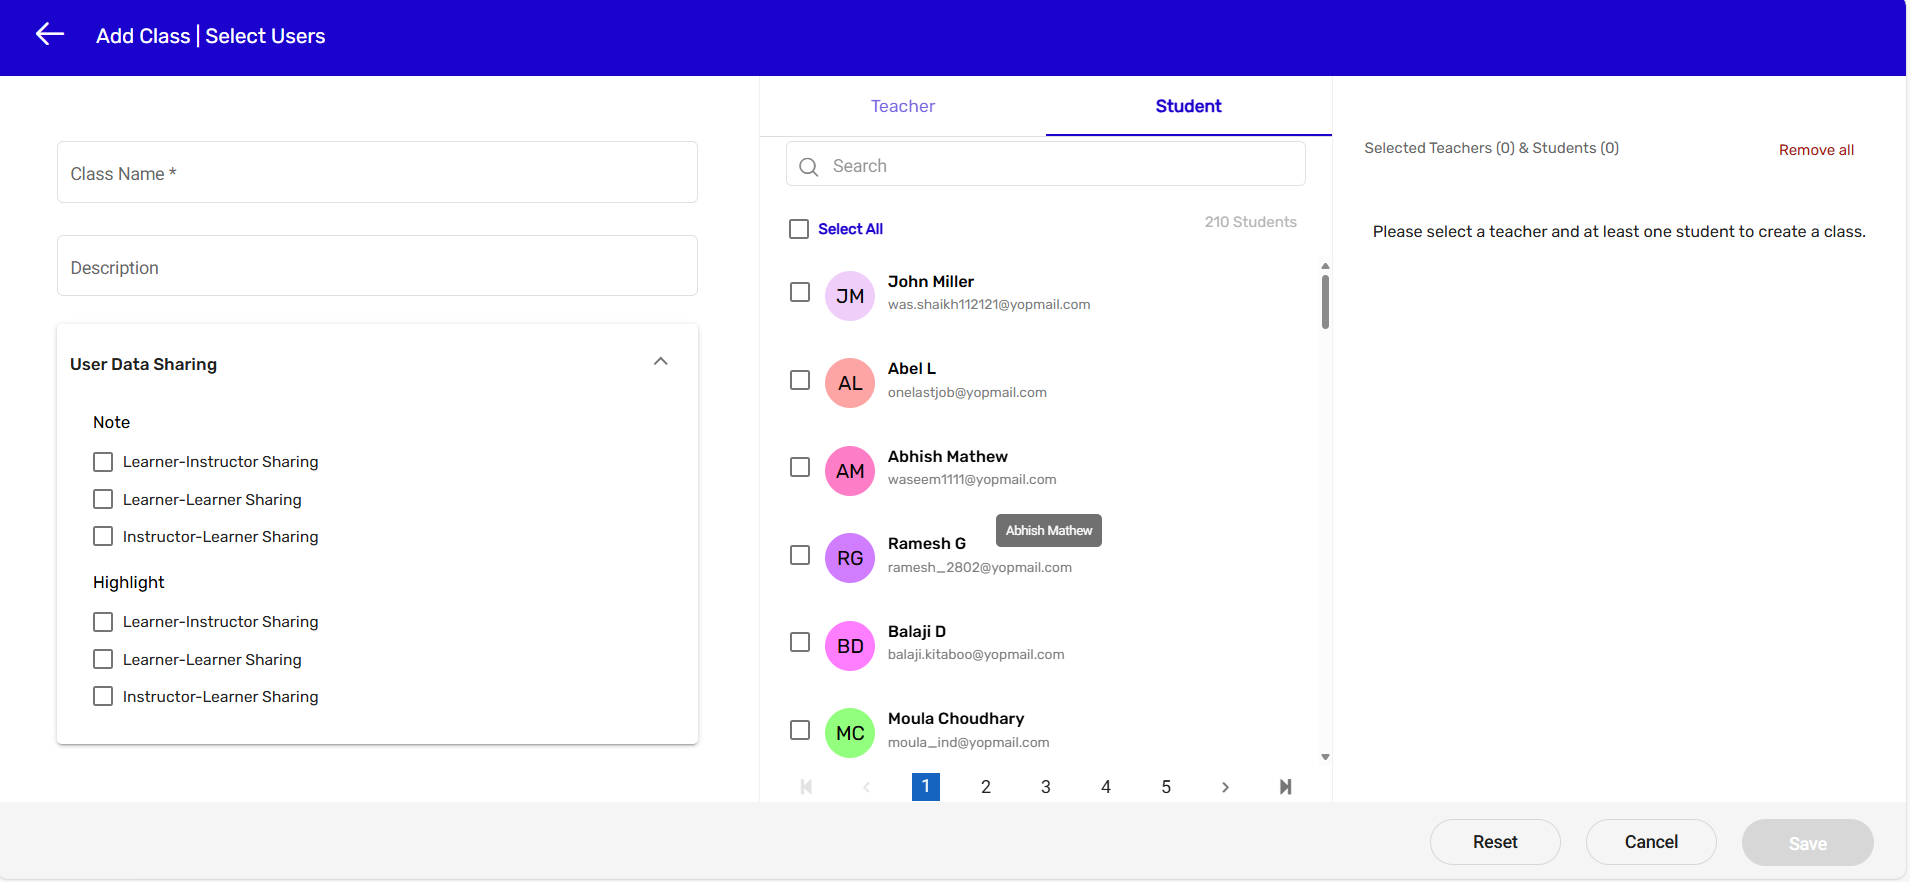
NOTE:
● The Teacher tab will be the default selection.
● Minimum one teacher and one student should be selected to create a class
2. Editing a Class –
You have already created a class. You may, however, need to modify some of the information
related to the class. Kitaboo portal allows you to edit the required information.
- Sign in with your Customer Admin credentials
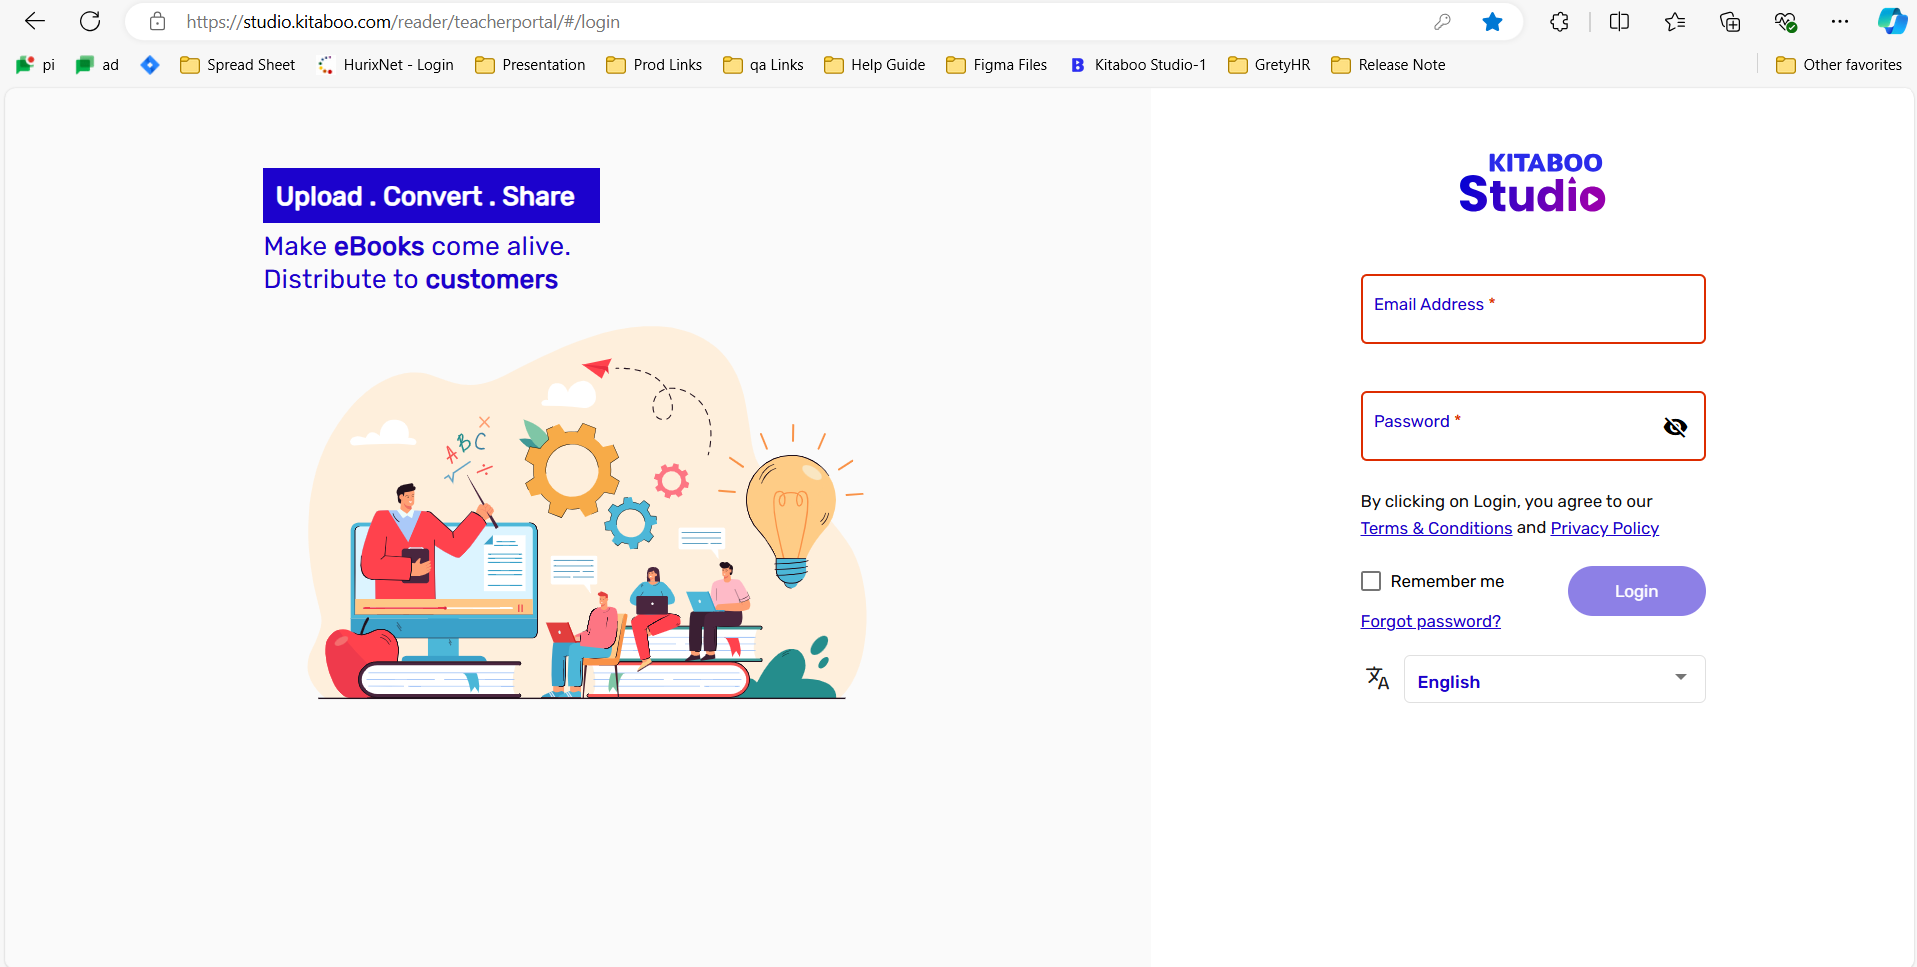
- Switch to the Users tab. > Click on Class on the Users tab.
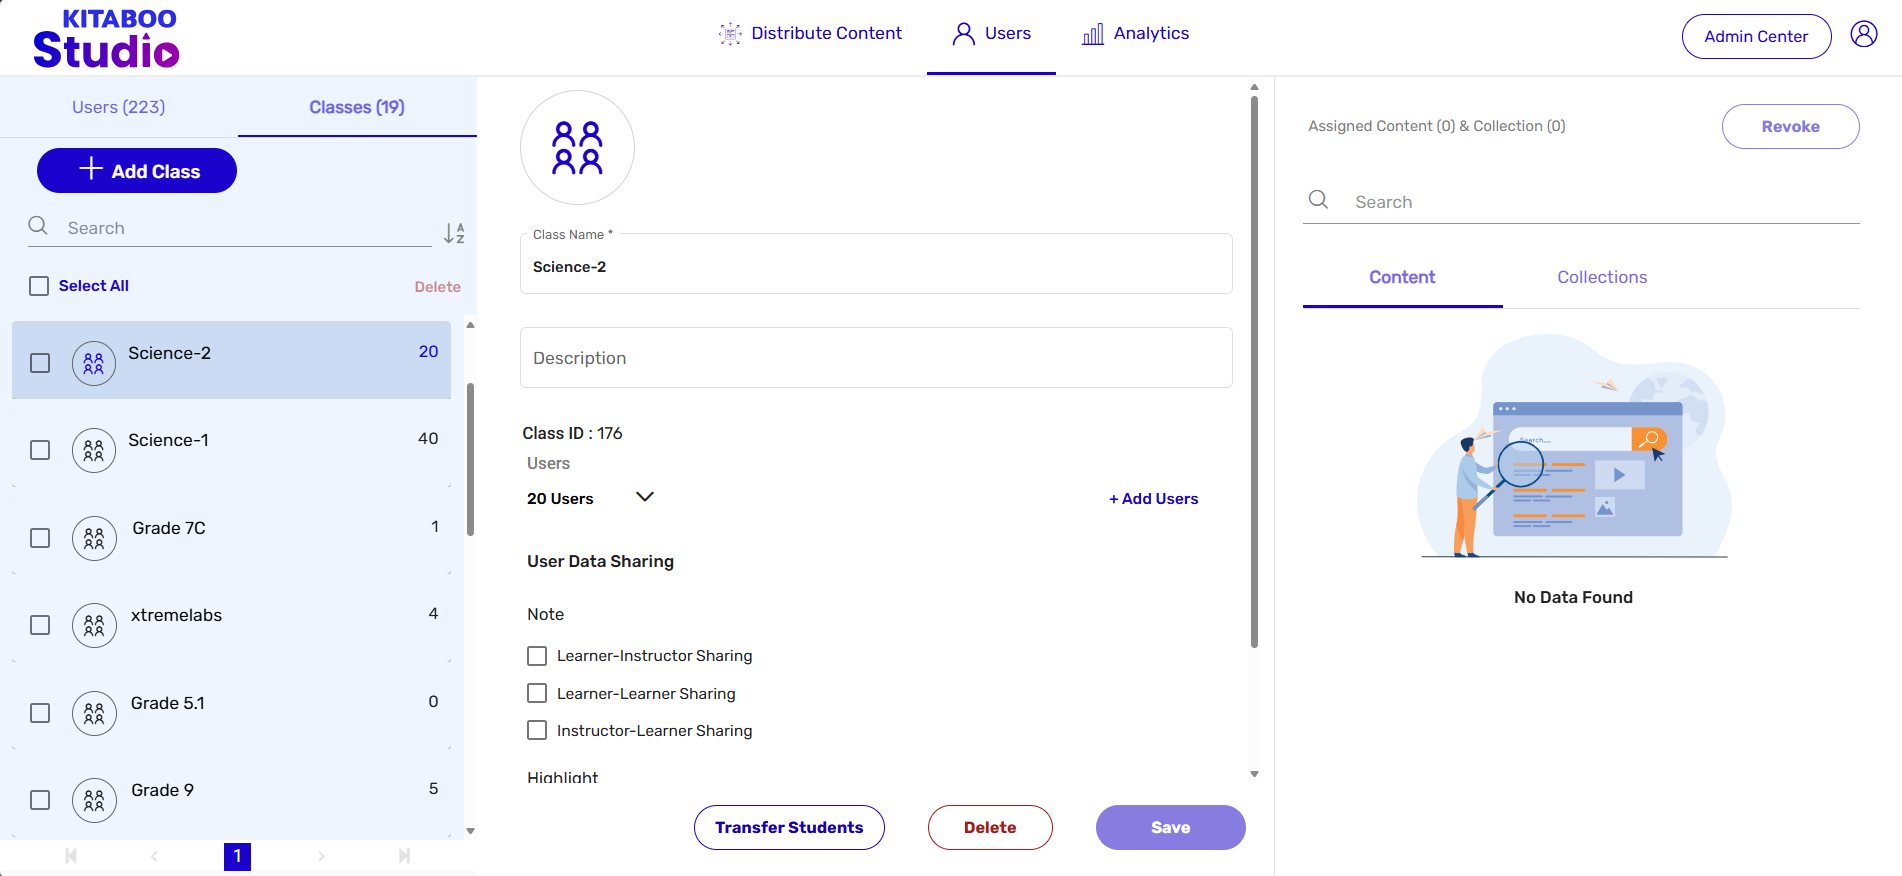
- Select the class you want to edit. > Modify information in the desired field(s). > Click on Save.
NOTE: Information in the highlighted field has been edited in this example.
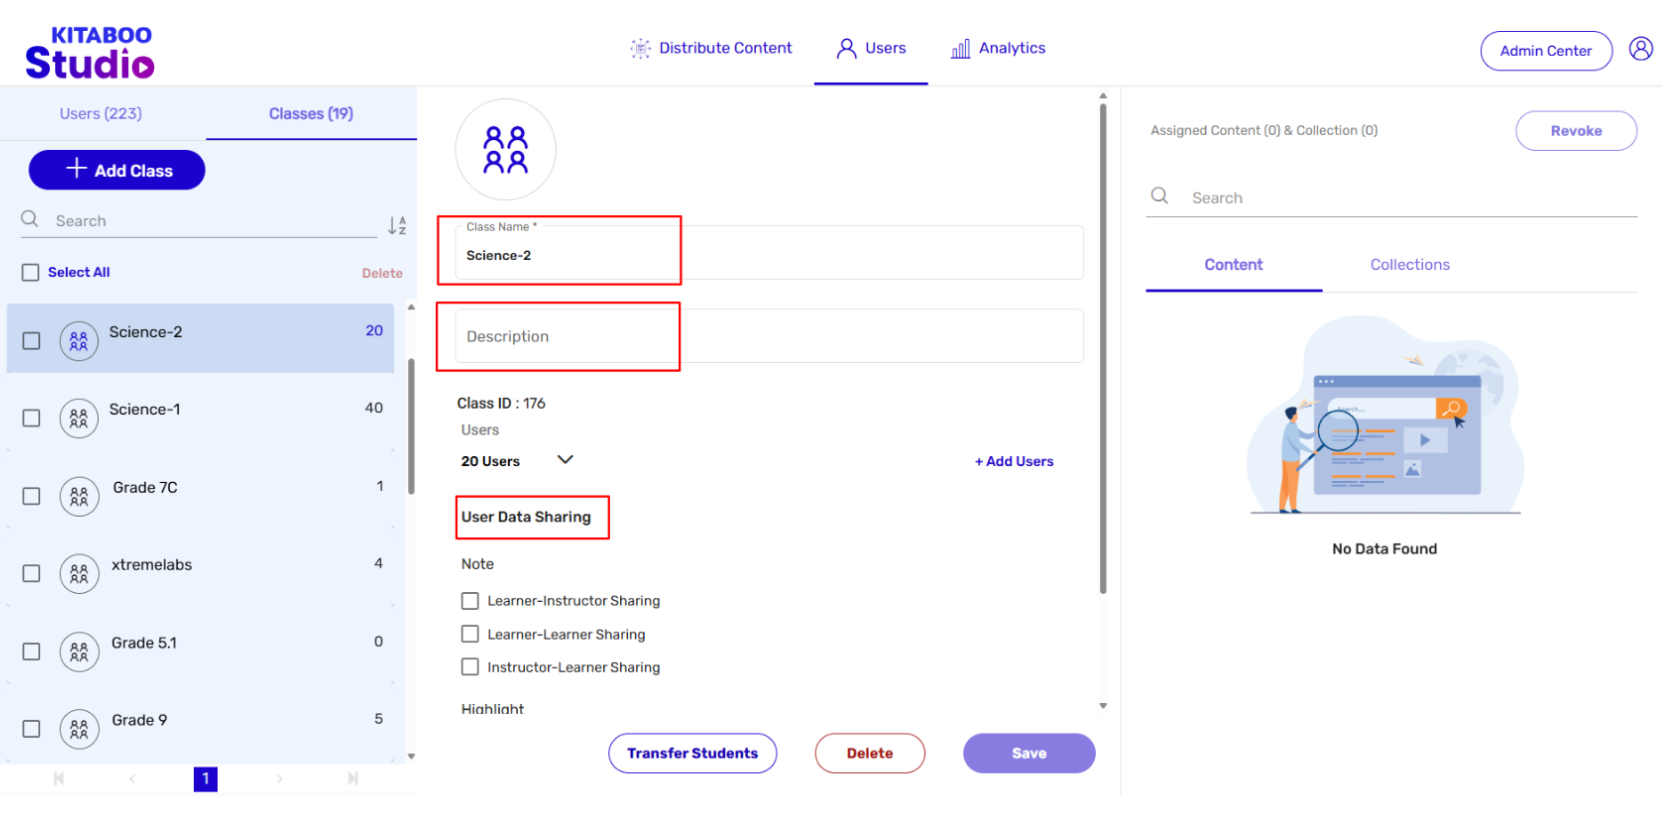
3. Adding a New User to an Existing Class
The Kitaboo portal also enables you to add a new user or more than one user to an existing class. You just need to follow a few steps for adding a new user.
- Sign in with your Customer Admin credentials.
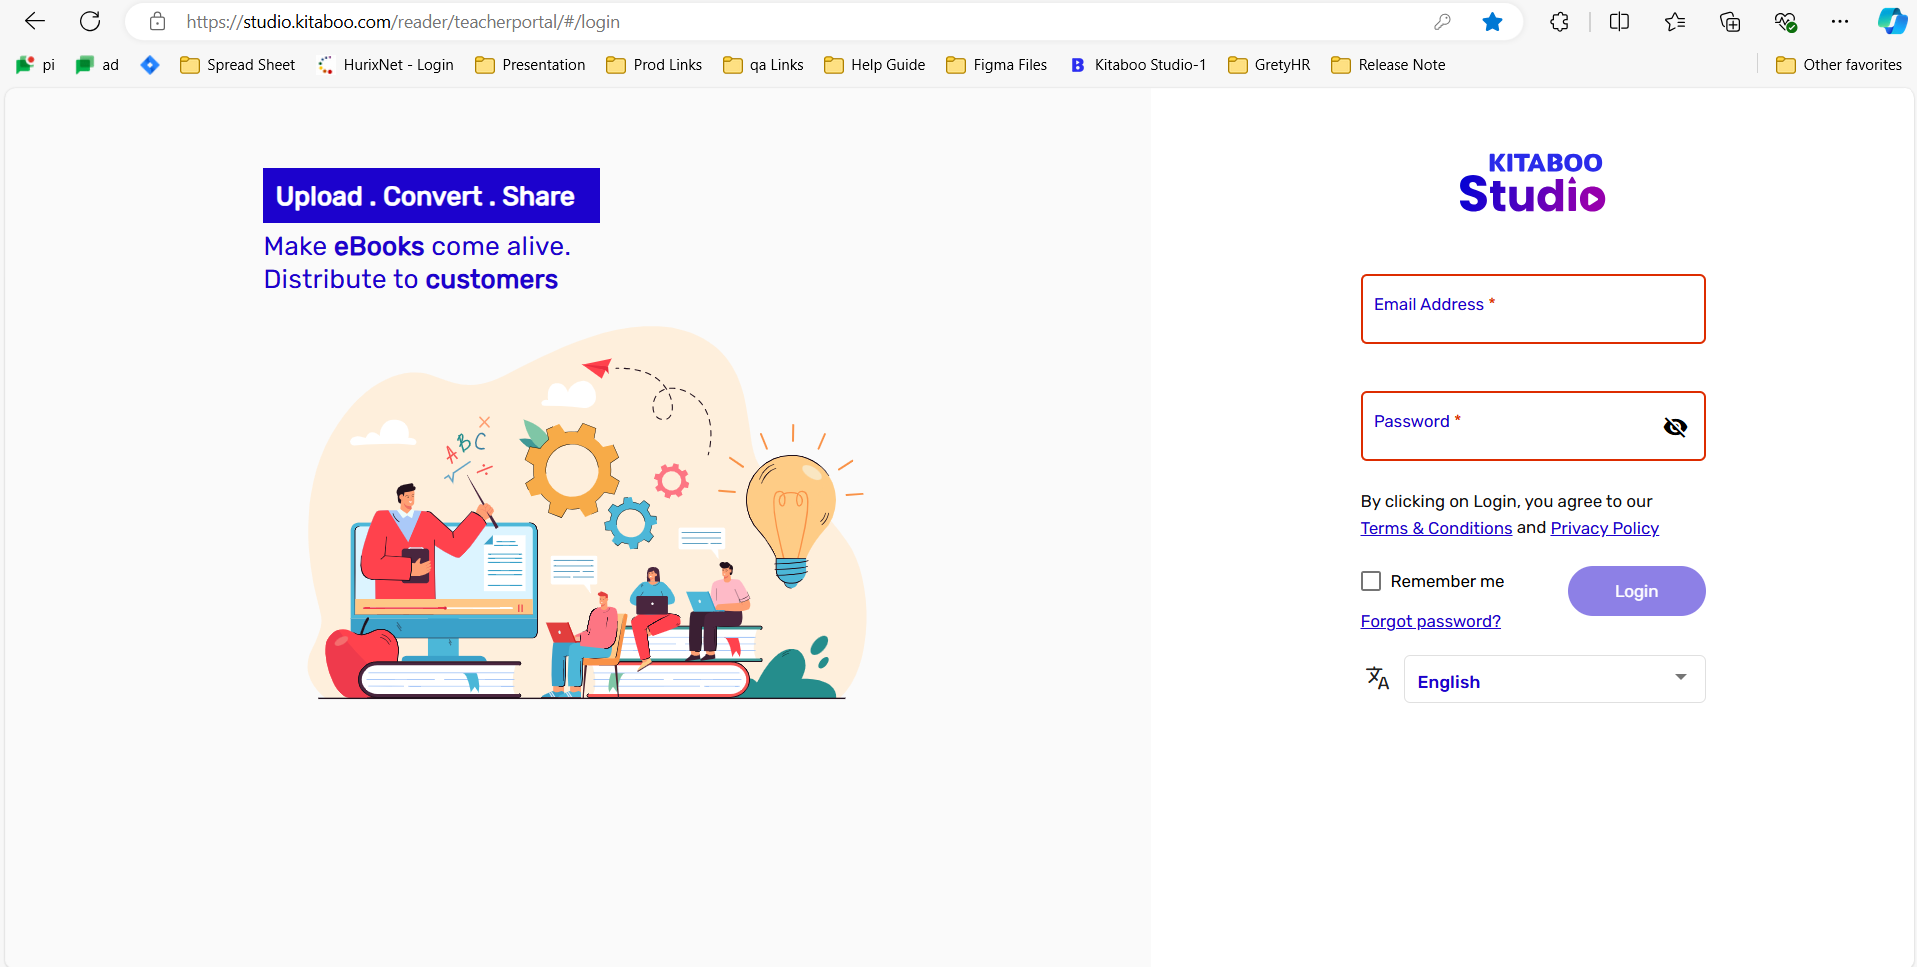
- On the Users tab, click on Class.
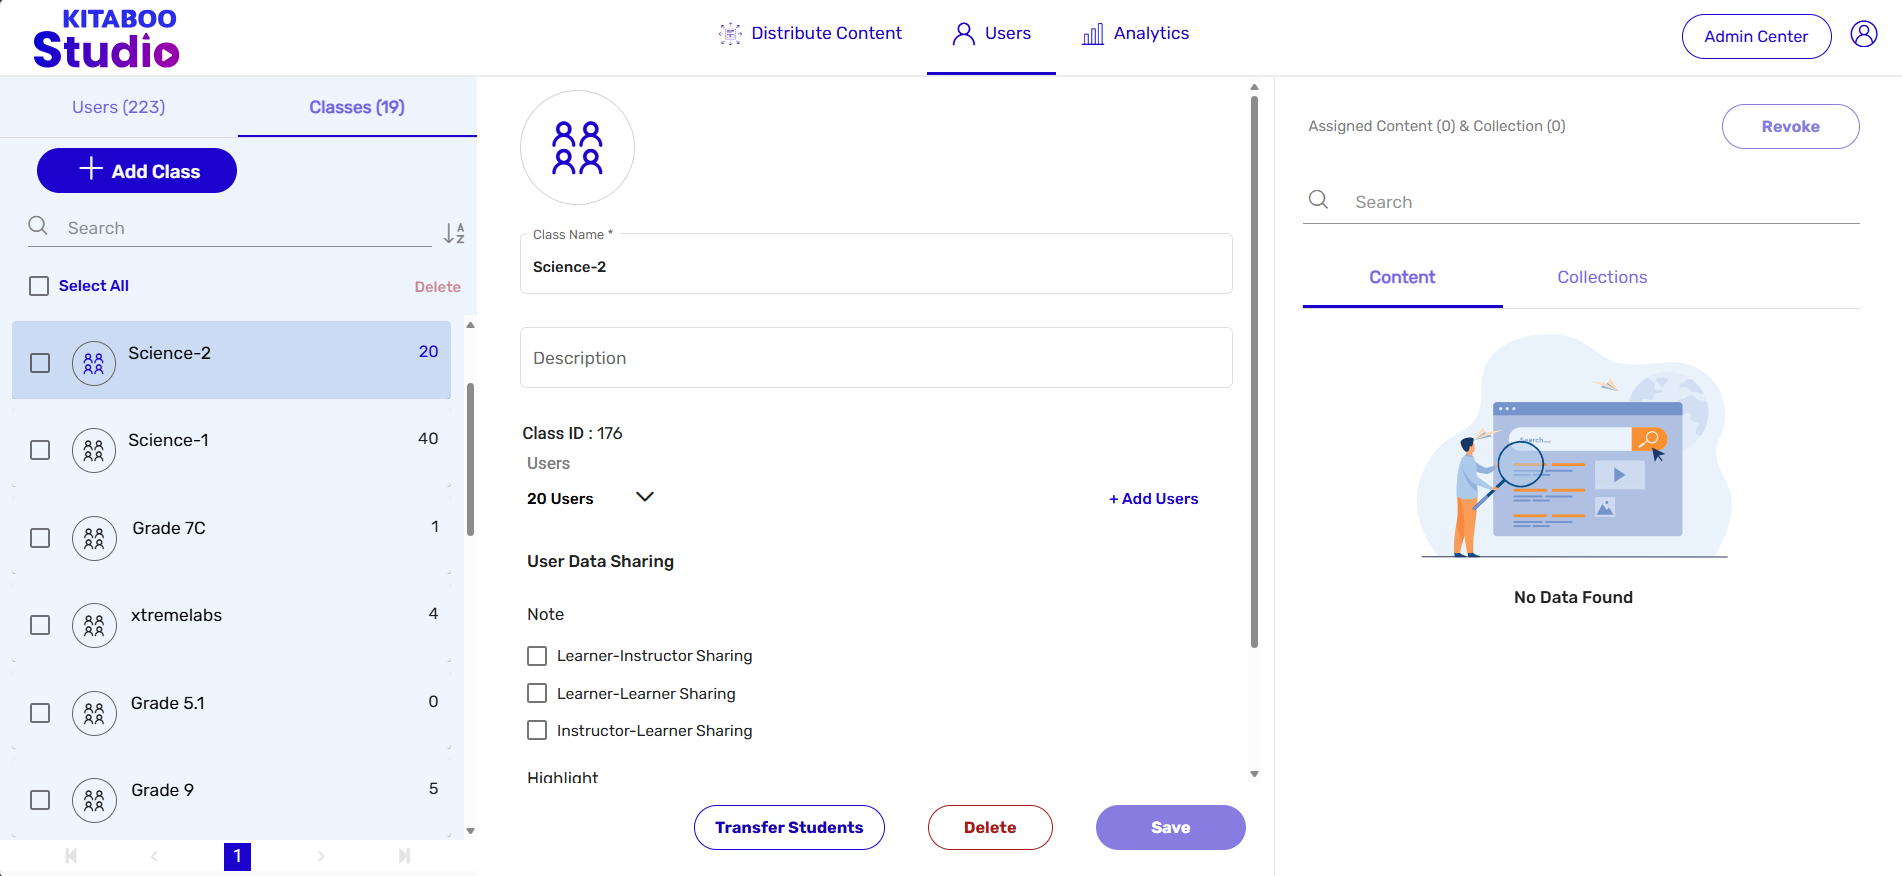
- Select the class you want to add user(s) to. > Click on the Add Users hyperlink.
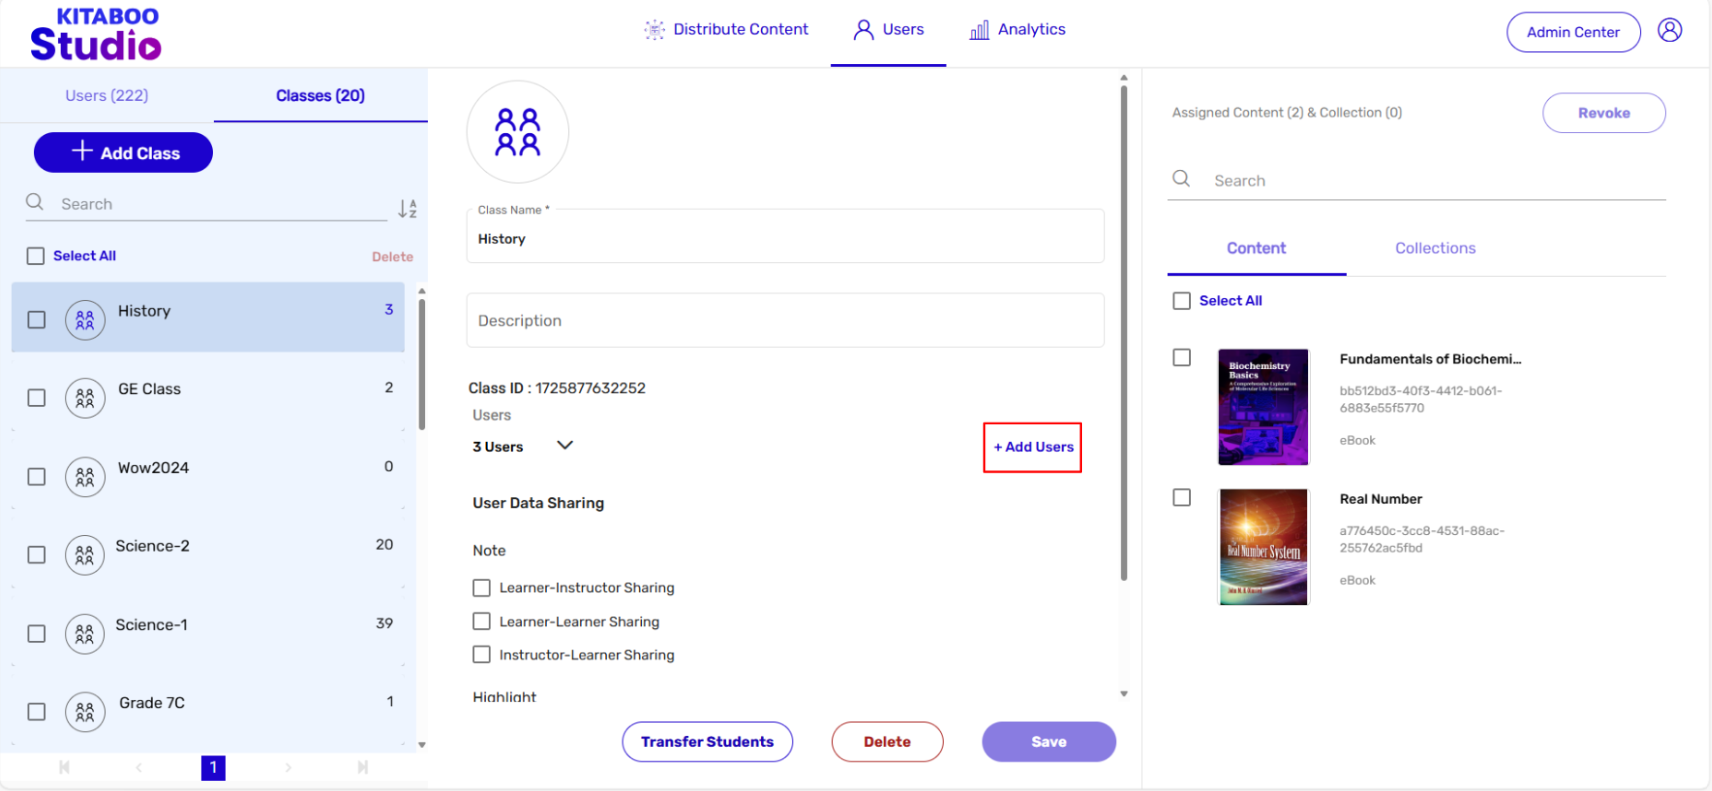
- Select the user’s Role (Teacher or Student) you want to add. > Select the user’s name(s) Box from the list.
NOTE: The second user (Teacher) has been added in this example.
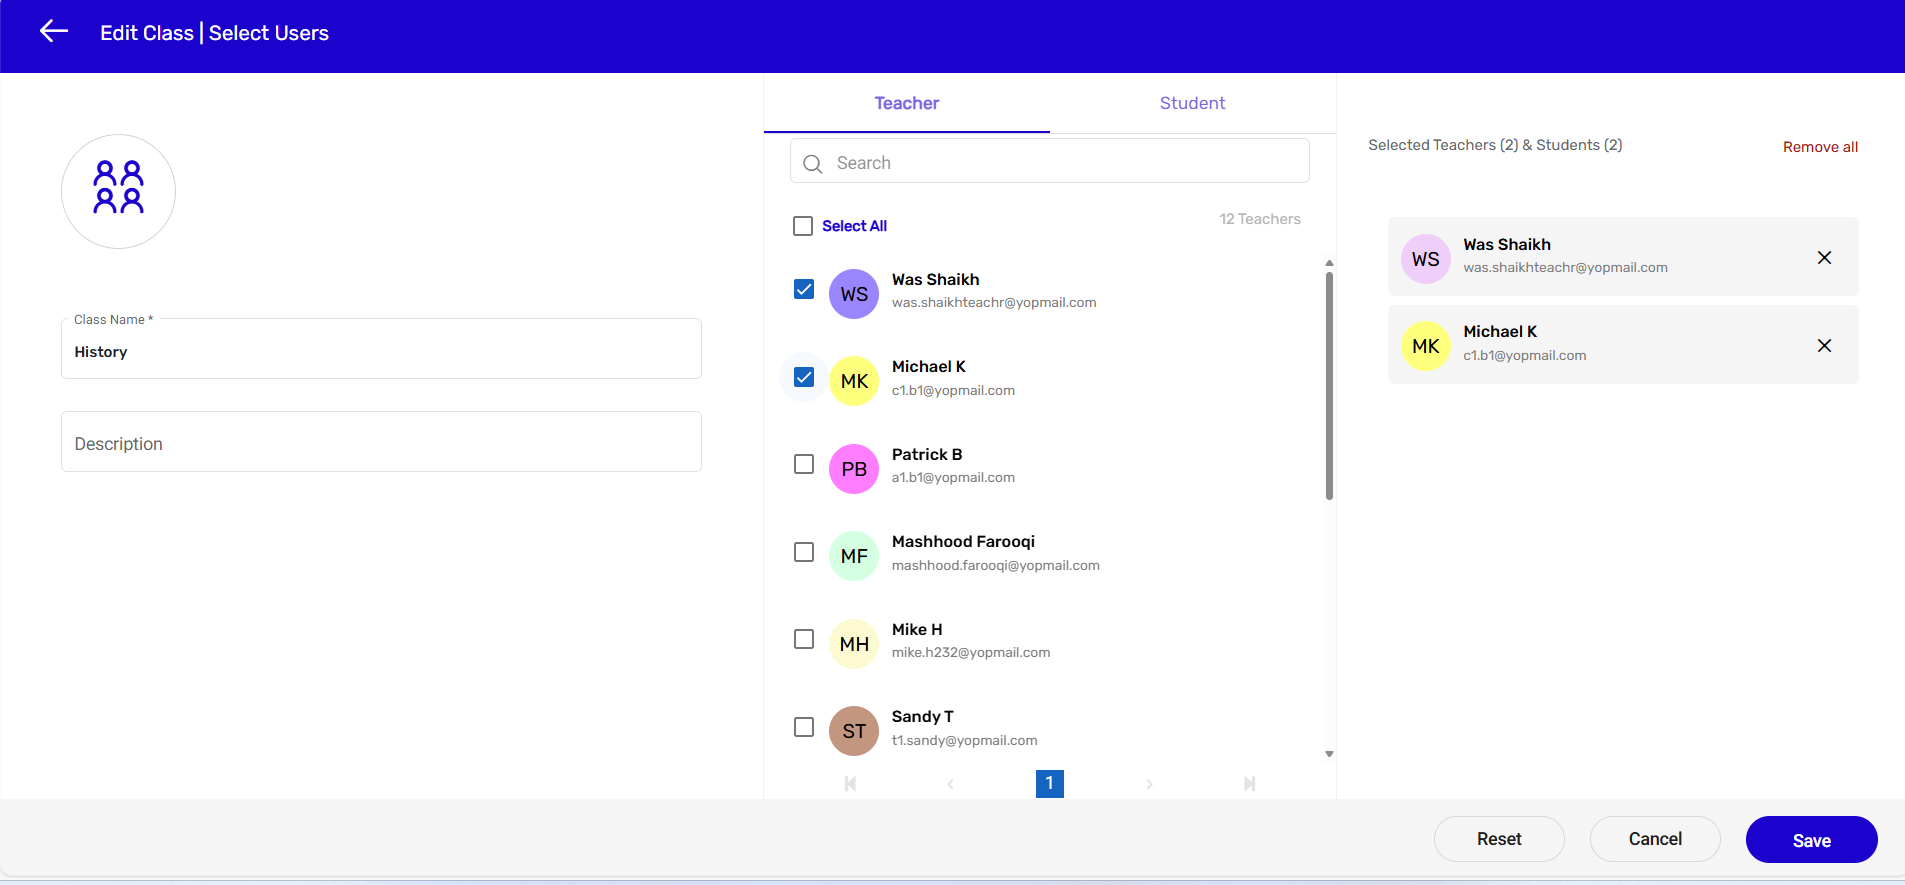
- Switch the user’s Role if required. > Select the user’s name(s) Checkbox from the list. > Click on Add.
NOTE: The third user (students) have been added in this example.
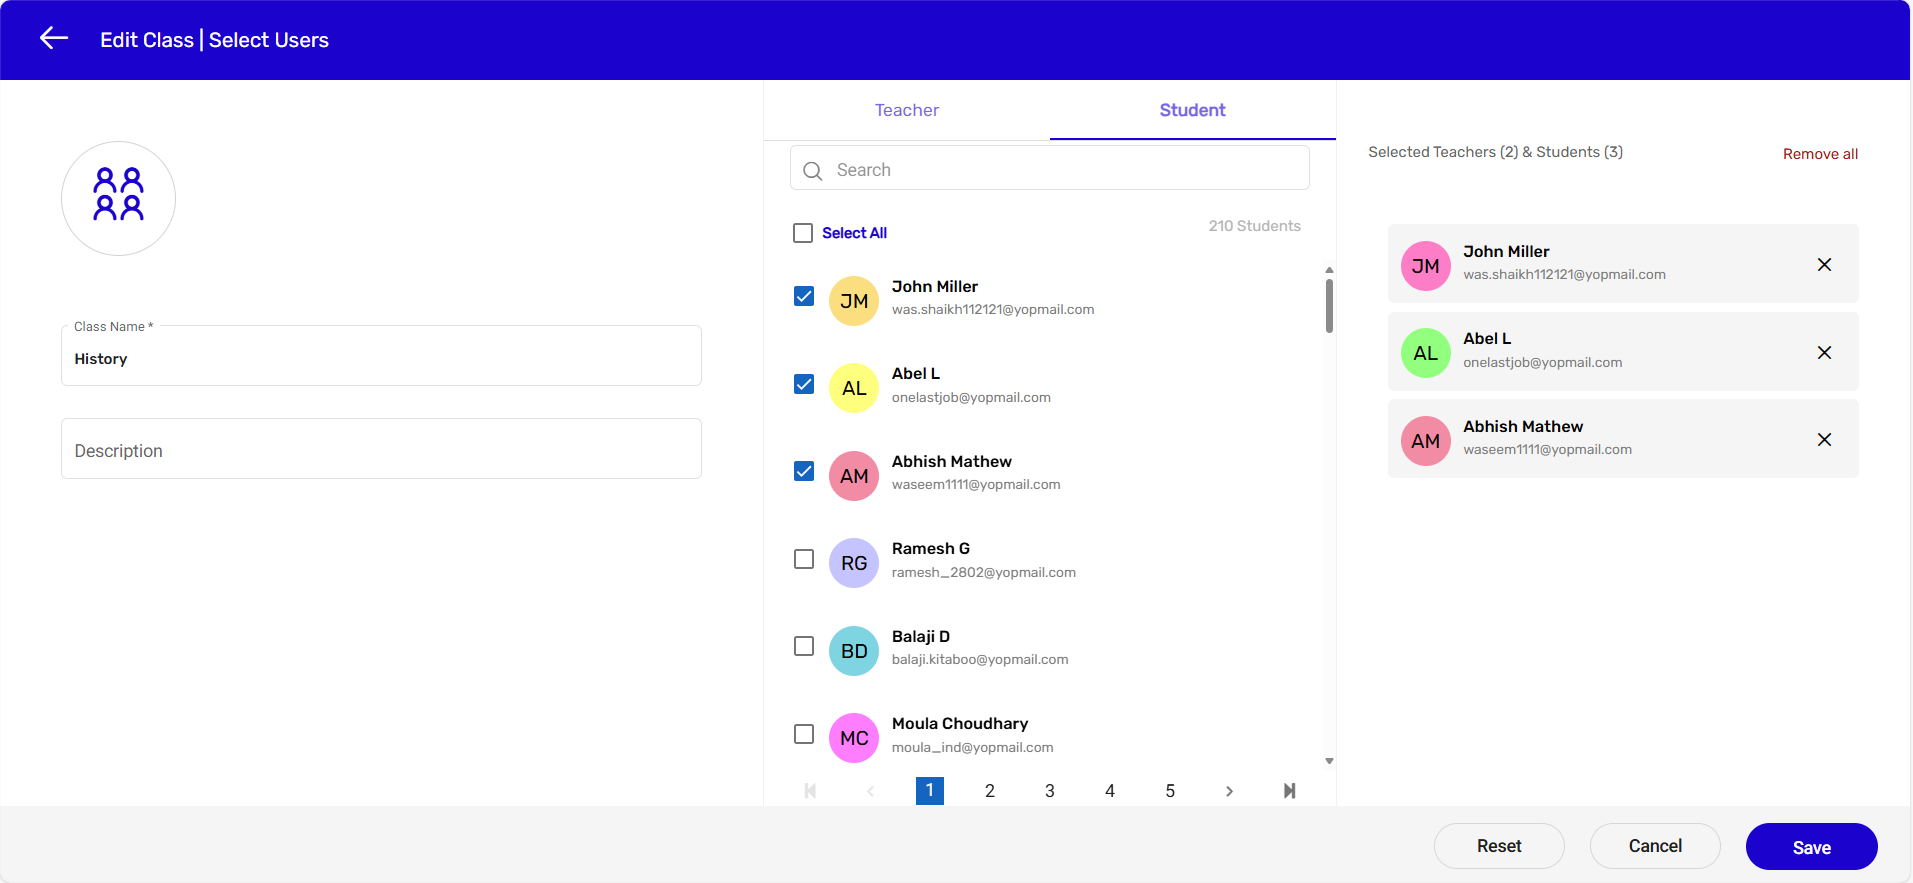
- In this example, there are three titles listed on the Assign Contents pop-up. You can manually select an order number from the drop-down menu against each title. > Click on the Assign button.
However, if the number of titles is too many, you can select the checkbox on the pop-up, and click on the Assign button.
NOTE: The system will automatically select a title with remaining licenses valid for a maximum expiry period.
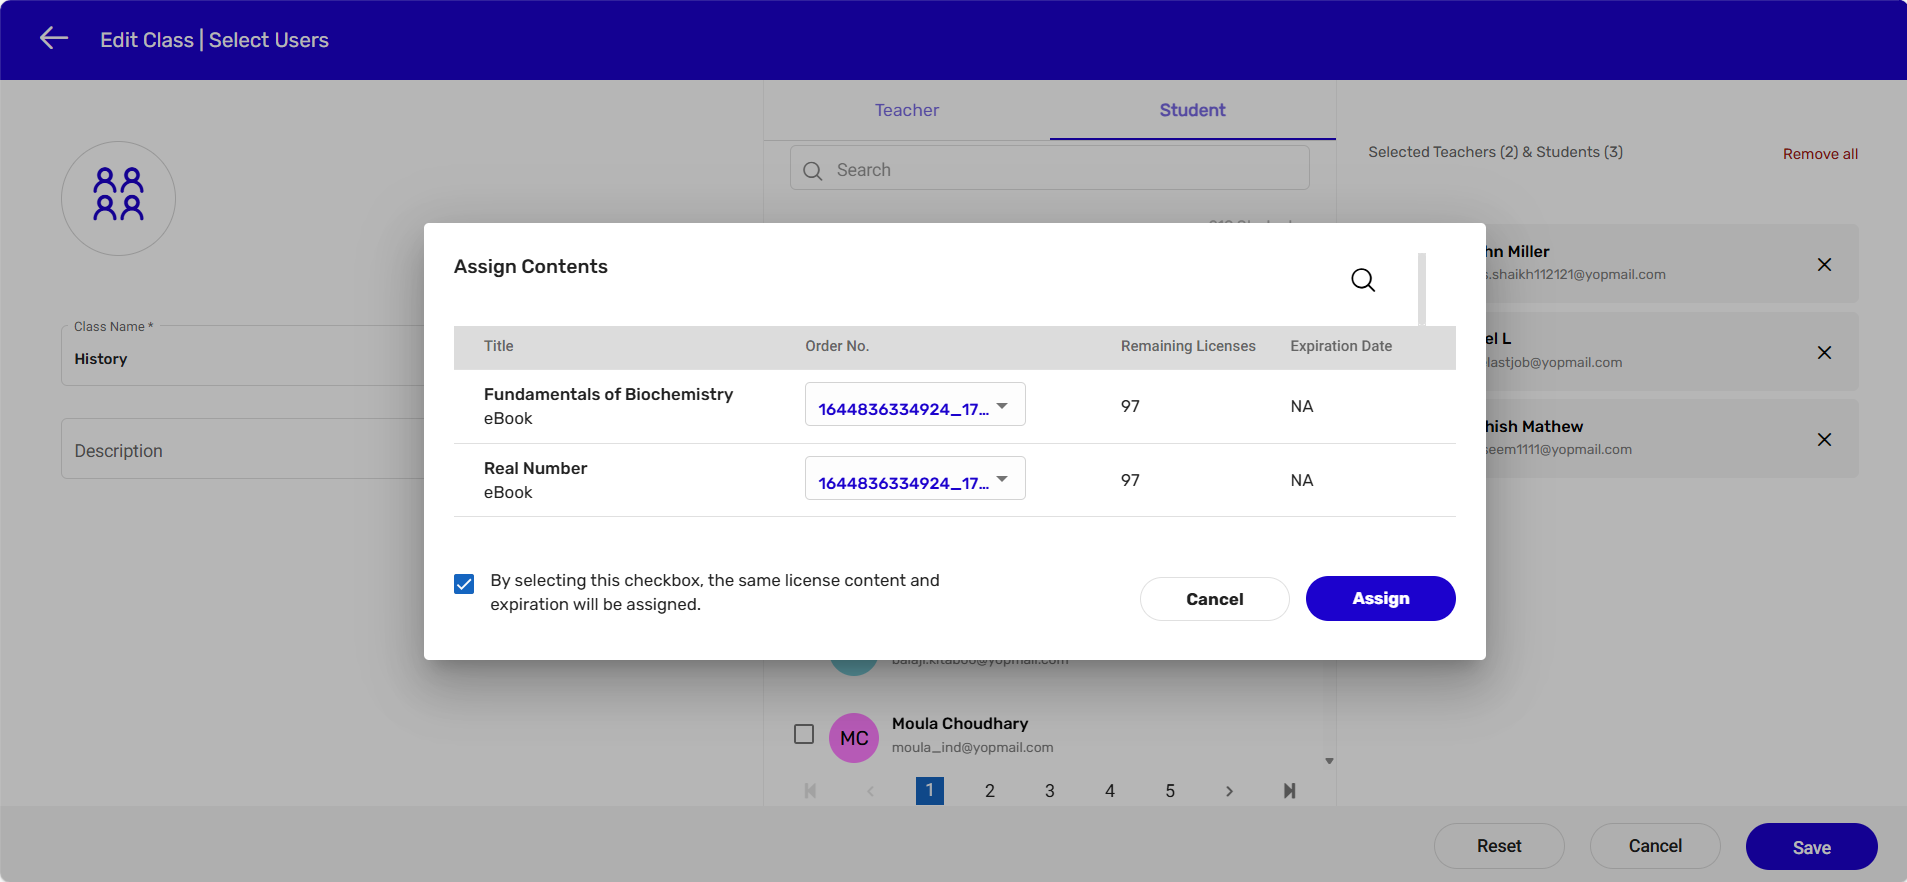
Important:
● No new user can be added to an existing class if there is no content assigned to the class.
● No new user can be added to an existing class if the number of remaining licenses for the content assigned to the class is zero.
4. Removing a User from an Existing Class
The Kitaboo system also allows you to remove a user from an existing class. Let’s see how to
do it.
- Sign in with your Customer Admin credentials.
- On the Users tab, click on Class.
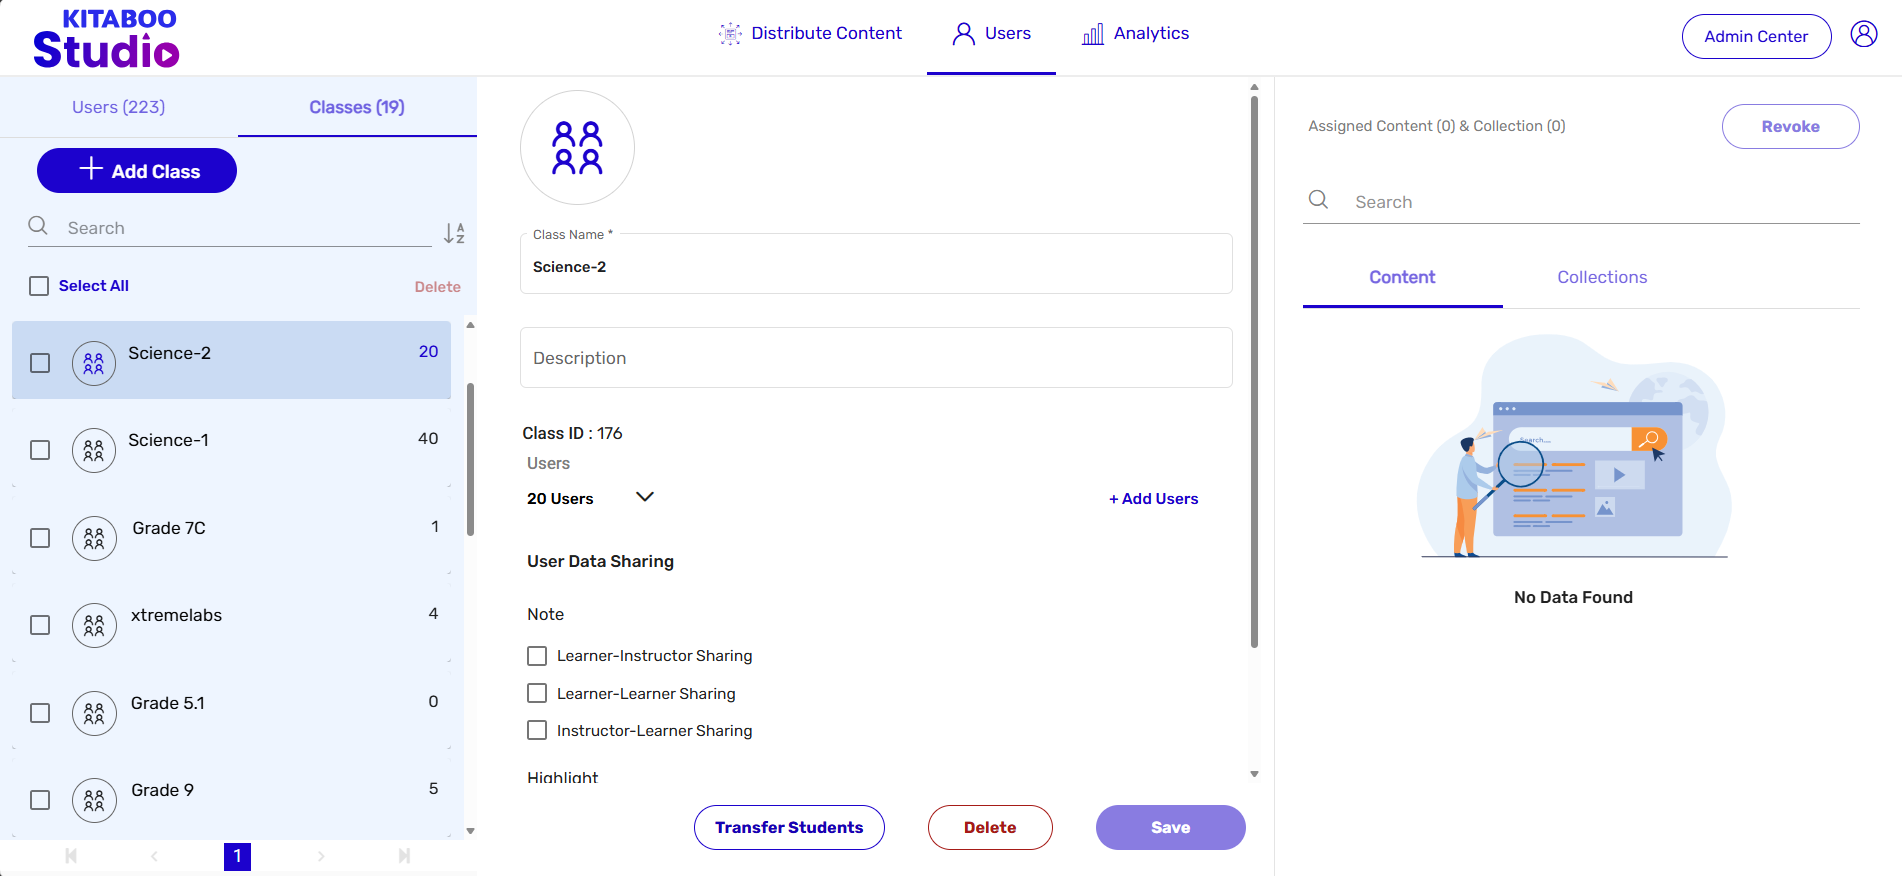
- Select the Class you want a user to remove from. > Click on Users.
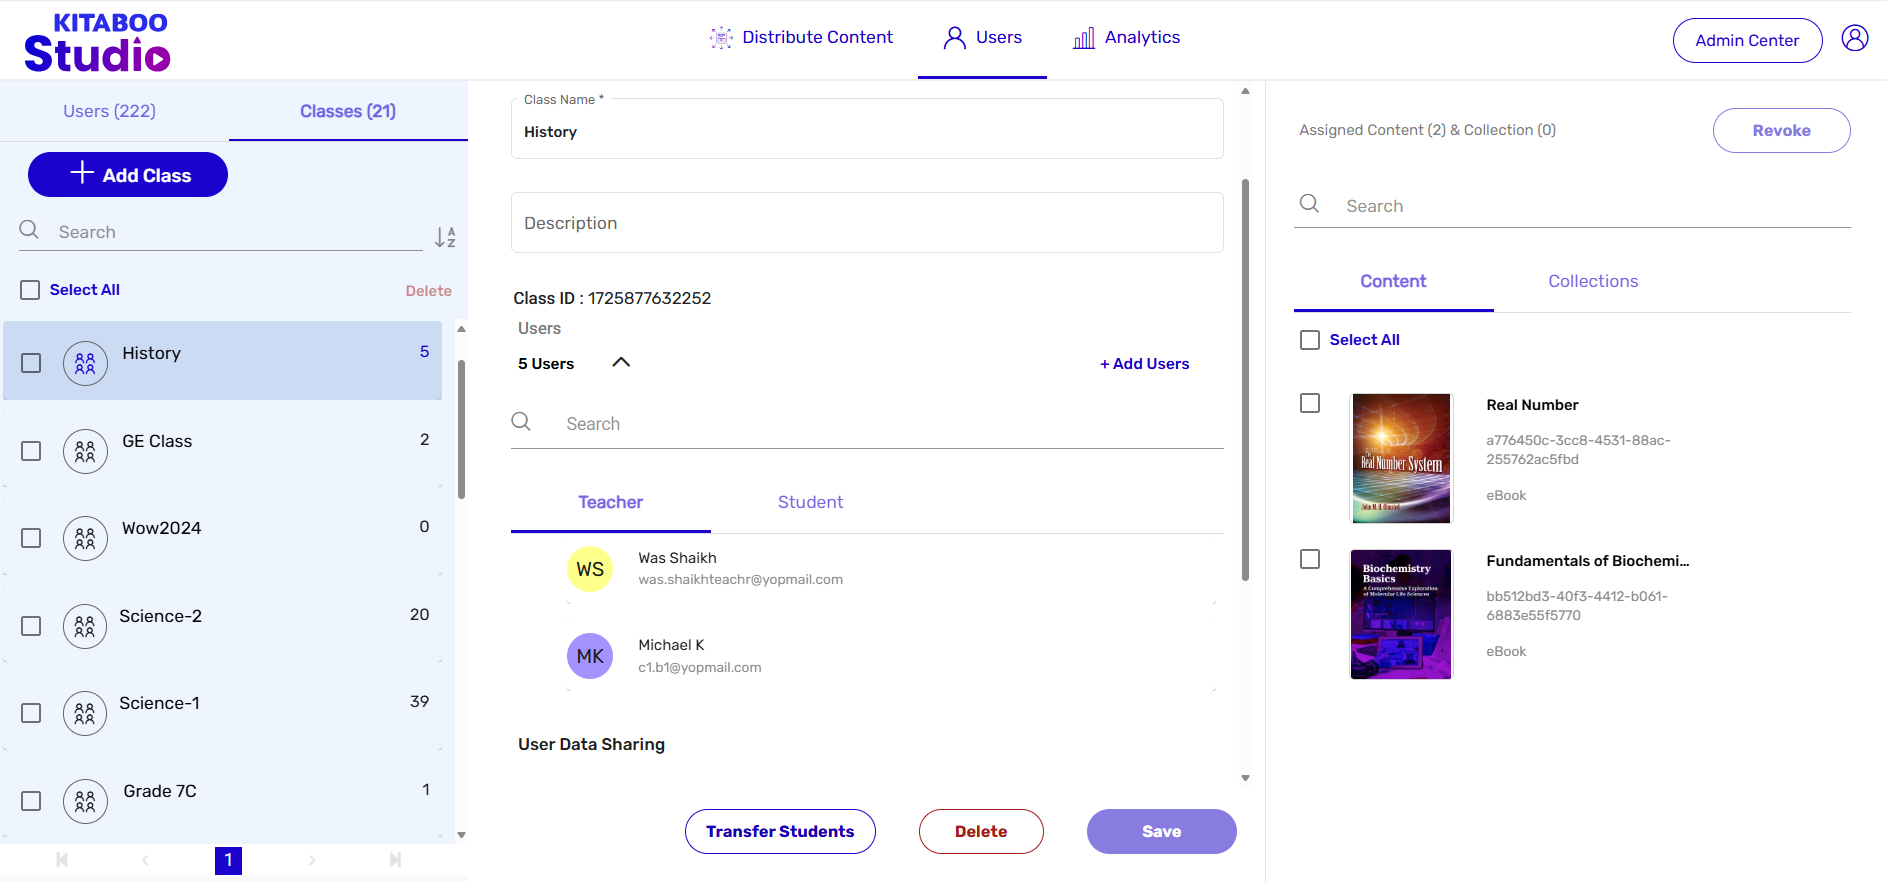
- Click on the user type, Teacher/Student, you want to remove. > Roll the cursor over the user you want to remove. > Click on the Cross symbol that appears.
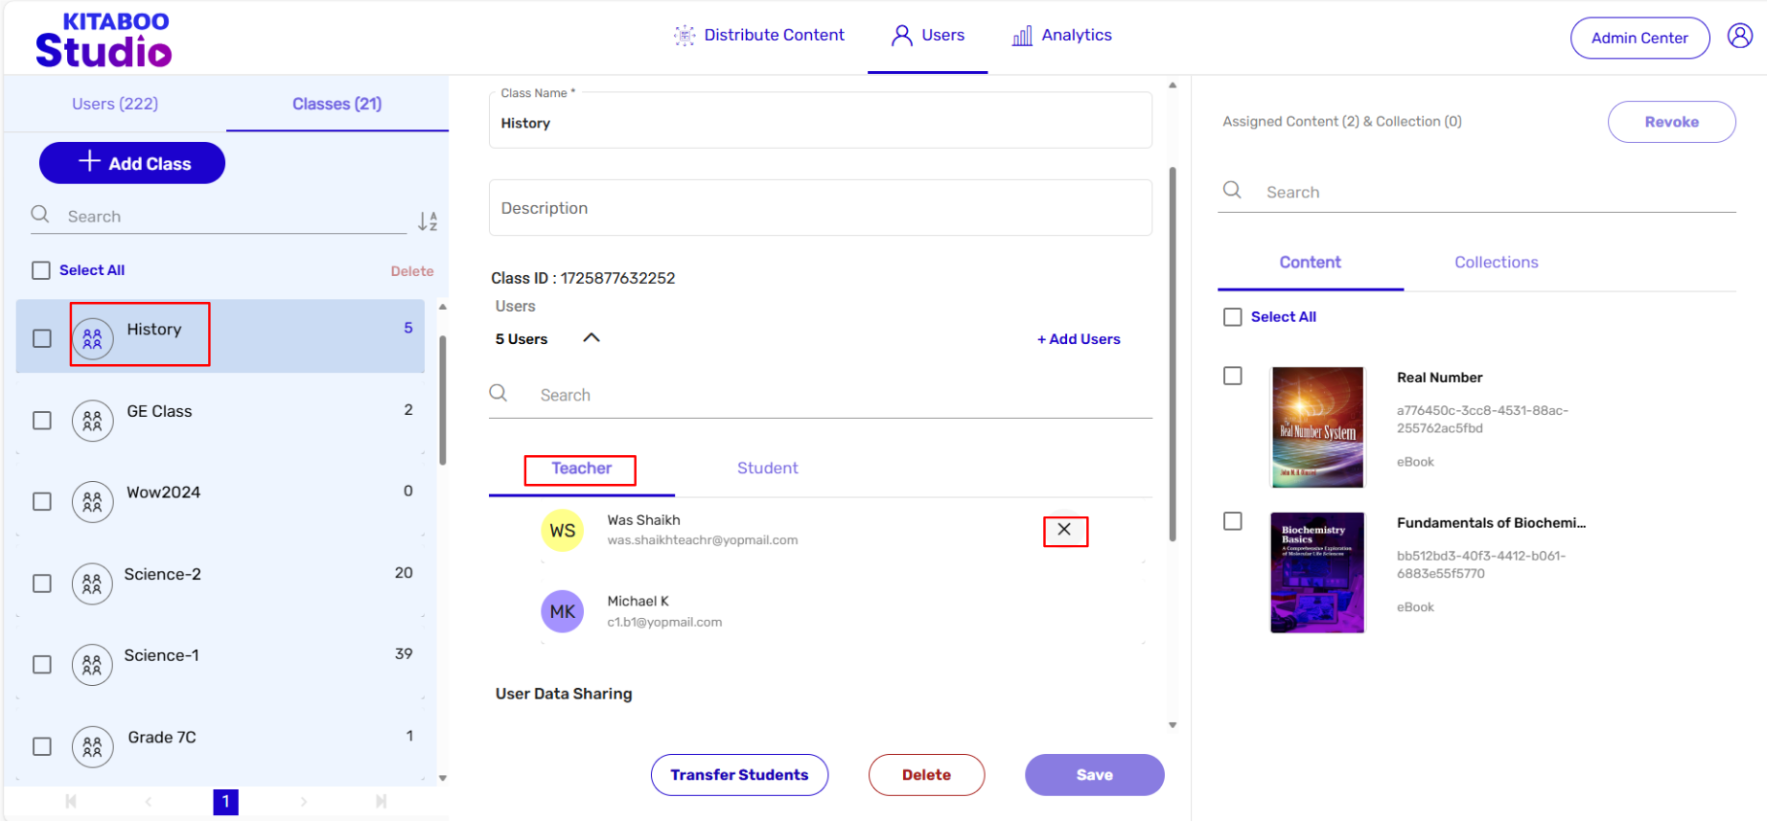
NOTE:
- The user type Teacher will appear enabled by default.
- In a similar way you can do it for students.
1. Admin Center
1. Users
- Sign in with your Customer Admin credentials.
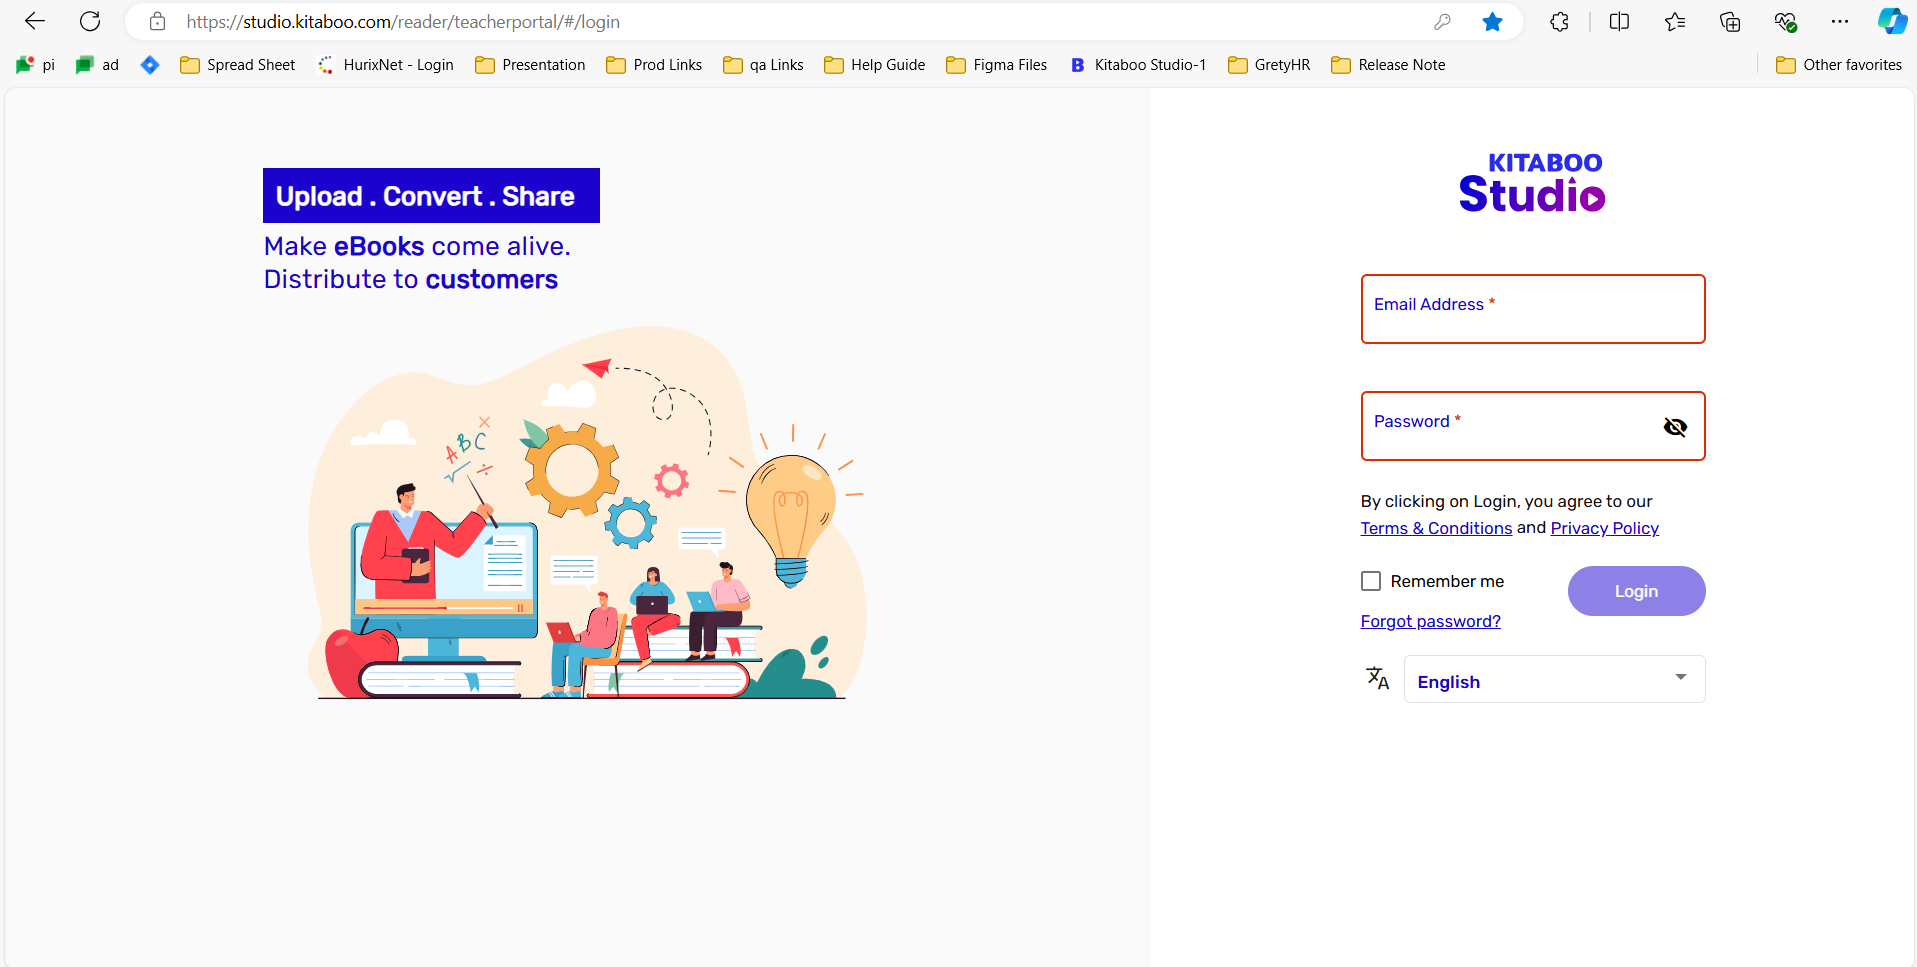
- The Admin Center button is placed on the top right corner of the screen.
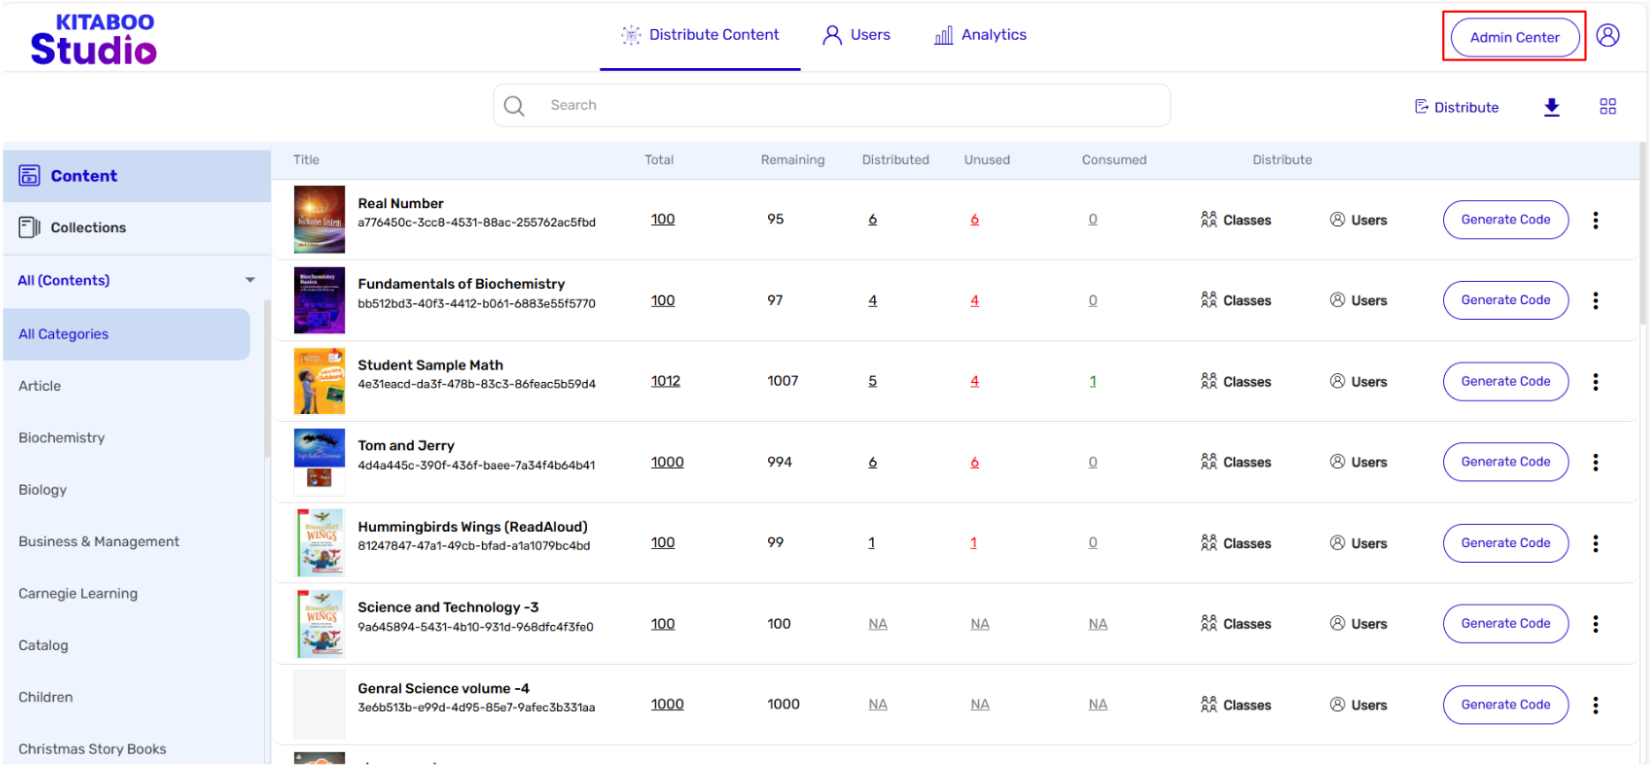
- The Admin Center page enables the main Institute Admin to either edit the profile of an existing user or add new user(s).
NOTE: Items like name, email ID, and password editable, except role.
Important: The main institute admin can change the password of his/her own account as well as of the other users attached to the institute’s account.
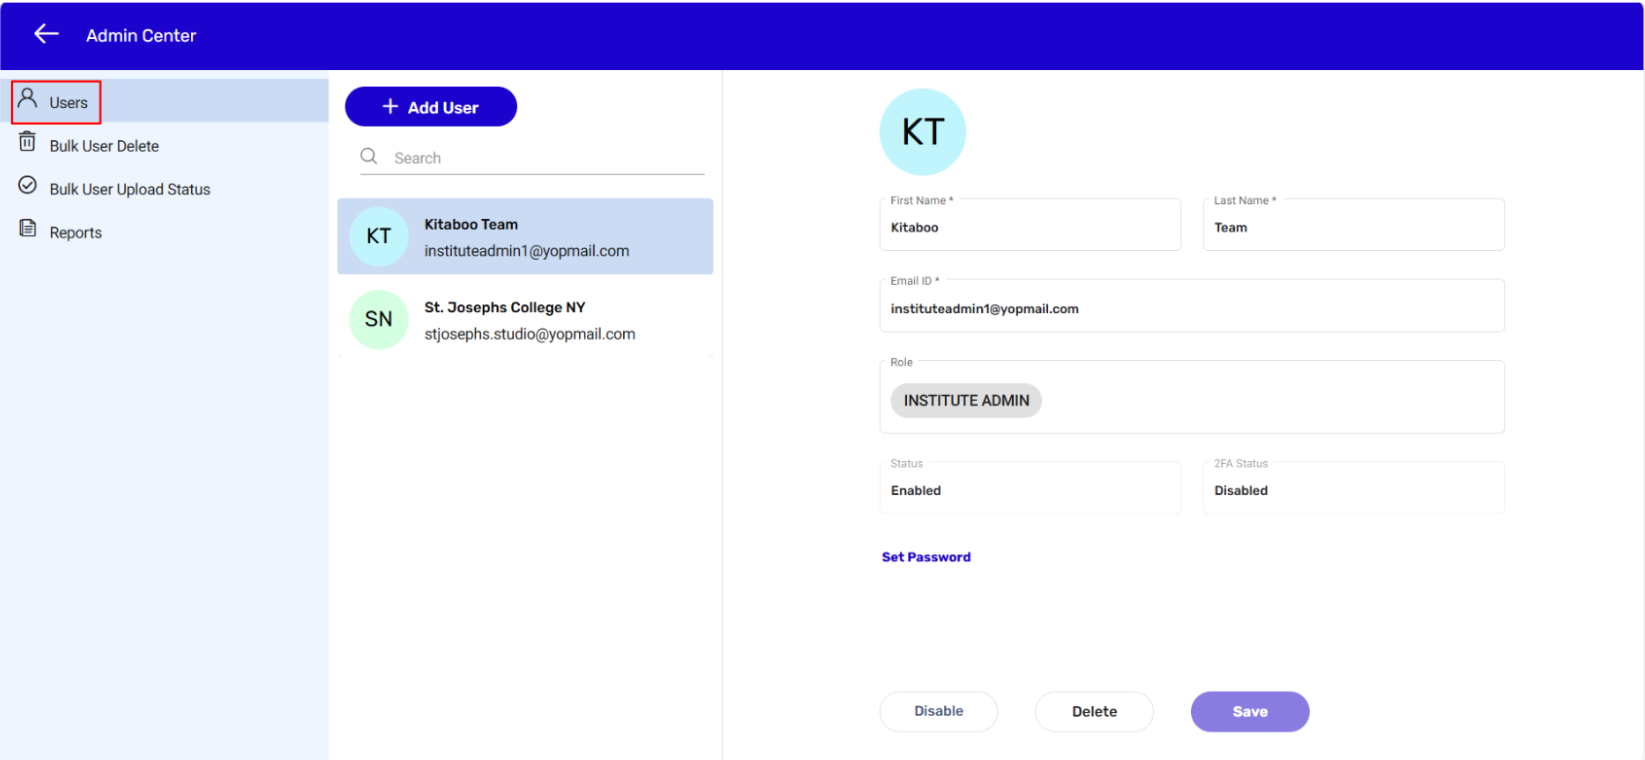
- To change the password of an existing user: Click on the Set Password link. > On the Set Password pop-up, enter a new password as per the prescribed format for a password. > click on Save.
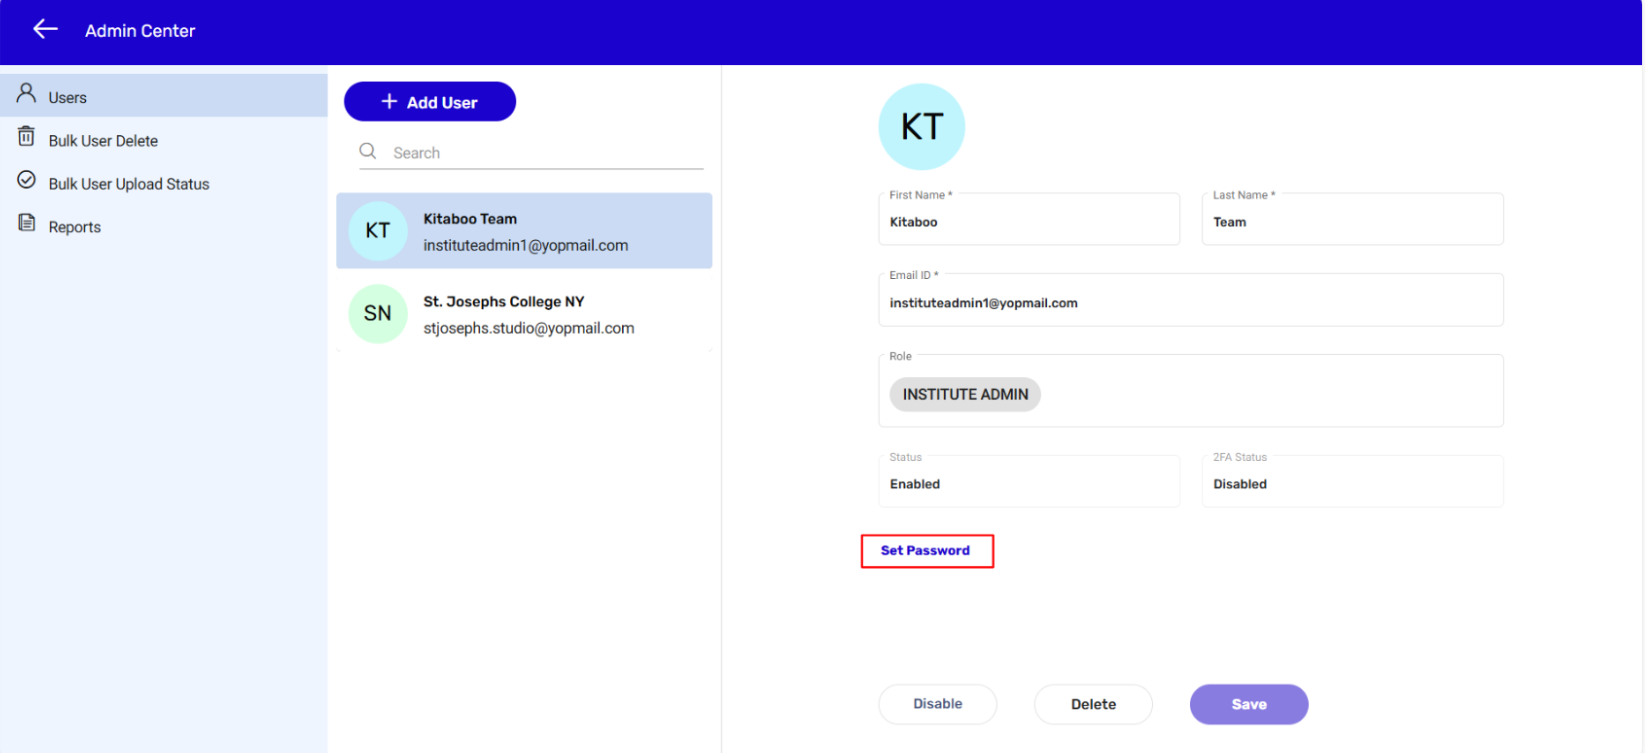
- The Admin Center also enables you to add a single user or to simultaneously add multiple users to your account.
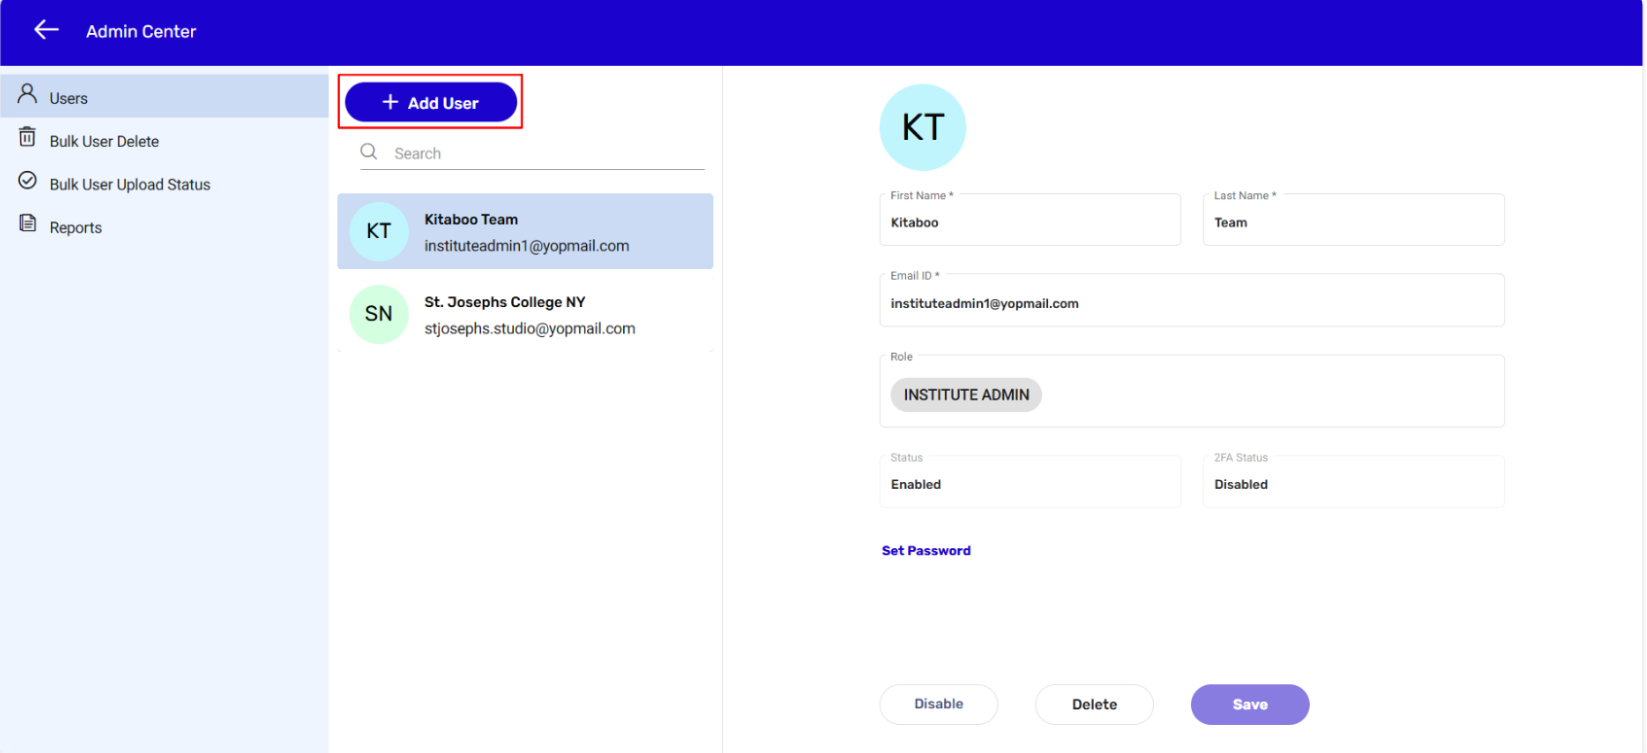
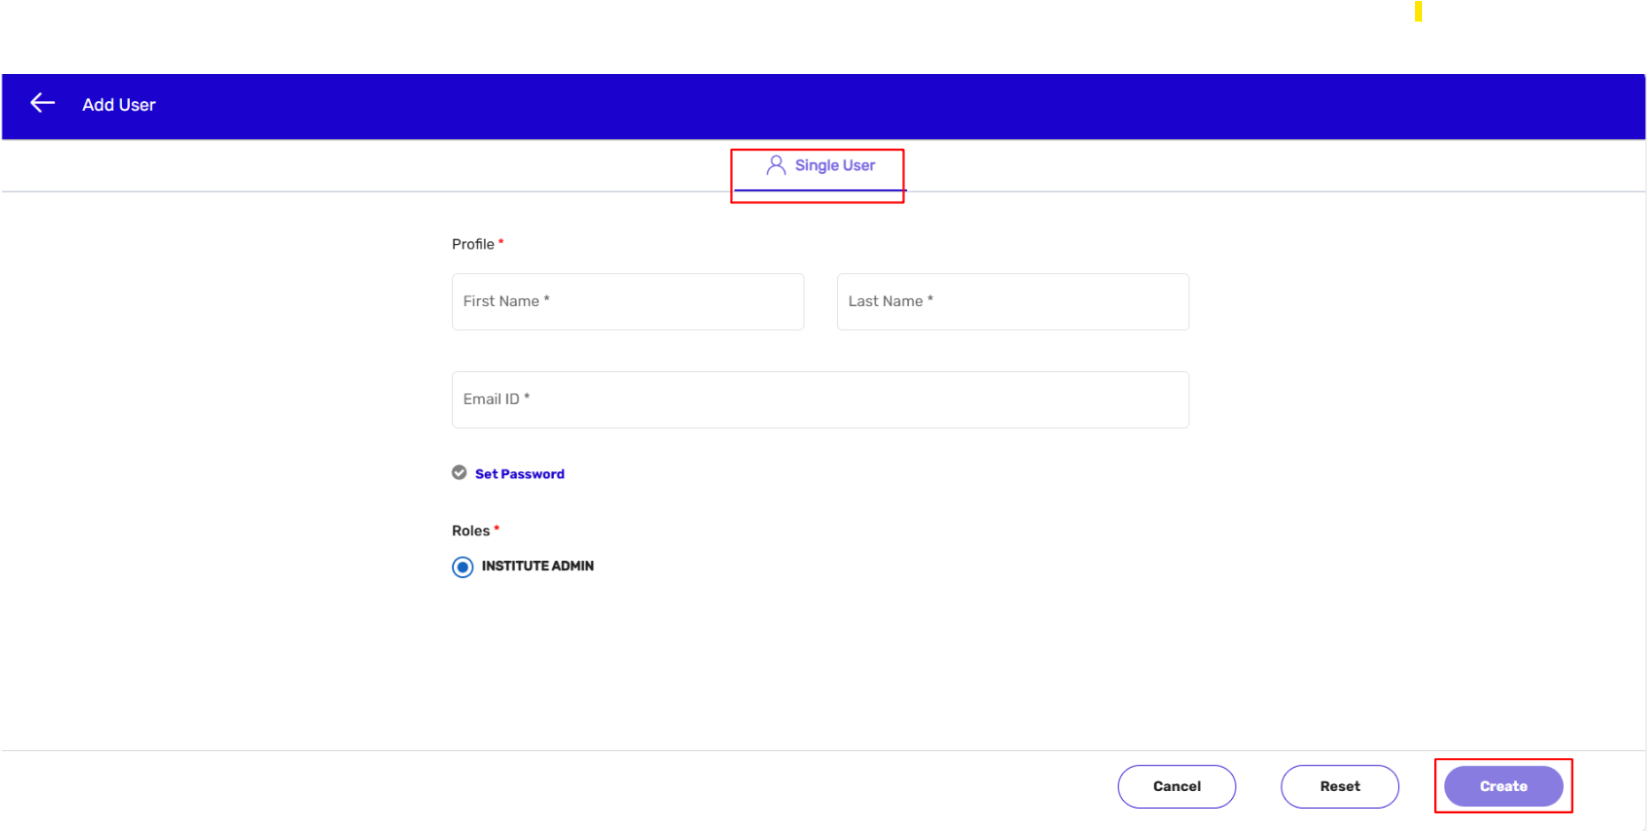
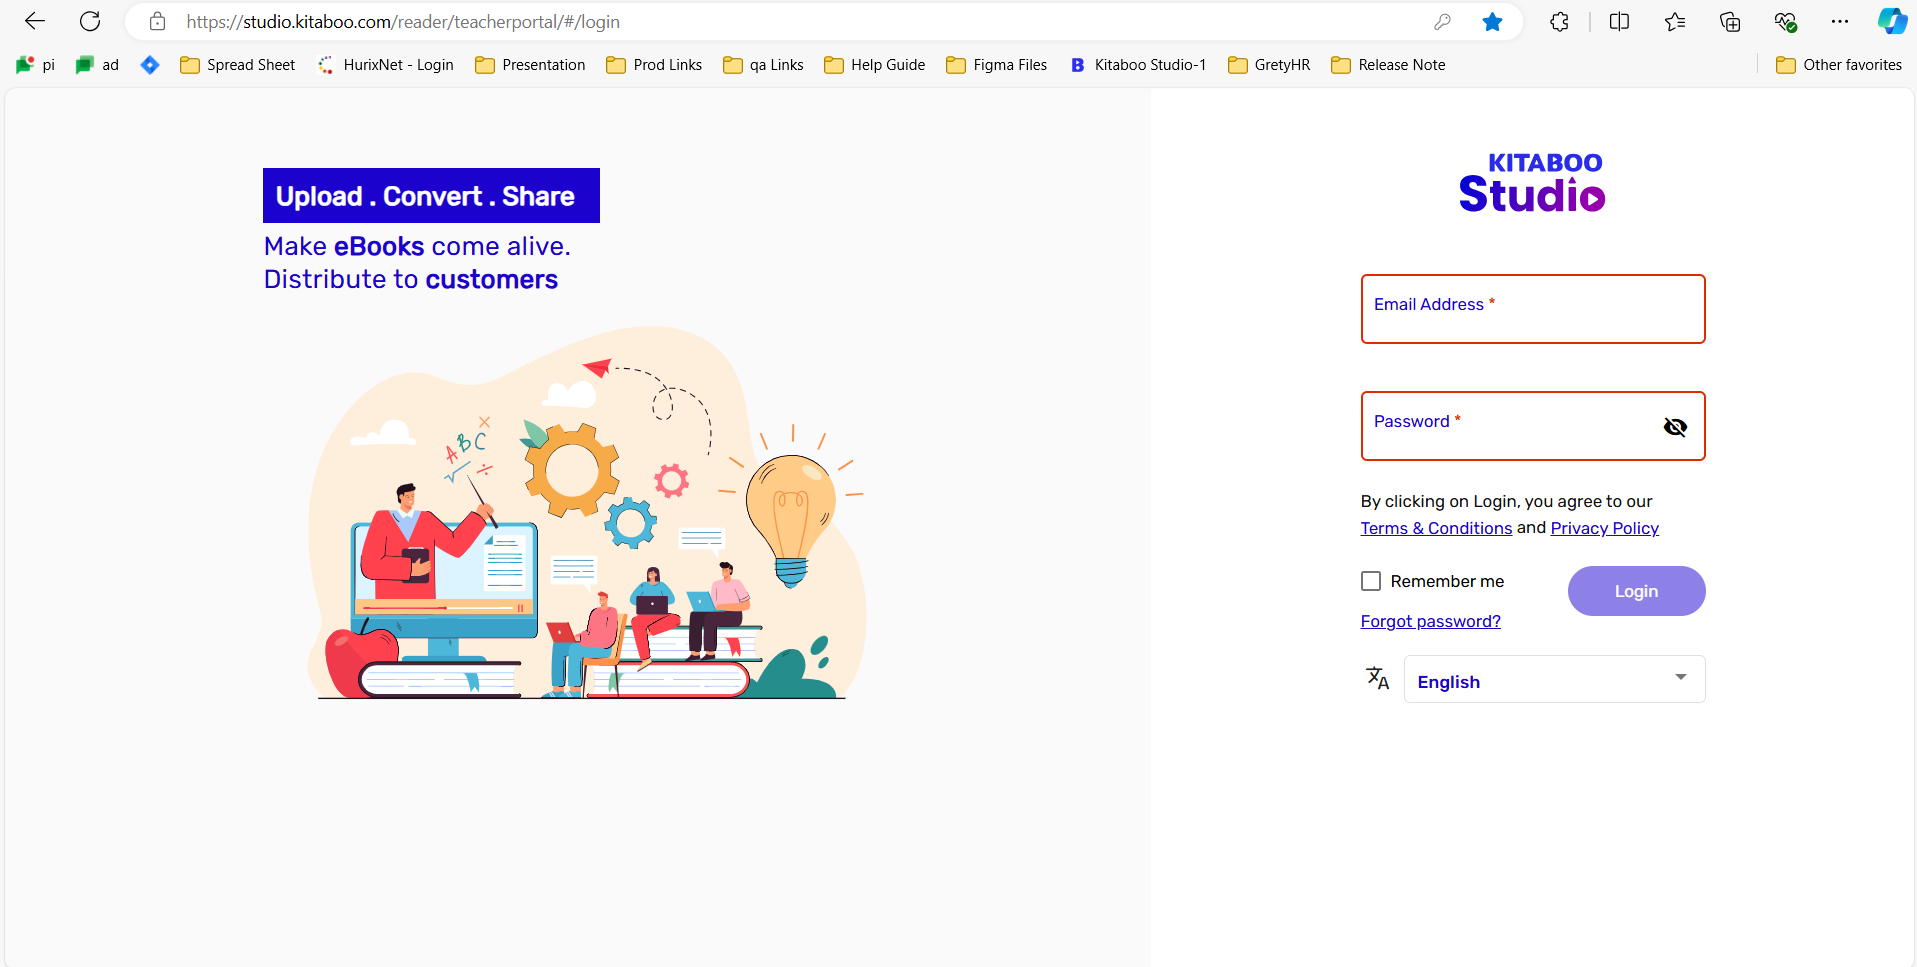 2. Bulk User Delete
- Sign in with your Customer Admin credentials.
- Select the option from the list for which you want to delete e.g. all users, all students, all teachers, all classes.
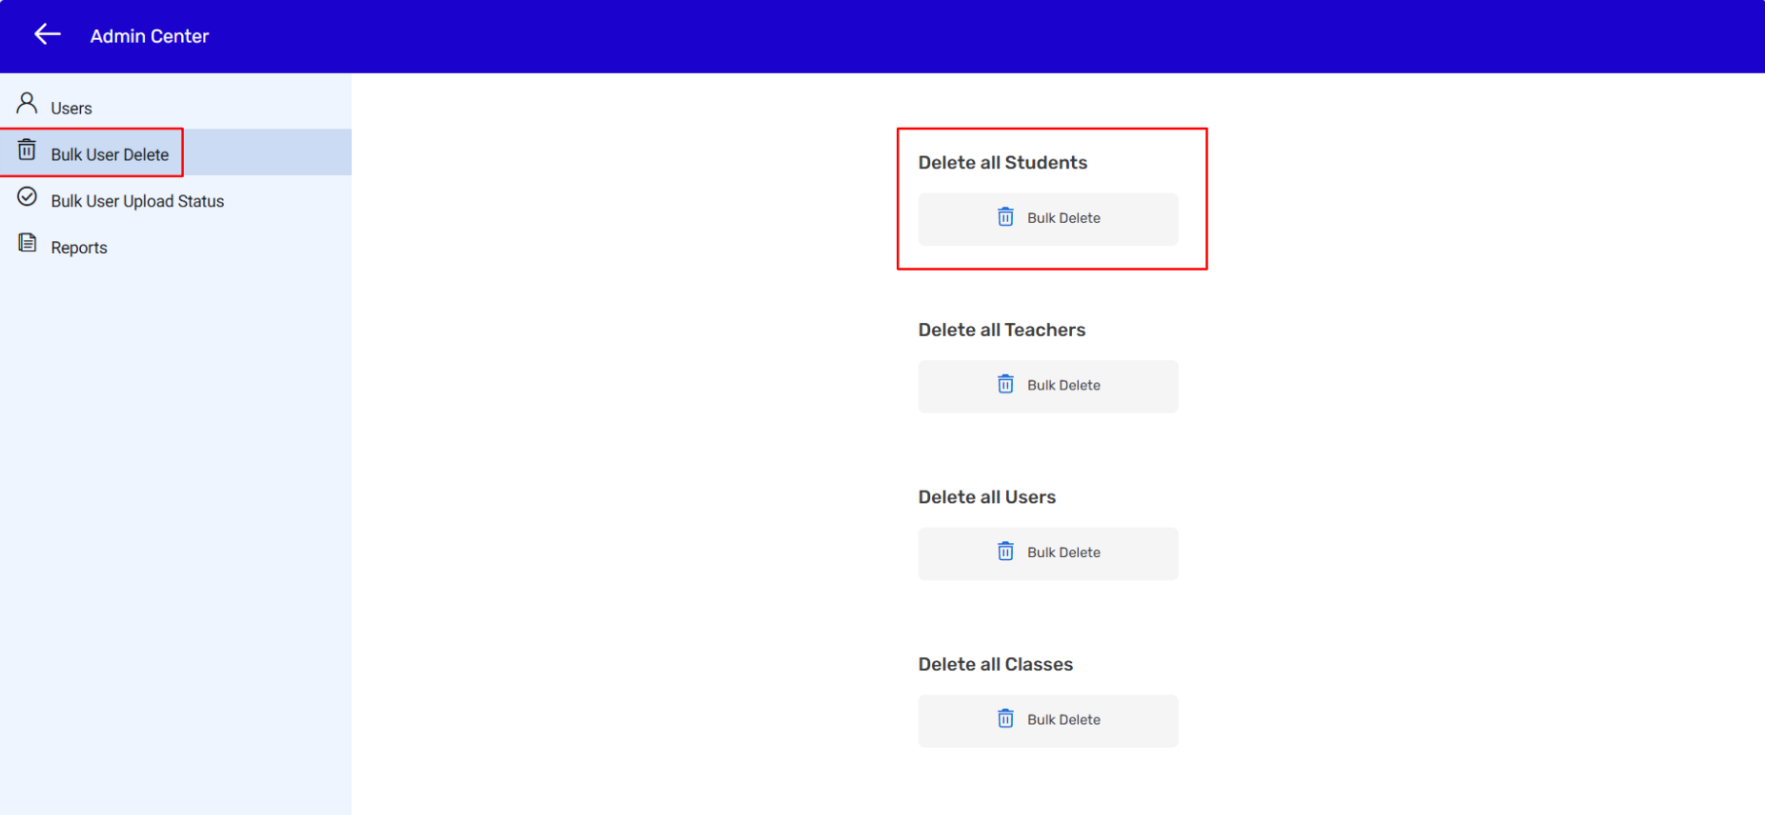
- Click on Proceed to confirm.
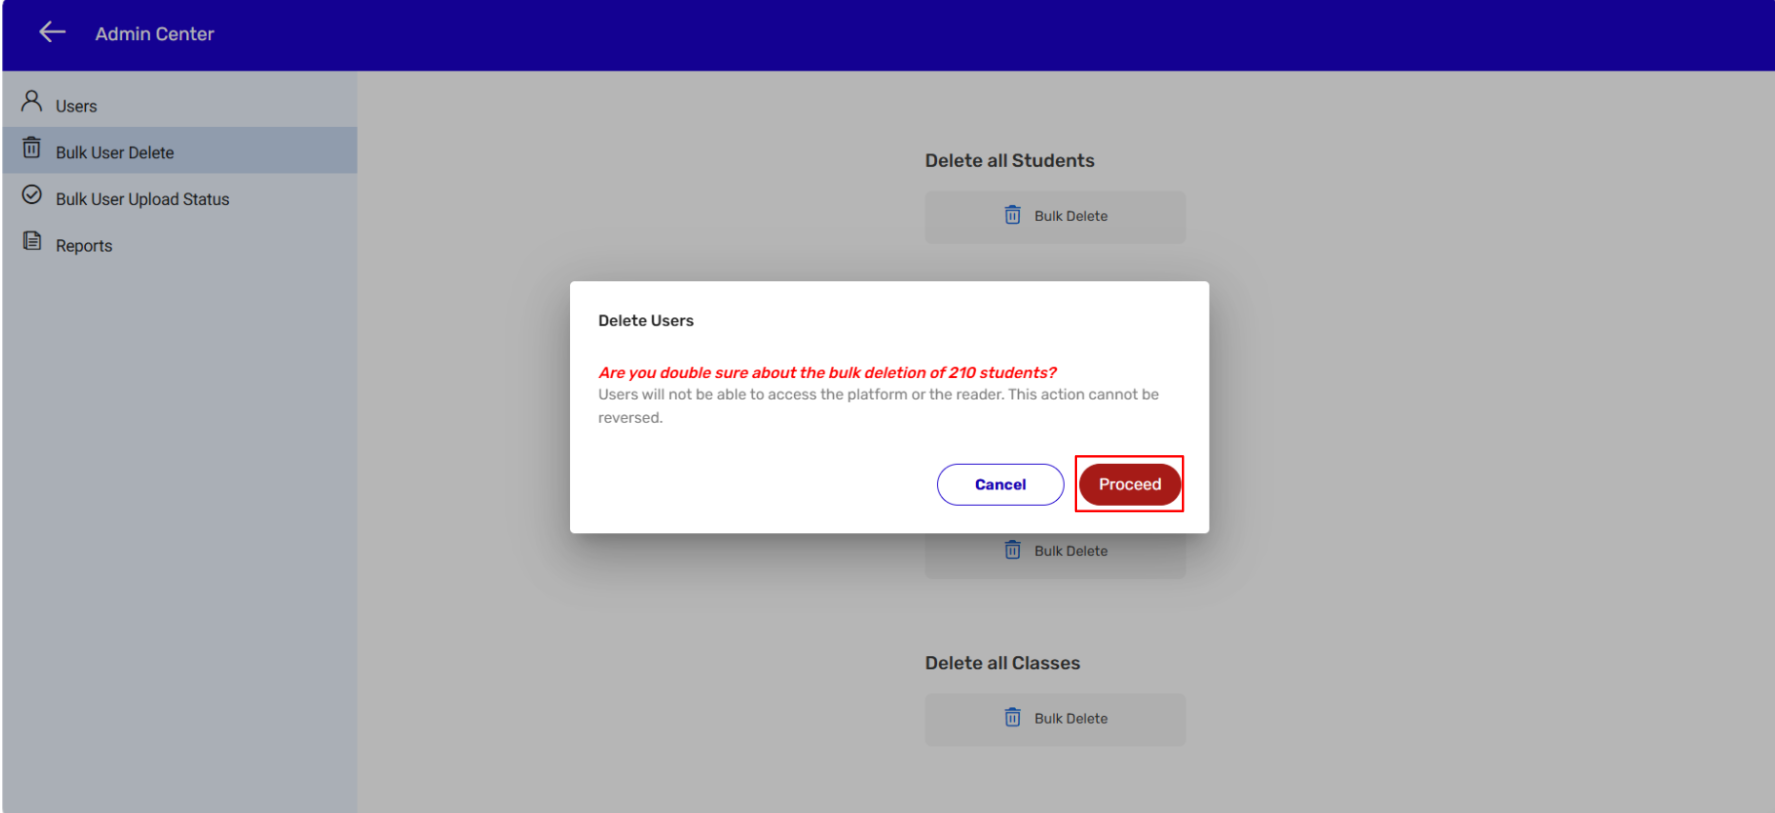
Kitaboo’s Studio Portal empowers you to create, publish and securely distribute your digital
content in multiple formats to your customers. It also empowers you to manage and track your
customers. The portal supports content in three popular languages namely English, German,
and Spanish and is a leading platform for education and online training.
So if you represent a group of educational institutions or a corporate house, what are you
waiting for! Be a part of our customer-driven environment and enjoy our delightful products
with a simple, honest pricing.
Login as Partner/Institute:
The Kitaboo Studio enables an Enterprise Admin to create an admin account within his/her account for a partner as well as a group admin.
Enter your Email Address and Password to proceed further
2. This is adashboard where you can distribute content, perform user creation & class creation.
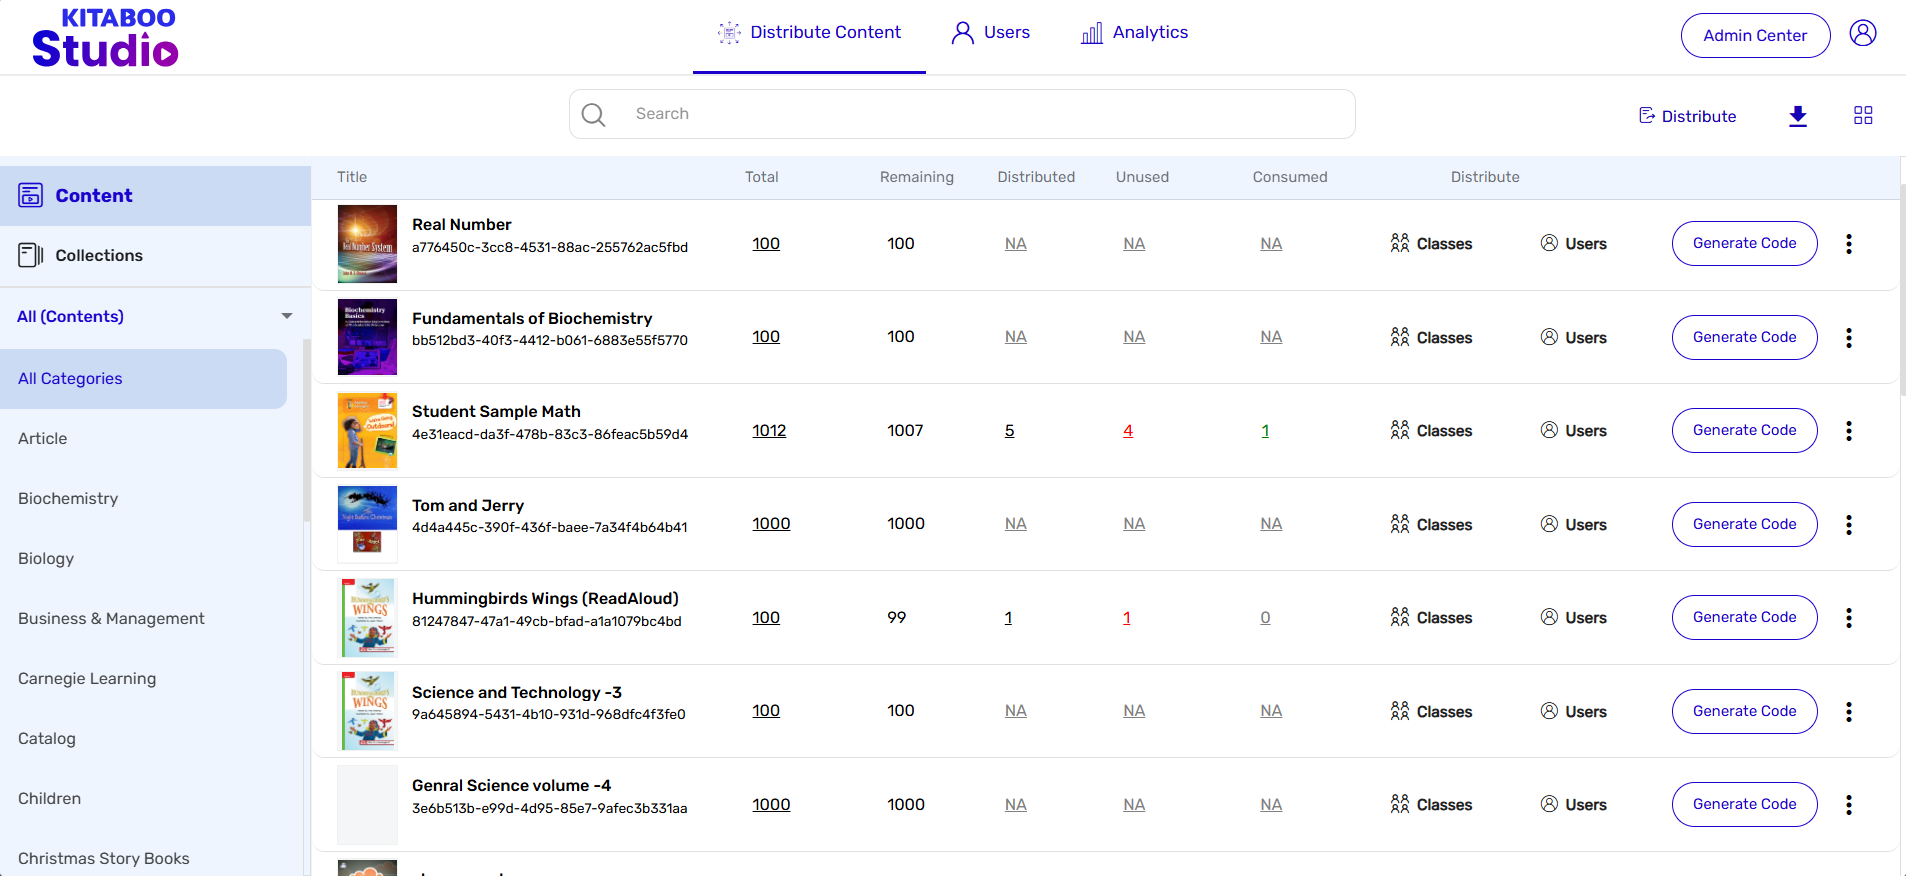
3. Know the Buttons and Links on the Kitaboo UI
3.1.1 The Distribute Content Tab
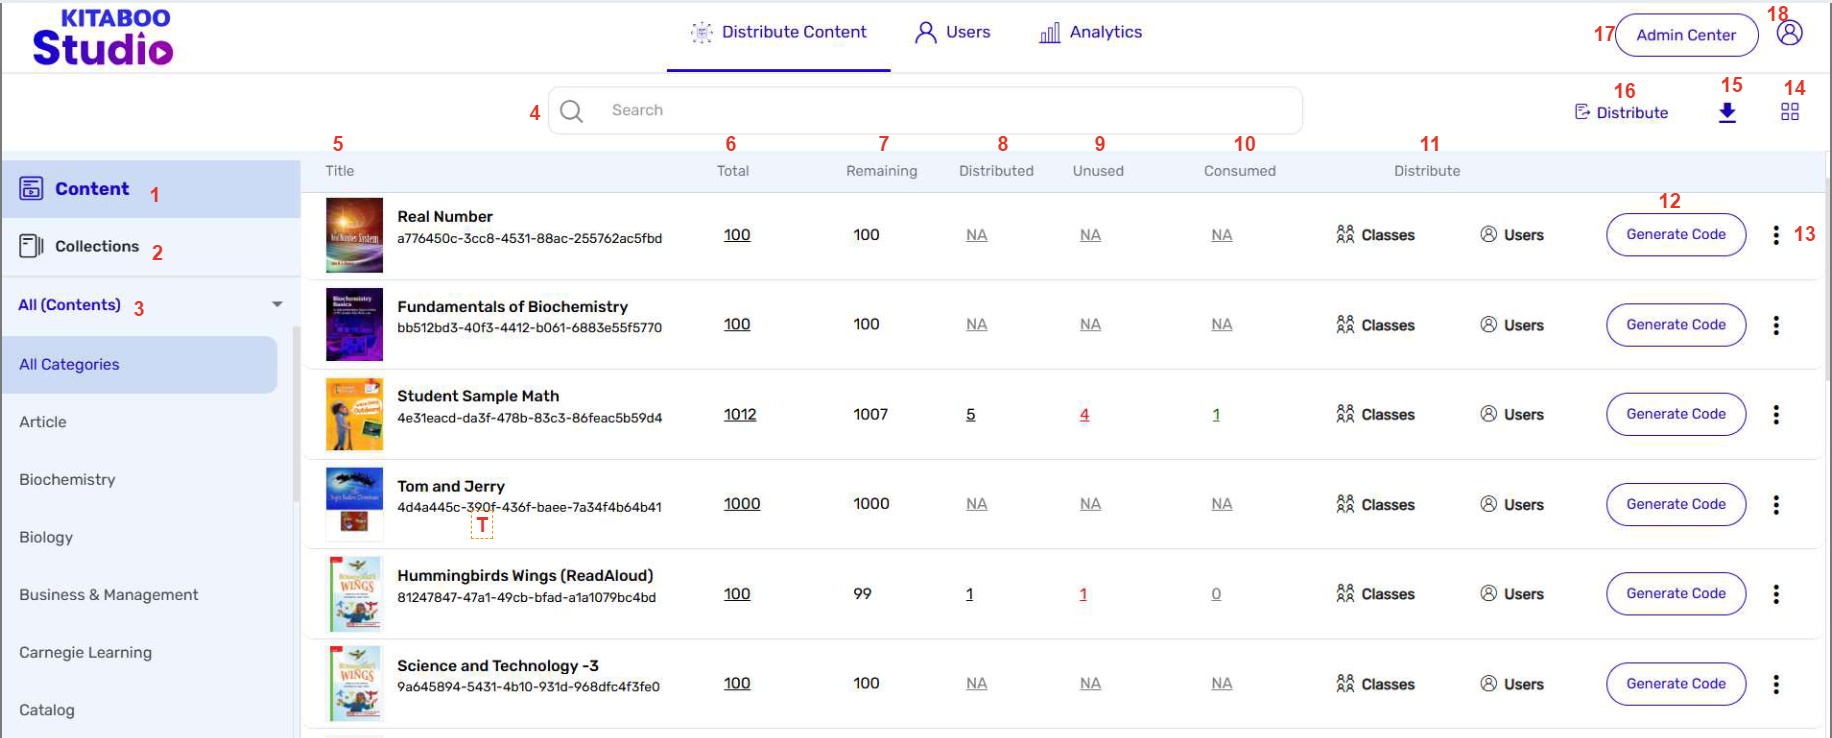
- Content – Lists all the available content on the Kitaboo system.
- Collections – Lists all the available collections (a few pieces of content grouped together) on the Kitaboo system.
- All (Content) – Lists all the available content based on their types or categories, like eBook, ePub, SCORM, audio book, video book etc.
- Search – Lets you do a quick search of content by its name.
- Titles – Displays names of the titles on the Kitaboo system.
- Total – Defines the total number of licenses issued.
- Remaining – Defines how many of the issued licenses are still available for distribution.
- Distributed – Defines the number of licenses that have already been distributed.
- Unused – Defines the number of licenses still to be used or consumed by users.
- Consumed – Defines the number of licenses already used or consumed by users.
- Distribute – Lets you select whether you want to distribute content to a class or a user.
- Generate Code – Enables you to generate access codes for a content in the form
of an excel sheet, which comprises information like total number of licenses, expiry date, device limit, and user type – whether a student, a teacher etc. - More Options Icon – Lets you discover more information about a content or view the access code report for a content.
- Toggle View – Enables you to select the way you want to view the list of content – whether in the form of a simple list or as a grid with thumbnails for the listed content.
- Content Report – Enables you to download a report on the usage of content comprising information like total number of licenses, number of remaining, distributed, unused, and consumed licenses.
- Distribute – This feature allows you to distribute content directly to the end user. You only need to enter the email ID, and the user will be created accordingly. If you wish to distribute content to an existing user, you can do so by entering the email ID of the existing user.
- Profile and Settings – Lets you manage your profile, view a few video tutorials, access the Kitaboo platform help guide, and know about the platform privacy policies and terms and conditions.
- Admin Center – Lets the main institute admin view or edit the profile of your existing customer(s), including the password or add a new user.
3.1.2 The Users Tab
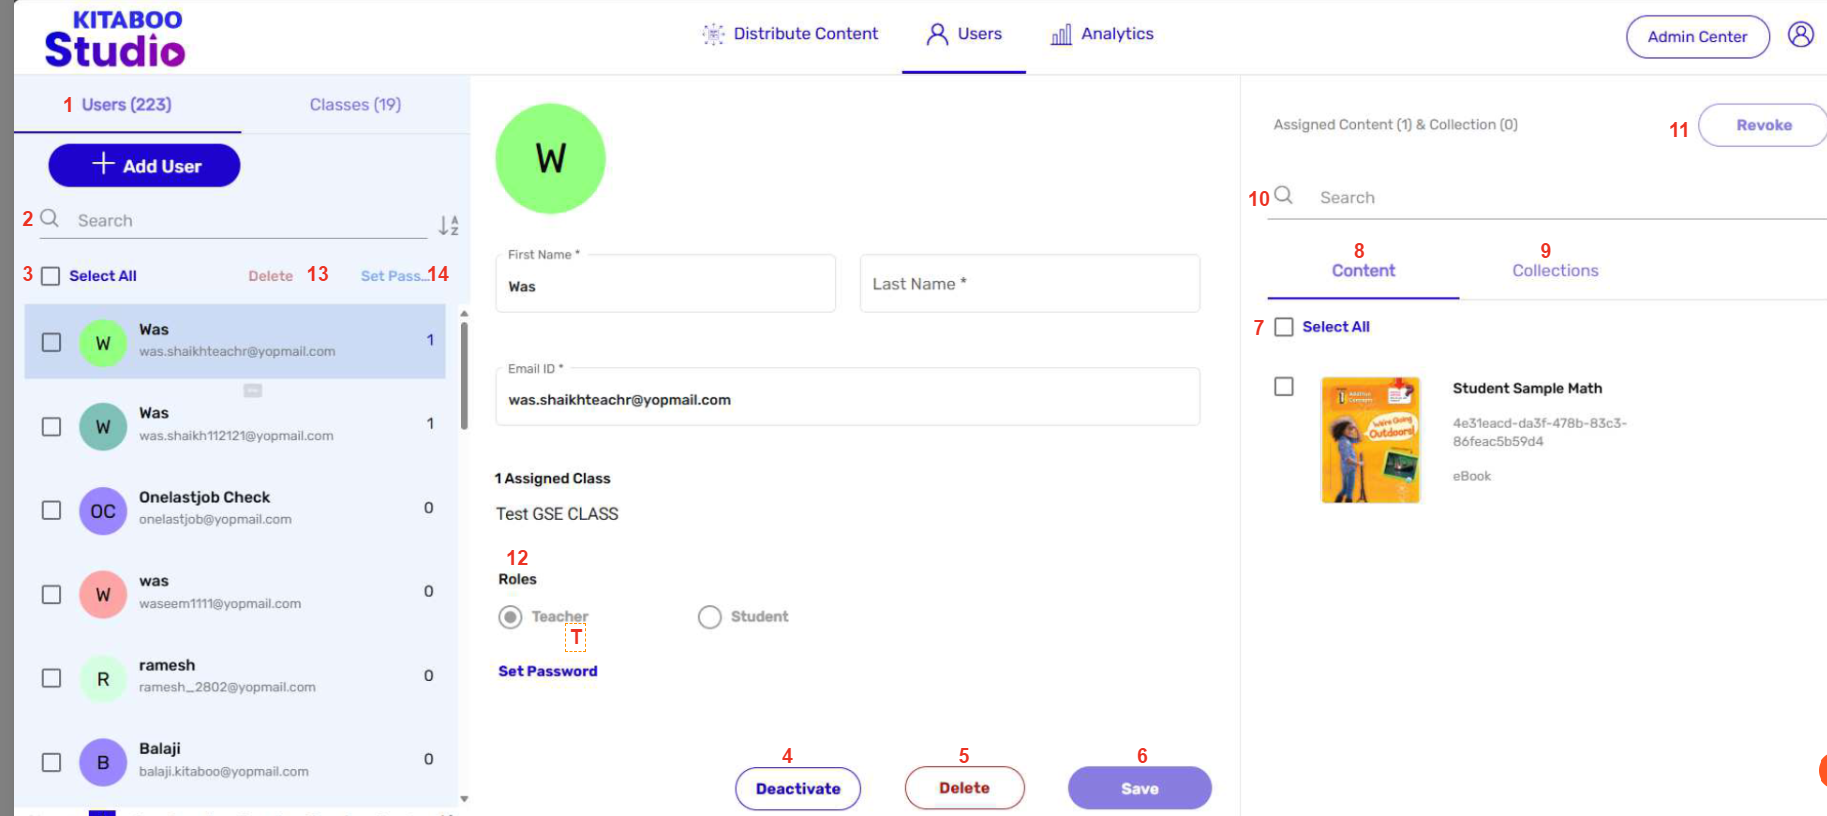
- Add User – Enables you to add a new user or multiple users to the Kitaboo system.
- Search – Enables you to do a quick search of an existing user.
- Select All – Lets you select all the listed users if you want to select all of them/few of them from the users list.
- Deactivate – Enables you to deactivate or suspend an existing user. A deactivated user exists on the Kitaboo system, but will not be able to access content until he/she remains deactivated. He/she can be restored.
- Delete – Enables you to delete or remove a user from the Kitaboo system. A deleted user cannot be restored.
- Save – Lets you save the edits.
- Select All – Lets you select all the listed pieces of content/collections if you want to revoke all of them from a user.
- Content – Displays a list of content assigned to a user.
- Collections – Displays a list of collections assigned to a user.
- Search – Enables you to do a quick search of a content or a collection.
- Revoke – Enables you to revoke the selected pieces content or collections from access
by a user. - Roles – Lets you define the role of the to-be-added user – whether a teacher or a student.
- Delete Selected Users – Lets you delete all the listed users if you want to delete all of them/few of them from the users list.
- Set Password – Enable you to set password for selected user or All user
3.1.3 The Users Tab – Class
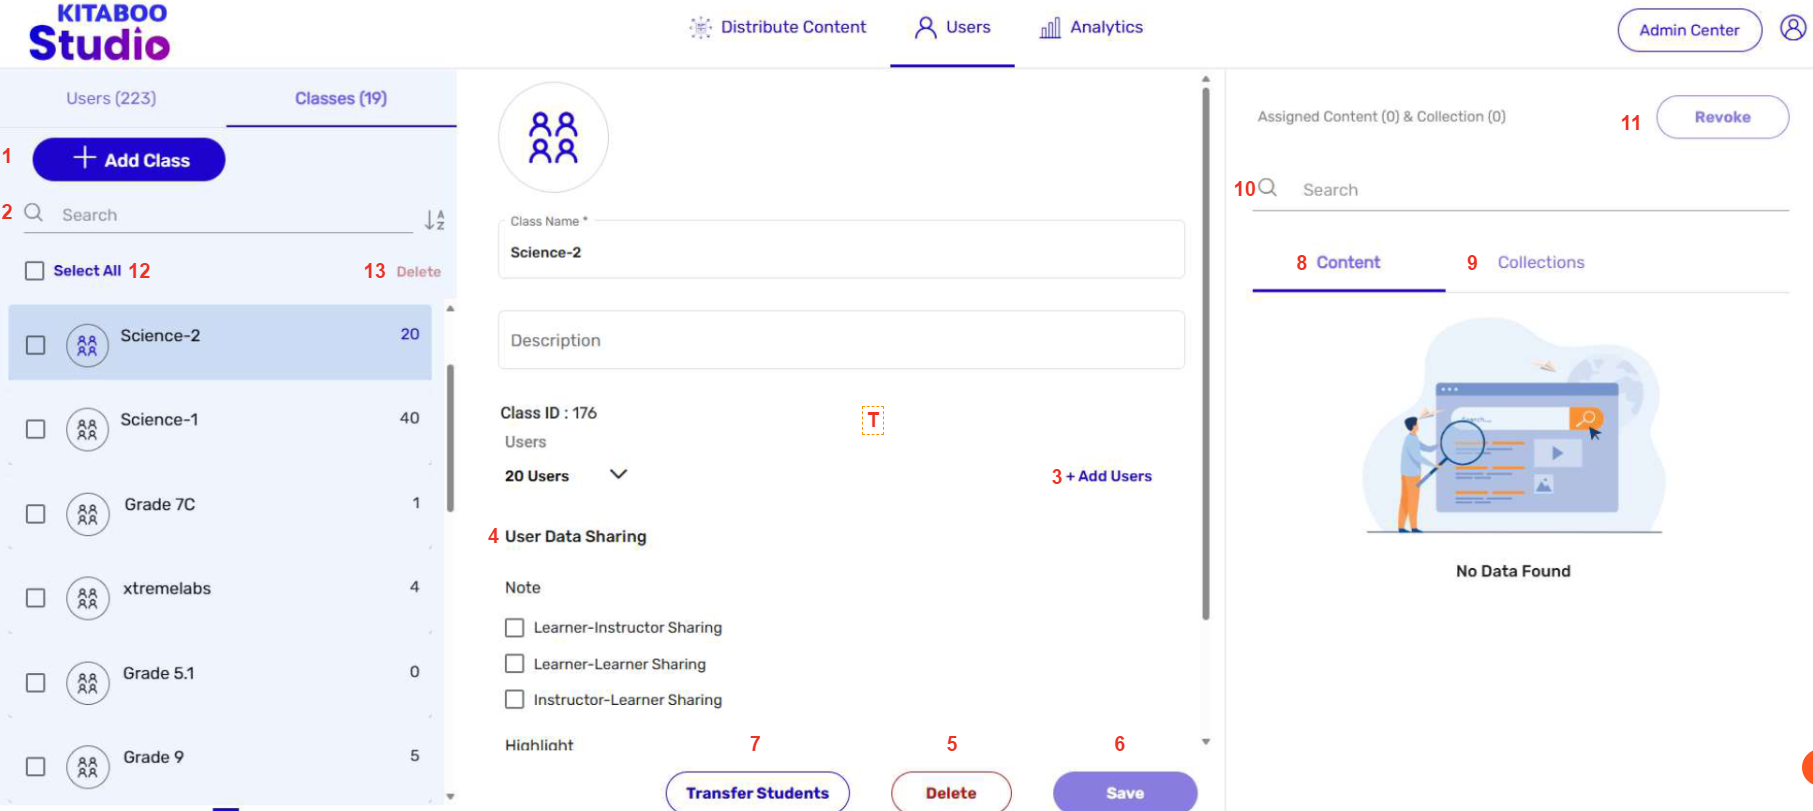
- Add Class – Enables you to add a new class to the Kitaboo system.
- Search – Enables you to do a quick search of an existing class.
- Add Users – Lets you add new users to an existing class.
- User Data Sharing – Lets you define the data like notes and highlights sharing options by selecting the relevant checkboxes.
- Delete – Enables you to delete or remove an existing class from the Kitaboo system. A deleted class cannot be restored.
- Save – Lets you save the edits.
- Transfer Students – Enables you to transfer the students from one class to another class.
- Content – Displays a list of content assigned to a class.
- Collections – Displays a list of collections assigned to a class.
- Search – Enables you to do a quick search of a content or a collection.
- Revoke – Enables you to revoke the selected pieces content or collections from access by a class.
- Select all – Lets you select all the listed classes if you want to select all of them/few of them from the class list.
- Delete Selected Class– Lets you delete all the listed classes if you want to delete all of them/few of them from the class list.
1. Distribute to Class –
1. 1 Distributing Content to a Class
- Sign in with your Customer Admin credentials.
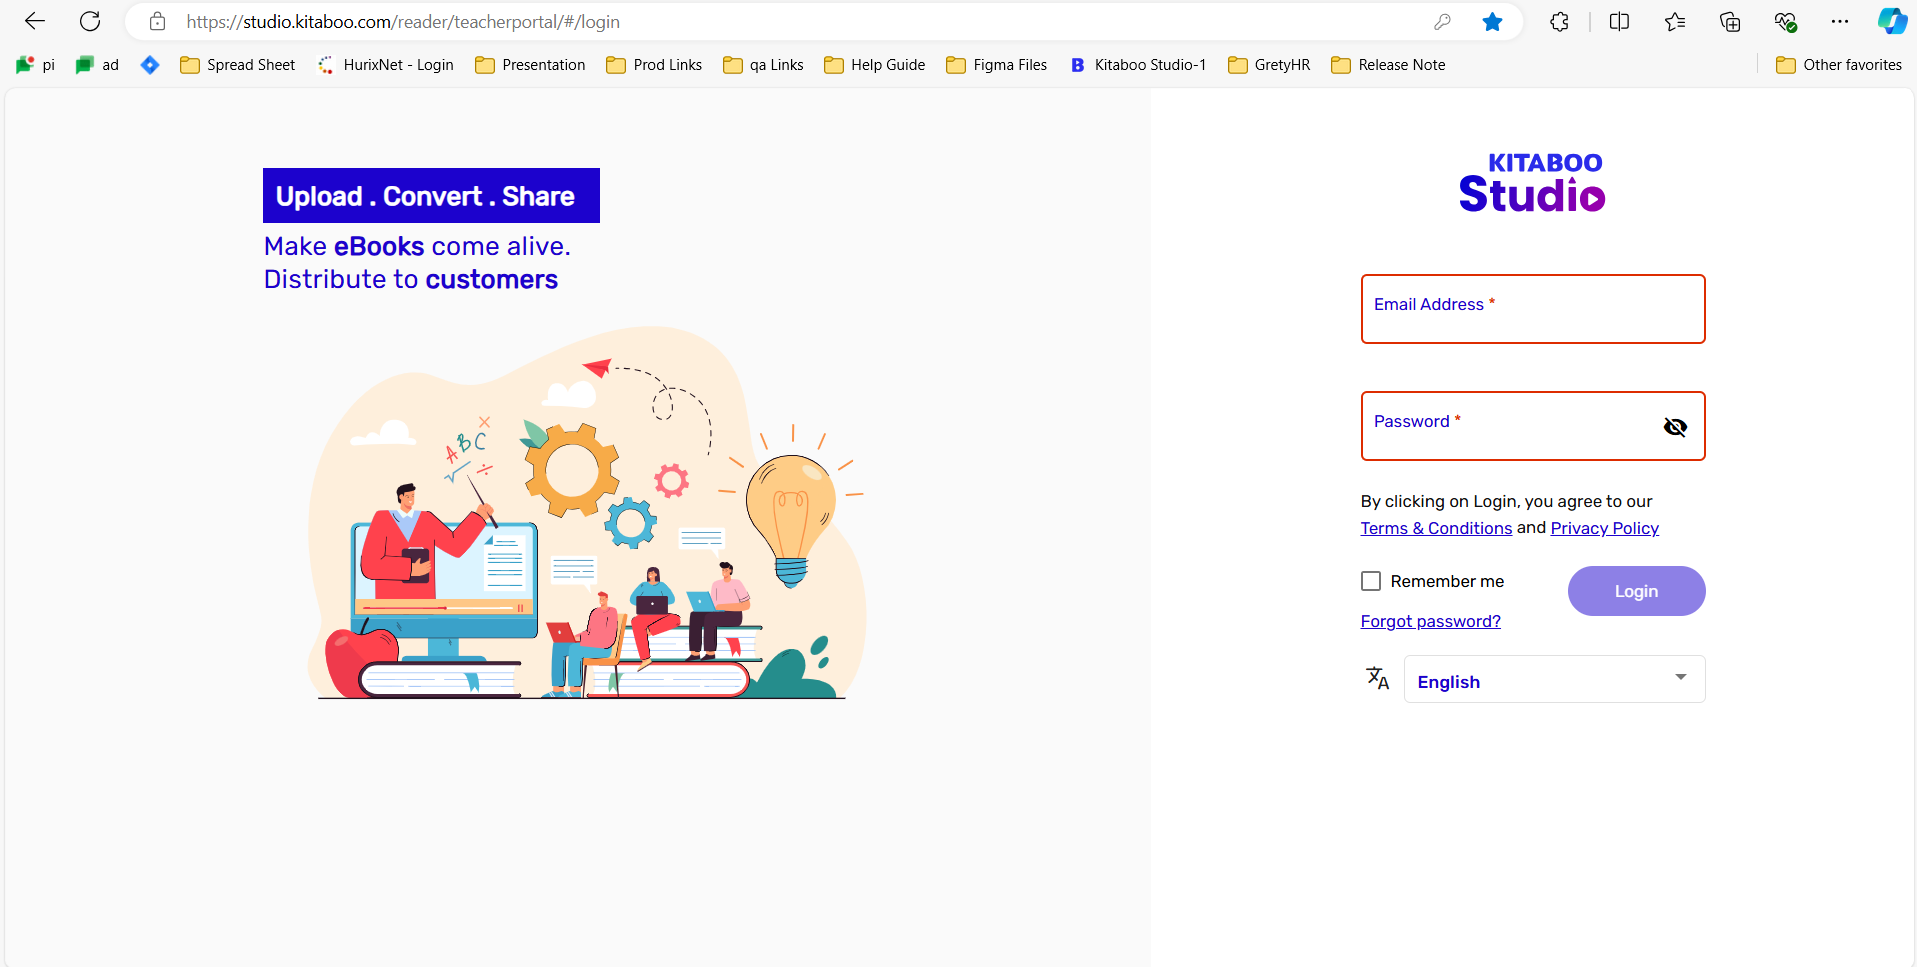
- On the Distribute Content tab, you have three options – Contents, Collections, and All (Content) – to use for distributing a content.
NOTE: The Contents option will be the default selection.
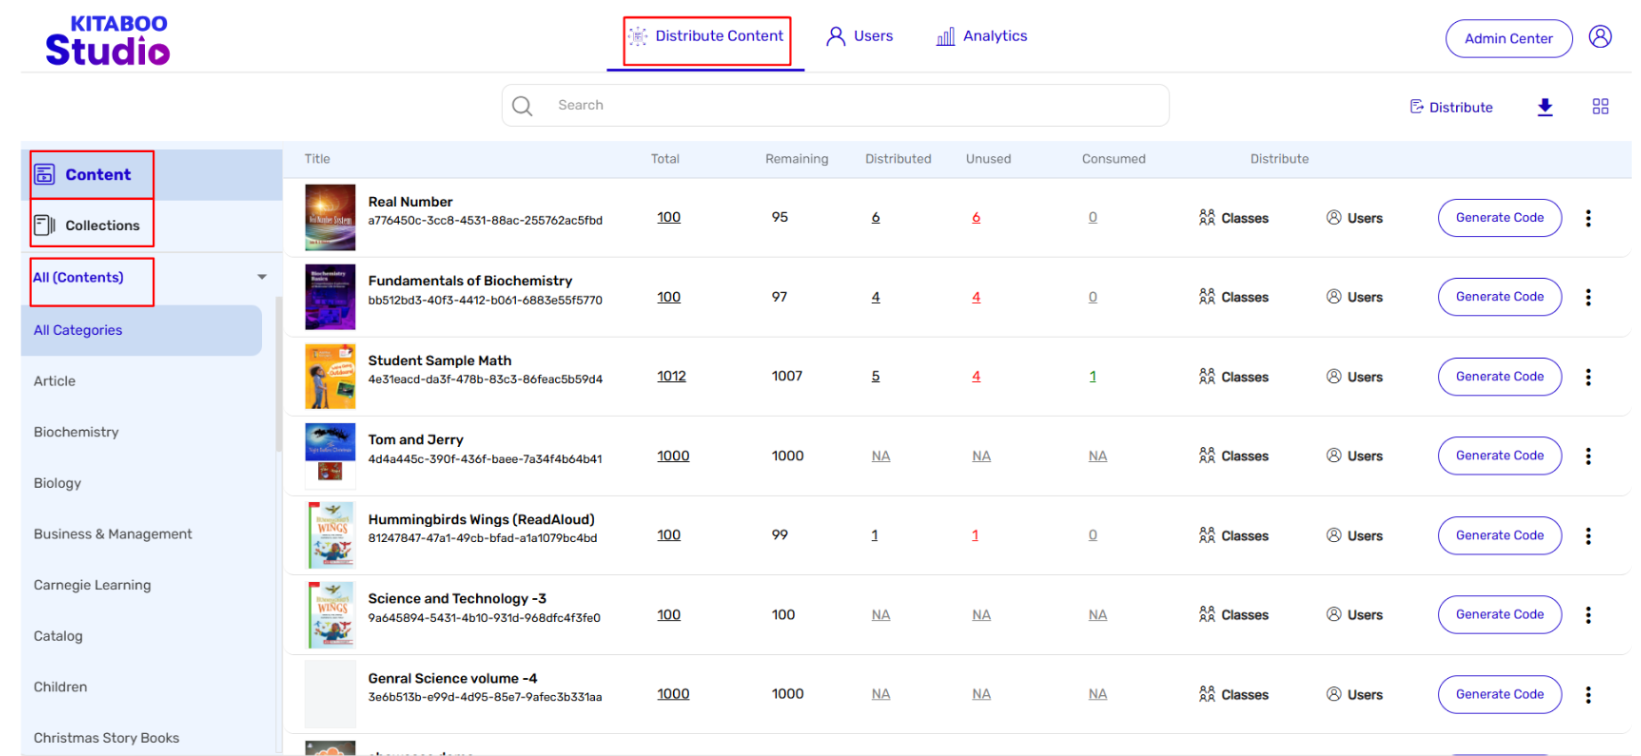
- Click on any of the three options. > Click on the Class against the title you want to distribute.
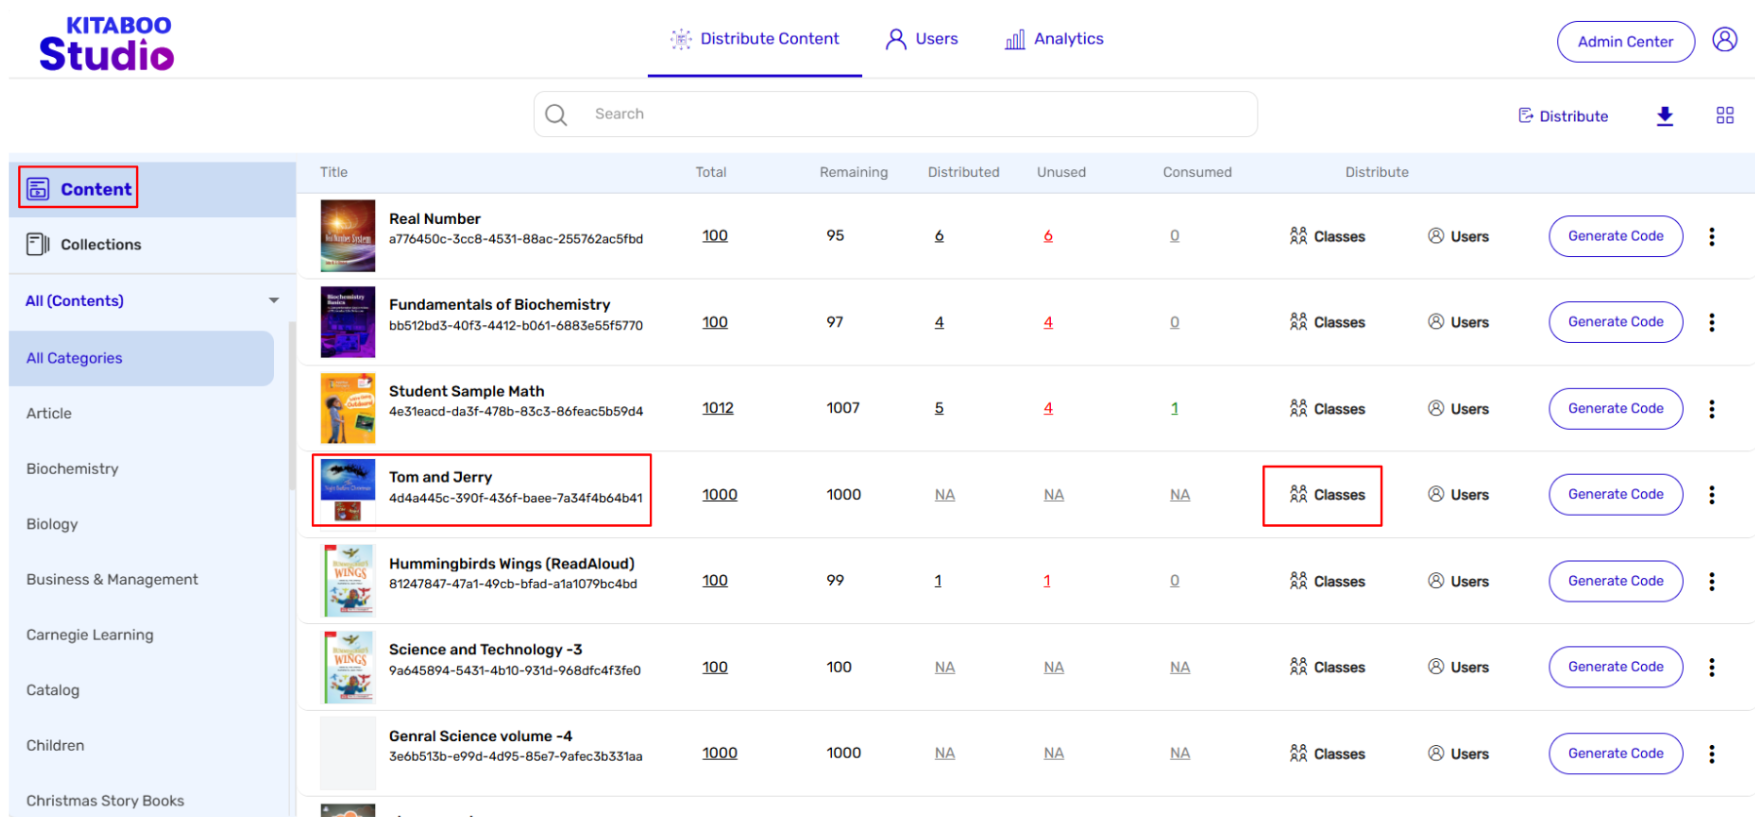
- Select Class from the list. > Check the Restriction box if you want the content to be accessible to teachers only. > Select the Order No. > Click on Distribute.
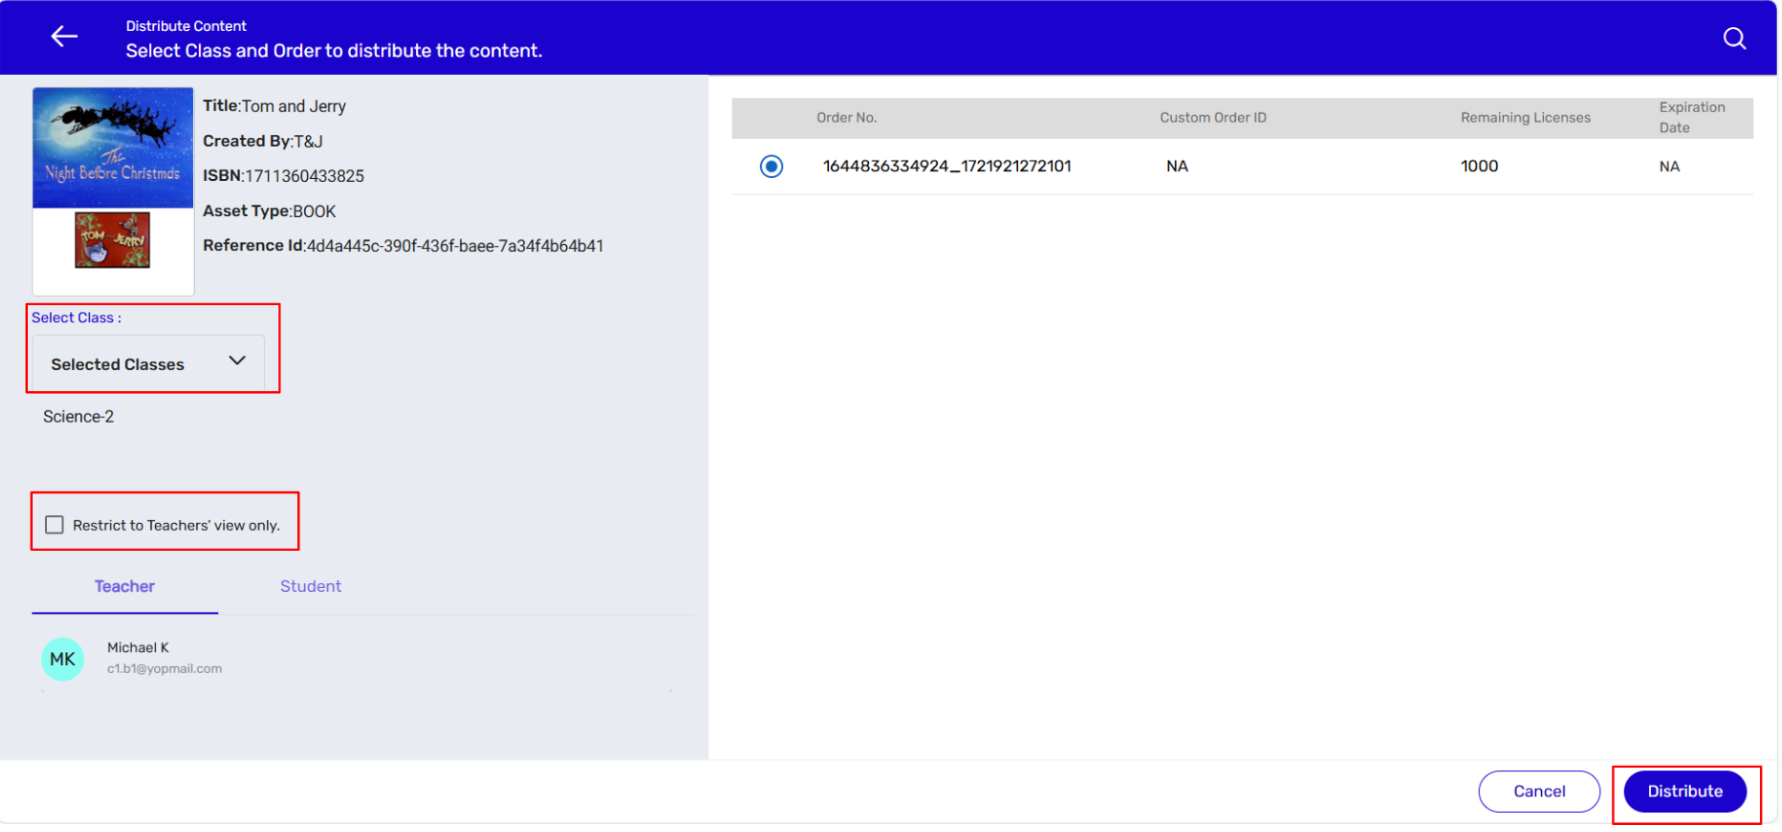
1.2 Distributing Content to All Classes At Once
- Sign in with your Customer Admin credentials.
- On the Distribute Content tab, click on Class against the title you want to distribute.
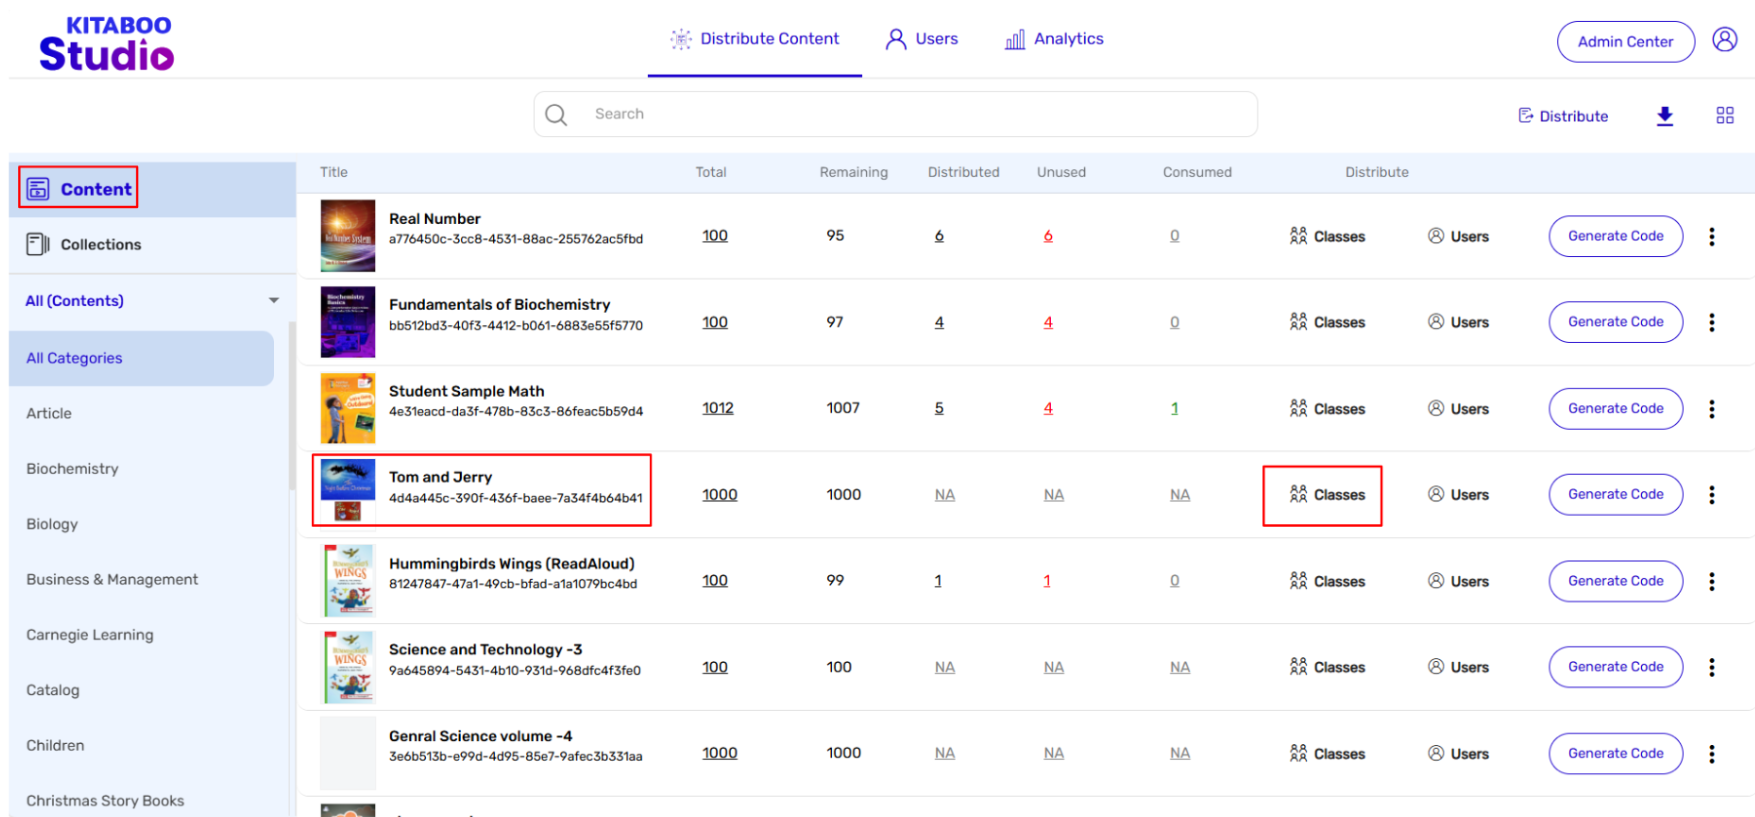
- Click on the Select Class drop-down menu arrow. A pop-up will appear which will allow you to select either a particular class or the entire list of classes by checking the All Classes box. As you want to distribute content to the entire list of classes, select the All Classes box. > Provide an email ID in the field that appears once you select the All Classes box. > Click on the Submit button.
NOTE:
● Once you click on the Submit button, the server will start the process of assigning content one-by-one. After the process is completed, the system will send an email to the email ID you have provided with.
● The system will assign content to both set of classes – those you had created manually as well as to those that were created by using the group access code.
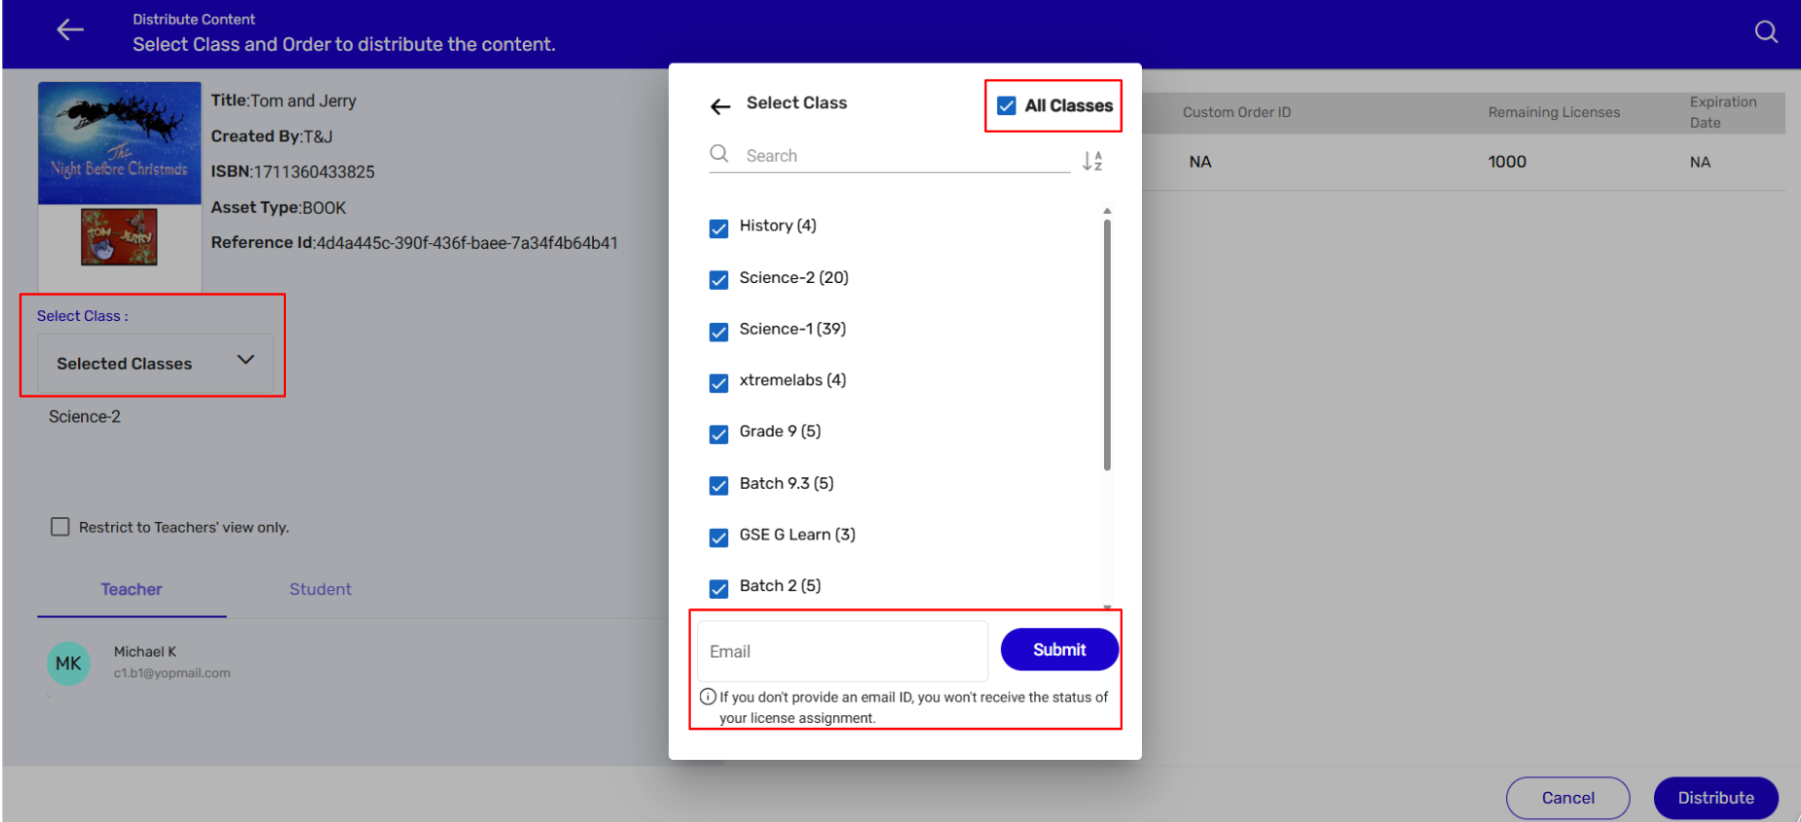
- Select the Order. > Click on the Distribute button. A confirmation message will appear for posting a successful request for bulk distribution.
Important: You must have a sufficient number of licenses to complete the bulk distribution
process.
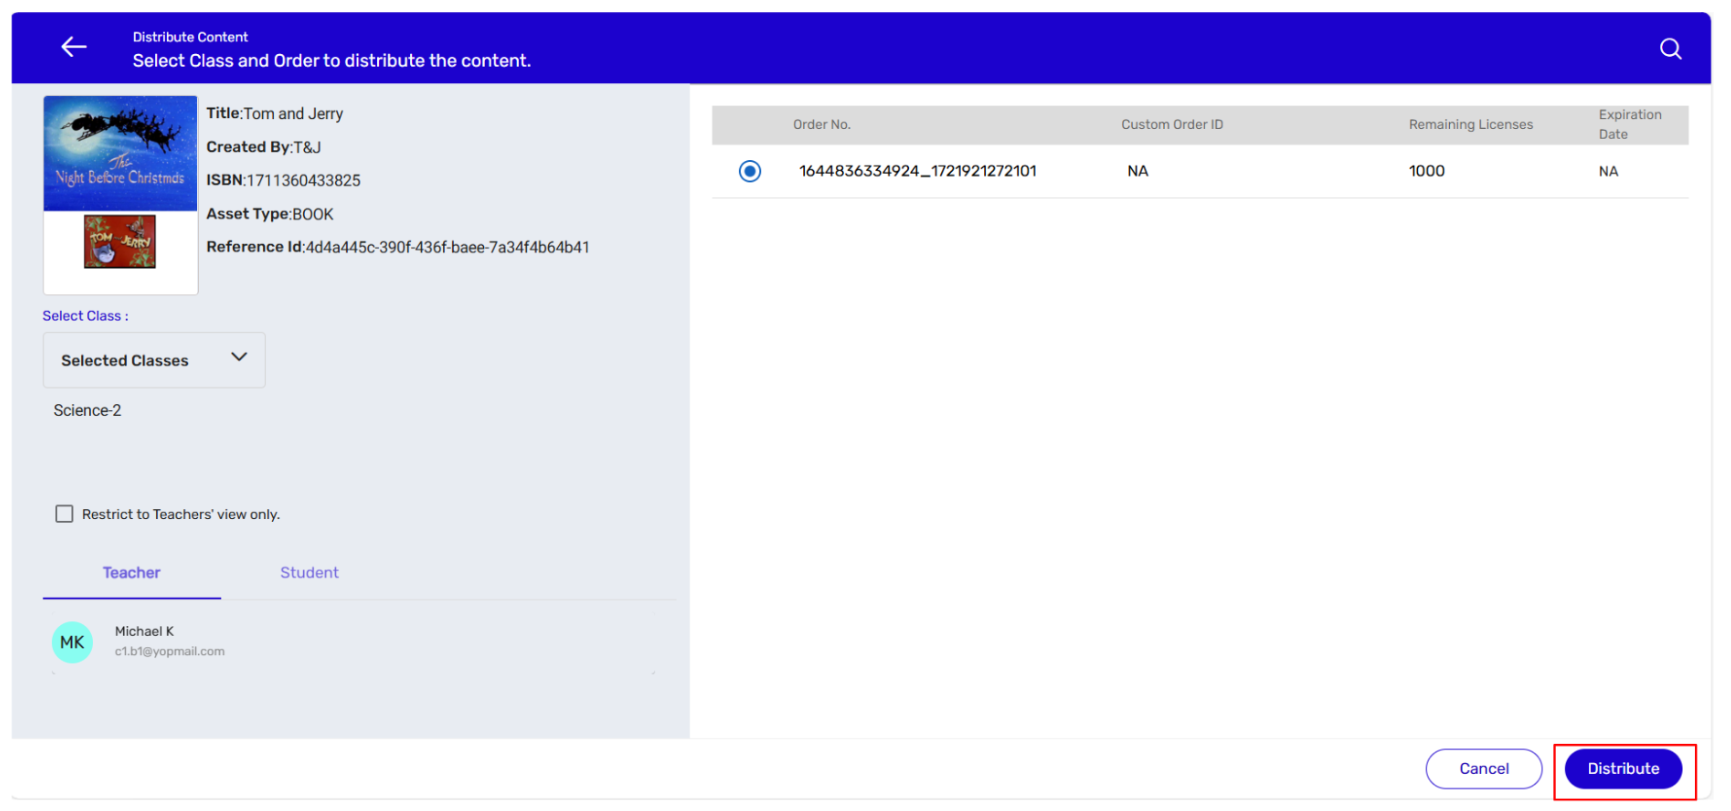
1.3 Distributing Content to Multiple Class
- Sign in with your Customer Admin credentials.
- On the Distribute Content tab, click on Class against the title you want to distribute.
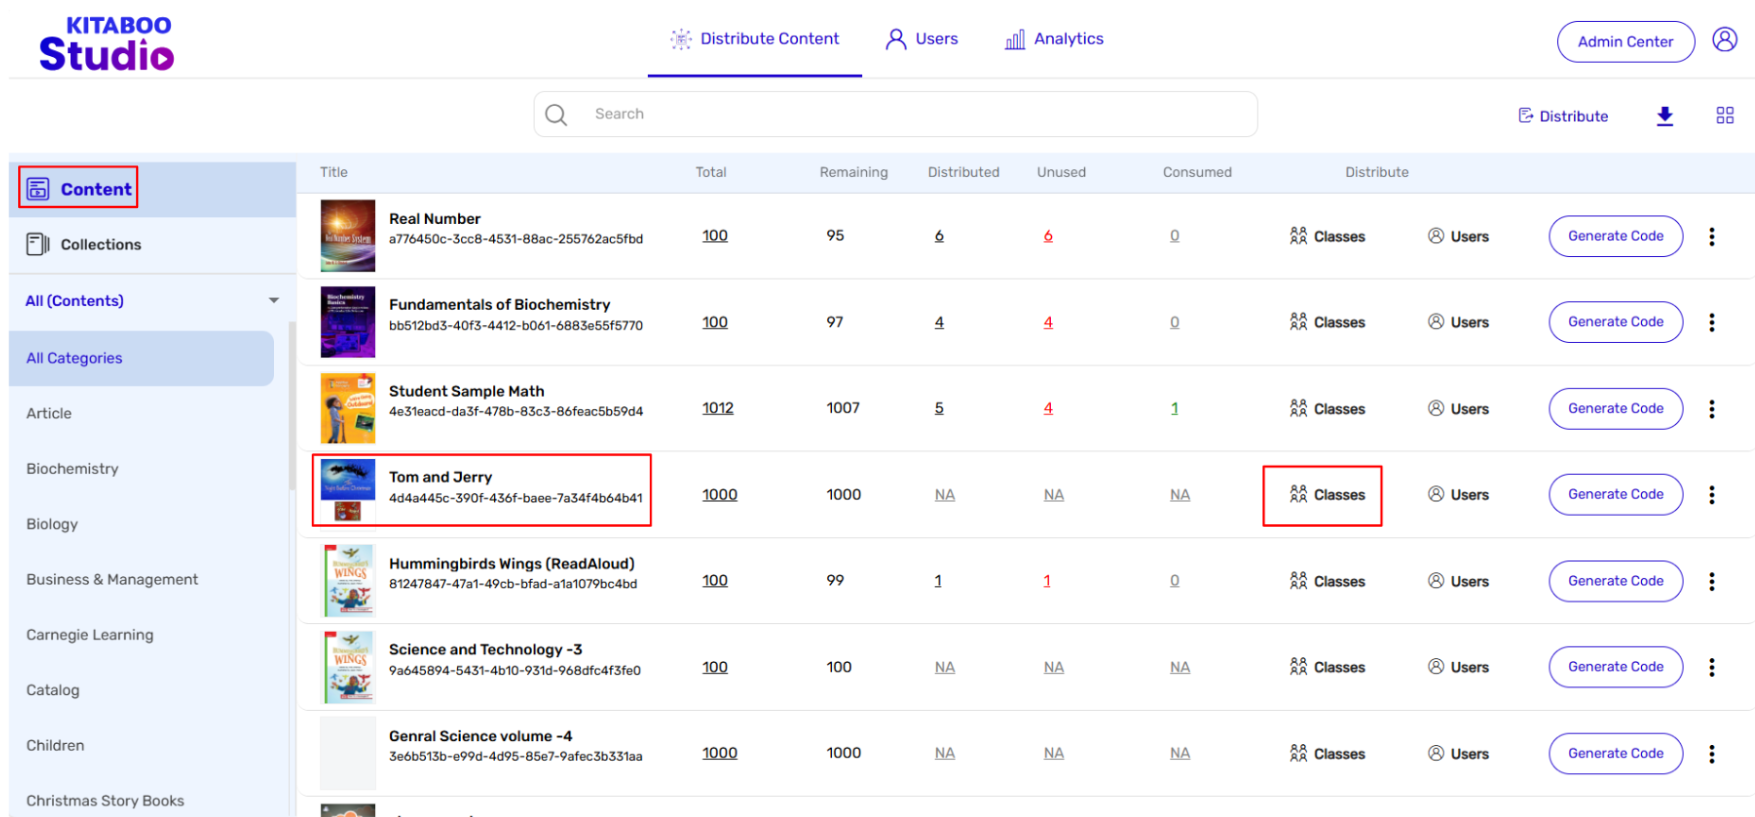
- Click on the Select Class drop-down menu arrow. A pop-up will appear which will allow you to select either a particular class or a Check-Box to select multiple classes. As you want to distribute content to the Selected list of classes. Provide an email ID in the field that appears once you select the Multiple Classes box. > Click on the Submit button.
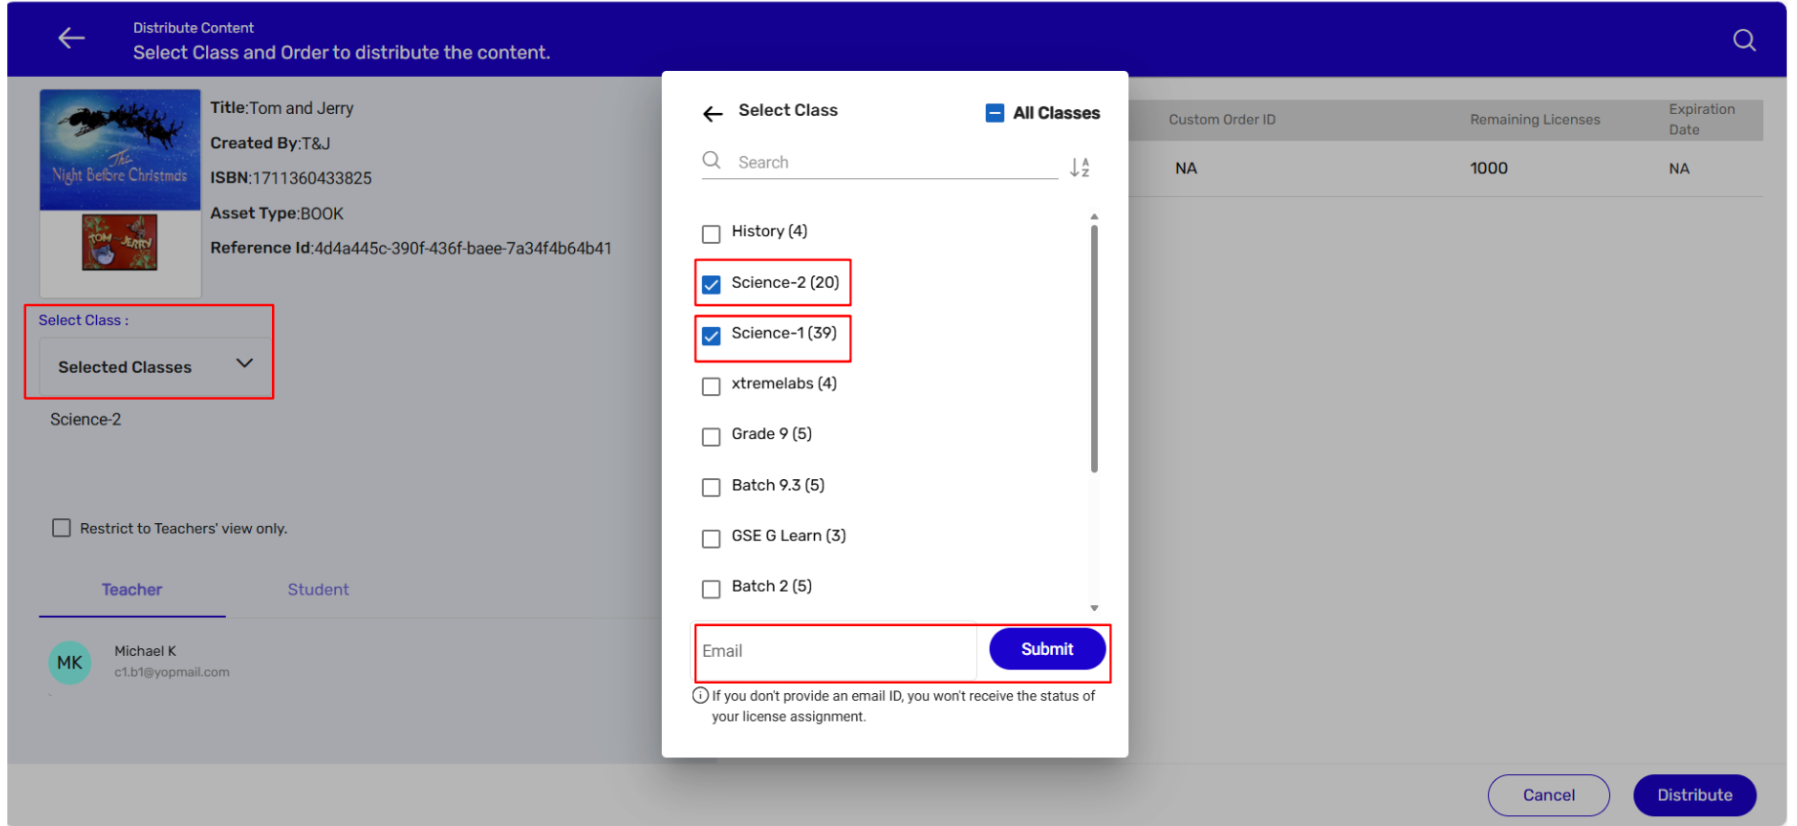
NOTE:
● Once you click on the Submit button, the server will start the process of assigning
content one-by-one. After the process is completed, the system will send an email to
the email ID you have provided with.
● The system will assign content to both set of classes – those you had created
manually as well as to those that were created by using the group access code.
- Select the Order. > Click on the Distribute button.
Important: You must have a sufficient number of licenses for completing the bulk distribution process.
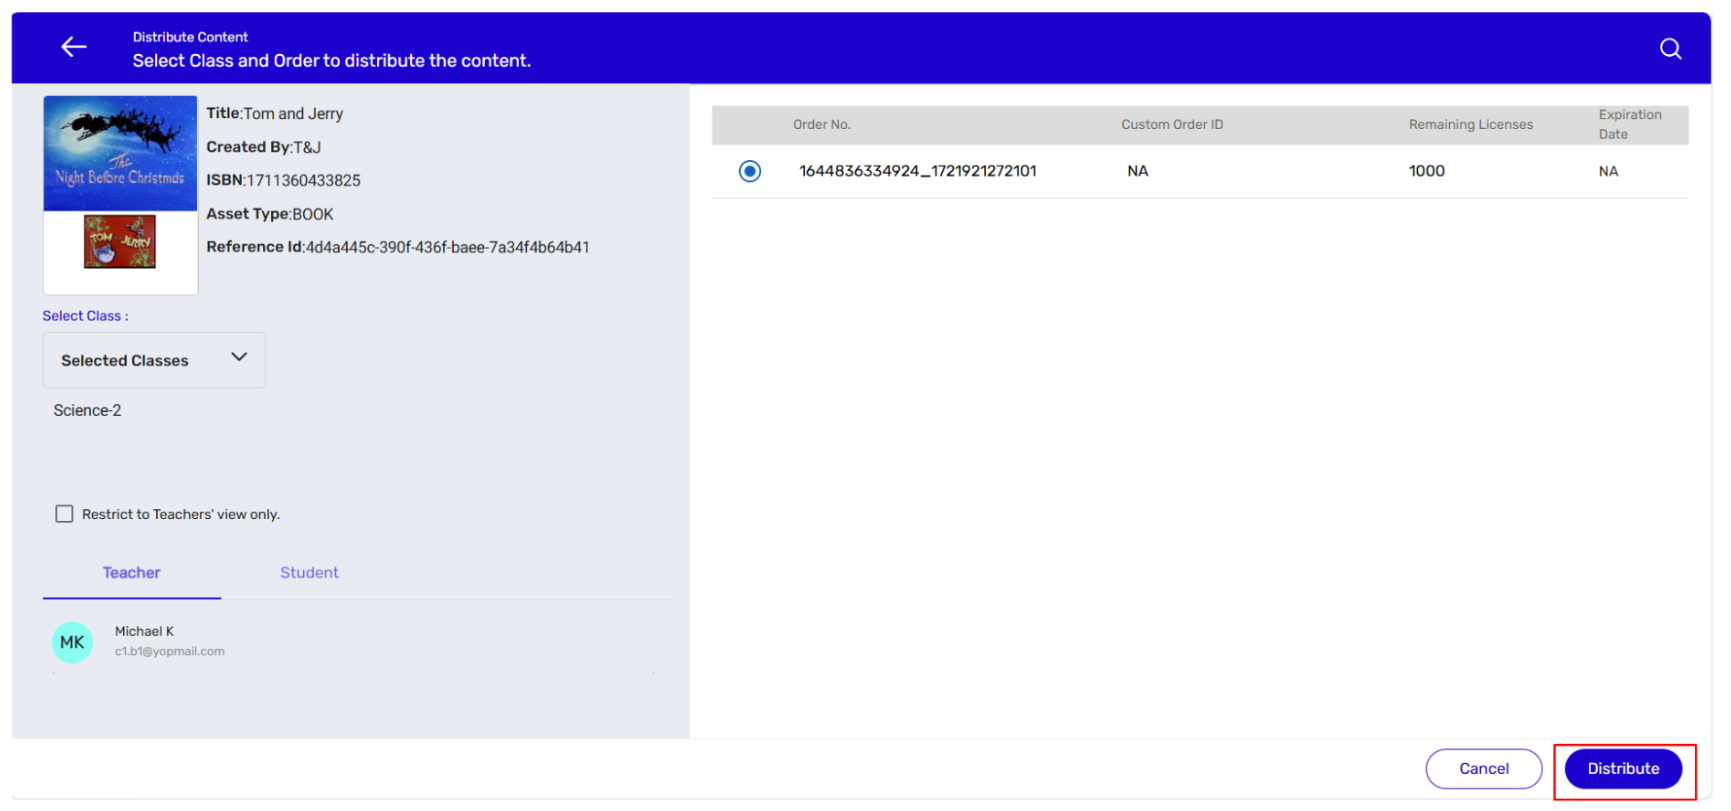
2. Distribute to User
- Sign in with your Customer Admin credentials.
- Go to the Distribute Content tab. > Click on Users aligned to the title you want to distribute. Go to the Distribute Content tab. > Click on Users aligned to the title you want to distribute.
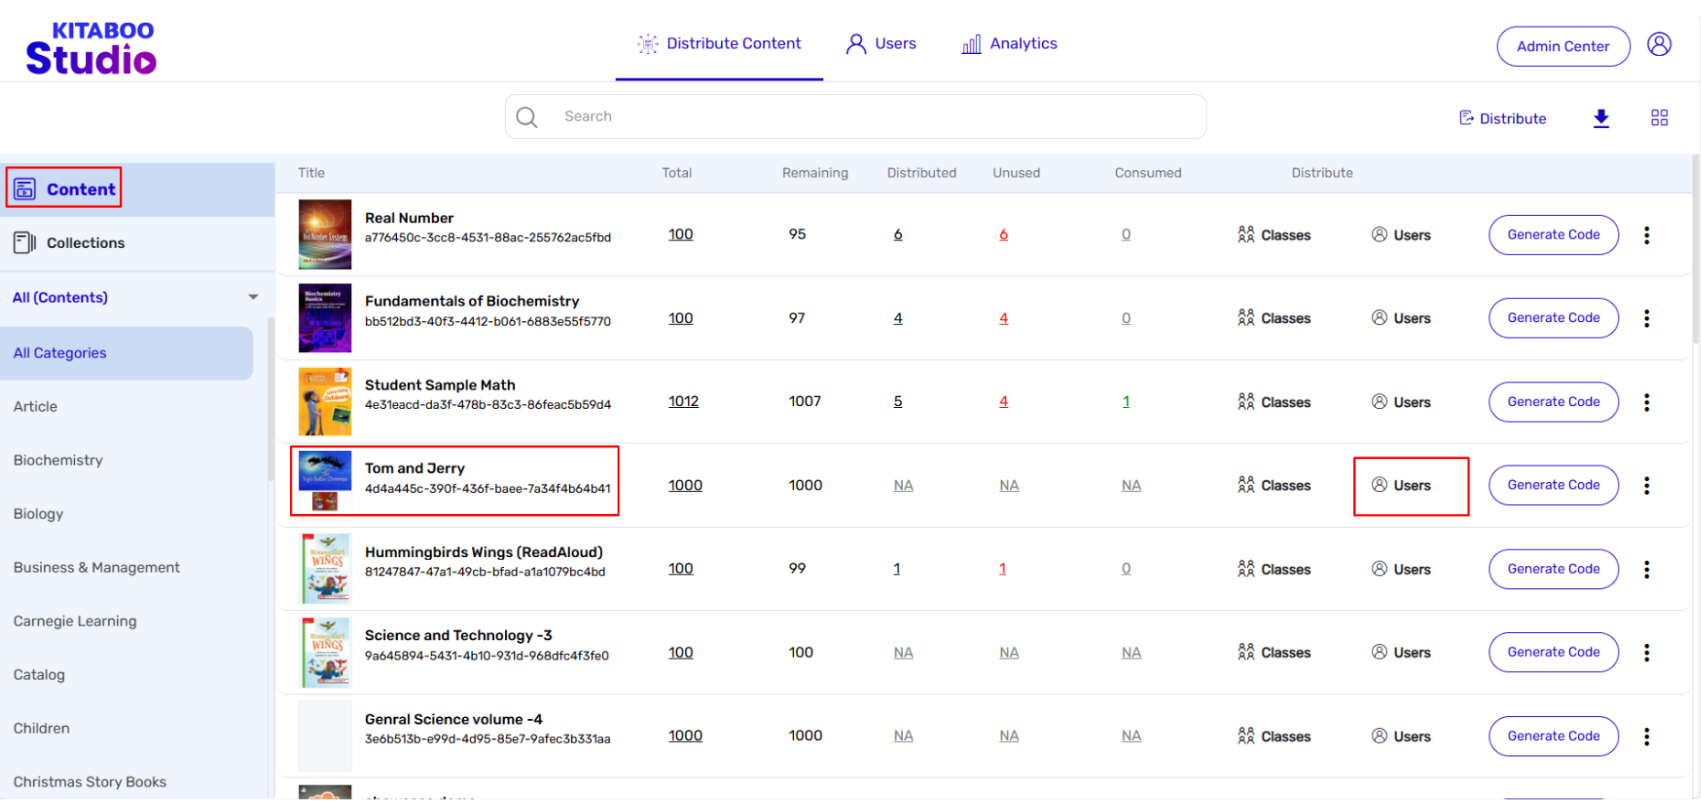
- Select User(s) from the list. > Select the Order No. > Click on Distribute.
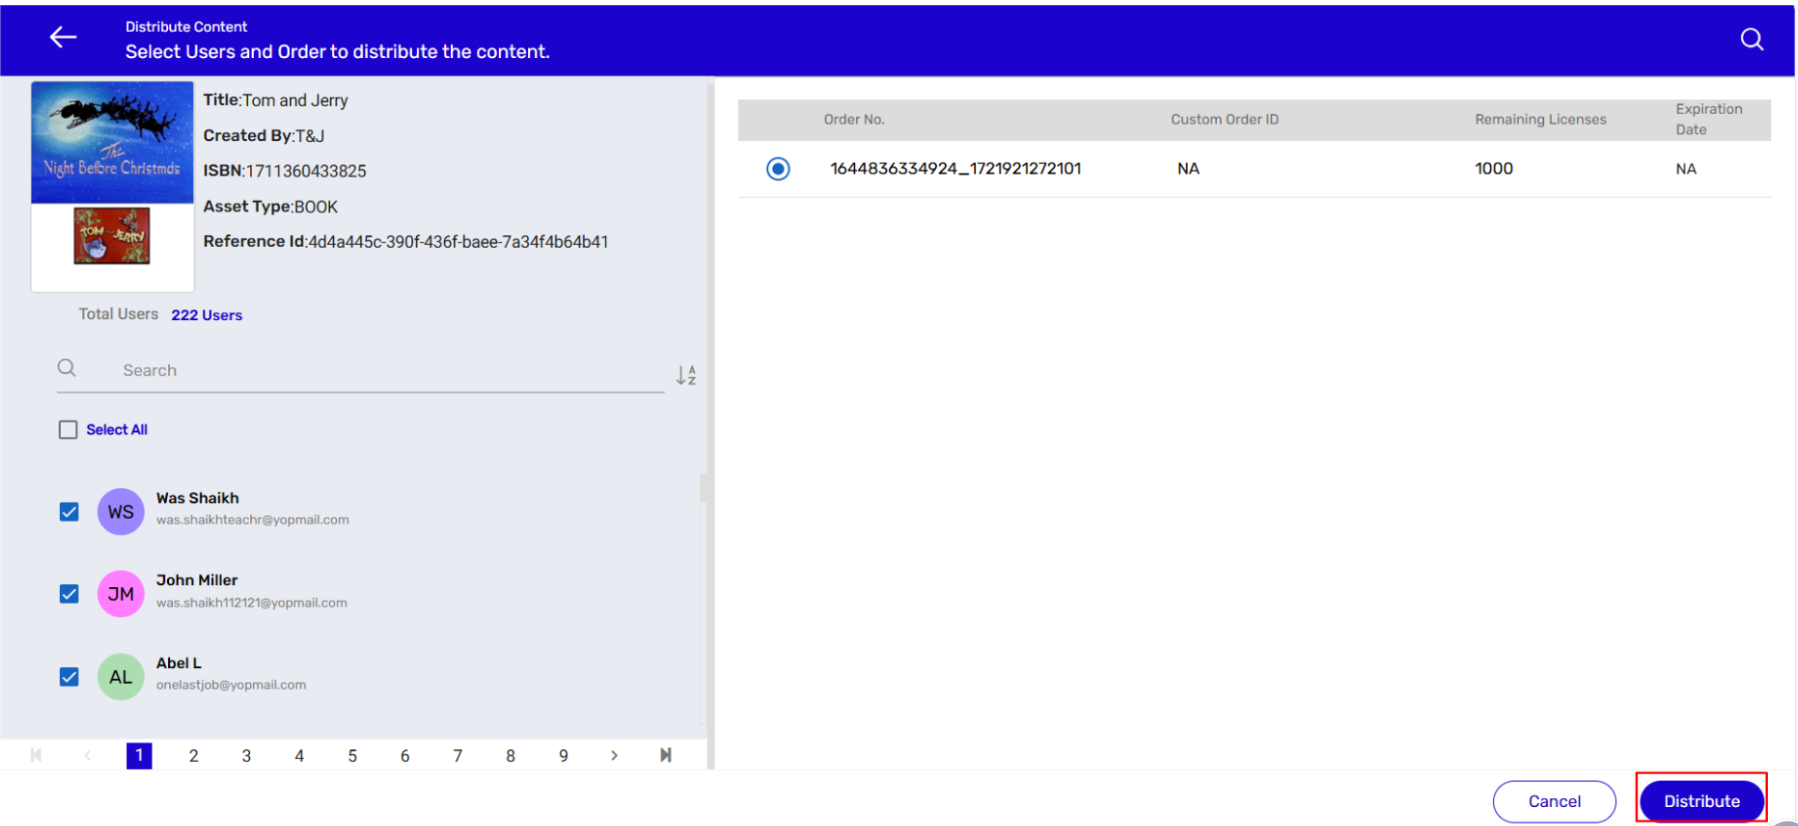
#eBook Assignment #eBook Management #ePub Assignment #book assignment
As an enterprise you have already added your customers by using your Enterprise Admin
credentials. Now, it is high time that your customers on their part distribute content to the
end users – teachers, students, or to your corporate employees. So first your customers need
to add users to the database.
1. Adding Single User –
- Navigate to the Kitaboo Studio Reader login page. > Enter your Customer Admin credentials
- Switch to the Users tab. > Click on Add User.
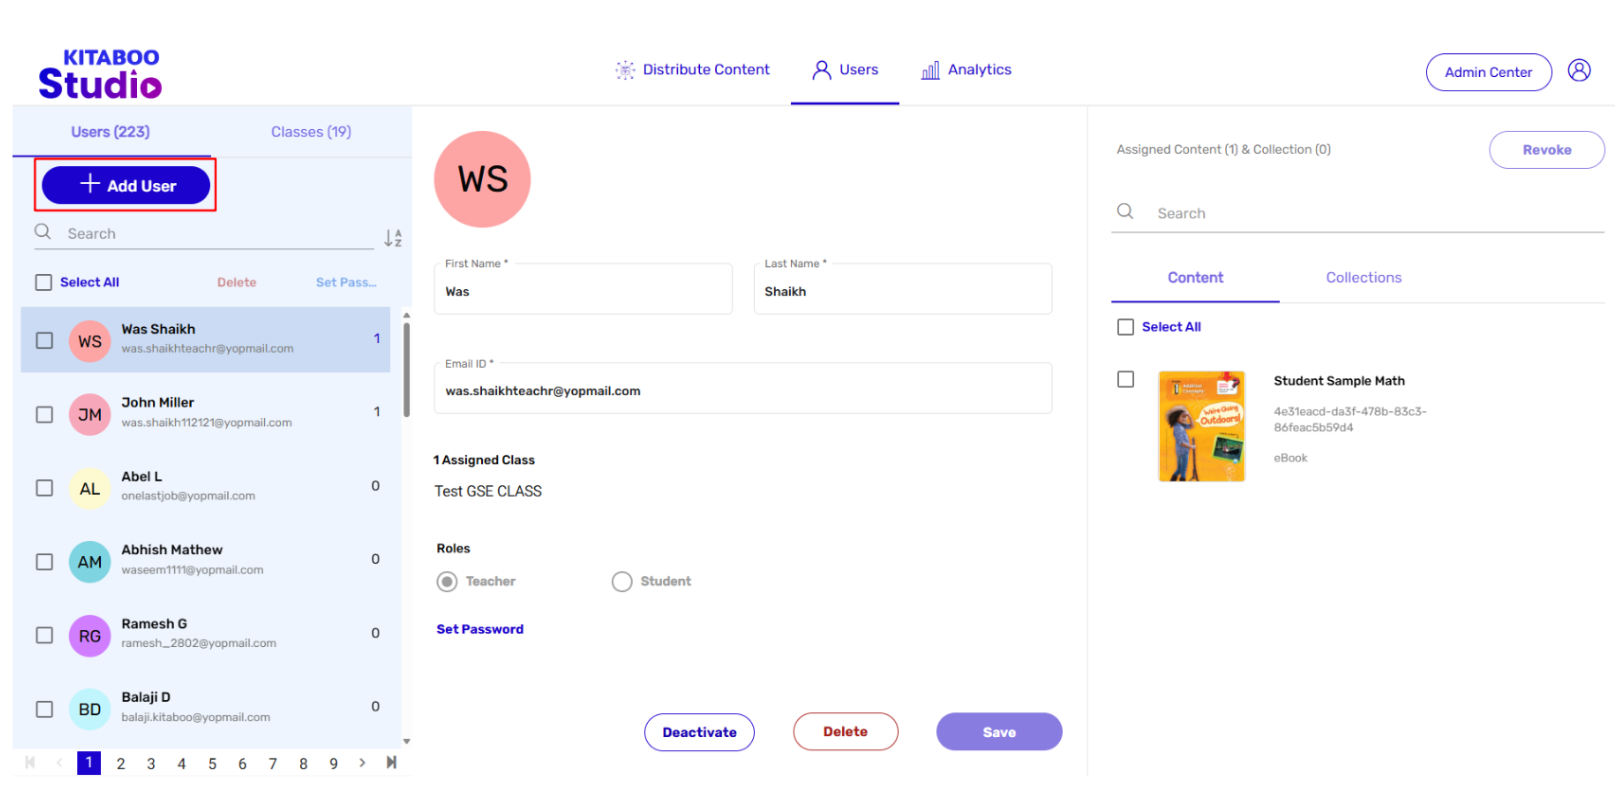
- Enter the User’s profile details > Define Role (Teacher or Student) > Click on Create. > Click on the Set Password link.
NOTE: Multiple users can also be created in one go by using a sample sheet.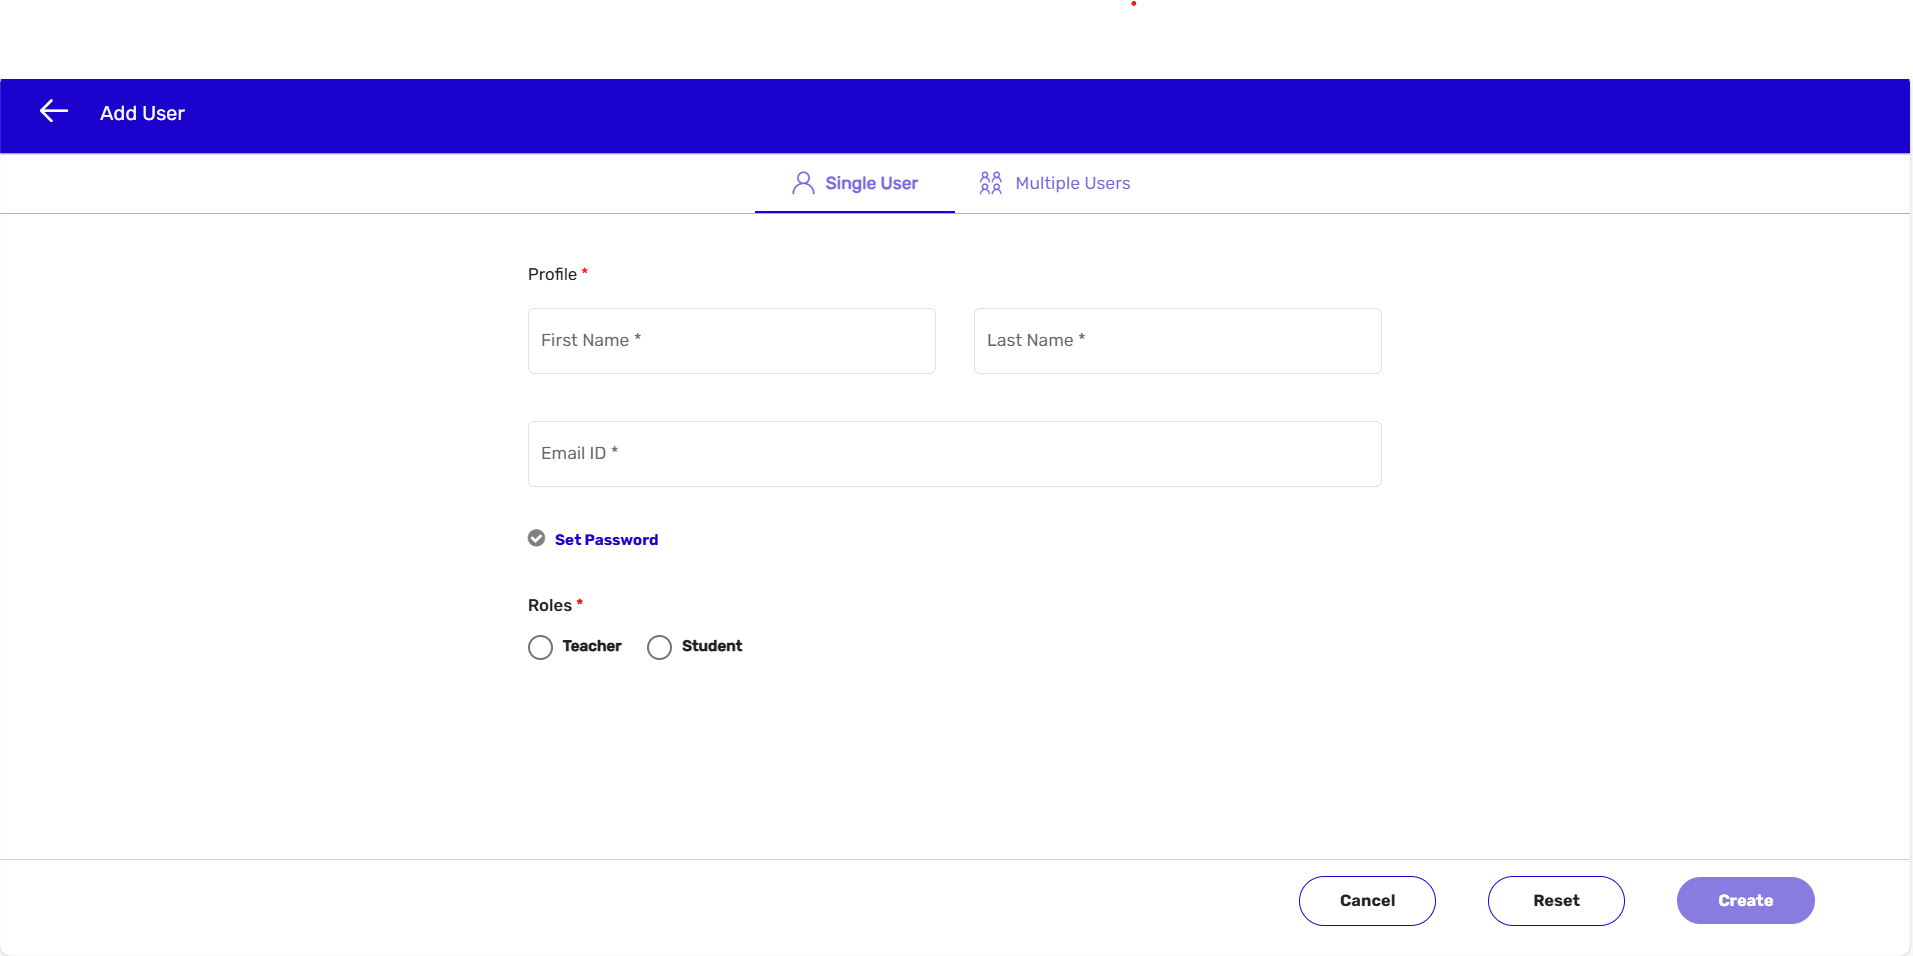
- On the Set Password pop-up, enter a new password as per the prescribed format for a password. > click on the Set button. > Click on Save.
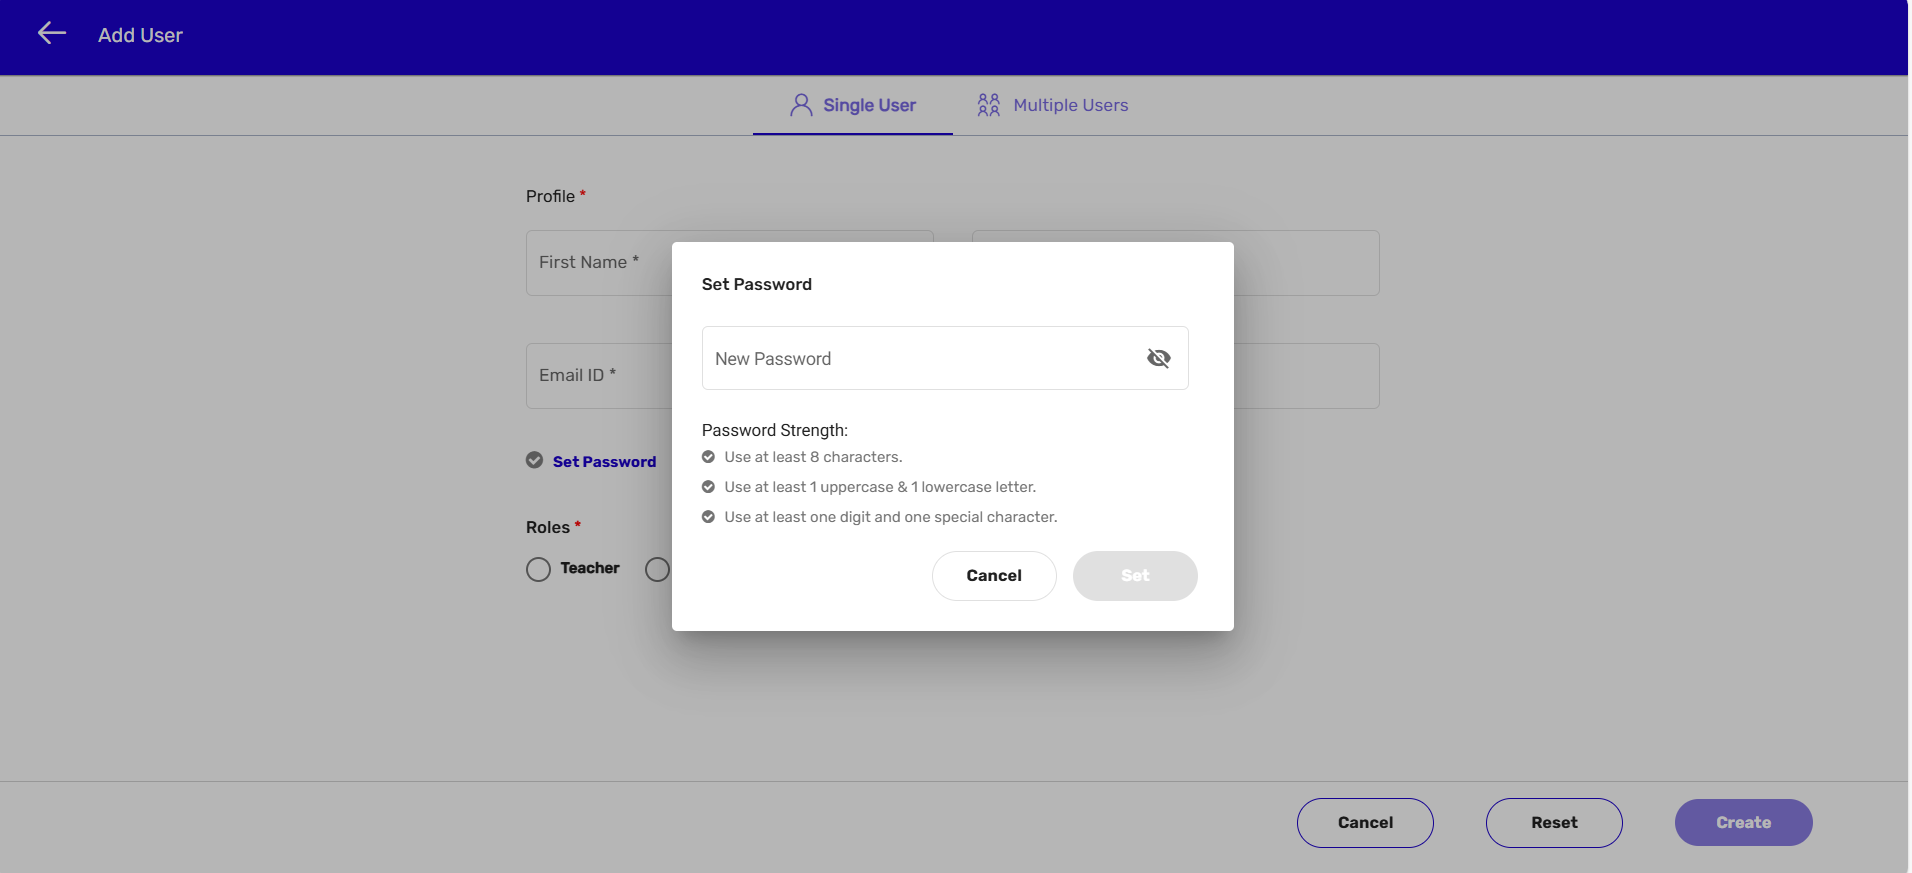
- You can also deactivate a user. For deactivating a user: Select the user, on the left pane, you want to deactivate. > Click on the Deactivate button.
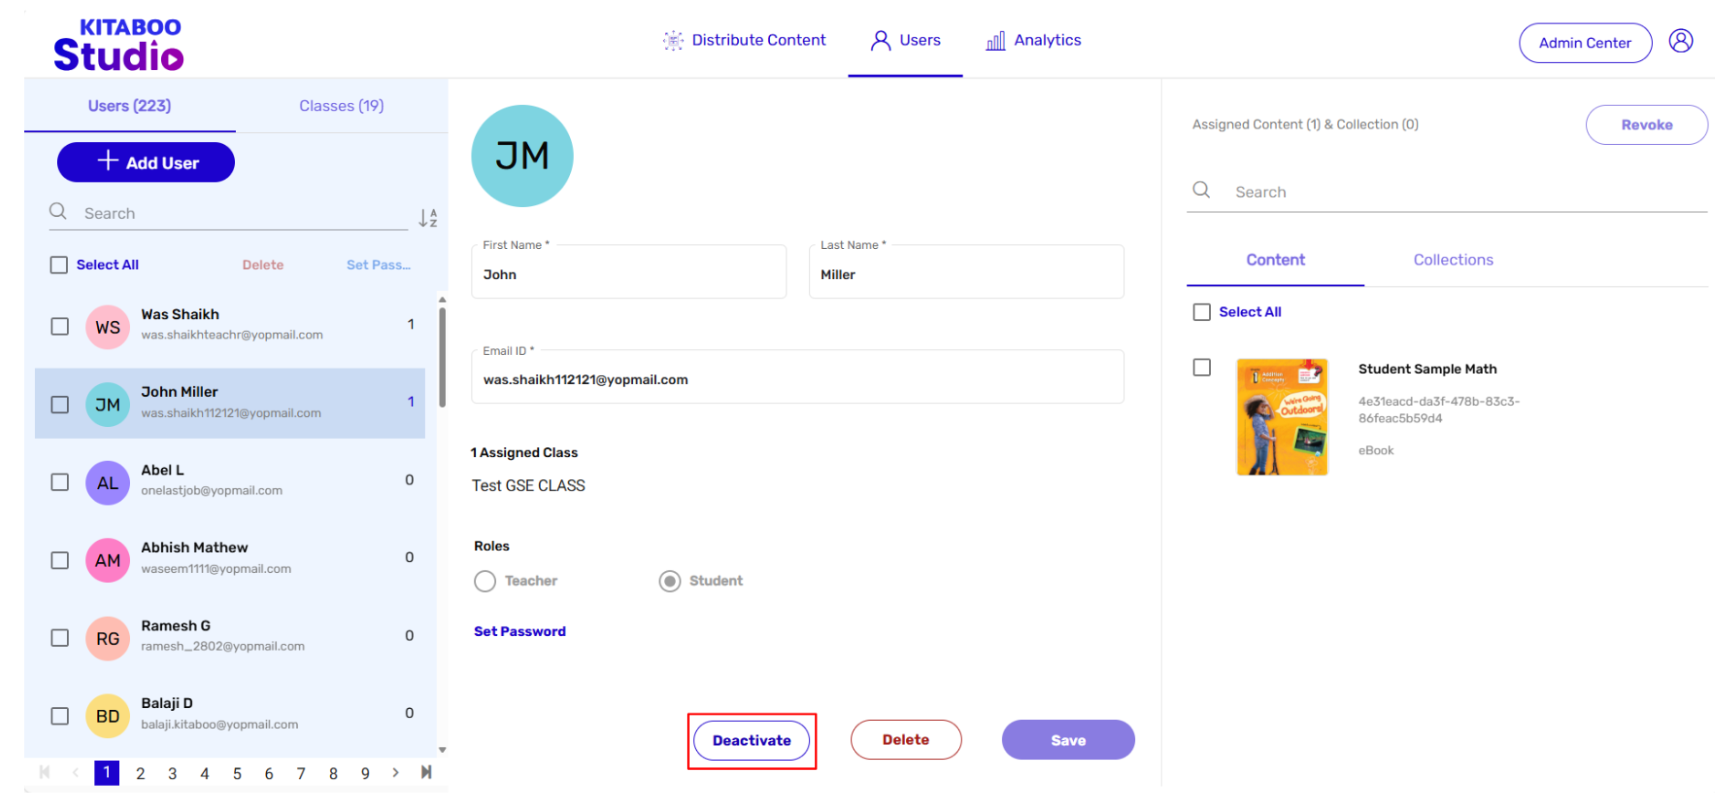
- Click on Yes, Deactivate it on the pop-up. Once confirmed for deactivation, the deactivated user will NOT be able to access the reader.
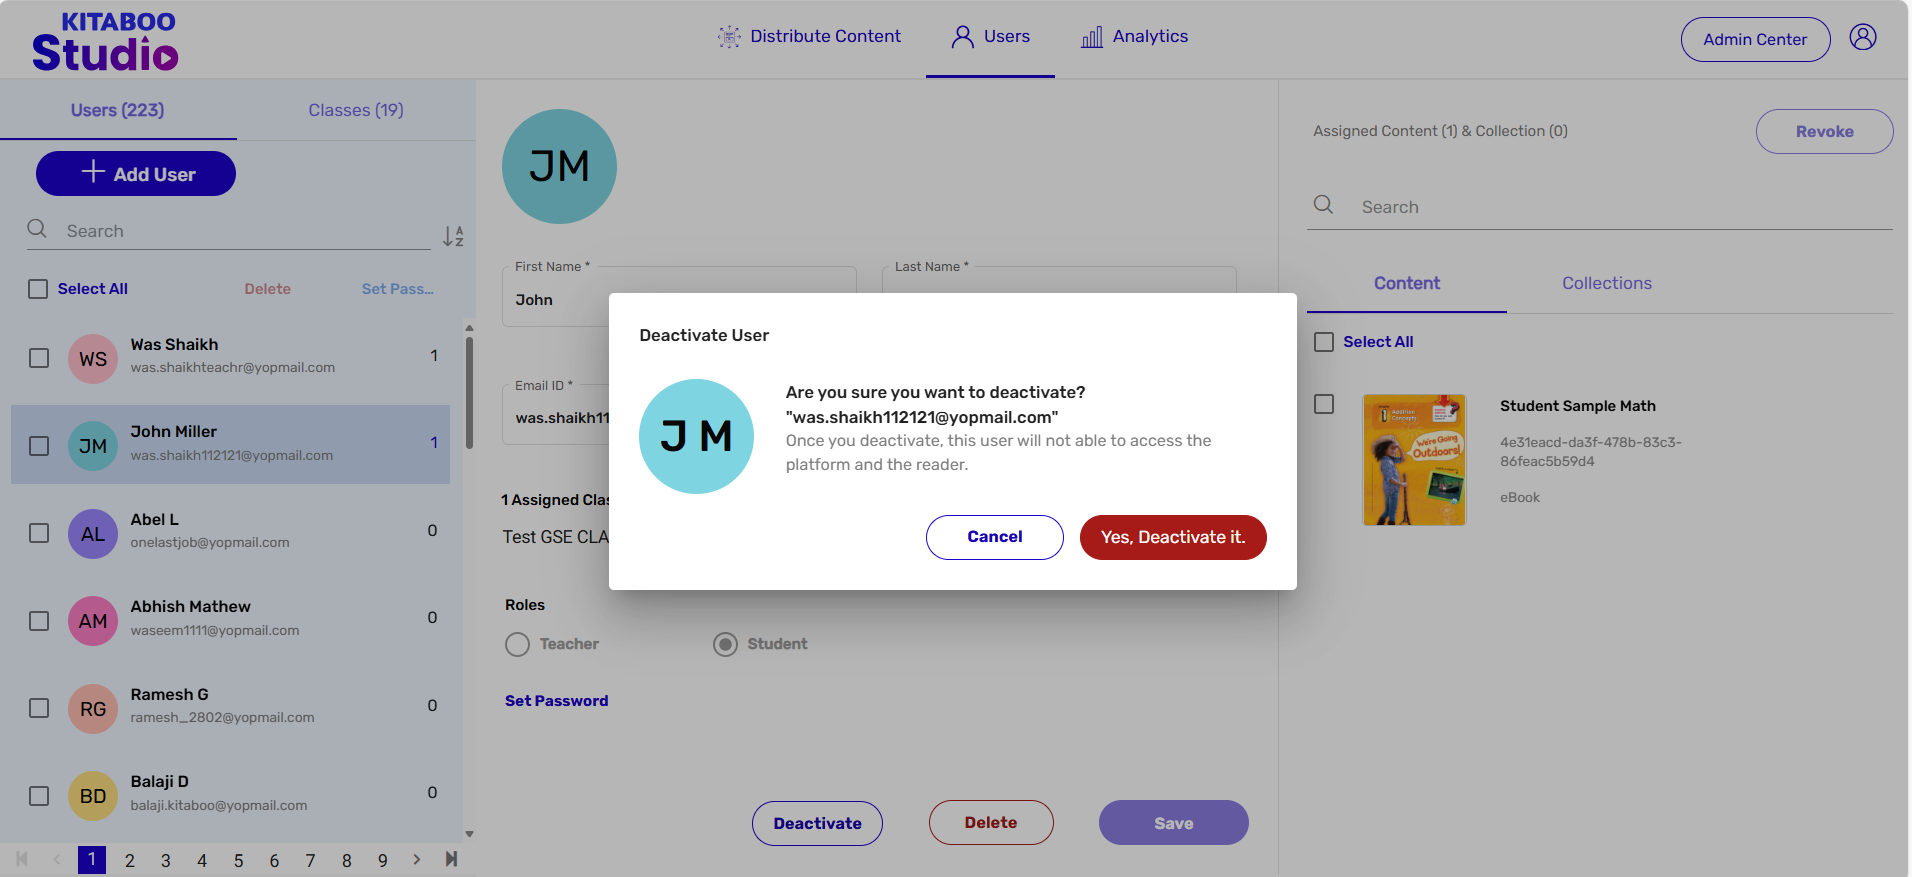
- You can also reactivate a deactivated user. For this: Select the user you want to reactivate. > Click on Activate.
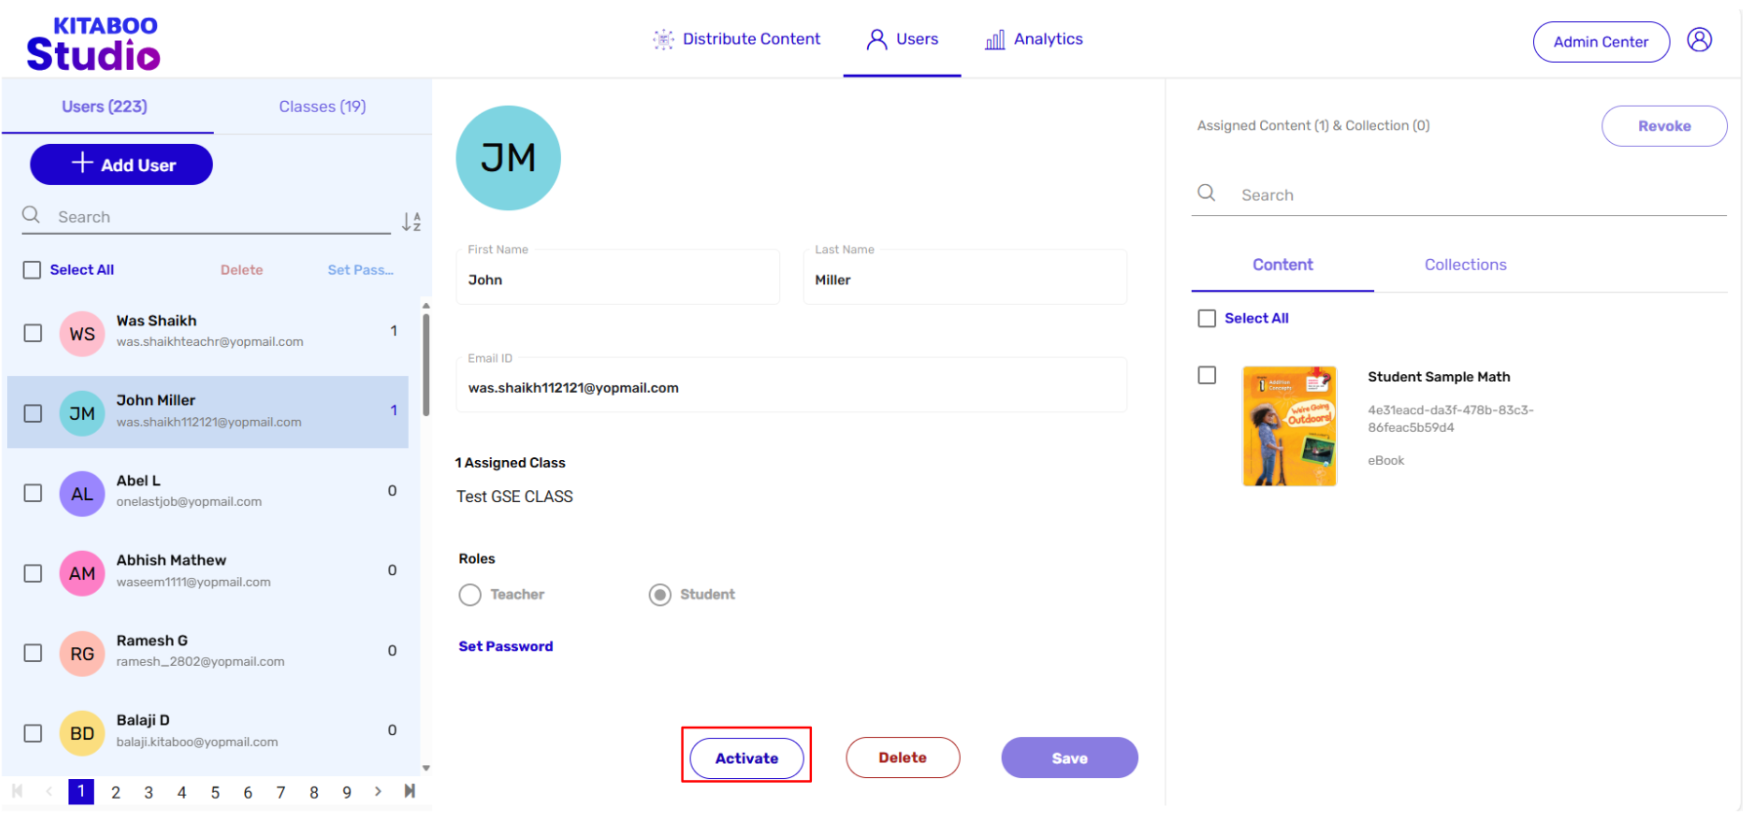
- Click on Yes, Activate it to confirm
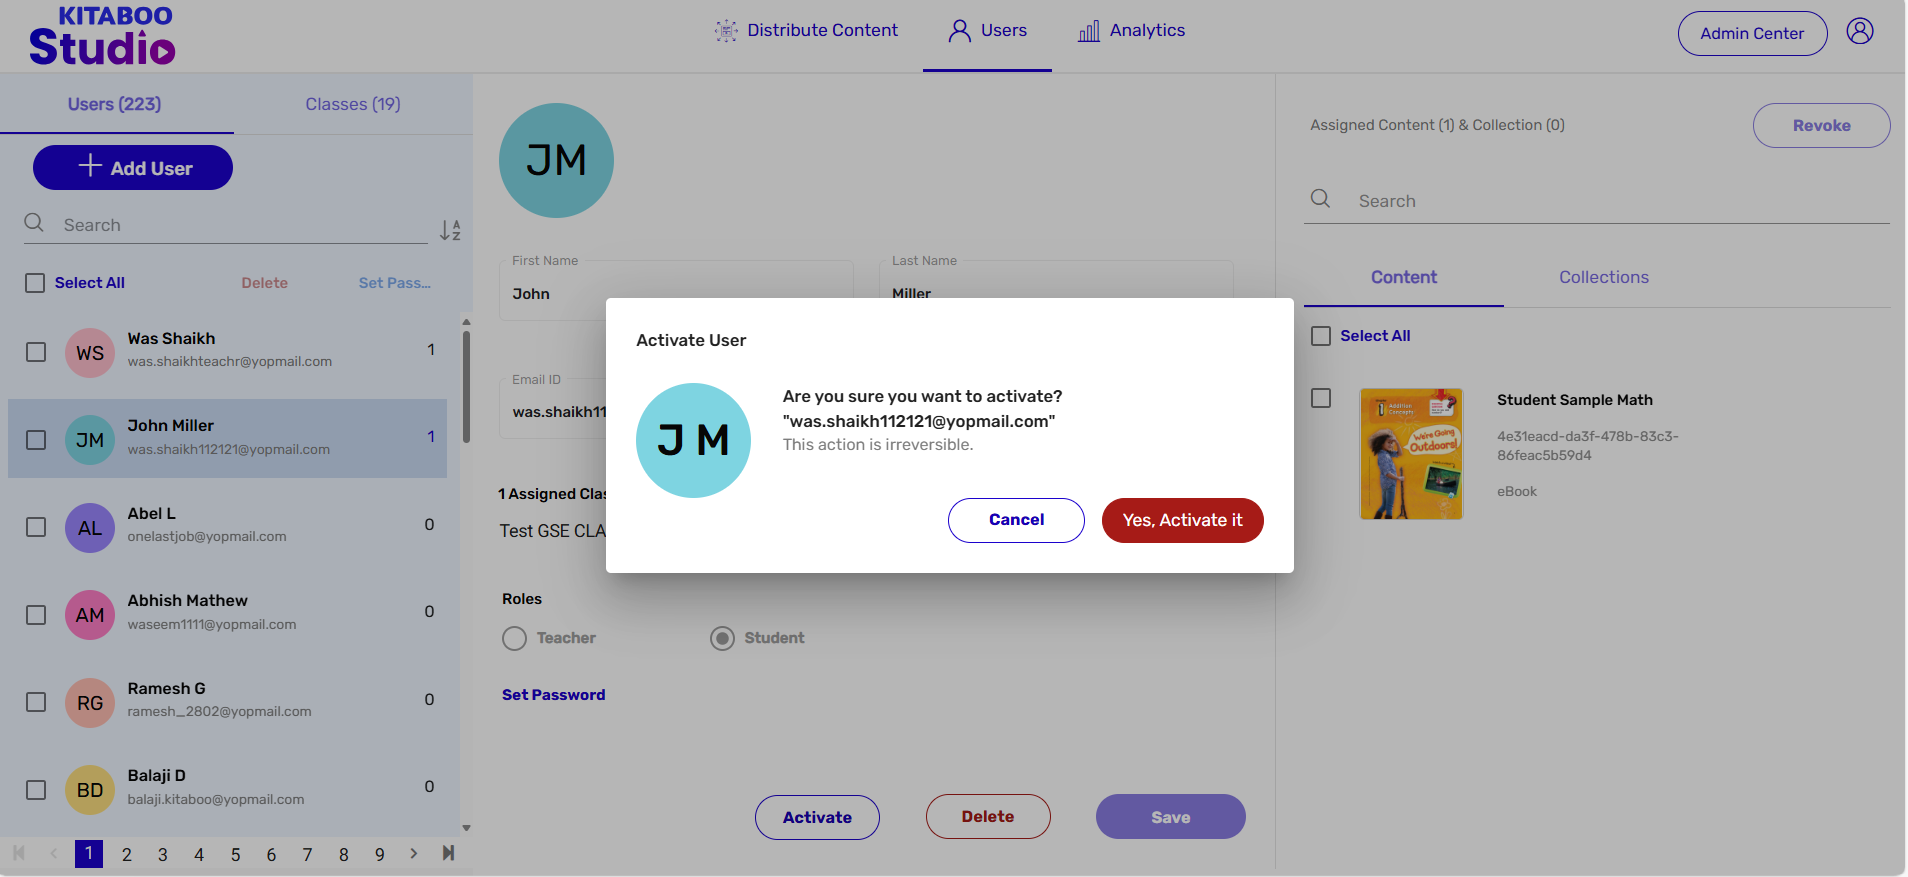
2. Creating Bulk Users via Bulk Upload sheet
Kitaboo Studio also enables you to create bulk users for a class. Let’s see how to do it.
- Sign in with your Customer/Partner Admin credentials.
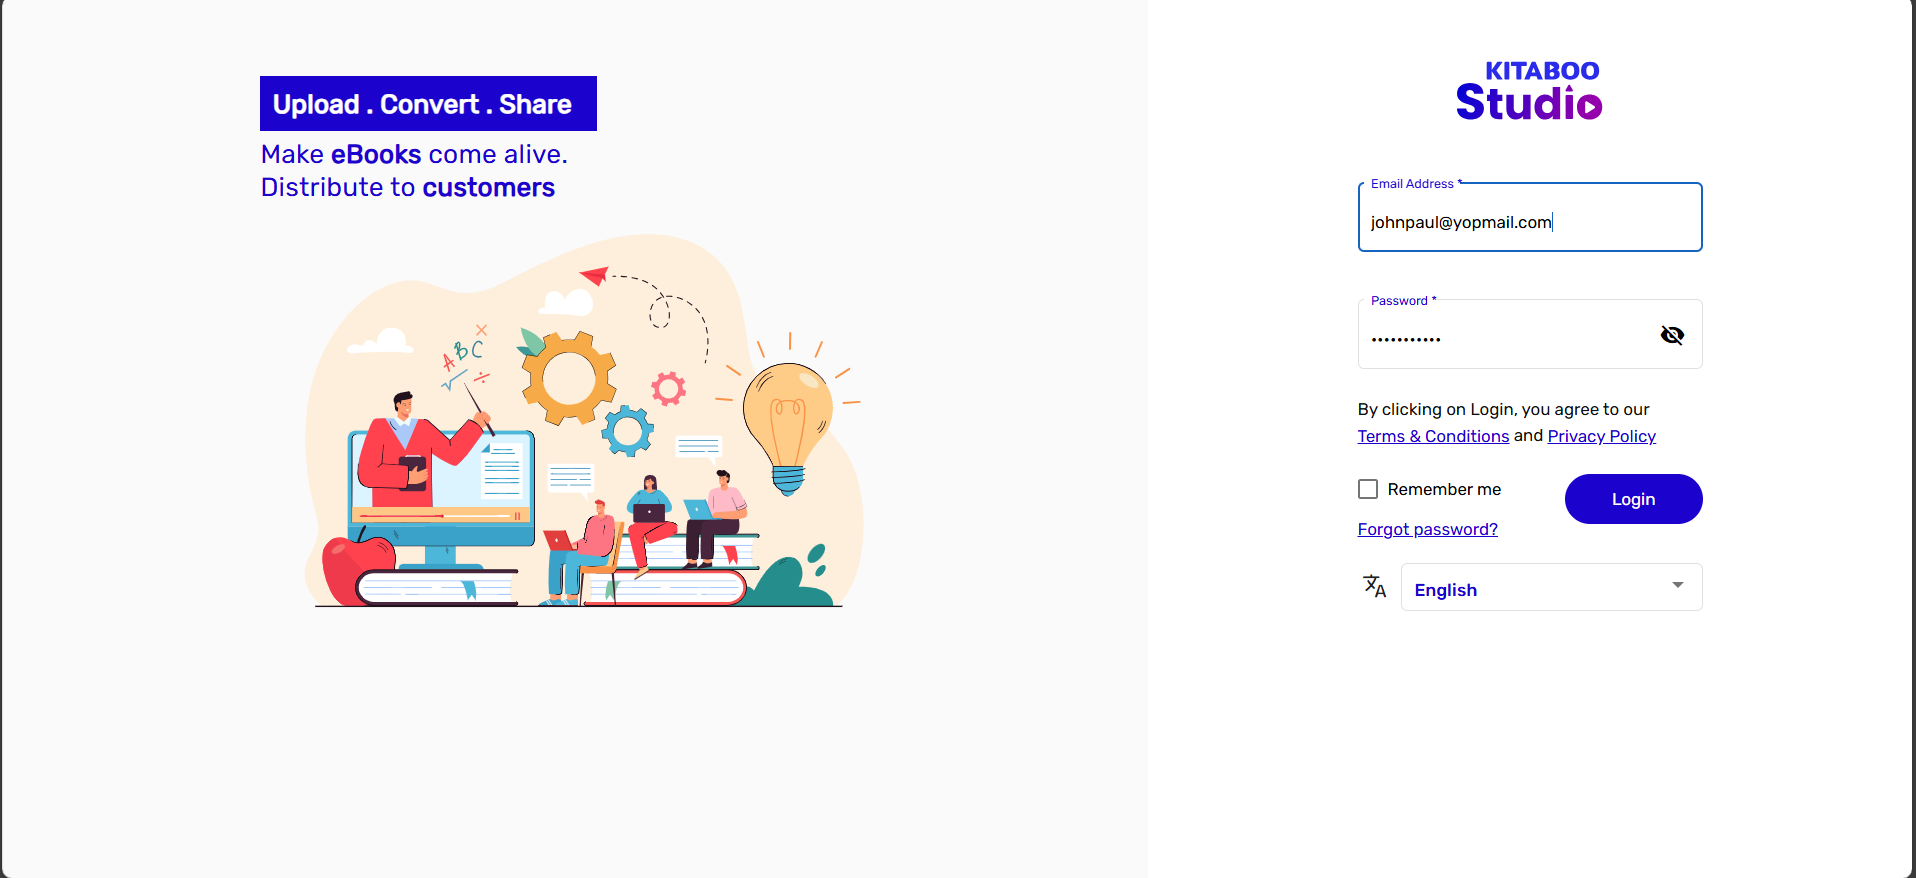
- Switch to the User tab. > Click on the + Add User button.
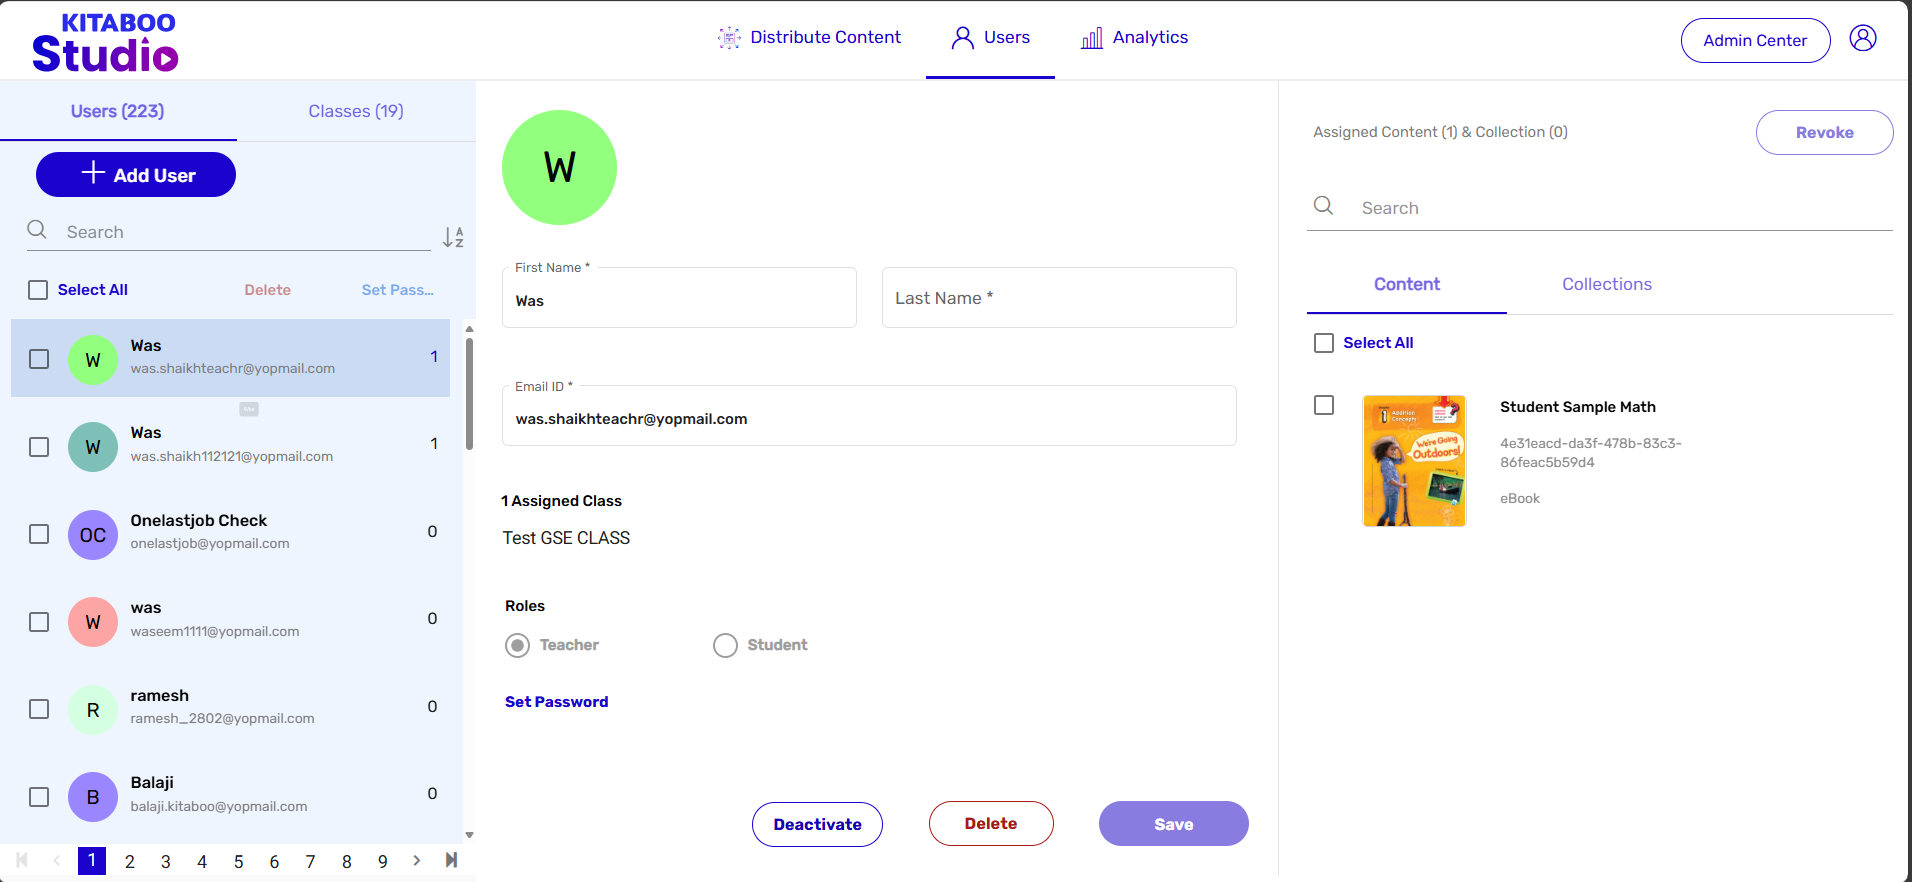
- On the Multiple Users tab, click on the Download Sample link. > Save the Excel sheet on your local machine. You need to enter the users’ details as per the format in the sheet.
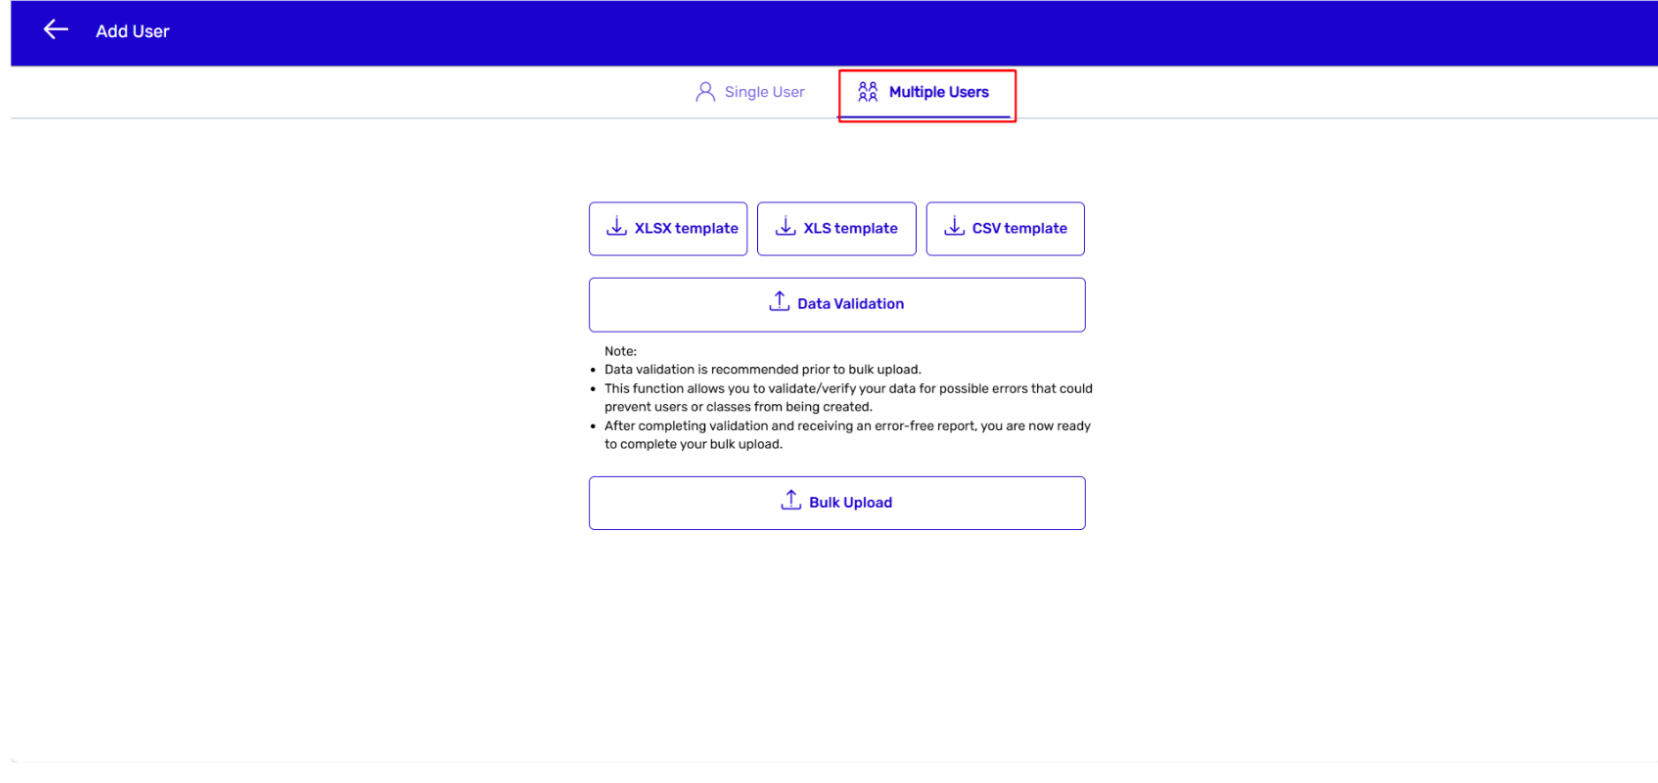
There are two tabs on the sample Excel sheet (download the sample file) – Bulk Upload and Instructions. You need to enter the details of the users on the Bulk Upload page. It is advisable to read through the instructions on the Instructions page before adding the users’ details. A recap of the
I) Special characters should not be used in contact numbers, city names, ZIP codes, and country names.
II) Username is a mandatory field. If you leave it blank, the system will create a username based on the given email ID. For example, for the email ID john.ked@gmail.com, the system will be creating a username as john.ked@gmail.com.
IV) You must ensure that all the mandatory fields are filled in before uploading the Bulk Upload Excel sheet.
V) You should refer to the Bulk Upload sheet for example, clarification, or reference.
VI) You should not edit the column header and order on the Bulk Upload sheet.
- Enter the new users’ details in the respective columns as per the format only. > Save the changes you have made.
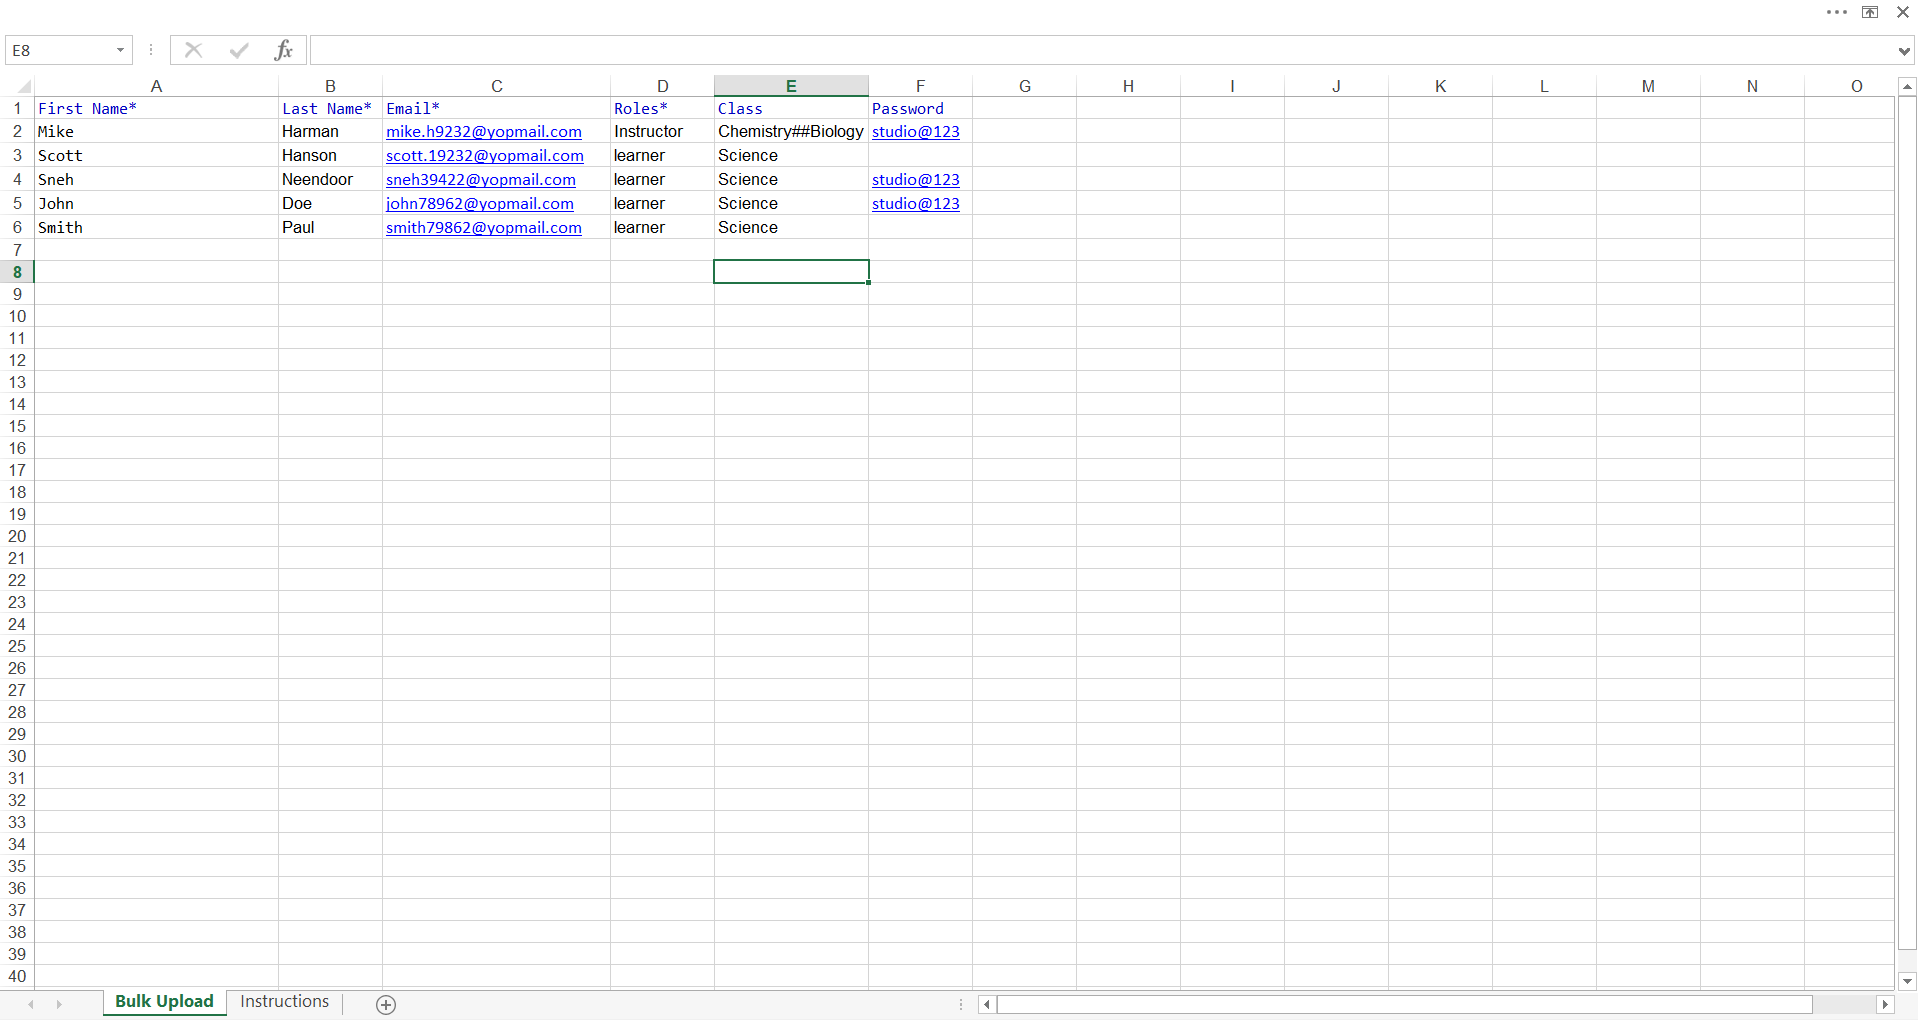
- Click on Data Validation on the Multiple Users page. > Upload the updated Sample sheet.
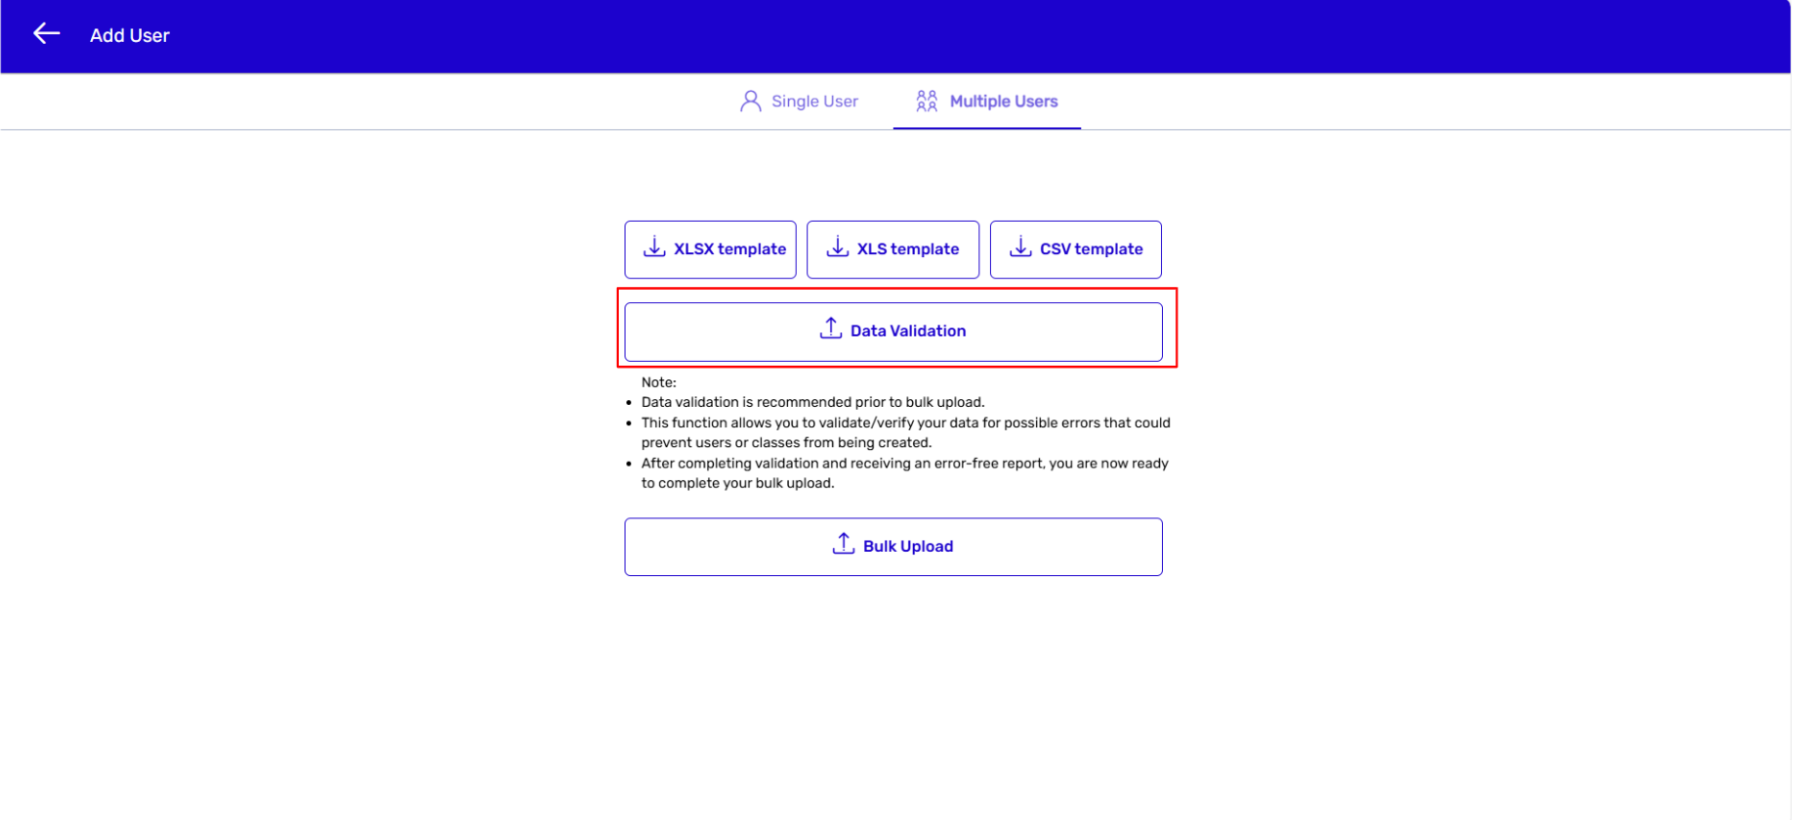
Note: Data validation is recommended before bulk upload. This function allows you to validate/verify your data for possible errors that could prevent users or classes from being created. After completing validation and receiving an error-free report, you are now ready to complete your bulk upload.
- Click on Upload Sheet on the Multiple Users page. > Upload the updated Bulk Upload sheet.
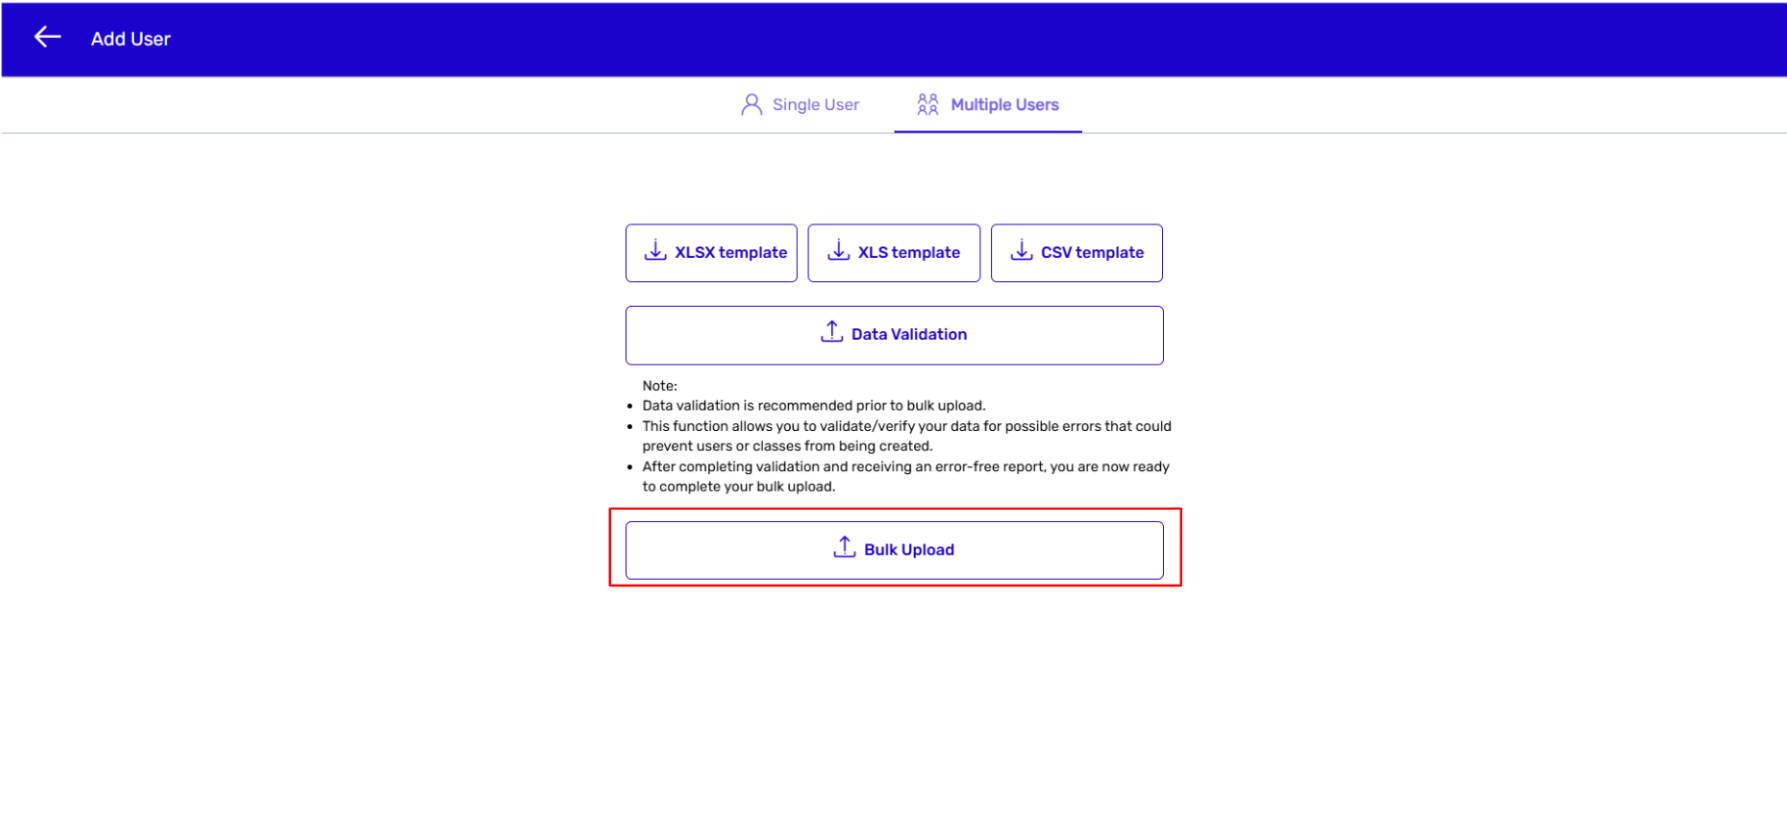
- You will be getting a confirmation message for a successful file upload. You can also download the updated sheet by clicking on Admin Center > Bulk User Upload Status,
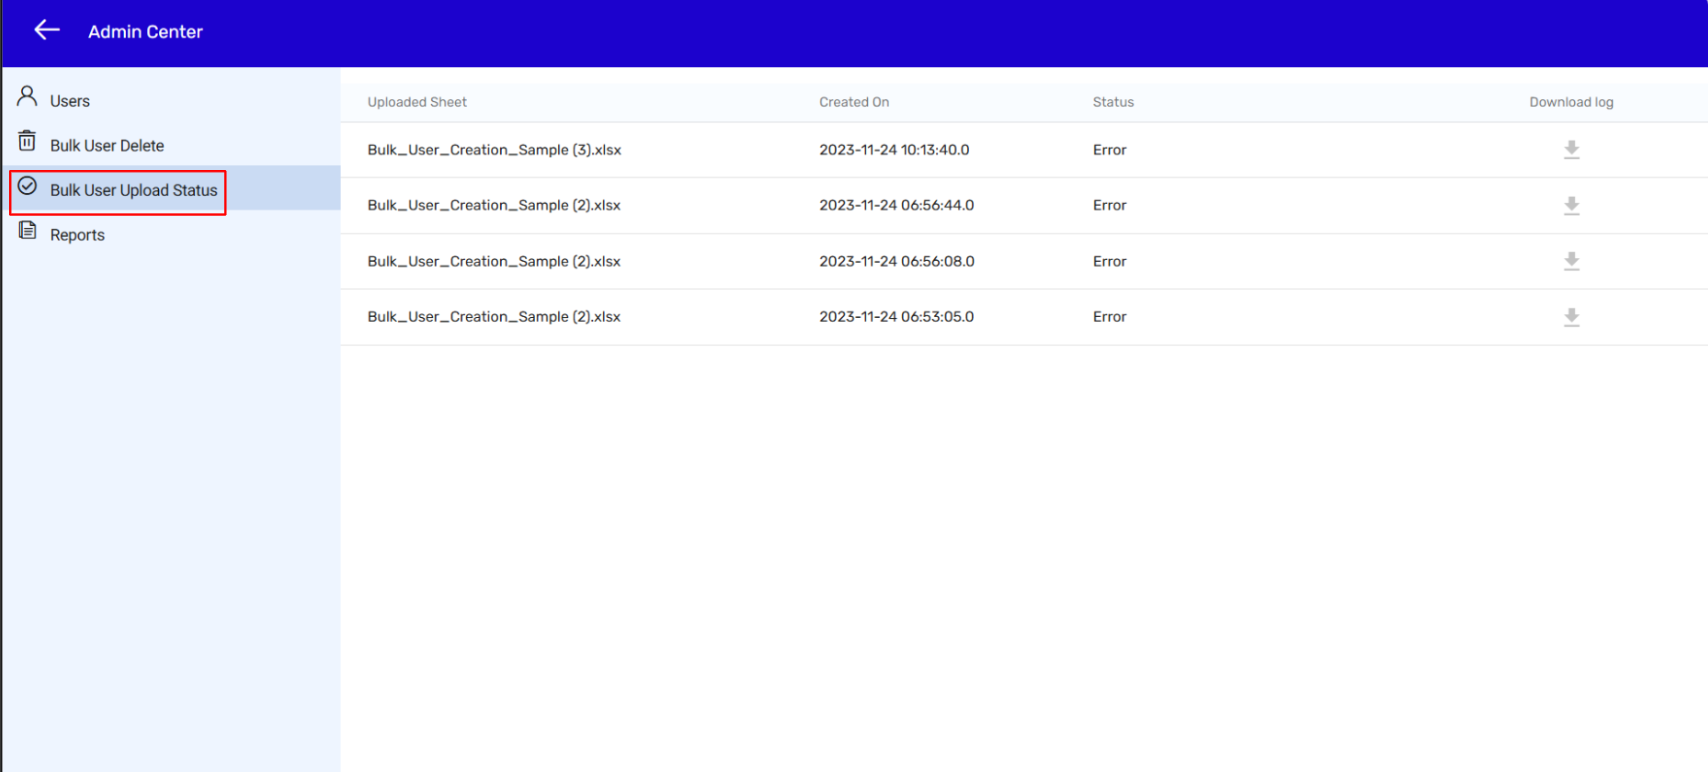
At times users may not be interested in being routed through the school and class network for accessing Kitaboo’s digital content. They prefer to have direct access to the content. Kitaboo has a solution for such users as well. Kitaboo allows such users to log in the portal by using a system-generated access code.
Let’s see how it happens.
- Sign in with your Customer Admin credentials.
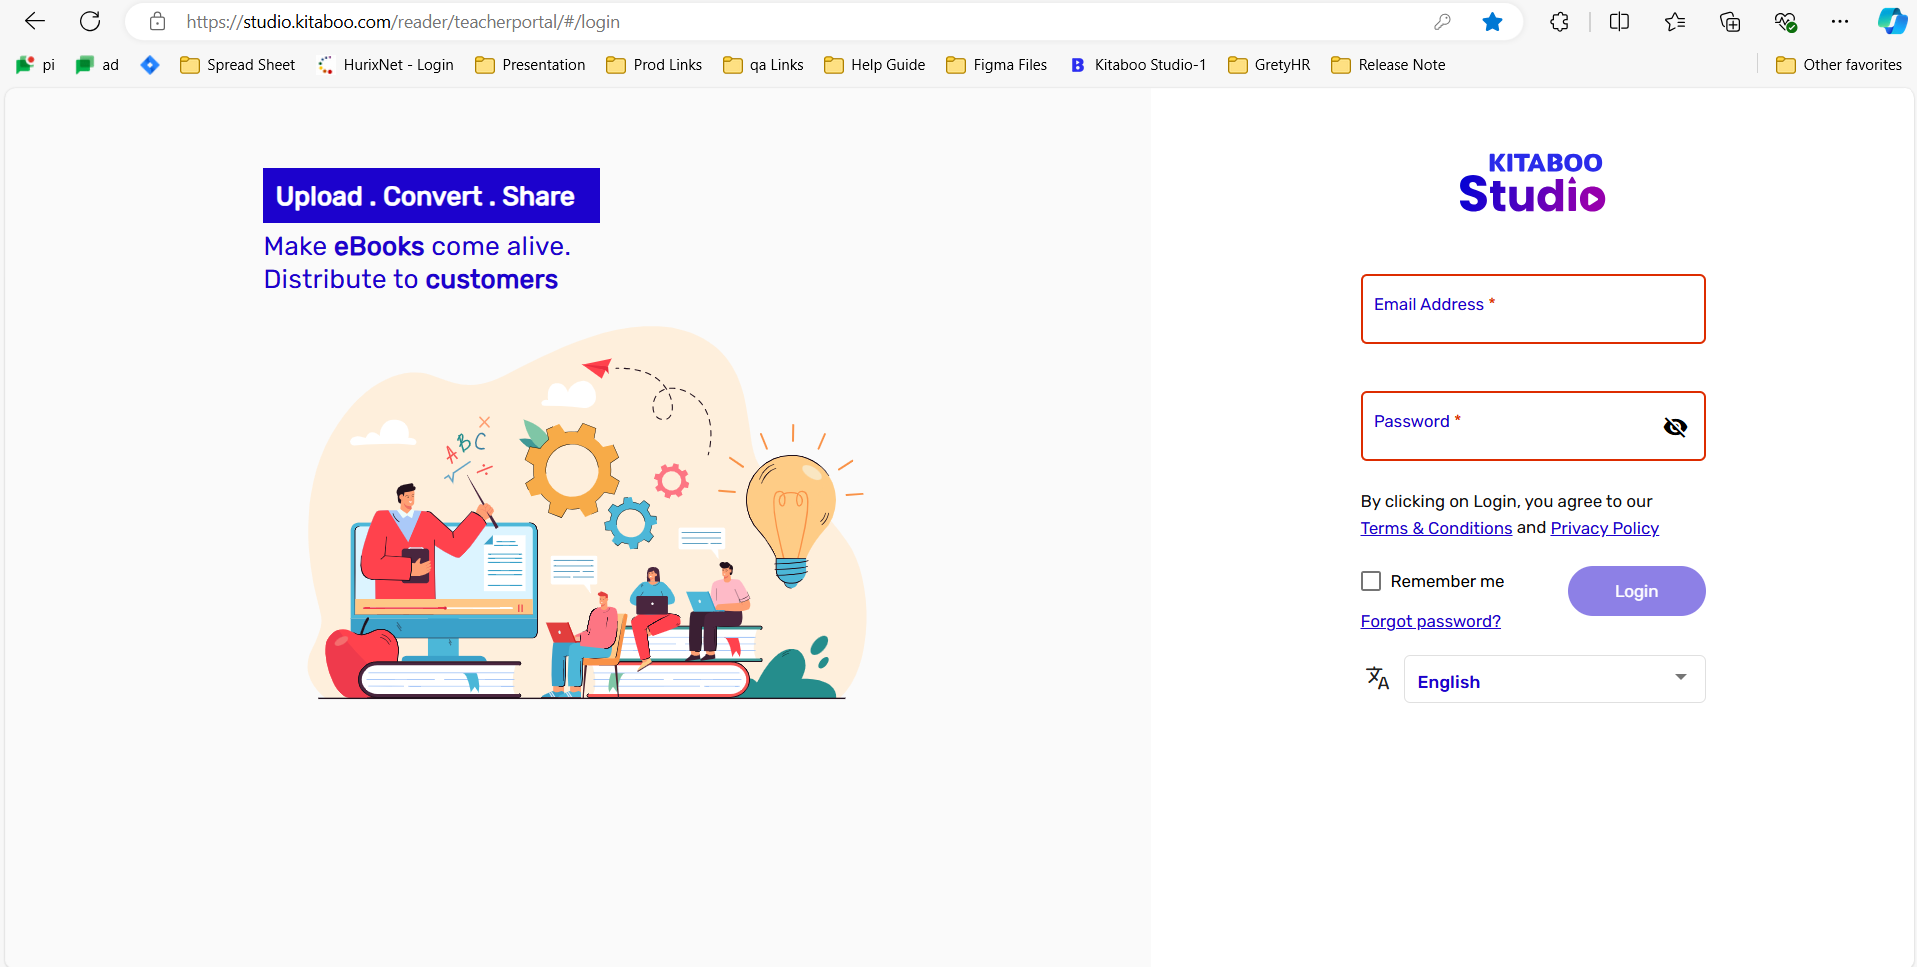
- Go to the Distribute Content tab > Select the content a user wants to access. > Click on Generate Code.
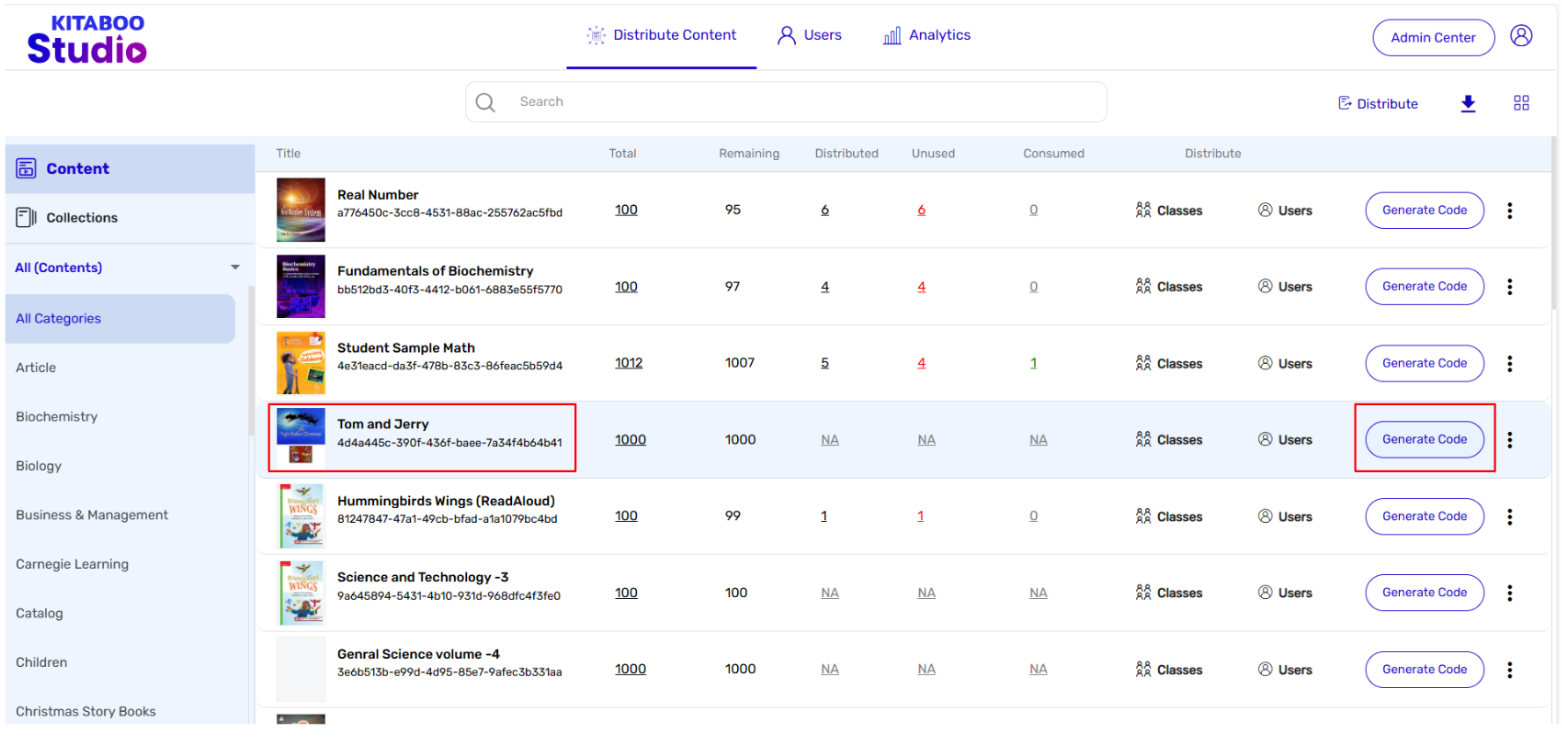
- Click on Access Code.
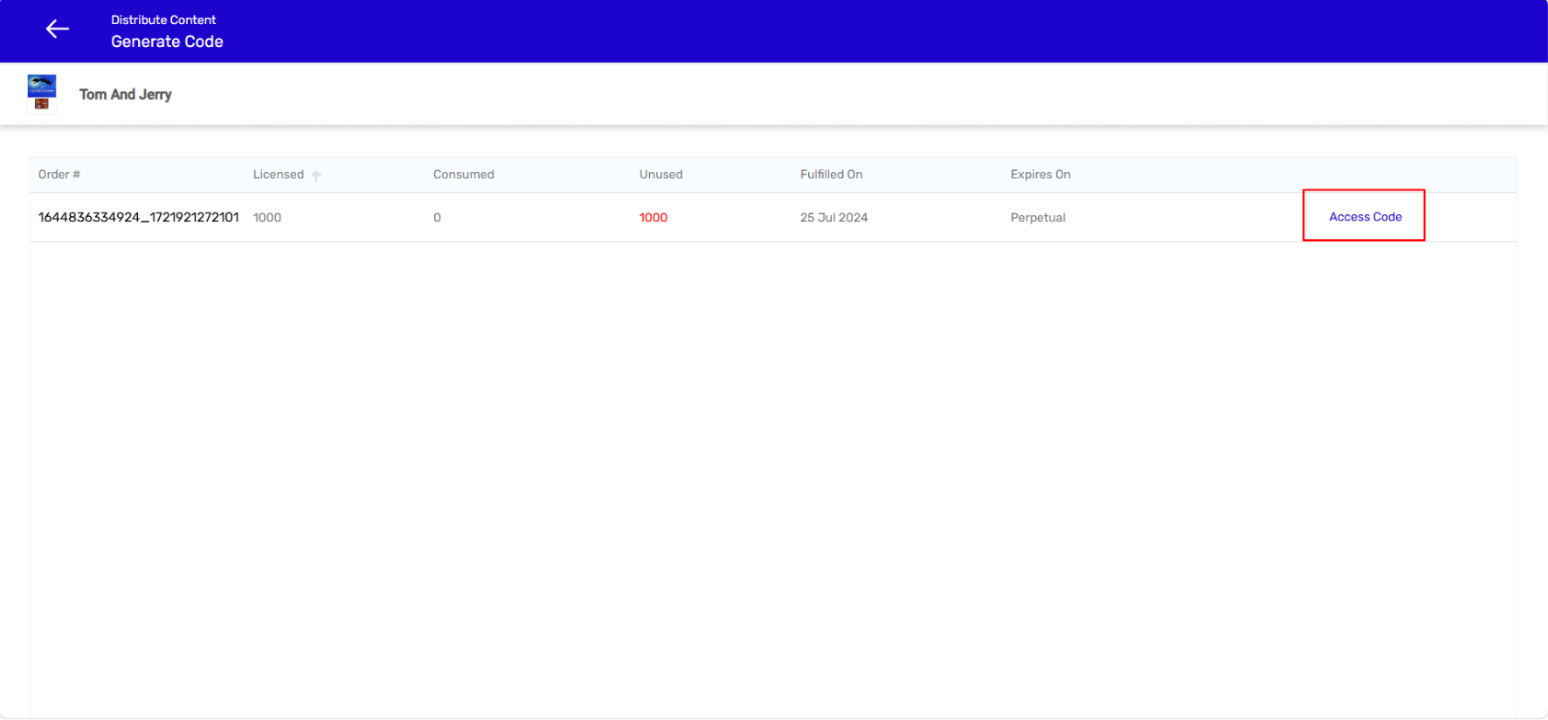
- Select the Access Code type boxes. > Enter the number of codes to be generated. > Click on Generate.
NOTE:
● Unique Access Codes can be utilized by individual users only once.
● Common Access Code provides a single access code that can be utilized by individual users multiple times as per the license limit.
● Class Access Codes are redeemed by a student-type user and an instructor-type user. When these access codes are redeemed, the users automatically become part of a single group or a class.
● Once you select the Class Access Code checkbox the Class Name field and the Data-sharing options will appear. You should provide the required information before clicking on Generate.
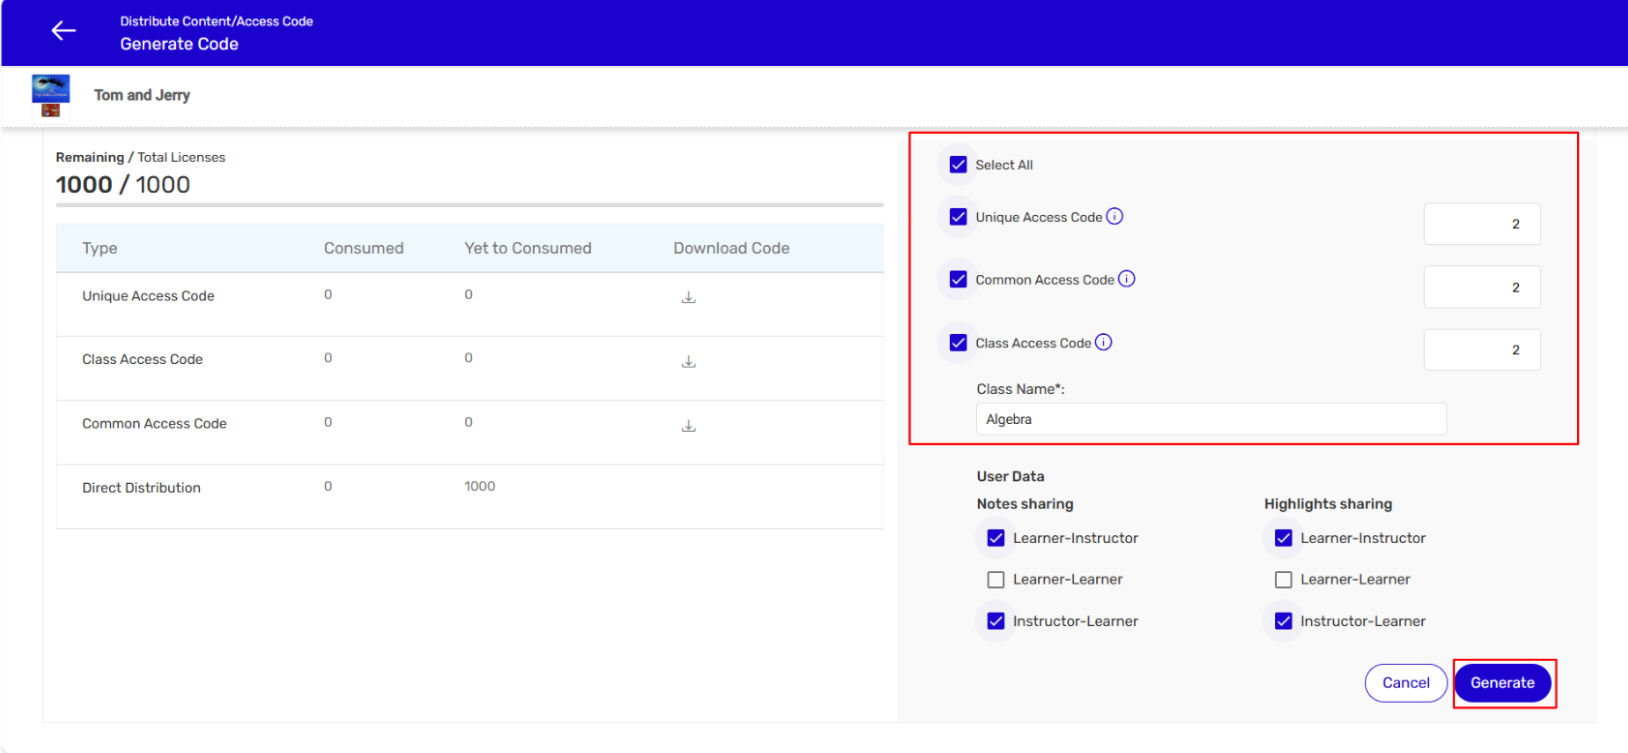
- Download each type of Access Code sheet.
NOTE: Access codes get generated in Excel sheets. The number of sheets depends upon the number of access code types you select for generating codes.
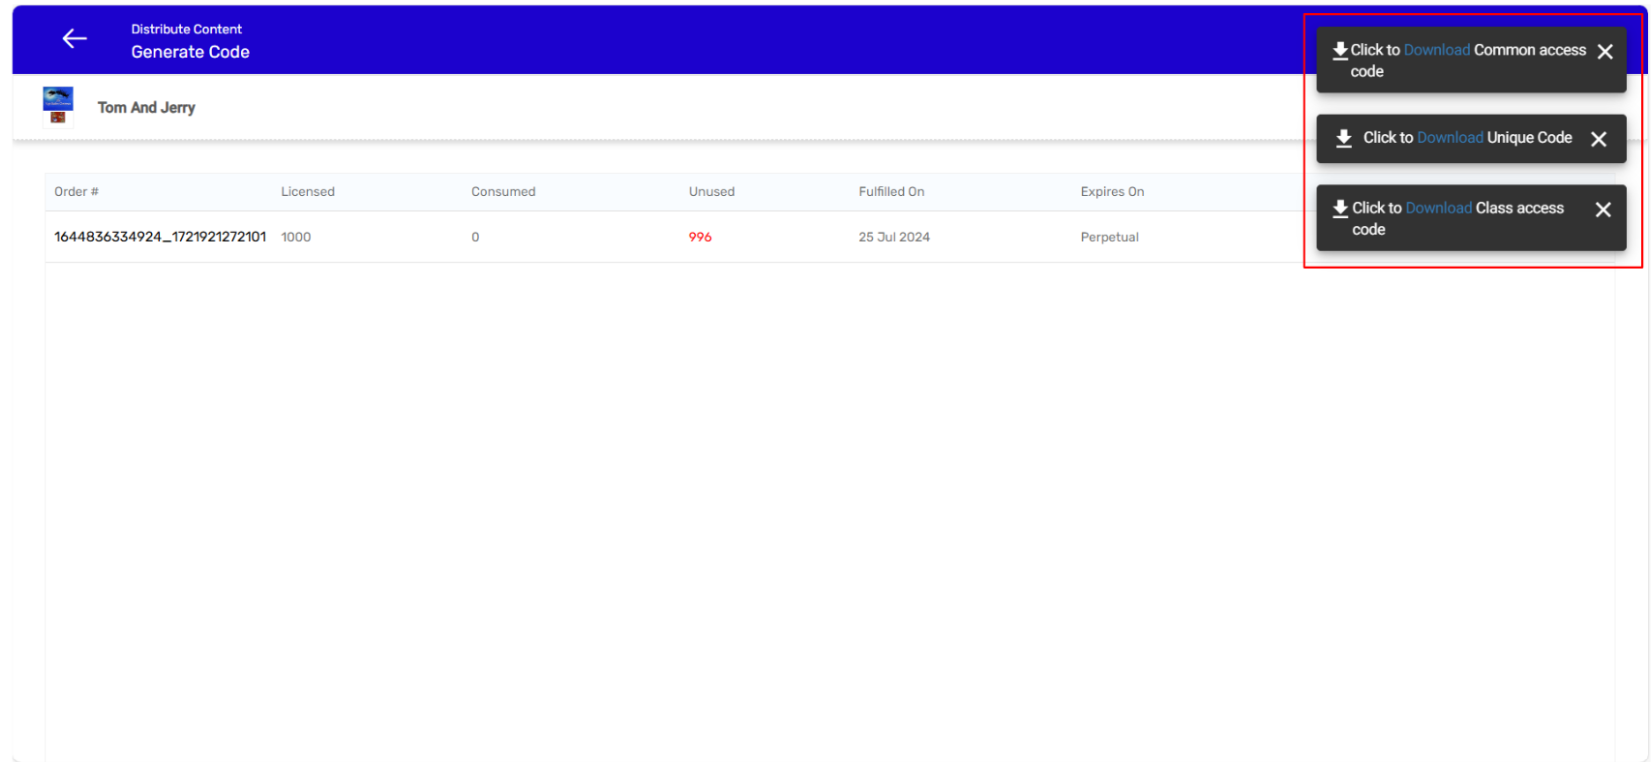
1. Access Code sheet: Unique Access Code

2. Access Code sheet: Common Access Code

3. Access Code sheet: Class Access Code
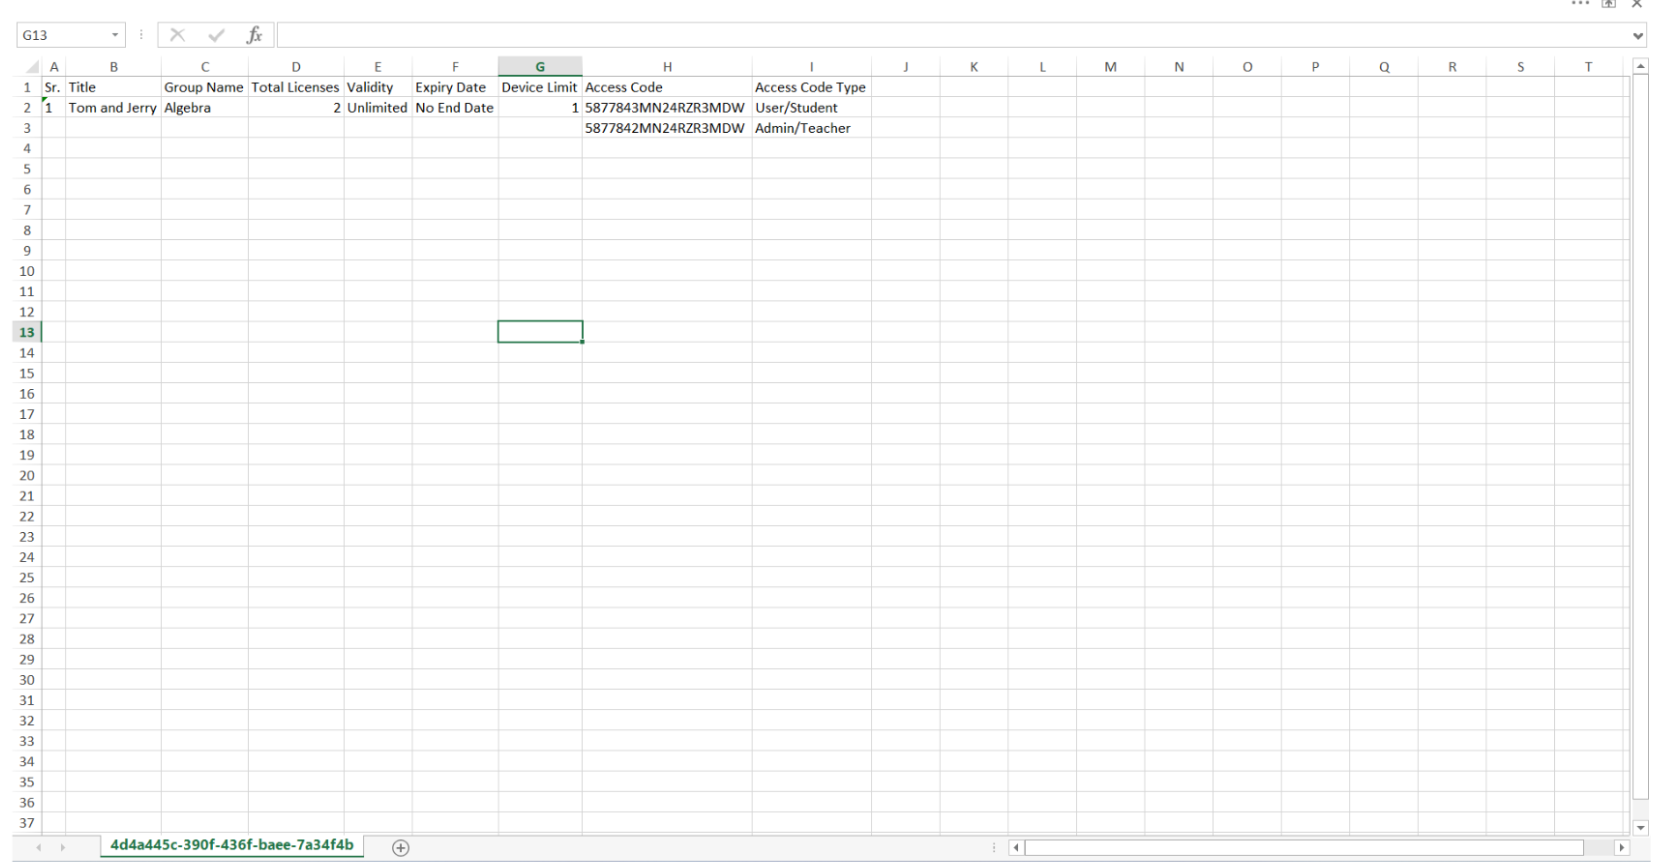
- Sign in to the Kitaboo Reader portal for redeeming the access codes > Go to the Access Code tab > Copy the required access codes from the excel sheet > Enter the Access Code and click on Send.
