Popular
- Manage License (Add on)
- Bulk Revoke
- Generating Access Code
- Direct Distribution (Add On)
- Creating Single User or Multiple Users (Bulk Upload)
- Admin Center and Profile and Settings
- Revoking Content
- Distributing Content
- Signing in to Kitaboo
- Promote User/Transfer
- Create Class/Update Class
- Selective Oneroster Sync with API/ZIP/SFTP
- Analytics Dashboard and Reports Overview
- How Kitaboo Reader – Text-to-Speech (TTS) Works
- Activated User – Definition & Billing Policy
- Understanding User Roles: Producer vs. Admin
- Auto Book Deletion Process
- Adding group with SAML
- Syncing Data with Clever
- Selective Oneroster Sync with API/ZIP/SFTP
- Syncing Data with PowerSchool
- Syncing Data with OneRoster
- Adding a Group
- Searching a Customer
- Issuing Licenses
- Editing a Customer
- Deactivating a Customer
- Adding a Google Classroom Customer
- Adding a OneRoster Customer
- Adding One roster 1.2
- Adding a LTI 1.3 Customer with OneRoster
- Adding a LTI 1.3 Customer
- Adding an LTI 1.1 Customer with OneRoster
- Adding LTI 1.1 Customers
- Sorting Customer and Group
- Enable K-AI at the content level
- Content Lifecycle Stages in Kitaboo for eBooks
- Creating a Fixed-layout Kitaboo eBooks
- Creating Fixed-layout ePub 3.0
- Upload 3rd Party ePub 2.0/3.0
- Creating a Course or Uploading Scorm
- Activity or Gradable Activity Creation
- Authoring an ePub
- Creating a Video Book
- Creating an Audio Book
- Updating the Cover Image
- Editing a Fixed eBook
- Deleting and Deactivating Content
- Users Tab
- How to Edit and Delete a Category
- Clever Integration
- Classlink Integration
- Canvas LTI Integration
- Admin Center
- Analytics Tab
- Adding a Customer
- Creating Admin Accounts
- Q1. How can I get help with a specific service?
- Q2. How do I report bugs or request service enhancements?
- Q3. As the main institute admin, if I revoke or delete a user created using an access code, can the same access code be reused? What will be the expiry period for that access code’s content?
- Q4. As a main institute admin, can I change the password(s) of institute(s) associated with my account?
- Q5. Why is my Customer ID and Password not working?
- Q6. As a main group admin, can I change the password(s) of groups (sub-admin) associated with my account?
- Q7. How can I redeem an access code?
- Q8. What is a common access code?
- Q9. While distributing content to all classes in one go, how does a user know if he/she has been assigned content?
- Q10. While distributing content, can I restrict access to it to teachers only?
- Q11. What are the prerequisites for adding a user to an existing class?
- Q12. Can I create a class with students only?
- Q13. How can I create multiple users on the Kitaboo system?
- Q14. Why is my Group ID and Password not working?
- Q15. I forgot my password. How do I reset it?
- Q16. How do I log in to the Kitaboo portal/Reader?
- Q17. How can I search for a Custom Order ID while assigning content or a collection in the Institute/Customer login?
- Q18. How to add a custom order ID to a new order or an Existing order?
- Q19. What is the API update process, how are changes communicated, and what is the support period for deprecated features?
- Q20. What is the notification process for product release notifications, product issues (discovered by Kitaboo), and product outage/downtime notifications?
- Q21. Why are some symbols not displaying correctly in my eBook or why is the file failing during the conversion process?
- Q22. Does Kitaboo support the Chinese language?
- Q23. What types of quiz activities does Kitaboo support?
- Q24. What is the file size limit supported in Kitaboo?
- Q25. What happens if I do not provide a Table of Contents (TOC) sheet during the bulk upload process in Kitaboo?
- Q26.How does the Multiple Admin Edit feature work, and what are its limitations?
- Q27.How to Update Widgets/Activities in Kitaboo After New Fixes or Enhancements Are Deployed ?
- Q28. Print Configuration in Kitaboo Reader.
- Q29. Glossary Instructions Guide (Kitaboo Fluid 360)
- Q30. WCAG 2.2 Compliance – Reader and Content Responsibilities
- Q31. Keyboard Shortcuts for Table and TOC Management in Author (Kitaboo Fluid 360)
- Help Screen: Your Personal Guide
- Easy Steps to Create or Upload a Cover Page
- Creating a structured Table of Contents (TOC)
- Choosing the Perfect Layout
- #1. Add content using the Authoring
- 1.1. Title: A Simple Way to Add Clear, Catchy Headings!
- 1.2. Explore the smart “Header” Element!
- 1.3. Discover the Power of Text in Authoring!
- 1.4. Make Your Pages Come to Life with Images!
- 1.5. Add Engaging Videos to Your Pages!
- 1.6. Add Engaging Sounds to Your Pages
- 1.7. Explore HTML Interactivity!
- 1.8. Organize your data with the Table element!
- 1.9. Callout Box: A Handy Way to Highlight Important Information!
- #2. Explore Fun and Interactive Widgets with the Authoring Platform
- 2.1. Multiple Choice activity
- 2.2. Create Engaging Presentations with the Slideshow Component!
- 2.3. Image Labelling: Make Your Pictures Interactive!
- 2.4. Fill in the Blanks: Fun and Interactive Learning!
- 2.5. Highlighter: Your Handy Tool for Highlighting Important Text!
- 2.6. Correction Element: Make Learning Fun and Interactive!
- 2.7. Sorting Component – Organize with Ease!
- 2.8. Match the Pairs: An Interactive Learning Tool!
- 2.9. Easy-to-Use Sidebar for Your Content
- 2.10. Click to Reveal activity – Making Learning Fun!
- 2.11. Explore the Fun World of Wordsearch
- 2.12. Discover the Flashcard Element for Your Learning Journey!
- 2.13. Explore the “Group Activity” Element
- 2.14. Discover the Fun of Categorizing with the “Categorize” widget
- 2.15. Explore the Question and Answer Activity
- #3. Unlock the Power of Gradable Activities in Kitaboo’s Authoring Platform
- 3.1. Creating a Gradable Activity
- 3.2. Adding a Gradable Activity in an eBook
- 3.3. Students Accessing the Activities
- 3.4. Standalone Gradable Activity
- 3.5. Grade Assessment: Activity Management for Admins and Teachers
- 3.6. Customizable Certificates for Course Completion
- #4. K.AI: Transforming Content Creation with AI-Driven Interactivity
- 4.1. K.AI Automatic Quiz Generation from PDF
- 4.2. Automatic Generation of Quiz from PDF Using K.AI Markup
- Kitaboo 6.0 Reader Accessibility Help Manual
- Login to Kitaboo Reader
- How to use Access Code
- Bookshelf Overview
- Bookshelf Search in Kitaboo Reader
- Guide to view Fixed Layout Ebooks
- Guide to view Reflowable ePUBs
- Guide to view VideoBooks
- Guide to view AudioBooks
- Changing Profile Settings in Reader
- Collections in Kitaboo Reader
- Viewing More Info in Kitaboo Reader
- How to add Bookmarks
- How to add Sticky Notes
- How to add Highlights
- How to use Pen Tool
- How to Access Resources
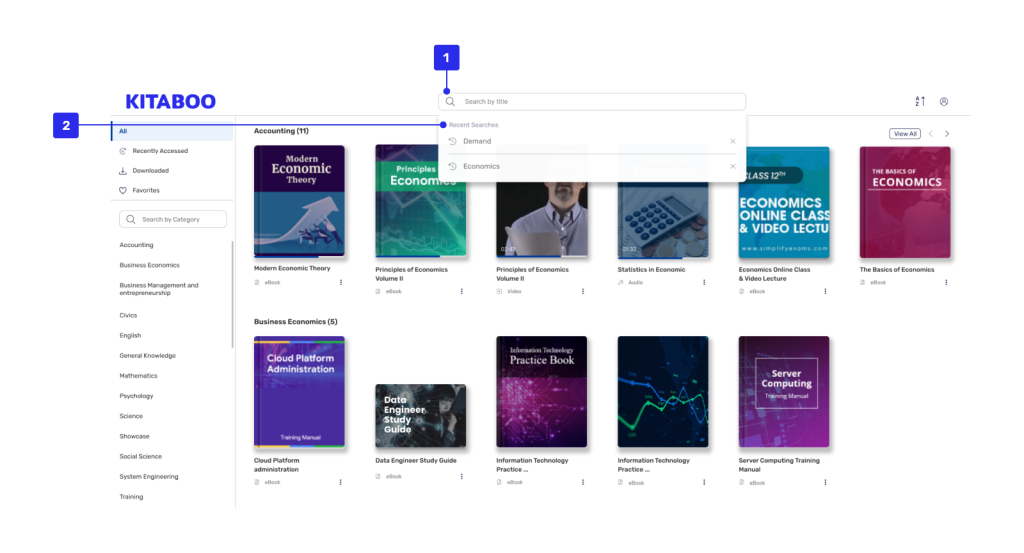
The Search on the top of the bookshelf lets student search for any content or keyword across the metadata of the contents.

1. Search Box : Student can search with content name or a keyword by entering the name in the search box panel.
2. Recent Searches : All the recent searches by student will be displayed here.

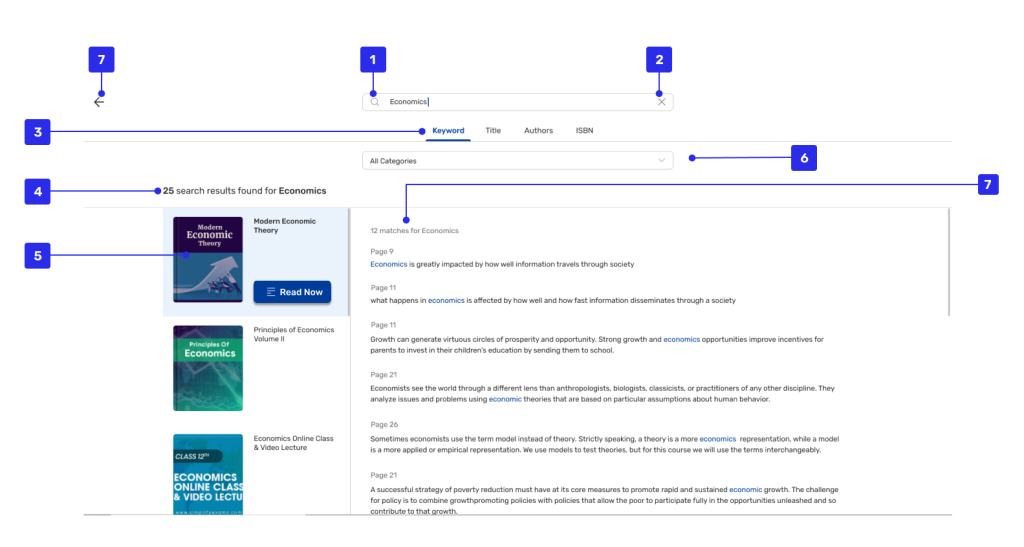
1. Search Box : Enter the keyword that needs to be searched.
2. Cancel : The entered keyword can be cancelled using this button
3. Search Type : Student can select the type of search that they want. For example, the search word can be found in either “Title” or “Author Name” or “ISBN Code”.
4. Search Instances : This displays the number of search results fetched from the search service.
5. Content : Displays the cover image of the content in which the search result is present.
6. Category Select : Student can select a particular category for which they want the search results.
7. Search Result : Displays all the instances in a particular content for the searched keyword.
