Popular
- Manage License (Add on)
- Bulk Revoke
- Generating Access Code
- Direct Distribution (Add On)
- Creating Single User or Multiple Users (Bulk Upload)
- Admin Center and Profile and Settings
- Revoking Content
- Distributing Content
- Signing in to Kitaboo
- Promote User/Transfer
- Create Class/Update Class
- Selective Oneroster Sync with API/ZIP/SFTP
- Analytics Dashboard and Reports Overview
- How Kitaboo Reader – Text-to-Speech (TTS) Works
- Activated User – Definition & Billing Policy
- Understanding User Roles: Producer vs. Admin
- Auto Book Deletion Process
- Adding group with SAML
- Syncing Data with Clever
- Selective Oneroster Sync with API/ZIP/SFTP
- Syncing Data with PowerSchool
- Syncing Data with OneRoster
- Adding a Group
- Searching a Customer
- Issuing Licenses
- Editing a Customer
- Deactivating a Customer
- Adding a Google Classroom Customer
- Adding a OneRoster Customer
- Adding One roster 1.2
- Adding a LTI 1.3 Customer with OneRoster
- Adding a LTI 1.3 Customer
- Adding an LTI 1.1 Customer with OneRoster
- Adding LTI 1.1 Customers
- Sorting Customer and Group
- Enable K-AI at the content level
- Content Lifecycle Stages in Kitaboo for eBooks
- Creating a Fixed-layout Kitaboo eBooks
- Creating Fixed-layout ePub 3.0
- Upload 3rd Party ePub 2.0/3.0
- Creating a Course or Uploading Scorm
- Activity or Gradable Activity Creation
- Authoring an ePub
- Creating a Video Book
- Creating an Audio Book
- Updating the Cover Image
- Editing a Fixed eBook
- Deleting and Deactivating Content
- Users Tab
- How to Edit and Delete a Category
- Clever Integration
- Classlink Integration
- Canvas LTI Integration
- Admin Center
- Analytics Tab
- Adding a Customer
- Creating Admin Accounts
- Q1. How can I get help with a specific service?
- Q2. How do I report bugs or request service enhancements?
- Q3. As the main institute admin, if I revoke or delete a user created using an access code, can the same access code be reused? What will be the expiry period for that access code’s content?
- Q4. As a main institute admin, can I change the password(s) of institute(s) associated with my account?
- Q5. Why is my Customer ID and Password not working?
- Q6. As a main group admin, can I change the password(s) of groups (sub-admin) associated with my account?
- Q7. How can I redeem an access code?
- Q8. What is a common access code?
- Q9. While distributing content to all classes in one go, how does a user know if he/she has been assigned content?
- Q10. While distributing content, can I restrict access to it to teachers only?
- Q11. What are the prerequisites for adding a user to an existing class?
- Q12. Can I create a class with students only?
- Q13. How can I create multiple users on the Kitaboo system?
- Q14. Why is my Group ID and Password not working?
- Q15. I forgot my password. How do I reset it?
- Q16. How do I log in to the Kitaboo portal/Reader?
- Q17. How can I search for a Custom Order ID while assigning content or a collection in the Institute/Customer login?
- Q18. How to add a custom order ID to a new order or an Existing order?
- Q19. What is the API update process, how are changes communicated, and what is the support period for deprecated features?
- Q20. What is the notification process for product release notifications, product issues (discovered by Kitaboo), and product outage/downtime notifications?
- Q21. Why are some symbols not displaying correctly in my eBook or why is the file failing during the conversion process?
- Q22. Does Kitaboo support the Chinese language?
- Q23. What types of quiz activities does Kitaboo support?
- Q24. What is the file size limit supported in Kitaboo?
- Q25. What happens if I do not provide a Table of Contents (TOC) sheet during the bulk upload process in Kitaboo?
- Q26.How does the Multiple Admin Edit feature work, and what are its limitations?
- Q27.How to Update Widgets/Activities in Kitaboo After New Fixes or Enhancements Are Deployed ?
- Q28. Print Configuration in Kitaboo Reader.
- Q29. Glossary Instructions Guide (Kitaboo Fluid 360)
- Q30. WCAG 2.2 Compliance – Reader and Content Responsibilities
- Q31. Keyboard Shortcuts for Table and TOC Management in Author (Kitaboo Fluid 360)
- Help Screen: Your Personal Guide
- Easy Steps to Create or Upload a Cover Page
- Creating a structured Table of Contents (TOC)
- Choosing the Perfect Layout
- #1. Add content using the Authoring
- 1.1. Title: A Simple Way to Add Clear, Catchy Headings!
- 1.2. Explore the smart “Header” Element!
- 1.3. Discover the Power of Text in Authoring!
- 1.4. Make Your Pages Come to Life with Images!
- 1.5. Add Engaging Videos to Your Pages!
- 1.6. Add Engaging Sounds to Your Pages
- 1.7. Explore HTML Interactivity!
- 1.8. Organize your data with the Table element!
- 1.9. Callout Box: A Handy Way to Highlight Important Information!
- #2. Explore Fun and Interactive Widgets with the Authoring Platform
- 2.1. Multiple Choice activity
- 2.2. Create Engaging Presentations with the Slideshow Component!
- 2.3. Image Labelling: Make Your Pictures Interactive!
- 2.4. Fill in the Blanks: Fun and Interactive Learning!
- 2.5. Highlighter: Your Handy Tool for Highlighting Important Text!
- 2.6. Correction Element: Make Learning Fun and Interactive!
- 2.7. Sorting Component – Organize with Ease!
- 2.8. Match the Pairs: An Interactive Learning Tool!
- 2.9. Easy-to-Use Sidebar for Your Content
- 2.10. Click to Reveal activity – Making Learning Fun!
- 2.11. Explore the Fun World of Wordsearch
- 2.12. Discover the Flashcard Element for Your Learning Journey!
- 2.13. Explore the “Group Activity” Element
- 2.14. Discover the Fun of Categorizing with the “Categorize” widget
- 2.15. Explore the Question and Answer Activity
- #3. Unlock the Power of Gradable Activities in Kitaboo’s Authoring Platform
- 3.1. Creating a Gradable Activity
- 3.2. Adding a Gradable Activity in an eBook
- 3.3. Students Accessing the Activities
- 3.4. Standalone Gradable Activity
- 3.5. Grade Assessment: Activity Management for Admins and Teachers
- 3.6. Customizable Certificates for Course Completion
- #4. K.AI: Transforming Content Creation with AI-Driven Interactivity
- 4.1. K.AI Automatic Quiz Generation from PDF
- 4.2. Automatic Generation of Quiz from PDF Using K.AI Markup
- Kitaboo 6.0 Reader Accessibility Help Manual
- Login to Kitaboo Reader
- How to use Access Code
- Bookshelf Overview
- Bookshelf Search in Kitaboo Reader
- Guide to view Fixed Layout Ebooks
- Guide to view Reflowable ePUBs
- Guide to view VideoBooks
- Guide to view AudioBooks
- Changing Profile Settings in Reader
- Collections in Kitaboo Reader
- Viewing More Info in Kitaboo Reader
- How to add Bookmarks
- How to add Sticky Notes
- How to add Highlights
- How to use Pen Tool
- How to Access Resources
Reflow ePUB Overview
In a reflowable ePUB, all the contents of the page adjust the orientation to fit into any screen size. Reflowable layout is flexible and easily adapts to different mobile devices.
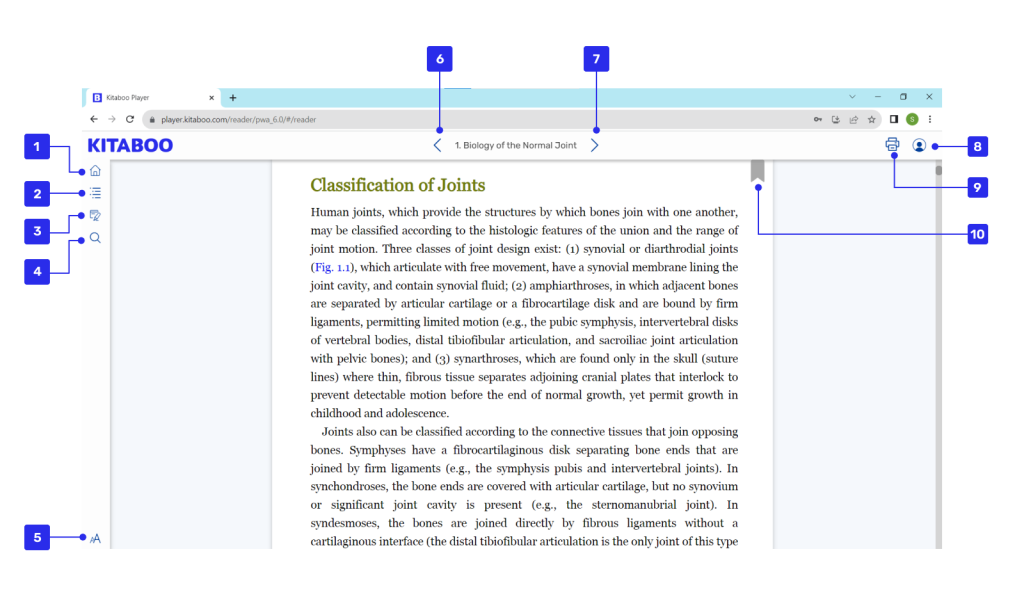
- Back to Shelf : Takes the student back to the bookshelf where they can access other contents.
- Table of Content : Opens the table of content, which enables students to quickly navigate to any part of content.
- My Data : Lists all the notes and highlights that a particular student has added or has been shared with him/her.
- Search : Lets the student search for any keyword in that particular content.
- Content Setting Panel : Opens the Setting panel, which enables student to select the font or text setting options.
- Back : This is used to the navigate to a previous chapter.
- Next : This is used to the navigate to a next chapter.
- Profile Settings : Opens the profile settings panel.
- Print : Student can print a particular chapter using the print button
- Bookmark : Student can add bookmark to a particular page in the content.
1. Table of Contents in Reflowable ePUBs
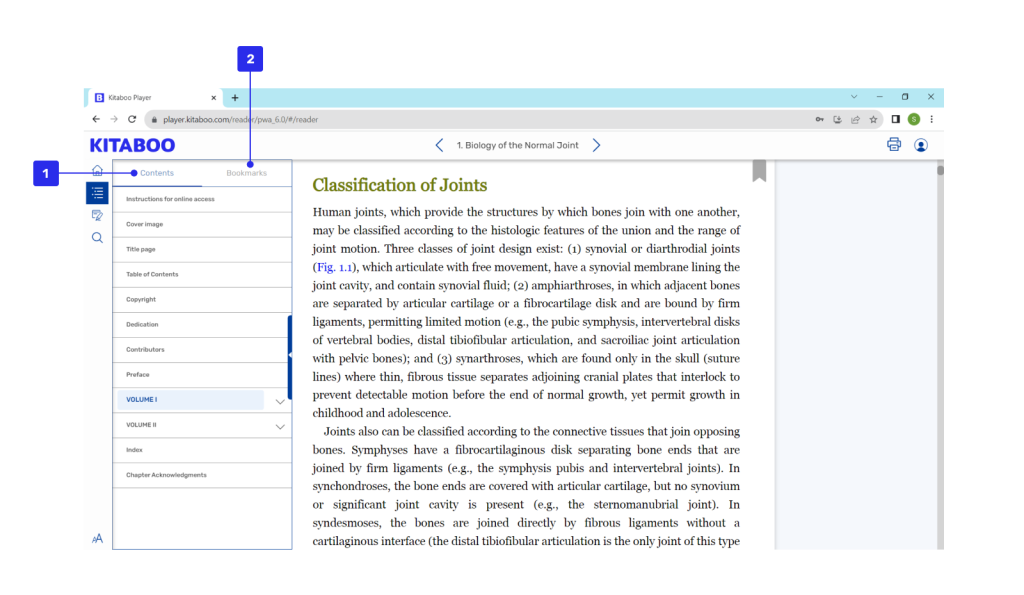
A Table of Content (TOC) groups the content and resources used in a book hierarchically so that you can access them easily. Student can also navigate to the desired content via index terms and bookmarks.
1. Table of Contents : Student can view all the chapters or subchapters of that particular content in this panel.
2. Bookmarks : All the bookmark data created by student will be displayed in this panel.
1.1 Using the Table of Contents (TOC) in Reflowable ePUBs
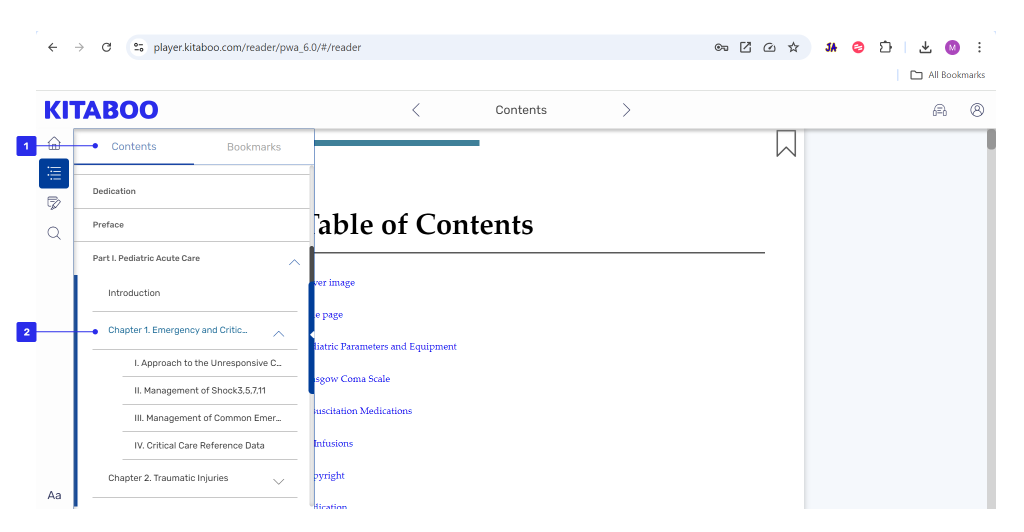
- Accessing TOC: When student opens the TOC panel, the Contents tab opens by default, displaying a tabular list of content with three to four levels (e.g., chapters, topics, subtopics).
- Navigating: Select a TOC element like a chapter, topic, or subtopic to jump directly to that section.
1.2 Bookmarks in Reflowable ePUBs
In the Kitaboo, bookmarks allow student to mark specific pages in their eBook for easy access later. This feature helps student quickly return to important sections or favorite pages without having to search through the entire book. Bookmarks are a simple way to keep track of key points and organize reading or study sessions.
1.2.1 How to add Bookmark in Reflowable ePUBs :
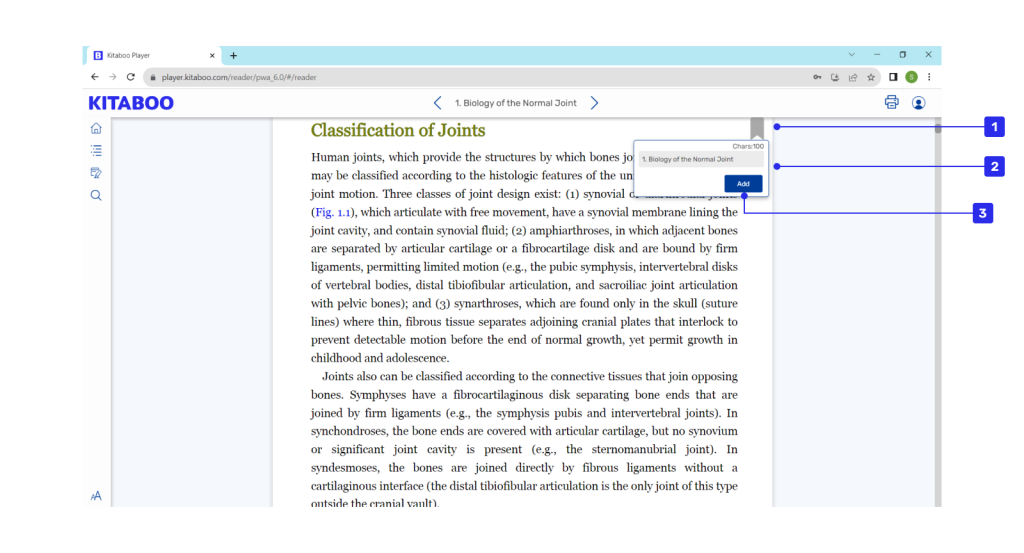
Navigate to the page you want to bookmark.
- Tap the Bookmark Icon : Select the Bookmark icon at the top of the page.
- Text Box : Student can add their desired name for that particular bookmark in the text box.
- Add : Clicking on add will save the bookmark for that particular page.
Student can can access it later from the Bookmarks section in the app.
1.2.2 How to Access Bookmarks in Reflowable ePUBs :
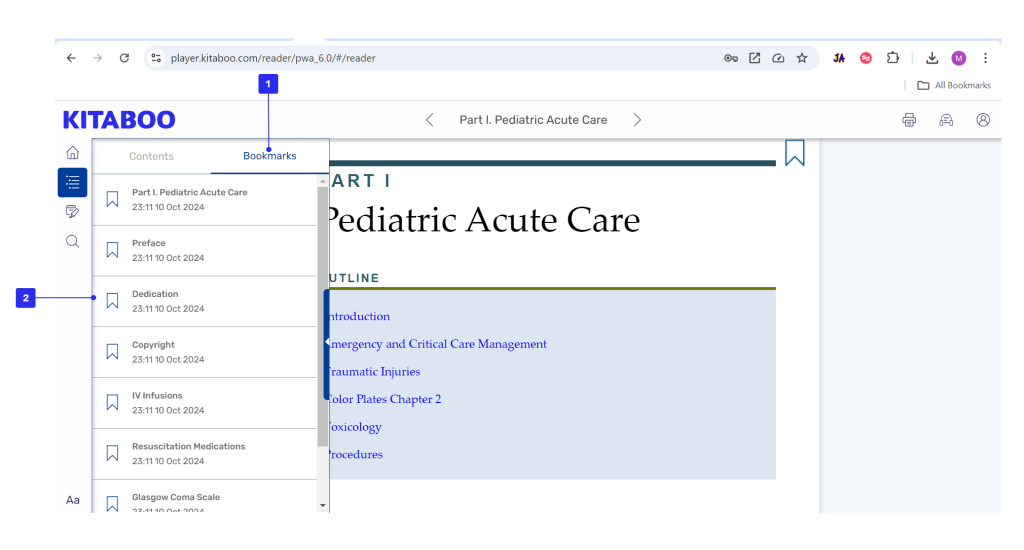
- Accessing Bookmarks: Bookmarks are organized under the Bookmarks tab in TOC panel. Select the Bookmark tab to view them.
- Navigating to Bookmarks: Choose a bookmark to go directly to the bookmarked page of that content section.
2. My Data in Reflowable ePUBs
The Kitaboo Reader allows you to do more than just creating notes and highlights. Sharing and organizing your data like notes, highlights etc. as well as the conversation threads becomes much easier with the help of Kitaboo Reader. They are always only a tap away. You can also collaborate with others by using the Kitaboo Share function.
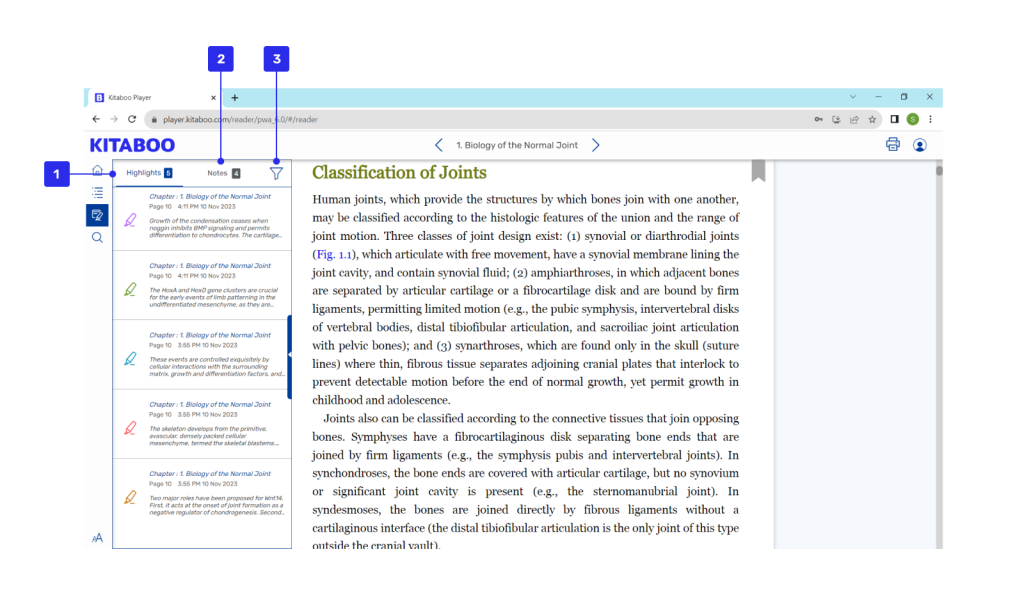
1. Highlights : This tab will show all the highlights that student has added in the particular content.
2. Notes : This tab will show all the notes the student has created and shared with him/her.
3. Filter : Student can filter the notes and highlights based on their color using this.
2.1 Highlights in Reflowable ePUBs
In the Kitaboo, highlights allows student to mark important text within their eBook. This feature helps them emphasize key information, making it easy to revisit crucial sections during study or review. Student can create color-coded highlights to categorize different types of information, making it simpler to organize their notes and study efficiently. Highlights can also be accessed later, providing a quick way to find important parts of their book without having to search through the entire content.
2.1.1 How to add Highlights in Reflowable ePUBs :
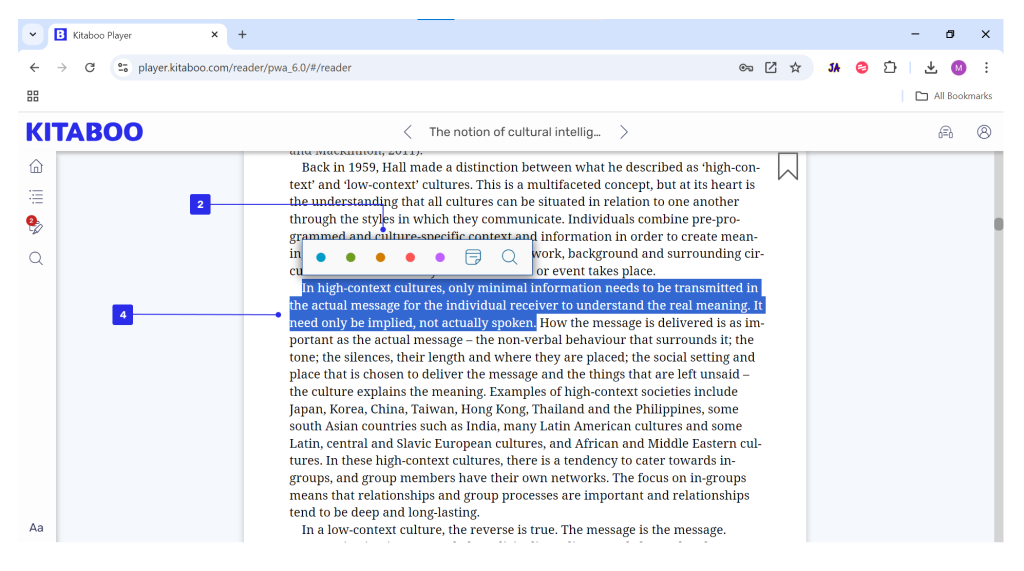
Select the Text: Press and hold on the text you want to highlight, then drag to adjust the selection.
Pick a Color : Select a color for the highlight from the color options available.
You can view all your highlights later for easy reference and review.
2.1.2 How to access Highlights in Reflowable ePUBs :
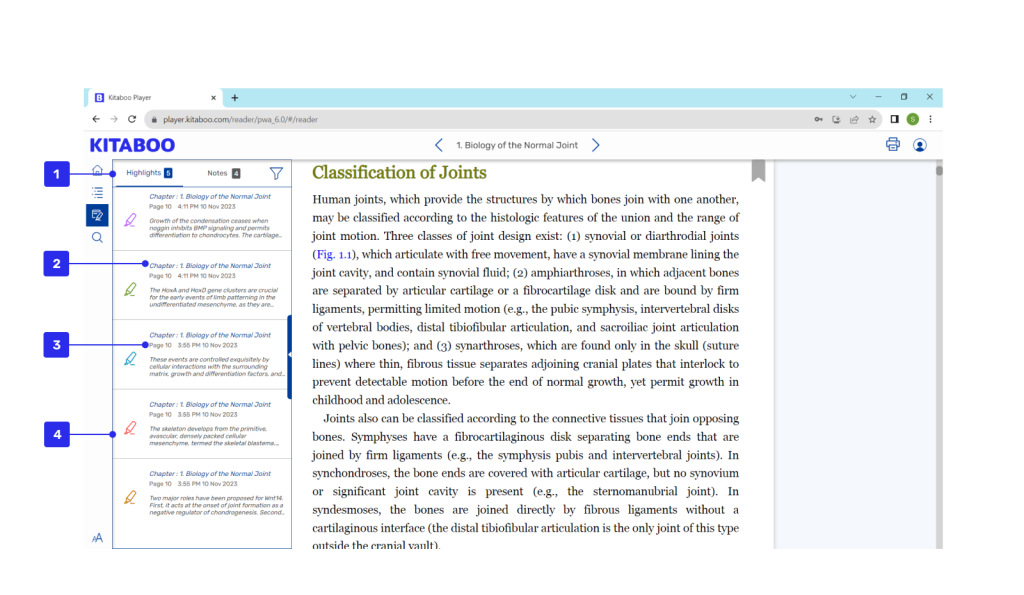
- Accessing the Highlights : The student can access all the highlights that are added by selecting the “Highlights” tab in My Data section.
- Chapter Name : Shows the chapter name in which the particular highlight is added.
- Date & Time : Shows the date and time of the highlight creation.
- Color : The color of the highlight icon denotes the color of the highlight added.
2.1.3 Filtering the Highlights in Reflowable ePUBs :
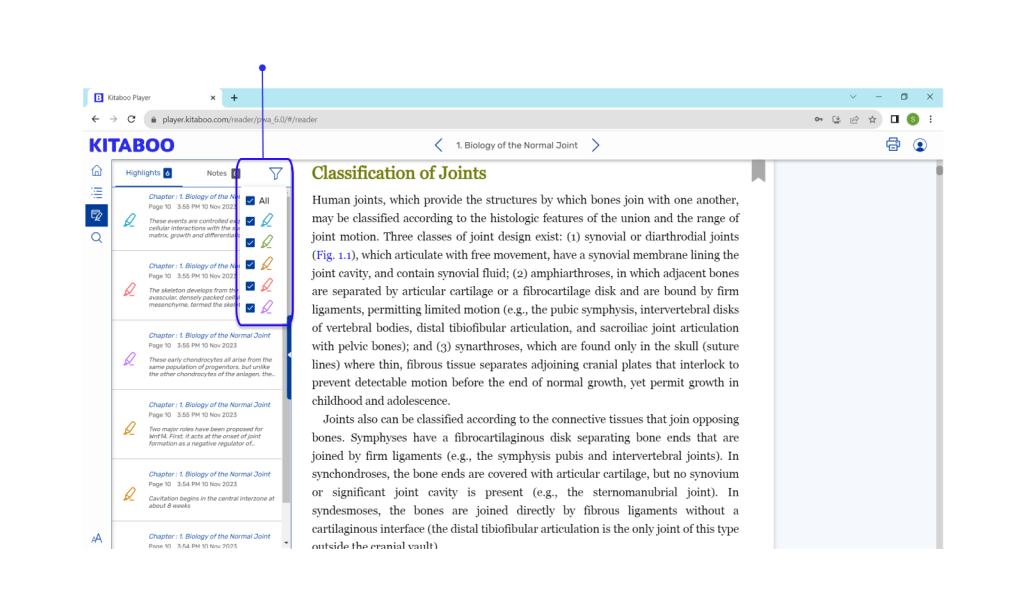
1. Filter : Student can filter the highlights based on the color of the highlights by clicking on “Filter” icon in the My Data section.
2. Highlight Color : Student can check/uncheck the color box of highlights to filter the highlights of required color.
2.2 Contextual Notes in Reflowable ePUBs
In the Kitaboo, contextual notes allows student to add detailed comments or thoughts directly associated with a highlight. This feature enables student to not only emphasize important text but also include additional insights, explanations, or reminders for that specific content. Contextual notes make it easy to revisit your personalized annotations alongside the highlights, providing a more interactive and enriched study experience.
2.2.1 How to add Contextual Notes in Reflowable ePUBs :
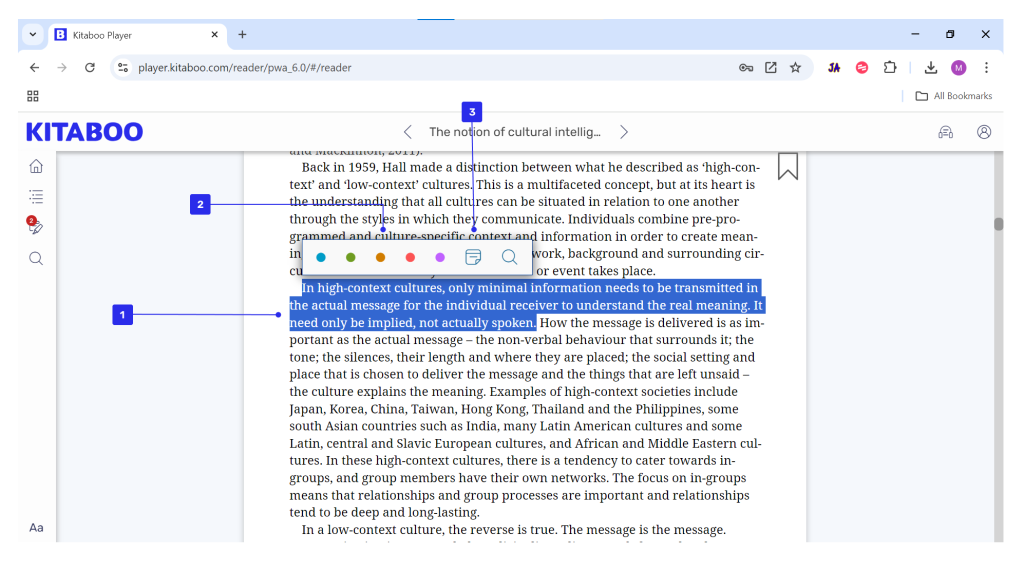
1. Highlight: Press and hold on the text you want to highlight, then drag to adjust the selection.
2. Tap on ‘Note’: From the pop-up menu that appears, select the Note icon option. It will open the Note text box as below
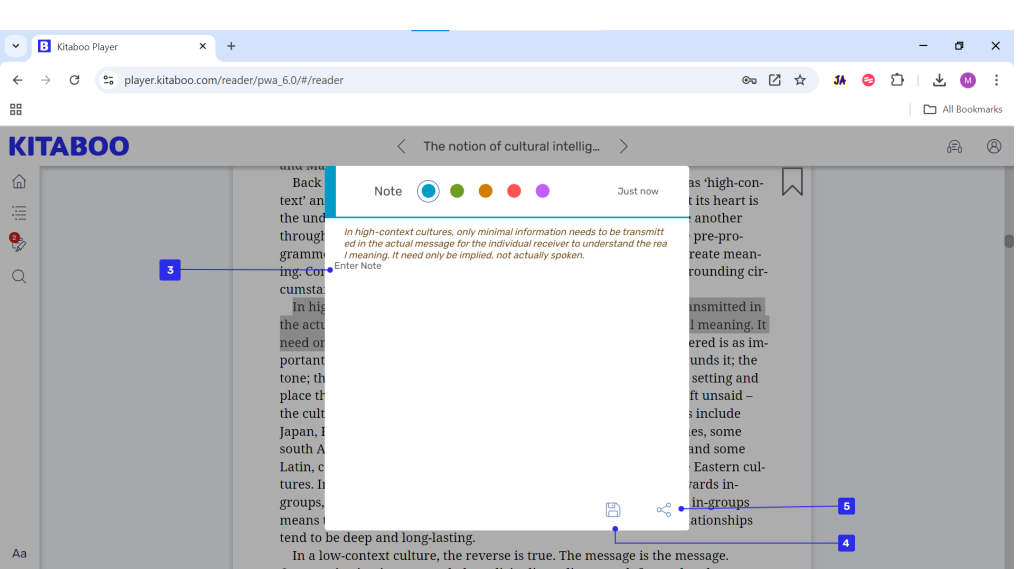
3. Write Your Note : Type your note in the text box that appears.
4. Save the Note : After writing your note, tap Save. The note will be attached to the selected text.
5. Share Note : Student can share the note with teacher or other fellow students using the share button.
2.2.2 Accessing the Contextual Notes in Reflowable ePUBs :
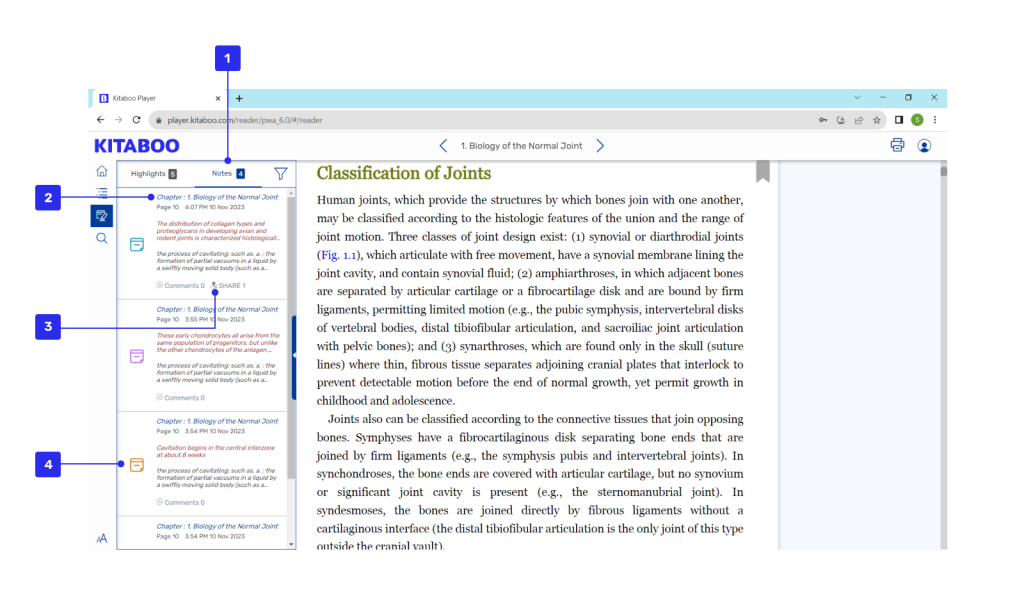
- Accessing the Notes : The student can access all the notes that are added and shared by selecting the “Notes” tab in My Data section.
- Chapter Name : Shows the chapter name in which the particular highlight is added.
- Comment & Share : Shows the comments added or to how many students/teacher the note is shared.
- Color : The color of the note icon denotes the color of the note added.
2.2.3 Filtering the Notes in Reflowable ePUBs :
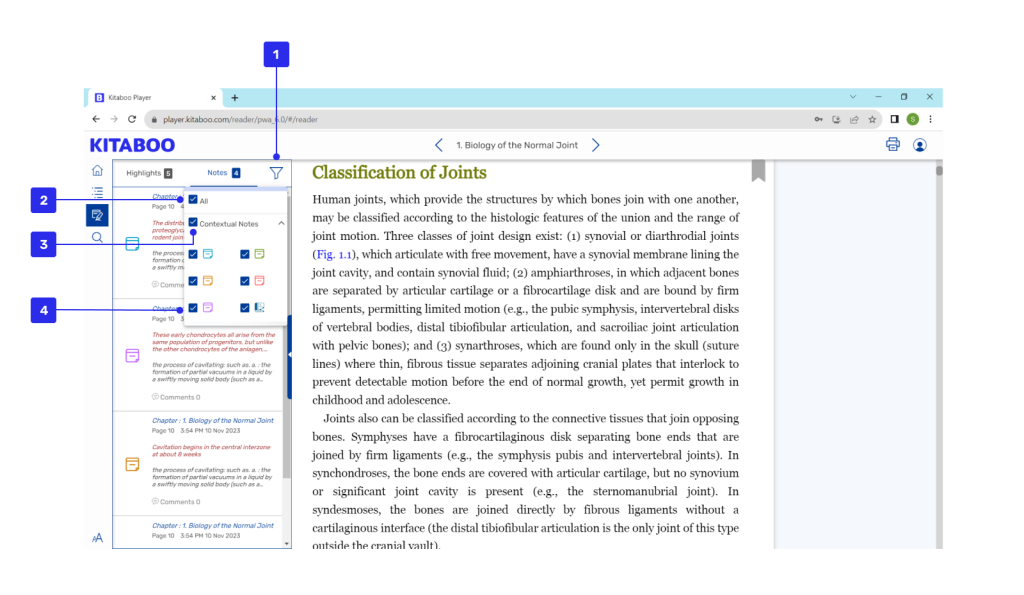
1. Filter : Student can filter the notes based on the type of note or based on the color of the notes by clicking on “Filter” icon in the My Data section.
2. All : Student can select the “All” checkbox if they want to view all the notes.
3. Color : Student can select the notes checkbox based on the color of the note.
2.2.4 Adding Comments in Reflowable ePUBs :
The student can add comments to the notes shared by the student with the teacher once the teacher adds comment to that particular note.
Student can click on the “Comment” button to add their comment reply to the teacher.
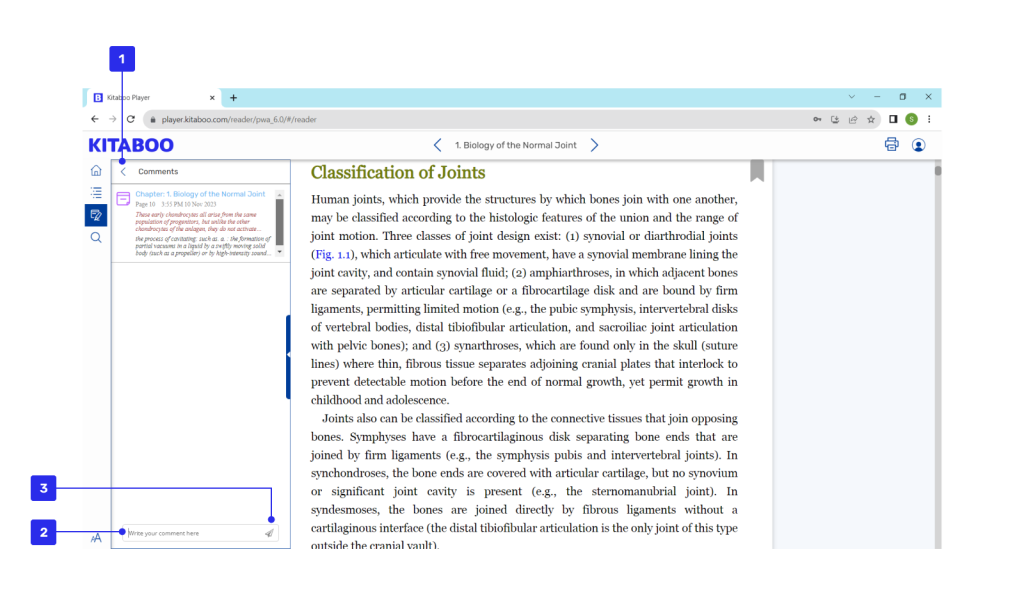
Once the student clicks on the “Comment” button as above it will open a panel inside the “My Data” column.
1. Back : By clicking here the student will be navigated back to the “My Data” panel.
2. Comment box : The student can respond to a comment by typing in the input
field at the end of the pop-up.
3. Send Button : On click or tap of the Send button, the student’s comment will be visible to the user the next time he/she opens the content.
2.2.5 Sharing Notes in Reflowable ePUBs :
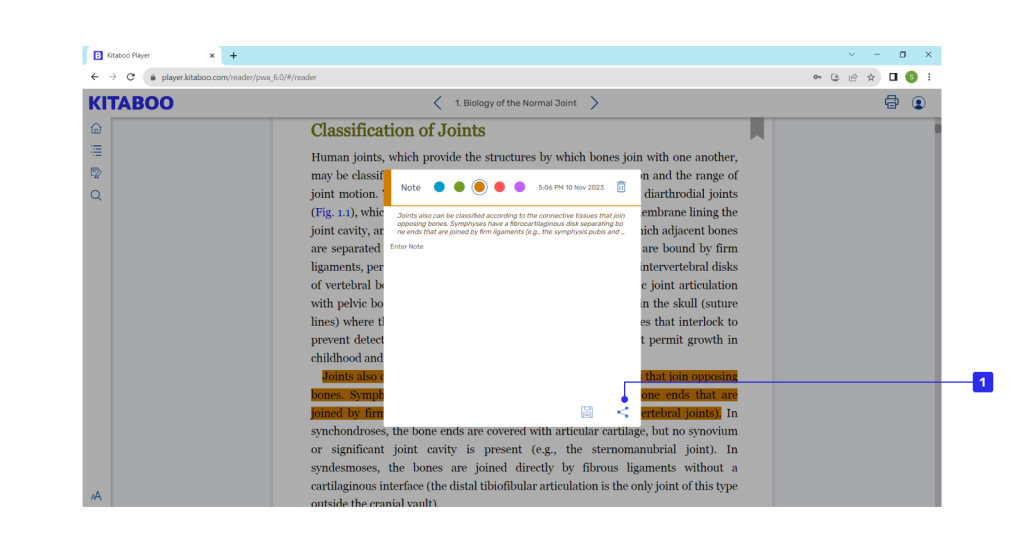
Student can click on the “Share” button to share the note with other students of the same class or with the teacher assigned to that class.
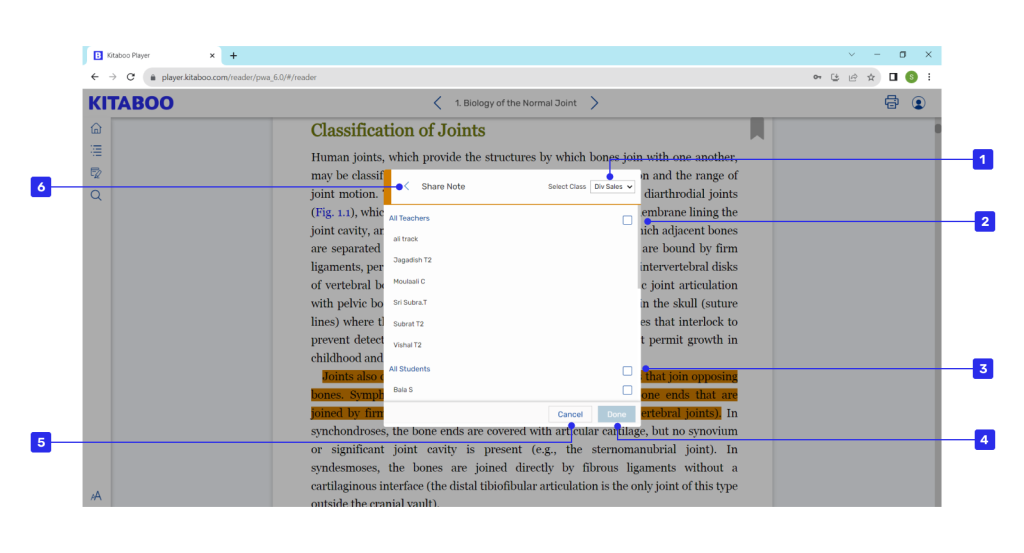
1. Select Class : The student can select the class in which they want to share the note with teacher.
2. Select Teacher : The student can select the fellow students with whom they want to share the note with.
3. Select Student : The student can select the fellow students with whom they want to share the note with.
4. Done : Once all the student and teacher are selected for the note sharing then student can click on “Done” to share the notes.
5. Cancel : The student can cancel the note sharing using the “Cancel” button.
6. Back : Student can go back using the back button.
3. Keywords Search in Reflowable ePUBs
The search functionality in the Kitaboo allows student to quickly find specific keywords or phrases within the content. By entering a keyword into the search bar, student can view all instances where that word appears, making it easier to locate important information or revisit key sections. This feature helps streamline study process and saves time by guiding students directly to the content they need.
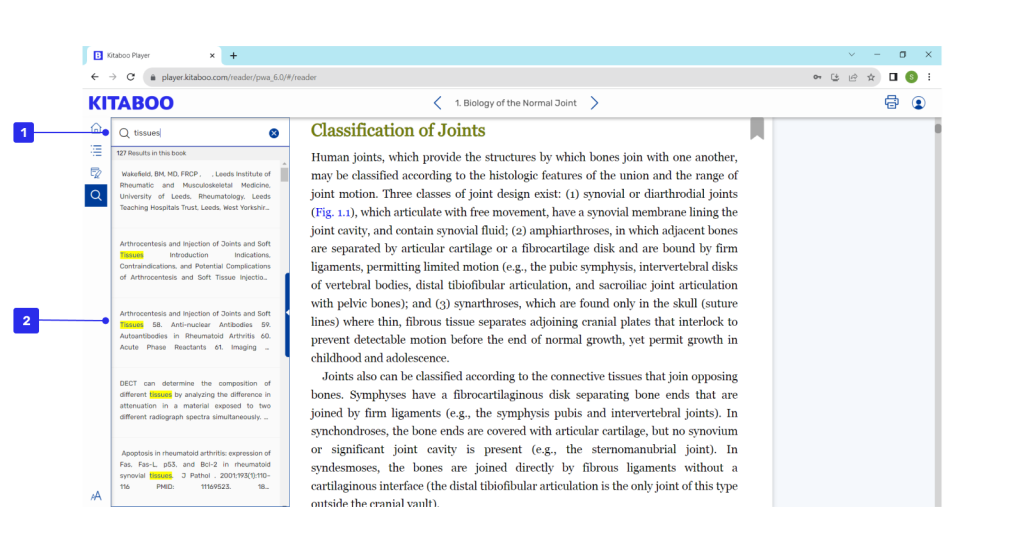
1. Enter the keyword : The student need to enter the keyword they need to search in the content and press enter.
2. Search responses : All the matching responses for the keyword would be displayed in the panel below. Student can click on any instance they want and they will be redirected to the page where the keyword is present.
4. Content Settings in Reflowable ePUBs
The content settings in the Kitaboo allow student to customize the appearance and layout of content for a more comfortable reading experience. With these settings, student can adjust the font style, size, and spacing, as well as modify background colors and margins. This feature helps student tailor the reading view to their preferences, making it easier to read and focus on the content for longer study sessions.
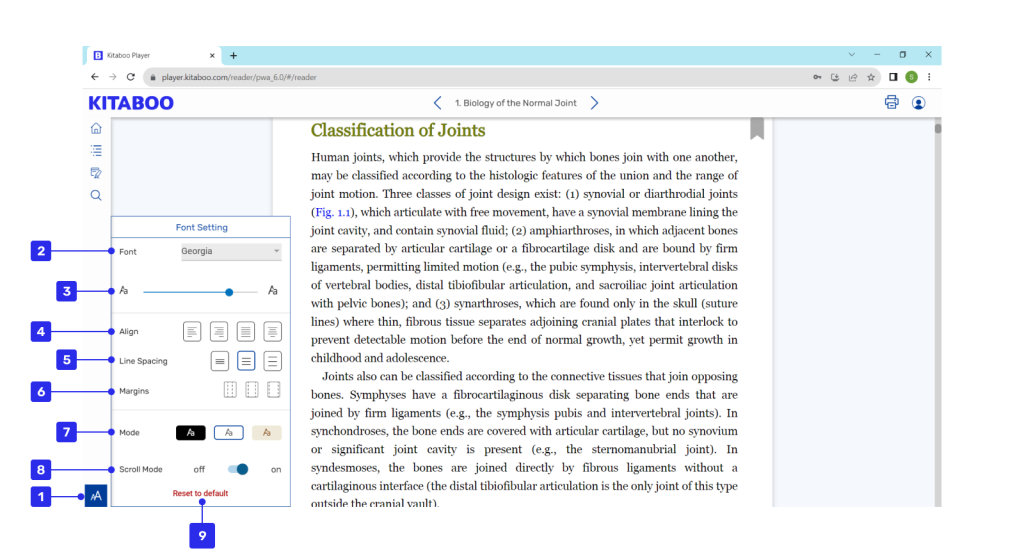
1. Content Settings : By clicking on this icon, it will open a panel for all the font and layout settings.
2. Font Selection : Student can change the font of the book from the dropdown menu by selecting the choice of font they want.
3. Font Size : Student can increase or decrease the font size of the texts by clicking on the “+” & “-” buttons respectively. Student can also move the slider to increase or decrease the font size.
4. Align : The student can change the alignment of the texts on the page by selecting the options of alignment.
5. Line Spacing : The student can adjust space between content lines by selecting one of the options available.
6. Margins : The student can adjust margin for your content by selecting one of the
available options.
7. Mode : Students can select reading-mode from the options day, night, and sepia for a better reading experience.
8. Scroll mode : Enables the Scroll mode that lets student apply the Continues Scroll mode. Disable the Scroll mode that lets student apply the swipe and read facility. Student can also view one page or two pages in horizontal mode using the Scroll Mode functionality.
5. Text-to-Speech (TTS) in Reflowable ePUBs
The Text-to-Speech (TTS) feature in the Kitaboo allows student to listen to their content being read aloud. This feature enhances accessibility by converting text into spoken words, making it easier for users who prefer auditory learning or have visual impairments to engage with the content. It also offers adjustable playback speeds and supports multiple languages, depending on the eBook’s content.
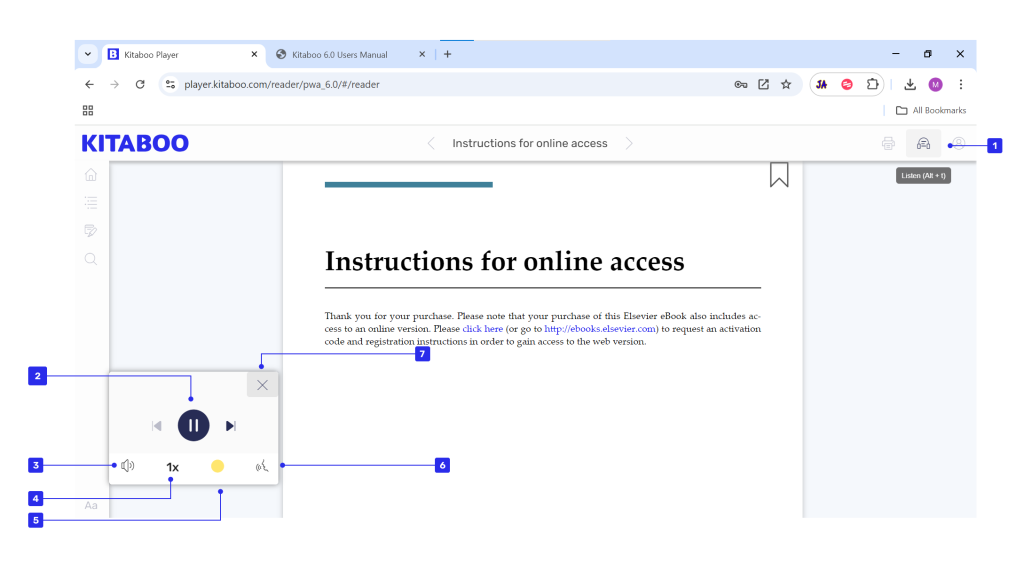
1. TTS button : For using this functionality student need to click on the TTS icon and it will open a TTS panel at the bottom of the page.
2. Control Buttons : Student can Play/Pause or go to previous or next sentence using the player controls.
3. Volume : Student can adjust the volume of the player using the volume button.
4. Narration Speed : Student can increase or decrease the narration speed of the voice being played using this.
5. Highlight Color : Student can change the highlight color of the sentence that is being played.
6. Change Voice : Student can change the voice of the the player to suit their preferences.
7. Close : Cancel button will close the player panel.
